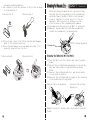
1
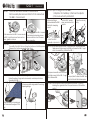
Clean MATE 365
Intelligent Automatic
Vacuum Cleaner
Model No. QQ-1
USER MANUAL
Clean MATE 365
Model No. QQ-1
Intelligent Automatic Vacuum Cleaner
Clean Mate 365
QQ-1
Clean Mate 365
!
!
!
!
!
!
Table of Contents
1
Safety Precautions
2
Safety Instructions
2
Battery and Recharging
2
Special Features
3
Cautions
4
Main Unit and Accessories
5
Parts of Main Unit
6
Control Panel
7
Remote Control Functions
8~9
Battery Installation and Removal
10
Recharging the Battery
11
Installing Basic Accessories
Sweeping Brush Installation and Removal
Rolling Brush Installation and Removal
Fragrance Installation and Removal
12
12
12
13
General Operation
Preparation for use
Starting Operation
Stopping Operation
14
14
14
15
Cleaning and Maintenance
Maintenance
Cleaning the Dust Hamper
Cleaning the Vacuum Entry
Cleaning the Underside Rolling Brush
15
15
16
17
18
QQ-1 Useful Tips
19~20
Safety Precautions
QQ-1
Clean Mate 365
Before using this product please read the following safety instructions
and keep this operation manual for future reference.
Before using this product please follow all normal safety precautions to
avoid the occurrence of situations such as fire, short-circuit, and injury.
Please make sure that you observe all the following safety precautions:
Safety Instructions
1, Read this user manual thoroughly before using this product.
2, This product is not for use outdoors.
3, This product is an electronic device. Never get it wet or let it come in
contact with water. Do not use it in a moist space, such as a
bathroom or a pantry. This is to prevent damage to the electronics.
4, Before using this product, please tidy up things on the floor. You must
tidy or remove all objects left on the floor that could stop the
device, like scattered clothing, paper, power cords, telephone cords,
and extension cords. If there are blinds or curtains that reach the
floor in the room, you must roll them up to prevent a dangerous
situation. During operations, objects like paper or power cords
might get sucked into the product. As the vacuum is dragging along
the power cord, it could tip over a table, a chair, a cabinet, or a
bookcase, causing a dangerous situation!
5, Please do not stand or squat on top of this product. Pay special
attention to toddlers, children, or pets in the house to prevent a
dangerous situation.
6, Please do not use this product to clean a still-burning cigarette, a lit
match or embers.
7, Please do not use this product to clean flammable or highly volatile
liquids such as gasoline or white gasoline.
8, If there is a balcony where the product is cleaning, please close the
door to the balcony so that the product does not operate out of the
balcony, causing a dangerous situation.
9, To prevent the product from being damaged, nothing should be
blocking the air vent while the machine is in operation.
10, For no matter what reason, if the unit is dropped and is damaged or
unable to function, then the unit cannot be used.
11, When not in use for long periods of time, the power switch must be
turned off.
Batter y and Recharging
1, When using rechargeable batteries, please use the correct voltage and
current listed on the product. If you are not sure about the standard
voltage, please ask your distributor or query the local electricity
2
company.
2, Use the factory-provided batteries.
3, When the batteries need to be recharged, use the factory-provided charger.
4, Only use the battery charger indoors.
5, When your hands are moist, do not touch the battery charger or the plug
and power cord.
6, When you need to clean this product, stop charging, and remove the
battery.
Special Features
1, This product is a groundbreaking, revolutionary automatic vacuum
cleaner. Besides the rolling brushes on the bottom and the strong vacuum
entry, it also has ultraviolet light providing disinfections and a fragrance
for removing odors. It also comes with a specialized built-in remote
control, allowing you to freely and easily command it to clean any part of
the room. Suitable for use on any normal household or office floors,
whether if it is on a basic floor, an artificial plastic floor, a waterproof
carpet, ceramic tiles, or a thin carpet. As long as you have the QQ-1
Intelligent Automatic Vacuum Cleaner, you have the most helpful
housecleaning mate.
2, Compact shape enables it to clean completely under beds, tables and other
furniture where dust, pet hair and allergens can be easily accumulated,
which standards upright vacuums cannot do.
3, After the QQ-1 Intelligent Automatic Vacuum has been turned on, it
will follow a five step repetitive rotation movement: the special bounce,
the spiral, the along wall side, the AS@ curve, the polygonal spiral, and
again the special bounce, to cover every space with its wide-ranging
rotating movements. As soon as it bumps into a wall, a piece of furniture
or any other large obstacle, the QQ-1 will move forward alongside the
wall or the edge of the furniture, sweeping dirt or dust towards its
vacuum entry with the brushes on the edges of the device to be vacuumed
in. By this back and forth rotating motion, it can effectively cover all of
your room.
Special Bounce
" S " Sha p e
3
Sp i r a l
Sp i r a l
Along Wall Side
Polygonal Sp i r a l
Sp i r a l
4, Furthermore, the QQ-1 is equipped with an automatic light-sensing
device. When the battery is low and the cleaning job is completed, it
will automatically move away from dark areas under the bed or tables,
and stop at a brighter spot, allowing you to find it easily. If it cannot
find a bright spot, it will automatically stop after seven minutes.
Otherwise you can also press the stop button on the remote control to
make the QQ-1 emit a long sound, allowing you to conveniently look
for the QQ-1.
5, There is a transparent window on top of the main module of the QQ-1
that gives a view to see if the dust hamper is full, it also has a handle
aperture that allows you to easily pick up and carry the machine.
6, With photo sensors to detect stair stand, QQ-1 can turn away
immediately to keep it from falling down.
7, By separate mode, you can choose to use only one kind of the five
movements to clean your house. It will make the cleaning job more
easily and flexible. For example, you can choose to use "spiral"
movement to clean the spot area or " along wall side" to clean all of the
wall side in your room.
Cautions:
Don't directly expose your eyes to the UV
Light
Don't use any objects to pick up the UV light
Tube
Please make sure the battery is installed in
The correct orientation
Sp i r a l
4
Main Unit and Accessories
1, QQ-1 Main Unit
X1
2, Remote Control
X1
3, Filter
X2
4, Rechargeable Battery
X1
5, Charger
X1
6, User Manual
X1
7, Little Cleaning Brush
X1
QQ-1
Clean Mate 365
Parts of Main Unit
Bumper
Remote Control
Sensor
Dust Hamper
Side Light
8, Fragrance (Sold Separately)
Clean Mate 365
Control Panel
1
Q Q - 1Clean Mate 365
QQ-1
Time set Button
Start/Stop Button
Remote Control
Dust Hamper
Discharge Button
Air Vent
Power Switch
2
Handle Aperture
Batter y Charging
Socket
7
3
Ultraviolet Light
Batter y Cover
6
8
Auxiliar y Wheel
Rolling Wheel
Vacuum Entr y
4
6
Clean MATE 365
Intelligent Automatic
Vacuum Cleaner
Sweeping Brush
5
Model No. QQ-1
USER MANUAL
Fast Recharge socket
Foot Wheel
After opening the box please make sure that all the
parts are included.
5
6
Control Panel
QQ-1
Clean Mate 365
1,Turn on the power switch, and the power light will light
up green.
2,Press the Time Set Button to set the length of operation
time. The numerical panel will display the operation
time. When power is first turned on, the default
setting is 30 minutes. The setting parameters are from
10 to 80 minutes in 10-minute increments.
3,Try to set the operation time by the size of the area to
be cleaned in order to prevent overuse of the battery
and shortening its lifespan.
4,When the battery is low the power light will blink red.
5,In the following situations the error light will light
up: High battery temperature, overloaded motor, and
no traction for more than three consecutive seconds.
Time Set Button
Operational Time Display
Power Indicating
Light
Forward
Left
Reverse
Time Set Button
QQ-1
Clean Mate 365
Right
Start
Stop
Separate Mode
Ultraviolet Light
Side Light
Drop Sensor
Vacuum Motor Off
Start/Stop Sensor
Error Indicator
Vacuum Motor
Off Indicator
Drop Sensor
On Indicator
Ultraviolet On
Indicator
Power Indicating Light
1,When the power is turned on, the light will be green.
When not in use, please remember to turn off the
power.
2,When recharging, power must be turned off.
3,Please see the chart below for the meaning of other
lights.
The Meaning of Power Indicating Lights
Color of Power Lights
Meaning
Green Light
Battery has power
Blinking Green Light
Charging
Blinking Red Light
Battery is low
7
Remote Control Functions
Function of each Button:
1,Start Button: Press the Start Button to begin the
activity of the QQ-1.
2,Stop Button: Press the Stop Button to stop the
activity, and it will emit a long sound to make it
easier to find the device.
3,Forward Button: Press the Forward Button and the QQ1 will automatically move forwards in a straight
line until it bumps into an object or when the Stop
Button is pressed.
4,Reverse, Right, Left Buttons: Pressing and holding
down these buttons will make the QQ-1 move forward,
in reverse, to the right, and to the left
respectively until the button is released. This is
helpful in moving the QQ-1.
5,Time Set Button: Use this button to set the activity
time of the QQ-1.
6,Separate Mode: When the QQ-1 is in automatic
cleaning mode, pressing this button and the QQ-1
will enter the separate mode. According to the
number of your pressing this button, it will
8
practice the five exercises independently, that is,
spiral, special bounce, the along wall side,
the"S"shape, the polygonal spiral and finally back to
the automatic mode.
7,Ultraviolet light Button: When the QQ-1 is in automatic
cleaning mode, this button will control the
ultraviolet light power switch.
8,Side Light Button: Press the button to turn on the LED
side light.
9,Vacuum Motor Off Button: Press this button to control
the On/Off of the vacuum motor.
10,Drop Sensor Button: When QQ-1 is being used with dark
color carpet, it will move backward as soon as the
power is turned on. You can press this button to avoid
the occurrence of this situation. However, please make
sure there are not any stairs to let QQ-1 to fall down
to cause any damage owing to the disabling of this
sensor.
Battery Installation and Removal
QQ-1Clean Mate 365
1.Make sure that the power of the unit is turned 'OFF'.
2.Use your fingers, depressing the tabs on the front of
the battery cover, and open the battery cover, as
shown in Illustration 1.
3.Make sure the battery is inserted in the correct
orientation by aligning the silver strips on the
battery with the metal tabs on the inside of the
battery compartment. See Illustration 2.
4.Replace the battery cover by first inserting the
tabs into the slots at the back of the unit, and
then pressing down on the front side of the battery
cover until the plastic tabs click in place. Please
see Illustration 3.
Illustration 1
Illustration 2
Illustration 3
2
1
9
QQ-1
Clean Mate 365
10
Recharging the Battery
QQ-1
Clean Mate 365
1,The battery needs 7 hours to recharge(around 2.5 hours
for fast charger) . The first time, it should be
charged for a full 12 hours to achieve peak
performance of the battery.
2,If the power indicating light on the control panel
blinks red, the battery must be immediately charged.
3,First make sure that the power is Off, and the battery
is properly installed.
4,Place one end of the charger into the battery recharge
socket on the machine, and place the other end into a
conventional household wall socket, see Illustration
1. At this time the power indicating light on the
control panel will be flashing green.
5,After the battery has been fully charged, the power
indicating light will stop flashing and replaced by a
steady green light.
Illustration 1
When power is off, plug
the adapter into the
batter y recharge socket
on the QQ-1 first, then,
plug the other end into
the wall socket
Installing Basic Accessories
QQ-1
Clean Mate 365
S w e e p i n g B r u s h I n s t a l l a t i on and Removal
Install the sweeping brush in the correct
orientation in its special slot on the bottom of the
main unit. Twist it in clockwise as shown below. If
you want to uninstall it, twist it out in a
counterclockwise motion.
Rolling Brush Installation and Removal
Install and uninstall the rolling brush according to
the following illustrations:
Rolling Brush Installation
1.Insert the rolling brush into
the flexible slot
2.Press the rolling brush into
the rolling brush slot.
C a u t i o n! Please make sure the power is off when you
recharge the power
11
12
Fragrance Installation and Removal (Fragrance sold
separately)
This Intelligent Automatic Vacuum has a slot to put a
fragrance. The installation method is as follows.
1,Press the Dust Hamper Discharge button. See the arrow in
Illustration 1.
2,Place your finger in the aperture on the dust hamper
cover, and lift up the cover as shown in Illustration 2.
3,Take out the dust hamper as shown in Illustration 3.
Illustration 1
Illustration 2
Illustration 3
General Operation
QQ-1
Clean Mate 365
Preparing for use
In order for QQ-1 to provide the best vacuuming
performance, please first tidy up and remove all the
obstruction on the floor. You must pick up items that
have been left on the floor, such as clothing, power
cords, extension cords, and other fragile items. QQ-1
will sweep alongside the walls and edges of furniture,
so please remove all easily tipped over objects and
unstable furniture.
* Please do not use on plush rugs or long fur rugs.
4,Open the fragrance packaging. Place the fragrance into
the small slot as shown in Illustration 4. (You can also
put in your favorite scented oil.)
Illustration 4
Illustration 5
Illustration 6
5,Replace the dust hamper as shown in Illustration 5.
6,Put the dust hamper cover back in its place as in
Illustration 6.
13
When using QQ-1 for the first time, please carefully
watch how the QQ-1 performs its cleaning activity to
make sure it doesn't stop its sweeping activity due to
the fact that the floor is not even, or gets stuck in
between or under furniture. If the QQ-1 should get
stuck, it will turn its power off after 10 seconds to
ensure safety.
Starting Operation
1,Please clean out the dust hamper before use.
2,Place the QQ-1 in a relatively open space in the
room.
3,Turn on the power switch on the right side.
4,Set the timer according to your desired cleaning
time, adjust the cleaning time with the Time Set
Button. As reference, use 10 minutes of cleaning
time per 54 to 72 square feet of floor space,
though there may be differences in cleaning time
between different kinds of floors.
5,Press the start button, after 2 seconds, the QQ-1
will begin to automatically sweep the floor.
6,After automatic sweeping, the QQ-1 will emit a long
signal and automatically stop. A green light
indicates that it still has enough power, and can
be used again. A red flashing light indicates that
the battery needs recharging.
7,If the battery is low, it will emit two beeps every
minute to remind you to recharge in order to
lengthen the lifespan of the battery.
14
Stopping Operation
QQ-1
Clean Mate 365
1,If you want to immediately stop the machine's motion,
you can press the Start/Stop Button, or pick up from
the ground.
2,Use the remote control and just press the Stop
Button.
If you want to continue vacuuming, just put the QQ-1
back on the floor, and press the Start/Stop Button
or use the remote control to press the Start Button.
Cleaning the Dust Hamper
QQ-1
Clean Mate 365
1,Press the Dust Hamper Discharging button. See the
arrow in Illustration 1.
2,Place your finger in the aperture on the dust
hamper cover, and lift up the cover as shown in
Illustration 2.
Illustration 1
Illustration 2
The QQ-1 is designed with a series of safety measures.
When it has been picked up off the floor or when its
movement is unusual, it will stop and start beeping.
Notice: Please do not change the ultraviolet light tube
yourself.
Cleaning and Maintenance
Maintenance
The operation and maintenance of the QQ-1 is
completely simple. Just remember to clean out the
dirt from the dust hamper after each vacuuming, as
well as the dust stuck to the filter. There is no
need to clean the vacuum entry or the sweeping brush
each time.
3,Remove the dust hamper cover (Illustration 3.)
4,Take the filter out by lifting it upwards
(Illustration 4.)
5,Clean out the contents of the dust hamper
(Illustration 5.)
Illustration 3
Illustration 4
Illustration 5
Sweeping brush
(No need to clean each time)
Vacuum entry
(No need to clean each time)
15
6,Wash the dust hamper with water. (Illustration 6.)
Please do not put it inside a clothes washing
machine, dishwashing machine or any other kind of
16
automatic washing machine.
7,Use a brush to clean the surface of the filter as shown
in Illustration 7
Illustration 6
Illustration 7
8,After drying, install the filter and the dust hamper
back to its original position
9,Close the dust hamper cover and make sure that it is
properly inserted into its slot.
Illustration 8
Illustration 9
Cleaning the Vacuum Entry
QQ-1
Clean Mate 365
After operating the machine for a period of time,
dust and dirt will accumulate on the vacuum entry
on the bottom of the QQ-1, which is why you must
clean it regularly to allow the air to flow in
smoothly, and to prevent an influence on the
effectiveness of the vacuuming performance.
1,First make sure the power of the QQ-1 is turned off.
2,Shake out the dust and dirt that has accumulated
inside the vacuum entry as shown below.
Sweeping brush
Vacuum entry
Cleaning the Underside Rolling Brush
1,Place the QQ-1 on a flat surface and turn it upsidedown.
2,Take out the rolling brush and manually pick out the
hair and other objects from the brush as shown
below.
3,Clean out the rolling brush slot, and check inside
for any hair or objects.
4,Reinstall the rolling brush to complete the cleaning
of the underside rolling brush.
Take out the rolling brush
Clean out the rolling
brush slot
Manually pick out the hair and other objects from the
brush
17
18
QQ-1 Useful tips
1st item
QQ-1
Mate
365
CleanClean
Mate
365
Clear the area where the QQ-1moves around.
Remove easily knocked over items from the area where
the QQ-1 moves around.
4th item Tips for fixing jams in the QQ-1.
1, Stop QQ-1 immediately. 2, Remove the objects.
3, Clear vacuum entr y and restart.
When something is
jammed inside the QQ-1,
It will emit a beeping
sound
In order to provide the QQ-1 a space
In the area where the QQ-1 moves around, for fast and safe cleaning, please
the QQ-1might knock over items such as remove small items from the area
vases, glasses, or lamps.
before operating.
2nd item Adjust the distance between furniture.
The width of the QQ-1is 36cm. Move the furniture so that the space
Between the furniture are greater than 36cm.
Under the edges of rugs and remove easily curled objects before
Operating the QQ-1
First remove plastic bags and leftover longshaped garbage
Clean the vacuum
entr y.
Turn off the QQ-1
manually or by remote.
5th item Block areas where the QQ-1 might get stuck. Some chairs and
tables are not high enough, and they will cause the QQ-1 to get
stuck. Use something to block the QQ-1.
36cm
3rd item Do not let the edges of tassels of rugs to curl into the QQ-1. Fold
Turn the QQ-1 upsidedown, and remove the
objects.
The space beneath some furniture is
just high enough for the QQ-1 to get
Use a pot plant to block the QQ-1 and
stuck underneath
do not let it enter this kind ao space.
6th item Aim the remote control at the sensor on the QQ-1. Anything
blocking the signal will affect the performance of the remote
control.
Sensor
TIM
ER
ER
&
UV
S IC
LE
RW
K
AR
C
BA
BA
P
RIG
D
te 3
TE
STO
MU
Ma
FO
FT
G HT
an
LI
Cle
MU
HT
SP
RT
IR A
STA
65
L
R
&
UV
UV
ME
T IIME
SIC
LE
RW
R I GH
D
te 3
AR
P
TE
C
CKK
STO
MU
BA
Ma
FO
T
FT
GH
an
LI
Cle
MU
T
SP
RT
IRA
65
ST
S TA
L
When the QQ-1 is cleaning rugs,
first fold under the edges of the
rug
19
20