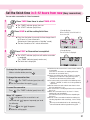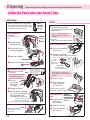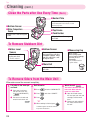
1
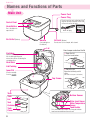
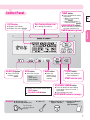
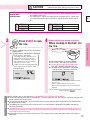
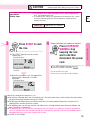
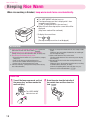
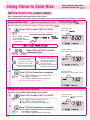
&OHMJTI & .*546#*4)*&-&$53*$ 45&".-&44 *) 3*$&$00,&3 '03)064&)0-%64& /+&94"+) */4536$5*0/."/6"- 3&$*1&4 Features ········································2 Inner Pot ········································2 Safety Precautions ····························3 Names and Functions of Parts···············6 How to Cook Tasty Rice ·······················8 Points for Cooking by Rice Type ············9 Cooking Rice <Basics> ····················· 10 Cooking White Rice/Japanese White Rice (QUICK)··· 12 Cooking Japanese Brown Rice ············ 14 Cooking Various Kinds of Rice ············ 16 • HOUZYUN • STICKY RICE • SUSHI • MIXED • CONGEE • CONGEE (1:7 ratio of rice to water) How to Cook Rice -5ZQF Before Use Table of Contents .0%&- Keeping Rice Warm ························· 18 This appliance is designed for use in Hong Kong and Macau only and please do not use in any other countries. Before use, please read this Instruction Manual carefully to ensure proper and safety use. Please make sure the date of purchase, retail store name and other items are correctly filled in the Warranty Card. Please keep the Instruction Manual and Warranty Card in a safe place. Cleaning ······································ 22 When You Cannot Cook Rice Well ········ 25 Status Display································ 26 Troubleshooting ····························· 27 Specifications ································ 36 Sticky Rice···································· 29 Sushi ·········································· 30 Mixed Rice ··································· 32 Brown Rice ··································· 34 Congee ········································ 35 Recipes • Set the finish time ········································· 20 (TIMER1/TIMER2) • Set the finish time in 2–12 hours from now ········ 21 (Easy reservation) Tips How to Adjust the Current Time ··········· 19 If Power Cut Occurs ························· 19 Using Timer to Cook Rice Before Use Features 1 Steamless This feature makes continuous boiling possible without caring about boiling over the steam vent and can cook fluffy rice that tastes sweet. Steam is processed inside the cooker and cooking odor is eliminated by absorption in water. 2 <How Steam is Removed> Cartridge Inner Pot Tank 3 A highly thermal efficient charcoal-coated thick pot efficiently transfers heat to the rice to cook fluffy rice that tastes sweet. Continuous-boiling IH that continues to cook at strong power without reducing heat after reaching the boiling point which maximizes the flavor of rice. HOUZYUN Cooking Advanced cooking mode enriches taste and sweetness of rice by spending more time on preparation to increase water absorption effect. NOTES 1 Steam generated inside the inner pot during rice cooking is passed through the cartridge and led into water in the tank. 2 Steam is cooled down by the water in the tank and converted back to water. Small amount of steam may be discharged from the cooker, but this does not cause high temperature or condensation. About 95% steam can be reduced compared with old model. (This is our own research.) Charcoal-coated Thick Pot and Continuousboiling IH Inner Pot Wash the pot with dishwashing liquid and a soft sponge, and then rinse it thoroughly. The coating on the bottom surface of the pot may be peeled off depending on conditions of use, but this does not effect its performance. The pot surface is coated with fluorine. Damage to the fluorine coating will increase the likelihood of peeling off. Penetration of salt and vinegar through the fluorine coating will increase the likelihood of erosion and rust. Even if the fluorine resin and base material peel off the pot, there will be no effect on performance and no harm to human health. When washing rice, lay a cloth under the inner pot to prevent damage to the bottom. (Damage to the bottom will not affect the performance and hygiene.) Please purchase a new inner pot if any of the following applies. • Rice sticks on the inner pot • The inner pot has become deformed • The fluorine coating has been damaged Please pay attention to the following points: Do not wash rice or drain the water with a colander. When putting rice in the inner pot, be careful that a colander or the like does not come in contact with the inner pot. Do not try to remove rice grains stuck on the rice scoop by pressing the rice scoop against the edge of the inner pot. Fluorine coating on the edge may be damaged Do not use hard objects (e.g. a metal rice scoop, whisk, or crockery). Do not wash dishes, spoons or utensils inside the inner pot. Fluorine Do not use the inner pot for cooking coating may appliances (such as direct heating, microwave, be damaged or electromagnetic cooking appliances) other than this appliance. Do not use a dish washer or dish dryer to clean the inner pot. When seasonings are used, rinse immediately after use. Cooking rice with vinegar or salt or mixing rice with vinegar in the inner pot may damage the fluorine coating or cause corrosion and rust. Do not wash the inner pot with a cleanser, scrubbing brush, nylon surface of a cleaning Nylon surface sponge, or cleaning sponge with nylon net. ( ) Before Use Safety Precautions The meanings of the graphic symbols are as follows. WARNING Indicates a hazard caused by mishandling that may result in death or serious injury. Prohibited CAUTION Indicates a hazard caused by mishandling that may result in a minor injury or damage to the home and its contents. No wet hands No disassembly No water exposure & The following categories describe hazards caused by mishandling and their levels. Observe instructions Do not disassemble, repair, or modify the appliance. Doing so may cause electric shock, fire, injury, or malfunction. * Please consult with your local dealer regarding repairs. This appliance is not intended for use by persons (including children) with reduced physical, sensory or mental capabilities, or lack of experience and knowledge, unless they have been given supervision or instruction concerning use of the appliance by a person responsible for their safety. Children should be supervised to ensure that they do not play with the appliance. Doing so may cause a burn or injury. Do not insert or pull out the power plug with wet hands. Doing so may cause electric shock. Do not put the appliance in water and do not pour water over it. Doing so may cause electric shock or short-circuit. Do not use the appliance for purposes other than described in the instruction manual. Do not use for other types of cooking (steaming, etc.). • Do not put anything in the inner pot that may block the hole in the heat sink. Doing so may cause steam and contents to spill out resulting in a burn, electric shock, or injury. Do not allow a child to use the appliance without supervision. Do not use the appliance in a place where an infant can reach it. Doing so may cause a burn, electric shock, or injury. Before Use WARNING Never open the lid or carry the appliance during rice cooking. Do not remove the tank during rice cooking. Doing so may cause a burn or injury. Do not insert foreign objects such as a pin, wire, or any other metallic object into the air inlet, air outlet, or any other gap. Doing so may cause electric shock or injury. Do not use a damaged power cord and plug, or a loose outlet. Doing so may cause electric shock, short-circuit, or fire. Do not damage the power cord. Putting a heavy object on the power cord, bending it with excessive force, binding it together, or stretching it may cause damage to it, resulting in electric shock or fire. • If the power cord is damaged, it must be replaced by the manufacturer, its service agent or similarly qualified persons to avoid hazards. Use an independent 220V AC power outlet rated at 10A or more. Sharing an outlet with other appliances or using an outlet on a desk or any furniture may cause overheating resulting in ignition and fire. * Use an independent extension cord rated at 10A or more. Remove dust from the power plug pins and pin mounting surface. A buildup of dust may cause a fire. Insert the power plug fully into the outlet. Failing to do so may cause electric shock or overheating resulting in a fire. Before Use Safety Precautions (Cont.) WARNING Close the lid firmly until it clicks. If the appliance is operating abnormally or fails, stop using it immediately. To prevent a burn or injury caused by steam leaking or the opening of the lid. Failing to do so may cause smoke, ignition, or electric shock. * To ensure that the lid can be closed, remove rice grains or any other foreign object on the top frame, lid packing, tank, and between the main unit and lid. •The power cord and plug are abnormally hot. •It smells like something is burning. •Touching the appliance causes a sensation like an electric shock. •The cooling fan stops rotating. •There is another abnormality or failure. To prevent a failure or accident, pull out the power plug and then inform Mitsubishi Electric. Adjust the amount of water to the water level scale mark suitable for the rice type and menu. To prevent boiling over or injury. CAUTION Do not touch the hot parts during cooking and immediately after use. Do not touch the hook button when you carry the appliance around. For example, the cartridge, inner pot, heat sink, tank, tank lid, and the boundary between the side surface of the main unit and the lid. Doing so may cause a burn. Doing so may cause the lid to open resulting in a burn or injury. Do not use any inner pot other than the supplied one. Do not use the appliance in following locations. Doing so may cause overheating or malfunction. Near a wall or furniture Doing so may cause discoloration or deformation. Allow the following distances when cooking rice and keeping rice warm. Front Left side Right side 3 cm (One of the surfaces must have adequately open space) Back Top 3 cm 10 cm (52 cm from the appliance is required to open the lid.) * Even if the distances above are allowed, the wall may become dirty or condensation may build up due to steam leak if foreign objects such as rice grains are caught between the top frame and the lid or the packing is deformed or deteriorates. In an unstable location or on a non-heat resistant carpet Doing so may cause a fire or a failure to start cooking rice. * Place the appliance on a level and stable surface. In a place exposed to water or near open fire or heating appliance Doing so may cause electric shock, electric leakage, or fire. In a place where the air inlet and outlet are blocked (On paper, towel, cloth, aluminum sheet, carpet, etc.) Doing so may cause discoloration, deformation, or failure. On an aluminum sheet or electric carpet (Doing so may cause the aluminum sheet to overheat.) * When you want to use, for example, a kitchen storage rack, confirm the load capacity of the rack before use. (Maximum weight of the appliance including rice and water: Approx. 10 kg) Do not use any cord set other than the supplied one. Also, do not use the cord set for any other appliance. Doing so may cause a failure or ignition. Disconnect the power cord while holding the plug. Disconnecting the power cord while holding the cord may cause electric shock, short-circuit, or ignition. A medical pacemaker user is required to consult with a doctor before using this appliance The operation of this appliance may interfere with the pacemaker. Clean the appliance after the main unit has cooled down. To prevent a burn. Disconnect the power cord when the appliance is not used. To prevent electric shock, electric leakage, or fire caused by insulation deterioration. This rice cooker is designed for household use. Please do not use it for commercial use or any purposes other than cooking rice at home. • Magnetic cards (cash card, commuter pass, etc.) • Magnetic tapes (cassette tape, etc.) • Wireless devices (TV, radio, phone, etc.) Doing so may cause data loss, noise, or malfunction. P.2 Keep the main unit and the area around it clean & Do not bring an object that is prone to magnetic or electric wave interference close to the appliance. * Inner Pot The entry of dust or an insect into the air inlet or outlet for ensuring the appliance functions properly may cause a failure. Do not use the appliance when there are any foreign objects, rice grains, or water droplets remaining on it. Do not lay a washcloth or put any other object on the main unit during use. Latch Before Use ATTENTION Lid Packing Bottom Doing so may make the unit hot, resulting in deformation or failure. Be careful of steam when opening the lid after rice cooking is finished. To prevent a burn. Flange Bottom Sensor Tank Lid Do not turn on the appliance without rice and water. Doing so may cause a failure or malfunction. Flange Contact Part Do not use the appliance in a place exposed to direct sunlight. Water Temperature Sensor Doing so may cause discoloration or deformation. Tank Holder Doing so may cause a failure, poorly cooked rice, or the failure to close the lid properly. <Tank> <Tank Water> Do not scratch the water level sensor surface. P.22 Doing so may cause a failure. Do not carry the appliance around with water in the tank. Doing so may cause water to spill out. Drain the water from the tank after it has cooled down and wash the tank after every use. To prevent mold and bacteria from growing. Do not use a damaged tank. Doing so may cause a failure. Do not place the tank in a place exposed to direct sunlight. Do not use other than tap water or do not put an object in the tank. Doing so may cause mold and bacteria to grow or cause a failure. Do not use hot water. Doing so may cause poorly cooked rice. Do not drink water in the tank. Doing so may cause a failure or discoloration. Before Use Names and Functions of Parts Main Unit Power Cord Power Plug Firmly insert the main unit plug all the way into the unit connector on left side of the main unit at the back. Control Panel Hook Button Press the button to open the lid. Air Outlet (Bottom) Main unit plug Handle Air Inlet (Bottom) (Left and right on the bottom) Do not cover it, for example, with a towel. Lid How to open and close the lid Open the lid Cartridge Captures the rice essence from the rice during boiling and returns them to the rice during the countdown time. Press the hook button. Heat Sink Lid Packing Close the lid Inner Pot (Fluorine coated) Close the lid firmly until it clicks. Inner Pot (Be careful not to press the button.) P.2 Top Frame Click Tank Tank Lid Tank Container Tank Cover Bottom Sensor Water Level Sensor Water Temperature Sensor Tank Holder This shows the state in which the inner pot and tank have been removed from the main unit. Control Panel TIMER button LCD Display Rice Cooking Indicator (red) Displays the settings Displays the status P.26 Lit during rice cooking & Press the button to make a reservation • Make a reservation by time P.20 • Make a reservation in 1hour increments P.21 HOUR/MINUTE buttons Press the buttons to adjust the clock and reservation time Before Use TIMER Indicator (green) HOUZYUN button RICE button MENU button Select HOUZYUN cooking P.16 Select the rice type Select the texture of rice or the cooking method • WHITE • JAPAN WHITE • JAPAN BROWN START button Press the button to start cooking rice START Indicator (red) STOP/KEEP WARM button The buttons have a convex mark on them STARTbutton STOP/KEEP WARM button Press the button to stop cooking rice or keep it warm, or cancel a reservation Press to keep rice warm KEEP WARM Indicator (orange) Accessories Rice Scoop (×1) Rice Scoop Holder (×1) Ladle (×1) Measuring Cup (×1) Instruction Manual/ (Approx. 180 mL) Recipes ×1 (this document) The rice scoop can also be placed vertically. How to Cook Rice How to Cook Tasty Rice Adjust the amount of water Use good quality rice correctly Use your favorite brand of rice that has been polished as recently as possible. Since the quality of rice deteriorates over time, store it in a well-ventilated cool place and use it as soon as possible. Use rice within one month in summer and within two months in a season other than summer. Measure the rice correctly Place the inner pot on a level surface and adjust the amount of water correctly. The water level scale is just a guide. You can adjust the water level within 2 mm according to the rice type and your preference. Do not use hot water at a temperature of 50°C or more, alkaline water with a pH value of 9 or more, or mineral water with a high degree of hardness. Doing so may cause a high degree of stickiness or yellowing. P.10 Be sure to use the supplied measuring cup and measure the rice with the cup correctly. Using a kitchen measuring cup (200 mL) or measuring rice bin may result in an error. Rinse rice quickly P.10 First, pour in plenty of water, stir the rice quickly, and then drain the water quickly. To prevent the rice bran odor from getting into the rice, repeat the above process quickly until the water is no longer milky. You can start cooking rice immediately without soaking it in water. Soaking will make the rice soft. Do not leave the rice in a colander. Doing so may cause the rice grains to crack and the rice to become too sticky. ( P.11 ) Insert the inner pot and start cooking the rice Place the main unit on a level surface, wipe water from the outer wall of the inner pot, and then put it in the main unit. If the appliance is used on an inclined surface or the inner pot is dirty, the sensor will not work correctly and you will be unable to cook tasty rice. When cooking is finished, stir the rice When cooking is finished, stir the rice gently from the bottom and remove any excess water. Leaving the rice without stirring may cause it to become hard or too sticky. Points for Cooking by Rice Type . & Configure the settings appropriately according to the type of rice and your preference. By default, the type of rice is set to and the texture of rice is set to Water level scale of inner pot Cooking white rice WHITE Cooking Japanese white rice JAPAN WHITE Cooking sticky rice Cooking Japanese brown rice To cook a mixture of different types of rice STICKY RICE BROWN Rice setting Press Texture of rice Press Measure the rice with the supplied measuring cup (approx. 180 mL). Rinse the rice sufficiently (to prevent the rice from absorbing the odor of rice bran). Measure the rice with the supplied measuring cup (approx. 180 mL). Rinse the rice sufficiently (to prevent the rice from absorbing the odor of rice bran). Do not keep sticky rice warm (doing so may cause odor and discoloration). How to Cook Rice Setup Procedure Measure the rice with the supplied measuring cup (approx. 180 mL). Rinse the rice gently (and remove the dirt and husk). Do not keep brown rice warm (doing so may cause odor and discoloration). The taste and texture of rice differ from the rice cooked with a pressure cooker or the like. (This is because a different cooking method is used.) Cook the rice using the settings for the type of rice whose percentage is the largest in the mixture. <Example> If a mixture of 2 cups of white rice and 1 cup of brown rice is cooked Cook the rice with . How to Cook Rice Cooking Rice Basics 1 2 Put water in the tank. 1 Take out the tank from the main unit and remove the lid of the tank. (Remove the lid while holding the part.) Rinse the rice. 1 Measure the rice. Use the supplied measuring cup. White rice, brown rice, etc. Measuring cup White rice (approx. 180 mL = approx. 155 g) Japanese rice (approx. 180 mL = approx. 150 g) The cup filled with rice to the brim is approx. 180 mL. Tank Lid Tank If water remains in the tank, drain the water and then wash the tank. 2 Put water in the tank Pour water up to the level between the two lines on the indicator inside the tank. (Check on a level surface.) Right Wrong Using a measuring rice bin may result in an error. 2 Rinse the rice. You can rinse the rice in the inner pot. <About the indicator> When you pour water while looking at the indicator from above, you will see the lower mark on the indicator being covered with water. Pour water until the whole mark is covered with water. Pour in plenty of water, stir the rice quickly, and then drain the water quickly. Repeat the “stirring and draining” process until the water is no longer milky. Do not use other than tap water. (Doing so may cause mold and bacteria.) Do not use hot water. (Doing so may cause poorly cooked rice.) P.25 If the water level is wrong, rice cannot be cooked. P.26 3 Attach the tank lid and then insert the tank into the main unit. When the lid is attached, the water level in the tank will rise but this is not a problem. Hang the two claws of the tank on the body. Be sure to attach the tank cover. (To prevent false detection of the water level) Wipe off water, dirt, and rice grains stuck to the tank. Do not drop the tank or hit it on something. (Doing so may cause the tank to crack, chip, or break) Do not wash rice with a metal colander over the inner pot. Damage to the fluorine coating will increase the likelihood of peeling off. White rice Rinse the rice sufficiently. (To prevent odor, discoloration, or burning) Brown rice Rinse the rice gently and then remove the dirt and husk. 3 Adjust the amount of water. Start cooking Keep warm. 1 Insert the inner pot in the main unit. Connect the main unit plug into the unit connector and then insert the power plug into an outlet. Flatten the surface of the rice and adjust the amount of water to the water level scale according to the rice type and menu. P.9 Adjust the amount of water on a level surface. Do not cook the rice using hot water at a temperature of 50°C or more, alkaline water with a pH value of 9 or more, or mineral water with a high degree of hardness. (Doing so may cause a high degree of stickiness or yellowing.) Wipe off water, dirt, and rice grains stuck to the heat sink, outside of the inner pot, inside of the main unit, top frame, and main unit plug. Be sure to attach the cartridge and heat sink. (Not doing so may cause steam to leak, resulting in a burn.) If the cartridge, heat sink, and tank are not attached, the lid cannot be closed. When you insert the power plug into an outlet, sparks may be generated. This is typical of IH cooking heaters and does not indicate an abnormality. 2 Press START. White rice Same display on both sides. Blip The “START” indicator turns on and cooking starts. To change the rice type and menu P.12–15 If “status display” appears on the LCD display P.26 Japanese rice The scales on both sides are different. Buzzer indicates cooking is finished. When cooking is finished, stir the rice. The “START” indicator turns off. The rice will be automatically kept warm. (The “KEEP WARM” indicator turns on.) Keeping Rice Warm P.18 To prevent the rice from becoming too sticky, stir the rice from the bottom. The water level scale is just a guide. Adjust the amount of water within 2 mm according to the rice type and your preference. Stir the rice within approx. 15 minutes and remove any excess water. Guide for adjusting amount of water Lower than the scale New rice Old rice, barley, rinse-free rice Stir the rice gently from the bottom Wipe off condensation from the top frame and lid packing, if necessary. Higher than the scale To cook rice with water whose level is higher than the scale, press to select “SOFT”. (To prevent water from boiling over) 4 Inner pot The inner pot is “coated with fluorine” to prevent the rice grains from sticking to the wall. Please observe the notes on handling as the fluorine coating is soft and easily worn off. Inner Pot P.2 Cleaning P.23 After use, drain the water from the tank after it has cooled down and then clean the tank. P.22–24 Be sure to drain the water from the tank. (To prevent mold and bacteria from growing) How to Cook Rice Note You can start cooking rice immediately without soaking it in water. Soaking the rice in water results in softer texture. Rice type & 3 How to Cook Rice Cooking White Rice/Japanese White Rice(QUICK) HOUZYUN P.16 <Before Use> Put water in the tank. P.10 <After Use> Drain the water from the tank after it has cooled down and then clean the tank. P.22 When cooking rice with the initial settings: and rice texture Rice to cook the rice quickly (the settings do not need to be changed) Start from Step When cooking rice with the previous settings: to cook the rice. Confirm the settings on the LCD display and then start from Step When changing the settings to cook rice: Follow the procedure below to change the settings and cook the rice. 1 Blip Press RICE and then select the type of rice. Every time you press the button, the display changes. 2 Blip Press MENU and select the texture of rice. Every time you press the button, the display changes. P.16 P.16–17 Blip blip Blip blip To cook white rice, select WHITE. To cook Japanese white rice, select JAPAN WHITE. To cook rinse-free rice Rinse it gently to prevent it from getting burned. Pour in water until the water level is slightly over the scale mark (within 2 mm). Stir gently from the bottom of the inner pot before you start cooking. Select from the 3 types: REGULAR, FIRM, and SOFT. To cook quickly Press and select QUICK. The cooking time can be reduced to about 15 minutes shorter than usual by reducing the residual heat time. Up to 3 cups of rice can be cooked. The rice will be cooked slightly firm. CAUTION REGULAR Approx. 52–61 minutes Approx. 52–61 minutes FIRM Approx. 54–61 minutes SOFT Press START to cook the rice. Blip The rice cooking indicator turns on and rice cooking starts. The approximate cooking time is displayed. ( The display time is approximate. The cooking time varies depending on the amount of rice, season of the year, room temperature, water temperature, amount of water, voltage, and so on, and it may take about 10 to 15 minutes longer. “16 MIN” will continue to be displayed while actual remaining time adjustment is made. <Example display> ) & REGULAR Approx. 51–61 minutes Approx. 51–61 minutes FIRM Approx. 54–61 minutes SOFT 4 When cooking is finished, stir Buzzer indicates rice cooking is finished. the rice. How to Cook Rice 3 At a voltage of 220 V, room temperature of 23°C, water temperature of 23°C, and standard water level. The cooking times slightly vary depending on the amount of rice, season of the year, room temperature, water temperature, amount of water, voltage, and so on. Japanese white rice White rice Approximate cooking times Do not touch hot parts while the rice is being cooked or kept warm (doing so may cause a burn). Bleep bleep bleep bleep bleep Stir the rice within 15 minutes. P.11 The “START” indicator turns off. The rice will be automatically kept warm. (The “KEEP WARM” indicator turns on) The keep-warm elapsed time is displayed. <Example display> Keep-warm indication The keep-warm time is displayed in 1-hour increments up to 24 hours. (“0 HR” is displayed for less than one hour.) When 24 hours have elapsed, the current time will be displayed. Do not keep the rice warm for more than 24 hours. NOTES Keeping Rice Warm P.18 Save settings such as the selected rice type and REGULAR, FIRM, or SOFT of MENU. You will hear a buzzing noise after rice cooking starts. The noise comes from a fan that allows the heat inside to escape to the outside and does not indicate a failure. The buzzing and clinking noises you will hear while the rice is being cooked or kept warm are typical of IH cooking heaters and do not indicate a failure. The bubbling noise you will hear from the tank while the rice is being cooked is generated by air bubbles and does not indicate an abnormality. The bubbling noise you will hear when you open or close the lid after rice cooking is finished is generated by the air that is released to the tank and does not indicate an abnormality. Opening the lid while the bubbling noise is being generated may cause water to spill out of the tank. Condensation may form on the heat sink during use. This is to prevent the rice from drying out and does not indicate an abnormality. How to Cook Rice Cooking Japanese Brown Rice <Before Use> Put water in the tank. P.10 <After Use> Drain the water from the tank after it has cooled down and then clean the tank. P.22 When cooking rice with the previous settings: Confirm the settings on the LCD display and then start from Step to cook the rice. When changing the settings to cook rice: Follow the procedure below to change the settings and cook the rice. 1 Blip Press RICE and select JAPAN BROWN. 2 Blip Press MENU and select REGULAR. When you select the rice type, “REGULAR” is automatically selected. Every time you press the button, the display changes. Every time you press the button, the display changes. P.16–17 Blip blip Blip blip You cannot select a rice texture other than “REGULAR”. At a voltage of 220 V, room temperature of 23°C, water temperature of 23°C, and standard water level. The cooking times slightly vary depending on the amount of rice, season of the year, room temperature, water temperature, amount of water, voltage, and so on. Brown rice 3 Press START to cook the rice. Approx. 83–107 minutes 4 Buzzer indicates rice cooking is finished. Blip Bleep The “START” indicator turns on and rice cooking starts. <Example display> approximate cooking time is not ( The ) displayed. & Approximate cooking times Do not touch hot parts while the rice is being cooked or kept warm (doing so may cause a burn). Press STOP/KEEP WARM to stop keeping the rice warm and then disconnect the power cord. The “KEEP WARM” indicator turns off. Stir the rice within 15 minutes. P.11 Do not keep the rice warm. Doing so may cause odor or discoloration. NOTES When the countdown starts, the approximate finishing time is displayed in 1-minute decrement. <Example display> Save the setting of the selected rice type. You will hear a buzzing noise after rice cooking starts. The noise comes from a fan that allows the heat inside to escape to the outside and does not indicate a failure. The buzzing and clinking noises you will hear while the rice is being cooked or kept warm are typical of IH cooking heaters and do not indicate a failure. The bubbling noise you will hear from the tank while the rice is being cooked is generated by air bubbles and does not indicate an abnormality. The bubbling noise you will hear when you open or close the lid after rice cooking is finished is generated by air that is released to the tank and does not indicate an abnormality. Opening the lid while the bubbling noise is being generated may cause water to spill out of the tank. “QUICK” is not available. How to Cook Rice CAUTION How to Cook Rice Cooking Various Kinds of Rice Approximate cooking times JAPAN WHITE WHITE JAPAN WHITE JAPAN BROWN HOUZYUN SUSHI STICKY RICE Approx. 67–75 Approx. 50–59 Approx. 49–58 minutes minutes minutes MIXED Approx. 61–71 minutes Approx. 62–69 minutes Blip you stir the rice and ingredients or there are a lot of ( Ifingredients, ) the rice may not be cooked well. 3 . 2 Blip Press HOUZYUN. “MIXED” cannot be selected for “JAPAN BROWN”. “QUICK” is not available. You cannot make a reservation. Blip 1 Press START to start cooking. Blip The “START” indicator turns on and cooking starts. 4 Buzzer indicates cooking is finished. When cooking is finished, stir the rice. P.11 2 Blip 3 STICKY RICE Select select “FIRM” with the with the button. button and 4 P.12–13 * The settings for HOUZYUN cooking are saved once the rice is cooked. Press MENU and select MIXED. The “START” indicator turns on and cooking starts. Buzzer indicates cooking is finished. Bleep ) Press RICE and then select the type of rice. P.12 Press START to cook the rice. Blip Cooking capacity: max. 4 cups Water level scale: “STICKY RICE” Use Japanese sticky rice. Cook the rice with the ingredients placed over it. If you stir the rice and ingredients or there are a lot of ingredients, the rice may not be cooked well. Do not make a reservation. Do not keep the rice warm. (Doing so may cause odor or drying out.) Do not use “QUICK”. ( P.12–13 <White rice, Japanese white rice> Cooking capacity: max. 3 cups Water level scale: White rice “WHITE” Japanese rice “JAPAN WHITE” Cook the rice with the ingredients placed over it. P.2 Press RICE and select button. button and MIXED Water level scale: “JAPAN WHITE” Can be selected only for . The texture of rice cannot be selected. “QUICK” is not available. 1 with the Water level scale: “SUSHI” Use Japanese rice. Do not use “QUICK”. At a voltage of 220 V, room temperature of 23°C, water temperature of 23°C, and standard water level. The cooking times slightly vary depending on the amount of rice, season of the year, room temperature, water temperature, amount of water, voltage, and so on. HOUZYUN Select select “FIRM” with the CONGEE Approx. 74–81 minutes Approx. 63–70 minutes Approx. 98–105 minutes SUSHI Press STOP/KEEP WARM to stop keeping the rice warm and then disconnect the power cord. The “KEEP WARM” indicator turns off. Stir the rice within 15 minutes. Do not keep the rice warm. Doing so may cause odor or discoloration. CONGEE (1:7 ratio of rice to water) <White rice> Cooking capacity: max. 0.75 cups Water level scale: (WHITE) “CONGEE” If the recipe includes ingredients r Cook the rice with the ingredients placed over it. If you stir the rice and ingredients or there are a lot of ingredients, the rice may not be cooked well r Do not make a reservation. Do not cook with any menu other than “CONGEE”. (Doing so may cause boiling over.) <Japanese white rice, brown rice> Cooking capacity: max. 0.75 cups Water level scale: (JAPAN WHITE) “CONGEE” If the recipe includes ingredients r Cook the rice with the ingredients placed over it. If you stir the rice and ingredients or there are a lot of ingredients, the rice may not be cooked well. r Do not make a reservation. Do not cook with any menu other than “CONGEE”. (Doing so may cause boiling over.) “QUICK” is not available. 1 Blip 2 Blip 3 Press MENU and select CONGEE. Press START to cook the rice. Blip 4 Press RICE and select WHITE. ( Press STOP/KEEP WARM to stop keeping the rice warm and then disconnect the power cord The “KEEP WARM” indicator turns off. Do not keep the rice warm. Doing so will cause the congee to become mushy. ) “QUICK” is not available. 1 Blip 2 Blip 3 4 Press RICE and then select the type of rice. P.9 Press MENU and select CONGEE. Press START to cook the rice. Blip The “START” indicator turns on and cooking starts Buzzer indicates cooking is finished. Bleep ) The “START” indicator turns on and cooking starts. Buzzer indicates cooking is finished. Bleep Press STOP/KEEP WARM to stop keeping the rice warm and then disconnect the power cord. The “KEEP WARM” indicator turns off. Do not keep the rice warm. Doing so will cause the congee to become mushy. How to Cook Rice ( & CONGEE How to Cook Rice Keeping Rice Warm When rice cooking is finished, keep-warm mode turns on automatically. The “KEEP WARM” indicator turns on. The elapsed keep-warm time is displayed in 1-hour increments up to 24 hours. (“0 HR” is displayed for less than one hour.) When 24 hours have elapsed, the current time will be displayed. (Keep-warm mode will be continued.) <To display the current time> Press or . (The elapsed keep-warm time is not displayed.) ATTENTION If the rice that is being kept warm has odor, remove the odor from the main unit of the cooker. P.24 Do not keep the rice warm for more than 24 hours. (Doing so may cause discoloration, odor, or drying out) Do not keep the following things warm. r Rice other than the white rice (e.g. mixed rice, congee, sticky rice) r Cold rice or mixture of cold and warm rice r Rice that was cooked without being well rinsed r Soups such as miso soup and curry soup Close the lid firmly. (Failing to do so may cause drying out or discoloration.) Do not use keep-warm mode with the rice scoop or ladle inside. (Doing so may cause odor, discoloration, or cracking of the rice scoop or ladle.) Move small amount of rice to the center. (Keeping small amount of rice warm may cause drying out or sticky.) Do not keep the rice inside after turning off the keepwarm mode. (Doing so causes the temperature to decrease, resulting in condensation, stickiness, or odor.) Clean the lid packing of the heat sink after every use because it tends to absorb odors. P.23 After Use 1 Turn off the keep-warm mode, pull out the power plug, and then remove the main unit plug. Bleep The “KEEP WARM” indicator turns off. 2 Drain the water from the tank after it has cooled down and then clean the tank. P.22 Tips How to Adjust the Current Time & The current time may have deviation due to changes in room temperature or the like. The time is displayed in a 24-hour format. (“12:00” at noon and “0:00” at midnight) You cannot adjust the time during cooking, keeping rice warm, or while a reservation is in progress. Example: Changing 19:10 (7:10 p.m.) to 19:12 (7:12 p.m.) 1 Insert the power plug. 2 Press or 3 Press and change the minutes to “12”. Blip twice. The time display lights up. Pressing and holding down the button fast forwards the time. Returning to 0 generates a “blip blip” sound. The time display will flash for 5 seconds. (You can adjust the clock during flashing.) Time adjustment will automatically complete after the operation is finished 5 seconds later. How to Cook Rice Flashing Blip Blip blip *Time adjustment will end when no operation is performed for 5 seconds even if time adjustment is still in progress. The clock continues to be powered by the built-in battery even if the power plug is pulled out. Tips The battery life is approx. 4 to 5 years. (Varies depending on the conditions of use.) If the battery runs out of power The time display and stored data such as a reservation will be lost when the power plug is pulled out. To replace the battery Please ask Mitsubishi Electric service centre to replace the battery as it is fixed inside the unit. (Service charge will be incurred.) If Power Cut Occurs (or Power Plug is Pulled Out) During cooking Cooking will continue after the power recovers. During a reservation Cooking will finish as reserved after the power recovers. If the power cut time is long, the rice may not be cooked well. During keeping warm Keeping warm will continue after the power recovers. If the power cut time is long and the rice becomes cold, keeping warm will be stopped automatically. Tips Before making a reservation, put water into the tank. P.10 Using Timer to Cook Rice Set the finish time (TIMER1/TIMER2) Rice is automatically cooked and finishes at the set time. Two reservation times can be saved so you can, for example, use one of them in the morning and the other one in the evening. Setting reservation time • • 12 o’clock noon The time can be displayed for 24 hours. • 12 o’clock midnight Confirm that the current time is correct. If the time is not correct 1 P.19 Press TIMER to select TIMER1 or TIMER2. Blip Pressing the button switches between <Example display> When setting Flashing The “TIMER” indicator (green) turns on. The “START” indicator Blip blip (red) flashes. Initial settings: 2 Blip Blip Press HOUR and MINUTE to set the cooking finish time. <Example display> When cooking is to be finished at 7:30 a.m. Flashing Every time the button is pressed, the time advances in 1-hour increments. 0 through 23 hours. Returning to 0 generates a “blip blip” sound. Pressing and holding down the button fast forwards the time. ( 3 ) Every time the button is pressed, the time advances in 10-minute increments. (Returning to 0 generates a “blip blip” sound.) Pressing and holding down the button fast forwards the time. Press START Reservation is completed. Blip The “START” indicator (red) turns off and the reservation is completed. (The “TIMER” indicator (green) remains on.) The reservation time is saved. <Example display> When cooking is to be finished at 7:30 a.m. On Cooking at a reservation time set previously Recall the set reservation time and make a reservation. 1 Press TIMER to select TIMER1 or TIMER2. Blip 2 Press START Reservation is completed. Blip The “TIMER” indicator (green) turns on. The “START” indicator (red) flashes. The previously reserved time is displayed. The “START” indicator (red) turns off and the reservation is completed. (The “TIMER” indicator (green) remains on.) <Example display> The time set for Flashing is displayed. Set the finish time in 2–12 hours from now (Easy reservation) 1 & You can make a reservation in 1-hour increments. Press TIMER three times to select TIMER AFTER. Blip blip blip The “TIMER” indicator (green) turns on. The “START” indicator (red) flashes. <Example display> When cooking is to be finished in 3 hours from now Press HOUR to set the cooking finish time. Blip Every time the button is pressed, the time changes from 2 to 12 hours in 1-hour increments. (Returning to 2 hours generates a “blip blip” sound.) The time cannot be set in 1-minute increments. 3 Press START Reservation is completed. The “START” indicator (red) turns off and the reservation is completed. (The “TIMER” indicator (green) remains on.) The finish time is displayed. Blip To change the rice type and menu Make a selection before pressing . To change the reservation time Press . (The “TIMER” indicator (green) turns off.) Set the reservation time again. P.20 To cancel the reservation Press . (The “TIMER” indicator (green) turns off.) When “U1” appears If is not pressed, the reservation is not confirmed and “ ” appears to prompt you to do the following. Make the setting again. Press so that “ Flashing Flashing <Example display> The finish time is displayed. On Confirm that the current time is correct before making a reservation. (If the time is not correct, the cooking will not be finished at the reservation time.) Set the reservation time within 12 hours in summer. Soaking rice in water for a long time may cause the water to deteriorate and produce odor. You cannot make a reservation in the following cases. • “QUICK”, “MIXED”, or while rice is being cooked or kept warm Do not remove the tank or drain water from it when the reservation time is set. The current time is not displayed when the reservation time is set. When the reservation time is less than 1–2 hours, cooking will start immediately. (The time that can be reserved varies depending on the menu.) Do not use the reservation function for cooking rice including ingredients and seasonings, such as sticky rice. Rice may not be cooked well as the seasonings will sink to the bottom and the ingredients may spoil. ( ) ( ) ” disappears. Tips 2 Tips Cleaning Before cleaning, pull out the power plug, remove the main unit plug, and then wait until the main unit cools. Clean the Parts after Use Every Time Cartridge <Clean the cartridge after it has cooled down> Rinse it with water and then wipe off the water. *Do not wash it with the nylon surface of a cleaning sponge (doing so may cause damage). Wash it thoroughly to ensure tasty rice. How to remove the cartridge First remove the heat sink. Packing (cannot be released) 1 Remove it while holding the tab. Tank <Clean the tank after it has cooled down> Tank lid and tank container: Rinse it with water and then wipe off the water. * Do not scratch the water level sensor surfaces (inside and outside) Water level sensor Tank cover: Wipe it with a well-wrung-out cloth. How to remove the tank Tab 2 Release the 3 locks (release the part). 1 Remove the tank from the main unit. 3 Open the cartridge. 2 Remove the tank lid (remove it while holding the part). Lock Cartridge Packing 4 Remove the cartridge packing. Release from here How to attach the cartridge 1 Attach the cartridge Hole packing. *Do not attach the packing by twisting it (doing so may cause steam to leak). 2 Insert the 4 claws into the holes and close the cartridge. Insert the packing into the groove so that the circular surfaces of the packing are at the top and bottom. Claw Lock 4 Confirm that the cartridge has a bush (see the figure below) and attach the cartridge to the main unit. Insert the lower part and then push in the upper part. If you do not attach the cartridge, the heat sink cannot be attached. Attach the bush correctly. Bush Not doing so may cause boiling over. * Do not pull or turn the check valve (doing so may cause steam to leak). 3 Drain the water. 3 Engage the 3 locks. How to attach the bush End Pipe of the Clean the Pipe inside of the pipe as well. Check Valve (inside the pipe) Do not remove this part. 4 Place the tank on a cloth and remove the tank cover. Hold the tank cover with both hands and push it downward. How to attach the Align the 4 protruding parts tank at the tank bottom push into the 1 Attach the tank and main unit. cover to the tank container. 2 Attach the tank lid. 3 Insert the tank into the main unit. & Heat Sink <Clean the heat sink after it has cooled down> Wash the heat sink with dishwashing liquid and a soft sponge, and then rinse it thoroughly. Lid Packing (cannot be removed) Wash it after use as it absorbs odors easily. If the heat sink is left unclean, rust, mold and burning may occur in addition to odor and decay. How to remove the heat sink Hold the tab with one hand and push the white lever upward with the other hand. Lever Tab How to attach the heat sink If you do not attach the cartridge, the heat sink cannot be attached. 1 Align the mark of the heat sink and the mark of the main unit and then insert the claws into the 2 protruding parts of the main unit. 2 Push in the upper part until it clicks. Tips ATTENTION Detergent other than dishwashing liquid (neutral) Do not use the Benzene, bleach, thinner, alcohol, cleanser following things Steel scrubbing brush or other scrubbing brush, nylon surface of a cleaning sponge, or Doing so may cause cleaning sponge with nylon net scratches, corrosion, Dish washer or dish dryer discoloration, and cracks. Do not wash the main unit (doing so may cause a failure). Claw Protruding Part Inner Pot <Clean the inner pot after it has cooled down> Wash the inner pot with dishwashing liquid and a cleaning sponge, and then rinse it thoroughly. * Do not wash it with a nylon surface. Inner Pot P.2 Rice Scoop, Rice Scoop Holder, and Ladle Wash them with dishwashing liquid and a cleaning sponge, and then rinse them thoroughly. Tips Cleaning (cont.) Clean the Parts after Use Every Time (Cont.) Heater Plate Wipe it with a well-wrung-out cloth. If the heater plate is left unclean, rust and burning may occur. Bottom Sensor Water Temperature Sensor Top Frame Tank Holder Wipe it with a well-wrung-out cloth. Wipe it with a well-wrungout cloth. To Remove Stubborn Dirt Bottom Sensor Water Level Sensor Measuring Cup Remove any stubborn dirt by polishing with fine sandpaper (approx. #800) and then wipe with a wellwrung-out cloth. Wipe it with a wellwrung-out cloth. * Do not scratch it. Wash it with dishwashing liquid and a cleaning sponge, and then rinse it thoroughly. * Do not wash it with a nylon surface. Main Unit Wipe it with a well-wrungout cloth. To Remove Odors from the Main Unit When odor cannot be removed completely, 1 Put water in the inner pot and tank. 1 Pour water in the inner pot up to the scale “0.5” of (JAPAN WHITE) “CONGEE”. 2 Put water in the tank and attach it to the main unit. 2 3 Boil the water. 1 Press and select “JAPAN WHITE”. 2 Press and select “CONGEE”. 3 Press . P.10 4 When cooking is finished, press It will take approx. 60 minutes until the keep-warm mode starts. . Wash the unit. P.22 The water in the main unit and tank is hot. Wash after the water has cooled down. 1 Open the lid and remove the inner pot, heat sink, and cartridge, and then wash them. 2 Remove the tank and drain the water, and then wash the tank. When You Cannot Cook Rice Well Causes and Solutions Rice is too soft. Rice is too firm. Rice cannot be cooked well. Rice is different than usual. Did you measure the rice correctly with the supplied measuring cup? Using a kitchen measuring cup or measuring rice bin may result in an error. P.10–11 Did you place the inner pot on a level surface and adjust the amount of water? If you adjust the amount of water on an inclined surface, the amount of water will increase or decrease and the texture of rice will vary. Is the amount of water and the menu correct? The texture of rice varies depending on the rice type, brand, and storage period. P.9 Adjust the amount of water to match with your preference and try using another menu. Did you put hot water in the tank? Doing so will cause the rice to be cooked with lower heat to prevent the temperature of water in the tank from overheating, resulting in variations of the texture of rice. “QUICK” is for cooking rice that is firm. Soaking the rice in water for a long time or setting a long-time reservation results in rice that is soft. If foreign objects such as rice grains or grime stick to the lid packing, edge of the inner pot, or the top of the bottom sensor, cooked rice will be firm. Wipe any foreign objects such as rice grains or grime off the surface. Rice is too sticky. Rice becomes hard. Did you stir the rice within 15 minutes after cooking finished? Failing to do so will result in excess water remaining and the cooked rice becoming too sticky or hard. The center of the cooked rice looks like a crater. This is typical when cooking with an IH heater and does not indicate an abnormality. The inner pot itself generates heat and cooks rice in a manner in which the rice along the wall of the inner pot becomes elevated to form a crater. A thin film forms on the rice and inner pot. The thin film is produced as a result of the savory elements (starch) of the rice melting and drying, and does not indicate an abnormality. Rice burns. <Rice burns in the following cases> • Rice is not rinsed sufficiently. (The rice bran residue remains and is burnt.) • Rice other than brown rice is cooked with “JAPAN BROWN”. • Rice is soaked in water for a long time or a long-time reservation is set. • Rice using seasonings, such as mixed rice, is cooked. • Foreign objects such as rice grains stick to the bottom of the inner pot or the top of the bottom sensor. A brownish black color may be left on the bottom depending on the amount of cooked rice (a small or large amount). Mixed or sticky rice cannot be cooked well. Did you stir in the seasonings sufficiently after you added them? If you do not sufficiently stir in the seasonings, they will sink to the bottom and the rice will not be able to be cooked well. If you stir the ingredients and rice, the rice may not be cooked well. Cook the rice with the ingredients placed over it. Did you add a lot of ingredients or large ingredients? Is the amount of water appropriate? Before adding the ingredients, adjust the amount of water to the water level scale mark. Did the amount of rice you cooked exceed the maximum amount of rice that can be cooked? When you add ingredients, the maximum amount of rice that can be cooked is less than that when cooking white rice. & Trouble Tips Cooking Rice Category P.36 Tips When You Cannot Cook Rice Well (cont.) Category Trouble Rice has odor. Rice becomes yellow. Rice dries up. Causes and Solutions Keeping Warm When rice has odor. P.18 ATTENTION Did you keep the rice warm for more than 24 hours? Did you close the lid firmly? Did you keep the rice warm with the rice scoop inside? Did you add cold rice to the rice that is being kept warm? Did you rinse the rice sufficiently? If the rice bran remains, the rice will absorb the odor. Did you make a reservation of more than 12 hours in summer? Soaking the rice in water for a long time may cause the water to deteriorate, resulting in odor. Did you cook the rice after cooking mixed rice or the like? If you use seasonings, the odor remains. Wash the inner pot, heat sink, and cartridge carefully. Cooked rice may appear yellow depending on the type of rice and water. If you cook the rice in alkaline water with a pH value of 9 or more, or mineral water with a high degree of hardness, the cooked rice appears yellow. Are the heat sink, cartridge, bush, and other parts free from dirt, or did you forget to attach them? Are foreign objects such as rice grains stuck to the area between the edge of the inner pot and the lid packing? Remove them. P.6 P.10–11 P.22–24 P.22–23 <Status Display> Displays the status of the main unit on the LCD display. Status Display Displayed in the following cases is not pressed after setting a reservation. (If the reservation is not confirmed.) There is no water in the tank. There is only a small amount of water in the tank. There is no tank. There is too much water in the tank. There is a buildup of white scale on the walls of the tank. The water in the tank is hot. Rice is cooked with hot water in the tank. Remedy Press to clear “ ” display. Set the reservation again, and then press last to confirm the reservation. There is not enough water in the tank. Increase the amount of water, and then start again from the beginning. Reduce the amount of water, and then insert the tank properly. Wash the tank if it is dirty. Replace the hot water in the tank with cold water. Troubleshooting Before requesting repairs, please read the instruction manual carefully and check the following points. Causes and Solutions & Trouble Cooking time is too long. P.36 Did the amount of rice you cooked exceed the maximum amount of rice that can be cooked? Is the menu appropriate? The cooking time may be longer depending on the rice type and menu. P.13·15·16 Did you put hot water in the tank? Doing so will cause the rice to be cooked with lower heat to prevent the water in the tank from overheating, resulting that the cooking time becomes longer. Water in the tank becomes cloudy. Water in the tank boils over. Water in the tank spills out. Did you attach the cartridge and bush correctly before cooking rice? Did the amount of rice you cooked exceed the maximum amount of rice that can be cooked? Is the amount of water appropriate? If the water level is higher by 2 mm or more than the scale on the inner pot, the water in the tank may become cloudy or boil over. To cook at a water level higher than the scale, select “SOFT” from menu. Did you select the right menu? If you cook a congee with any menu other than “CONGEE”, the water may boil over. Are foreign objects such as rice grains stuck to the area between the edge of the inner pot and the lid packing? Remove them. If the rice is not rinsed sufficiently, the water may boil over. When you open or close the lid after cooking is finished, a bubbling noise will be generated. If you open the lid at this time, water may spill out of the tank. Water in the tank has odors after cooking. Water has odors because it absorbs them during cooking. Tank lid becomes discolored. The tank lid may become discolored over time. Discoloration does not affect performance and hygiene. Reservation cannot be set. Is the menu or status appropriate for a reservation? You cannot make a reservation for “QUICK” or “MIXED” and during cooking or keeping warm. Did you press P.9·11 P.12–17 P.20–21 Did you select a menu for which a reservation cannot be made? You cannot make a reservation for “QUICK” and “MIXED”. Cooking is not finished at the reserved time. Is the current time display correct? The time is displayed in a 24-hour format. Check it again. Did a power cut occur during cooking? Steam leaks. Are foreign objects stuck to the heat sink and lid packing? Remove them. Is the pipe of the tank lid clogged with rice grains? Is the cartridge packing attached correctly? Is the lid packing, check valve, or inner pot deformed or missing? Please replace the parts by a new one. Mist or water droplets form on the front left of the tank or front left of lid. If the temperature of the water in the tank rises, steam may be discharged from the air vent hole on the top surface of the tank lid. This becomes particularly noticeable when the room temperature is low but this does not affect cooking performance and safety. Do not block the air vent hole. Doing so may cause the water in the tank to boil over as a result of changes in the pressure when the lid is opened and closed. Condensation drips on the top frame and rice. Condensation may drip depending on the rice type, menu, amount of rice cooked, and room temperature. Wipe off any condensation from the top frame and lid packing, if necessary. P.19 P.19 Tips Pressing generates a “blip blip blip” sound. ? P.22 P.36 P.22 Tips Troubleshooting (cont.) Trouble Causes and Solutions Lid cannot be closed. Lid is difficult to close. Are foreign objects such as rice grains stuck to the top frame or bottom of the inner pot? Remove them. Are the cartridge and heat sink attached correctly? Are the tank lid, tank, and tank cover attached correctly? Sound can be heard during cooking or keeping warm. Sound can be heard when the lid is opened and closed after cooking. A buzzing sound is produced by the fan that allows the heat inside to escape to the outside. Buzzing and clinking sounds are typical of IH cooking heaters. Simmering and hissing sounds are produced by boiling water at a high heat. A cracking sound is produced by reducing steam to water. Bubbling and rattling sounds are produced by air bubbles. A “blip blip blip blip” sound occurs shortly after pressing . The inner pot is not in the main unit. Put the inner pot into the main unit. A “blip blip blip blip” sound occurs and status display appears shortly after pressing . Check the amount of water in the tank and adjust it again. The status display appears when the tank is dirty or the tank mists, or when water droplets or air bubbles form on it. Wipe the water level sensor surfaces (inside and outside). Is the appliance placed on an unstable surface? Place the appliance on a level and stable surface. If the main unit is wobbled when cooking starts, the water surface will move, causing the status display to appear. Button operation cannot be performed. Are the main unit and power plugs disconnected? cannot be operated during cooking, keeping warm, and Any button other than the reservation. “FIRM”, “SOFT”, and “QUICK” can be selected when “WHITE” or “JAPAN WHITE” is selected for . “HOUZYUN” can only be selected when “JAPAN WHITE” is selected for . Remaining time display advances all of a sudden or stops. This is because the cooking time is adjusted to cook a tasty rice in response to changes in the amount of rice, season of the year, room temperature, water temperature, amount of water, voltage, and so on. The time may become longer by approx. 10 to 15 minutes. Remaining time is not displayed. The remaining time (approx.) is displayed from the start of cooking only when “REGULAR”, “FIRM”, “SOFT”, “QUICK”, “CONGEE” is selected for “WHITE” and “JAPAN WHITE”, or “HOUZYUN” is selected for “JAPAN WHITE”. The remaining time is displayed in countdown mode for other rice types and menu. LCD display turns off when the power plug is pulled out. The built-in battery is exhausted. Even if the battery is exhausted, the appliance can be used by inserting the power plug. Correct the current time display every time you make a reservation. Contact Mitsubishi Electric service centre with regards to replacing the battery. (Service charge will be incurred.) Sparks are generated when the power plug is inserted. This is because electric current flows to the electric parts in the main unit to recharge the battery. This does not indicate a failure. “ ” appears on the LCD display. P.22–23 P.22–23 P.26 If a towel or other item is laid under the main unit, the air inlet at the bottom of the unit will be blocked, which may cause “ ” to appear and cooking to stop prematurely. Remove the towel or other item that is laid and unplug the power plug from the outlet and then plug it back in. “ ” will disappear and you will be able to use the appliance. If “ ” appears again, unplug the power plug and contact your local dealer. *If you accidentally drop the main unit or tank, if part of the main unit or tank is cracked, chipped, broken, loose, or rattling, if you accidentally put water or rice directly in the main unit, or if a lot of water boils over, stop using the appliance and contact Mitsubishi Electric service centre for any inspection or repairing. If you are unable to resolve the problem despite performing the above checks, stop using the appliance and be sure to disconnect the power plug. Notify Mitsubishi Electric service centre of the circumstances of the problem and the alphanumeric characters ( , , , , , , , , , , , , , , ) indicated on the LCD display. Recipes Sticky Rice Use supplied measuring cup (1 cup = approx. 180 mL). 1 tablespoon = 15 mL, 1 teaspoon = 5 mL (1 mL = 1 cc). Cooking Capacity for Sticky Rice Red Bean Rice MENU FIRM & Max. 4 cups (Using Japanese rice) Ingredients (4 servings) 3 cups sticky rice (Japanese rice) 1/4 cups (approx. 30 g) sasage beans Pinch of roasted black sesame seeds Pinch of salt 1 Place sasage beans in pot with plenty of water. Discard water after it boils. 2 Boil again with plenty of water. Simmer by low heat until sasage beans are firm. Separate sasage beans from broth and let both cool. 3 Wash the sticky rice until water runs clear. 4 Place rice and broth from 2 in inner pot. Add water to the line marked “3” for “STICKY RICE”. 5 Spread sasage beans from 2 evenly on top and soak for an hour. Select , and cook. 6 When rice is done, stir and put in bowl. Sprinkle roasted black sesame seeds and salt as desired. Ingredients (4 servings) 3 cups sticky rice (Japanese rice) 3 slices fresh salmon 1/2 bunch of honeywort Pinch of white roasted sesame seeds 3 tbsp soy sauce A 3 tbsp mirin 3 tbsp sake 1 Wash the sticky rice until water runs clear and soak in plenty of water for an hour. 2 Cut each slice of salmon into 4 or 5 pieces. Sticky Rice with Wild Vegetables MENU FIRM Ingredients (4 servings) 3 cups sticky rice (Japanese rice) 100 g boiled wild vegetables 1 tbsp soy sauce 1 tsp salt A 1 tbsp sake Pinch of soup powder (dashi) Tips MENU FIRM 3 Lightly boil honeywort, remove excess water and cut into 2 cm pieces. 4 Place A in pot with 300 mL of water. When water boils, add salmon and simmer for 2 to 3 minutes. 5 Take out salmon and let broth cool. Remove skin and bones from salmon and tear into small pieces. 6 Place rice and broth from 5 in inner pot. Add water to the line marked “3” for “STICKY RICE”, select , and cook. 7 When rice is done, mix with salmon from 5, stir and put in bowl. Sprinkle honeywort and roasted white sesame seeds over rice. 1 Wash the sticky rice until water runs clear. 2 Place rice in inner pot, add water to the line marked “3” for “STICKY RICE”, and soak for an hour. 3 Wash wild vegetables and cut into thin strips. 4 Add A into 2 and mix. 5 Place 3 on top of rice, select , and cook. 6 When rice is done, stir and serve. Recipes Sticky Rice with Salmon Recipes Sushi Tips for Making Sushi Rice (Using Japanese rice) Hand-Roll Sushi MENU FIRM Ingredients (4 servings) 3 cups Japanese rice 1 tbsp sake Vinegar mix 4 tbsp rice vinegar 2 tbsp sugar 1 tsp salt Pinch of dried seaweed Pinch of sashimi, Japanese omelet, fermented soybeans (Natto), etc. Pinch of green perilla and wasabi Vinegar .....................Use high-quality rice vinegar for the best results. Soup stock (dashi) ...Cook with soup stock made from dried kelp, or water and a dash of sake. Vinegar mix ..............When serving with sashimi such as tuna, reduce sweetness by cutting down on the amount of sugar in the sushi rice recipe below. When stirring in vinegar mix • Stir while rice is still hot to allow vinegar to soak into rice more easily. • Fan to quickly lower temperature and make rice shiny. • Hold rice scoop upright and mix with cutting motion to prevent rice from becoming sticky. 1 Wash the rice until water runs clear. 2 Place rice and sake in inner pot. Add water to the line marked “3” for “SUSHI”, stir, select , and cook. 3 Wipe sushi bowl with cloth moistened with vinegar. Place cooked rice in moistened bowl. 4 While cooling rice with fan, quickly stir in vinegar mix with cutting motion to prevent rice from becoming sticky. 5 Cut dried seaweed into suitable size. Place sushi rice from 4 on seaweed, spread the filling of your choice onto rice, and roll. Sushi for Girls’ Day MENU FIRM Ingredients (4 servings) 3 cups of sushi rice Dried shiitake mushrooms boiled in sugar 4 dried shiitake mushrooms 2 tbsp sugar A 1 1/2 tbsp soy sauce Gourd strips boiled in sugar 20 g dried gourd Pinch of salt 2 tbsp sugar B 1 1/2 tbsp soy sauce Boiled rape blossoms 80 g rape blossoms 2 tbsp soup stock (dashi) C 1 tsp soy sauce 2 slices salted salmon Shredded egg crepes 2 eggs 1/2 tsp salt 1 tbsp potato starch 1 1/2 tbsp water Little vegetable oil 2 tbsp white sesame seeds 4 tbsp salmon roe 1 Make sushi rice. See “Hand-Roll Sushi” above. 2 Soak dried shiitake mushrooms in warm water and cut into thin slices. Place in pot and cover slices with flavored water used to soak shiitake. Add A and slowly simmer until water is gone. 3 Wet dried gourd strips, rub with salt, then rinse. Place in pot with B and add water to just cover strips. Simmer until water is gone. Once strips are boiled, chop into chunks. 4 Boil rape blossoms with salt. Squeeze to remove excess water and cut into 1.5 cm pieces. Soak in C for about 5 minutes and drain with strainer to dry. 5 Wrap salted salmon in aluminum foil and grill. Remove skin and bones from salmon and tear into small pieces. Cut skin into thin slices. 6 Mix eggs with salt and starch mixed with water. Pour thin layer of vegetable oil onto frying pan and cook 2 to 3 thin crepe-like omelets. Once cooled, make shredded egg crepes by cutting eggs into thin 4 to 5 cm strips. 7 Mix white sesame seeds and 23 with sushi rice, mound in bowl, and decorate with 456 and salmon roe. MENU FIRM Ingredients (4 servings) Same amount of rice and vinegar mix as P.30 3 slices lightly-salted salmon 2 knobs of ginger Pinch of white radish sprouts Little sake and vinegar Pinch of white sesame seeds Sweet Beancurd Sushi MENU FIRM Ingredients (4 servings) Same amount of rice and vinegar mix as P.30 8 pieces of rectangular deep-fried tofu 200 mL soup stock (dashi) A 7 tbsp sugar 100 mL sake 3 tbsp soy sauce 2 tbsp mirin Little vinegar water Pinch of sweet pickled ginger & 1 Make sushi rice. See “Hand-Roll Sushi” on P.30 . 2 Grill salmon without burning. Remove skin and bones, mix with sake and vinegar after cut into flakes. 3 Cut ginger into thin strips and remove harsh taste. Cut white radish sprouts into 2 cm pieces. 4 Mix salmon, white sesame seeds and ginger with sushi rice. 5 Put in bowl and sprinkle with white radish sprouts. 1 Make sushi rice. See “Hand-Roll Sushi” on P.30 . 2 Cut deep-fried tofu in half and open pouch. Pour hot water on pouches to rinse off excess oil. 3 Heat up A in pot. Add pouches, soy sauce, and mirin. Simmer by low heat. (Let A simmer alone first and make them shine once after adding pouches.) Allow pouches to cool in pot. 4 Gently squeeze liquid from pouches, put vinegar water on hands, and fill pouches with sushi rice. 5 Put in bowl and place sweet pickled ginger on the side. Sushi Balls MENU FIRM Ingredients (4 servings) 2 cups of sushi rice 100 g white fish (for sashimi) 8 slices smoked salmon Little grated wasabi Few pieces of lemons 1 Make sushi rice. See “Hand-Roll Sushi” on P.30 . 2 Cut white fish into thin slices and smoked salmon in linear half. 3 Soak cloth in water with little amount of vinegar and tightly squeeze out excess liquid from cloth. Place white fish in the center of cloth, spread wasabi, place desired amount of sushi rice on top, and squeeze cloth to create round shape. 4 Make salmon balls in the same manner and decorate with small slices of lemon. Recipes Salmon Sushi Rice Recipes Mixed Rice Tips for Making Mixed Rice Cooking Capacity for Mixed Rice Max. 3 cups using white rice Follow the tips below for the best results. water ready in bowl 1. Have and add all at once ingredients quickly when 4. Add steaming Rice initially absorbs water easily. Make sure to change water quickly to prevent rice from absorbing the smell of bran. Have water ready in separate bowl and pour into rice at once. Swiftly stir rice and quickly pour out water. For ingredients that need to preserve color or are boiled beforehand, make sure to add after the buzzer goes off. Spread evenly over rice as quickly as possible, immediately close lid, and let steam for another 10 minutes. 2. Be quick when washing rice When washing, lightly rub rice grains and then rinse. Repeat until water runs clear. Ideally, the entire process should take less than 3 minutes. 3. 5. Stir rice after it is done When rice is done, turn off keep-warm mode. Stir within 15 minutes and let excess water evaporate. When stirring, sweep the scoop along the sides of the pot and mix thoroughly. Cook with ingredients on top of rice Stir well after adding seasoning to water. Spread ingredients evenly over rice and cook. Mixing the ingredients with the rice may sometimes make poor results. Using more ingredients than listed on the recipe may also make poor results. Do not let rice mix with the seasoning and ingredients for a prolonged period of time. What to do with Leftover Mixed Rice Separate into small serving portions, individually wrap with plastic wrap, and store in freezer. Reheat with microwave or make rice porridge by adding water. Rice Mixed with Vegetables/Meat MENU MIXED Ingredients (4 servings) 3 cups white rice 50 g chicken breast 1/2 medium-sized carrot (approx. 50 g) 1 deep-fried tofu 30 g boiled bamboo shoots 3 dried shiitake mushrooms 2 tbsp light soy sauce 1 tbsp mirin A 1 tbsp sake 1 tsp salt Pinch of soup powder (dashi) Flavored water used to soak dried shiitake mushrooms 1 Peel carrots and boil deep-fried tofu to remove excess oil. Soak dried shiitake mushrooms in approx. 500 mL of water and cut away stems. Cut deep-fried tofu, shiitake mushrooms, chicken and bamboo shoots into thin strips. 2 Wash rice until water runs clear. 3 Place rice in inner pot and add water to the line marked “3” for (White rice) “WHITE” or (Japanese white rice) “JAPAN WHITE”. Pour in flavored water used to soak shiitake mushrooms, add A, and stir. 4 Spread filling from 1 evenly over rice, select and cook. 5 When rice is done, stir and serve. MENU MIXED Ingredients (4 servings) 3 cups white rice 200 g boiled bamboo shoots Pinch of soup powder (dashi) 3 tbsp sake A 2 tbsp soy sauce 1/2 tsp salt Pinch of leaf buds Sweet Potato Rice MENU MIXED Ingredients (4 servings) 3 cups white rice 250 g sweet potatoes 2 tbsp sake 1 tsp salt Pinch of roasted black sesame seeds Rice with Canned Salmon MENU MIXED Ingredients (4 servings) 3 cups white rice 1 can (approx. 200 g) canned salmon 4 fresh shiitake mushrooms 500 mL soup stock made from dried kelp 3 tbsp sake A 2/3 tsp salt 1 tbsp soy sauce Pinch of chives & 1 Remove tips of bamboo shoots and cut vertically in half. Cut remainder into thin slices. 2 Wash rice until water runs clear. 3 Place rice and A in inner pot, add water to the line marked “3” for (White rice) “WHITE” or (Japanese white rice) “JAPAN WHITE”, and stir. 4 Spread 1 evenly over rice, select and cook. 5 When rice is done, stir, put in bowl, and sprinkle with leaf buds. 1 Cut sweet potatoes into 1 cm round slices. Cut slices into 4 and soak in water to remove harsh taste. 2 Wash rice until water runs clear. 3 Place rice in inner pot and add water to the line marked “3” for (White rice) “WHITE” or (Japanese white rice) “JAPAN WHITE”. Add sake and salt, and stir. 4 Spread sweet potatoes from 1 evenly over rice, select and cook. 5 When rice is done, stir and put in bowl. Sprinkle roasted black sesame seeds as desired. 1 Separate salmon and liquid from can. 2 Cut fresh shiitake mushrooms into thin strips. 3 Wash rice until water runs clear. 4 Place rice, liquid from 1, and soup stock made from dried kelp in inner pot. Add water to the line marked “3” for (White rice) “WHITE” or (Japanese white rice) “JAPAN WHITE”, add A, and stir. 5 Spread salmon from 1 and 2 evenly over rice, select and cook. 6 When rice is done, lightly mix, put in bowl, and sprinkle with chives. Recipes Bamboo Shoot Rice Recipes Brown Rice Cooking Capacity for Brown Rice Max. 3 cups (Using Japanese rice) Brown Rice MENU REGULAR Ingredients (4 servings) 3 cups brown rice (Japanese rice) 1 Lightly wash brown rice to remove dust and husk. 2 Place 1 in inner pot and add water to the line marked “3” for “BROWN”. 3 Select , and cook. 4 When rice is done, stir and serve. Brown Rice Salad MENU REGULAR Ingredients (4 servings) 3 cups brown rice (Japanese rice) 90 g canned tuna Little lemon juice Pinch of sugar Pinch of raisins Little brandy 2 green peppers 1/3 onion 1 tomato Pinch of sliced almonds Pinch of parsley Pinch of red leaf lettuce Little French dressing 1 Cook brown rice and let cool. 2 Roughly flake tuna and add lemon juice mixed with sugar. 3 Mix brandy with raisins. 4 Wash green peppers, remove seeds, and coarsely cut into slices. 5 Cut onion, soak in water, and squeeze out excess water with cloth. 6 Peel tomato after boiled in hot water, cut into round slices, remove seeds, and dice. 7 Cut parsley. 8 Wash red leaf lettuce, tear into large pieces, and cool in ice water. 9 Mix cooled brown rice with 2 through 6 and place red leaf lettuce on plate. Decorate with almonds and parsley, and sprinkle dressing over entire salad. Cooking Capacity for Congee Max. 0.75 cup (Up to 0.5 cup with ingredients) White Rice Congee MENU CONGEE Ingredients (4 servings) 0.75 cup rice Minced Meat with Japanese Pickles Congee Toppings Pickled Plum with Daikon MENU CONGEE Ingredients (4 servings) 1 pickled plum 150 g grated daikon 1 Wash rice until water runs clear. 2 Place rice in inner pot and add water to the line marked “0.75” for (White rice) “CONGEE” or (Japanese white rice) “CONGEE”. 3 Select and cook. 4 When rice is done, put in warm bowl. & Congee Dash of soy sauce 1 Remove pit from pickled plum and cut into tiny pieces. 2 Mix 1 with grated daikon and add a dash of soy sauce for extra flavor. MENU CONGEE Ingredients (4 servings) 100 g minced pork 1 tbsp vegetable oil 50 g Japanese pickles (pickled eggplant and cucumber, etc.) Little sake Little soy sauce Pinch of seven-spice chili pepper 1 Coarsely mince Japanese pickles. 2 Pour vegetable oil onto hot frying pan and stir-fry minced pork. 3 Once meat crumbles into small pieces, add 1, sake and soy sauce. Stir-fry some more and sprinkle with seven-spice chili pepper. Minced Meat with Japanese Pickles Tofu with Seasoned Cod Roe MENU CONGEE Ingredients (4 servings) 1 seasoned cod roe 1/3 brick of cotton tofu 1 tsp sake 1 tsp soy sauce 1 Cut seasoned cod roe lengthwise and take out roe. 2 Break tofu into small pieces and roast in pot with sake. 3 Add 1 and soy sauce to 2 and lightly roast. Pickled Plum with Daikon Seven-Herb Congee Ingredients (4 servings) 0.75 cup rice Pinch of salt Greens Japanese parsley Daikon leaves White turnip leaves Japanese mustard spinach Potherb mustard, etc., all as needed 1 Follow steps 1 through 3 of “White Rice Congee” above. 2 Boil greens in hot water and place in bowl of cold water. Squeeze out excess water and coarsely cut. 3 When 1 is done, add 2 and salt, and let steam for approx. 5 minutes. Tofu with Seasoned Cod Roe The congees in the above photo were made with the water level “CONGEE”. Seven Herbs The seven herbs are Japanese parsley, shepherd’s purse, Jersey cudweed, chickweed, henbit, turnip leaves, and daikon leaves. Recipes MENU CONGEE Specifications Model NJ-EXSA10JH Power supply 220 V∼50 Hz Cooking: 1270 W, Keeping warm: 1270 W (25 W*1) Cooking capacity (min. – max.) Power consumption White rice White rice Japanese rice 0.18–1.0 L (1–5.5 cups) Brown rice 0.18–1.0 L (1–5.5 cups) ——— 0.18–0.54 L (1–3 cups) Mixed rice (white rice) 0.18–0.54 L (1–3 cups) 0.18–0.54 L (1–3 cups) Congee 0.09–0.14 L (0.5–0.75 cups) 0.09–0.14 L (0.5–0.75 cups) Sticky rice ——— 0.36–0.72 L (2–4 cups) Sushi (white rice) ——— 0.36–1.0 L (2–5.5 cups) Quick (white rice) 0.18–0.54 L (1–3 cups) Power cord length 0.18–0.54 L (1–3 cups) 1.0 m Dimensions (W × D × H) 253 × 348 × 245 mm Approx. 6.6 kg*2 Weight The power consumption refers to the maximum electric power consumed instantaneously when cooking or keeping rice warm. The appearance and specifications are subject to change without advance notice. *1 Average power consumption while keeping rice warm (at room temperature 23°C) *2 Including the power cord. Menu Summary Recipes Normal rice cooking : This function can be used. ×: This function is not recommended. Water level Rice WHITE WHITE JAPAN WHITE JAPAN WHITE JAPAN BROWN JAPAN WHITE BROWN HOUZYUN cooking JAPAN WHITE CONGEE Congee CONGEE CONGEE Sushi SUSHI Sticky rice Mixed rice STICKY RICE WHITE JAPAN WHITE Approx. cooking time (min.) 52–61 REGULAR/FIRM/SOFT 37–46 QUICK 51–61 REGULAR/FIRM/SOFT 36–46 QUICK Menu —: This function is not available. Timer Keep warm Menu memory — — — — REGULAR 83–107 × HOUZYUN 67–75 WHITE CONGEE 74–81 × × — JAPAN WHITE CONGEE 63–70 × × — CONGEE 98–105 × × — FIRM 50–59 FIRM 49–58 × MIXED 61–71 — MIXED 62–69 — × × × JAPAN BROWN JAPAN WHITE JAPAN WHITE WHITE JAPAN WHITE Sole Agent in Hong Kong Mitsubishi Electric Ryoden Air-Conditioning & Visual Information Systems (Hong Kong) Limited. Head Office: Tel.: 2510 1505 Service Center: Tel.: 2427 8484 — —