1
8. Guía de puesta en marcha
8. Start up
8.1 Controles preliminares
8.1 Preliminary checks
Antes de poner en marcha un Humidificador SD, se debe
efectuar algunos controles preliminares:
• las conexiones eléctricas de alimentación;
• el conexionado de la sonda o regulador y el On-Off
remoto;
• el tubo de conducción de vapor, no debe estar obstruido
a lo largo de la instalación;
• la llegada del agua al humidificador;
• el conexionado al desagüe;
• central (o conducto de aire) de tratamiento, debe ser
totalmente operativa.
Before starting up a SD humidifier, check the following:
• power supply electrical connections;
• connection of the probe (or regulator) and remote
ON-OFF;
• the steam duct must not be narrowed in any part;
• water supply to the humidifier;
• drainage connection;
• unit (or air duct) of treatment fully operative;
8.2 El encendido
8.2 Turning on
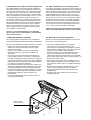
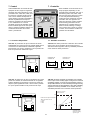
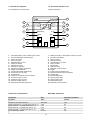
Actuar sobre el interruptor situado debajo del control frontal. Sobre el display del control el cursor (triangulo), se
posicionará automáticamente sobre la indicación “ELECTRIC CURRENT” en los modelos CDC y CDP, sobre la
indicación “RELATIVE HUMIDITY”, en los modelos
CDH,CDD y sobre la indicación “TEMPERATURE” en el
modelo CDT. Simultáneamente es visualizado el valor
medido. Si al humidificador se le pide vapor, se encenderá
el LED verde de “HUMIDIFY ON” y el LED naranja “FIL”’.
En el primer caso indica que está humidificando, y el contactor de potencia está conectado, en el segundo caso
nos indica que está entrando agua, mediante la apertura
de la válvula de solenoide.
Press the switch placed below the control panel. On the
display of the control the slider (small triangle) will automatically
position itself on the indication “ELECTRIC CURRENT”, in
the CDC and CDP models, on the indication “RELATIVE
HUMIDITY”, in the CDH and CDD models or on the indication “TEMPERATURE” on the model CDT.
Simultaneously, their measured value is being displayed.
If humidification is needed the green LED of “HUMIDIFY
ON” and the orange LED of “FILL” will light up on the control.
In the first case it is indicated that the machine is
humidifying because the power contactor is enabled, in
the second one, on the contrary, it is indicated that it is fill
water through the opening of the solenoid valve.
Una vez que el humidificador haya arrancado verificar:
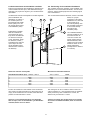
• que el distribuidor lineal de vapor, instalado en el
conducto, recoja bien los condensados y que la
conexión del tubo de vapor no tenga pérdidas ni haya
goteo dentro del canal, por problemas de condensación,
• después de unos minutos de funcionamiento, verificar
que no haya aparecido ninguna alarma en el display del
control,
• que el humidificador funcione sólo cuando el ventilador
de la central de tratamiento de aire esté en marcha,
• cuando esté excitada la válvula de llenado/vaciado, haya
una aportación de agua o un vaciado según el caso.
Once the humidifier has been started up check that:
• from the linear steam distributor, that is inserted in the
piping, come out the condensed water from the air bleeder
located in the distributor and there is no dripping in the
duct;
• after a few minutes of operation no alarm is shown on
the control display;
• the humidifier operates only where the fans of the unit
are active;
• when the fill/drain valve is excited, there is actually a
water inflow/outflow to/from the cylinder.
Note: When the water conductivity is less than 400µS, the
humidifier could reach full efficiency within a few hours.
Nota: Si la conductividad del agua fuese inferior a 400µS,
el humidificador puede necesitar varias horas para estar a
pleno régimen.
Funcionamiento humidificador sin regulación
externa
Functioning of the humidifier without external
regulation
N.B. Se recomienda seguir las operaciones siguientes
con el humidificador parado.
N.B. It is advisable to do the following operations with the
humidifier OFF.
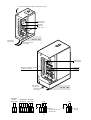
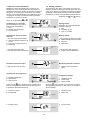
CDH desconectar la sonda - posicionar el microinterruptor 1 en ON los demas en OFF.
CDP desconectar el regulador modulante - posicionar
los microinterruptures 2,6 en ON, los demas en
OFF - hacer un puente entre los bornes 56-57 y
otro entre los bornes 58-59.
CDC desconectar el humidostato - verificar la posicion de
los microinterruptures 4,6 en ON; los demas en OFF
- hacer un puente entre los bornes 56-57 y otro entre
los bornes 58-59.
CDH disconnect the probe - position dip-switch 1 ON the
others OFF.
CDP disconnect the modulating regulator-position dip-switch
2.6 ON the others OFF – insert a jumper between
the terminals 56-57 and another one between the
terminals 58-59.
CDC disconnect the humidostat – check the positioning
dip-switch 4.6 ON and the others OFF – insert a
jumper between 56-57 and another between the
terminals 58-59.
27