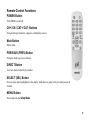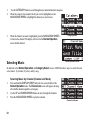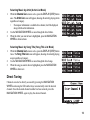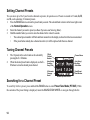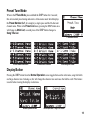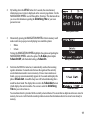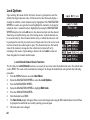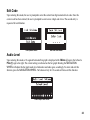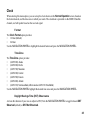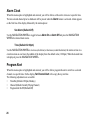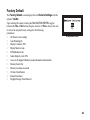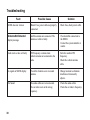
1
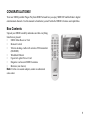
DISH Network
130885
SR200 User’s Guide
Warning and Attention Symbols
You must be aware of safety when you install and use this system. This User Guide provides various
procedures. If you do some of these procedures carelessly, you could injure or kill yourself or damage
equipment or property. Some other procedures require special attention.
The WARNING! symbol means that if you are not careful,
You could injure or kill yourself, or
You could damage equipment or property.
The ATTENTION! symbol means you should pay special attention to:
Important instructions for using the system, or
Important instructions for maintaining the system.
For Your Safety
Do not try to open the case of the receiver. There is risk of electrical shock, which may cause
damage to the receiver and/or personal injury or death to you. There are no user-serviceable
parts inside the receiver.
Opening the receiver case or making unauthorized changes will void the warranty.
To reduce the risk of fire or electric shock, do not expose this appliance to rain or moisture.
Safety Precautions
Warning
Take the following precautions to prevent traffic accidents and avoid personal injury:
•
•
•
•
•
•
•
•
•
•
Installation must be performed according to this installation manual. DISH Network is not
responsible for
issues arising from installations not performed according to the procedures in this manual.
Do not install the unit where it may obstruct your view through the windshield or of your
vehicle’s indicator
displays.
Do not install the unit where it may hinder the function of safety devices such as an airbag.
Doing so may
prevent the airbag from functioning properly in the event of an accident.
The installation and use suggestions contained in this manual are subject to any restrictions
or limitations
that may be imposed by applicable law—the purchaser should check applicable law for any
restrictions or
limitations before installing and/or operating this unit.
Failure to follow these safety instructions and warnings may result in a serious accident.
Warning
•
Do not operate the unit in a way that might divert your attention from driving safely. As a
driver, you alone are responsible for safely operating your vehicle in accordance with traffic
safety laws at all times.
i
Warning
Take the following precautions to prevent fire and avoid personal injury:
•
•
•
•
•
To avoid short circuits, never put or leave any metallic objects (coins, tools, etc.) inside the
unit.
If the unit emits smoke or strange smells, turn the power off immediately.
Do not drop the unit or subject it to strong shocks.
If the LCD display becomes damaged or broken, do not touch the liquid crystal fluid. The
fluid may be
dangerous to your health or even fatal. If the liquid crystal fluid contacts your body or
clothing, immediately wash it off with soap and water.
Caution
Take the following precautions to keep the unit in proper working order:
•
•
•
•
•
•
ii
Be sure the unit is connected to a 12V DC power supply with a negative ground connection.
Do not open the unit.
When replacing a fuse, use only a new one with the proper rating. Using a fuse with the
wrong rating may
cause the unit to malfunction.
To prevent a short circuit when replacing a fuse, first disconnect the wiring harness.
When drilling holes to mount the unit, make sure not to damage wiring or other systems on
the other side.
Caution
Take the following precaution while setting up your SR200:
Don’t push any buttons or perform any operations until updating has been completed. Once all
updated SIRIUS channels are received, the display will change to Call 1-888-539-SIRIUS to
Subscribe and will place you in SIRIUS Satellite Radio’s Preview Channel. Channel 184 is the
SIRIUS preview channel. You will not be able to tune to any other channels until you activate
your SIRIUS subscription.
Note
If the unit doesn’t seem to be working properly:
•
•
Turn the unit’s power off, wait 5 – 10 seconds, then turn the power on again.
If the unit still mis-operates, turn the unit’s power off, remove it from the cradle, wait 5 – 10
seconds, replace it in the cradle and turn the power back on. If the problem persists, consult
your dealer.
iii
Table of Contents
Box Contents .................................................................................................................................. 1
Quick Start Guide ........................................................................................................................... 3
Installation Instructions ................................................................................................................. 4
Installation in a Vehicle: Mounting the Antenna ......................................................................... 5
Installation in a Vehicle: Running the Antenna Cable ................................................................ 6
SR200 Controls and Features ....................................................................................................... 7
Remote Control Functions ............................................................................................................ 9
Installing Batteries in the Remote .............................................................................................. 10
Activating your SIRIUS Subscription ......................................................................................... 10
Removing SR200 from the Dock .................................................................................................. 11
Basic Operation ............................................................................................................................. 11
Menu Display Options .................................................................................................................. 19
SIRIUS ID ....................................................................................................................................... 20
Time Based Features ................................................................................................................... 24
Factory Default .............................................................................................................................. 29
Troubleshooting ........................................................................................................................... 30
Specifications ............................................................................................................................... 31
Cleaning the Unit .......................................................................................................................... 31
Warranty ......................................................................................................................................... 32
FCC Warning ................................................................................................................................. 35
iv
CONGRATULATIONS!
Your new SR200 portable Plug-n-Play from DISH Network lets you enjoy SIRIUS® Satellite Radio’s digital
entertainment channels. Use this manual to familiarize yourself with all of SR200’s features and capabilities.
Box Contents
Unpack your SR200 carefully and make sure that everything
listed here is present:
•
SR200 Main Receiver Unit
•
Remote Control
•
Vehicle docking cradle with wireless FM transmitter
(SR200DS)
•
Windshield Mount
•
Cigarette Lighter Power Cord
•
Magnetic roof-mount SIRIUS antenna
•
Batteries (not shown)
Note: For the car cassette adapter, contact an authorized
sales center.
1
Cigarette Lighter
Power Cord
Windshield Mount
Antenna
If anything is missing or damaged, or if your SR200 fails to operate, notify your dealer immediately. If your
SR200 was shipped to you directly, notify your shipper immediately. DISH Network recommends that you
retain the original carton and packing materials in case you need to ship your SR200 in the future.
Note: Do not put the SR200 in the docking station until you have completed the installation.
2
Quick Start Guide
After you have successfully installed the SR200 and activated your SIRIUS subscription, the Normal Operation
screen will appear. The SR200 has four ways to find music:
•
Select Music with the NAVIGATION WHEEL. Turn the NAVIGATION WHEEL to find channels
you like. When you stop turning the NAVIGATION WHEEL, the SR200 tunes to the selected
channel.
•
Select Music by Direct Tuning. Press the NAVIGATION WHEEL and then use the 0-9 buttons to
enter the channel you want to hear.
•
Select Music by Category:
1.
Press the CATEGORY button up or down to scroll through the various music and entertainment
categories.
2.
When the category (for example, Rock) you want is highlighted, turn the NAVIGATION WHEEL to
highlight the channel you want.
3.
Press the NAVIGATION WHEEL to select the channel.
•
Select Music by List Mode.
1.
Press and hold the DISPLAY (DISP) button for two seconds while in the Normal Operation mode to
display a List screen (Channel, Artist, and Song Title).
2.
Press the DISPLAY (DISP) button to scroll through the lists:
• Once to display the Channel List.
• Twice to display the Artist List screen.
• Three times to display the Song Title List screen.
3.
Turn the NAVIGATION WHEEL to scroll through the selected list.
4.
Press the NAVIGATION WHEEL to play the selection.
3
Installation Instructions
1.
2.
3.
4.
4
Determine where you want to mount SR200.
•
Do not install SR200 where it may obstruct your view through the windshield or your view of your vehicle’s
indicator displays.
•
Do not install SR200 where it will hinder your access to the vehicle’s controls.
•
Do not install SR200 where it may hinder the function of safety devices such as an airbag. Doing so may
prevent the air-bag from functioning properly in the event of an accident.
•
Find a location that provides good visibility of and access to SR200’s front panel.
•
Mount SR200 in a location on the windshield with the provided suction-cup mount.
Using the provided screws, assemble the docking station cradle to the windshield mount.
Plug the cigarette lighter power cord into the back of the cradle. Don’t plug the power cord into the cigarette lighter
until the installation is completed.
Tune your radio to one of four FM stations on the side of the vehicle dock.
Installation in a Vehicle: Mounting the Antenna
1.
2.
3.
4.
5.
6.
Temporarily plug the antenna into the ANT connector on the
back of the cradle until it is firmly seated.
Find an antenna location on a metal surface of your vehicle at
least 12" x 12", and at least 6" from a window.
•
Best reception is achieved with the antenna mounted on the
roof (trunk for convertibles).
•
If the vehicle has a roof rack or skid ribs, it may be
necessary to mount the antenna off-center.
The antenna’s powerful magnet will secure it to the metal
surface. Before routing the antenna cable, confirm that the
antenna is mounted in a good location.
Temporarily plug the cigarette lighter adapter into the cigarette
lighter.
Slide SR200 all the way into the cradle so that the connector at
the bottom of the unit makes proper contact in the cradle. Press the POWER button to turn SR200 on.
If your SR200 has been properly connected and the antenna is receiving the SIRIUS signal you will hear audio. If
you do not hear audio, the display will read Acquiring Signal. Reorient the antenna until you hear audio. See
Antenna Aiming on page 24 to use the ANTENNA SIGNAL screen to aim the antenna.
•
Make sure the vehicle is not in garage, or somewhere the satellite signal could be blocked.
5
Installation in a Vehicle: Running the Antenna Cable
1.
2.
3.
4.
5.
6.
6
Turn SR200’s power off and remove it from the cradle; unplug the cigarette lighter adapter from the cigarette
lighter; unplug the antenna from the cradle.
Route the cable from the antenna to the vehicle’s interior by tucking it underneath the rubber molding around rear
window, as shown below.
Route the cable from the lowest point of the rear window into the trunk. Take advantage of any existing cable
channels or wiring conduits.
•
For SUVs, minvans, and 5-door vehicles, bring the cable into the vehicle under the rubber molding for the
tailgate, and continue under the interior trim.
From the trunk, route the cable around the passenger compartment and to the back of the cradle.
•
Do not pull the wire across sharp edges that could damage it.
•
Keep the wire away from areas where it could become tangled in driver’s and passenger’s feet.
Plug the antenna into the back of cradle where it says ANT.
Plug the cigarette lighter adapter into the cigarette lighter.
Note: Do not leave the cigarette lighter adapter plugged in after you turn the vehicle’s ignition off.
SR200 Controls and Features
POWER Button
Turns SR200 On and Off; exits the Channel, Category,
Song and Artist List modes.
NAVIGATION WHEEL
Navigates through display screens and makes selections of
items highlighted on the display. Clockwise increases or
moves up in the menus. Counterclockwise decreases or
moves down in the menus. Press the NAVIGATION
WHEEL to makes selections.
CATEGORY Up/ Down Button
Navigates through Category List screen which displays
SIRIUS Channel Categories.
Display (DISP) Button
Changes text size of artist names and song titles.
Menu Button
Used to access menu options to make set-up and feature changes.
7
Preset Number Buttons (0-9)
Sets and selects preset channels.
Memory (MEMO) Button (S-Seek Function)
Saves and recalls artist names and song titles. You can store up to 20 artist/song title combinations.
Band Button (P.Tune)
Pressing and releasing switches between preset banks A, B, and C, which hold 10 presets each. Pressing and
holding enables Preset Tune Mode, which allows for viewing and listening of stored presets with turn of the
NAVIGATION WHEEL.
Remote Control Receiver
Receives signals from the included wireless remote control.
8
Remote Control Functions
POWER Button
Turns SR200 on and off.
CH+/ CH-/ CAT+/ CAT- Buttons
Navigate through channels, categories, and display screens.
Mute Button
Mutes audio.
PREVIOUS (PREV) Button
Navigates back to previous channel.
DIRECT Button
Accesses channels directly by number.
SELECT (SEL) Button
Press to select items highlighted on the display; hold-down to jump to the previously-received
channel.
MENU Button
Enters and exits the Setup Mode.
9
MEMORY (MEMO) Button
Saves and recalls Song and Artist information; sets Parental Lock code number.
DISPLAY Button
Changes text size of artist names and song titles.
BAND Button
Switches between preset bands A, B, and C.
Number Buttons (0-9)
Selects channels directly and by preset.
Installing Batteries in the Remote
1.
2.
3.
Remove the battery cover.
Install two AAA batteries.
Replace the battery cover.
Activating your SIRIUS Subscription
1.
2.
3.
10
Before you can listen to SR200, you must subscribe to SIRIUS Satellite Radio’s service.
Make sure that SR200 is properly connected and that its antenna is oriented to receive the SIRIUS satellite signal.
See Installation sections for details)
Press the POWER button to turn SR200 on. After displaying the SIRIUS logo, SR200 will update all SIRIUS
channels. The display will read UPDATING CHANNELS on the top line and X% Completed (0%-20%40%-60%-80%-100%) on the bottom line shall be displayed by the SR200 until the update completes.
4.
5.
6.
Note: Don’t push any buttons or perform any operations until updating has been completed. Once all updated
SIRIUS channel channels are received, the display will change to Call 1-888-539-SIRIUS to Subscribe and
will place you in SIRIUS Satellite Radio’s Preview Channel. Channel 184 is the SIRIUS preview channel. You
will not be able to tune to any other channels until you activate your SIRIUS subscription.
Press the MENU button to enter the Setup Mode. The SIRIUS ID Menu Option will be highlighted.
Push the NAVIGATION WHEEL to select SIRIUS ID. This will display your unit’s unique 12-digit SIRIUS ID
(SID) number. This SID number should also be available on the SR200 packaging. Write the number down and
have your credit card handy.
Contact SIRIUS on the Internet at: https://activate.siriusradio.com/ Follow the prompts to activate your
subscription.
•
You can also call SIRIUS toll-free at 1-888-539-SIRIUS (7474). The operator will instruct you.
Removing SR200 from the Dock
To remove SR200 from the docking station, press the button on the underside of the unit and gently slide SR200
out of the cradle. Replace it by sliding the unit all the way into the cradle so that the connector at the rear of the
unit makes proper contact in the cradle.
Basic Operation
After you have successfully activated your SIRIUS subscription, the Normal Operation screen will appear.
Use the NAVIGATION WHEEL to select channels.
The selected channel will automatically play the name and artist of the currently-playing song and will scroll
across the display. If you want to listen to a different entertainment category, push the CATEGORY button up or
down to activate the Category Select screen:
11
1.
2.
Use the CATEGORY button to scroll through music and entertainment categories.
When the category (for example, Rock) you want is highlighted, use the
NAVIGATION WHEEL to highlight the channel you want to hear.
3.
When the channel you want is highlighted, press the NAVIGATION WHEEL
to listen to the channel. The display will revert to the Normal Operation
screen for that channel.
Selecting Music
Category Screen
Normal Operation Screen
In addition to the Normal Operation and Category Select screens, SR200 has three ways to search for and
select music: by channel, by artist, and by song.
Selecting Music by Channel (Channel List Mode)
1.
2.
3.
12
Press and hold the DISPLAY (DISP) button for two seconds while in the
Normal Operation mode. The Channel List screen will appear, showing
all available channels regardless of category.
Use the UP and DOWN ARROW buttons to move through the channels.
Press the NAVIGATION WHEEL to play the selection.
Channel List Screen
Selecting Music by Artist (Artist List Mode)
1.
2.
3.
While the Channel List screen is active, press the DISPLAY (DISP) button
once. The Artist List screen will appear, showing all currently-playing artists
regardless of category.
•
If composer information is available for a channel, it will be displayed
along with the artist information.
Use the NAVIGATION WHEEL to move through the list of Artists.
When the Artist you want to hear is highlighted, press the NAVIGATION
WHEEL to listen to them.
Artist List Screen
Selecting Music by Song Title (Song Title List Mode)
1.
2.
3.
While the Channel List screen is active, press the DISPLAY (DISP) button
twice. The Song Title List screen will appear, showing all currently-playing
songs regardless of category.
Use the NAVIGATION WHEEL to move through the list of songs.
When the song you want to hear is highlighted, press the NAVIGATION
WHEEL to listen to it.
Song List Screen
Direct Tuning
Channels can also be directly accessed by pressing the NAVIGATION
WHEEL and using the 0-9 number keys to numerically enter the desired
channel. Once the desired channel number has been entered, press the
NAVIGATION WHEEL again to play the desired channel.
Direct Tuning Screen
13
Setting Channel Presets
You can store up to 30 of your favorite channels as presets, for quick access. Presets are stored in 3 banks, A, B,
and C, each containing 10 channel presets.
1. Press the BAND button to activate the preset bank you want. The selected bank is shown in the lower right corner
of the Normal Operation screen.
2. Select the channel you want to preset (see Basic Operation and Selecting Music).
3. Hold the number button you want to store the channel in for at least 2 seconds.
•
The selected preset number will flash and then remain lit on the display to show that it has been memorized.
•
If the preset button already has a channel stored in it, it will be replaced with the new channel.
Tuning Channel Presets
1.
2.
The 10 presets in the active bank can be selected by
pressing the 0 – 9 buttons.
When the desired preset bank is displayed, use the 0 –
9 buttons to tune the desired preset channel.
3-Digit
Channel
Number
Channel Name
Auto Sizing/
Scrolling
Song Title
Auto Sizing/
Scrolling
Artist Name
8-Character
Category
Name
Band/Preset
Bank Number
Normal Operation Screen
Searching for a Channel Preset
To search by list for a preset, press and hold the BAND button to enter Preset Tune Mode (P.TUNE). While
the contents of the preset listing is displayed, rotate the NAVIGATION WHEEL to navigate through the list.
14
Preset Tune Mode
When in the P.Tune Mode, press and hold the DISP button for 2 seconds;
this exits normal preset tuning and enters a 6-line menu mode which displays
the Preset Number (A-1, for example), a single space and the 20-character
channel name. While in the Preset List menu, pressing the DISP button once
will change to Artist List; a second press of the DISP button changes to
Song Title List.
P.Tune Mode Screen
P.Tune Channel List Screen
P.Tune Artist List Screen
P.Tune Song List Screen
Display Button
Pressing the DISP button from the Normal Operation screen toggles between the artist name, song title fields
and large character size. In doing so, this will change the character size and cause the field to scroll. This feature
is useful when viewing the display at a distance.
Normal Operation Screen
Normal Operation - Large Font Screen
15
Note: The field will scroll only if the length of the artist or title cannot be
viewed in its entirety.
Pressing and holding the DISP button will enter the channel list mode.
While in the Channel List mode, any subsequent press of the DISP button
will
display program information by Artist Name or Song Title. Pressing and
holding the DISP button will exit the Channel List mode and return to the
previously
selected tuning/display mode.
Channel List Screen
Memory Button (S-Seek Function)
This feature allows the user to capture and store the current program definition
text (PDT) (Artist and Song title) with a total of 20 listings (20 Artist/Song Title combinations). The unit
also has the capability to search the current incoming SIRIUS signal and alert the user when a saved song is
being played.
1. While the SR200 is in either of the two standard display modes, momentarily pressing and releasing the MEMO
button stores the current program data information within the SR200’s memory. A Memory Stored pop-up
screen, followed by X Used / Y Empty will each appear for 1 second.
Memory Stored Screen
16
Memory Used/Empty Screen
2.
By holding down the MEMO button for 3 seconds, the stored memory
information (one at a time) is displayed on the screen in page format. Use the
NAVIGATION WHEEL to scroll through the 20 entries. This function allows
you to recall information regarding the Artist/Song Title for your own
personal review.
Memory Select Screen
3.
4.
Momentarily pressing the NAVIGATION WHEEL while in memory recall
mode results in a pop-up screen displaying two selectable options:
•
Delete
•
S-Seek
Turning the NAVIGATION WHEEL highlights the options and pushing the
NAVIGATION WHEEL selects the option. The S-Seek option implies
S-Seek On/Off, with the default setting as S-Seek On.
Memory Recall Mode Screen
Each time the SR200 is turned on, it automatically searches the incoming
signal to determine if a match exists between the signal and the currently
saved information stored in receiver memory. If one or more matches are
found, a pop-up screen momentarily appears for 2 seconds and displays the
phrase S-Seek Alert. An audible beep tone will be heard indicating that a
match has been found. The display then reverts to the S-Seek Alert screen
which displays the current matches. You can now select the Artist/Song
S-Seek Alert Screen
Title that you wish to listen to.
No stored match alert is provided for the currently selected channel. To ensure that no duplicate entries are stored in
memory, the receiver will check the stored input data to ensure the information about to be stored is not already in
memory.
17
a.
5.
If one or more matches are found, a display list appears, and allows you to scroll through the list of songs
using the NAVIGATION WHEEL. Once a song is found, it can be selected by pressing the NAVIGATION
WHEEL, and the display will revert to either of the selected display modes.
b. If a selection is not chosen within 10 seconds after the last action, the screen will revert to the previously
selected display and tuning mode.
Note: Play of the current selection will continue until a new selection is made.
If the MEMO button is pressed to save a selection currently playing, and all
of the memory spaces are full, a prompt screen alerts you to the possibility of
accidentally overwriting a memory space with new information. If the
MEMO button is pressed to save a currently playing selection, and all of the
memory spaces are full, S-Seek Full will flash on the display for 1 second,
followed by a pop-up screen presenting the Replace/Cancel options. This
prompt allows you to make the following Replace/Cancel choices:
S-Seek Full Screen
a. By selecting Replace, the memory list will appear, and you can use
the NAVIGATION WHEEL to select the information that you would
like to overwrite with the new Artist/Song Title. After highlighting
the selected title in the list, press the NAVIGATION WHEEL to delete
the stored Artist/Song Title, and replace it with the updated
information.
b. By selecting Cancel, the prompt screen would disappear and revert to
the original screen.
S-Seek Repace/Cancel Screen
S-Seek Artist/Song Title Screen
18
S-Seek Stored Screen
Menu Display Options
To enter the Menu Options page, press and hold the MENU Button. The
Menu Options list will appear on the LCD display. Using the NAVIGATION
WHEEL, highlight the option you wish to adjust and press the NAVIGATION
WHEEL to make the selection. The following options are available:
•
SIRIUS ID
•
Display Settings
Menu Options Screen
•
Confirm Tone Settings
•
FM Transmitter Options
•
Add or Skip
•
Lock Options
•
Audio Level Options
•
Antenna Aiming
•
Memory Options
•
Time Based Features
•
Factory Default
If, while in the menu screen function, a button is not pressed within 10 seconds from the previously selected
function, the unit exits the menu screen function and reverts to the Normal Operation screen display.
19
SIRIUS ID
Displays your 12 digit SIRIUS ID number. No adjustments are allowed in this
mode. To exit this option, press the NAVIGATION WHEEL or MENU Button.
Display Settings
SIRIUS SID Screen
The following adjustments are possible:
Dimming Control
Contrast Control
To enter either of these modes, use the NAVIGATION WHEEL to highlight
the option you wish to adjust and the press the NAVIGATION WHEEL to
make the selection. Upon entering either of these modes, a 10 segment
horizontal bar graph is displayed with a Minus (-) sign to the left and a Plus
(+) sign to the right.
The current setting is indicated on the bar graph. Rotating the NAVIGATION
WHEEL adjusts the bar graph indication and function accordingly. To select
and exit this function, press the NAVIGATION WHEEL. No button activity
for 10 seconds will also exit this function.
Contrast Control Screen
Dimming Control Screen
20
FM Transmitter Options
The following adjustments are possible:
FM On/Off
Upon entering this mode, rotating the NAVIGATION WHEEL toggles
between the FM On or FM Off function/display selection. To select and exit
this function, press the NAVIGATION WHEEL. No button activity for 10
seconds will also exit this function.
Channel Add/Skip
Upon entering this mode, a channel list shall be displayed with the current
channel in play highlighted. Rotate the NAVIGATION WHEEL to navigate
the list and highlight the channel to be adjusted. Once a channel has been
highlighted, pressing the NAVIGATION WHEEL displays the text Skip next
to the channel, and prevents the channel from being accessible during any of
the tuning modes. Skipped channels can only be accessed either through
direct channel number entry or by returning to this menu and going through
the same process to return the skipped channel to the list. Adding a channel
will remove the text Skip from alongside the channel number/ name.
FM Transmitter Options Screen
Add or Skip Channels Screen
21
Lock Options
Upon entering this mode for the first time, the user is prompted to enter the
default four digit numerical code. All future entries into this mode display a
channel list with the current channel in play highlighted. The NAVIGATION
WHEEL is used to navigate the list and highlight the channel to be locked or
unlocked. Once a channel has been highlighted, pressing the NAVIGATION
WHEEL displays the text Lock next to the channel and prevents the channel
from being accessible during any of the tuning modes. Locked channels can
be accessed only by direct channel number entry, at which time the user will
be prompted to enter the previously stored 4-digit code. Once the correct code
has been entered, the audio begins to play. The channel returns to the locked
status if the channel is changed or the vehicle/unit is turned off (or by
returning to this menu). Upon adding a channel, the text Lock is removed
from alongside the channel number/name.
Lock Options Screen
Channel Lock Screen
Lock/Unlock Default Code Function
The first time the Lock/Unlock function is accessed, the user must enter the default lock code. The default lock
code is 0000. This code can be maintained or changed. To change the default lock code perform the following
procedure:
1. Press the MENU button to access the User Menu.
2. Rotate the NAVIGATION WHEEL to select the Lock Options.
3. Press the NAVIGATION WHEEL.
4. Rotate the NAVIGATION WHEEL to highlight Edit Code.
5. Press the NAVIGATION WHEEL.
6. Enter the default code 0000.
7. The New Code prompt will appear. Enter your new four digit code using the 0-9 number buttons. You will then
be prompted to confirm the new code by entering your code again.
8. The lock code is now changed.
22
Edit Code
Upon entering this mode, the user is prompted to enter the current four digit numerical lock code. Once the
correct code has been entered, the user is prompted to enter a new 4-digit code twice. The second entry is
requested for confirmation.
Lock Options Screen
Edit Lock Code Screen
Audio Level
Upon entering this mode, a 10 segment horizontal bar graph is displayed with a Minus (-) sign to the left and a
Plus (+) sign to the right. The current setting is indicated on the bar graph. Rotating the NAVIGATION
WHEEL will adjust the bar graph audio level indication and audio gain, accordingly. To select and exit this
function, press the NAVIGATION WHEEL. No button activity for 10 seconds will also exit this function.
Audio Output Level Screen
23
Antenna Aiming
Upon entering this mode, a 10 segment horizontal bar graph is displayed with a
Minus (-) sign to the left and a Plus (+) sign to the right. The current setting
is indicated on the bar graph. Moving the antenna location adjusts the bar
graph signal strength indication, thus ensuring optimum reception. To exit this
function, press the NAVIGATION WHEEL or MENU button.
Memory Options
Antenna Aiming Screen
In this mode, the user can turn the Memory Search Function (S-Seek) on or off. In addition, all 10
Memory Locations can be cleared. On the display, the top line displays the text Memory Options.
The following adjustment options are possible:
1. Automatic Memory Search function - On or Off. Use the NAVIGATION WHEEL to select between the two
options by highlighting the desired selection. Then press the NAVIGATION WHEEL to enter the option.
2. Clear all Memory Locations. Momentarily press the NAVIGATION WHEEL; a prompt display screen appears
confirming - Clear All Memory? Select Yes or No and press the NAVIGATION WHEEL.
Time Based Features
The following adjustments are possible:
•
Clock
•
Alarm Clock
•
Program Alert
•
Auto Shutdown
•
Sleep Mode
Upon entering this mode, rotate the NAVIGATION WHEEL to highlight the desired function and press the
NAVIGATION WHEEL.
Note: No button activity for 10 seconds will also exit the desired (highlighted) function.
24
Clock
When entering this menu option, you can set up the clock shown on the Normal Operation screen, based on
the format desired, and the time zone in which you reside. The clock data is provided via the SIRIUS Satellite
channel, and will update based on the received signal.
Format
The Clock Format option provides:
•
12 Hour (Default)
•
24 Hour
Use the NAVIGATION WHEEL to highlight the desired format and press the NAVIGATION WHEEL.
Time Zone
The Time Zone option provides:
•
(GMT-9:00) Alaska
•
(GMT-8:00) Pacific
•
(GMT-7:00) Mountain
•
(GMT-6:00) Central
•
(GMT-5:00) Eastern
•
(GMT-4:00) Atlantic
•
(GMT-3:30) Newfoundland (Abbreviated as GMT-3:30 Newfndlnd)
Use the NAVIGATION WHEEL highlight the desired time zone and press the NAVIGATION WHEEL.
Daylight Savings Time (DST) Observance
Activate this function if your area is subject to DST; Turn the NAVIGATION WHEEL to toggle between DST
Observed (default) or DST Not Observed.
25
Alarm Clock
When this menu option is highlighted and selected, you will be able to set the unit to turn on at a specific time.
The last selected channel prior to shutdown will be present when the Alarm feature is activated. Alarm appears
on the first line of the display followed by the alarm options:
Set Alarm (Default-Off)
Use the NAVIGATION WHEEL to toggle between Alarm On or Alarm Off and press the NAVIGATION
WHEEL for desired alarm status.
Time (Default-12:00pm)
Use the NAVIGATION WHEEL to increase (clockwise) or decrease (counterclockwise) the alarm set time in a
circular motion on one line in the middle of the display from the default value (12:00pm). When the desired time
is displayed, press the NAVIGATION WHEEL.
Program Alert
When this menu option is highlighted and selected, you will be able to program the unit to switch to a selected
channel at a specific time. On the display, Set Channel Alert will occupy the top text line.
The following adjustments are accessible:
•
Time/Day (Default-12:00pm, Monday)
•
Channel (Default-Currently Playing Channel)
•
Program Alert On/Off (Default-Off)
26
Time/Day
Rotating the NAVIGATION WHEEL toggles between Time and Day. If Time is selected, use the
NAVIGATION
WHEEL increase (clockwise) or decrease (counterclockwise) the set time in a circular motion on one line in the
middle of the display from the default value (12:00pm).
When the desired time is displayed, press the NAVIGATION WHEEL. If Day is selected, the screen displays a
default day of Monday, with selectable choices of Monday, Tuesday, Wednesday, Thursday, Friday,
Saturday or Sunday. Use the NAVIGATION WHEEL to increase (clockwise) or decrease (counterclockwise)
the desired day in a circular motion on one line in the middle of the display from the default value (Monday).
Channel
Rotate the NAVIGATION WHEEL to scroll through a listing of all the SIRIUS channels in a circular motion.
The listing should encompass all 6 available lines. When the desired channel is highlighted, press the
NAVIGATION WHEEL.
Program Alert On/Off
Rotate the NAVIGATION WHEEL to toggle between Program Alert On or Program Alert Off. When the
desired alert status is highlighted, press the NAVIGATION WHEEL.
Auto Shutdown
In this mode, you have the option of programming the unit to automatically shut off after a 1-hour period without
any user intervention. After 59 minutes of inactivity, a beep tone sounds, and a display prompt appears on the
screen stating Cancel Auto Shutdown.
27
Cancel Auto Shutdown
Press the NAVIGATION WHEEL to terminate the function temporarily.
The following options are available in this mode:
•
Enabled
•
Disabled (Default)
Rotate the NAVIGATION WHEEL to toggle between Enabled and Disabled. When the desired shut down
status is highlighted, press the NAVIGATION WHEEL.
Sleep Mode
In this mode, you have the capability of programming the unit to shutdown after a selected period of time. The
screen displays Sleep Mode on the top line, with optional time settings as follows:
•
Sleep Off
•
15 Minutes
•
30 Minutes
•
45 Minutes
•
60 Minutes
Rotate the NAVIGATION WHEEL to toggle through the desired sleep times. When the desired time is
highlighted, press the NAVIGATION WHEEL. The unit will now turn off after the selected time has expired.
28
Factory Default
The Factory Default screen displays the text Restore Settings with the
options: Yes/No.
Upon entering this mode, rotating the NAVIGATION WHEEL toggles
between the Yes or No function display selection. If Yes is chosen, the unit
reverts to the original factory settings for the following
parameters:
•
All Presets revert to empty
•
Auto Dimming On
•
Display Contrast to 50%
•
Display Mode to Auto
•
FM Modulator to On
•
Audio Output Level to 50%
•
Access to all skipped Channels (Locked channels remain locked)
•
Memory Search On
•
Memory Locations are erased
•
12 Hour Clock Format
•
Eastern Time Zone
•
Daylight Savings Time Observed
Factory Default Screen
29
Troubleshooting
Fault
Possible Cause
Solution
SR200 does not turn on
Blown Fuse, power cable not properly
connected.
Check fuse, check power cable.
Antenna Not Detected
display message
Satellite antenna not connected. The
antenna or cable is faulty.
Check satellite connection to
the SR200.
Contact the system installer or
vendor.
Audio static or loss of clarity
FM Frequency contains static.
Vehicle antenna not connected to the
radio.
Switch to another FM
frequency.
Check the vehicle antenna
cable.
No signal on SR200 display
Check for obstacles over or around
antenna.
Change location to eliminate
interference from nearby
objects.
No Sound
The audio cables are not connected.
The car radio is set on the wrong
frequency.
Check the audio cables.
Check the car radio’s frequency.
30
Specifications
Audio Output ..................................................................................................................... 2.2V (Peak-to-Peak)
Total Harmonic Distortion (THD) .......................................................................................................... <0.3%
Signal-to-noise (S/N) ........................................................................................................... Greater than 75dB
Fuse Requirement ...................................................................................................................... 3A Slow Blow
Power Supply ................................................................................................... 10-16V, Negative Ground, DC
Receiver Dimensions .............................................................................. 138mm(W) x 92mm(H) x 48mm(D)
..................................................................................................................... (5-3/8” W x 3-5/8” H x 1-7/8” D)
Receiver Weight ............................................................................................................................. 311g (11oz.)
Remote Control Dimensions .................................................................. 49mm(W) x 164mm(H) x 30mm(D)
........................................................................................................................ (1-7/8”W x 6-3/8”H x 1-1/8”D)
Remote Control Battery Requirements ........................................................................................... 2 x “AAA”
Cleaning the Unit
If the unit becomes dirty, turn its power off and wipe it clean with a soft dry cloth. Do not use hard cloths or
paint thinner, alcohol, or other volatile solvents to clean the unit. These may cause damage or remove indicator
characters.
31
Limited Warranty
This Limited Warranty is a legal document. Keep it in a safe place. Remember to retain your
Bill of Sale for warranty service! Any items returned without a copy of the Proof of Purchase
will be considered out of warranty.
What the Warranty Covers
This warranty extends only to the original user of the equipment and is limited to the purchase price of each part.
EchoStar Technologies Corporation and its affiliated companies (“EchoStar”) warrant this system against defects
in materials or workmanship as follows:
Labor: For a period of one (1) year from the original date of purchase, if EchoStar determines that the
equipment is defective, subject to the limitations of this warranty, it will be replaced at no charge for labor.
EchoStar warrants any such work done against defects in materials or workmanship for the remaining portion of
the original warranty period.
Parts: For a period of one (1) year from the original date of purchase, EchoStar will supply, at no charge, new
or remanufactured parts in exchange for parts determined to be defective, subject to the limitations of this
warranty. EchoStar warrants any such replacement parts against defects in materials or workmanship for the
remaining part of the original warranty period.
Note: “Parts” means items included in this system, which may include a receiver, antenna, cradle, and remote
control. It does not include other parts purchased separately.
32
What the Warranty Does Not Cover
This warranty does not cover installation of the system. If applicable, such installation will be warranted under a
separate installation agreement.
This warranty does not cover consumer instruction, physical setup or adjustment of any consumer electronic
devices, remote control batteries, signal reception problems, loss of use of the system, or unused programming
charges due to system malfunction. This warranty does not cover the elimination of externally generated static or
noise, correction of antennae problems, costs incurred for installation, removal or reinstallation of the product, or
damage to tapes, compact discs, speakers, accessories, or vehicle electrical systems
This warranty does not cover cosmetic damage, damage due to lightning, electrical, battery leakage, fire, flood,
or other acts of Nature, accident, misuse, abuse, repair or alteration by other than authorized factory service, use
of accessories not recommended by the receiver manufacturer, negligence, commercial or institutional use, or
improper or neglected maintenance.
This warranty does not cover equipment sold AS IS or WITH ALL FAULTS, shipping and handling, removal or
reinstallation, shipping damage if the equipment was not packed and shipped in the manner prescribed, nor
equipment purchased, serviced, or operated outside the continental United States of America.
33
Legal Limitations
REPLACEMENT AS PROVIDED UNDER THIS WARRANTY IS YOUR EXCLUSIVE REMEDY.
ECHOSTAR SHALL NOT BE HELD LIABLE FOR ANY INCIDENTAL OR CONSEQUENTIAL
DAMAGES FOR BREACH OF ANY EXPRESSED OR IMPLIED WARRANTY ON THIS SYSTEM, NOR
FOR ANY INCIDENTAL OR CONSEQUENTIAL DAMAGES RESULTING FROM THE USE OF, OR
INABILITY TO USE, THIS SYSTEM. UNDER NO CIRCUMSTANCES SHALL ECHOSTAR’S LIABILITY,
IF ANY, EXCEED THE PURCHASE PRICE PAID FOR THIS SYSTEM. EXCEPT TO THE EXTENT
PROHIBITED BY APPLICABLE LAW, ANY IMPLIED WARRANTY OF MERCHANTABILITY OR
FITNESS FOR A PARTICULAR PURPOSE ON THIS SYSTEM IS LIMITED IN DURATION TO THE
PERIOD OF THIS WARRANTY. ECHOSTAR RESERVES THE RIGHT TO REFUSE TO HONOR THIS
WARRANTY IF ECHOSTAR DETERMINES ANY OF THE ABOVE EXCEPTIONS TO HAVE CAUSED
THIS SYSTEM NOT TO HAVE PERFORMED PROPERLY. THIS WARRANTY SHALL BE VOID IF ANY
FACTORY APPLIED IDENTIFICATION MARK, INCLUDING, BUT NOT LIMITED TO, SERIAL
NUMBERS AND SIRIUS IDENTIFICATION (SID) OR ELECTRONIC SERIAL (ESN) NUMBERS HAVE
BEEN ALTERED OR REMOVED. THIS WARRANTY SHALL ALSO BE VOID IF THE SYSTEM HAS
BEEN OPENED BY AN UNAUTHORIZED PERSON.
If You Need Assistance
1.
2.
3.
4.
34
Call the Customer Service Center at 1-866-247-8028. Have the date of purchase, the receiver model number, and
the SID or ESN number from the back of the receiver ready.
A Customer Service Representative will assist you.
If the Representative determines you should return any equipment, you will be directed to call a Return
Authorization representative. Before shipping any equipment, you must talk to a Return Authorization
representative and must obtain a Return Authorization (RA) number.
You will be given the appropriate address for which to return your equipment. Whether under warranty or not, you
will be responsible for the cost of shipping back the defective equipment.
5.
6.
Returned equipment must be packaged properly, using either the original shipping materials or the packaging in
which the replacement equipment is shipped. Include a copy of the Bill of Sale. Any items returned without a copy
of the Proof of Purchase will be considered out of warranty. Follow the instructions given to you by the Customer
Service Representative.
Write the RA number in large, clearly visible characters on the outside of the shipping box that you use to return
the equipment. To avoid confusion and misunderstandings, shipments without an RA number clearly visible on the
outside of the box will be returned to you at your expense.
FCC Warning
This equipment may generate or use radio frequency energy. Changes or modifications to this equipment may
cause harmful interference unless the modifications are expressly approved in this User Guide. The user could
lose the authority to operate this equipment if an unauthorized change or modification is made.
Note: This equipment has been tested and found to comply with Part 15 of the FCC Rules. These rules are
designed to provide reasonable protection against harmful interference in a residential installation. This
equipment may cause harmful interference to radio communications if it is not installed and used in accordance
with these instructions. However, there is no guarantee that interference will not occur in a particular installation.
If this equipment does cause harmful interference to radio or television reception, which can be determined by
turning the equipment off and on, the user is encouraged to try to correct the interference by one of more of the
following measures:
•
Reorient or relocate the receiving antenna.
•
Increase the separation between the equipment and receiver. Connect the equipment into an outlet on a circuit
different from that to which the receiver is connected.
•
Consult the dealer or an experienced radio/TV technician for help.
35
Notes
36
Copyright © 2004
EchoStar Technologies Corporation
Englewood, Colorado 80112
All rights reserved.
The information in this Guide may change without notice.
We may issue revisions to tell you about such changes.
Send any comments or questions to:
EchoStar Technologies Corporation,
Technical Publications, 94 Inverness Terrace East,
Englewood, Colorado 80112
Part Number: 130885
DISH Network is a registered trademark of EchoStar Satellite L.L.C. For information about DISH Network, visit
our website at www.dishnetwork.com.
37