1
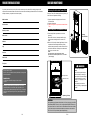
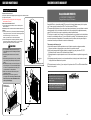
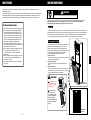
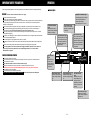
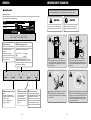
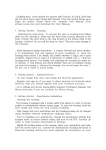
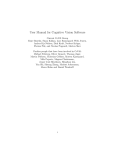
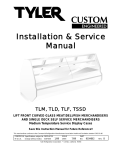
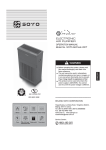
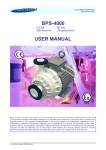
6
Phase
Electronic Air Purifier
Operation Manual
Model No. RespirAide301F
R
R
SERVICE
Manual
Timer
13-100 Hanlan Road
Woodbridge, Ontario Canada
L4L 4V8
Tel: 1-866-874-2532
Fax: 1-905-850-5553
www.respiraide.com
Remote control Button melody
Filter & UV lamp Safety switch
replacement alarm
de Tech
Ai
RespirAide Tech Inc.
Auto
Check alarm
WARNING
Before operating the system, please read this
manual thoroughly, and retain it for future
reference.
This product can be used only where the
power supply is 120V/60Hz. You can not use
the unit if the power voltage is different.
To reduce the risk of electric shock, this
equipment has a grounding type plug
that has a third (grounding) pin. This
plug will only fit into a grounding type
power outlet. If the plug does not fit into
the outlet, contact a qualified person to
install the proper outlet. Do not alter the
plug in any way.
RespirAide Tech Inc.
R
C
RespirAide reserves the right to revise or modify products and/or specifications
without notice.The contents of this manual are subject to change without notice.
R
301-0710-1-500 Rev.1
US
ISO9001
13-100 Hanlan Road
Woodbridge, Ontario Canada
L4L 4V8
Tel: 1-866-874-2532
Fax: 1-905-850-5553
www.respiraide.com
**RespirAide is a trademark of RespirAide Tech Inc.
R
ENGLISH
RTI
Sensor
c. Respi
r
In
. Resp
c
i
In
de Tech
i
rA
Negaive ion
generator
Yellow green
IONIZER
COLLECTOR
Electronic cell
Black
Red
Black
Green
E-23
Red
Red
Red
Pink White
Speaker
Fan motor
Red
UV lamp and ballast
Black
Red
HVG
Yellow green
Electrostatic
Discharge switch
Y.green
Wiring diagram
Black
ENGLISH
White
White
White
Gray
Blue
Green
Green
JZ3
White
Black
Fuse
TRANSFORMER
JZ2
JZ5
LED DISPLAY PANEL
Main Circuit Board
Green
Gas sensor
Interlock switch
Interlock switch
120V/60Hz
Stepping Motor
Dust sensor
WIRING DIAGRAM
TROUBLESHOOTING
The system does not
operate at all
When functions do not
work
Automatic function
does not work properly
When other problems
in terms of functions
are found
Power failure?
Check other electrical appliances.
Power plug disconnected?
Make sure to insert the plug.
The FUSE out of order?
Replace the FUSE with new one.
Front panel open or Interlock switch
failure?
The unit does not operate when the front panel is
detached. Install properly. Check Interlock switch.
Is the CHECK light flashing?
If so, call the Customer Service.
There is too much dust on the
Pre-filter, electronic cell, carbon filter?
Clean the filter or replace it.
There is too much dust on the
electronic cell?
Wash it and dry completely before installing it.
The air inlet or outlet blocked?
Get rid of foreign materials around the product.
There is too much dust on the
sensor?
Remove dust on the sensor.
There is no dust on the sensor.
Call the Customer Service.
Check the problems first and then unplug the power cord. Call the Customer Service to
ask for after-sale service or make inquiries.
E-22
BEFORE OPERATING,
READ ALL INSTRUCTIONS IN THIS MANUAL
CAREFULLY.
CONTENTS
FOR CUSTOMER ASSISTANCE .............................. E-4
CONSUMER LIMITED WARRANTY .......................... E-5
HOW IT WORKS .................................................. E-6
FEATURES AND SPECIFICATIONS ......................... E-7
IMPORTANT SAFETY PRECAUTIONS ..................... E-8~11
WARNING ........................................................................ E-8
CAUTIONS CONCERNING OPERATION ...................... E-8
PART NAMES AND DESCRIPTION ......................... E-12~13
UNIT CONTROL PANEL ....................................... E-14
BEFORE OPERATING .......................................... E-15
Remote Control Setup ................................................... E-15
OPERATION ....................................................... E-16~18
Main Unit Operation ........................................................ E-16
Indicator Lights ................................................................. E-17
Remote Control Operation ................................................ E-18
CARE AND MAINTENANCE .................................. E-19~21
Main Unit .......................................................................... E-19
Cleaning the Pre-filter ..................................................... E-19
Cleaning the Electronic Cell ............................................ E-20
Replacing the Activated Carbon Filter ............................. E-21
Photo catalytic Filter and UV Germicidal Lamp ............... E-21
TROUBLESHOOTING .......................................... E-22
WIRING DIAGRAM .............................................. E-23
E-3
ENGLISH
Before calling for repair, please review the list below, since the problem may not be a unit malfunction.
FOR CUSTOMER ASSISTANCE
CARE AND MAINTENANCE
If you have questions about your air purifier, call the customer service number. Before calling, please note the
model and serial number located on the back of the unit and fill in the following information below. This information
will help us answer your questions much more quickly.
Model number
Replacing the Activated Carbon Filter
When the "Filter Life" indicator light flashes in yellow, you
have 50 hours of operation remaining.
1) Stop the operation and unplug the cord from the
electrical outlet.
2) Open the front panel.
3) After removing the cell, pull out the Activated Carbon
Filter.
Serial number
R
Photo catalyst & UV Germicidal Lamp
Date of purchase
1.Photo catalytic filter is permanent, never needs
replacing.
When there is dust on it, clean the dust off using a
vacuum cleaner dusting brush. Do not wash it in
water.
2.When the "UV Lamps" indicator light flashes, it is time
to replace the Ultraviolet germicidal lamp. Gently
rotate the lamp a quarter turn in either direction until it
unlocks from the socket. Pull the pins out the sides of
the socket, one end at a time.
Dealer name
Address
City
Replacing
the Carbon Filter
Postal code
ENGLISH
NOTE:
1)Do not wash the photo catalyst filter in water.
2)Do not look at the UV lamp when it is lit, it can cause
personal injury.
Province
Telephone
WARNING
Phone:1-866-874-2532
Write:For service problems, warranty information, missing items
and other assitance:
Photo catalytic Filter
RepirAide Tech Inc.
13-100 Hanlan Road Woodbridge, Ontario Canada
L4L 4V8
UV Germicidal Lamp
Please provide the following information when you write or
call:model number, serial number, date of purchase, your
complete mailing address(including Postal Code), your daytime
telephone number(including area code) and description of the
problem.
Germicidal Light Radiation
Hazard
Never look directly at UV lamp or
place face directly on outlet grill.
Direct exposure to germicidal light
can cause temporary or chronic
damage to your eyesight, or even
blindness.
Always unplug the unit before
cleaning, servicing or replacing the
UV lamp.
Replacing UV lamp
CAUTION
After replacement of Activated Carbon filter or UV lamp, be sure to press Filter
Reset Button(RESET1 Button) or UV Lamp Reset Button(RESET2 Button) on
the remote control for 12 times. Once the Reset Buttons have been activated,
you will hear a beep sound that means that the unit has been reset and the
Filter Life or UV Lamp indicator lights will stop flashing.
E-4
E-21
CARE AND MAINTENANCE
CONSUMER LIMITED WARRANTY
Cleaning the Electronic Cell
RespirAide AIR PURIFIER
LIMITED WARRANTY
Remove the electronic cell
a) Stop the operation and unplug the power plug from the electrical outlet.
b) Open the front panel.
c) After removing 2 cell clips, pull out the cell graping
the handels on the cell.
How to clean the electronic cell
a) Use a large enough container, such as a laundry tub or
trash container.
RespirAide Tech Inc. (hereinafter called RTI) gives you the following limited warranty for this product
only if it was originally purchased from RTI or from an Authorized RTI Dealer.
RTI warrants that this product is free, under normal use and maintenance, from any defects in material
and workmanship. If any such defects should be found in this product within the applicable warranty
period.RTI shall, at its option, repair or replace the product as specified herein.
RTI will repair or replace, free of charge, to the original purchaser, any part that is found to be defective
in material or workmanship within one (1) year of the date of purchase. This limited warranty does not
cover the replacement of expendable or consumable parts such as filters, and other parts subject to
normal wear unless they are defective in material or workmanship.
R
R
b) Dissolve about 3/4 cup of automatic dishwasher detergent
in enough hot water to cover the cell. If the detergent does
not dissolve readily, or form a scum on the
water, try another brand, or use softened water.
c) After the detergent has completely dissolved, place the
cells in the container and let soak for 15 to 20 minutes.
Agitate up and down a few times, and remove.
CAUTION
1. Do not splash the detergent solution in eyes.
Wear rubber gloves to avoid detergent contact
with skin.
2. Keep detergent and solution out of reach of
children.
3. When cleaning be careful not to cut your hands
on the ionizing wire. (Wearing rubber gloves is
safer.)
4. Be careful not to snag or cut the ionizing wire. If
the ionizing wire is cut, have the dealer replace
it. If the unit is operated with the ionizing wire
cut, there will be no dust collection.
5. Slide in the cell so the airflow arrow points
toward the machine.
6. After cleaning, make sure to dry the cell
thoroughly before reinstalling. If the cell or Prefilter is wet, it can cause breakdown of the
unit or personal injury.
+
+
+
+
Cell Clips
+
+
Removing the cell
Washing cell at car wash
This warranty shall not apply to:
(A) Any defects caused or repairs required as a result of abusive operation, negligence,accident,
improper installation or inappropriate use as outlined in the operation manual.
(B) Any product tampered with modified, adjusted or repaired by any party other than RTI, RTI
Authorized Service Centers or RTI Authorized Service Dealers.
(C) Damaged caused or repairs required as a result of the use with items not specified or approved by
RTI.
(D) Any damage caused by external or enviromental conditions, including but not limited to the use of
voltage other than indicated on the product.
RTI's limited warranty is valid only if you retain proof of purchase from RTI or an RTI Authorized Retail
Dealer for this product.
To obtain the name and address of the nearest
Authorized RespirAide Dealer, please contact:
13-100 Hanlan Road, Woodbridge, Ontario
Canada L4L 4V8
R
RespirAide Tech Inc.
+
+
Washing cell
in the container
For more information on this Warranty, Dealer or
Service Locations, please call1-866-874-2532
Visit our website: www.respiraide.com
+
+
+
+
E-20
E-5
ENGLISH
NOTE: Sharp corners on the cells can scratch the surface of a
bathtub.
Congratulations on your investment
HOW IT WORKS
CARE AND MAINTENANCE
The air purifier functions as an air cleaner by helping to disinfect airborne microorganisms and removing
particulates from the air.
The centrifugal fans of the unit draw air through the front panel (Intake) on the front of the unit. Then it passes
through the Microbiologic filter, the Electrostatic precipitator, the Activated Carbon Filter and the UV-Photo
catalytic sterilization chamber. The purified air is then realeased through the outlet on the top of the unit.
WARNING
To reduce risk of electric shock always unplug before maintenance.
To maintain optimum performance of this air purifier, please clean the unit including the filters periodically.
When cleaning the unit, be sure to unplug the power cord, and never handle the plug with wet
hands. Electrical shock and/or bodily injury may occur as a result.
1. The Microbiologic Pre-filter traps large dust particles.
2. The two stage electrostatic precipitator (Electronic
cell) captures airborne particles, as small as 0.01
microns. In the ionizing section of the electronic cell,
billions of microscopic particles become electrically
charged as they pass through the powerful electric
field. The collector plates immediately attract and
collect these charged dust and dirt particles.
3. The Activated Carbon Filter absorbs and reduces
odors, chemicals and gases, removes tobacco smoke,
the smell of food and other odors.
4. The UV sterilization chamber kills bacteria and viral
micro-organisms such as influenza, TB and
Legionnaire's Disease as well as other harmful
contaminants.
5. When UV light hits the photo catalytic filter, it creates
e- and h+, which have an excellent effect in the
decomposition of odors.
6. The unit also generates negative ions that freshens
the room air.
Main Unit
To prevent dirt or stains on the main unit, clean as often as necessary. If stains are allowed to remain, they may
become difficult to remove. Wipe with a dry, soft cloth for stubborn stains or dirt, use a soft cloth dampened with
warm water. Do not use volatile fluids, Benzene, paint thinner, polishing powder, this may damage the surface.
Do not use detergents, detergent ingredients may damage the unit. Keep the unit away from water.
Cleaning the Pre-filter
To assure optimum performance the Pre-filter and electronic
precipitator must be cleaned regularly-every one to six
months. Washing frequency will vary depending on the
number of family members, pets, activities( such as cooking
or woodworking) and smoking habits. Use the wash
reminder schedule provided with the air purifier.
1.Open Front Panel
Hold the front panel upper portion( left and right side) and
pull the front panel toward you.
2.Remove the Pre-filter
Remove by pulling out in front while holding the front
panel.
3.Clean the Pre-filter
After using a vacuum cleaner to remove any dust, clean
with water.If it is very dirty, use a soft brush or a neutral
cleaner to clean then dry well in the shade.
R
ENGLISH
The air is cleaned in six stages:
WARNING
During maintnance, be
careful not to tip over
the unit. It may cause
personal injury.
Pull out
the Pre filter.
After cleaning, make
sure to dry the Prefilter thoroughly before
reinstalling. If the prefilter is wet, it can
cause a breakdown of
the unit or personal
injury.
Metal Mesh
Pre filter
E-6
E-19
Operation available with
the Remote Control:
.Fan Speed
.Operation time Setting
.Auto
.UV Lamp On/Off
.Negative Ion On/Off
.RESET1
.RESET2
Remote Control Operation
Night Button
When pressed,all the indicator
lights on the display panel will
go out.
Power (ON/OFF) Button
The unit will start operating when
the POWER Button is pressed.
Pressing the button again will stop
operation.
Transmitter
Speed Button
The fan speed can be
switched among Low,
Medium and High settings.
Power
Swing Button
When pressed,the louver
will swing horizontally.
Night
Speed
Timer
Swing
Auto
UV Lamp
Neg.Ion
RESET1
RESET2
**The indicator light shows
the set time.
1hr-2hr-3h......10hr-11hr-12hr
Cancel
Auto Button
At AUTO mode, the fan
speed is automatically
switched (H, M, L)
depending on the
amount of pollution in
the air.
Neg.Ion Button
When pressed, the
generation of ions will
cease and the Negative
ion generator light on
the control panel will go
out.
UV Lamp Button
When pressed,UV lamp
will go out.
RESET1 Button(Filter Reset Button)
After replacement of Activated Carbon Filter,
make sure to press the button 12 times for
initialization.
Before pressing the Filter Reset Button, be
sure that the unit is plugged in.
Timer Button
The set time switches every
time the button is pressed as
shown below.
RESET2 Button(UV Lamp Reset Button)
After UV lamp replacement, ensure to
press the button 12 times for initialization.
Before pressing the Filter Reset Button, be
sure that the unit is plugged in.
Remote Control Use
1.Operate with the remote control facing the main unit receiver.
2.The signal range is about 19 feet (6 m).
3.Make sure there are no objects blocking the path of the signal.
4.Avoid dropping or damaging the remote control.
5.Do not use it in high humidity conditions or in direct sunlight or near a heat source.
E-18
FEATURES AND SPECIFICATIONS
FEATURES
Multi-Stage Filters
The unit utilizes a two stage electrostatic precipitator combined with a Microbiologic Pre-filter (for large
particles), an Activated Carbon Filter (for odors and gases), UV germicidal light (killing airborne pathogen),
a Photo catalytic filter (removes VOC's) and a Negative ion generator.
Automatic Function
The gas sensor(odor sensor) can let the unit automatically select the appropriate fan speed depending on
the air quality detected.
Filter and UV Lamp Replacement Indicator
The "FILTER" and "UV LAMP" replacement indicators tell you when to replace the Activated Carbon Filter
and the UV lamp.
Safety Micro-Switch (Interlock Switch)
This air purifier is equipped with a safety interlock switch (Micro-safety switch) that will turn the unit off if
the front panel is removed while the unit is running.
Easy Maintenance and Low Cost
When the electrostatic precipitator(Electronic cell) needs to be washed or the filters need to be replaced,
simply open the front panel and lift out the electronic cell or old filters and drop the new or clean one in.
No screws, hooks or tools are required. The electronic cell captures small particles on aluminum plates
that are simply rinsed off in the sink. There are no expensive filters to replace.
SPECIFICATIONS
ENGLISH
OPERATION
Model No.
RespirAide 301F
Power Requirement
120V,60Hz,1.1A
Rated Power
130W
Fan Motor
120V,60Hz,0.8A
Fan Speed CFM
H-300,M-135,L-88
Applicable Floor Surface
1 air exchange per hour: 2257 sq.ft.
(Ceiling height 8')
2 air exchanges per hour: 1129 sq.ft.
5 air exchanges per hour: 451 sq.ft.
19 air exchanges per hour: 10 x 12 sq.ft.
*The applicable floor surface area is appropriate for operating the unit at maximum fan speed.
Noise Level
<55dB
Negative Ion
>1.2x10⁶pcs/cc
UV Lamp
6Wx2
Cord Length
2.5m (8.3 ft)
Dimensions
153cm(H)x45cm(W)x28cm(D)
Weight
38kg
Standby Power
In order to operate the electrical circuits while the power plug is inserted in the wall outlet, this product
consumes about 2W of standby power. For energy conservation, unplug the power cord when the unit
is not in use.
E-7
When using electrical appliances, basic safety precautions should always be followed, including the following:
OPERATION
Indicator Lights
WARNING -To reduce the risk of electrical shock, fire or injury:
Use only as described in this manual.
Use only a 120-volt outlet with a polarized receptacle.
The air purifier has a polarized plug (one blade is wider than the other), this plug will fit in a polarized outlet only
one way. Initially, if the plug does not fit into the outlet, reverse it. If it still does not fit, contact a qualified
electrician or service person.
Do not use the air purifier if the power cord or plug is damaged or the connection to the wall outlet is loose.
When removing the power plug, always hold the plug and never pull by the cord. Do not handle plug or
appliance with wet hands. Electrical shock and/or fire from short circuit may occur.
Remove the power plug from the wall outlet before cleaning the unit and when not using the unit. Turn off all
controls before unplugging.
If the power cord is damaged, it must be replaced by the manufacturer, its service agent, RespirAide authorized
service or similarly qualified person.
Do not insert fingers or foreign objects into the intake or air outlet.
The batteries must be removed from the remote control before disposal, and the batteries must be disposed of
safely.
Keep hair, loose clothing, fingers and all parts of body always from openings and moving parts.
Do not use appliance in an enclosed space where oxygen, flammable, explosive or toxic vapors are
given off by oil base paint, paint thinner, some mothproofing substances, or in an area where
flammable dust is present.
CAUTIONS CONCERNING OPERATION
Do not block the intake and air outlet.
Do not use the unit near or on hot objects, such as range or where it may come into contact with steam.
Do not use the unit on its side.
Always hold the handles on the side of the unit when moving it.
Holding the front panel when carrying may cause it to detach, and result in bodily harm.
Be careful not to tip over the unit when maintaining the unit. If not, it may cause bodily harm.
Do not operate the unit without filters.
Do not wash and reuse the Activated Carbon Filter.
Do not clean outside with paint thinner or any chemicals. The unit surface may become damaged or
may cause fire.
Timer Indicator Light
When the Timer button
pressed, the indicator light
will light up.
Air Pollutant Indicator
Light
When the power plug is
inserted into the outlet the
indicators will light up.
Filter Indicator Light
The 6 yellow bars indicate
the remaining time for
cabon filter.When the Filter
life indicator light flashes
,the carbon filter needs to
be replaced.
Speed Indictator Light
When the power is on, the
unit is set at the L speed
indicator light,select the
speed by pressing the
Speed button.
Night
Night Indicator
Light
When the Night
button on the
remote control is
pressed the light
will light up.
Negative Ion Indicator Light
When the power plug is inserted
into the electrical outlet, the
indicator light will light
up.Pressing again will go out.
Gas Level
Timer
Dust Level
Auto Indicator Light
When the unit is at Auto
mode, the light will light
up.
Auto
Swing
M
L
Speed
hr
H
Filter Life
Negtive Ion
UV Lamps
Check Unit
L-R
Swing Indicator Light
When the Swing button
pressed, the light will light
up.
UV Lamp Indicator
Light
When the power is on
the light will light up.
when the indicator
light flashes, it tells the
time for UV lamp to be
replaced.
Check Indicator Light
When the high voltage
system cause a problem it
will flash red.
E-8
E-17
ENGLISH
IMPORTANT SAFETY PRECAUTIONS
OPERATION
IMPORTANT SAFETY PRECAUTIONS
Main Unit Operation
Connect the Power
When the power plug is inserted into the wall outlet all the indicators on the display panel will light up for 2
seconds.(As shown in the diagram below)
Night
Speed
Timer
Dust Level
Auto
Power
Swing
Speed
1.Operate the Unit
Press the Power(On/Off) button
to start operating the unit.Press
the button again will stop
operation.
NOTE:When the power is
connected, the "Gas Level" and
"Dust Level" indicator lights will
flash for 3 minutes.
Power
2
Speed
.Manually Switch the Airflow
Rate
Each time the Speed button is
pressed the airflow rate changes
as shown below:
L(Low)------M(Medium)-----H(High)-----L(Low)... ...
hr
Filter Life
Negtive Ion
UV Lamps
Check Unit
WARNING
If you do not follow these instructions
exactly, the unit may cause property
damage, personal injury or loss of life.
CAUTION
If you do not follow these instructions
exactly, the unit may cause minor
property damage or personal injury.
L-R
Timer
Swing
Auto
3.Setting the Operation Time
Press the "TIMER" Button to select the time
for operation. Each time it is pressed the timer
setting switches as shown below:
120V
"1hr"-"2hr"-"3hr"----"11hr"-"12hr"
(Cancel)
NOTE: When the set time is reached, the
operation will automatically stop. The set
time can be changed if the button is pressed
while the unit is operating.
Timer
4.Press Swing Button
When the Swing button
is pressed, the louver of
the unit will swing
horizontally.Pressing the
button again will stop
swing.
E-16
Swing
Do not do anything that could damage the
electrical power cord. Do not set heavy items on
the cord or place the cord between items. If the
electrical power cord is damaged, fire or electric
shock may occur.
Do not use the power cord if it is damaged or
loose in the socket. Using the power cord in
anything but proper working condition can lead
to short-circuits and subsequently electric shock
and/or fire.
Use the plug provided exclusively for the product.
Connecting the system in an improper power
source may cause electric shock or a breakdown
of the system.
If the power plug is unplugged,be sure to hold and
pull out the end of the power plug without holding
the power cord. Do not pull on the power cord to
remove the plug from the wall outlet. There is a
chance that an electrical shock or short- circuit
may occur causing a fire.
Auto
5.Press Auto button
The fan speed is automatically
switched(HIGH, MEDIUM, LOW)
depending on the amount of
pollution in the air. The Gas and
Dust sensor detects the pollution
and automatically sets the fan
speed for efficient air purification.
E-9
English
Gas Level
H
M
L
This manual classifies precautions into WARNINGS and CAUTIONS. Be sure to
to follow all precautions below: They are important for ensuring your safety.
IMPORTANT SAFETY PRECAUTIONS
BEFORE OPERATION
Remote Control Setup
125V 2A
Copper Wire
Do not operate the unit or touch the plug with
wet hands. It may cause electric shock.
Use a fuse with proper capacity. Never use a
wire in place of a fuse. Doing this may lead to
malfunction or fire.
Preparing the remote control
The battery is already set in the remote control, pull out the clear sheet from the battery cover
before using.
How to use the remote control
a) Point the transmitter of the remote control towards the receiver of the main unit. If an
obstruction to the signal exists, the remote control will not operate.
b) The distance from which the remote control can transmit is approximately 19 feet(6m).
Power
Night
Speed
Timer
Swing
Auto
UV Lamp
Neg.Ion
RESET1
RESET2
+
Battery Information
40 C
5C
Relative humidity<80%
If any parts of the power source get wet remove
the plug and dry it completely before reusing.
Use the product in the ambient temperature of
0-40 C.
1.Open the cover on the rear of the remote control towards the arrow.
2.Replace the battery with CR2025 battery. Be sure to set the battery with the+ side up.
3.Close the cover to its original position.
4.The battery for this remote control is for initial use only. Change the battery when necessary.
5.When not using the unit or remote control for an extended period, remove the battery.
6.Store the battery where babies and children can not reach them. If the battery is
swallowed contact a doctor immediately.
7.When discarding battery, cover the terminals of the battery with tape. If mixed with other metal or
batteries, heat, explosion or combustion may occur.
8.Bring the battery to a nearby electronics store, watch store or camera store to recycle them.
Remote Control
1.Do not drop or place the remote control in water. (Damage may occur.)
2.Do not press the remote control buttons with sharp objects. (Damage may occur.)
3.The remote's signal may not be received properly if fluorescent lamps (such as inverter
fluorescent lamps) are in the same room.
Do not place the product in direct contact with
sunlight. It may cause malfunction and
deformation of the product.
Do not block the intake or outlet. Blocked
openings can reduce capacity or damage the
unit.
E-10
E-15
ENGLISH
CR2025 Battery
UNIT Control Panel
IMPORTANT SAFETY PRECAUTIONS
Unit Indicator Lights
Timer Indicator Light
Shows the time for operation.
Speed Indictator Light
Shows the fan speed from
Low to Medium and then
High.
Filter Indicator Light
When Filter life indicator
light flashes, the carbon
filter needs to be replaced.
Night
Timer
Dust Level
Auto
Power
Auto Indicator Light
At Auto mode, the fan
speed is automatically
switched (H,M,H)
depending on the amount
of pollutant in the air.
Swing
Speed
hr
Do not use the unit in humid places which
might be wet. Contact with water can lead to
electric shock or damage the equipment.
Do not disassemble or modify this equipment.
Unwarranted tampering can lead to fire, electric
shock and/or unit malfunction.
Prevent combustibles from being drawn into
the unit. Combustible substances can cause fire.
Make sure to prevent water from coming into the
product. It can lead to malfunction or electric
shock.
Be careful not to tip over the unit when opening
the front panel or moving it. If not, It may cause
personal injury.
After cleaning the filters, make sure to dry the cell
thoroughly before reinstalling. If not, it can cause
breakdown of the unit or personal injury.
H
M
L
Speed
Gas Level
Night Indicator
Light
When it is on, all
indicator lights on
the display panel
will be off.
Negative Ion Indicator Light
When the indicator is on,negative
ions are discharged.
Filter Life
Negtive Ion
UV Lamps
Check Unit
L-R
Timer
Swing Indicator Light
Shows the louver swings
horizontally.
Swing
English
Air Pollutant Indicator
Light
Monitors and displays the
indoor air contamination
level.
Auto
UV Lamp Indicator
Light
When UV lamp
indicator light flashes,
it tells the time for UV
lamp to be replaced.
Check Indicator Light
Once the Check indicator
light flashes red, a checkup
is required.
Unit Buttons
Power(ON/OFF) Button
Timer ButtonSelect the time for operation
Power
Speed
Speed ButtonSelect the fan speed
you desired
E-14
Timer
Auto ButtonSet the unit at Auto mode
Swing
Swing ButtonControl the air outlet
louver
Auto
E-11
PART NAMES AND DESCRIPTION
Part Numbers and Names
48
47
49
42
43
44
46
30
45
31
34
39
36
21
22
19
37
35
20
41
40
38
28
23
14
18
13
16
33
12
15
17
24 25 26
11
32
29
10
7 8
9
50
51
6
3
52
5
4
1
2
E-12
27
1. Front panel(Air Intake Grill)
2. Pre filter Groove
3. Magnetic Catcher
4. Pre filter
5. Electronic Cell
6. Activated Carbon Filter
7. UV light Blocker
8. Photo catalyst
9. Germicidal UV Lamp
10. UV Lamp Holder & Ballast
11. UV Light Reflector
12. Cell Clip
13. Chamber Side Plate
14. Light Reflector Side Holder
15. Repairment Door
16. Pre filter Ground Plate
17. Fuse and Fuse holder
18. Interlock Switch
19. Discharge Switch
20. Power Supply
21. Unit Power Contact
22. Circuit Board Protector
23. Main Circuit Board
24. Sensor Chamber
25. Gas Sensor
26. Dust Sensor
27. Sensor Chamber Cover
28. Power Cord and Plug
29. Plastic Upper Panel
30. Button Holder
31. Display Sticker
32. Button Unit
33. Display Circuit Board and Wire
34. Display Circuit Board Back Cover
35. Unit Speaker and Wires
36. Fan Motor Front Plate
37. Fan Motor Housing
38. Fan Blade
39. Fan Motor
40. Motor Capacity
41. Negative Ion Generator
42. Air Outlet Metal Mesh
43. Plastic Air Outlet
44. Swing Motor Connector
45. Swing Motor
46. Louver Unit
47. Metal Top Plate
48. Plastic Top Cover
49. Unit Housing
50. Light Reflector Lower Holder
51. Metal Bottom Plate
52. Plastic Bottom Basement
ENGLISH
Main Unit
E-13