1
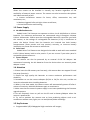
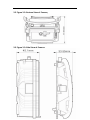
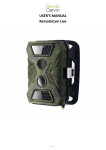
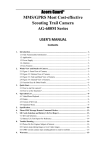
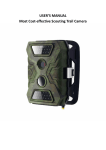
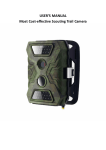
USER’S MANUAL Kodiak Series Wireless Trail Camera Contents 1. Introduction ............................................................................................................................. 0 1.1 Functionality Introduction..................................................Error! Bookmark not defined. 1.2 Applications ........................................................................................................................ 0 1.3 Power Supply ...................................................................................................................... 1 1.4 Attention.............................................................................................................................. 1 1.5 Key Features ....................................................................................................................... 1 2. Camera Views .............................................................................Error! Bookmark not defined. 2.1 Figure 1: Front View of Camera; ........................................................................................ 2 2.2 Figure 3.2: Bottom View of Camera;.................................................................................. 3 2.3 Figure 3.3: Side View of Camera........................................................................................ 3 2.4 Figure 3.4: Internal View of Camera .................................................................................. 4 2.5 Function Keys & Other Details ........................................................................................... 5 3. Quick Start ............................................................................................................................... 5 3.1 How to Start the Camera ..................................................................................................... 5 3.2 How to Adjust Camera Settings .......................................................................................... 5 4. Operation List .......................................................................................................................... 6 4.1 Video/Photo Playback ......................................................................................................... 6 4.2 Delete: ................................................................................................................................. 6 4.3 Format the SD Card ............................................................................................................ 6 4.4 Operation Menu .................................................................................................................. 7 5. Specifications............................................................................................................................ 8 6. SD Card Selection .................................................................................................................... 9 6.1 SD Card Selection ............................................................................................................... 9 7. Troubleshooting ..................................................................................................................... 10 7.1 Photos Do Not Capture Subject of Interest ....................................................................... 10 7.2 Camera Stops Taking Images or Won’t Take Images ...................................................... 10 8. Warranty ................................................................................................................................ 11 8.1 Warranty............................................................................................................................ 11 1. Introduction Thank you for choosing Kodiak Series Trail Cameras from Comanche Outfitters. Kodiak Series Cameras are the first trail cameras on the market with fully integrated Wi-‐Fi functionality, without the need for any external remotes or accessories. You are about to experience the future of trail camera technology. 1.2 Applications This camera is designed for home security, warehouse surveillance, and, most importantly, scouting for game. Camera installation takes less than a minute to complete, and is capable of running for several months on one set of batteries. This allows the camera to be installed in virtually any location regardless of the availability of external power sources. The camera can also be used to take photos and videos manually at will. a. Instant surveillance camera for home, office, construction site, and warehouse, etc.; b. Motion-‐triggered infra-‐red night vision surveillance; c. Animal observation and hunting; 1.3 Power Supply A. AA Alkaline Batteries Kodiak Series Trail Cameras can operate on either 4 or 8 AA Alkaline or Lithium batteries. For maximum performance we recommend using 8 Energizer Ultimate Lithium AA batteries. Please note that rechargeable batteries cannot be used with this camera, as the voltage of rechargeable AA batteries (1.2V) is insufficient to power the device. Ensure that the batteries are inserted into both battery compartments (front portion and rear portion) correctly, as incorrect battery installation can cause the camera to malfunction. B. Solar Panel Kodiak Series Trail Cameras are designed to be able to work with most standard 6~12V lithium battery built-‐in solar panels. If you are unsure if your solar panel is compatible please contact us. C. Power Adapter The camera can also be powered by an external 6~12V DC adapter. We recommend removing the AA batteries from the device when an external power adapter is used. 1.4 Attention 1. Please insert the SD memory card correctly, this camera does not support SD card hot swap (insertion). 2. Please use high quality AA batteries to ensure maximum performance and durability. 3. Remember to use the correct adapter (6V/1A or 2A) for this unit, and do not invert the electrode when installing batteries. 4. When in Live View mode, the camera screen will automatically power off after 1 minute of inactivity. Hold the ON button again to reactivate it. 5. Make sure that the camera’s power supply is not interrupted during the firmware upgrade process. 6. Do not frequently insert or pull out the SD card or battery/adapter when the camera is powered on. 8. Try not to position the camera next to heat producing objects such as air conditioner exhaust vents, lights, etc. to avoid photo/video recordings. 1.5 Key Features a. Programmable 5/8/12 Megapixel high-‐resolution still images; 1 b. c. d. e. f. g. h. i. j. k. l. m. n. o. p. q. r. s. User friendly interface; Optional built-‐in audio playback; 40 IR LEDs for flash range as great as 65 feet; Adjustable PIR sensitivity; Multi-‐shot photo capture (up to 7 photos per trigger); Rapid trigger time of 0.8 seconds Supports standard 6~12V solar panels; Full color daytime photos; incredibly detailed black and white night photos. Adjustable delay between triggers; Up to 5 months of standby time using 8 Alkaline AA batteries ; Over a year of standby time using Energizer Ultimate Lithium AA batteries; Operating temperature: -‐25°F to 140°F; Time Lapse function for automatically recording pictures/videos at preset intervals; Adjustable timer allows the camera to be programmed to work only during preset time periods each day; Each photo includes a stamp with the following information: USER LABEL, date, time, temperature and moon phase. This allows the user to identify where and when the photo was taken; Built-‐in 2.0" TFT color screen allows users to view photos and videos directly on the camera. High-‐quality audio recording; Two different TV OUT settings allow users to connect their camera to an external television for media playback. 2. Camera Views 2.1 Figure 1: Front View of Camera; 2 2.2 Figure 3.2: Bottom View of Camera; 2.3 Figure 3.3: Side View of Camera. 3 2.4 Figure 3.4: Internal View of Camera Introduction of each button a) Buttons 01: Menu; 02/ 03/ 04/ 05: navigation arrow buttons; 06: OK b) Switches 07: Power Switch; 08: Camera/Video Switch; 09: IR LED Group Switch; 10: Future upgrade switch (leave off) c) Interfaces 11: 12V DC in; 12: USB Port; 13: SD Card Slot; 14: TV Out. 4 2.5 Function Keys & Other Details A. Switches Power Switch Video/Photo Switch IR LED Group Switch Future Upgrade Switch Switch up: Power On—PIR intelligent automatic monitoring; light sensor flashes 5 times before entering “Power On” Mode Switch “On”, press “OK” once to wake up camera LCD screen and enter Live View Mode; Press and hold “OK” button for 5 seconds to get back to “Power On” mode Switch down: OFF—Camera shuts off completely Switch up: Photo—Photograph Mode Switch down: Video—Video Recording Mode Switch up: 19—Top 19 IR LEDS will be active Switch down: 40—All 40 IR LED will be active Leave in the off position B. Navigation buttons a) Switch power to “On”, hold “OK” for 5 seconds to activate the camera LCD screen and enter Live View Mode; b) In Live View Mode press “Menu (M)” once to enter the camera settings menu; Press “OK” to capture photo(s) or video clips. c) In Live View Mode, navigate the interface by pressing “←”, “↑”, “→”, or “↓”, press “OK” for selection. To modify the selection, press “↑” and “↓”again and press “OK” to confirm. To return to the previous menu, press “Menu”. d) Press and hold the “OK” button for 5 seconds to return to “Power On” mode. 3. Quick Start 3.1 How to Start the Camera Switch button ⑦ to “ON”, hold button ⑥ “OK” for 5 seconds to activate the camera LCD screen (to enter Live View Mode.) In order to prepare the camera for installed use (motion detection mode), all the user needs to do is switch the power switch to the “ON” position, then reconnect the front portion of the camera with the rear portion. 3.2 How to Adjust Camera Settings C. In Live View Mode, press button ① “Menu” once to enter the camera settings menu; D. Navigate the menu interface by pressing “←”, “↑”, “→”, or “↓”, press “OK” for selection. To modify the selection, press “↑” and “↓”again and press “OK” to 5 confirm. To return to the previous menu, press “Menu”. E. Exit Menu, then press button ⑥ “OK” for 5 seconds to return the camera to motion detection mode. F. Switch button ⑧ to switch “Photo”/ “Video Recording”; G. Switch button ⑨ to turn on 19 IR LEDs or all 40 IR LEDs. H. Leave button ⑩ in the “OFF” position. 4. Operation List 4.1 Video/Photo Playback In Live View Mode press the arrow button “↑” to enter Playback; press “←” and “→” for selection, “OK” to play photo/video. Press button “↑” again to return. Press “Menu” button to initiate Deletion of files or to format the SD card. 4.2 Delete: a. Delete one: delete selected photo/video; b. Delete All. Press“↑” and “↓”for selection, and “OK” to confirm, then “MENU” to return to the previous interface. 4.3 Format of SD Card a. No b. Yes: Deletes all content on the SD card. Press“↑” and “↓”for selection, “OK” to confirm, and “MENU” to return. 6 4.4 Operation Menu In Live View Mode, Press “Menu” once to enter the camera settings menu; then navigate the settings interface by pressing “←”, “↑”, “→”, or “↓”, press “OK” for selection, and “Menu” to return back to the previous menu. Default Main Menu Functions Description Setting Select “ON” to set a 4 character ID for the 1. Camera ID OFF camera for identifying which camera captured each photo. Select “ON” to enable the camera to take 2. Camera + Video OFF simultaneous photos and video based on Video Length and Multi-‐shot user settings. 3. Multi-‐Shot 1P Adjustable 1-‐7 photos per trigger 12MP/8MP/5MP 4. Image Size 5MP 4000x3000, 3264x2448, 2592x1944 5. Video Size 640 HD/640/320: 1080x720/640x480/320x160 6. Video Frame 30FPS 30fps/15fps, programmable 7. Digital Zoom NO Optional 2x, 3x, or 4x zoom 8. Video Length 5 Sec Adjustable between 5-‐60 seconds High/ Middle/ Low; We highly recommend setting the PIR 9. PIR Sensitivity Middle (motion detector) sensitivity to High when used in high temperature environments. Select “ON” to set the start time and end time (hour/minute); if activated, the 10. Timer OFF camera will only operate during this interval. Select “ON”, to set the interval; PIR sensor will be turned off; camera will shoot photos or video clips automatically at the 11. Time Lapse OFF user set intervals. Configurable interval: 5 seconds to 24 hours. The pre-‐set time interval you desire between photo/video recordings upon motion. This option prevents the camera from taking too many photos of each subject. 12. Delay OFF Example: Camera will wait 1 minute between photo/video recordings with motion Configurable delay time: 5 seconds to 2 hours. 7 13. Audio Recording 14. TV Out ON N 15. Stamp ON 16. Frequency 50Hz 17. Language 19. Camera Sound English 01/ 01/ 2011 12: 00 ON 20. Cycle Recording OFF 21. Password OFF 22. Reset No 18. Time/Date Select “ON”, audio available in video clips. NTSC/PAL To select or cancel imprinting of programmed user label, moon phase, temperature, date, and time on photos. Improper settings may cause the camera screen to flicker English, German, French,… Date/Time; Date: “month/ date/ year”; Time: “hour/minute” Select “OFF” to turn off camera speaker. When turned “ON”, the camera will continue to record photos/videos after the card is full by deleting the earliest photos or video clips recorded on the SD card. Select “ON” to enable password protection for your camera; supports up to 6 characters Select “Yes” to reset the camera back to factory default settings. 5. Specification Image Sensor Effective Pixels Day/Night Mode IR range IR Setting Memory Operating keys Lens LCD Screen PIR Sensitivity PIR distance PIR Angle Picture size Picture Format Video resolution Video Format Video Length Multi-‐Shot Trigger Time Trigger Interval 5 Mega Pixels Color CMOS 2560x1920 Yes 65 feet Top: 19 LEDs, Bottom: 21 LEDs SD Card (8MB – 32 GB) 10 F=3.0; FOV=52°; Auto IR-‐Cut-‐Remove (at night) 2” TFT, RGB, 262k 3 sensitive levels: High / Normal / Low 39ft-‐65ft 60° 5MP/8MP/12MP = 2592x1944/3264x2448/4000x3000 JPEG 720P (1280x720), 640x320, 320x160 AVI 1-‐60 sec. programmable 1-‐7 0.8 seconds 2s-‐5s 8 Camera + Video Playback Zoom in Device Serial No. Time Lapse Beep Sound SD Card cycle Operation Power Battery Type External DC Stand-‐by Current Stand-‐by Time Auto Power Off Power Consumption Low battery Alert Interface Mounting Operating Temperature Yes 2x, 3x, 4x Yes Yes ON/OFF ON/OFF Battery: 6V; DC: 12V 8AA (Optional 4 AA) 12V 0.15mA 4~6 months (4×AA~8×AA) After 60 seconds of inactivity 150mA (+650mA when all 40 IR LEDs are active) 4.8V (4.8V: alert; 4.6V: power off) TV out/USB/SD Card/DC Port Strap; Tripod -‐25°F to 140°F Storage temperature Operation Humidity Waterproof spec Dimensions Weight Certification -‐30°F to 158°F 5%-‐90% IP54 131.42 x98.72 x77.44mm 300g CE RoHs 6. SD Card Selection 6.1 SD Card Selection Using a memory card is required to operate the camera. When the camera is "ON" and no memory card is inserted, the screen displays "Pls insert memory card". The SD slot of the camera has a 32 GB memory capacity. Before inserting or removing the memory card, the camera must be turned "OFF". Failing to do so may cause loss of or damage to the pictures already recorded on the memory card. When the SD card is full, the viewing screen indicates "Memory Full". The following data shows an approximate quantity of photos which can be recorded by the camera depending on the memory card capacity. 9 SD Card Data Tests SD Size 1GB Capacity 5MP 8 MP 12 MP 705 452 201 720P HD 00:09:27 640x480 00:26:01 320x160 01:14:07 2 GB 4 GB 8 GB Photo (pictures) 1373 2823 5517 882 1813 3544 392 806 1575 Video (hours) 00:18:32 00:38:15 01:14:53 00:50:48 01:44:33 03:24:27 02:24:28 04:57:04 09:40:39 16 GB 32 GB 11141 7157 3181 24962 14241 6326 02:31:20 06:52:58 19:32:30 04:53:40 13:09:27 39:15:10 7. Troubleshooting 7.1 Photos Do Not Capture Subject of Interest 1. Check the “Sensor Level” (PIR sensitivity) parameter setting. For warm environmental conditions, set the Sensor Level to “High” and for cold weather use, set the sensor to “Low”. 2. Try to set your camera up in an area where no heat sources are in the camera’s field of view. 3. In some cases, setting the camera near water will cause the camera to take images with no subject in them. Try to place the camera over ground. 4. Try to set camera on stable and immovable objects, i.e.: large trees. 5. At night, the motion detector may detect beyond range of the IR illumination. Reduce distance setting by adjusting sensor sensitivity. 7. Rising sun or sunset can trigger the sensor. The camera may take a moment to take proper photos again. 8. If a person/animal moves extremely quickly, it may move out of the camera’s field of view before a photo is taken. Move the camera further back or redirect camera’s view. 7.2 Camera stops taking images or won’t take images 1. Please make sure that the SD card is not full. If the card is full, the camera will stop recording images. Or the user can turn on the Cycle Recording feature to avoid such problems. 2. Check the batteries to make sure that they still contain enough power for the camera to operate properly. 3. Make sure that the camera power switch is in the “On” position and not in the “Off” or “Live View” modes. 4. Please format the SD card with the camera before using, and reformat it if the 10 camera stops taking images. Warranty Full Two-Year Warranty on Kodiak Series Cameras What is Covered This warranty covers any factory defects or malfunctions in your Kodiak Series Camera How Long Coverage Lasts This warranty lasts for 2 years from the date you receive your Kodiak Series Camera What is Not Covered Any damage or problems caused to the camera by batteries, unapproved accessories, abuse, misuse, or failure to properly follow the instructions for use listed in the manual. What Comanche Outfitters Will Do Comanche Outfitters will repair or replace any defective units covered under this warranty at no cost to the consumer. Comanche Outfitters will cover all costs related to the transportation and repair/replacement of the unit. How To Get Service Contact Comanche Outfitters via any of the means listed below, and a service representative will assist you within 72 hours of receiving your request for service. Phone: 844-GAMECAM (426-3226) E-mail: [email protected] Mail: 2231 Landmark Place, Manasquan, NJ 08736 How State Law Applies This warranty gives you specific legal rights, and you may also have other rights which vary from state to state. 11