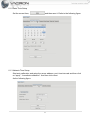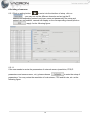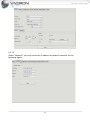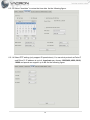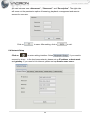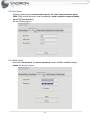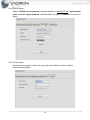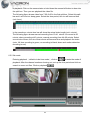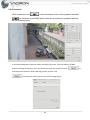
1
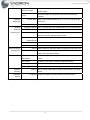
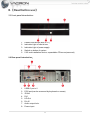
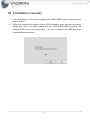
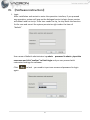
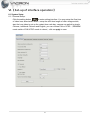
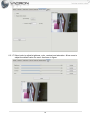
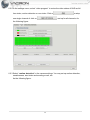
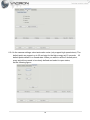
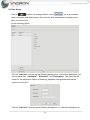
16 / 36 / 64 CH Linux NVR Network Video Recorder User’s Manual Network video recording system 2013 OCT V1.1 Notice before use This authorization agreement of client’s software/hardware is legally effective to you(individual or single machine) and our company. This agreement covers components of software/hardware, media, print, online publication and electronic files. All the application through installation, duplication or the other way must be based on this agreement. If you disagree with the terms of this agreement, please don’t install or use this product. This product is protected by copyright law, international copyright treaties and other international property laws and treaties. Please note this product authorizes to you, not sold. Through the software/hardware license code on the license certificate indicates you have got the permit of use. Copyright The company owns all the headers, including but not subject to the copyright, software/hardware products and any duplicates. The company reserves all the rights not expressed clearly. Unsecure notes The company clearly denies warrantee repairmen of any products. Unsecure of warrantee for any kind of expressed or implied, including any documents and software products of no limit, implied warrantee repairmen or marketability, suitable for specific usage or non-infringement. Terms and Conditions The overall risk, is that arising out of the use or performance of software and hardware products. This product will be informed, such as when it is used with certain device or other hardware, may enable you to carry out surveillance and data processing, which may be subject to or in violation of applicable law, which includes but is not limited to data privacy, and criminal law. Please check your use to comply with applicable laws is the responsibility of users themselves. Limitation of liability The provision of this paragraph is in effect to the maximum extent permitted by applicable law. In any situation Xia, VACRON or its dealer assumed any special, and accidentally of, and indirect of, and or any indirect loss (including but not limited to business profits loss, and business interrupted, and commercial information loss, and or any other money loss of compensation) due to using or cannot using of software products or provides or failed provides appropriate of support, even we of company has is informed this class damage of possibilities. If there is no willful misconduct or gross negligence, under any provision of this agreement, VACRON total liability, shall be limited to the amount actually paid. Other conventions (A) Prohibition of reverse engineering, decompilation, splitting or rescind the contract within the scope allowed by the applicable law cannot be waived by, as well as any software and hardware components of the product. (B) As long as the recipient agrees to the terms of this agreement, you may permanently transfer rights of use of this product. Closing remarks Without prejudice to any other rights, the company may terminate this license agreement. If you fail to comply with its terms and conditions, in which case you must destroy all copies of the software product CONTENTS Foreword 【Notices】 ........................................................................................................................ 1 I.【Specification List 】....................................................................................................................... 2 II.【Read before use】 ......................................................................................................................... 4 III.【Installation manual】.................................................................................................................. 5 IV.【Software instruction】 ............................................................................................................... 6 V.【NVR function description by area】 ...................................................................................... 7 VI.【Set-up of interface operation】 ............................................................................................. 8 6.1 System settings: ................................................................................................................. 8 6.2 setting of cameras...........................................................................................................12 6.3 User setting: ......................................................................................................................19 6.4 Network setting: ..............................................................................................................20 6.5 Playback ..............................................................................................................................23 6.6 Screenshot .........................................................................................................................26 6.7 Exit from system...............................................................................................................27 VII. 【Windows CMS remote monitoring software】 ...........................................................28 7.1Log on to remote monitoring software ...................................................................28 7.2 Add NVR .............................................................................................................................29 Foreword 【Notices】 WARNING Do not expose the DVR under the sunlight, heat or wet environment while installation. As it could decrease the performance of DVR and damage the machine. Do not touch the power plug or case with wet hands as this could result electric shock. Do not forcedly bend or put heavy object on power cable as this could result in injury to personal or equipment. Do not operate with damaged power cord or loose electrical outlet as this could result in electric shock or accident. Please use individual power instead of share electrical outlets with other electrical equipment as this could result in damage or accident. Do not attempt to service this DVR by yourself as it may expose you to dangerous voltage or other hazards. Please refer all service to the qualified servicing distributor. Please do not remove the machine housing during operation. It may cause electric shock or accidental injury. CAUTION Do not place the machine on an uneven surface or it would decrease the DVR efficiency or malfunction. Avoid any shock or bumping of the DVR while recording. Improper handling could damage the system. CAUTION Make sure the voltage selector switch is set to appropriate setting before plug in! 1 I. 【Specification List 】 Hardware Specification Processor Memory HDD Capacity Intel® Core™CPU Core i5 3470 4GB DDR3 RAM,1GB Flash(DOM) Storage: Maximum 2 x 3.5" SATA HDD,1 x 5.25" drive bay One 2T HDD included(support for 3T) Lan Port LED Indicators USB Buttons 1 x Gigabit RJ-45 Ethernet Port HDD, Power, Network LEDs 6 x USB 2.0 Power Button Alarm Buzzer System warming Power supply Input:AC110V or AC240V(Dip Switch),50/60Hz, Output:270W Video Output 1 x HD OUT/1 x VGA D-Sub/1 x DVI-D Support Channel Weight Dimension Operating Environments 16CH / 36CH / 64CH 4.75Kg 367 x 99 x 350mm (WxHxD) Temperature: 0 ~ 40 °C Humidity: 90% Software Specification Recording Supported Camera VIT and VIH Series(can connect to VDH-412VS) Models Number of Channels Up to 64 IP CAM Supported(Recording) Recording Mode Buffer Storage for Alarm Continuous/by hand/by schedule/alarm/multi-alarm Pre-recording: Up to 300 sec Post-recording: Up to 300 sec Images (before and after events) Recording Performance Local Display Display Mode Local Monitoring Enhancement Local Playback Search Mode for Local Playback Up to 30 fps at 720P or 23fps at 1080P for each channel * Real performance may vary in different environment Split-screen display model for 1, 4, 9, 16, 25, 36 or 64 channels, auto channel touring. Full screen display, event notification, PTZ control, digital zoom Max 4-view playback from multiple NVR servers simultaneously By date & time 2 Playback Control speed control Convert multiple recording files to the external USB device Export Remote Play, pause, stop, reverse play, next/ previous video file, different instantly Display Mode Split-screen display model for 1, 4, 9, 16, 25, 36, 49 or 64 channels. Video Setting Resolution, Quality, Frame Rate Monitoring Remote Playback Channel Playback Search Mode (coming soon) Playback Mode Max 4-view playback from multiple NVR servers simultaneously By date & time Play, pause, stop, reverse play, next/ previous frame, next/ previous video file, different speed control Playback Full screen display, video snapshot, digital zoom Enhancement Export Download 264 compression format Download recordings via the web Advanced Event Events Motion detection and alarm features must equip with VDH-412S Management Actions Video recording, email alert, buzzer, PTZ camera control, alarm output, and user-defined action Security Control Network Authority Different user groups and rights can be assigned to different Management users Auto Logoff Automatic user logoff from idling configuration pages Event Logs Detailed event logs On-line Users List Record of the users currently logged on and previously logged Support UPnP Services Language HTTP, TCP/IP, SMTP, DHCP, Static IP, DNS, DDNS, FTP, NTP, Language English/Simplified Chinese/Traditional Chinese/Russian Support ★Product specifications are subject to change without notice; please contact us for the latest information. 3 II. 【Read before use】 2.1 Front panel introduction: 1. 2. 3. 4. 5. Hidden hard drives (built-in 2T) Indication light of hard drives. Indication light of power supply. Switch on button of system 5.25 inch installation device; expandable CD burner(reserved) 2.2 Rear panel introduction: 1. 2. 3. 4. 5. 6. 7. 8. USB2.0 port x 6 P/S2 port(can be accessed by keyboard or mouse) D-Sub DVI HD Out RJ-45 Audio output hole. Power input. 4 III. 【Installation manual】 1. At the first turn-on, if fail to enter, please select SATA DOM as the first prior turn-on device in BIOS. 2. At the first entrance into system, if tip for HDD formatting, when you need recording, please click “yes”, if no need, please click ”no”. Notice! After HDD formatting, the existing DATA will be non-recoverable. If no tip, it indicates the HDD has been formatted before shipment. 5 IV. 【Software instruction】 1. Login After installation and restart to enter the operation interface, if you proceed any operation, system will pop-up the dialogue box to tip login (some version will default and not to tip. If the user needs the tip, he may enter the function list for user and cancel the system permission right under the item of “default” User name of default administrator is:admin password is admin。Input the username and click “confirm” to finish login and you can proceed with customized settings for software. Click to lock,you need to input user name and password to login again. 6 V. 【NVR function description by area】 1, exit(exit system,auto power off) 2, channel switch option(1,2,4,9,16,25,36 channel switch) 3, the video display area(select the corresponding camera, double-click for amplification of single channel and return to multi-screen) 4, tool bar menu (enter system setup, camera setting, network setting, option of playback control., etc.) 5, the time status bar(display the current system time) 6, ticker display(display power on the welcome icon, users are free to modify) 7, HDD status display. 8, PTZ control button(control the movement of cloud platform) 7 VI. 【Set-up of interface operation】 6.1 System Setup 6.1.1 General Setup: Click the setting button to enter setting interface. You may setup the flow time of video loss, alarm/audio alarm ; setup the shift time length of video image switch; start the loop video to set up the restart time each day; camera can switch to simple Chinese, traditional Chinese and English; you can choose PAL or NTSC.(REMARK: mode switch of PAL/NTSC needs to reboot)click on apply to save. 8 6.1.2 Date/ Time Setup Set the current time, and then save it. Refer to the following figure. 6.1.3 Network Time Setup: Start auto calibration and setup the server address, port, time intervals and then click on “apply”, “immediate calibration”. And then click return. As the following figure: 9 6.1.4 Disk Info: View the situation of hard drive mounting and usage 10 6.1.5 Version information Enter to find the current software version. You may upgrade and renew the marquee pictures. As the follows: 11 6.2 setting of cameras 6.2.1 Click on setting button to enter into the interface of setup. click on ,you may turn on the different channels and set up the IP address/corresponding network port/user name and password(if the setup and network are no problem, camera will display on the corresponding channel)click on to apply. As the following figure: 6.2.1.1 If the user needs to revise the parameters of network camera (resolution, FPS,IP parameters and camera name., etc), please choose to enter the setup of parameters. You may revise the resolution of main stream, FPS and bit rate, etc. as the following figure: 12 6.2.1.2 Select “Network”, you may revise the IP address of network cameras. As the following figure: 13 6.2.1.3 Select “time/date” to revise the time date. As the following figure: 6.2.1.4 Select PTZ setting (only support IP speed dome). You can slect protocol as Pelco P and Pelco D. IP address is up to 4, baud rate can choose 1200,2400, 4800, 9600, 19200 and speed can support up to 23. As the following figure: 14 6.2.1.5 Select audio setting. You can choose turn on or off, mode can choose micro phone, horn or both. There are G.771 and PCM sound encoding. Sample sounds is 8K by default. You can select a higher level as 16K. Volume size defaults to 50, the output volume for 75, and noise level is 50 As the following figure: 6.2.1.6 Select motion detection, motion detection (currently supports Video-Server and VIT-series machines) (VIT series IP CAM firmware must be updated to B563 above version) to check the alarm, alarm sound from sound card output and motion detection feature. You can set the sensitivity to low, medium, high, or defined by the user's own figure of 0-100. Number 12 on the image segmentation and selection area, click after you enter this, red lines will provide identification. As the following figure: 15 6.2.1.7 Select color to adjust brightness, color, contrast and saturation. Allow users to adjust the default value for reset. As shown in figure: 16 6.2.2 In the settings menu, select “video program” to revise the video status of NVR as full time video, motion detection or non-video. Click on one single channel of click on to setup to set up for all channels. As the following figure: 6.2.3 Select “motion detection” in the camera settings. You may set up motion detection, sensitiveness, start video and sending e-mail, etc. As the following figure: 17 6.2.4 In the camera settings, select automatic cruise (only support high speed dome). The default point can support up to 32 and stay for the high energy set 15 seconds. 32 default points default in a closed state. When you want to set the 5 default point, every arrival time needs to be clearly defined and select to open status, As the following figure: 18 6.3 User Setup: Click on to enter the setting interface. select , you may increase users, edit users and delete users. Only the user with administrator permission can carry out the revision. As the following figure: Click on “Add User” will pop-up the following dialogue box. In the white dialog box, you can increase new“Username” , “Password ” and “Description”. The right side will come out the permission option of browsing, playback, management and remote access for new user. Click on “Edit User” will pop-up the following dialogue box. In the white dialogue box, 19 you can increase new“Username” , “Password ” and “Description”. The right side will come out the permission option of browsing, playback, management and remote access for new user. Click on to save. After setting, click on to exit. 6.4 Network Setup Click on to enter setting interface. Select ,if you need to connect by client in the local area network, please set up IP address, subnet mask and gateway. If you need to link internet, please set up domain name server. 20 6.4.2 Port Setup: Software default page communication ports: 80, video communication ports: 5500 (CMS remote ports use shall correspond), hand controlled communication port: 5577 (no function). As the following figure: 6.4.3 ADSL Setup: Enter the user account, the user's password, select the link, confirm, display status. As shown in figure: 21 6.4.4 DDNS Setup: Select a DDNS service provider, software defaults to www.3322.org, input domain name, user-ID, login password, select the link, and press to confirm. As shown in figure: 6.4.5 E-mail Setup: Set up the time length of mail sent, input the mail address and then confirm. As the following figure: 22 6.5 Playback Click on playback button ,playback interface will show up(playback channels are up to 4),as the following figure: Click on the channel with record as the following figure: Click on the channels to check, display area to show the video you select. As the following figure: Sect the time mode (default), file mode, time mode: Firstly select the recording date, display split box and then select the camera number 23 to playback. Click on the camera twice or hold down the mouse left button to draw into the split box. Then you can playback the video file. The following figure shows video from 7:00~8:00 in the first split box. Select this split bar and it will turn into deep green. Select the time period, the rim will become blue (unit: hour). In the meantime, minute time bar will show the actual video length (unit: minute). The following figure shows manual recording from 19~41 minute. No record at 42 minute, alarm recording at 43 minute, manual recording from 44~60 minute. Select one minute of them, the rim of that minute will become blue and playback the video (note: full time recording is green, no recording is black, alarm and motion detection recording is red) 6.5.2 file mode: Entering playback (defaults to be time mode), click on to enter the mode of playback. After the channel numbers showing out, set up the time period and click on search to come out files. Click on playback 24 . 6.5.2.1 Insert USB to back up.As the following figure: Playback buttons description: :Play :Pause :Fast forward :Backward reverse :2、4 times fast forward :1/2、1/4 、1/8 slow motion :Stop :Screenshot 25 6.6 Screenshot Click screen shot icon or click screenshot button of the playback interface to catch the current BMP picture from the monitoring or playback split box. As the following figure: In the blank dialog box of picture folder will display the time, lens information of BMP pictures through screenshot. User can choose the time and channel to click search previous pictures. After selecting specific picture, click to backup the current picture. As the following figure: 26 to 6.7 Exit from system Click system-exit system to pop up dialog box. As the following figure: After confirmation, system will automatically shut down 27 VII. 【Windows CMS remote monitoring software】 7.1Log on to remote monitoring software Please click on the mouse left button twice to install system to Microsoft on your computer (currently supports XP, 32-bit Vista, 32 bit WIN7). Then on your desktop after the installation or Assembly to see NetMonitorClient.exe perform the following figure Login window appears after implementation, as shown in Figure; please enter the correct account number and password, software defaults to the account: admin password: admin, as the following figure Enter the main screen as shown in figure. Click set to make all the necessary setups to join into PC300 as show in the following figure: 28 7.2 Add NVR Click the "Add current device" and back to "real-time" viewing. Then you have set the number of channels into the list, To see the picture, please click twice on the number of cameras so that the camera icon will turn into green. Then you can now display the picture. As the following figure 29 Click the right button of mouse to show your favorite settings by the function of listing. 30 For More Information Please check VACRON Website http://www.vacron.com Made in Taiwan