1
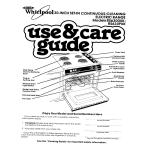
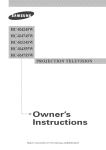
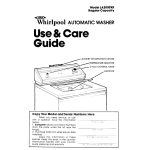
30-1NCH SET-INCONTINUOUS-CLEANING
ELECTRICRANGE
Models RS6300XK;
RS630PXK
tlse
Oven Vent
Surface Unit
Control Panel
Oven Control
Panel
Automatic
Oven
Light Switch
One-Piece
Chrome Reflector
Bowl
Piug-ln
Surface
Broil Element
Oven Rack
Guide
Bake Element
Unit
Monuo_ Oven
Light Switch
Air-Flow
Oven Door
Model anti Serial
Number Plate
Sillcone
Fall Liner
Copy
If you
need
information
1
2.
Complete
just behind
Purchase
service,
or call
Your Model
with
and Serial
a question,
have
Here
this
ready
Model Number
Model
and Serial
the oven door}.
date
Numbers
from
your
Numbers
sales
[from
the
plate
Serial Number
slip
Purchase Dale
Copy this information
in these spaces. Keep this book,
your warranty
and the sales slip together in a handy
place,
See the "Cooking
Guide" for important
Service Company and Phone Number
safety information.
Your responsibilities...
Proper installation
and safe use of the range are your personai
responsibilities.
Read this "Use and Care Guide" and the "Cooking
Guide" carefullyforimportant use and safety information.
Installation
You mL_stbe sure your ronge is...
• installed
net and
and
leveled
on :_' floor
that
in ,u cabs'_ L ho!d
the weight:
• installed
rect
connected
electric
grounding,
in (:: weli-,,,entl
area protec*ed
• properly
ted
supply
(See "Installation
!nstruetions."]
from th_
weather:
Proper
to the corand
j|
use
/
J
')
Using your range
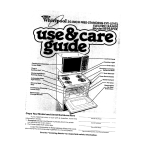
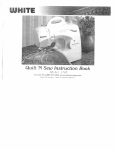
AutomaticMEALTIMER
Surface Unit
Controls
Stop Time Knob
Clock and Minute Timer
StartTime Knob
SURFACE
CONTROLS
UNIT
Clock
Control knobs must be
pushed in before turning them
to a setting, They can be set
anywhere
between HI and OFF
One of the signal lights will
glow when a surface unit is on.
Be sure all lights are o11when
you are not cooking.
PUSH IN
Turn to setting.
Indicators
Until
lowing
you get used
as a guide•
to the settings,
use the
to!
°V
_o
Signal
_o
Light
Usei"llto start
foods cooking or
to bring liquidsto
a boil.
Use MED-HI to
hold a rapid boil
or to frychicken
or pancakes,
o_
Use MED for
gravy, puddings
and icings or to
cook large
a mounts of
vegetables,
UNITs:SURFACE
_,>
Use MED-LO to
keep food
cooking after
startingiton a
higher setting
See The Accessory
Canning
your
'Cooking
Guide
for
information.
4
Kit' {page
_mportant
9) and
utensi_
-_
Use LO to keep
food warm until
ready to serve.
Set the heat
higher or lower
within the LO
band to keep
food ot the
temperature
you
want.
Element
will
be
black
during
cooking
if contact
with bottom
of pan
is good
Element
will Qot torn red it
_ood
made
_':Orqtaot IS
Trek
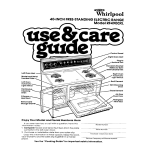
Manual
Oven
Light
Switch
Oven
Oven
Signal
Light
Adjustable Oven
Selector
Temperature
Control
OVEN CONTROLS
BAKING
t.
Put oven
2.
[See page
6 for suggestions
Set Oven Selector
to BAKE
:3.
4.
rackswhere
¢ou w_untthern.
)
Set Oven Temperature
ir_g temperature
you
Controi
_vc_nt
Let the
Jrltiitne
oven
preheat
to the
Signal
bQk
ignl
goesofl
S.
Put food
6.
When
OFF
in tne
done
During baking,
the elements
will turn on
and o11 to help hold the oven temperature
oven
baking,
turn _:)oth knobs
to
at
the setting.
[The top element
will never turn
red, but will be hot.) The Signal Light will turn
on and off with the elements.
RESETTING THE OVEN TEMPERATURE CONTROL
Does your new oven seem to be hotter cr C'older at the some settings
t,nan /our
old oven?
The len'perature
setting
in vour :rid oven may have changed
grodu
ally over the years
The "accurate
sethng
of voor Dew oven can seem differen:
if you think the oven temperature
needs
adlushng,
follow
these steps
OFF
OFF
OFF
OFF
//
[o,
.
Pull out the cenlef
ofthe
Oven Temoerature
Control
2,
_lng
:oo_h
Screw
L..osonthe
,-'_
oc,,
ir,_ b{:rew
_,
\
(,!D_ve'tneter,'n
the locking
4.
::)erature
move
L_ack ring So tooth
:;,osertoLO
Each
_otch equc,'Is
}bout!O
F[5
Tighten
Tooth
Notches
screw.
Replace
1C rOlSe the "err'.
©eralure
!s
C]
the knob_
Noiche5
rnoveblQck
ring so tooth ts
oloserle
Hi Each
i10toh eq UC1tS
sbout10
F r5 C}
5
BROILING
1.
Plaeethe
rack
where
_'ou
2.
want it for broiling.
[See
below
for suggestions
/
PuI broiler
pan
on the rock
and
3.
food
Set Oven
Selector
to
BROIL
//
i!
il
!!
4.
Set Oven Temperature
_
Control
to BROIL. (Set :,n o
lower temperature
fcr
sower
broiling
Se_
t elow.I
5.
broL ing the
6.
over",
door must be partly
open
A built-in
stop wfl; hcJ!d i'
there
Broiling
can be slowed
lower than BRO!L Vvhen
,:)r _temperaluro
_.
s-orl@ror_:
During
o17 setting
rne (_ven Temperature
ConTroi .o c, :_÷rT ,
ff's on BROIL the broil element
is on o li the time
W'_-_r : :
the e_ement
thetmet:
when
The Oven Selector
broiling
tem_)eratures.
When broiling IS i:-'e
turn both !,_n: b_ t-. __r_;
Knob
turns off and on The lower
the eiernent
ls or,
must
be on BROIL and
the lem_erdt
the door
partl_-
; _
open
.-,
tot
;
aii
OVEN RACK POSITIONS
Position
racks
before
turning
on the
I
oven.
I
J,
[ )l St("]
-:CO
i-_
Lift :_qk jr
i
DU_;
BAKING
O'd
OR ROASTING
Food for baking or reastin_ sh..._,ld c_u
placed
in the cenler oi the o,,er,
Aiways Leave at leas 1 ;.to 2 inches
(4-5 cm) between the s des .::da pan ar_a tn_
oven wall and another p_an _or more '.r,forr" a
ton see the Coo_lng
,u_d,
BROILING
Adiustthetoprac_,so'r-eto
: ,* ,:-t-r_e,;
_, ot a suggested
q_star, ce fro _ _7',' r'-,i
_'_
rnent (See page
7 i ALWAYS Dr<:'' ,*_,i_ _he:
:_oor odor/to
the brod-st<;:-_
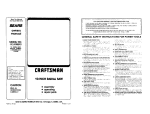
Suggested
kinds
oven-rack
positions
and broiling
times for different
Inches {cm} from top
of food to Broil Element
Approximate
MinutesSelector set to BROIL
Ist side
2rid side
of meats.
Food
Description
Beef Steaks
RQre
Medium
Well done
!
{25cm]
3
{8cm]
t (2.5cm)
3 [8cm)
1
(2,5cm)
3
Beef Steaks
Rare
Mediurr,
Well Done
1
t
;
Hamburgers
Lomb
14oral
[4ore]
(8cm)
Mediurr-
5-7
i3-15
I7-19
6-8
6-t0
cm)
19-21
14-16
.
6-8
4-5
6-8
4-5
6-8
45
6
4
[10-13cm)
(I0-13cm)
t' 2 {4 cm]
4 -5
(10-t3
_
3
[8cm}
3
[8 .cm_]
I
(2,5 cm)
: -1
[t -25cm}
.
.
3 (Scm)
Canodia_nBa_or, '_ _i Cm)- 3 (scm)
Pork Rib or Loin Chop
Well
34 -I
done
[2-2.5cm)
Chicken
4-5
(10-13
cm)
(18-23
era)
[1-I.5
kg}
cutin
half
7 -9
whole
fillets
3
3
fi-2cm
3 [ScmJ
.....
t0
25-30
(8 cm)
(Scm)
4 -5 (10-t3
10-12
1!16
7-8
cm}
0-14
5-7
3
3
6-7
415
THE CLOCK
tLJrn the
Minute
Tim_:÷r Knoto
_o set Trie
Push in Minute Timer Knob and turn
clockwise
dnt!l CIOC' qr',ow:_ t'e rlgh'
Clock
2,
hr_>
'_ ":_,:,',
USING THE MINUTE
DO NOT PUSH IN THE KNOB
when
IN AND TURNING THE KNOB
THE CLOCK SETTING
the
Let the Minute
counterclockwise
Timer Knob pop out Tununtil the Minute
lim_r
dial snows OFF The clock setting will
change
if you push in when turning
TIMER
setting
. Without
pushing
it in, turn the Minute
Timer Knob until the hand passes
the
setting
you want
PUSHINO
CHANGES
15__
2-3 lb.
_
PUS_q 'q _rqd
4-7
Chops
Ham slice
precooked
or tendered
SETTING
3-5
9-11
11-13
4-5
4 -5
[lcm)
7-9
Minute
Timer
_.
Without
pushing
in, turn the
the setting
you want
3.
When
To stop
without
thetime
_s up
o buzzer
knob
@il
back
o.J[
the buzzer, turn the d_a_ tc LDF_
pushing
in the knob
to
_
7
USING
THE AUTOMATIC
MEALTIMER
The Automatic
MEALTIMER Clock
is designed
vouset
even when you are not around
To start
1.
and
stop
baking
Put the rOCKS where
w'znt
them
and
place
7.
Push
Tree
_. Make sure the clock is set
to the qghttime
of day
you
the
t.
2
in and turn the Stop
Knob clockwise
!t!e tJ!-_(_ you want
<:verl 1o shut oft
i-/e
After baking is done
both knobs to OFF
turn
To stop
baking
5,
Set the Oven Selector
TIMED
8.
To stop
the oven
the preset
time
knobs to OFF
Putthe
olace
ackswhere,,ouwantthemand
the food in the oven
Make
sure _l_e _ lock
_>_set to 1he nghf
Push in :and turn the Stop lime
wiseto
the time you want the
off
SPECIAL
on and
off at times
on
3.
6.
Push in and
turn the
Start
Time Knob
to the time
ing to start
clockwise
you want
bak-
Set the Oven Temperature
Control on the baking
temperature
you want
before
turn both
automatically:
4,
Set 1he Oven
5.
Set the
baking
6.
After
OFF
7.
To stop the oven before
turn both knobs to OFF
time
at day
3,
to turn the oven
automatically:
,,cJ in _he over
=
CLOCK
Knob clockoven to shut
Selector
or_ riMEb
Oven Temperature
temperature
you
baking
is done,
Control
,want
turn both
the
,on the
Knobs
preset
to
time
CAUTION:
Use foods
that
will
not
go
bad
or spoii
while waiting
for cooking
to slart. Avoid
using dishes
with milk or eggs,
cream
soups,
cooked
meats
or fish, or any item
with baking
powder
or yeast
5rooked
or frozen meats
may be used:
so can vegelables,
fruits and casserolewDe foods
Vegetables
can be cooked
a coveled
baking
dish with about
a half.
cup 1118 mL) of water
for I to 1_/2 hours
Any food
that has to wait for cooking
to
start should
be very cold or frozen before
_t is put in the oven.
MOST UNFROZEN
FOODS SHOULD NEVER STAND MORE THAN
TWO HOURS BEFORE COOKING
STARTS
in
THE OVEN LIGHT
The oven light _..qil cor'nP on wr, en you open the oven door or when
the Oven Light Swllct
Close the avert door or push the switch
again
light
To replace
I.
yoq p_jst
to shut oft the.,
the light bulb:
Turn off the electric
althe ma_n power
p(;p_er
supph
2,
por_-_,et['_
:- _!ntbulb
frDr_ !' ::OCkO_
3.
Replaeeme
buJb
.vffn a
40-watt
appliance
bulb
available
from most (_ro
_.:ery variety
and
hardware
StOreS _r',
electrlcal
Dower
back
on
7_ithema_r
power
supply
THE OVEN VENT
_,nen
the
oven
is ON InOt air
:]Nd
moisture
esc,q pe through
a vent under
the right rea_
surface
unit The vent is needer]
!or a_r c,rcu
!ation
in the oven
Do not block
Poor
bak
would
1i4e a rotisserie
for your oven.
you car_ order
a kit (Part
, m,-c_Jdes
easy instaliatJon
instruction:s
from your dealer
The ki_
N_
THE OPTIONAL
If _ou
261880]
ACCESSORY
CANNING
the vent.
ng
con
result
ROTISSERIE
KIT (Part
No. 242905)
The large diameter
of most water-bath
or pressure
canners
combined
with high
heat settings
for long periods
of time can snorfen
the life of regular
surface
units and
cause
damage
to the cooktop,
It you plan Io use the oooktop
for _.;(]nrllAg, we recommend
the fflsbJi It aroi
a
Cannmng
Kit. Order the kit from your Whirlpool
Dealer
or Tech-Care
Service
Cornpany
Use only riot-bottomed
utensils
for best results and to prevent
damage
to the
range
Specialty
items with rounded
or ndgea
bottoms[woks
ridged
bottom
canners
or tea Kettles}
are Rot recommended
See the "Cooking
Guide"
for important
utensil
intormation
SEE THE "COOKING
GUIDE" FOR IMPORTANT
CANNING
INFORMATION
Cleaning and caring
for your range
CONTROL
PANELS
AND
SURFACE UNITS AND
REFLECTOR
BOWLS
KNOBS
REMOVING
I
t.
Firslmoke
knob
sure knobs
straight
_:,
_
_, d._;:_ _qe_
_;m_
off
.i
,f
L
i
_'"
f _ ',e eoge
X:z:e
otthe
luf!t enough
unl! toDr :;,__ me receF:
to clear
_qe r_ _:nr
bo,_,_
\
Receptacle
3"_d
(_ry
' _<: e ;.bt-; C le
m
/r
,
-
r_
!_ f_-"
tT:2'
'
REPLACING
1.
Be sure
surface
unit controls
are
OFF.
Opening
#ecepfacle
4.
While pushing the surface unil terminal into
the receptacle,
lift a little on the edge of
the unit nearest the receptacqe.
S. When the terminal
is pushed into the receptacle
as far as it will go, the surface unit
will fit into the reflector bowl.
2.
Line up opening
in the reflector
the surface unit receptacle.
bowl
with
Terminal
Reflector
Receptacle
3.
CLEANING
WHAT
TO USE
of range
Soft cloth, warm soapy water
Nylon or plastic scouring pad
for stubborn
spots
Surface
units
No cleaning
Control
knobs
Warm, sudsy water
brush
Chrome
bowls
reflector
•
•
required
and bristle
Automatic
dishwasher
soapy water or plastic
scrubbing
pad
or warm,
water or soapy
back
to the
a utensil
goes
bowl.
This ex-
TO CLEAN
•
Wipe off regularly when range is cool,
Do not allow food containing
acids (such as vinegar,
tomato, lemon juice or milk)to remain on surface.
Acids will remove the glossy finish.
Do not use abrasive
or harsh cleansers
•
•
Spatters or spills will burn off.
Do not immerse in water.
• Wash, rinse and dry well.
• Do not soak.
•
•
•
Clean frequently.
Wash with other cooking utensils.
Do not use harsh abrasives.
•
Wash with other cooking
Aluminum broiler
pan and grid
Warm, soapy
wool pads
Surface unit
conlrol panel
Warm, soapy water
•
Wash, rinse and dry with sott cloth.
Oven control
panel
Warm, soapy water
Commercial
glass cleaner
•
•
Wash, rinse and dry with soft cloth.
Follow directions provided
with cleaner.
Oven racks
Warm, soapy water
wool pads
•
Wash, rinse and dry. Use steel wool pads for
stubborn areas.
Oven door glass
Warm, soapy water or plastic
scrubbing
pad
Commercial
glass cleaner
•
Make certain oven is cool. Wash, rinse and drywell
with soft cloth.
Follow directions
provided with cleaner.
Continuouscleaning
oven
Warm, soapy water or soapy
• Clean stubborn spots or stains. Rinse well with
scrubbing
pad
clean water.
Heavy-duty
aluminum foil
• Place strip of aluminum foil on bottom of oven to
available
at grocery stores or
catch spillovers.
order Part No. 241430 from your
* Oo not use commerclal
even cleaners.
Whirlpool dealer
or your
TECH-CARE
service
representative
Most fat spatters
on the Continuous
Cleaning
porcelain-enamel
interior surface gradually
reduce to a presentably
clean condition
during normal baking or roasting operations
11
or soapy
steel
heat
CHART
HOW
Outside
reflect
meant
to go into or around
down
and heats the reflector
tra heat can discolor
it
Hold the surface unit as level as possible
with the terminal
just started
into the
receptacle.
PART
bowls
utensils
on the surface
units, They Qlso help
catch
spills. When they are kept clean,
they
reflect
heat better
and look new longer
If a reflector
bowl
gets discolored,
some
of the utensils used may not be flat enough.
Or some
may be too large
for the surface
unit. In either case, some of the heat that is
steel
•
utensils.
THE OVEN DOOR
REPLACING
REMOVING
i
)
i
/
Open
the
door
to the
first s:op
H)dthed00
arid ilft I! atthe
iS in.
:+r'OH
same
sides
_ngle
it
F_t the bottom
corners
of the
door over the ends of the hinges
Push the door down
everuy
[he door will close
only when
it ,s on the
THE OUTER OVEN
hinges
correctly
WINDOW
It your range
hcs an ,)yen window
instead
of the black
glass door. the outer glas',
and frame can be rer7 oved tar cieon,ng
DO NOT take apart a black glass door,
REMOVING
With the door <losed
rem
the screws from the top of
the outer window frame
',._€
p
trl@ ¢,'if]C
from
the
for-
)¢_ (Jrl(J
lame
oat
l.j-Nt:iN
t.
Sb<u_!tl'.
L_ft UP on oath
frame
s_des oftne
REPLACING
Fit tile
frame
window
12
boftom
into the
openng
ads or t_e
Dottom
of tf_
_br!
lie
+" u
opeqJfl_
t
,, 7, :!t"
Cdl',iC
':
i:;dshlNc
Replace
!he screws
THE CONTINUOUS-CLEANING
Standard
over
continuous-cleaning
porcelain-enarr
wails
OVEN
are coated
with smooth
porcelain-enamel
oven walls are coated
with a special,
rougher
Your
ei
A fat spotter
beads
up on the smooth
surface,
but spreads
out on the rougher
surface
The bead
of fat chars and turns black
The spread-out
tat gradually
burns away
at medium
to high baking
temperatures
(350 -475 F, 176 -231 C] so
the oven can return to a presentably
clean
condition
Fat Spcdre_
Beads
Jp
Fat SDatter
Spreads
Oul,
Turns
Burns
Standardporcel3Jn
B*ack
enamel
"Continuous-cleaning
USING
Away
porcelain-enamel
FOIL
Llsmg fcm on tr _ _,_e,_ :)ot|om
Js reqommer,:ued
only if the foil is used properly,
CuT foil from a o; o t neavv-auly
18qnch
45 cm] aluminum
foii or b,_v a foil kit
(Part No 241430
from €our Whirlpoo
Aopik:qce
dealer
!
I
\
/
[_it! the cool
bake
shghtly
to lift the
oven barton-
element
feel
off',_.
F:;=rprop_._r O(:u,_ _ owerthE'
bake
element
so all feet
elemer
Mal, e s_Jrq-t(Sl S
_on{;
sides
/
,_rqo(Jgn
:snd
@nterea
s;srt Up both
wltrq:DiJ" wrinkles
rest solidly
on the
toil.
!'2
13
TIPS
t,
The oven
coated.
2,
The oven
window
Clean
door
walls+ Some
be needed.
and
racks
are
them
by hand.
does
not get
hand
cleaning
not
as hot as fi_e
If you do more broiling than baking,
cleaning
may be needed.
4.
Use aluminum
foil on the oven bottom according
to instructions,
Spillovers do not burn away and
may stain the bottom.
may
HAND
-
3.
CLEANING
J fS"
I
DO NOT USEOVEN
CLEANING PRODUCTS,
Some can be trapped
in
the porcelain-enamel
surface and give off
harmful fumes,
WALLS AND
water+
DOOR
- Wash
Use a soapy
plastic
scouring
Rinse well
14
RACKS- Use a soapy
steel-wool pad tot best
results, Rinse wel!.
WINDOWKeep clean
with hot sudsy water.
Do not use steel wool or
abrasive cleansers. Use a
plastic scouring pad for
stubborn spots+ Rinse well+
with
steel-wool
pad
hot soapy
pad
for stubborn
or
spots
hand
Ifyou need service or assistance,
we suggest you follow these
four steps:
1.
Before
_ng
for assistance...
Performance
problems often result from
little things you can find and fix yourself without tools of any kind.
If nothing operates:
• Is the range plugged
into an operating
outlet or wired into a live circuit with the
proper voltage? [See Installation
Instructions,)
• Have you checked
the main fuse or circuitbreaker box?
It the oven will not operate:
• Is the Oven Selector Knob turned to a setting [BAKE or BROIL, but not TIMED)?
• Isthe Oven Temperature
Control turned to a
temperature
setting?
It surface units will not operate:
• Have you checked
the main fuse or circuitbreaker box?
• Are surface units plugged
in al! the way?
• Do the control knobs turn?
• Are lhe pans the size called for in
the recipe?
• Are you following a tested recipe from a
reliable source?
• Do the cooking
utensils have smooth, flat
bottoms?
• Do the cooking utensils fit the surface unit
being used?
See the Cooking Guide for more information
on cooking problems
and how to solve them.
2. Ifyou
If cooking results aren't what you expect:
• is the range level?
• Are you using pans recommended
in the
Cooking Guide?
• If baking, have you allowed 11/2to 2 inches
14-5 cm] on all sides of the bans for air
circulation?
• Does the oven temperature
seem too low or
too high? See page 5, "Resetting the oven
temperature
control"
• Have you preheated
the oven as the recipe calls for?
assistance:_
...
Call the Whirlpool COOL-LINE" service assistance telephone number. Dial tree from:
Continental U.S.........
(800) 253-I 301
Michigan ................
(800) 632-2243
Alaska & Hawaii ........
(500) 253-1121
and talk with one of our trained Consultants.
The Consultant can instruct you in how to obtain satisfactory
operation
from your appliance or, if service is necessary, recommend
a
qualified
service company
in your area.
3.
It surface unit control knob or knobs will not
turn:
• Did you push in before trying to turn?
It soil is visible on continuous-cleaning
oven finish:
• The special finish is designed
to gradually
reduce oven soil during normal baking
or roasting. It is not designed to keep your
oven spotless...only
presentably
clean.
• If you broil often, you may see oven soil.
• The door is cooler than oven walls. Soil will
be more visible on the door than other
areas in the oven. See page 14, "Hand
Cleaning"
need
If you need
serwce....
Whirlpool
has a
nationwide
network of franchised
TECH CARE _ Ser-
- Jo
vice
Companies
TECH-CARE service
technicians
are
trained
to fulfill the
I TE H- ARE
L
FRANCHISED
warranty
States To
area, call
telephone
telephone
APPLIANCE_
MAJOR
...
product
SERVICE
and
warranty
provide
after-
service,
anywhere
in the United
locate TECH-CARE service
in your
our COOL-LINE service assistance
number
[see Step 2] or look in your
directory
Yellow Pages under:
- HOUSEHOLD
SERVICE
& REPAIR
,_1 ALl 0L
_, PL _CES
rqAr4
H_EB T-_
]_,R_
kt /:! I( t
X_'! S_R_ CE C.
'23 _ar
_R',r
_ IJIH)I
ELECTRICAL
MAJOR
OR
APPLIANCES
REPAIRING
& PARTS
WHIRLP0[]L _,PPI IAN{E$
_R,_NCI_ SED _[]k
CAI4_ SFRVI{f
E
\!J:
_,
_YZ
EAYC
23 M:!le
9!:_ _
<F.I_I
C
!I'_.
I _)li/ A \IF._'
999 9999
OR
WASHING
MACHINES
& IRONERS
_
tlFLPQOL
_,PPL
_qANCHI£ED
XYZ SERYI(E
12/MJD',"
DRYERS
SERVICING
_(,
T 81
S
CAA
EAV
'0
999 9999
15
4.
If you have
a problem
...
Call our COOL-LINE service assistance
telephone number
[see Step 2} and talk with one
of our Consultants,
or if you
prefer,
write
to
Mr. Robert EGunts, Vice President
Whirlpool Corporation
Administrative
2000 US-33
Center
North
Benton Harbor, M149022
If you must call or write, please
prowde
mode_
number,
serial number,
dole
of purchase,
and
a complete
description
_f the problem
This
information
is needed
in order
to better
respond
to your
request
for (]ssistanoe.
P'SP ,s ]
registered
quality
pa[t_
lrademark
Look
for
this
symbo{
Of quc_hty
wherlever
of Whirlpool
CorporohOn
for
you
need
e feplooemerlt
par!
lot
your
Whirlpool
appliance
FSP replocemeni
Wl! i tlf
righl
_" ride
to the
tl,ed
Qnd
Io build
WOrK right
same
every
parls
because
exachng
new
Whirlpool
Benton
Whrrl
ol
Part No 311410 Rev B
_
Bu,lt-ln
Harbor
M=ehlgan.
Hefrlgeraler
Ovens
Compaelors
_--v_,
ate
aDphence
F[eezers
Heating
e_q
they
specifications
Automali:
Freezers¸
and Surlace
Room
Units,
Washers
If;e
Ranges
Air Conditioners
and Air CondiNonin@
Makers¸
CIolhes
Dryers
Dishwashers¸
Microv/ave
Dehumidiliers
Ovens
Central
Systems
,'__._J
Printed
in U S A