1
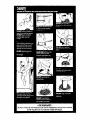
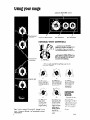
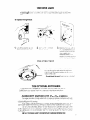
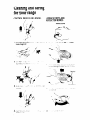
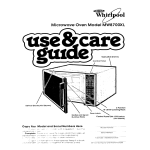
P
WhiI $1
-
01304NCH
SET-INCONTINUOUS-CLEANING
ELECTRIC RANGE
Models RS6300XK;
RS630PXK
-
-
Surface Unit
Control Panel
Oven Control
pane,
Automatic
One-Piece
y
f;;rne
Reflector
Surface
Unit
Light Switch
Model
and Sedal
Copy
If YOU need Service.
information
ready1. Complete
just behind
2. Purchase
Your Model
and Serial Numbers
or call with a question,
Here
have this
Model
Model and Serial Numbers
the oven door].
Number
[from the plate
Serial
Number
date from your sales slip
Copy this information
in these spaces.
your Warranty
and the sales slip together
place.
See the “Cooking
Purchase
Keep this book,
in a handy
Guide’jfor
Service
important
safety
Company
information.
Date
and Phone
Number
Oven
Your responsibtities
l
..
Proper installation
and safe use of the range are your persona;
responsibilities.
Read this “Use and Care Guide”and
the “Cookins
Guide” carefully
for important
use and safety information.
Installation
You mkst
l
l
be sure
Installed and ieveled In ,CIcabnet and on c.:flcior that :h 11 holcl
.,
me welgnt.
installed iri C-J‘weli+entll
.:!ei:
area protec’ea
frcsrr th::
weather
Proper use
You must
l
be sure
yaur
ra’lge
used only V,r jcb~ 12x.p~ :3*
of horne ror’ges
is .
your
range
is...
* properly
connected
to the co;
rect electric silpply and
grounding.
[See “lnstallctlon
!nstructions.“I
Using your range
Automatic
\
,
Surface
Controls
Unit
Clock
and Minute
Timer
MEALTIMER
Start Time Knob
Clock
Stop Time Knob
SURFACE UNIT CONTROLS
Control
knobs must be
turning
them
to a setting. They can be set
anywhere
between
HI and OFF
pushed
\ Surface
/
in before
One of the signal
lights will
glow when a surface
unit is on.
Be sure all lights are off when
you are not cooking.
Unit
Indicators
Turn to setting.
Until you get used to the settings.
I>wing as a guide
- Signal
use the fol
Light
Use HI to start
foods cooking
or
to bring liquids to
a boil.
Use MED-HI to
hold a rapid boil
or to fry chicken
or pancakes.
Use MED for
gravy, puddings
and icings or to
cook large
amounts of
vegetables.
SURFACE
UNITS:
UEC
Use MED-LO to
Keep food
cooking
after
starting it on a
higher settrng
See
‘The Accessory
your ‘Cooklng
information.
d
Canning
Guide
Kit.
(page
for important
9) and
utensil
Use LO to keep
food warm until
ready to serve.
Set the heat
higher or lower
within the LO
band to keep
food at the
temperature
you
want.
Element will be
black during
cooking
If contact
with bottom of pan
is good Element
WII Tot tarn red if
good : :,7tact IS
made
Tmk
Monuol
Oven
Oven Signal
Light Switch
Adjustable
Oven Selector
Light
Oven Temperature
Control
OVEN CONTROLS
goes
5.
6.
off
Put food in the oven
When done baking, tlJri both Lnobs to
OFF
During baking,
the elements
will turn on
and off to help hold the oven temperature
at
the setting.
(The top element
will never turn
red, but will be hot.) The Signal light will turn
on and off with the elements.
RESETTING THE OVEN TEMPERATURE CONTROL
Does your new :Iven seem to be hotter (;r colder ot tne same
old oven? The ten-perature
setting In vour old oven may have
ally over the years. The accurate
setting of vour new oven can
If vou?hrnk the oven temperature
needs a:l]ustrng, follow these
settings r:-Ior ~ocir
changed
grodI;seem differen:
steps
OFF
iIF F
%ot n
Yotc5es
1.
pull outthe
center
ot the Oven Temperature Control
2.
,..,3;f,n
the
,r.,‘; ii- rew
0~~~
3.
(‘ I_?der ‘hc: Iem-
:jerature
move
:3iack ring so tooth 1s
:Noser to LO Each
:tCh
eCjUC:iS
-rbout!O
Tighten
the locking
screw.
Replace
F (5 C]
the knob.
4.
Nolches
the Tern.
perature. move black
ring so ‘00th IS
closer to HI Each
::otch equals
about 10 F r5 C]
7:: ase
5
BROILING
3.
1.
Place the rack where you
want it for broilrng. (See
below for suggestions
1
2.
Put brorler pan and food
on the rack
4.
Set Oven Temperature
Control to BROIL. [Se+ in c
iower temperature
fee
slower brorlrng See
!Jelow.\
5.
D urrng brolIrnq t&z :jver’N
door must be partly open
A built-in st,?p &II, ho!d 1’
there
Set Oven Selector
BROIL.
to
can be slowed
‘3~ settrny tne i,‘ieri Temperature
Contror tc G >e~: I
rower than BRr?ll bhen It’s on BROIL the broil element IS on ali rhe +rrne zii;:~
:
ill- d temperalure
the element turns off and on The lower the tember:-:+,. i A--‘-r 1
*n:- s,lorter arc: t?e t me- when the elemenf IS or
Broiling
The Oven Selector
broiling
temperatures.
Knob
must
be on BROIL
and
the door
partly
cpen
tar Q!:
OVEN RACK POSITIONS
Position
ilft
racks
before
turning
on the oven.
ICk ~11
fror-r cm::
DUI ClLJf
BAKING OR ROASTING
BROILING
Food for baking or ro ystrn.;; sr;,8,,;d t!;i
:)iaced rn the center or rl‘le c,‘ver
Always leave at leas+ 1 jztc. 2 ir,chei
(3-5 cmj between the c, ties ,~l*a pan crud !‘-I(’
:sven wall and another c)~rr F,.;r ‘nore ;:ifo,=a
t or: see the ‘Cooking ~.Gc:~dt~~
Adtust rhe top rat I( sc t--e ‘,.; - 1: ‘. :,r -!II~
‘:, at a suggested
&stance
kc--: --I+ I- “-‘I, ++j
-lent (See page 7 j ALWAYS h-,-.1’ \.&,I~*.*hci
-loor open to the brori-stf:.:
Suggested oven-rack
kinds
r
Food
6-m
positions and broiling times for different
of meats.
Description
ADDroximote
Minutes S&ctor
set to BROIL
1st side
2nd side
Inches (cm) from top
of food to Broil Element
Beef Steal.5
I (2.5 cm)
1 (2.5 cm)
(2.5 cm)
__ 1 ---__
Yam slice precooked
or~~-~-~~
tendered
~
3-5
4-7
5-7
13-15
17-19
19-21
6-8
6-8
8-10
14-16
4-5
4
4
4
3
1 (2.5 cm)
-1
(l-2.5 cm1
3 (8 cm)
6-8
4-5
3 (8 cm)
3 (8cm)
6-8
6
4-5
4
(l-2
CI*i’
II
-5 (IO-13 cm)
-5 (IO-13 cm)
-5 (IO-13 cm)
(8cm)
7-9
9-l 1
11-13
.’ (4cm)
1 L (4cm)
I’ z (4 cm)
cut in half
whole
fillets
kra;lkfurte
3 (8 cm)
3 (8 cm)
3 (8 cm)
~-__~~~
4 -5 (IO-13 cm)
15
10
7 -9’ (18-23 cm)
3 (8cm)
3 (8cm)
25-30
II-16
7-8
IO-12
9-14
5-7
“(8g
~~
~~
4 -5 (IO-13 cm)
3
3
6-7
4-5
SETTING THE CLOCK
Pclsh ‘? and turr: the MIntire Timer Knob ‘r: set i?e Clock
1
Push in Minute
Timer
clockwise
dn+Y clot:
Knob
and
turn
cno:‘, , t’-e rlgh” tory .
2.
Let the
Minute
Timer
Knob
pop
out
Turf
sounterclockwlse
until the Mlnule Time:
dial snows OFF The clock setting
will
* 3 :-:‘i
change
if you
push
in when
turning.
Timer
1.
pushing
it in, turn the Minute
5mer Knob until the 9and passes the
setttng you want
Without
PUSHING
CHANGES
IN AND TURNING THE KNOB
THE CLOCK SETTING.
2.
Without
pushing
the setting
3.
in, turn the knob
back
to
you want
When the time IS up, a buzzer svlII >o:r ::
To stop the buzzer, turn tne alai V PC
without
pushing
in the
knob
7
USING THE AUTOMATIC
MEALTIMER”’
The Automatic
MEALTIMER Clock is designed
r’ou set even when you are not around
Yo start and stop baking
to turn the oven on and off at times
automatically:
1.
Put the racks where you
wlnt the?? and place the
‘6, ~(-jln itie over’
2.
4.
Push In and turn the Slop
T!Te Knob clockwise
‘( tne ?lr?e you want t-70
‘. verl to shut oft
5. Set the Oven Selector
TIMED
7.
After baking is done, turn
both knobs to OFF
8.
To stop baking
CLOCK
Make sure the clock is set
to the right time of day.
on
3.
Push in and turn the Start
Time Knob clockwise
to the time you want baking to start
6.
Set the Oven Temperature
Control on the baking
temperature
you want
To stop the oven before
the preset time turn both
knobs to OFF
automatically:
1. Put the racks where )ou want them ancl
olace the food In the ovep
2 Make sore +he clock I’; set tcj the right time
ot day.
3. Push In and turn the Stop Time Knob clockH ise to the time you want the oven to shut
1ff
4. Set :he Oven Selector
on :IMtTI,
Set the Oven Temperature
Control on the
baking temperature
you want
6. After baking is done, turn both knobs to
OFF
7. To stop the oven before the preset time.
turn both knobs to OFF.
5.
SPECIAL CAUTION:
Use foods that will not go bad or spoil
while waiting for cooking
to start. Avoid
using dishes with milk or eggs, cream
soups, cooked
meats or fish, or any item
with baking powder or yeast.
Smoked or frozen meats may be used.
so can vegetables,
fruits and casserole‘vpe foods Vegetables
can be cooked
in
--__I
5
o covered
baking dish with about a halfcup (118 ml) of water for 1 to 1% hours
Any food that has to wait for cooking
to
start should be very cold or frozen before
rt is put in the oven. MOST UNFROZEN
FOODS SHOULD NEVER STAND MORE THAN
TWO HOURS BEFORE COOKING STARTS
“17 K
THE OVEN LIGHT
The oven light ijlil cc~rrle on when vcju open the oven door or \/vhen ~:LIJ pL;r
the Oven Light Svdrtch Close the over door or push the switch again to shut off tht,
lrght
To replace
1.
the
light
Turn off the electric
at the marn power
bulb:
pamper
Replace ir\e UUIL vvltil J
do-watt appliance
bulb
avarlable
from most yro
:;ery varrety anti
hardware
stores T;:?ri
electrrcal
bower back ,on
.~l the r113~:-1power supply
sur~pl~
THE OVEN VENT
/v-Ian the oi/en Is on, hot (311.rnd rnor;r;~re
escape through CI vent under the right rea’
fcr arr c~rcu
surface unit The vent IS needed
lation in the oven.
Do not block
the vent. Poor baker-rg 2cln resurf
THE OF’TIONAL ROTISSERIE
It you would lrie a rotisserie for voclr oven, you can order a krt (Parr rU<.
261880) from your dealer The kl? In::! .ldes easy Installation
rnstructtons
ACCESSORY CANNING KIT (Part No. 242905)
The large diameter
of most water-bath
or pressure canners combined
with high
heat settings for long periods of time can shorten the life of regular surface units and
cause damage
to the cooktop.
If you plan 10 use the cooktop
for zanriing, we recommend
the Instar! ztlor or a
Cannrng Kit. Orderthe
kit from your Whrrlpool Dealer or Tech-Care Service
iJse only flat-bottomed
utensils for best results ano to prevent damage
to the
range Specralty
items ,wrth rounded or ridged bottoms (woks, ridged bottom =onners
or tea kettles] are not rec:ommendea
See the “Cooklng
Gurde” for rmportarlt
utensrl
rnformatron
Cor~pu~ly
SEE THE “COOKING
GUIDE”
FOR IMPORTANT
CANNING
INFORMATION
Cleaning ad caring
for your range
SURFACE UNITS AND
REFLECTOR BOWLS
REMOVING
CONTROL PANELS AND KNOBS
1.
First make sure knobs
knob straight
oft
3-r’ s--
C#i: :r:e
‘7
L,.?If
,jl
2.
‘,
-------\
c
-4,
I
/
Terminof
Recepbcle
3.
4.
REPLACING
1.
2.
Be sure surface
unit controls
are OFF.
Line up opening
in the reflector
the surface unit receptacle.
bowl
While pushing the surface unit terminal into
the receptacle,
lift a little on the edge of
the unit nearest the receptacle.
5.
When the terminal
is pushed into the receptacle
as far as it will go, the surface unit
will fit into the reflector bowl.
with
Terminal
3.
4.
Reflector bowls reflect heat back to the
utensils on the surface units. They also help
catch spills. When they are kept clean, they
reflect heat better and look new longer.
If a reflector bowl gets discolored,
some
of the utensils used may not be flat enough.
Or some may be too large for the surface
unit. In either case, some of the heat that is
meant to go into or around a utensil goes
down and heats the reflector bowl. This extra heat can discolor it.
Hold the surface unit as level as possible
with the terminal
just started
into the
receptacle.
CLEANING CHART
PART
Outside
of range
WHAT TO USE
Soft cloth, warm soapy water
Nylon or plastic scouring
pad
for stubborn
spots
Surface
units
No cleaning
Control
knobs
Warm, sudsy water and bristle
brush
Automatic
dishwosher
or warm,
soapy water or plastic
scrubbing
pad
Warm, soapy water or soapy steel
wool pads
Warm, soapy water
Chrome
bowls
reflector
Aluminum
broiler
pan and grid
Surface unit
control oanel
Oven control
panel
Oven racks
Oven door glass
Continuouscleaning
oven
required
HOW TO CLEAN
Wipe off regularly
when range is cool.
l
Do not allow food containin
acids (such as vinegar,
tomato, lemon juice or milk) ? o remain on surface.
Acids will remove the glossy finish.
l
Do not use abrasive
or harsh cleansers
l
Spatters or spills will burn off.
l
Do not immerse in water.
l
Wash, rinse and dry well.
l
Do not soak.
l
Clean frequently.
l
Wash with other cooking
utensils.
l
Do not use harsh abrasives.
l
Wash with other cooking
utensils.
l
l
Wash, rinse and dry with soft cloth.
l
Wash, rinse and dry with soft cloth.
Warm, soapy water
Commercial
alass cleaner
l
Follow directions
orovided
with cleaner
Warm, soapy water or soapy steel
l
Wash, rinse and dry. Use steel wool pads for
wool pads
stubborn
areas.
l
Make certain oven is cool. Wash, rinse and dry well
Warm, soapy water or plastic
scrubbina
pad
with soft cloth.
Commercial
glass cleaner
l
Follow directions
provided
with cleaner.
Warm, soapy water or soapy
l
Clean stubborn spots or stains. Rinse well with
scrubbing
pad
clean water.
Heavy-duty
aluminum
foil
l
Place strlp of aluminum
foil on bottom of oven to
available
at grocery
stores or
catch spillovers.
order Part No. 241430 from your
l
Do not use commercial
oven cleaners.
Whirlpool
dealer or your
TECH-CARE ’ service
representative
Most fat spatters on the Continuous
Cleaning
porcelain-enamel
interior surface gradually
reduce to a presentably
clean condition
during normal baking or roasting
operations
11
THE OVEN DOOR
REPLACING
REMOVING
Open the door to the first ~‘0~2
ti ,Id the COO, !’ !:otl-I sides
cf-~d lift 0 at the same angle
is In.
Fit the bottom
it
corners of the
door over the ends of the hinges
Push the door down evenly
The door will close only when
it !s on the hinges correctly
THE OUTER OVEN WINDOW
block qlcss door.the oclter glass
If your range has an \,ven window !rlsteoS,1 -*‘the
ii
ana frame can be rem:ived for cieallcg
DO FlOT take apart a black glass door.
REMOVING
With tQe dGGr ,AoseU rerTi ‘..:-’
the screws from the top of
the outer wlndow frame
Lift up on t3oth sides of tne
trame
REPLACING
FI?the bottom lilbs 0’ t:le
frame Into the bottom rot tTt>
window opening
12
Replace
the
SC:~WS
Standard over
contfnuous-cleaning
porcelafn-enarrei
WOIIS
are coated with smooth porcelain-enamel
oven walls are coated with a specfal, rougher
YGU~
A fat spatter beads up on the smooth surface but spreads out on the rougher
surface The becd of tat cnars and turns black The spread-out
fat gradually
burns away at medium
to high baking
temperatures
(350 -475 F. 176 -231 C] SC
the oven can return to a presentablv
clean condition
Fat Spatter
Spreads Out
Burns Away
Fat Spcl!tei
Beads up
Turns Black
Standard
parcel-xln-enamel
Lantinuous-cleaning
porcelain-enamel
USING FOIL
ils~ny toI1 3n tr C; :,s,t-‘1~1bottom IS rer~mrneriaed
only if the toil is used properly.
Cut fGll from a loll or neavy-duty
16.inch [45 cm] aluminum foil or bby a foil kit
(Part No 241430
rr,~rv your Whirlpoo
ADplIC;,:ce
dealer
iLit<the cool
bake
element
slightly to lift the feet off ‘!I*
oven botton
F<J~prope: 5c.r (1 q jtier
bake element so all feet
rest solidly
on the foil.
the
TIPS
1.
The oven window and racks are not
coated. Clean them by hand.
2. The oven door does not get as hot as the
walls. Some hand
be needed.
cleaning
may
3.
If you do more broiling than baking,
cleaning
may be needed.
4.
Use aluminum
foil on the oven bottom according
to instructions.
Spillovers do not burn away and
may stain the bottom.
HAND CLEANING
-\.
-:--a+
t-Qb===?
I
’
“, \
I
;3
&
DO NOT USE OVEN
CLEANING
PRODUCTS.
Some can be trapped
the porcelain-enamel
surface and give off
harmful fumes.
in
WINDOW-Keep
clean
with hot sudsy water.
Do not use steel wool or
abrasive
cleansers. Use a
plastic scouring pad for
stubborn spots, Rinse well.
steel-wool
pad for best
results. Rinse well.
WALLS AND DOOR-Wash
with hot soapy
water. Use a soapy steel-wool
pad or
plastic scouring pad for stubborn spots.
Rinse well.
14
hand
If you need service or assistance,
we suggest you follow these
four steps:
1
l
Before calling for assistance.. .
Performance
problems often result from
little things you can find and fix yourself without tools of anv kind.
If nothing
l
operates:
2
Is the range plugged
into an operating
outlet or wired into a live circuit with the
proper voltage?
(See Installation
Instructions.)
l
Have you checked
breaker box?
If the oven
l
l
l
l
not operate:
units
will
not operate:
Have you checked
the main fuse or circuitbreaker box?
Are surface units plugged
in all the way?
Do the control knobs turn?
If surface
turn:
l
the main fuse or circuit-
Is the Oven Selector Knob turned to a setting (BAKE or BROIL, but not TIMED)?
Is the Oven Temperature
Control turned to a
temperature
setting?
It surface
l
will
unit control
knob
Did you push in before
If soil is visible
oven finish:
or knobs
trying
will
not
to turn?
on continuous-cleaning
The special finish is designed
to gradually
reduce oven soil during normal baking
or roasting. It is not designed
to keep your
oven spotless...only
presentably
clean.
If you broil often, you may see oven soil.
The door is coolerthan
oven walls. Soil will
be more visible on the doorthan
other
areas in the oven. See page 14, “Hand
Cleaning.”
If cooking
l
l
Cooking
l
l
l
results
aren’t
what
you
Is the range level?
Are you using pans recommended
Are the pans the size called for in
the recipe?
Are you following a tested recipe from a
reliable source?
Do the cooking utensils have smooth, flat
bottoms?
Do the cooking utensils fit the surface unit
being used?
See the Cooking
Guide
for more information
on cooking
problems and how to solve them.
l
If you need assistance”‘. . .
Call the Whirlpool
COOL-LINE’
service
assistance
telephone
number.
Dial free from:
Continental
U.S. . . . . . . . . (800) 253-1301
Michigan
. . . . . . . . . . . . . . . . (800) 632-2243
Alaska
& Hawaii
. . . . . . . . (800) 253- 112 1
and talk with one of our trained Consultants.
The Consultant can instruct you in how to obtain satisfactory
operation
from your appliance or, if service is necessary,
recommend
a
qualified
service company
in your area.
3 . If you need service”’ . . .
Whirlpool
has a
nationwide
network of franchised
TECH-CARE y Service Companies.
TECH-CARE service
technicians
are
trained to fulfill the
warranty
1 FRANCHISED
SERVICE
( product
and provide
afterwarranty
service,
anywhere
in the United
States. To locate TECH-CARE service
in your
area, call our COOL-LINE service assrstance
telephone
number [see Step 2) or look in your
telephone
directory
Yellow Pages under:
1
expect:
in the
Guide?
If baking, have you allowed 1% to 2 inches
(4-5 cm) on all sides of the pans for air
circulation?
Does the oven temperature
seem too low or
too high? See page 5, “Resetting the oven
temperature
control.”
Have you preheated
the oven as the recipe calls for?
15
4
a
If you have a problem
&..
Call our COOL-LINE service assistance
telephone number (see Step 2) and talk with one
of our Consultants, or if you prefer, write to
Mr. Robert F Gunts, Vice President
Whirlpool Corporation
Administrative
Center
2000 US-33 North
Benton Harbor, Ml 49022
If you must call or write, please srovlde
mode:
number, serial number, date of purchase,
and
a complete
description
>f the problem
This
information
is needed
in order to better respond to your request for cissistance
FSP ,s ‘I] regIstered
trademark
or WhIrlpool
Corporallon
for
quality
parts took for this
FSP
symbol of quallly whenever
you need a replacement
par1
’ for your WhIrlpool
appliarlce
ESP replacement
parts
ti111 111rrghl and work right because
they are
-r,?de tc the same exacting
ipeclfrcalloni
.~-rd 10 bulld evelr
ww
Whirlpool
appliance
0
Benton Harbor hlrchrgan Aulomalr: Washers Clolhes Dryers
Freezers qelr~qeralor Freezers Ice Makers Drshwashers.
BurlI-rn Ovens and Surlace Un~ls. Ranges MIcrowave Ovens
Compactors Room Arr Condilrouers
Dehumidrlrers
Cenlral
Heallnq and Arr Condrllonrng Systems
Part No 311410 Rev B
Prlrlted
In U
S .A