1
Part No.: RN0332H2009
P
O
Mode_
Number°
f
Please register your product
at
www.proscanus.com
Please keep your sales receipt and keep the record of
the serial number and the date of purchase in order to
receive warranty parts and service.
The serial number is located at the back of the TV.
Serial Number / N_mero de serie de TV
Date of Purchase / Fecha de la ¢ompra
www.proscanus.com
Congratulations on your purchase! As you enjoy your new product, please
keep thesesafely tips in mind:
THE ISSUE
• The home theater entertainmentexperience is a growing trend and larger
flat panel displays are popular purchases.However, flat panel displays
are not always supported on the proper standsor instaled according to the
manufacturer'srecommendations.
* Flat pane displays that are inappropriatey situatedon dressers,bookcases,
sheves, desks, speakers, chestsor carts may fall over and cause injury.
THIS MANUFACTURERCARES!
• The consumerelectronics industryis committed to making home entertainment
enjoyable and safe.
TUNE INTO SAFETY
• One size does NOT fit a. Follow the manufacturer'srecommendations
for the safe insta ation and useof your flat pand dispay.
• Carefully read and understandall enclosed instructionsfor proper useof
this product
• Don't allow children to climb on or play with furnitureand teevision sets.
• Don't pFaceflat panel displays on furniturethatcan easily be usedas steps,
such as a chest of drawers.
• Rememberthatchildren can become excited whib watching a program,
especially on a "larger than ife" flat panel display. Care should be taken to
place or installthe dispay where it cannot be pushed, pulled over,
or knocked down.
• Care should be taken to routeall cords and cables connected to the fiat
pane display so that they cannot be pulled or grabbed by curious children
WALL MOUNTING: IF YOUDECIDE
TOWALLMOUNT
YOURFLATPANELDISPLAY,
ALWAYS:
• Use a mountthat has been recommended by the display manufacturer
and/or isted by an independent laboratory (suchas UL,CSA, ETL)
• Follow al instructionssupphed by the display and wall mount manufacturers.
• Ifyou haveany doubts about your ability to safely installyour flat panel
display, contact your retailer about professional insta ation.
• Make surethat the wal where you are mounting the display is appropriate.
Some wall mountsare not designed to be mountedto wails with steel
studsor old cinder block construction.Ifyou are unsure,contact a
professional installer.
• A minimumof two people are requiredfor installation. Flat panel displays
can be heavy.
Consumer
Elec_ron_A_o_on
www.CE.org/safety
English- 1
Child Safety
Caution
........................................................................................................................................
and Warning
FCC Notice
Safety
Guide
..................................................................................................................................
....................................................................................................................................................
Precautions
....................................................................................................................................
Preparation for Your New TV ......................................................................................................................
1
4
4
5,6
7
Check Accessories ......................................................................................................................................
.7
Setup TV Table Stand ..................................................................................................................................
.7
Select TV Location ......................................................................................................................................
.7
Connection and Using ..................................................................................................................................
.7
TV Stand
Installation
....................................................................................................................................
8
TV Signal Connection
..................................................................................................................................
Cable Connections
.....................................................................................................................................
9
.I 0
Back Panel Connections
11
............................................................................................................................
Connecting AV Composite Video device (Good Video Quality) ........................................................................
11
Connecting YPbPr Component device (Better Video Quality) ..........................................................................
12
Connecting HDMI device (Best Video Quality) ...............................................................................................
13
Connecting a Computer ...............................................................................................................................
How to Obtain Various Kinds of input Sources ...............................................................................................
14
14
TV Jacks
Explanation
Side Keypad
and Front
..................................................................................................................................
Panel
...................................................................................................................
15
16
Side Panel Buttons ......................................................................................................................................
.16
Front Panel ................................................................................................................................................
16
Remote
Control
Instructions
......................................................................................................................
17
Inserting Batteries in the Remote .................................................................................................................
17
Remote Control Reception Angle .................................................................................................................
17
Learning about Remote Control ...............................................................................................................
Remote Control Buttons ..............................................................................................................................
18
18
Initial
.I 9
Setup
..................................................................................................................................................
Menu Language ..........................................................................................................................................
19
Signal Type .................................................................................................................................................
Auto Channel Search ...................................................................................................................................
19
19
Basic Operations
.........................................................................................................................................
20
Turning On and Off .....................................................................................................................................
20
Choosing TV Channel .................................................................................................................................
20
Selecting input Source ................................................................................................................................
20
Adjusting TV Stand Angle ............................................................................................................................
Channel Bar ...............................................................................................................................................
20
21
Adjusting Volume .......................................................................................................................................
EPG (Electronic Program Guide) .................................................................................................................
21
2!
English-2
OSD Menu
.............................................................................................................................
22
Adjust the OSD Screen .............................................................................................................................
22
Picture Menu ............................................................................................................................................
22
Sound Menu ............................................................................................................................................
24
Channel Menu ..........................................................................................................................................
25
Parental Menu ..........................................................................................................................................
26
Setup Menu ...............................................................................................................................................
30
Others Menu ............................................................................................................................................
32
Frequently
Operations
Asked Questions
Troubleshooting
V-Chip
Rating
(FAQs)
.....................................................................................................
.........................................................................................................................................
Explanations
....................................................................................................................
33
34
36
US V-Chip Rating System ..........................................................................................................................
36
Canadian English Rating System ................................................................................................................
36
Canadian French Rating System ................................................................................................................
37
Wall Mounting
Product
Warranty
Unit Specification
Specification
............................................................................................................
................................................................................................................................
Card .........................................................................................................................................
End ................................................................................................................................................................
Spanish User' Manual
.........................................................................................................................
38
39
40,41
41
42-82
English-3
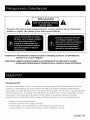
CAUTION
Caution: To reduce the risk of electric
shock, do not remove cover or back. No user-serviceable
parts inside.
Refer servicing to qualified service personnel.
WARNING: TO REDUCE THE RISK OF FIRE OR ELECTRIC SHOCK, DO NOT EXPOSE THIS APPLIANCE TO RAIN
OR MOISTURE.
CAUTION: CHANGES OR MODIFICATIONS
NOT EXPRESSLY APPROVED BY THE PARTY RESPONSIBLE FOR
COMPLIANCE WITH THE FCC RULES COULD AVOID THE USERS AUTHORITY TO OPERATE THIS
EQUIPMENT.
FCC Information
This equipment has been tested and found to comply with the limits for a Class B digital device, pursuant to Part 15 of the
FCC rules. These limits are designed to provide reasonable protection against harmful interference in a residential installation.
This equipment generates, uses and can radiate radio frequency energy and, if not installed and used in accordance with
the instructions, may cause harmful interference to radio Communications. However, there is no Guarantee that interference
will not occur in a particular installation. If this equipment does cause harmful interference to radio or television reception,
which can be determined by turning the equipment off and on, the user is encouraged to try to correct the interference by
one or more of the following measures:
-
Reorient or relocate the receiving antenna.
Increase the separation between the equipment and the receiver.
Connect the equipment into an outlet on a circuit different from that to which the receiver is connected.
Consult the dealer or an experienced radio/TV technician for help.
English-4
1.
Read these instructions.
2.
3.
4.
Keep these instructions.
Heed all warnings.
Follow all instructions.
5.
Do not use this apparatus near water. For example, do not use near a laundry tub, in a wet basement, or near a swimming
pool, and the like.
6. Clean only with dry cloth.
7. Do not block any ventilation openings. Install in accordance with the manufacturer's instructions. Slots and openings in
the cabinet back or bottom are provided for ventilation, to ensure reliable operation of the TV and to protect it from
overheating. These openings must not be blocked or covered. The openings should never be blocked by placing the TV
on a bed, sofa, rug, or other similar surface.
8. Do not install near any heat sources such as radiators, heat registers, stoves, or other apparatus (including amplifiers) that
produce heat.
9. Do not defeat the safety purpose of the polarized or grounding-type plug. A polarized plug has two blades with on wider
than the other. A grounding-type plug has two blades and a third grounding prong. The wide blade or the third prong is
provided for your safety. If the provided plug does not fit into your outlet, consult an electrician for replacement of the
obsolete outlet.
10. Protect the power cord from being walked on or pinched particularly at plugs, convenience receptacles, and the point
where they exit from the apparatus.
11. Only use attachments/accessories specified by the manufacturer.
12. Use only with cart, stand, tripod, bracket, or table specified by the manufacturer, or sold with the
apparatus. When a cart is used, use caution when moving the cart/apparatus combination to
avoid injury from tip-over. A TV and cart combination should be moved with care. Quick stops,
excessive force, and uneven surfaces may cause the TV and cart combination to overturn.
13. Unplug this apparatus during lightning storms or when unused for long periods of time. For added protection for this TV
receiver during a lightning storm, or when it is left unused for long periods of time, unplug it from the wall outlet and
disconnect antenna or cable system. This will prevent damage to the TV due to lightning and power line surges.
14. Refer all servicing to qualified service personnel. Servicing is required when the apparatus has been damaged in any way,
such as power-supply cord or plug is damaged, liquid has been spilled or objects have fallen into the apparatus, the
appratus has been exposed to rain or moisture, does not operate normally, or has been dropped.
15. This TV should be operated only from the type of power supply indicated on the rating label. If customer is not sure the
type of power supply in your home, consult your appliance dealer or local power company. For TV remote control battery
power, refer to the operating instructions.
16. The TV set shall not be exposed to dripping or splashing. No objects filled with liquids, such as vases, shall be placed on
the TV set.
17. Never push objects of any kind into this TV through openings as they may touch dangerous voltage or other electrical
parts that could result in fire or electric shock. Never spill liquid of any kind into the TV.
18. Unplug the TV from the wall outlet before cleaning. Do not use liquid or aero cleaners. Use a damp cloth for cleaning.
19. This TV should never be placed near or over a radiator or heat resource. This TV should not be placed in a built-in
installation such as a bookcase or rack unless proper ventilation is provided or the manufacturer's instructions have been
adhered to.
20. Do not place this TV on an unstable cart, stand, tripod, bracket, or table. The TV may fall, causing serious injury to
someone, and serious damage to the appliance.
21. Do not attempt to service this TV by yourself because opening or removing covers may expose you to dangerous high
voltage or other hazards. Refer all servicing to qualified service personnel.
22. This device complies with Part 15 of the FCC Rules. Operation is subject to the following two conditions: (1) this device
may not cause harmful interference, and (2) this device must accept any interference received, including interference
that may cause undesired operation.
English-5
23. WARNING: To prevent injury, this apparatus must be securely attached to the floor/wall in accordance with the
installation instructions.
24. To reduce the risk of electric shock, the grounding of center pin of plug must be maintained.
25. If an outside antenna or cable system is connected to the TV, be sure the antenna or cable system is grounded to provide
some protection against voltage surges and built-up static charges. Section 810 of the National Electrical Code,
ANSI/NFPA NO.70, provides information with respect to proper grounding of the mast and supporting structure,
grounding of the lead-in wire to an antenna discharge unit, size of grounding conductors, location of antenna discharge
unit, connection to grounding electrodes, and requirements for the grounding electrodes. (See Diagram Figure A.)
ANTENNA
LEAD tN
WIRE
GROUND
CLAMP
ANTENNA
DISCHARGE
(NEC
SECTION
UNIT
810-20)
GROUNDING
CONDUCTORS
(NEC SECTION
810-21)
GROUND
ELECTRIC
EQUIPMENT
SERVICE
POWER
SERVICE
GROUNDING
ELECTRODE
SYSTEM
(NEC
ART
250,
PARTH)
Diagram
Safety
CLAMPS
Figure
A
Strap
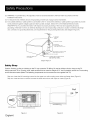
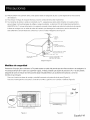
Caution: Pushing, pulling or climbing on the TV may cause the TV falling. Do not let children climb or hang on the TV.
Always place the TV on a sturdy, level, sable surface that can hold the weight of TV. And if possible, secure the TV according
to the instruction below (Note: The fastening components such as screws are not supplied with TV).
Step one: Insert the M4 mounting screws into the upper two wall mounting screw holes and fasten them (Figure A).
Step two: Insert anchors to wall and connect the bolts and anchors with ropes or chains (Figure B).
Wall
J
...................
l
M4 Screws
Figure
English-6
A
Figure
B
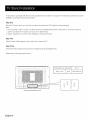
Before Turning On TV
Check Accessories
Check the accessories that are packed with your TV.
:1 !_[O_li:
[_o] _ii -'[o]I
r:T:V:! :_:| l i :1-'|1::_']
Imlol_lJ_l_i_"]
If tkvl.,._f±__ I m][_o] -'| =kVAV_I
PART NO.: RE20QP75
PROSCAN
SCREW
MACHINE
_"
M4 x lOmm, 5pcs
Part# RSO1TM41 OH
/ =vl,:,_ir±_
_ ID]
_
LCD TV
_i
QU ICK START
GUIDE
USER'S
GUIDE
r_,le]l_elhv] ::1:t [_e) :tm]
REMOTE CONTROL
GUIDE
Setup TV Table Stand
Please refer to TV Stand Installation guide in next page to carry out stand installing.
Select
TV Location
Select a flat, stable table to locate your TV set. Please follow the Safety Instructions
Connection
when locating the TV.
and Using
After placing your TV properly, you can connect the TV with power supply and cable components.
For further information,
see page
11 to page 14.
Note: Above accessories are subject to change without notice.
English- 7
TV 32LD30Q is packaged with the TV stand separated from the cabinet. To setup the TV table stand, please carry out the
installation according to the instructions below.
Step One
Place the TV faced down on a soft cloth or cushion to prevent the LCD panel from being damaged.
Note:
1. The LCD panel is easy to scratch, so please choose an absolutely flat surface to place the TV, and use soft cloth or
cushion to protect the TV panel. Do not put TV on table directly.
2. Always unplug the AC cord first when installing or removing the stand.
Step Two
Take the stand. Please align the screw holes of the stand and TV.
Step Three
Insert the five M4 machine screws (which are totally the same) and tighten them.
Please refer to the picture given below:
Pedestal Screws
M4 x 10mm
/ ::,,:;m
English-8
Quantity
Part #
5pcs
RS01TM410H
'.._
_:#
k
u ._
I
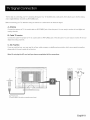
The first step in connecting
your TV is obtaining the signal. Your TV 32LD30Q has a side panel, which allows you to receive analog
and/or digital television channels via ANT/CABLE
Before connecting
your TV, determine
jack.
using an antenna or a cable service to obtain the signal.
A. Antenna
Connect
the antenna to TV via coaxial cable on ANT/CABLE
jack of the side panel. You are ready to receive air local digital and
analog channels.
B. Cable -rv service
Connect
the cable TV wall jack to TV via coaxial cable on ANT/CABLE
jack of the side panel. You are ready to receive off-air local
digital and analog channels.
C. Set-Top
Box
If you use a set-top box, you may need to call your cable company or satellite service provider, which use a special connection,
please refer to the user's guide of set-top box.
Note: Do not plug the AC cord until you have accomplished
all the connections.
Cable TV
Antenna
]
AC
110V/60Hz
AC Power Cord
(Connect after all the other connections
are done.)
English-9
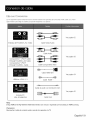
Choose Your Connections
TV 32LD30Q supports various of connecting ways from other devices (such as DVD, VCR, Set-top
table sheet to choose the cables which adapt to your device.
box, ect.). Please follow the
Go to page 11
R-AUDIO-L/AV,
VIDEO In
Video/Audio
cable
Audio Cable
|
|
Go to page 12
COMPONENT
1 IN Y, Pb, Pr
R-AUDIO-L
COMPONENT 2 IN Y, Pb, Pr
R-AUDIO-WAV
COMPONENT
HDMI-DVI
I---"*_"
ZPIIIIII
lh
video cable
cable
Go to page 13
I
HDMI IN 1/DVI, 2, 3
HDMI TMcable
Audio cable with 3.5mm terminal
Go to page 14
PC INPUT
SOUND/DVI,
VGA cable
VGA
Note:
HDMI,
the HDMI
logo, and High-Definition
Multimedia
Interface
Caution:
Unplug
the AC cord
English-lO
when you connect
other
devices
to TV.
are trademarks
or registered
trademarks
of HDMI
Licensing
LLC
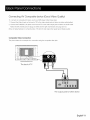
Connecting AV Composite device (Good Video Quality)
To connect an composite
AV device, such as a DVD player, follow these steps:
1. Connect
the Video In jack on the back of TV to the video output jacks of device via video cable (yellow).
2. Connect
the R-AUDIO-L/AV
jacks on the back of TV to the audio output jacks of device via audio cable.
Notice the left channel jack and plugs are white and the right channel jack and plugs are red.
Note: AV signal belongs to composite
Composite
Video
video. This kind of video signal has regular good display quality.
Connection
The picture below is an example of a connection
using the composite
video jack.
The back of TV
The output panel of other device
English- 11
Connecting YPbPr Component device (Better Video Quality)
To connect a component
1. Connect
device, such as a DVD player, follow these steps:
the COMPONENT
1,2 Y/Pb/Pr jack on the back of TV to the video output jacks of device via video cable (green,
blue and red).
2. Connect
the COMPONENT
1,2 R-AUDIO-L jacks on the back of TV to the audio output jacks of device via audio cable.
Notice the left channel jack and plugs are white and the right channel jack and plugs are red.
Note. Y/Pb/Pr jacks are component
Component
Video
video. This kind of video signal has better display quality.
Connection
The picture below is an example of a connection using the component video jack.
The back of TV
The output
English-12
panel of other device
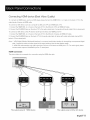
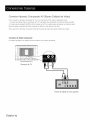
Connecting
HDMI device (Best Video Quality)
To connect an HDMI device, such as a DVD player, please Connect the HDMI1/DVl,
2, or 3 jack on the back of TV to the
output jacks of device via HDMI cable.
To connect an DVl device, such as a computer
via DVl port of PC and HDMI jack of TV:
1. Connect the HDMI1/DVl,
2, or 3 jack on the back of TV to the DVl port of PC via HDMI-DVl
2. Connect the SOUND/DVl
jack on the side of TV to the audio output jack of computer
cable.
with audio cable (3.5mm stereo jack).
To connect an DVl device, other AV device via DVl port of device and HDMI jack of TV:
1. Connect the HDMI1/DVl,
2, or 3 jack on the back of TV to the DVl port of device via HDMI-DVl cable.
2. Connect the SOUND/DVl
jack on the back of TV to the audio output jack of device with audio cable (dual-channel
RCA
jacks to 3.Smm stereo jack).
Note: !. HDMI (High-Definition
Multimedia
Interface) is a compact
audio/video
interface for transmitting
uncompressed
digital
data. It carries the audio and video signal via the same cable and has the best display quality.
2. HDMI-DVI cable transfers only video signal from DVI port of DVI device to HDMI jack of TV. For audio signal, please
connect audio output to SOUND/DVI jack on TV back panel.
HDMI
Connection
The picture below is an example of a connection
The output
panel of HDMI device
using the HDMI video jack.
PC
The output
panel of other AV device
English-13
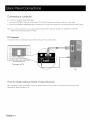
Connecting a computer
To connect a computer,
follow these steps:
1. Connect
the PC INPUT VGA port on the back of TV to the VGA output jack of device via D-sub 15-pin cable.
2. Connect
the PC INPUT SOUND/DVl jack on the back of TV to the audio output jack of computer
Note. If you want to use your TV as a monitor, please notice that the maximum
Please set the computer graphic correctly.
with audio cable (3.5mm).
resolution for 32LD30Q is !366"768.
PC Connection
The picture below is an example of a connection
using your TV as a PC monitor.
The back of TV
PC
How to Obtain Various Kinds of Input Sources
After connection
is done, press INPUT button on remote control or TV top panel to choose the input source you need.
See page 20, Basic Operation of TV.
English-14
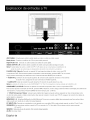
...........................
l
I|]
"l_l
_m
I]
m]m]
m
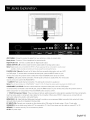
ANT/CABLE:
Connect to receive the signal from your antenna or cable via coaxial cable.
Head phone:
Connect
a 3.Smm headphone for personal audio.
Digital Audio-out:
Connect
AUDIO OUTPUT
L/R: Connect
Note:• Digital Audio-out
a coaxial cable for digital audio output.
to be connected
to audio power
smoother and more powerful sound performance.
Video In: Connect
an AV device that has composite
or a DVD player. To access device connected
remote; then press the up/down
• AUDIO-L:
coaxial cables for analog audio output.
and AUD/O OUTPUT L/R are supposed
amplifer, which proddes
R-AUDIO-L/AV,
double-channel
video jacks, such as a VCR
to these jacks, press the INPUT button on your
arrow to select AV. Press the ENTER button at last to confirm.
Left audio channel connection.
The left audio connector
is usually white. For mono audio
sources, be sure to use the left AUDIO INPUT.
• AUDIO-R:
Note:•
Right audio channel connection.
The AV input (Video In), COMPONENT
COMPONENT
1,2 Y/Pb/Pr:
Connect
To access device connected
select Component1
•
Y/Pb/Pr
(Component
is usually red.
I Lnput _, Pb, Pr) share the same audio Lnput jacks R-AUD/O-L/AV.
a device that has component
video jacks, such as a DVD player.
to the Y/Pb/Pr jack, press the INPUT button on your remote; then press the up/down
or Component2.
Use three video-grade
The right audio connector
Video):
arrow to
Press the ENTER button at last to confirm.
They provide good picture quality because the video signal is separated
or component
video cables for the connection.
When using Y/Pb/Pr,
into three components.
make sure you connect left and
right audio cables to the Audio L and Audio R jacks.
HDMI1/DVl, 2, 3: (High-Definition Multimedia Interface) It provides an uncompressed
and audio data by way of an integrated mini-plug cable.
PC INPUT VGA: Connect your computer
SOUND/DVI:
SERVICE:
AC-IN:
digital connection
that carries both video
or other device with a VGA output to this jack using a 15-pin, D-sub cable.
Use to obtain sound when a PC is connected
to TV. Use 3.5mm stereo mini-pin cable to connect PC to TV.
For service use only. Do not connect any device.
AC power input.
English-15
Side Keypad
Buttons
If you cannot locate your remote, you can use the side keypad buttons on your TV to operate many TV features.
m
INPUT: Displays the Source Select List.
MENU:
Displays the TV Main Menu.
CH • : Scans up through the channel list. In the TV menu system, it acts like the up arrow on the remote control and
can be used to select menu options.
CH - : Scans down through the channel list. In the TV menu system, it acts like the down arrow on the remote control
and can be used to select menu options.
VOL+: Increases the volume. In the TV menu system, it acts like the right arrow on the remote control and can be used
to select menu options.
VOL-:
Decreases the volume. In the TV menu system, it acts like the left arrow on the remote control and can be used
to select menu options.
POWER ((b): Turns the TV on and off.
Front Panel
About remote control working distance and angle, see page 17.
Power/Standby
Indicator:
Blue and red dual-color
LED. It shows red when the TV is turned off and blue when turned on.
Remote Control Sensor: Remote control IR sensor, which receives infrared ray sent by remote control.
--
I oRei°te
Control Sensor
Power/Standby
Indicator
(blue/red)
English-16
1
Inserting
Batteries
in the Remote
Remove the cover of battery cabin on the back of the remote control by lifting the cover
Insert two AAA batteries
making sure the polarities (+ and ) are aligned correctly
Place the cover back
If the remote
control
does not work, check
• Are the polarities (+)
these points:
correct?
CAUTION:
•
Used batteries should be recycled
• Are the batteries worn out?
•
Keep out of children's
•
Is there an AC power failure?
•
DO NOT use new and old batteries together
•
Is the power cord plugged in?
• Change both the batteries at the same time
•
Is there any interference or block near the remote
control sensor?
• When not using the remote control for a long time
remove the batteries from the unit
reach
Remote Control Reception Angle
Use your remote control within the distance and angle range shown below
Universal Remote Control Code List
For Universal Remote Control brands listed below
please
use accompanying codes and refer to your Universal
Remote Control User Manual for basic Instruction
for changing TV code to operate the TV model
_L
7 meters
•
Codes for DIRECTV: 0178
•
•
Codes for Time Warner Cable: 0178 10178
Codes for Cox Communications:
0178
10178
•
Codes for Comcast:
•
Codes for Dish Network:
•
Codes for Fios Verizon: 0205
10178
627
0057
0493
0775
English-17
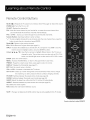
Remote Oontrol Buttons
MUTE ([:_:[): Reduces the TV volume to its minimum level. Press again to restore the volume.
POWER (_):
CH.LIST:
Turns the TV on or off.
Displays the channel list.
FAV.: Adds the current channel to your favorite list, or erases the current channel from
your favorite list (if this channel is a favorite channel already).
FAV.+ or FAV.- : Scans up or down through the current favorite channel list.
Numeric Buttons: Use these buttons to enter numbers.
"--": To enter a digital channel with a sub-channel,
button to enter the sub-channel
Recall(g):
enter the main channel; then, press this
and press ENTER.
Returns to the previous channel.
EPG: Shows Electronic Program Guide (see page 21).
INPUT: Accesses the available input channels (TV, AV, Component
1/2, HDMI 1/2/3, PC).
Use the arrows to highlight options, and press ENTER to select.
Arrows
(_1/•/A
/ v ): Uses the four arrows to highlight different items in the TV menu or
change the value. The up/down arrow can also work as CH,",/CHv
button, and the left/right arrow can also work as VOL-/VOL+
button.
ENTER: Enter and confirm button.
MENU:
Accesses the Main Menu, or return to the upper level of a sub-menu.
FREEZE : Freeze the current screen frame, press again to return to normal.
DISPLAY: Displays the Channel Bar (see page 21).
EXIT: Exits the current menu or function.
VOL+ or VOL-:
CH,',or
CHv:
Increases or decreases
the TV volume.
Scans up or down through the current channel list. Press once to change
the channel up or down; press and hold to continue changing channels.
PICTURE: Switches between the preset picture mode (see page 22).
SOUND: Switches between the preset sound mode (see page 24).
SLEEP: Selects the sleep timer, after which the TV will shut off automatically.
ASPECT:
Switches between the preset screen size mode (see page 23).
CC: Selects the closed caption.
MTS: Selects the multi-channel television sound.
NOTE : The keys not fisted are for DVD controi,
they are not avaiiabie for this TV modei.
Remote
English-18
control
part
number
RE2OQP7S
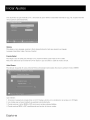
If it is the first time you turn on your TV, or you have done Clear Channel List option (see page 29), the initial setup menu appears
automatically.
Menu
Language
To choose your menu language, press the left/fight arrow until the language you need appears.
Available languages:
Signal
English, French and Spanish.
Type
To choose your TV tuner signal type, press the left/right arrow until Air or Cable appears.
Note: please select TV signal type according
Auto
Channel
to the antenna or cable closed circuit TV you use.
Search
To execute auto channel search, press the up/down
arrow to highlight Auto Channel Search and press ENTER button.
What to notice:
1. The channel search access starts from the Analog TV channel searching
and ends at Digital TV channel searching.
2. The channels that have been found will be stored automatically.
3. You can press MENU or EXIT button to skip analog/digital
channel searching.
4. You can press MENU or EXIT repeatedly to end the channel searching.
English-19
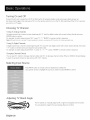
Turning On and Off
Connect the AC cord to power the LCD TV. At this time the TV will enter standby mode and power indicator shows red.
Use Power button (_)
on the side panel of TV or on the remote control to turn on the TV. After switching
off the TV for 5 seconds,
you can turn on TV again.
Choosing TV Channel
Tuning To Analog Channels
An analog channel has a channel number beginning with "A". Input the digital number with numeric buttons directly and press
ENTER button to confirm.
For example, to watch analog channel "A51 ", press "5", "1 ", "ENTER" on remote control in sequence.
Note; Although there is no analog TV signal available in America, we reserve ATe! functions for some expansible use.
Tuning To Digital Channels
A digital channel has a channel number beginning with "D". Input the main digital number with numeric buttons directly, then press
" --"
button on remote control, and input the sub number at last.
For example, to watch analog channel "D31-1 ", press "3", "1 ", .....
Changing
Channels
Directly
You can use CHA button to increase channel number and CHv
is used, the up/down
button. "ENTER" on remote control in sequence.
arrows can also work as CHA/CHv
to decrease channel number. When no OSD (On Screen Display)
buttons.
Selecting Input Source
Press INPUT button on remote control to display Source Select list.
Use up/down
arrows to highlight the source you need and press ENTER to confirm.
Adjusting TV Stand Angle
The TV cabinet can manually adjust to left or right for 30 degrees from the centre.
You can adjust the angle for the best viewing effect and comfort.
English-20
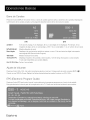
Channel Bar
Press the DISPLAY button on the remote control, the channel bar will appear on the right top of screen. It displays the current
channel's information.
The following list describes the items on the channel bar.
ATV
A2/D50-1
DTV
If the channel is analog, A is displayed. If it's a digital channel, D is displayed. For example, in the pictures
above, A2 is an analog channel, and D50-1 is a digital channel ( -1 is a sub-channel
MTV/KOCE-HD
Displays the channel label.
Mono/English
Displays whether the current channel is being broadcast
number).
in stereo or mono. If the current channel is digital,
this space will be SAP (Second Audio Program) language.
480i/1080i
Displays the signal resolution.
16:9/CC/TV-PG
Displays the screen aspect ratio, closed caption and TV rating level of the current program or channel.
And these are only available for digital channels.
Oct-31
23:14 Mon
Current date and time.
Adjusting Volume
Press the VOL+/VOL-
button on the remote control to adjust the volume. If you want to switch sound off, press MUTE (1_).
When OSD (On Screen Display) is not used, the arrows lefVright can also work as VOL-/VOL+
butttons.
EPG (Electronic Program Guide)
Press EPG button on the remote control, the electronic
The electronic
program guide gives the TV program
program guide will appear in the center of screen.
playing project. You can use left/right arrows to switch pages.
English-21
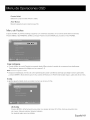
Adjust the OSD Screen
The OSD (On Screen Display) menu enables you to approach
to the TV functions.
To use OSD menu system, press MENU button on remote control, then use left/fight arrow to highlight an option from PICTURE,
SOUND, CHANNEL, PARENTAL, SETUP or OTHERS and press ENTER button.
Press the up and down arrow to move to a different option within each menu. If necessary,
the choices of the option you've highlighted.
previous menu, press the MENU button.
press ENTER or right arrow to display
If available, use the text at the bottom of each screen for help. To return to the
To exit the OSD menu:
• Press the EXIT button. The menu will clear from the screen.
• Press the MENU button repeatedly until the menus disappear.
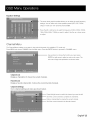
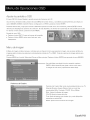
Picture Menu
The Picture Menu contains menus and controls to configure the way the picture appears. The Picture Menu options apply to the
video for the main TV and VIDEO INPUT selections. All picture options can be applied to each input.
Press MENU on the remote. Select Picture from the Main menu. Press the ENTER button to proceed to PICTURE menu.
Use up/down to choose the function you need, press
ENTER or right arrow to adjust or enter a sub-menu.
sub-menu
Picture
image and explanation
The
are shown below.
Settings
Picture Settings: Choose the preset visual mode of your TV:
Standard,
Movie, User, Dynamic. Only in User mode you can
adjust Brightness, Contrast,
Color, Tint and Sharpness.
Brightness: Adjust the brightness
of picture.
Color: Adjust the richness of color.
Tint: Adjust the balance between red and green level (only
available in NTSC signal.
Sharpness:
English-22
Adjust the sharpness
level of picture.
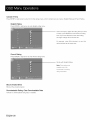
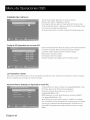
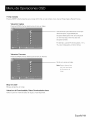
Screen
Settings
Screen Size: Select a screen aspect ratio.
(Available ratio: Full, Normal, Waterglass and Cinema.)
Please choose the ratio that applies to your video signal format best.
Auto Wide: Make the screen size compliant with signal format
automatically.
If you turn on this function, the Screen Size setting will be ignored.
PC Settings
(only available
in PC mode)
Auto Adjust: Adjust the PC picture display automatically.
Horizontal Position: Adjust the horizontal position of picture.
Vertical Position: Adjust the vertical position of picture.
Clock: Adjust the clock of picture.
Phase: Adjust the phase of picture.
Reset: Reset all the PC picture settings to factory default.
Color
Temperature
This option allows you to select one of three automatic color adjustments: Cool for a bluer palette of picture colors; Normal or
Warm for a redder palette of color.
Advanced
Picture
Settings
(not available
in PC mode)
Dynamic Contrast:
Set dynamic contrast Hight!off/Low/Medium.
Film Mode: Set film mode on/off.
Noise Reduction: Set noise reduction
MPEG Noise Reduction:
as Off/low/Medium/High.
Set MEPG noise reduction as Off/Low/Medium
or High.
Note: Noise reduction
helps to reduce the picutre "static" or any type of
interference. This feature is especially useful for providing a clearer picture
in weak analog signal conditions.
The MEPG Noise Reduction specifically
works on video signal with MPEG coding.
English-23
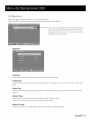
Sound Menu
The Sound Menu lets you adjust audio output. To access the Sound Menu, press MENU on the remote, and then select SOUND
from the Main Menu. Press ENTER button to proceed
to SOUND menu.
Use up/down to choose the function you need, press
ENTER or right arrow to adjust or enter a sub-menu.
sub-menu
Sound
image and explanation
The
are shown below.
Settings
Sound Mode: Choose the preset sound mode of your TV:
Standard,
Soft, User, Dynamic. Only in User mode you can
adjust Bass and Treble.
Bass: Adjust the bass component
of TV sound.
Treble: Adjust the treble component
of TV sound.
Balance: Adjust the balance between the left and right channel.
Surround
Mode
Creates a 3D sound surround from standard stereo material, with deep and rich enhancement.
Analog
Sound
Select analog TV audio sound type: Stereo, Mono or SAP (only available in TV mode).
Digital Sound
Select digital TV audio language type: English, French or Spanish (only available for DTV channel).
Other Settings
Set Auto Volume on/off.
Set TV speakers on/off.
Set the audio output type as Off, PCM or Dolby Digital.
Please set this option according
English-24
to your power amplifier.
Equalizer
Settings
The seven-band
graphic equalizer allows you to adjust the audio frequency
settings. You can select one of the equalizer presets (OFF, POP, ROCK,
JAZZ) or create your own personal preset (USER).
Press the left or right arrow to select the frequency (100Hz, 250Hz, 500Hz,
1KHz, 2KHz, 4KHz, 10KHz) you want to adjust. Use the up or down arrow
to adjust.
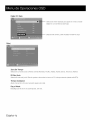
Channel Menu
The Channel Menu enables you to search, view and edit channels. It is available in TV mode only.
Press MENU and choose CHANNEL from the Main menu. Press the ENTER button to proceed to CHANNEL menu.
Use up/down to choose the function you need, press
ENTER or right arrow to adjust or enter a sub-menu.
sub-menu
Channel
image and explanation
The
are shown below.
List
Display a channel list. It shows the current channels.
Favorite
List
Display a favorite channel list. It shows the current favorite channels.
Channel
Settings
Go to channel setting sub-menu
(as shown below).
Press left/right arrow to switch the channel you want to edit.
Set if the current channel is contained
--
in channel list.
Enter a channel label to rename the current channel.
Set if the current channel is the favorite channel.
English-25
Signal Type
Select your TV signal type: Air or Cable.
Auto Channel
Search
Execute an auto channel search (see page 19).
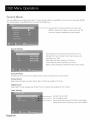
Parental Menu
The Setup Menu enables you to lock program with special content, panel key board and input source.
Press MENU and choose PARENTAL from the Main menu. Press the ENTER button to proceed to PARENTAL menu.
Lock Parental
Control
• When the Parental Control Menu is accessed from the Main Menu, you need to enter password to unlock the menu function.
Please enter your four-digit password with numeric keys 0-9.
Note: The original passwo/_ is "0000",
• After unlocking, the items in parental control menu can be used. Use arrow up/down to highlight the function you need and
press ENTER or right arrow to use V-chip, Change Password, Front Panel Lock and Source Lock, Clear Channel List sub-menu.
V-Chip
The following graphic details where items locate within the V-Chip menu.
US V-Chip
Press ENTER or right arrow to enter US V-Chip ratings menu, which contains two sub-menus:
See next page for more details.
English-26
Movie Rating and TV rating.
Movie
Rating
Use arrow keys to select the rating level you want to block,
press ENTER to IocWunlock the rating level. If you have
blocked a lower level rating, the higher ratings will be
blocked too.
For example, when PG-13 is blocked,
be blocked at the same time.
R, NC-17 and X will
TV Rating
Similar with Movie Rating.
After adjusting, press MENU to return or press EXIT to exit the menu..
TV Rating Overview
TV-MA
Mature Audience Only
D
Sexually Explicit Dialogue
TV-14
Parents Strongly Cautioned
L
Adult Language
-R/-PG
Parents Guidance Suggested
S
Sexual Situations
TV-G
General Audience
V
Violence
TV-Y7
Directed to Children 7 Years and Older
FV
Fantasy Violence
TV-Y
All Children
For more rating explanation,
see page 36.
English-27
Canada
V-Chip
Press ENTER or right arrow to enter US V-Chip ratings menu, which contains two sub-menus:
English
English Rating and French Rating.
Rating
Press ENTER or right arrow to enter English rating menu.
Use arrow keys to select the rating level you want
to block, press ENTER to IocWunlock the rating
level. If you have blocked a lower level rating,
the higher ratings will be blocked too.
For example, when PG is blocked, 14+ and 18+
will be blocked at the same time.
French
Rating
Press ENTER or right arrow to enter French rating menu.
Similar with English Rating.
Note: These ratings are
available only if the
broadcaster ls sending
rating info/rnation.
Block
Unrated
Show
Block all the unrated program.
Downloadable
Rating,
Activate or downloadable
English-28
Clear Downloadable
rating data. if available.
Data
Change
Password
Change the password
of parental menu.
Input the old password.
Input the new password.
Input the new password again to confirm.
Front Panel Lock
Select this option to block or unblock the TV's side panel buttons so that they can't be used.
Source
Lock
This option allows you to lock or unlock the input source. The source blocked can not be
chosen from input list unless you input the correct parental password.
Use up/down arrow
to select the source,
press ENTERto
lock or unlock it.
Clear Channel
List
This option allows you to execute Clear Channel List function.
This function will reset the whole TV system to factory default (not only reset OSD menu).
English-29
Setup Menu
The Setup Menu lets you config the TV with your preferences.
Select SETUP from the Main Menu. Press ENTER button to proceed to SETUP menu.
Use up/down
to choose the function you need, press
ENTER or right arrow to adjust or enter a sub-menu.
sub-menu
Closed
Caption
Closed
Caption
image and explanation
The
are shown below.
Press left/right arrow to select closed caption display on or off.
Analog
Caption
Type
Press left/right arrow to select analog closed caption type: CC1, CC2, CC3, CC4, TEXT1, TEXT2, TEXT3, TEXT4.
Digital
Caption
Type
Press left/right arrow to select digital closed caption type: Service1, Service2, Service3, Service4, Service5, Service6.
Digital
CO Preset
Press left/right arrow to select digital closed caption preset: Default, Custom.
Only in custom
Digital
mode you can adjust the digital closed caption style.
CO Style
Press left/right arrow to go to digital closed caption style sub-menu (see next page).
English-30
Digital
CO Style
--
Select the item you want to adjust in Digital CC Style menu
with up/down
arrows.
After changing, you can preview the caption style here.
Clock
Time Zone
Select your time zone: Eastern, Central, Mountain,
Pacific, Alaska, Hawaii, Samoa, Newfoundland,
Atlantic.
Auto Clock
Select auto clock on/off. Auto clock helps you synchronize
your TV time to standard time (from DTV signal).
Setup Time
Set your TV time manually (needs to turn off auto clock).
Day of Week
Display what day it is (can't be adjust, display only).
English-31
Others Menu
The Others Menu lets you config the TV with your preferences in other features.
©hoose OTHERS from the Main Menu. Press ENTER button to proceed to SETUP menu.
Use up/down
to choose the function you need, press
ENTER or right arrow to adjust or enter a sub-menu.
The sub-menu
image and explanation
are shown below.
Blue Background
Press ENTER button to select Blue Background
background
when there is no signal input.
No Signal
Power
on or off. If the Blue Background
is turned on, the TV will display a blue
Off
Press ENTER button to select "No Signal Power Off" on or off. If it is turned on, the TV will shut off after 10-minute
no signal time. We suggest you turn on this function when Blue Back is turned on. Because it may hurt the LCD panel
if the blue screen lasts too long.
Note: In PC mode, the monitor standby and power off settings depend on the No Signal Off time.
No Operation
Power
Off
Press ENTER button to select "No Operation Power Off" on or off. If it is turned on, the TV will shut off after a 3-hours
no operation time.
All Reset
Press ENTER button to execute reset to TV system. All the settings will be reset to factory default.
Audio
Only
Press ENTER button to activate audio only mode. The TV will output only sound and the LCD panel will be turned off.
To restore normal playing, hold POWER button for three seconds.
English-32
What's the most convenient
Connect
way to view High Definition
(HD) video?
an antenna to the TV Input jack to view free local digital channels. You may need to purchase an antenna. (See page 9
for more information about antenna setup).
Visit www.antennaweb.org
for assistance
in deciding what type of antenna to use to receive the local digital channels available
to you. After entering your location, this mapping
certain antenna.
program tells you which local analog and digital stations are available using a
Are there other ways to view High Definition
(HD) video?
Besides using an antenna as mentioned above, you can also use a set-top box to receive digital video. Contact your cable service
provider or satellite provider to purchase
digital programming
and have them connect the box to ensure you are viewing channels
in the best way.
How do I tell an analog
channel from
a digital channel?
Press the DISPLAY button to display the Channel Bar. Look at the top right corner of the screen. An "A" is displayed for an analog
channel. A "D" is displayed for a digital channel.
Note: Since the analog TV in America has been cut off, we reserve analog TV function only for some unexpected
Why are there bars on my screen,
use.
and can I get rid of them?
Most digital video is sent in a 16/9 format which fills your screen, but is sometimes
depends on how the station or device connected
to your TV is formatting
sent in 4/3 which does not fill your screen. It
the video. If there are bars on the screen, press the
ASPECT button to try a different format that may eliminate the bars. Some bars can't be removed because of the way the format
is sent by the broadcaster.
The format changes as you press the ASPECT button and the format type is displayed at the bottom
of the screen. For more information
Why does channel
search
on screen formats, go to page 23.
find a lot of channels,
Some channels don't carry programming,
but when I try to tune to them, there's
nothing
there?
such as video On Demand. When channels are unavailable, your TV screen is blank or
appears like snow. You probably want to remove these channels from your channel list. Remove these in the Channel List Menu.
Go to page 25 for more information.
Why does it take a long time when I search
the channels
at first time?
If you have both analog and digital channels, the TV is looking for all available channels in the channel list. If you do have digital
channels, the TV is also searching for scrambled
channels, non-scrambled
channels, and each sub-channel
of that digital channel.
English-33
Jdent ng Probbn
If there are any problems when using the product, please consult the list below. If the list does not solve the problem, call our
Customer
Service Center immediately.
TV Problems
The TV can't be turned on.
•
Make sure the AC cord is plugged in.
•
Check the wall outlet, make sure the AC output works normally and stably.
•
The side panel may be locked (disabled). Use the remote control to turn on the TV.
•
Select the Front Panel Lock function in the PARENTAL Menu and press ENTER to uncheck the locking status.
There is no picture or sound but the TV is on and there is a "No Signal" sign on screen.
• Are you trying to use an input source with no device connected
to it? For using other video/audio
device, make sure the external
device works normally first, then press INPUT and choose the right input source.
•
The Signal Type option may be set incorrectly.
•
The channel may be blank. Try to search the channel again or change another channel.
Go to page 18 for detailed instructions.
The sound is fine, but the picture is poor.
•
If you can only get black and white pictures from external device that you've connected
cables is not connected
well, or they are connected
wrongly.
Check the connection
to your TV, maybe it is due to the video
stability first, then check the correctness.
For AV input, the yellow video cable connects to the yellow Video In jack on the side of your TV. For Component
Y, Pb, Pr video cables (red, blue, and green) should be connect to the corresponding
•
Check the antenna connections.
Make sure all of the cables are firmly connected
input, the three
input jacks on the side of your TV.
to the TV jack on side of your TV.
• Try adjusting the color features to improve.
There is no sound,
but the picture is fine.
•
The sound might be muted. Try pressing the MUTE button to restore sound.
•
For using AV or Component,
•
The sound settings may not be set correctly. Go to page 23 for more information.
remember
to connect the device's left and right audio output correctly. The left channel
cable is white and the right channel cable is red. Please match the cables and jacks accoding to there colors.
•
If your audio source has only one jack or is a (mono) audio source, make sure you have plugged the connection
into the
Audio In L jack (white) on the TV.
The buttons on the side panel don't work.
• Theside panel may be locked (disabled).Use the remotecontrolto turn on the TV.
• Select the Front Panel Lock function in the PARENTAL Menu and press ENTER to uncheck the locking status.
• Unplug the TV from the AC power for 10 minutes and then plug it back. Turn the TV on and try again.
The TV turns off unexpectedly.
•
The electronic protection
circuit may have been activated because of a power surge. Wait 30 seconds
on again. If this happens frequently,
the voltage in your house may be abnormal.
can't work normally, consult a qualified service personnel.
English-34
and then turn the TV
If the other electronic equipment
in your home
Can't select a certain channel.
• The channel may be blocked or not approved in the PARENTAL Menu.
• The channel may be skipped in channel list in CHANNEL Menu. Check the blocking and skipping status of channel.
The stereo sound performance
•
is bad.
It may be a weak station. Use the SOUND Menu and set Analog Sound as Mono.
A black box appears
•
on the screen.
Closed captioning might be on. Check Closed Caption in the SETUP menu. Go to page 31 for more instructions.
Problems
•
with the HDMI
Connection.
Make sure the HDMI device (DVD, video gamer, etc.) is turned on and the cables are firmly connected. If problems still occur, turn off
your device and reconnect it. Reset the power by unplugging the power cord and plugging it again.
•
If a "No Signal" message appears on screen, the HDMI device isn't responding. Contact the manufacturer of the HDMI device for
further assistance.
•
Ifyou have black bars on each side of your picture (which means the TV can not display a full-screen image), the device you connected
might have a switch or a menu option allowing you to change the picture quality output that will fix this. Choose either 720p or 1080i.
The Remote control doesn't
•
Something
work.
might be blocking between the remote control and the remote sensor on the front panel of the TV. Make sure
there is a clear path.
•
The remote may not be aimed directly at the TV.
•
The batteries in the remote may be weak, dead, or installed incorrectly. Put new batteries in the remote.
You are experiencing
•
problems with V-Chip/Parental
If the rating limits don't work, you must lock the settings.
Controls.
Go to the Main Menu (press MENU on your remote), select
PARENTAL to check the settings.
What else can I do?
If you've been through the Troubleshooting
section and nothing has fixed your problem, try rebooting your TV. Note that after
a reboot, you may need to run your TV through the setup process again. To reboot, unplug the power cord from the wall
outlet or power strip. Keep your TV unplugged
for about 5 minutes. Then plug in the TV and turn it on. See if the problem
is fixed. If the problem remains, then please visit the Customer
contact
PROSCAN Customer
Support at the support
Support
Menu at www.proscanus.com
or updated
FAQs or
number provided in your Warranty card.
English-35
US V-Chip Rating System
TV-MA (Mature
Audience
Only): Specifically designed to be viewed by adults and may be unsuitable for children under 17. It
contains one or more of the following content themes: crude indecent language (L), explicit sexual activity (S), or graphic violence (V).
TV-14 (Parents
Strongly
Cautioned):
Contains some material that many parents would find unsuitable for children under 14.
Parents are strongly urged to exercise greater care in monitoring this program and are cautioned
age of 14 watch unattended.
This program
contains one or more of the following content themes: intensely suggestive dialogue (D),
strong coarse language (L), intense sexual situations
rV-PG
(Parental
Guidance
Suggested)
(S), or intense violence (V).
: Contains material that parents may find unsuitable for younger children. Many parents
may want to watch it with their younger children. The program contains
suggestive
dialogue (D), infrequent
TV-G (Parental
or situations
Audience):
against letting children under the
one or more of the following content themes:
coarse language (L), some sexual situations
some
(S), or moderate violence (V).
Most parents would find this program suitable for all ages. It contains little or no sexual dialogue (D)
(S), no strong language (L), and little or no violence (V).
TV-Y7 (Directed
to Children
7 years and older): Designed for children age of 7 and above. It may be more appropriate
who have acquired the developmental
skills needed to distinguish
for children
between make believe and reality. Themes and elements in this
program may include mild fantasy violence (FV) or comedic violence, or may frighten children under the age of 7.
TV-Y (All Children):
Themes and elements in this program are designed for a young audience,
including children ages 2-6.
It is not expected to frighten younger children.
Canadian English V-Chip Rating System
18+ (Adult):
Programming
intended for adults 18 and older. It may contain elements of violence, language, and sexual content
which could make it unsuitable for viewers under 18. Violence Guidelines: May contain violence integral to the development
the plot, character or theme, intended for adult audiences.
Other Content Guidelines: May contain graphic
of
language an d explicit
portrayals of nudity and/or sex.
14+ (Viewer 14 and over): Programming
Parents are strongly cautioned
contains themes or contents which may not be suitable for viewers under the age of 14.
to exercise discretion in permitting viewing by pre-teens
and early teens. Violence Guidelines:
May contain intense scenes of violence. Could deal with mature themes and societal issues in a realistic fashion.
Other Content Guidelines: May contain scenes of nudity and/or sexual activity. There could be frequent use of profanity.
PG (Parental
Guidance):
Programming
intended for a general audience but which may not be suitable for younger
(under the age of 8). Parents may consider some content inappropriate
Violence Guidelines: Depictions
supernatural
of conflict and/or aggression
for unsupervised
will be limited and moderate;
children
viewing by children aged 8-13.
may include physical, fantasy,
or
violence. Other Content Guidelines: May contain infrequent mild profanity, or mildly suggestive language.
Could also contain brief scenes of nudity.
G (General Audience):
it is understood
Programming
considered
acceptable
for all ages groups. While not designed specifically for children,
younger viewers may be part of the audience. Violence Guidelines: Will contain very little violence, either physical or
verbal or emotional.
Will be sensitive to themes which could frighten a younger child, will not depict realistic scenes of violence
which minimize or gloss over the effects of violent acts. Other Content Guidelines: There may be some inoffensive slang, no
profanity and no nudity.
English-36
C8+ (Children
8 and older):
Programming
generally considered acceptable
for children 8 years and over to watch on their own.
Violence Guidelines: Violence will not be portrayed as the preferred, acceptable,
children to imitate dangerous
or only way to resolve conflict or encourage
acts which they may see on television. Any realistic depictions
discreet, of low intensity and will show the consequences
of violence will be infrequent,
of the acts. Other Content Guidelines: There will be no profanity,
nudity or sexual content.
C (Children):
Programming
intended for children under age of 8. Violence Guidelines: Careful attention is paid to themes which
could threaten children's sense of security and well being. There will be no realistic scenes of violence. Depictions
of aggressive
behavior will be infrequent and limited to portrayals that are clearly imaginary, comedic or unrealistic in nature.
Other Content Guidelines: There will be no offensive language, nudity or sexual content.
Canadian French V-Chip Rating System
18+ (Adult):
Programming
is for adults only. This program contains sustained violence or extremely violent scenes.
16+ (Viewer 16 and over): Programming
is not suitable for those under age 16. This program contains frequent scenes of
violence or intensely violent scenes.
13+ (Viewer 13 and over):
Programming
may not be suitable for children under the age of 13. This program either contains
several violent scenes or one or more scenes that are violent enough to affect them. Viewing in the company
therefore strongly recommended
of an adult is
for children under the age of 13.
8+ (Viewer 8 and over): Not recommended
for young children. This program is suitable for most audiences,
but it contains
or occasional violence that could upset young children. Viewing in the company of an adult is therefore recommended
children (under the age of 8) who do not distinguish
G (General Audience):
mild
for young
between reality and imagination.
This program is suitable for audiences of all ages. It contains no violence, or any violence that it does
contain is either minimal or is presented in a humorous
manner, as a caricature,
or in an unrealistic way.
English-37
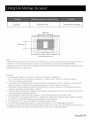
32LD30Q
VESA 400 x 200
M4 screws, length 12mm
400 mm
200 mm
Note:
A. The wall mount is not contained
in the accessories
sold with television. We only provide the installing specifications
but not the
wall mount itself. If you need the mount, please consult with the local dealer for a VESA wall mount.
B. We strongly suggest to set the wall mount with equipments
of specification
we ordered.
If not, inappropriate
installing may
cause damage to device or people.
Warnings:
1. Do not set up the wall mount by yourself. Please contact qualified professionals
for installation.
2.
The TV should not be mounted on walls or surfaces which have an angle more than 10 degrees with vertical direction.
3.
The walls for mounting
Otherwise the TV set may fall.
must have enough strength to hold the whole weight of TV set. For example, concrete wall and brickwork
are eligible. Do not place the mount on soft walls such as earth walls and plasterboard.
4.
If spare parts of different specifications
(such as screws) are used during mounting,
consult with qualified professionals
to make
sure these parts are safe and effective.
5.
Before attaching the base to wall, ensure the holes for anchors are in keeping with the installing rules. Otherwise there may exist
some potential problems.
6.
Do not place any heating source under your television. Or else, it can cause fire.
7.
Do not place the TV near anything dripping.
Or else, it may cause creepage,
Transducers
and high voltage wires should be kept far away from the apparatus too.
electric shock or bad resonance.
8.
Do not place TV in a location where collision or vibration is liable to happen.
9.
In order to avoid unexpected
falling of the TV set, do not put any strong force on TV or wall mount after installing.
10. Be sure to unplug the TV before installing. Keep anything hard or sharp away from the screen panel to prevent the scuffing.
11. After installing, if there is any need to move the cabinet, please contact the qualified professionals.
English-38
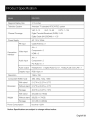
Diagonal Display Size
31.5 inches
Television System
American TV standard ATSC/NTSC
VHF: 2-13
Channel Coverage
UHF: 14-69
Digital Terrstrial Broadcast
system
CATV: 1-135
(8VSB): 2-69
Digital Cable (64/256QAM):
1-135
AC 110 V, 60Hz
Power Supply
Cable/Antenna
RF input
x 1
AVx 1
Connection
Interface
Video input
Component
x 2
HDMI x 3
AVx 1
Audio input
Component
x 2
PC Audio In x 1
Audio output
Headphone
Graphic input
RGB 15pin x 1
Resolution
1366 x 768
Component/HDMI
Dimension
Weight
mode
480i, 480p, 720p, 1080i
With stand
31.2"W x 22.2"H x 9.7"D
Without
31.2"W x 20.2"H x 4.1 "D
stand
Package
40.6"W x 24.2"H x 7.5"D
With stand
28.2LBS
Without
26LBS (11.7KGS)
Package
Power Consumption
Notice:
x 1, Digital Audio Out x 1, Analog Audio Out (L/R) x 1
Specifications
stand
33.1LBS
(12.7KGS)
(14.9KGS)
less than 120W
are subject
to change
without
notice.
English-39
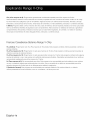
PROSCAN
Coverage-
*
Labor
For a period of 12 months from date of purchase of your PROSCAN product, we will pay an
authorized PROSCAN service center the labor charge to repair any defects in materials or
workmanship in your television.If your television is unrepairable we will provide you with
a refurbished unit of the same or better model.
Coverage-Parts
For a period of 12 months from date of purchase of your PROSCAN product, we will pay an
authorized PROSCAN service center for the new, or at our option, refurbished replacement parts
needed to repair any defects in material or workmanship in your television.If your television is
unrepairable we will provide you with a refurbished unit of the same or better model.
Coverage-LCD
Panel
For a period of 12 months from date of purchase of your PROSCAN product, we will pay an
authorized PROSCAN service center for the new, or at our option, refurbished LCD panel
needed to repair any defects in material or workmanship in your television.If your television is
unrepairable we will provide you with a refurbished unit of the same or better model.
How to Obtain Service
• For assistance (USA)
- if you purchased PROSCAN product in USA, please call 1-888-977-6722.
Or www.proscanus.com
• For assistance (Mexico) - if you purchased PROSCAN product in Mexico, please call 01-800-8233858
Or www.proscanus.com
[Mexico service center address]
Servicios Computacionales de M6xico, S.A. de C.V.
Francisco Diaz Covarrubias # 33, Ciudad Satelite
C.P. 53100, Naucalpan, Mexico
The service representative will review your options for service.As a convenience we offer three ways
to obtain warranty service.You may mail your product to the address provided by the service
representative, you may take your product to an authorized service center,or you may request in
home service (servicer will determine if product is serviceable in home or must be taken back to local
service center for repair). Service representative will supply instructions for preferred service.At the
time of service proof of purchase such as original receipt, will be required. Only 37" LCD size and
above are applicable for in-home-service.
English-40
•
•
•
•
•
•
•
•
•
Un-installation,
installation and adjustment of customer controls and operating instruction.
Batteries and customer replacement fuses.
Damage due to misuse, abuse, negligence
or neglect including but, not limited to, damage
resulting from exposure to moisture, humidity or salt.
Inability to receive a signal due to problems not caused by the product.
Damage to the product due to images burnt into the screen.
Product purchased or serviced outside the United States / Puerto Rico.
Product modified or incorporated into other products.
Damage due to acts of nature, including but not limited to, lightning damage or flooding.
Service calls which do not involve any defect in materials or workmanship.
Commercial
Use Excluded
This limited warranty only applies to products used for personal or use and does not cover any
product used for institutional, commercial or rental purposes.
THIS LIMITED WARRANTY
IS THE SOLE AND EXCLUSIVE WARRANTY
APPLICABLE
TO THIS
PRODUCT.
ON CORP US, INC., THE MANUFACTURER
OF THIS PRODUCT,
DISCLAIMS ALL
OTHER WARRANTIES,
EXPRESSED
OR IMPLIED (INCLUDING
ALL IMPLIED WARRANTIES
OF MERCHANTABILITYOR
FITNESS FOR A PARTICULAR
PURPOSE). NO VERBAL OR WRITTEN
INFORMATION
GIVEN BY ON CORP US, INC., ITS AGENTS,
INDEPENDENT
CONTRACTORS,
SALES REPRESENTATIVES,
EMPLOYEES,
RETAIL DEALERS,
WHOLESALE
DISTRIBUTORS
OR ANY OTHER THIRD PARTY SHALL CREATE A GUARANTY
OR
INCREASE.
EXPAND OR MODIFY THE SCOPE OF THIS LIMITED WARRANTY.
THIS
LIMITED
WARRANTY
PROVIDES
THE
SOLE
AND
EXCLUSIVE
REMEDY
FOR
THE
CONSUMER
OF REPAIR OR REPLACEMENT
OF THE PRODUCT.
ON CORP US, INC. SHALL
NOT BE LIABLE FOR SPECIAL, INCIDENTAL OR CONSEQUENTIAL
DAMAGES ARISING OUT OF
THE USE OF THE PRODUCT OR ARISING OUT OF A BREACH EXPRESSED
OR IMPLIED
WARRANTY
ON THIS PRODUCT.
THIS LIMITED WARRANTY AND THE DISCLAIMERS
CONTAINED HEREIN ARE GOVERNED
BY
THE LAWS OF THE STATE
OF INDIANA.
EXCEPT
TO THE EXTENT
PROHIBITED
BY
APPLICABLE
LAW, ANY IMPLIED WARRANTY
OF MERCHANTABILITY
OR FITNESS FOR A
PARTICULAR
PURPOSE
IS LIMITED TO APPLICABLE
LIMITED WARRANTY
PERIOD(S)
SET
FORTH ABOVE.
THIS WARRANTY
GIVES YOU SPECIFIC LEGAL
RIGHTS THAT VARY FROM STATE TO STATE.
RIGHTS
AND YOU ALSO
MAY HAVE OTHER
English-41
iMuchas gracias por su uso del presente producto! Cuando usted disfruta de su nuevo producto,
pot favor tenga en cuenta los consejos de seguridad:
POSIBLES PROBLEMEAS
• La expedencia
de entretenimiento
de cine en casa es una tendencia
creciente y los grandes monitores de pantalla plana son muy populares.
Sin embargo, los monitores de pantalla plana no se han instalado siempre
en los soportes adecuados o instatado de acuerdo con las recomendaciones
de fabricante.
Los monitores de pantalla plana que se han instalado inadecuadamente
en tocadores, estanterias,
estantes, escritorios, oradores, baQtes o carros
se pueden caer y causar el daSo corporal.
i AL FABRlCANTE LE IMPORTA!
• La industria electr6nica del consumidor
esta comprometida
entretenimiento
de casa agradable y seguro.
AJUSTAR HASTA SEGURIDAD
,, Un tamaSo fijo NO es adecuado para todos. Siga las recomendaciones
fabricante para la instataci6n segura y el uso de su monitor de pantalla
" Lea con cuidado y entienda
propio de este producto.
• No permita
todas las instrucciones
adjuntas
a los niSos a subir al equipo o jugar con muebles
= No cloque los monitores de pantalla plana en el mueble
f&cilmente como escal6n, asi como una c6moda.
•
de
plana.
para el uso
y televisiones.
que se puede usar
Recuerde que los niSos pueden Ilegar a ser excitados al ver una programaci6n,
especialmente
en el monitor de pantalla plana "m_s grande que vida".El cuidado
se tiene que empezar por poner o instalar el monitor donde no se
puede empujar, detener al costado del camino ni echar abajo.
= El cuidado se tiene que empezar por encaminar todos los cordones y cables
conectados al monitor de pantalla plana para que no se puedan tirar o agarrar
por los niSos curiosos.
MONTAJE DE PARED: S! USTED DECIDE A MONTAR
MONITOR DE PANTALLA
.
PLANAA
Use una montura que se ha recomendado
y/o listado por un laboratorio independiente
" Siga todas las instrucciones
y montaje
de pared.
ofrecidas
SU
LA PARED, SIEMPRE:
por el fabricante de monitor
(como UL, CSA, ETL).
por el fabricante
de monitor
o Si usted tiene cualquier duda sobre su habilidad para instalar seguramente
su monitor de pantalla plana, contacte a su distribuidor
para la instalaci6n
profesional.
o Compruebe que la pared adonde se esta montando el monitor es adecuada.
AIgunos montajes de la pared no son diseSados para ser montados a paredes
con tachones de acero o la vieja construcci6n
de bloque de ceniza. Si usted
esta inseguro, contacte a un instalador profesionat.
o Pot 1o menos dos personas se requieren
de pantalla plana puede ser pesados.
Espa ol-42
para la instalaci6n.
Los monitores
a hacer el
Seguridad
de nihos
Precauciones
...................................................................................................................................
y Advertencias
Notas FCC
42
..................................................................................................................
45
..................................................................................................................................................
Precauciones
Preparacion
45
.........................................................................................................................................
para su nueva TV
Accessorios
46,47
................................................................................................................
48
..............................................................................................................................................
48
Ajuste de mesa de TV ...............................................................................................................................
.48
Seleccione lugar ........................................................................................................................................
48
Connexiones y Uso ...................................................................................................................................
48
Instalacion
de base TV
.............................................................................................................................
49
Conexion
de sehal
TV ...............................................................................................................................
50
Conexion
de cable
.....................................................................................................................................
51
.................................................................................................................................
52
Conexiones
traseras
Conexion Audio Video Compuesto (Buena Calidad de Video) .......................................................................
52
Conexion de Componente YPbPr (Mejor Calidad de Video) .........................................................................
53
Conexion aparato HDMI (Mejor Calidad Video) ............................................................................................
54
Conexion Computadora
55
............................................................................................................................
Obtener varios tipos de entradas fuente .....................................................................................................
Explicacion
Teclado
de entradas
a TV
55
..................................................................................................................
56
................................................................................................................
57
lateral y panel Frontal
Botones laterales ......................................................................................................................................
57
Panel fronta ..............................................................................................................................................
57
Instrucciones
del control
remoto
............................................................................................................
58
Colocando pilas en e! Control ....................................................................................................................
58
Angu!o de reception de! Control ................................................................................................................
Conociendo
el Control Remoto ...............................................................................................................
58
59
Botones control remoto .............................................................................................................................
Iniciar
Ajustes
59
............................................................................................................................................
.60
Lenguaje de! menu ....................................................................................................................................
60
Tipo de SePal ............................................................................................................................................
60
Auto busqueda Canales ............................................................................................................................
60
Operaciones
Basicas
.................................................................................................................................
61
Encender y Apagar ....................................................................................................................................
61
Eligiendo canal de TV ................................................................................................................................
6!
Selection sepal entrada .............................................................................................................................
61
Ajuste de angu!o de base ..........................................................................................................................
61
Barra de Canales ......................................................................................................................................
62
Ajuste Volumen .........................................................................................................................................
62
EPG (Guia de Programa Electronico) ..........................................................................................................
62
Espa oi- 43
Menu de Operaciones
OSD
.....................................................................................................................
63
Ajustar pantalla OSD .................................................................................................................................
63
Menu Imagen ...........................................................................................................................................
63
Menu Sonido ............................................................................................................................................
65
Menu Canales ..........................................................................................................................................
66
Menu Padres ............................................................................................................................................
67
Ajustar Menu ............................................................................................................................................
71
Otros Menus ............................................................................................................................................
73
Preguntas
mas Frecuentes
Problemas
de funcion
Explicando
Rango V-Chip
(FAQs) .........................................................................................................
................................................................................................................................
74
75
........................................................................................................................
77
Chip V Rango Sistema EUA .......................................................................................................................
77
Rango Sistema Canadiense ingles ..............................................................................................................
77
Rango Sistema Candiense frances .............................................................................................................
78
Unidad
de Montaje
Especificacion
Tarjeta
Espa ol-44
de pared
de unidad
de garantia
....................................................................................................................
.........................................................................................................................
.................................................................................................................................
79
80
81,82
PRECAUCION
Precaucion: Para reducir el riesgo de choques electricos, no retire la cubierta o tapa. No contiene partes
reusables en el interior. Para cualquier servicio acuda a personal calificado.
ADVERTENCIA:
PARA REDUCIR EL RIESGO DE FUEGO O CHOQUES ELECTRICOS,
APARATO A LA LLUVIA O HUMEDAD.
PRECAUCION: CAMBIOS O MODIFICACIONES
NO AUTORIZADAS
ESTANDARES INTERNACIONALES
Informacion
NO EXPONER ESTE
POR EL FABRICANTE Y ACORDE A
PUEDEN EVITAR AL USUARIO A OPERAR ESTE EQUIPO.
FCC
Este equipo ha sido probado y cumple con los limites para un aparato digital de Clase B, enbase al apartado 15 de las
normas FCC. Limites dise_ados para provee proteccion rasonable contra da_os en instalaciones residenciales Este
equipo genera, usa e irradia radio frecuencias si no se instala y utiliza de acuerdo alas instrucciones y causara interferencias
alas radio Comunicaciones. Sin embargo, no hay Garantia de que la interferencia no ocurrira en una instalacion particular.
Si este equipo no causa interferencia a la recepcion de radio o television, que puede set causado por encender
o apagar el equipo, el usuario debe de intentar corregir la interferencia siguiendo uno o mas de las siguientes pasos:
- Reoriente o mueva la antena de recepcion.
- Incremente la separacion entre el equipo y el receptor.
- Conecte el equipo a otro tomacorrientes u otro circuito diferente al que esta conectado.
- Consulte al distribuidor o un tecnico experimentado en radio/TV technician para ayuda.
EspaSoi 45
.
Leer estas instrucciones.
2. Conserve las instrucciones.
3.
Guarde sus precauciones.
4.
Siga todas las instrucciones indicadas en este instructivo.
5.
No use este aparato cerca del agua. Tampoco Io use, cerca de tuberias, en pisos mojados, o cerca de una alberca o
algo similar.
6.
No bloquear ninguna ventilacion o apertura. Instalar de acuerdo alas instrucciones del fabricante. Ranuras y aperturas en
el gabinete trasero o abajo son para ventilacion, para asegurarse de una operacion optima de la TV y protegerlo de algun
sobrecalentamiento.
Las aperturas no deben bloquearse o cubrirse. Ni tampoco set bloqueadas al colocar la TV sobre
una cama, sofa, alfombra u otra superficie similar.
8.
No instalar cerca de alguna fuente de calor tal como radiadores, registradores de calor, estufas, o algun otro aparato
(incluyendo amplificadores) que produzcan calor.
9.
No deseche los aditamentos de seguridad de las clavijas polarizadas o con tierra. Una clavija polarizada tiene dos pernos
con uno mas ancho que el otro. Una clavija con tierra tiene dos pernos y un tercero a tierra. El perno ancho o el tercero
es provisto para su seguridad. Si la clavija no se enchufa en su tomacorrientes, consulte a un electricista para
reemplazarlo por uno nuevo.
10. Proteger el cable de areas transitadas o de ser pinchada particularmente la clavija, receptaculos
convenientes, y el punto desde el cual sale del aparat.
11. Use solo accessorios especificados por el manufacturero.
12. Usesolo con carro, base, triples, repisas, o mesas especificadas por el manufacturero, o vendidos
con el aparato si se usa un carro, utilicelo con precaucion al moverlo para evitar algun da_o al
rodarlo de un un lugar a oiro. Debe cuidar paradas rapidas, uso de fuerza excesiva y superficies
disparejas las cuales pueden ocasionar alguna caida de la TV y el carro.
13. Desconecte este aparato en tormentas electricas o cuando no se utilice por un periodo largo de tiempo. Para una mejor
proteccion de esta TV desconectela del tomacorrientes y desconecte tambien la antena y el sistema de cable. Esta
accion preveera da_os a la TV debido a la tormenta electrica y alas lineas de corriente.
14. Para reparar acudir a un tecnico calificado. El Servicio se requerira cuando el aparato haya sido da_ado,
ya sea por el cable o clavija danados, liquido derramado u objetos tirados dentro del aparato, exposicion directa a la
Iluvia o a la humedad, no opera normalmente, o haya sido tirado.
15. Esta TV debe operarse solo con el tipo de corriente indicada en la etiqueta. Si el usuario no esta seguro del tipo de
corriente del hogar, consulte a su distribuidor o la compa_i de luz local. Para el contr ol remoto de la TV las pilas
correctas se indican en el instructivo.
16. El aparato de TV no debe exponerse a goteos o salpicaduras. Ningun objecto Ileno con liquidos, tales como vasos,
deben de colocarse sobre el aparato de TV.
17. Nunca coloque objetos de ningun tipo sobre la TV por las aberturas ya que pueden tocar voltajes altos u otras partes
electricas que pueden ocasionar flu go o choques electricos. Nunca derrame liquidos de ningun tipo en la TV.
18. Desconecte la TV del tomacorrientes antes de limpiarla. No use liquidos o aerosoles. Use un trapo para limpiar.
19. Esta TV nunca debe colocarse cerca o sobre un radiador o fuente de calor. Esta TV no debe de colocarse en una
instalacion prefabricada tal como libreros o racks a menos que exista buena ventilacion tal como Io recomienda el
fabricante.
20. No coloque esta TV sobre nu carro inestable, base, triple, repisas, o mesas. La TV podria caer, causando se rios da_os
a alguien, y algunos serios da_os al aparato.
21. No intente reparar la TV por Ud. mismo porque al abrirlo o remover cubiertas puede exponerlo a altos volatajes muy
peligrosos o. Para cualquier servicio, acuda a personal calificado.
22. Este aparato cumple con las Reglas Part 15 de la FCC. Las Operacion esta sujeta alas siguientes condiciones:
(1) Este aparato puede no causar interferencia, y (2) este aparato puede aceptar cualquier interferencia en la recepcion,
incluyendo interferencia que puede causar su operacion.
Espafiol-46
23. PRECAUCION: Para prevenir da_os, este aparato debe set asegurado al piso o pared siguiendo las instrucciones
de instalacion.
24. Para reducir el riesgo de choques electricos, el perno central de tierra debe mantenerse.
25. Si un sistema de antena o cable es conectado a la TV, asegurese que estos esten dotados con puesta a tierra
para proteger contra sobrecargas de volltaje y cargas de estatica. La Seccion 810 del Codigo Nacional Electrico,
ANSI/NFPA No.70, provee informacion con respecto a puesta a tierra desde una parte de la estructura de soporte,
la tierra se consigue con un cable de cobre de la antena, que descarga los conductores, para la colocacion de
este aditamento conecte electrodos a tierra tal y como Io indica el diagrama de la Figura A.
ANTENA
Cable de
Tierra
Grapas
para Tierra
ANTENA
Unidad de Descarga
(NEC SECTION
818-20)
CONDUCTORES
(NEC SECTION
Grapas
EQUIPO
DE
SERVICIO
Tierra
Servicio
de Descarga
a Tierra
Sistema
de Electrodos
(NEC ART 250, PARTH)
ELECTRICO
Diagrama
Medidas
para
DE TIERRA
810-21)
Figura
A
de seguridad
Precaucion: Empujar, jalar o subirse a la TV puede causar su caida. No permita que los n_ffos se suban o se cuelguen a la
TV.Coloque siempre la TV sobre una superficie rugosa, nivelada, estable que soporte el peso de la TV. Y de set posible,
asegurela tal como Io indican las instrucciones
abajo indicadas (Nota: Los accesorios de sujeccion, como los
tomillos no se incluyen).
Paso uno: Inserte una base de montaje y atornille firmemente a la parte alta de la pared (Figura A).
Paso dos: Inserte ganchos a la pared y conecte los tornillos y ganchos con cuerdas o cadenas (Figura B).
Wall
j
...................
[
M4 Screws
Figura A
Figura B
EspaSoi 4 7
Antes de Encender la TV
Checar
Accessorios
Verifique los accessorios empacados con su TV.
ilIo]
_i I :{.o]I I-=l==hV_EoJ
loJ
I-.]lm&_IW±V±Y±_II
m lie]-'t_ll! I.o].II =]=1It.,! :V.,_.I:
Imlol_lJ
_I=_|(oI_
_]
PART NO.: RE20QP75
PROSCAN
SCREW
MACHINE
_J
LCD TV
GUIA RAPIDA DE
INICIO
;i INSTRUCTIVO
M4 x 10ram, 5pcs
Part# RS01TM41 OH
I:Y-'Y,."]
= Iml=_lm
LvJ
[lt:l
"11dl I] :1I:I I I_ I _1_i If:_ll Ill i
GUIA DE CONTROL
RE-MOTO
Colocacion
de la base de mesa
Guia de instalacion
Seleccionar
para base de TV, ver pag. siguiente para mejor comprension.
lugar de TV
Seleccione supefficie
Conexion
de la TV
plana y estable para su TV. Favor seguir Instrucciones
de seguridad
al colocar la TV.
y Uso
Despues de colocarla apropiadamente
informacion ver de pag.52 a pag. 55.
Es pa fiol-48
TV, conecte la TV a la corriente y componentes
del cable. Para futuras
Nota: Los accessoriosestan sujetos a cabio sin previo aviso.
Pedestal de instalaciOn
TV 32LD30Q esta empaqueta con el soporte del televisor separad o del gabinete. Para configurar el soporte de mesa del TV,
pot favor Ilevar a cabo la instalacion de acuerdo con las instrucciones de abajo.
Paso Uno
Coloque el televisor abajo sobre un paso suave o un cojin para evitar posibles da_os
Nota:
1. El panel es fa cil de set rascado, asi que pot favor, elija una superficie totalmente plana para colocar el televisor, y el uso
de un paso suave o un cojin para proteger el panel de la TV. No ponga la TV directament en la mesa.
2. Desconecte siempre primero el cable de AC al instalar o retirar el soporte.
Paso Dos
Tome el soporte. Pot favor, alinear los agujeros de los tomillos del soporte y la television.
Paso Tes
Inserte los 5 tomillos M4 de la maquina (que son totalmente iguales) y aprietelos.
Pot favor, vea el dibujo a continuacion:
Pedestal Screws
M4 x 10mm
/ :}cm
Quantity
Part #
5pcs
RS01TM410H
'.._
_:8
k
u .a
/
Espafiol-49
El primer paso al conectar su TV es obtener la sepal. Su TV 32LD30Q tiene un panel lateral, el cual le permite recibir Granalesde TV
analogos y/o digitales via entrada ANT/CABLE.
Antes de conectar
su TV, determine
el uso de antena o servicio de cable para obtener la sepal.
A. Antena
Conecte
la antena a la TV via cable coaxial en entrada ANT/CABLE
del panel lateral. Y asi recibira TV de aire con canales digitales
y analogos.
B. Servicio
Conecte
-rv por cable
el cable a la TV via cable coaxial a la entrada
ANT/CABLE
del panel lateral. Y estara listo para recibir canales locales
fuera del aire digitales y analogos.
C. Caja de Control
Si usa una caja de control, necesitara
Ilamar a su compaflia
de cable o satelite, quien usara una conexion especial,
favor
verificar la guia del usuario de la caja de control.
Nota: No conecte
el cable de corriente
sino hasta haber terminado
todas las conexiones.
Cable TV
AC
110V/60Hz
AC Power Cord
(Connect after all the other connections
Espafiol-50
are done.)
Antenna
Elija sus Conexiones
La TV 32LD30Q suporta vafias formas de conexion desde otros aparatos (tal como DVD, VCR, cable, ect.). Favor
siga el listado para elegir los cables que pueden adaptarse
a su aparato.
Ver pagina 52
Entrada de R-AUDIO-L/AV,
Video
Cable Video/Audio
Cable Audio
-
_m
-|
Ver pagina 53
Componente 1 Y,Pb,Pr Cable
Entrada R-AUDIO-L/AV Cable
Componente 2 Y,Pb,Pr
Entrada R-AUDIO-L Cable
Cable Componente
Video
Cable HDMI-DVI
Vet pagina 54
=tmlIIIIIll
HDMI en 1/DVI, 2, 3
Cable
HDMI TM
Cable de audio con terminal 3,5mm
Vet pagina 55
Entrada
PC
Cable VGA
VGA, SOUND/DVI
Nota:
El logo HDMI yel de High-Definition Multimedia Interface son marcas or registradas y/o licenciadas por HDMI Licencing.
Precaucion:
Desconectar
el cable
de corriente
cuando
conecte
otros
aparatos
a la "IV.
EspaSol- 51
Conexion Aparato Compuesto AV (Buena Calidad de Video)
Para conectar un aparato compuesto
AV, como un reproductor
DVD, siga los siguientes pasos:
1. Conecte la entrada Video In al costado de la TV a la salida video del aparato via cable de video (amarillo).
2. Conecte las terminales
R-AUDIO-L/AV
al costado de la TV a la salida audio del aparato via cable de audio.
Nota las salidas y entradas del canal izquierdo son blancos y del derecho son rojos.
Nota: sehal A V es del video compuesto.
Conexion
Este tipo de sehal de video tiene regular calidad de imagen.
de Video Compuesto
La imagen de abajo es un ejemplo de una conexion con el video compuesto.
Reverso de TV
Panel de salida de otro aparato
Espa_ol-52
Conectando
Para conectar
aparato con salida YPbPr (Mejor Calidad de Video)
un aparato componente,
1. Conecte terminal COMPONENT
tal como un reproductor
DVD, siga los pasos siguientes:
1,2 Y/Pb/Pr al costado de la TV a la salida de video del aparato via cable de video (verde,
azu y rojo).
2. Conecte terminales
COMPONENT
1,2 R-AUDIO-L
del costado de la TV a la salida de audio del aparato via cable de
audio. Nota la terminal y entrada de canal izquierdo son blancas y del derecho son rojos.
Nota: terminales
Conexion
Y/Pb/Pr de/componente
del Componente
de video. Esta sehal de video tiene calidad de imagen.
de Video
La imagen de abajo es un ejemplo de una conexion usando el componente
de video.
Reverso de TV
Panel de salida de otro aparato
Espa_ol-53
Conexi6n HDMI dispositivo (Mejor Calidad de Video)
Para conectar
un dispositivo
la TV a los conectores
Para conectar
HDMI a un reproductor
de salida del dispositivo
un dispositivo
1. Conecte el HDMI1/DVl,
2. Conecte SOUND/DVl
de DVD, per favor conecte el HDMI1/DVl,
mediante
DVl a un ordenador
2, o 3 al enchufe del lado de
un cable HDMI.
a trav_s del puerto DVl del PC y el conector
HDMI del televisor:
2, o 3 al enchufe del lado de la TV al puerto DVl del PC a trav_s de DVI-HDMI.
al enchufe del lado de la TV a la salida de audio de la computadora
con el cable de audio ( enchufe
de est_reo 3,5 mm).
Para conectar
un dispositivo
1. Conecte el HDMI1/DVl,
2. Conecte SOUND/DVl
(dual-channel
DVl, a otros dispositivos
AV a trav_s del puerto DVl del dispositivo
2, o 3 al enchufe del lado de la TV al puerto DVl del dispositivo
al enchufe de lado de la TV a la toma de salida de audio del dispositivo con el cable de audio
RCA a la toma est_reo de 3,5 mm).
Nota: !. HDMI (High-Definition
descomprimido.
Multimedia
Se transporta
Interface) es un compacto
interface de audio / vfdeo para transmitir audio
la sehal de audio y vfdeo a traves del mismo cable y tiene la mejor calidad de pantalla
2. Cable HDMI-DVI sdlo transfiere la sehal de vfdeo desde el puerto DVI del dispositivo
el sehal de audio, por favor conecte audio output a SOUND/DVI
Conexion
y toma HDMI del televisor:
a trav_s de DVI-HDMI.
DVI a HDMI toma de TV. Para
en el panel posterior de televisidn.
HDMI
La imagen de abajo es ejemplo de una conexion usando terminal video HDMI.
Panel de salida de otro aparato
Espa ol-54
PC
Panel de salida de otto dispositivo
AV
Conectando
una computadora
Para conectar una computadora,
siga estos pasos:
1. Conecte el puerto PC INPUT VGA al costado de la TV a la salida VGA del aparato via cable D-sub 15-pin.
2. Conecte terminal SOUND/DVl
del costado de la TV a la salida de audio de computadora
Nota: Si desea usar su TV como un monitor,
Favor ajustet la computadora
Conexion
con cable de audio (3,5mm).
favor checar que la maxima resolucion para 32LD30Q is !366"768.
grafica correctamente.
de PC
La imagen de abajo es ejemplo de una conexion usando su TV como monitor de PC.
The back of TV
PC
Como Obtener Varios tipos de fuentes de entrada
Despues que la conexion sea hecha, presione boton INPUT del control o el panel de la TV para elegir la fuente requerida.
Ver pag. 61, Operaciones
basicas de la TV.
Espa_ol-55
...........................
i
ANT/CABLE:
Conecte
para recibir la sepal desde su antena o cable via cable coaxial.
Head phone:
Conecte
un audifono de 3,Smm para audio personal.
Digital Audio-out:
Conecte
AUDIO OUTPUT
L/R: Conecte
Note:•
un cable coaxial para salida de audio digital.
cables coaxiales de doble canal para salida analoga de audio.
Salida Digital de Audio y AUDIO OUTPUT L/R deben de set conectadas
poder de audio, et cual provee un desempeho
R-AUDIO-L/AV,
o reproductor
Video In:Conecte
de sonido mas armonico
un aparato AV que tenga terminales
DVD. Para accesar aparatos conectados
luego presione subir/bajar
• AUDIO-IN
L: conexion de canal audio izquierdo.
El conector
• AUDIO-IN
R: canal de conexion de audio derecho. El conector
de
de video, como una VCR
a esas terminales,
para seleccionar AV. Presione finalmente
al amplificador
y poderoso.
presione INPUT en su control;
ENTER para confirmar.
audio izquierdo es blanco. Para fuentes
de audio mono, asegurese de usar la entrada de AUDIO izquierda.
Nota:•La
entrada AV (Video In), y la de COMPONEI',JT I (Y, Pb, Pr) comparten
COMPONENT
1,2 Y/Pb/Pr:
Conecte
Para accesar aparato conectado
Component1
•
de audio derecho
Y/Pb/Pr
o Component2.
(Component
un arbol de video-grade
un aparato con entradas component
al Y/Pb/Pr,
es rojo.
/a misma entrada de R-AUD/O-L/AV.
video, como un reproductor
DVD.
presione INPUT desde su control; luego presione la flecha subir/bajar
para seleccionar
Presione ENTER al mismo tiempo para confirmar.
Video):
provee buena calidad de imagen porque la sepal es separado
o cables componente
video para la conexion. Cuando use Y/Pb/Pr,
en tres componentes
asegure de conectar
como
los cables de
audio derecho e izquierdo.
HDMI1/DVl, 2, 3: (Interfase Multimedio de AIta Definicion) Provee una conexion digital descompresada
video y audio por medic de un cable mini-plug integrado.
PC INPUT VGA: Conecta su computadora
SOUND/DVI:
que Ileva ambos datos
u otro aparato con una salida VGA a esta entrada usando un cable 15-pin, D-sub.
Use para tener sonidos cuando la PC se conecta a la TV. Use cable 3,5mm stereo mini-pin para conectar
PC a laTV.
SERVICE: Solo para el uso de servicio. No conecte ningun aparato.
AC-IN: AC power input.
Espafiol-56
Botones
Laterales
Si no Iocaliza su control remoto, puede usar los botones laterales de su TV para operar varias funciones de la TV.
m
INPUT: Despliega la lista de Seleccion.
MENU:
Despliega Menu principal de la TV.
OH • : Incrementa cambio en la lista de canales. En el menu de la TV, acciona la flecha para arfiba en el control remoto
y puede ser usado en opciones de Menu.
OH • : Desciende
en la lista de canales. En el menu de la TV, se acciona con la flecha hacia abajo en el control remoto y
pue- de ser usado para opciones en el menu.
VOL+: Incrementa el volumen. En el menu de la TV, se acciona con la flecha derecha del control remoto y puede ser
VOL-:
usada para seleccionar
el menu.
Desciende el volumen.
En el menu de la TV, se acciona con la flecha izquierda del control remoto y ouede ser usado
para seleccionar
POWER ((_):
el menu
Enciende y apaga la TV.
Panel frontal
Funcionamiento
Indicador
en distancia y angulo del control, ver pag. 58.
Power/Standby:
LED dual color AzuI-Rojo. Es rojo cuando la TV se apaga y azul cuando se enciende.
Sensor del Control Remoto: El sensor IR del control, recibe un rayo infrarrojo enviado por el control remotol.
Sensor del Control
•
J
Indicador
Remoto
Power/Standbyl
(azul/rojo)
Espa ol-57
Instalando Batedas en el Control
Retire la tapa del compartimento
de atras del control remoto levantando
la tapa.
Inserte dos pilas "AAA", asegurese que la polaridad (+ y -) esten alineadas correctamente.
Coloque
Si el control
la tapa trasera.
remoto
no funciona,
verifique
estos puntos:
Precaucion:
•
Baterias usadas deben ser recicladas.
Las baterias estan inservibles?
•
Mantener lejos del alcance de ni_os.
•
Hay una falla de energia de corriente?
•
NO use baterias usadas y nuevas combinadas.
•
El cable de corriente esta conectado?
• Cambie ambas baterias al mismo tiempo.
•
Hay alguna interferencia
control remoto?
• Cuando no use el control remoto per largo tiempo,
retire las baterias de la unidad.
•
Polaridades
•
correctas
(+, -)?
o algo bloquea el sensor del
Angulo de recepcion del Control remoto
Use su control remoto a un rango de distancia y angulos como se ilustra abajo.
Control Remoto Universal abajo listados
Para las marcas de Control Remoto Universal abajo listados,
favor usar los codigos y referencias de su Control Remoto
Universal indicados
en el Manual para Instrucciones
basicas de
operacion de su TV.
• Codigos para DIRECTV: 0178, 10178
_L
• Codigos
para Time Warner Cable: 0178, 10178
• Codigos
para Cox Communications:
• Codigos para Comcast:
7 metros
Espa_ol-58
10178
• Codigos para Dish Network:
• Codigos
0178
627
para Fios Verizon: 0205, 0057, 0493, 0775
Botones del Control Remoto
MUTE (u_:[):
Reduce el volumen de la TV a su minimo nivel. Presione otra vez para restaurar
volumen
POWER ((b): Enciende y apaga laTV.
CH.LIST:
Despliega la listade canales.
FAV.: Adiciona
el canal actual a su lista de favoritos,
o elimina el canal actual de la lista
de favoritos (si ya existia este canal en el listado de favoritos).
FAV.+ or FAV.- : Asciende/desciende
Numeric
Buttons:
per la actual lista de canales favoritos.
Use estos botones para los numeros.
"--": Para entrar a un canal digital con un sub-canal,
entre al canal principal;
y presione
este boton para entrar al sub-canal y presione ENTER.
Recall (_,_m):Retorna al canal previo.
EPG: Muestra la Guia de Programa Electronico
INPUT: Accesa los canales disponibles
(ver pag. 62).
(TV, AV, Component
1/2, HDMI 1/2/3, PC).
Use las flechas para las opciones, y presione ENTER para selecionar.
Arrows
(_1/I_/A
/ v ): Use las 4 flechas para elegir las diferentes opciones del menu de la
TV o cambie el valor. Las flechas arriba!abajo
CH^/CHv,
y las flechas izquierda/derecha
botones VOL-/VOL+.
pueden funcionar con
puede funcionar con
ENTER: Boton aceptar y confirmar.
MENU:
Accesa al Menu principal, o retorna al nivel superior de un sub-menu.
FREEZE : Congela escena en pantalla, presiona otra vez y retornara a normal.
DISPLAY: Despliega la barra de Canales (ver pag.62).
EXIT: Para salir del menu o funcion actual.
VOL+ or VOL-:
CH^
or CHv:
Incrementa o reduce el volumen de la TV.
Ascender
o descender
los canales arriba!abajo;
PICTURE:
SOUND:
per la lista de canales. Presione otra vez para cambiar
mantener
presion para continuar
Para modificar modo de imagen predeterminado
Para modificar modo de sonido predeterminado
cambio de canal.
(ver pag. 63).
(ver pag. 65).
SLEEP: Selecciona tiempo, despues del cual la TV se apagara automaticamente.
ASPECT:
Modifica el modo tamaflo de pantalla predeterminado
(ver pag. 64).
CC: Selecciona modo "closed caption".
MTS: Selecciona sonido de TV multi-canal.
NOTA : Los botones
no fistados son para ei DVD, no estan disponibies
para esta TV.
Control
Remoto
parte
No. RE20QP75
Espa ol-59
Si es la primera vez que enciende su TV, o ha borrado la opcion eliminar canal (Clear Channel) (ver pag. 70), el ajuste inicial del
menu aparecera automaticamente.
Idioma
Para elegir su menu lenguaje, presione la flecha izquierda/derecha
Lenguajes disponibles:
Fuente
hasta que aparezca su lenguaje.
Ingles, Frances y Espaflol.
SeSal
Para elegir su tipo de sepal para sintonizar la TV, presione la flecha izq!der hasta ver Air o Cable.
Nota: favor seleccione
tipo de sepal de la TV en base a Io que use antena o cable de circuito cerrado.
Auto-Busca
Para ejecutar busqueda de canal, presionar flechas arriba/abajo hasta IocalizarAuto Canal y presione el boton ENTER.
Que entender:
1. El acceso a busqueda de canales inicia con la TV Analoga y termina con la Iocalizacion
2. Los canales que se hayan Iocalizado se guardaran
automaticamente.
3. Puede presionar el boton MENU o EXIT para buscar canales analogos/digitales.
4. Puede presionar MENU o EXIT repetidamente
Espa ol-60
para terminar de buscar canales.
de canales en la TV Digital.
Apagar y Encender
Conecte el cable de corfiente de su TV LCD, esta entrara al modo "standby"
boton de encendido
enciendala
(_)
y el indicador de encendido
del panel lateral de su TV o del control remoto para encenderla.
Apaguela
apareceraen
rojo.Use el
despues per 5 segundos,
y
nuevamente.
Elegir canales en la TV
Para sintonizar
canales Analogos
Un canal analogo muestra un numero comenzando
con "A". Teclee el numero digital con los botones numericos y presione el
boton ENTER para confirmar.
Per ejemplo, para ver el canal analogo "A51 ", presione "5", "1 ", "ENTER" en el control remoto en secuencia.
Nota: Aunque no haya sehal de TV analoga en America, resepvamos
funciones A TV para expandir su uso.
Cambio a Canales Digitales
Un canal digital tendra al inicio una letra "D". Teclee el numero principal con los botones
del control remoto, y capture los sub-numeros al final.
Per ejemplo, para vet el canal analogo "D31-1 ", presionar "3", "1 ", " _
numericos, y presione el boton "--
"
"y luego "ENTER" del control remoto en secuencia.
Cambio Directo de Canales
Puede usar el boton CHA para incrementar
Display), las flechas subir/bajar
el canal y CHv
pueden tambien funcionar
para disminuir el numero del canal. Cuando no use OSD (On Screen
con los botones CHA/CH
v.
Elija fuente de entrada
Presionar boton INPUT del control remoto para desplegar la lista Fuente a Seleccionar.
Use las flechas subir/bajar
para elegir fuente deseada y presione ENTER para confirmar.
Ajustando angulo de base de TV
El gabinete de la TV puede ajustarse manualmente
a izquierda o derecha hasta 30
grados del centre. Puede ajustarlo hasta conseguir la mejor vista y comfort.
Espa_ol-61
Barra de Canales
Presione el boton DISPLAY del control remoto, la barra de canales aparecera arfiba a la derecha de la pantalla. Desplegando
la informacion
de los canales actuales. La lista siguiente describe toda los items de la barra de canales.
ATV
A2/D50-1
DTV
Si el canal es analogo, A se desplegara.
Si es un canal digital, D se desplegara.
imageries de abajo, A2 es un canal analogo, y D50-1 es un canal digital(
Por ejemplo, en las
-1 es un numero de sub-canal).
MTV/KOCE-HD
Muestra etiquetas de canal.
Mono/Ingles
Despliega si el canal actual es recibido en estereo o mono. Si el canal actual es digital, este espacio
sera lenguaje SAP (Second Audio Program).
480i/1080i
16:9/CC/TV-PG
Muestra resolucion de la sepal.
Despliega el aspecto de la pantalla, closed caption y nivel de rating del programa o canal actuales.
Y solo estan disponibles
Oct-31
23:14 Mon
para canales digitales.
Fecha y hora actuales.
Ajuste de Volumen
Presione el boton VOL+/VOL-
del control remotorpara
ajustar el volumen. Si desea quitar el sonido, presione MUTE (1:_).
Cuando no use OSD (On Screen Display), las flechas izquierda!derecha
pueden funcionar
con VOL-/VOL+.
EPG (Electronic Program Guide)
Presione el boton EPG enrel control remoto, la guia electronica
Esta guia electronica
Espa ol-62
le dara la guia de la programacion
de programas
aparecera en el centro de la pantalla.
de la TV. Puede usar las flechas izq!derecha
para cambiar.
Ajustar la pantalla a OSD
El menu OSD (On Screen Display) le permite accesar las funciones de la TV.
Uso del menu del sistema OSD, presione el boton MENU del control remoto, y use laflecha izquierda/derecha
opcion IMAGEN, SONIDO, CAUCE, Padres, Configuracion
para elegir una
u OTROS y presione el boton ENTER.
Presionar flechas subir y bajar para moverse a diferentes opciones de cada menu. Si es necesario,
derecha para desplegar las opciones de su eleccion. Si esta disponible,
presione ENTER o flecha
use el texto de la parte baja de cada pantalla para ayuda.
To retornar al menu anterior, presionar el boton MENU.
Parasalir al menu OSD:
• Presione e botonl EXIT. El menu se borrara de la pantalla.
• Presione el boton MENU vafias veces hasta que este
desaparezca.
Menu de Imagen
El Menu de imagen contiene menues y controles para con figurar la forma que aparezca la imagen. Las opciones de Menu de
imageries aplica al video para seleccionar
principalmente
entradas de TV y VIDEO. Todas las opciones de imagen aplican para
cada opcion.
Presione MENU en el control. Seleccione
Picture en Menu principal. Presione el boton ENTER para preceder
Use subir/bajar
al menu IMAGEN.
para elegir la funcion requerida, presione
ENTER o flecha derecha para ajustar o entrar a sub-menu.
La imagen de sub-menu
Ponienco
y explicaciones
estan abajo.
del Cuadro
Poniendo del Cuadro: Elija modo visual predeterminado
Estandar,Dinamico,Usuafio,Pelicula.
puede ajustar Brillo, Contraste,
en su TV:
Solo en modo User
COLOR, Tinte y Nitidez.
Brillo: Ajusta la brillantes de imagen.
COLOR: Ajusta la riqueza del color.
Tinte: Ajusta el balance entre niveles rojo y verde (disponible
solamente en sepal NTSC.
Nitidez: Ajusta nivel de sombras
de la imagen.
Espa ol-63
PONIENDO
DEL PANTALLO
Tama_o de la pantalla: Seleccione un rango de aspecto.
(Rangos:Lleno,
Neutro, Waterglass y Cinema.)
Favor elegir el radio que aplica a la mejor sepal de formato de video.
El automovil Extensamente : Haga que el tamaflo de la pantalla cumpla
con el formato de sepal automaticamente.
Si cambia a esta funcion, el tamaflo de ajuste de Pantalla se ignorara.
Config.de
PC (disponible
solo en modo
PC)
El automovil Extensamente:
Ajuste la imagen de la PC automaticamente.
La Posicion horizontal: Ajuste la posicion horizontal de imagen.
La Position Vertical: Ajuste la posicion vertical de imagen.
Reloj: Ajuste el reloj de la imagen.
Fase: Ajuste la fase de la imagen.
Reajuste: Reajuste a las imageries de PC de fabrica (origen).
La Temperaturo
colorida
Esta opcion le permite seleccionar
uno de los tres ajustes automaticos
de color: Frio para fondo azulado en colores de imagen;
Normal o Caliente para fondo rojizo en colores de imagen.
Advanced
Picture
Settings
(no disponible
en modo
PC)
Contraste
Dinamico: Ajuste contraste
con Apagado/Bajo/Medio
o Alto.
Film Mode: Ajuste modo filmacion Encend/Apagado.
Reduccion
de Ruido: Ajuste reduccion
Apagado/Bajo/Medio
MPEG Reduccion
o Alto.
de ruido: Ajuste Reduccion
con Apagado/Bajo/Medio
Nota: Reduccion
de Ruido en MEPG
o Alto.
de ruido ayuda a reducir la "estatica" de cualquier
tipo de interferencia.
Esta caracteristica
mas clara en condiciones
es util para proveer una imagen
de sepal analoga debil. La Reduccion
Ruido MEPG especificamente
MPEG.
Espafiol-64
de ruido con
de
trabaja en sepal de video con codigo
Menu de Sonido
El menu de Sonido le permite ajustar las salidas de audio. Para accesaflo,
del Menu principal. Presione el boton ENTER para proceder
presione MENU del control remoto, y luego elija SOUND
al menu SOUND (Sonido).
Use subir/bajar
para la funcion que requiera, presione
ENTER o flecha derecha para ajustar o enter para
sub-menu.
SONIDO
La imagen sub-menu
se explica mas abajo.
Poniendo
Modo de Sonido: elija el modo predeterminado
en su TV:
Normal, Soft, Usuafio, Dinamico. Solo en modo User puede
ajustar Bajo y agudo.
Bajo: Ajuste el componente
Agudo:
Bajos de sonido de la TV.
Ajuste el componente
de Agudos de sonido de la TV.
Balance: Ajuste el balance entre canal izquierdo y derecho.
Modo
de Surround
Crea un sonido surround
Sonido
3D con material estandard
estereo, con gran profundidad
y riqueza.
Analogico
Seleccione tipo de audio analogo de su TV: Esterer, Mono o SAP (solo para el modo TV).
Sonido
Digital
Seleccione tipo de lenguaje de audio: Ingles, Frances o Espaflol (disponible
Otras
solo para canal DTV).
Escenas
Ajuste Auto Volume De/En.
Ajuste bocinas De/En.
Ajuste tipo de salida de audio con Off, PCM o Dolby Digital.
Ajustar esta opcion en base a potencia de amplificador.
Espafiol-65
Equalizer
Settings
El ecualizador
grafico de 7-bandas
Puede seleccionar
le permite ajustar la frecuencia
uno de los ajustes predeterminados
(Apagado,
de audio.
PIEDRA,
POP JAZZ, Usuafio) o crear su propio ajuste personal (USER).
Presione la flecha izquierda o derecha
(100Hz,250Hz,
para seleccionar
frecuencia
500 Hz,1KHz, 2KHz, 4KHz, 10KHz) que desee para
ajustes. Use la flecha subir o bajar para ajustar.
Menu de canales
El menu de Canales permite buscar, very editar canales. Esta disponible solo en modo TV.
Presione MENU y elija CHANNEL del Menu principal. Presione el botch ENTER para accesar al menu CHANNEL.
Use subir/bajar
para elegir funciones requeridas,
presione
ENTER o flecha derecha para ajustar o entrar a sub-menu
La imagen del sub-menu
y explicacion
estan abajo.
Lista de Canales
Despliega
lista de canales. Muestra
canales actuales.
Lista preferida
Despliega
Ajuste
lista de canales favoritos.
Muestra
canales favoritos actuales.
de Canal
Para ajuste de canal sub-menu
(como se ve abajo).
Use la flecha izq!der para cambiar canal deseado
Ajuste si el canal actual esta contenido
--
en la lista de canales.
Entrar a numero de canal para renombrar
Ajuste si el canal actual es el canal favorito.
Espafiol-66
para editar.
canales.
Fuente
SeSal
Seleccione su tipo de sepal: Antena o Gable.
Auto°Busca
Ejecute busqueda de auto canal (ver pag. 60).
Menu de Padres
El ajuste del Menu le permitira restringir programas
con contenidos
especiales, en los botones teclee fuente de entrada.
Presione MENU y elija PARENTAL del Menu principal. Presione el boton ENTER para preceder al menu PADRES.
Crear contrasena
•
Cuando el Menu de control Parental es accesado desde el Menu principal, necesita dar su password para desbloquear.
Favor teclear su password de 4digitos con los numeros 0-9.
Nora- Passwo/_ o;iginal es "0000".
•
Despues de desbloquear,
lel menu de control parental puede usarse. Use laflecha subir/bajar para elegir la funcion quenecesita
y presione ENTER o flecha derecha para V-chip, Cambio de Password, en Panel frontal Iocalizar seguro, quitar Lista de sub-menu.
V-Chip
La grafica siguiente detalla donde se Iocalizan los items en el menu V-Chip.
US V-Chip
Presione ENTER o la flecha derecha para entrar a los rangos del menu US V-Chip, donde se encuentran dos
sub-menus:
Valuacion pelicula, Valuacion television.
Ver siguiente pagina para mas detalles.
Espa oi267
Valuacion
pelicula
Use las flechas para seleccionar
nivel de rango a
bloquear, presione ENTER para bloquear/desbloquear
nivel. Si ha blo-queado
el
un nivel inferior, el nivel mas
alto se bloqueara tambien.
Por ejemplo, cuando PG-13 es bloqueado,
se bloquearan al mismo tiempo.
Valuacion
television
Similar con Rango pelicula.
Despues de ajustar, presione MENU para regresar o EXIT para ir al menu.
Repaso de mngosTV
TV-MA
Solo para Adultos
D
Dialogo Sexual Explicito
TV-14
Precaucion
L
Languaje Adulto
-R/-PG
Guia Paternal Sugerida
S
Situacion sexual
TV-G
Todo Publico
V
Violencia
TV-Y7
Dirigida a niSos de 7 aflos y mayores
FV
Fantasia Violenta
TV-Y
Para ni_os
Patema alta
Para mas tangos, vet pag. 77.
Espafiol-68
R, NC-17 y X
V-Chip
Canada
Presione ENTER o flecha derecha para el rango US V-Chip, el cual contiene 2 sub-menus:
Valuacion
Rango Ingles y Rango Frances.
Inglesa
Presione ENTER o flecha derecha para el menu en Ingles.
Use las flechas para seleccionar
el nivel que
desea bloquear, luego ENTER para
bloquear/desbloquear
nivel. Si ha bloquedo
un nivel mas bajo,el nivel mas alto sera
bloquedo tambien.
Por ejemplo, cuando PG es bloqueado, 14+ y
18+ seran bloqueados al mismo tiempo.
Valuacion
Francesa
Presione ENTER o flecha derecha para el menu en Frances.
Similar con rango en Ingles.
Nota- Rangos disponi-bles
solo si el canal envia
la informacion de
tango.
Bloq-sin
clasif
Bloquea programas
Valuacion
sin rango.
de Downloadable,
Datos Downloadabe
claros
Activar o porter en memoria datos de rangos, si esta disponible.
Espa oi]69
Cambiar
Contrasena
Cambiar password
de menu paternal.
Teclee ultimo password.
Teclee nuevo password.
Teclee de nuevo password
BIq.PnI.Fr
Elegir para bloquear o desbloquear
Cerraduta
botones 'del panel de la TV para que no puedan ser usados.
de la fuentre
Esta opcion le permite bloquear o desbloquear la fuente. La fuente bloqueada no puede elegirse
de la lista de entrada a menos que capture el password correcto.
Use subir/bajar para seleccionar
la fuente, presione ENTER
para bloquear o desbloquear
Borrar
lista de Canales
Esta opcion le permite ejecutar funcion de Borrado de Lista de Canales.
Esta funcion reajustara la TV al sistema inicial de fabrica (no aplica en menu OSD).
Espa ol-70
para confirmar.
Configuracion
El Menu de ajuste le permite configurar
Seleccione
la TV con sus preferencias.
SETUP del Menu principal. Presione ENTER para accesar al menu SETUP.
Use subir/bajar
para elegir la funcion requerida, presione
Menu Language English Clock ENTER o flecha derecha
para ajustar o entrar a sub-menu.
La imagen sub-menu
y
explicacion se muestran abajo.
Subtitulos
Subtitulos
Presione flecha izq!der para seleccionar closed caption Apagado u Encend.
Analog.Tipo
Presione flechas izq!der para seleccionar
Text4.
Digital
closed caption en TV analoga: CC1, CC2, CC3, CC4, Text1, Text2, Text3,
Tipo
Presionar flechas izq!der para elegir closed caption en TV Digital: Service1, Service2, Service3, Service4, Service5,
Service&
Digital
Prefije
Presione izq!der para elegir preajuste closed caption digital: Valor,Costumbre.
Solo en modo custom puede ajustar el estilo closed caption digital.
Digital
CO Style
Presione izq!der para ir a closed caption digital estilo sub-menu (ver siguiente pagina).
Espa oi:71
Digital
CO Style
--
Seleccione
el item deseado para ajuste en el menu el estilo
Digital CC con las flechas subir/bajar.
Despues del cambio, puede visualizar el estilo CC aqui.
Reloj
Zona De Tiempo
Seleccione su horatio zonal: Oriental, Central, Montaflas,
Pacifico, Alaska, Hawaii, Samoa, Terranova, Atlantico
El RelojAuto
Seleccione auto reloj on/off. Estole ayudara a sincronizarla hora enlaTVatiempo
Tiempo
instalacion
Ajuste manual de la hora (es necesario apagar auto reloj).
Day of Week
Despliega que dia es (no se puede ajustar, solo vet).
Espa ol-72
estandar(desde sepal DTV).
Otros Menus
Los Otros Menus le permite configurar
la TV con sus preferencias en otras opciones.
Elija OTHERS del Menu principal. Presione el boton ENTER para proceder al menu SETUP.
Use subir/bajar
para elegir la funcion requerida, presione
ENTER o flecha derecha para ajustar o entrar a
sub-menu.
La imagen de sub-menu
y explicacion
seven
abajo.
Azule Atras
Presione el boton ENTER para poner o quitar el fondo azul. Si este se activa,
cuando no se reciba sepal de entrada.
Ningun
10-minutos
que no haya sepal. Sugerimos
Si es activado, la TV se apagara despues de
activar esta funcion cuando se active el fondo azul. Porque podria daflar el
panel LCD Si la pantalla azul dura demasiado
tiempo.
Nota: En el modo PC, el monitor en standby se apagara dependiendo
del ajuste de Apagar sin SePal.
Ope.P-FUERA
Presione el boton ENTER para activar o desactivar
3-horas que permanezca
Todos
sin operacion
"Todos Restablecieron".
Si es activado, _a TV se apagara en
alguna.
Restablecieron
Presione boton ENTER para ejecutar reajuste de la TV. Todos los ajustes retomaran
Audio
un fondo azul
Sig.P-FUERA
Presione el boton ENTER para porter o quitar "Ningun Sig.P-FUERA".
Ningun
la TV desplegara
a los de fabfica.
Solo
Presione el boton ENTER para activar solo modo audio. La TV activara solo sonido y el panel LCD se apagara.
Para restaurar reproduccion
normal, mantener el boton POWER por tres segundos.
Espafioi:73
Cual es la forma mas conveniente
Conecte
para ver en video de Alta Definicion
(HD) ?
una antena a la entrada de la TV para vet los canales digitales locales. Necesita comprar
una antena.
(Vet pag. 50 para mayor informacion sobre ajustes de la antena).
Visite www.antennaweb.org
para asistencia para decidir el tipo de antena a usar para recibir los canales locales digitales del area.
Despues de dar su Iocalizacion, este programa de mapeo le dira las estaciones
locales analogas y digitales disponibles
usando
cierto tipo de antena.
Existen otras maneras
de ver video de Alta Definicion
(HD) ?
Ademas de utilizando una antena como se menciono arfiba, puede usar tambien un controlador
Contacte su distribuidor
de cable o satelite para comprar programaciondigital
y conectelos
para recibir video digital.
a su controlador
para
asegurarse de ver los canales de la mejor manera.
Como distinguir
un canal analogo
de un canal digital ?
Presione el boton DISPLAY para ver la barra de Canales. En la esquina superior derecha de la pantalla. Una "A" aparecera
para un canal analogo. Una "D" aparecera para un canal digital.
Nota:
Como los canales analogos de TV se eliminaron en EUA, reservamos
Porque
hay barras en mi pantalla,
y puedo
La mayoria de video digital se envia en formato 16/9
eliminarlas
funciones de TV analogas solo por excepcion.
?
el cual Ilena su pantalla, pero aveces se envia en 4/3 el cual no la Ilena.
Depen- diendo de como la estacion o el aparato esten conectados
presione el boton ASPECT para ver diferentes formatos
a su TV es el formato de video. Si hay barras en pantalla,
que pueden eliminar las barras. Algunas no podran removerse por
set parte del formato que envia el canal. El formato cambia al presionar el boton ASPECT y el tipo de formato aparece abajo
de la pantalla. Para mas informacion
de formatos de pantalla, ver pag. 64.
Por que un canal desea encontrar varios canales, pero al intentar sintonizarlos, no hay nada ?
AIgunos canales no tienen programacion,
como canales por pre-pago.
negra o aparecera como nieve. Probablemente
Cuando los canales noestan disponibles,
la TV se vera
desee eliminar esos canales de su lista de canales. Retirelos del Menu en la
lista de Canales. Ver pag. 66 para mayor informacion.
Por que toma
mucho tiempo
cuando
busco unos canales
la primera
Si tiene tanto canales analogos y digitales, la TV Iocalizara todos los canales disponibles
vez ?
en el listado de canales. Si tiene
canales digitales, la TV buscara canales al revueltos, los canales no revueltos, y cada sub-canal
Espa ol-74
de ese canal digital.
ldentificarProbl
Si hubiera problemas cuando use el producto, favor consultar la Iista de abajo. Siesta Iista no resuelve el problema, Ilame a nuestro
Centro de Servicio al Cliente de inmediato.
Problemas
en TV
La TV no puede encender.
•
Asegurese que el cable de la corriente este conectado
•
Verifique el tomacorrientes,
•
El panel lateral puede estar inactivo (deshabilitado). Use el control remoto para encender laTV.
•
Seleccione
del Panel Frontal
No hay imagen o sonido
correctamente.
asegurese de que la corriente trabaja normalmente
y es estable.
la funcion Menu PARENTAL y presione ENTER para checar el seguro.
pero la TV esta encencendida
y no aparece
"No Signal" en pantalla.
• Esta tratando de usar un cable de corriente sin conectar a un aparato? Para usar otro aparato video/audio,
aparato externo trabaja normal, presione INPUT y elija el cable de alimentacion
Ver pag. 60 para instrucciones
asegurese que el
correcto.
•
La opcion Tipo de SePal puede ser incorrecta.
detalladas.
•
El canal puede ser blanco. Intente Iocalizar el canal otra vez o cambie a otro canal.
El sonido esta bien, pero la imagen es pobre.
•
Si solo puede ver imageries en blanco y negro desde un aparato externo que haya conectado
de video no estan bien conectados,
o se conectaron
a su TV, puede ser por el cable
mal. Cheque que la conexion este estable, y que sea correcta.
Para entrada AV, conecte cable amarillo de video a la entrada amarilla de video del costado de su TV. Para entrada de
•
Componente, los tres cables de video Y, Pb, Pr (rojo, azul y verde) deben conectarse
costado de su TV.
alas entradas correspondientes
Cheque las conexiones
firmemente
de entrada. Asgurese
• Intente ajustar los aditamentos
que todos los cables esten conectados
en el
al costado de su TV.
de color para mejorar imagen.
No hay sonido, pero la imagen es correcta.
•
El sonido puede estar en "mute". Intente presionando
•
Para usar AV o Componente,
recuerde
el boton MUTE para restaurar sonido.
conect ar las salidas de audio izquierda y derecha correctamente.
El cable del canal
izquierdo es blanco y el del derecho es rojo. Favor verifique que los cables y entradas sean acordes a esos colores.
•
Los ajustes de sonido pueden ser incorrectos.
Ver pag. 65 para mayor informacion.
•
Si la fuente de audio tiene solo una entrada o es un monoaural, asegurese de tener conectada
la terminal en el marcado con
Audio In L (blanco) en la TV.
Los botones
del panel lateral no funciona
• El panel lateralpuede estar cerrado(deshabilitado).Use el control remoto para encenderla TV.
• Seleccione la funcion del menu PARENTAL Lock en el panel frontal y presione ENTER para verificar el estatus.
• Desconecte la TV de la corriente por 10 minutos y conecte nuevamente. Encienda la TV e intente otra vez.
La TV se apaga inesperadamente.
•
El circuito de proteccion
nuevamen-te.
electronica
pudieron activarse por una falla electric&
Si esto pasa frecuentemente,
su casa no puede funcionar
normalmente,
Espere 30 segundos
y encienda la TV
el voltaje en su casa puede ser anormal. Si el otro equipo electronico
en
consulte a una persona de servicio calificado.
Espa oi-75
No puede seleccionar
un canal.
•
El canal puede estar bloqueado
•
El canal puede ser saltado en la lista de canales del Menu CHANNEL.
El sonido estereo se escucha
•
Por ser una estacion
Closed caption
Problemas
en el Menu PARENTAL.
Cheque el bloqueo y estatus de canal.
mal.
debil. En el Menu SOUND cambie Sonido Analogo a Mono.
Un cuadro negro aparecera
•
o no aprobado
en la pantalla.
podria estar activado. Cheque Closed Caption en el menu SETUP. Ver pag. 72 para mas instrucciones.
con la Conexion
HDMI.
•
Asegurese
que el aparatoHDMI
(DVD, videojuego,
•
Si aparece mensaje "No Signal" en pantalla, el aparato HDMI no responde.
•
Si aparecen barras negras a los lados de laimagen (significa que la TV no la despliega completa), el aparato conectado
apague su aparato y reconectelo.
etc.) esta encendido
Reajuste la energia desconecte
y los cables esten conectados.Si
hay problemas
el cable y conecte otra vez.
Contacte al distribuidor
del aparato HDMI
para futu- ra asistencia.
podria tener un switch o una opcion del menu que permite cambiar la calidad de salida de imagen que arreglara esto.
Elija ya sea 720p o 1080i.
El control Remoto
no funciona.
•
Algo puede estar bloqueando
de obstaculos.
•
El control remoto puede no estar apuntando
•
Las baterias del control pueden estar bajas, muertas o instaladas incorrectamente.
Experimenta
•
problemas
entre el control remoto y el sensor remoto fronte al panel de la TV. Asegurese
con los Controles
Si los limites de rango no funciona,
directamente
que este libre
a la TV.
Coloque baterias nuevas.
V-Chip/Parental.
debe ajustar elseguro. Ver el Menu Principal (presione MENU en el control), seleccione
PARENTAL para checar ajustes.
Que mas puede hacer?
Si ha repasado la seccion de problemas y nada resuelve el problema,
puede necesitar correr el proceso de la TV nuevamente.
Mantenga su TV desconectada
intente resetear su TV. Note que despues de resetear,
Para resetear, desconecte
el cable o cordon del tomacorfientes
por cerca de 5 minutos. Luego conecte y encienda la TV. Verifique si el problema se resolvio.
Si el problema persiste, favor visite el Menu de Soporte al Cliente en www.proscanus.com
Soporte a Clientes PROSCAN
Espa ol-76
en el numero de soporte proporcionado
en su Garantia.
o vea seccion FAQ o contacte
US V-Chip Rating System
"I-V-MA (Solo Adultos):
Diserado
Especificamente
para ser vista por adultos y puede ser no apta para menores de 17 aros.
Contiene uno o mas de los siguientes contenidos:
lenguaje indecente y soez (L), actividad sexual explicita (S), o violencia
grafica (V).
TV-14 (Precaucion
Paternal
de 14. Se recomienda
Sugerida):
Contiene algun material que varies padres podrian nominar como no apto para menores
a los Padres ejercer un mayor cuidado en el monitoreo
niros menores de 14 en Io que ven. Estos programas
sugerentes
rV-PG
contienen
de estos programas y precavidos
uno o mas de los siguientes contenidos
para atender a
con temas: dialogos
intensives (D), lenguaje fuerte y rudo (L), situaciones sexuales intensas (S), o violencia intensa (V).
(Guia Paternal
Sugerida)
: Contiene materiales que los padres pueden clasificar como inapropiado
Algunos padres podrian ver el programa
dialogo sugestivo (D), dialogo fuerte frecuente
TV-G (Solo para Padres):
TV-Y7 (Dirigido
han adquirido
algun
(L), algunas situaciones sexuales (S), o violencia moderada (V).
Muchos padres pueden clasificar estos programas
dialogos sexuales (D) o situaciones
para jovencitos.
con sus hues. El programa contiene uno o mas de los siguientes contenidos:
paratodo
publico. Contiene un poco o no tiene
(S), sin lenguaje fuerte (L), y un poco o sin violencia (V).
a ni_os de 7 a_os y menores):
Diserados
el desarrollo necesafio en habilidades
para niros de 7 y menos aries. Puede ser mas apropiado
para niros
para distinguir entre la ficcion y la realidad. Temas y elementos en este
programa puede incluir fantasia con un poco de violencia (FV) o violencia en comedia, o podria asustar a niros menores de 7 ares.
TV-Y (Para Ni_os): Temas y elementos
en este programa son diserados
para una audiencia juvenil, incluidos niros entre 2-6.
Sin escenas que asusten a niros mas pequeros.
Ingles Canadiense Rango de Sistema V-Chip
18+ (Solo Adultos):
Programa dirigido a adultos mayores de 18 aflos.
Puede contener elementos
de violencia, lenguaje y sexual
los cuales podrian hacerlo no apto para audiencia menor al 8. Violencia Guiada: Puede contener violencia integral en el desarrollo
de el guion, caracterizacion
o tema, dirigido para adultos. Otros Contenidos
Guiados: puede contener lenguaje grafico y escenas
de desnudos y/o sexo.
14+ (Audiencia
mayor a 14):
Programacion
que contiene temas o contenidos
14. Se sugiere a los Padres a ejercitar discrecionalmente
que pueden no ser aptos para audiencia menor a
permiso para ver a los adolescentes
y aun menores. Violencia Guiada:
Puede contener escenas intensas de violencia. Podria haber tratos con temas y escenas maduras en una realidad de moda.
Otros Contenidos
Guiados: Puede contener escenas de desnudos
PG (Guia Paternal):
Programacion
Los Padres pueden considerar
Violencia
y/o actividad sexual. Puede haber frecuente uso de blasfemia.
dirigida para audiencia general pero que puede no ser apta para niros (menores a 8 ares)
algun contenido
inapropiado
para audiencia infantil entre 8-13 ares.
Guiada: Tintes de conflicto y/o agresion sera limitado y moderado;
supernatural. Otros Contenidos
escenas de desnudos.
G (Audiencia
General):
Guiados: puede contener frecuentes
Programacion
considerada
aceptable
puede incluir violencia fisica, fantasiosa
para cualquier edad. Mientras no se dirija especificamente
niros, se entiende que audiencia mas joven puede estar presente. Violencia Guiada: contendra
fisica o verbal o emocional.
para
un poco de violencia, ya sea
Escenas sensibles a temas que podrian asustar a niros, no incluira escenas realisticas de
violencia que minimicen.resaltan
dichos inofensivos,
o
blasfemias o lenguaje sugestivo. Podria contener breves
los efectos de efectos de violencia. Otros Contenidos
Guiados:
Puede haber algunos
sin blasfemia ni desnudos.
Espa oi:77
C8+ (ni_os mayores
de 8): Programacion
generalmente
considerada
Violencia Guiada: Violencia no sera mostrada como favorita, aceptable
aceptable
para ni_os mayores de 8 aflos.
sino solo comoforma
de resolver conflict os de coraje.
los ni_os imitan actos peligrosos que ven en television. AIgunas escenas con violencia seran frecuentes,
intensidad y consecuencias
C (Ni_os):
de los hechos. Otras Guias de Contenidos:
no habra blasfemias,
discretas y de baja
desnudos o contenidos
sexuales.
Programa dirijido a ni_os menores de 8 aflos. Guia de Violencia: atencion especial prestada a los temas que puedan
herir los sentimientos
comportamientos
infantiles de seguridad y buen comportamiento.
infrecuentes
Otras Guias de Contenidos:
Habra escenas no realisticas de violencia o agresividad
y limitados a escenas que son claramente
No habra lenguaje ofensivo, desnudos
imaginarios, de comedia o no reales en naturaleza.
o contenido
sexual.
Frances Canadiense Sistema Rango V-Chip
18+ (Adultos): Programacion
escenas violentas.
solo 16+ (Para mayores de 16): adultos. Este programa contiene violencia sustancial o extrema y
16+ (Para mayores de 16): Programacion
violencia o escenas de violencia intensiva.
no apta para menores de 16 aflos. Este programa contiene escenas frecuentes
13+ (Para mayores
no apta para jovencitos
de 13): Programacion
menores de 13 aflos. Este programa
escenas de violencia o una o mas escenas con suficiente violencia para afectarles. Televidentes
recomendado
ampliamente
8+ (Para mayores
de 8): No recomendado
para ni_os. Este program a ies recomendable
peque_os (menores de 8 aflos) que do no distinguen
General):
minima presentada
Espa ol-78
contiene tanto algunas
acompaflados
de un adulto es
para ni_os menores de 13 aflos.
un poco u ocasional violencia que podria perturbar a los ni_os. Ver en compa_ia
G (Audiencia
de
Este programa
en forma humoristica,
para toda audiencia, pero contiene
de un adulto es recomendable
para ni_os
entre realidad e imaginacion.
es recomendable
para cualquier audiencia. No contiene violencia, o violencia
como un a caricatura,
o de forma poco real.
32LD30Q
VESA 400 x 200
Tomillos
M4,12mm
largo
400 mm
200 mm
Nota:
A. El montaje no esta incluido en los accessodos
de la television. Solo se incluyen las especificaciones
montaje en si. Si necesita un montaje, favor consultar con su distribuidor
B. Sugerimos
colocar el montaje de pared equipado
con especificaciones
de instalacion
pero no el
para comprar una base VESA montable.
recomendadas.
Una instalacion inapropiada
puede
causar daflos al aparato o alas personas.
Precaucion:
1.
No coloque el montaje Ud. mismo. Favor contactar
2.
La TV no debe ser montada en paredes o superficies con un angulo mayor a 10 grados en direccion vertical de.
3.
otra forma la TV podria sufrir una caida.
Las paredes para el montaje deben ser Io suficiente fuertes para soportar el peso de la TV. Per ejemplo, las de concreto
4.
tabique son idoneas. No colocar sobre paredes suaves tales como de tierra, falsas o de tablarroca.
Para sustituir partes de diferentes e specificaciones (tomillos) en el montaje, consultar con un profesional calificado
5.
asegurarse que dichas partes son seguras y efectivas.
Antes de colocar la base a la pared, asegurese que los agujeros para sujeccion son acordes a la instalacion. De otra forma
6.
podria haber algunos problemas potenciales.
No coloque alguna fuente de calor bajo su television. O algo similar, porque podria ser causa de fuego.
7.
No coloque la TV cerca degoteras.Transductores
8.
De otra forma, causaran sobre-imagenes,
cheques electricos o mala resonancia.
No coloque la TV en un lugar donde colisiones o vibraciones puedan suceder.
9.
Para evitar caidas inesperadas
10. Asegurese
de desconectar
a un profesional en instalaciones.
y cables de alto voltaje deben mantenerse
y
para
tambien alejados del aparato.
del aparato, no ejerza mucha fuerza en la TV o montaje despues de instalar.
laTV antes de instalar. Mantener cosas duras o filosas
11. Despues de instalar, si se requiere mover el gabinete, favor contact
lejos de la pantalla para prevenir rayones.
arta un profesional calificado.
Espa oi:79
Tamaho de la Pantalla
31.5 pulgs
Sistema de Television
Sistema Americano
VHF: 2-13
Cobertura
de Canales
TV estandard
UHF: 14-69
Transmision
CATV: 1-135
Digital Terrestrie
Cable Digital (64/256QAM):
Alimentacion
ATSC/NTSC
(8VSB): 2-69
1-135
AC 110 V, 60Hz
Entrada RF
Cable/Antenna
x 1
AVx 1
Entrada RF
Interfase
Component
Entrada Video
x 2
HDMI x 3
AVx 1
Entrada Audio
Component
x 2
PC Audio In x 1
Salida Audio
Audifonos
Entrada Grafica
RGB 15pin x 1
Resolucion
1366 x 768
Componente/modo
Dimensiones
Peso
Consumo
HDMI
480i, 480p, 720p, 1080i
Con base
79.4cmA
x 56.5cm
Sin base
79.4cmA
x 51.3cmA
Empaque
103cmA x 61.5cmA
Con base
28.2LBS
Sin base
26LBS (11.7KGS)
Empaque
33.1LBS
de potencia
Aviso: Las especificaciones
Espa_ol-80
x 1, Salida Audio Digital x 1, Salida Audio Analogo
A x 24.6cm
F
x 10.4cmF
x 19cmF
(12.7KGS)
(14.9KGS)
menos de 120W
estan sujetas a cambio sin previo aviso.
(L/R) x 1
PROSCAN
*
Cobertura-Trabajo
Durante
un perfodo
a un centro
defecto
en materiales
proporcionar_,
Cobertura
Durante
la fecha de compra
de PROSCAN
o mano de obra en el televisor.
reacondicionada
de su producto
PROSCAN,
pagaremos
el cargo de mano de obra para reparar
Si su televisor
del mismo
modelo
es irreparable
cualquier
que le
o superior.
/ Recambios
de 12 meses
autorizado
reacondicionadas,
reacondicionada
desde
de serivico
o a nuestra
obra en el televisor.
opci6n,
Si su televisor
del mismo
la fecha de compra
de PROSCAN
para reparar
es irreparable
modelo
de su producto
para un reemplazar
cualquier
defecto
PROSCAN,
pagaremos
ya sea con partes
del material
que le proporcionarA
nuevas
o
o mano de
una unidad
o superior.
de Cobertura-LCD
Durante
un perfodo
un centro
pantalla
desde
de servicio
una unidad
un perfodo
a un centro
Panel
de 12 meses
autorizado
de 12 meses
autorizado
nueva
desde
la fecha de compra
de servicio
de PROSCAN
o reacondicionada,
o a nuestra
o mano de obra en la pantalla
unidad
reacondicionada
Como
Obtener
de su telecisor.
del mismo
modelo
de su producto
para un reemplazar
opci6n,
para reparar
Si su televisor
PROSCAN,
la pantalla
cualquier
es irrepartable
pagaremos
LCD, ya sea con
defecto
del material
que le proporcionarA
una
o superior.
Servicio
Para asistencia en Estados Unidos (E.U.A) si compr6
al: 1-888-977-6722
o visite:www.proscanus.com
Para asistencia en Mexico: si compr6
823-3858,
o visite: www.proscanus.com
un aparato
un aparato
PROSCAN
PROSCAN
en Mexico,
favor
en E.U.A. favor dellamar
de Ilamar al: 01-800-
(Centro de Servicio en Mexico)
Servicios Computacionales de Mexico, S.A. de C.V.
Francisco Dfaz Covarrubias # 33, Ciudad Sat_lite
C.P. 53100, Naucalpan, Mexico
El representante
de Servicio revisar_, sus opciones para el servicio.
Para su comodidad
le ofrecemos
tres formas de obtener servicio de garantfa. Usted puede enviar
su producto a la direcci6n proporcionada
pot el representante
de servicio, usted puede Ilevar su
producto a un centro de servicio autorizado,
o puede solicitar en el servicio a domicilio
(administrador
determinate, si el producto se encuentre en funcionamiento
en casa o debe set
Ilevado de vuelta a servicio local tecnico para su reparaci6n).
El representante
del Servicio le
proporcionar_,
las instrucciones
para el servicio preferido. Se requiere del comprobante
de
compra original. $61o se les dar_. servicio a Domicilio a Televisores
de 37 " pulgadas de tamaffo
y
m,=4.sgrandes.
Espaffol-81
• Un-instalacion, montaje y ajuste de controles det cliente e instrucciones de funcionamiento.
• Las pilas y los fusibles de repuesto al cliente.
• Daffos por uso indebido, abuso, negligencia o descuido incluyendo pero no limitado a, los daffos derivados
de la exposicion a la humedad, la humedad o la sal.
• Incapacidad para recibir la sepal debido a los problemas que no son causadas por et producto.
• Daffos en el producto debido alas imagenes de grabadas en la pantalta.
• Productos comprados o reparados fuera de los Estados Unidos / Puerto Rico.
• Productos modificados o incorporados a otros productos.
• Daffos debidos a fenomenos de la naturaleza, incluyendo pero no limitado a, daffos por rayos o
inundaciones.
• Las Itamadas de servicio que no impliquen cualquier defecto en materiales o mano de obra.
Uso Comercial Exclusion
Esta garantia limitada s61o se aplica a los productos utilizados para uso personal o, y no cubre
todos los productos utilizados con fines institucionales, comerciales o de alquiler.
ESTA
GARANT[A
PRODUCTO.
garantia,
LIMITADA
EN CORP
expresada
o escrita
tercero
DEBER_,N
garantia
limitada.
CONSUMIDOR
por daffos
ESTA GARANT[A
IMPL[ClTA
anteriormente.
Espaffol-82
OTROS
ESTAR_,
TODAS
LIMITADA
DEL 0NICO
DERECHOS,
o modificar
QUE PUEDEN
IMPL[ClTAS
DE
garantia
NO informaci6n
o cualquier
el alcance
Y EXCLUSlVO
EN CORP
expresa
PARA
o implicita
Inc.
DEL USO
de este
CUALQUIER
UN PROPOSlTO
de garantia
(S) mencionado
legales
especificos
y USTED
DE ESTADO.
EL
en el se rige por
periodo
VARIAR
PARA
EE.UU.,
resultantes
contenida
otro
de esta
REMEDIO
POR LA LEY APLICABLE,
O IDONEIDAD
derechos
otra
independientes,
mayoristas
Y RESPONSABILIDADES
A LIMITADA
le otorga
contratistas
A ESTE
cualquier
PARTICULAR).
o consecuentes
DE UNA VlOLAClON
SALVOPROHIBIDO
LIMITADA
rechaza
DEL PRODUCTO.
incidentales
DE COMERClALIZAClON
Esta garantia
minoristas,
Ampliar
O REEMPLAZO
APLICABLE
LAS GARANT[AS
Inc., sus agentes,
ni aumentar.
LIMITADA
de Indiana.
de este producto,
comerciantes
especiales,
O DERIVADOS
las Leyes del Estado
TENER
empleados,
DE REPARAClON
DEL PRODUCTO
PARTICULAR
DE EE.UU.,
Esta GARANT[A
DE GARANT[A
PARA UN PROPOSlTO
crear una garantia
no ser_. responsable
GARANT[A
(INCLUYENDO
O IDONEIDAD
de ventas,
Y EXCLUSlVO
Inc., el fabricante
por parte CORP
representantes
producto.
EE.UU.,
o implicada
COMERCIALIZAClON
verbal
ES EL 0NICO
TAMBIt_N
PUEDE
ON Corp US, Inc.
4370 La Jolla Village Drive, Suite 400
San Diego, CA 92122, U.S.A.
@2010 ON Corporation