1
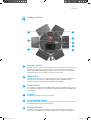
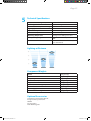
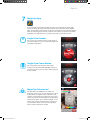
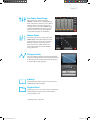
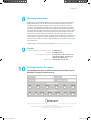
Anova_User_Guide.indd 1
04/05/2012 14:03
Page 2
“Excellence is never an accident. It is always the result of high intention,
sincere effort, and intelligent execution; it represents the wise choice of
many alternatives - choice, not chance, determines your destiny.”
- Aristotle
Anova_User_Guide.indd 2
04/05/2012 14:03
Contents
Chapter Title
1
2
3
4
5
6
7
8
9
10
Page
About Anova
What’s in the Box
Anova Menu Operation
Hardware Notes
Technical Specifications
Troubleshooting
Magic Eye App
Warranty Information
Credits
4
4
5
9
12
13
14
16
16
Rotolight Quality Assurance 16
Published by Rotolight Inc.
Pinewood Studios,
Pinewood Road,
Iver Heath, SL0 0NH
United Kingdom
www.rotolight.com
Tech Support: [email protected]
UK +44 (0) 1753 422 750
Anova_User_Guide.indd 3
04/05/2012 14:03
Page 4
1
About Anova
Thankyou for purchasing Rotolight ANOVA, the world’s most
advanced LED Floodlight.
Rotolight have developed the AlphaNova series of Professional LED Ringlights to
utilise a new WiFi technology, which allows iPhone or iPad to control the light’s
brightness and colour temperature, using the Magic Eye (Pat Pending) application.
For the first time this unique technology allows the AlphaNova lights to ‘see’ and
measure colour and brightness. (The Magic Eye App is available from the iTunes APP
Store).
The Rotolight ANOVA is the first product release from the AlphaNova series and is a
true ‘continuous light’ which does not use PWM (Pulse Width Modulation) to control
the brightness. You can therefore use incredibly short exposure times (1/200,000th
of a second) and not get blank frames. The ANOVA is a Bi-Colour LED Ring Flood,
and provides a natural, softly diffused, ‘shadowless’ circular beam at 110 degree
beam angle. ANOVA has the equivalent light output as an efficient 1000 watt
tungsten bulb (calculated at 18.5 lumens per watt/360 degree radiant angle – note
that tungsten bulbs vary in efficiency, from 8 lumens per watt, typically around 15
lumens per watt) .
We call ANOVA an EcoFlood as it only uses 38 watts of energy at full output
(to deliver 1000 watts at 5600k), so you can expect excellent extended battery
operation. ANOVA is equipped with a standard V-Lock broadcast battery connector plate which
also supports Anton Bauer goldmount batteries (using the optional Anton Bauer
QR200A plate adapter). You can run ANOVA from a D-Tap port on a broadcast
battery (to the 15VDC Input) or via the supplied universal AC to DC Power Adapter
(100-240v to 15V DC 60W). The ANOVA has been specially designed to be fully
serviceable thanks to its modular component design.
Please take care of your ANOVA, and it will provide you with many years of excellent
service.
2
What’s in the Box
Your Anova kit includes the following:
ANOVA Led EcoFlood
ANOVA Support Yoke
ANOVA Gel Frame Holder and 3 Ball Lock Pins
ANOVA Filter Sleeve Pack with 3 Diffuser and 3 minus green Gels
ANOVA Colour Calibration Card
15Volt 60 watt universal AC to DC converter
User Manual
Quality Control card
One Pair of XTRA-Strap cable ties
Anova_User_Guide.indd 4
04/05/2012 14:03
Page 5
3
Anova Menu Operation
ANOVA’s menu can be accessed via the encoder knob on the
backplate. Rotating the knob will toggle through the menu items,
press the encoder knob inwards to make a selection.
Below are explanations of the menu functions.
Brightness
Brightness is displayed as 0% to 100%. The brightness setting can be controlled
locally on the back of the ANOVA using the encoder knob. Rotating the encoder
knob will increase the brightness in steps of 1%, however, if you press and hold the
encoder knob then you can increase or decrease the brightness in steps of 10% (Fast
Mode).
If you wish to control ANOVA using wired or wireless DMX then you need to go to
the DMX menu and select the desired DMX channel for the BRI (brightness) setting.
The ANOVA will respond to brightness commands via the set DMX-bri channel
number if the CNTL (control) menu is set to -dmx. If the CNTL setting is -wifi then
the ANOVA will respond to brightness commands sent via the iPhone/iPad Magic
Eye application.
ANOVA can accurately reproduce a sampled brightness setting from the Magic Eye
App, via both -wifi or -dmx
Colour Temperature
On ANOVA the colour temperature of the LEDs can be set locally using the encoder
knob, or using -wifi , or using -dmx , where the incoming signals can be sent via
wired DMX or wirelessly using the Magic Eye app.
ANOVA can electronically reproduce any colour of white light from candlelight (3150
kelvin) through to direct Daylight (6300 kelvin).
ANOVA has a remarkably even colour spectrum with a CRI (colour rendering index)
better than >91. ANOVA reproduces studio accurate colour , i.e. light whose colour
temperature is within 50 kelvin of the desired setting. This allows the ANOVA to
be used in conjunction with other professional calibrated lighting systems with no
noticeable difference in the lighting colour.
ANOVA can use the camera in an iPhone or iPad to measure the colour of ambient
light (using the calibration card) , via the Magic Eye App. These colour settings can
be stored and recalled using the application.
ANOVA uses a patented system of bi-colour LEDs to accurately display sampled
colour settings. As you rotate the encoder knob of the ANOVA you will see colour
increase in 10 kelvin steps from (3150k) to (5100k) and thereafter in twenty kelvin
steps to (6300k).
If you need to manually enter a colour setting quickly, you can press and hold the
encoder knob to increase or decrease the colour temperature in steps of 100 kelvin
(Fast Mode).
Anova_User_Guide.indd 5
04/05/2012 14:03
Page 6
Control Mode
Anova offers a range of control methods:
Local Control
Displayed as LOCL, this mode allows control via the backplate encoder knob and
switch.
DMX Control
This mode allows control via a DMX device wired through the DMX input.
In addition, ANOVA can be set to act as a DMX Master Controller and convert
incoming wireless signals to DMX via the selected DMX -bri (brightness channel #)
and –col (colour channel #)
NB CONNECTING WIRED DMX INPUTS FROM A DMX CONSOLE MAY CAUSE DAMAGE
TO THE ANOVA IF DMX MASTER MODE IS SWITCHED ON.
WiFi allows control via the Magic Eye iPhone or iPad APP (sold separately). using
this control via –wifi option will automatically force WIFI to turn on (if it was –off )
and this may reboot the ANOVA to allow for synchronisation of the WiFi data. Please
note that controlling ANOVA via –wifi is an independent process from the DMX
Master Mode, which can simultaneously translate DMX channel sent across wifi sub
channels into wired DMX for connecting legacy third party equipment such as other
lights from the DMX outputs of the ANOVA. I.e. Anova can be controlled via –wifi
and can also be in DMX Master mode - thus controlling externally connected third
party DMX equipment.
Note: the Magic Eye APP allows operation of a single ANOVA, or Multiple ANOVAs
via the pro fader panel, and the APP will also have a magic Eye Colorimeter which
can measure colour and light intensity. The Magic Eye App is available via the
iTunes App Store.
DMX Menu
In the DMX Menu you can select the channels that will control ANOVA’s brightness
(-bri) and Colour (-col) . Simply select the function that you wish to edit and enter
the channel number using the encoder knob. Each channel is set separately .
Additionally you can set DMX Master Mode to –on or –off. DMX Master Mode will
automatically activate WIFI to be ‘-on’. DMX Master mode allows you to connect
legacy 3rd party equipment to the DMX wired output and control it wirelessly from
the Magic Eye App. NB DMX Master Mode works independently from the ANOVA
control , so if you wish, you can continue to control ANOVA via –wifi or via –locl,
whilst running DMX master mode to control your legacy equipment. DMX Master
mode can be used to create a wired DMX512 ‘universe’ from each independent
ANOVA in your kit. This is a most powerful feature, and allows a large amount of
equipment to be controlled from within the ‘scenes’ of the pro fader control page,
and matrix page of the Magic Eye App. The Matrix Page illustrates which DMX sub
channels are related to which ANOVA using colour bars, these channels can then
be allocated to the desired fader channels on he pro fader control page of the
Magic Eye APP. The Matrix page also allows you to ‘hide’ channels, which may be
useful if they contain ‘colour’ information and once set can hidden until they require
resetting the values. (user information for the Magic Eye App is included with the
application).
To operate the ANOVA via the selected DMX channels you must also select CNTL –
dmx from the control menu.
To summarise, you can set the channels for DMX control of brightness and colour
in the DMX Menu. You can also activate DMX Master Mode, which in turn will
automatically activate the WIFI system. You must choose CNTL-dmx if you wish for
ANOVA to be controlled via wired DMX or via DMX Master mode.
NB NEVER CONNECT A WIRED DMX CONTROLLER TO ANOVA WHILST DMX
MASTER MODE IS ACTIVATED AS DAMAGE MAY OCCUR.
Anova_User_Guide.indd 6
04/05/2012 14:03
Page 7
WiFi Menu
In the WIFI Menu you can activate/de-activate ANOVA’s WiFi interface. If you do not
need to use WIFI or DMX Master Mode, then de-activating the WiFi system will save
power and extend your battery life.
The Factory default setting for the WiFi System is ‘ON’
When you change the WIFI setting, ANOVA will reboot to allow the changes to take
effect. (ANOVA will retain all other current settings)
You can NOT turn WIFI –off if either CNTL-wifi or DMX Master Mode is –on.
PIN Menu
A lot happens in the PIN menu. (Personal Identification Number)
The Factory Default PIN is ‘1AAA’. This data is used to encrypt the WiFi system
communication using Apple iOS WEP (Wireless Encryption Protocol). The first
digit can be 1-4, 6-9 or 11. This first numeric digit is also used to ‘force’ the WiFi
Channel so that you can choose to create an ANOVA wifi network on a specific
channel. Because we can only display 4 digits on the back of the ANOVA, we add a
‘0’ to the first single numeric digit of the PIN to make a 5 digit WEP password so PIN
‘1AAA’ becomes password ‘01AAA’, PIN ‘2ABC’ would become password ‘02ABC’, etc.
However ‘11’ is already a double digit, so for instance PIN ‘11XYZ’ would become
password ‘11XYZ’.
When you use your iPhone or iPad to connect to the ANOVA , go to settings, wifi,
and select the ANOVA.
If you set ‘1AAA’ as your PIN, then the displayed ANOVA network is ‘ANOVA 1’ and the
WEP password is ‘01AAA’. If you set ‘11XYZ’ as your PIN, then the displayed ANOVA
network is ‘ANOVA 11’ and the WEP password is ‘11XYZ’.
NB: It is possible to create multiple ANOVA networks, so if you have more than one
studio, you can create a unique ANOVA network for each studio, to avoid interaction
between different engineers/studios. For example if you had three studios (Studio
A/B/C) each with 10 ANOVAs, then you could create a network in studio A using PIN
‘1STA’ which would have WEP password ‘01STA’ , at the same time Studio B could
have PIN ‘6STB’ (password ‘06STB’) and studio C could use PIN ‘11STC’ (password
‘11STC’).
NB Each ANOVA in each studio/network should be set with the same PIN.
Forcing 3 networks to exist on WiFi channels 01, 06, and 11 gives the perfect amount
of channel separation between the three networks.
If you have created three separate networks as above , they will show up on your
iPhone wifi page as ‘ANOVA 1’, ‘ANOVA 6’ and ‘ANOVA 11’. Each will require the
appropriate WEP password to join.
NB You can only join one network at a time .
NB: The iPhone and iPad have a bad habit of remembering the last settings for a
particular network, and so it is good practice to ‘forget this network’, before joining
an ANOVA network. If the iPhone or iPad does not ask you for the WEP Password,
then ‘Forget This Network’ and join again.
We apologise if this PIN process seems a little complicated, but a lot is happening
here, e.g., you are setting a specific wifi channel for your ANOVA network, by setting
the same PIN you are identifying which lights will be networked together, the WEP
is protecting you from unwanted interference from Audiences/Hackers, and finally
if you need to have multiple ANOVA networks this is easily possible using the PIN
system.
Some notes about the operation of the ANOVA wifi network.
Anova_User_Guide.indd 7
04/05/2012 14:03
Page 8
When you turn on an ANOVA , with the WIFI turned –on, it will create a network (no
third party equipment, eg router, required). When you turn on the next ANOVA it
will check to see if the first ANOVA has the same PIN and if a network exists, and
then it joins that specific network. Your iPhone or iPad also become ‘clients’ of that
specific ANOVA network. Only one (authorised by WEP password) control client
(iPhone/iPad) can be connected to an ANOVA network.
If you need to run multiple simultaneous ANOVA networks it is a very good idea to
provide as much WiFi channel separation as possible, i.e. use WiFi channels 1, 6, 11.
This will avoid interference between the channels. If you are only using one
network, then you can choose any appropriate wifi channel , i.e. 1,2,3,4,6,7,8,9,11.
The Anova will have been set to provide you with an appropriate range of legal wifi
channels for your country (of purchase). Please refer to local legislation as to which
channels are legal in your territory prior to operation.
If you have forgotten your PIN setting or simply wish to start over with a simple
setup, powering up the ANOVA whilst depressing the encoder switch will bring
up the DIST (Distributor) menu, and you can reset the factory default settings by
choosing ‘-yes’. The PIN will now be set to ‘1AAA’ and the WEP Password for your
iPad/iPhone will be ‘01AAA’ . You will also need to select CNTL – wifi to run the light
from the Magic Eye App.
Anova_User_Guide.indd 8
04/05/2012 14:03
Page 9
4
Hardware Notes
1
2
4
5
6
7
3
Anova_User_Guide.indd 9
1
Encoder Switch
2
DMX In/Out
3
Power Switch
4
Display
5
Programming Socket
6
DC Input Socket
8
Rotate to Increase (+) or Decrease (-) displayed value. Click to select. Press, hold and
rotate for ‘Fast’ data entry. NB: To reset the device to the Factory Default Values,
Power up the ANOVA whilst holding down the encoder switch, it will display ‘DIST’
(Distributor), and you select either yes or no to reset the unit.
Connect to 3rd party devices or lighting console using standard 5 pin DMX wired
XLR cable. NB – To prevent accidental damage disconnect DMX Consoles or
Controller before selecting ‘DMX Master Mode’ on the ANOVA.
Select DC for an attached DC Input, Off, or Battery for the V-Lock Plate (NB : you can
use standard V-Lock Batteries or Anton Bauer Goldmount Batteries with a QR-A200
plate adapter)
This displays the Menu Item or selected value.
Firmware programming socket. This is not intended for use by users, and is used to
install firmware updates by the manufacturer.
Use this 2.1mm DC socket to connect the supplied 15volt 60W AC/DC converter.
You can also run ANOVA from a 14.4volt D-Tap connector via this socket. Only use
04/05/2012 14:03
Page 10
the recommended AC/DC adapter. Never exceed the recommended Voltage (1317 volts DC). Make sure you use the ‘XTRA Strap’ cable ties to secure the Power
connector / adapter to your light stand, so there is no strain on the 2.1mm DC
Socket, otherwise damage may occur to the socket.
7
Utility Blocks
Use these to connect the Yoke, or Barn Doors. There are additional mounting holes
on the rear face and either side of the main mounting point, these can be used to fix
the T-Bar connector plates which join the lights together. ANOVA is designed with
an outer ‘Honeycomb’ shape so it can easily be ‘tesselated’ into a panel/wall/ring of
lights. Rotolight Inc at Pinewood Studios, England (+44 1753 422750) are happy to
quote on custom Yokes for larger arrays of ANOVA lights.
The ANOVA Yoke is fitted with a ‘TVMP’ (TeleVision Motion Picture) bracket. This
will fit a standard ‘Junior’ Lighting support stud as used in film and televison studios.
The TVMP Bracket on the ANOVA has two positions for the retaining screw, The
higher position is for a Junior stud, the lower position is so you can mount the
Anova on a 3/8 stud on a normal studio lighting stand (Please check that the stand
is designed to take the weight of the Anova first ! 3.2 Kilos without barn doors / 4.7
Kilos with the Barn Doors Fitted)
8
Anova_User_Guide.indd 10
V-Lock Battery Plate
Connect standard (14.4 volt) V-Lock Batteries or Anton Bauer Goldmount Batteries
with a QR-A200 plate adapter. To release the battery, press the button on the
bottom of the plate.
04/05/2012 14:03
Page 11
1
2
3
1
Accessory Mounting Spigots
2
Barn Doors
The three spigots on the front face of ANOVA are used to mount the ‘Gel Frame
Holder’ (lower position) using three ‘Ball Lock Pins’, and the upper mounting position
is used to mount optional accessories for the ANOVA, e.g. Honeycomb Louver,
SoftBox, Focussing Fresnel Filter (Available separately).
The Barn doors install using 4 of the smaller ‘soft touch’ knobs on the main mounting
points of the utility blocks. The six sided barn doors have two types of shutter
shapes, the three shutters which become narrower at the outer edges close in first,
and the three trapezoid shutters which become wider at the outer edge close in
after the other types, this enables the ANOVA to create soft hexagon shaped pools
of light when the doors are folded inwards. The doors can be folded ‘flat’ at 90
degrees to the body.
The flight case will store the ANOVA with both the Gel Frame holder and the Barn
doors fitted (closed).
3
Anova_User_Guide.indd 11
Gel Frame Holder
The ‘Gel Frame Holder’ mounts the spigots with the ring and spokes closest to the
protective window glass, and is secured in place using three ‘Ball Lock Pins’ at the
lowest positions on the spigots. You can carefully slide a precut filter gel underneath
the Gel frame or, alternatively you can remove two of the pins and lift the frame up
slightly to install the filter gel. The ‘Lee’ filter gels are stored in the Gel Sleeve, in the
lid of the flightcase.
04/05/2012 14:03
Page 12
5
Technical Specifications
CRI (Colour Rendering Index)
Better than >91
Beam Angle
Flood - 110 degrees
Variable Colour Temperature Range
3150K to 6300K
Lighting System
Bi Colour LED
Equivalent Output
1000 Watt Tungsten
Power Consumption
38 Watts at full power
Operating Temperature
-15degrees to +40degrees Celcius
PSU Operating range
100V AC to 250V AC output 15V DC at
60W
Dimensions
W 340mm x H 380mm x D 55mm (w/
barn doors fitted)
Lighting at Distance
Component Weights
Anova
2590g (2.59kg)
Yoke
440g (0.44kg)
One piece yoke with knobs
610g (0.6kg)
Anova with Yoke, and knobs
3202g (3.2kg)
Flight Case
7100g (7.1kg)
Case filled with Anova, yoke, PSU and AC cord
8530g (8.53kg)
Filter Sleeve Set
90g (0.9kg)
Power Supply and AC Cord
500g (0.5kg)
Barn Doors and fixing knobs
1500g (1.5kg)
Optional Accessories
‘Anton Bauer’ Dionic Battery Bundle
Hexagonal Honeycomb louver
SoftBox
Focussing Filter
T-Bar Mounting plate
Anova_User_Guide.indd 12
04/05/2012 14:03
Page 13
6
Troubleshooting
I have attached a battery but the unit does not power up ?
Check that the power switch is set to ‘BATT’ and not ‘OFF’ or ‘DC IN’.
I have attached the AC to DC Adapter but the unit does not power up ?
Check that the power switch is set to ‘DC IN’ and not ‘OFF’ or ‘BATT’.
I want to use an Anton Bauer battery with my ANOVA, how does it fit ?
You need to get an Anton Bauer QR-A200 adapter plate, available from your dealer
or the Rotolight online store.
My ANOVA has powered up but when I try to adjust the brightness or colour
using the encoder knob, nothing changes?
The CNTL (control) needs to be set to –locl (local), not DMX or WIFI.
When I try to connect to my ANOVA via WIFI from my iPhone it does not work?
Firstly you need to download the Magic Eye APP from the iTunes APP Store (sold
separately) , then to connect, go to settings – wifi, select the ‘ANOVA’ from the list
of available wifi sources, if it does not ask you for a password, then press the right
arrow > and ‘forget this network’. Reselect the ANOVA from the list of wifi sources,
then enter the password when prompted, the factory default is ‘01AAA’.
This problem is caused by the iPhone remembering old passwords for networks that
no longer exist.
I have forgotten the pin/password for my ANOVA?
You can either press the PIN button and this will reveal the PIN code that has been
set one letter at a time, or alternatively you can RESET the ANOVA back to factory
default by powering it up , holding down the encoder switch (it will say DIST
(Distributor) and ask you yes or no for the RESET command) – all variables will be set
back to factory default including the PIN which will be ‘01AAA’.
I have set a PIN of ‘3XYZ’, what is my password and which ANOVA network
should I select on my iPhone?
The password on your phone will be ‘03XYZ’, the network will appear as “ANOVA 3”
on the list of available networks.
I used a standard photographic colorimeter to check the colour of light on my
ANOVA and it did not seem to give me a sensible reading.
Most colorimeters are not designed to accurately measure the light colour from
LED’s , The ANOVAs are all calibrated using a Konica Minolta CL-200A colorimeter
which is specially designed to accurately measure LED light sources.
Anova_User_Guide.indd 13
04/05/2012 14:03
Page 14
7
Magic Eye App
A brief first look at the Magic Eye APP (available seperately from the iTunes APP
Store). The Magic Eye App considerably enhances the capabilities of the ANOVA
light. The App will launch with the Single View Controller, D-Fade and Power Button
View, the remaining features will be added as free updates (except Pro Fader Mode
and DMX ). The App will also be available separately as an HD iPad version.
Single View Encoder
Gives you a representation of the encoder knob so
you can instantly access and control both brightness
and colour temperature.
Single View Power Button
Gives you ‘Power Fade Up’, ‘Power Fade Down’,
Designer Fade (D-Fade), Output On/Off, and device
selector page where you can choose which light you
wish to control.
Magic Eye Colorimeter*
The App allows the ANOVA to ‘see’ colour and
brightness, In this page you can calibrate the camera
in your iPhone, (using the colour calibration card),
and then use the Magic Eye Colorimeter to measure
colour temperature and/or brightness of light falling
your desired subject. These ‘samples’ of light can be
stored (and recalled), transmitted to a local light or
sent to another iPhone across the world (perhaps
from a location shoot to the studio).
Anova_User_Guide.indd 14
04/05/2012 14:03
Page 15
Pro Fader Panel Page*
This page shows all your connected
ANOVAs as channels on a Lighting Mixing
Desk, and you have instant access to Power
Fade Up, Power Fade Down and D-Fade.
You also have access to the ‘GROUPS’ page
and to the ‘MASTERS’ page where you can
store and recall Scenes, and put together
scenes with transitions as a ‘PLAYLIST’.
Matrix View*
In this page you can (re-)assign and ‘name’
ANOVA lights to specified channels in your
Pro fader View, you can create associated
DMX sub channels and specify / ‘name’
their fader channel. DMX channels are
shown attached to their master ANOVA
using colour links.
Designer Fade
This page allows you to design a fade with multiple
nodes and custom duration. This fade is applied ‘non
destructively’ to the master fader in the Mix page, so
it can fade all the lights together.
Library*
In the Library page you can store and recall Scenes,
and Magic Eye colour Samples.
Project View*
In this page you can set , store and name all the parts
of your project (Channel Names, fade durations,
scenes, hardware, etc).
* Coming in June / July 2012
Anova_User_Guide.indd 15
04/05/2012 14:03
Page 16
8
Warranty Information
Manufacturer will extend Distributor and its customers a Limited manufacturer’s
Product Warranty of 1 Year on Manufacturers Products from date of purchase.
Distributor agrees that this warranty shall not include General ‘wear and tear’,
and shall be invalidated by tampering with, dropping or damaging the product
or misuse. The Manufacturer’s Products warranty will specifically not include the
tearing or damage to filter Gels, unless immediately reported upon delivery, water
damage to the unit, battery acid damage to the unit, stress fractures to the unit
or filter holder (unless reported on delivery), or disconnection of wires (unless
reported on delivery). This warranty is subject to the manufacturer standard terms
and conditions available on request. Rotolight strives to continually improve its
products. We therefore reserve the right to modify the specifications and designs
discussed herein.
Register online now to activate your warranty at www.rotolight.com/register.
9
Credits
Conceptual Design and Imagineering
Artwork
Anova Engineering Team
RotoDudes
10
Rod Gammons
Mark Mankarious
Chris, David, Jonathan, Arthur, Jan,
Peter, Gary, Darren , Paul, George,
Warren, Nick, Mike, Paul.
Rod. A, Alex, Ricardo, Zak
Rotolight Quality Assurance
Your Rotolight has been individually examined and found to pass
Rotolight’s Quality Assurance testing.
Magic Eye™ Technology is patent pending 1115546.2 Anova™ and Magic Eye™ are registered
designs of Rotolight Inc.
Rotolight™, Anova™ and Magic Eye™ are registered trademarks of Rotolight Inc.
All rights reserved © 2012 Rotolight Inc.
Anova_User_Guide.indd 16
04/05/2012 14:03