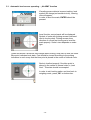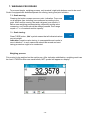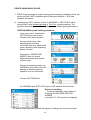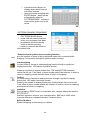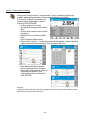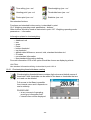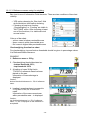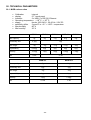
1
Operation Manual for MGB-Series/XAB-Y /ASB-Y/BPS-Y/APPB-Y Y-Scales PLEASE READ THIS MANUAL CAREFULLY BEFORE OPERATION 3, Hagavish st. Israel 58817 Tel: 972 3 5595252, Fax: 972 3 5594529 [email protected] MRC.VER.01-5.11 AUGUST 2009 -2- CONTENTS 1. BASIC INFORMATION............................................................................................................ 5 1.1. Scale’s intended use......................................................................................................................5 1.2. Operating conditions......................................................................................................................5 1.3. Warrantycconditions ......................................................................................................................5 1.4. Metrological parameters inspection...............................................................................................5 1.5. The manual’s significance.............................................................................................................5 1.6. Scale users’ traning .......................................................................................................................5 2. TRANSPORT AND STORAGE .............................................................................................. 6 2.1. Delivery verification.......................................................................................................................6 2.2. Casing ...........................................................................................................................................6 3. UNPACKING, INSTALLATION AND SCALE INSPECTION .................................................. 7 3.1. Installation and operation place .....................................................................................................7 3.2. Unpacking .....................................................................................................................................7 3.3. Scale cleaning............................................................................................................................9 3.4. Connecting to mains ......................................................................................................................9 3.5. Additional equipment connecting..............................................................................................10 4. 5. TURN ON/OFF THE SCALE .............................................................................................. 11 SCALE LEVELING............................................................................................................. 11 5.1. Automatic level sensor operating – ,,ALARM” function ...............................................................12 5.2. Hand-operated leveling................................................................................................................13 6. SCALE’S MENU STRUCTURE ............................................................................................. 14 6.1. Operating mode choosing............................................................................................................14 6.2. Menu operating............................................................................................................................15 6.3. Return to weighing function .........................................................................................................15 6.3. Quick return to weighing .............................................................................................................16 7. WEIGHING PROCEDURE ................................................................................................. 19 7.1. Scale zeroing:..............................................................................................................................19 Weighing process:................................................................................................................... 19 7.3. Constant tare using for weighing..................................................................................................20 7.4. Automatic tare using for weighing ................................................................................................21 7.5. Digital tare ...................................................................................................................................21 8. BASIC TERMINAL AND SCALE’S SOFTWARE OPERATION .......................................... 22 8.1. What you should know about scale’s operating possibilities ........................................................25 9. SCALE SOFTWARE ............................................................................................................. 26 9.1. Users’ profiles..............................................................................................................................26 9.2. System settings ...........................................................................................................................26 9.3. Functions of operating modes......................................................................................................26 10. SCALE’S CALIBRATION................................................................................................... 28 10.1. Calibration report setting............................................................................................................30 10.2. History of calibration ..................................................................................................................30 11. DISPLAY’S CALIBRATION ............................................................................................... 31 12. SCALE’S USER CHOOSING .............................................................................................. 31 13. PERIPHERY ....................................................................................................................... 32 14. SYSTEM INFORMATION .................................................................................................... 32 15. WEB.................................................................................................................................... 33 -3- 16. UPDATING .......................................................................................................................... 33 17. LEVELING ........................................................................................................................... 33 18. SCALE ADAPTING – USER’S SETTINGS ........................................................................ 34 18.1. New user adding........................................................................................................................35 18.2. User elimination .........................................................................................................................35 18.3. User choosing............................................................................................................................35 18.4. User’s settings ...........................................................................................................................35 18.4.1. User’s details..........................................................................................................................................................36 18.4.2. View ........................................................................................................................................................................37 18.4.3. Readout...................................................................................................................................................................38 18.4.4. Buttons operating ....................................................................................................................................................39 18.4.5. Date /Time..............................................................................................................................................................40 18.4.6. Prints – standard print .............................................................................................................................................41 18.4.6.1. Quick Heading Print and Text Foot Print buttons activation. ................................................................................44 18.4.7. Prints – non-standard prints ....................................................................................................................................45 18.4.8. Units ........................................................................................................................................................................49 18.4.9. Operating Modes – general information ..................................................................................................................50 18.5. Quick access to operating modes parameters defining .............................................................51 18.6. Weighing operating mode parametres- quick access buttons ....................................................52 18.7. Weighing operating mode parametres - information...................................................................53 18.8. Details counting .........................................................................................................................56 18.8.1. Details counting – quick Access buttons ................................................................................................................56 18.8.2. Pattern base creating ..............................................................................................................................................60 18.8.3. ACAI function – Automatic Accuracy Correction ....................................................................................................61 18.8.4. Details counting operating mode parametres - information ....................................................................................62 18.8.5. Feeding and Checkweighing functions graphic interpretation. ................................................................................64 18.9. Checkweighing .........................................................................................................................65 18.9.1. Checkweighing thresholds base creating ................................................................................................................66 18.9.2. Checkweighing thresholds using .............................................................................................................................67 18.9.3. Bar chart using for checkweighing...........................................................................................................................69 18.10. Dosing .....................................................................................................................................69 18.10.1. Target masses base creating ................................................................................................................................70 18.10.2. Target masses using for weighing.........................................................................................................................71 18.10.3. Bar chart using for dosing .....................................................................................................................................73 18.11. Percentage deviations In relation to pattern’s mass .................................................................74 18.11.1. Reference masses base creating ..........................................................................................................................77 18.11.2. Reference mass using for weighing. .....................................................................................................................78 18.11.3. Reference masses using for weighing...................................................................................................................79 18.12. Animal weighing.......................................................................................................................80 18.12.1. Animals weighing function internal settings...........................................................................................................81 18.12.2. Animals weighing- manual operating.....................................................................................................................82 18.13. Density of solids, liquids and air...............................................................................................83 18.13.1. Default operating mode choice for density ............................................................................................................84 18.13.2. Solids’ density .......................................................................................................................................................85 18.13.3. Liquids density.......................................................................................................................................................86 18.13.4. Air density..............................................................................................................................................................86 18.14. Formulations............................................................................................................................87 18.14.1. Formulation creating..............................................................................................................................................88 18.14.2. Formulations base using for weighing. ..................................................................................................................90 18.15. Satatistics ................................................................................................................................92 18.15.1. Statistics function internal menu............................................................................................................................92 19. ACCESS TO SCALE PARAMETERS ................................................................................. 93 19.1. Accass pasword loading ............................................................................................................93 19.1.1. Administrator password loading ..............................................................................................................................94 20. TECHNICAL PARAMETERS .............................................................................................. 95 20.1. MGB series scales.....................................................................................................................95 20.2. XAB-Y series scales ..................................................................................................................96 20.3. ASB-Y series scales ..................................................................................................................97 20.4. BPS-Y series scales ..................................................................................................................98 20.5. APPB-Y series scales ................................................................................................................99 -4- 1. BASIC INFORMATION 1.1. Scale’s intended use Scale is used for weighed loadings precise measurement performed in laboratory conditions. It can be used only as non-automatic scale, so weighed product should be placed gently in centre of product bearing surface, that is on the pan. 1.2. Operating conditions Scale must not be used in explosive or other hazard conditions. No constructional scale modification is allowed. 1.3. Warrantycconditions Warranty does not cover: • Damage as result of using scale inadequate to its intended use • Damage or disturbance of stickers protecting scale from opening • Mechanical failures or damage caused by liquid, water or usual wear and tear, • Inappropriate setting or electrical system failure, • Measuring system overloading. 1.4. Metrological parameters inspection Scale’s metrological characteristics are supposed to be checked by user in fixed time intervals. Checking frequency is caused by operating scale’s environmental factors, weighing process kind and valid quality monitoring system. 1.5. The manual’s significance It is very important to read the manual carefully before switching on and starting the scale even if user is experienced and has worked with the scales’ type before. 1.6. Scale users’ traning Scale should be used and supervised by trained and scale-experienced users only. -5- 1. 2. TRANSPORT AND STORAGE 2.1. Delivery verification Packing and device should be checked respecting external damage directly after it has been delivered. XAB-Y ASB-Y Element’s type BPS-Y d 0,01mg φ 85mm pan • φ100mm pan • 0,01 0,1mg 0,1mg 1mg 10mg 0,1g • • 128 x 128 pan • 190 x 190 pan • 346 x 258 pan • • Bottom weighing cell shield • • • Centre ring • • • Anti-blast cylinder shield Anti-blast glass shield Pan mandrels- 4 pieces Feeder APPB-Y • • • • • • • • • • • Protective cover Carrier hook • 2.2. Casing All casing elements should be stored In order to be used for future transport. Only manufacturer casing can be used for scale’s transport. Before packing, cables must be disconnected and movable elements must be removed (pan, shields,pads). Scale’s elements should be packed in manufacturer casing to protect it from damage during transport. -6- 3. UNPACKING, INSTALLATION AND SCALE INSPECTION 3.1. Installation and operation place • scale should be kept and use in free from vibration, shocks, drafts or dust rooms, • the room’s air temperature range should be appriopriate to the instruction given on scale’s weight plate, temperature changes should be of laminar character, not higher than 0,5°C per hour, • scale should be placed on console or stable desk free from vibration, far from heat emitters • it is important to be particularly careful while magnetic product weighing as strong magnet is a part of scale; when magnetic products must be weighed, lifted loads weighing option should be used in order to eliminate magnet’s influence on the product; lifting device is located in scale’s base. • if static electricity influences scale’s indications, its base must be grounded.; grounding bolt is placed on the back of scale’s base. 3.2. Unpacking Carefully take out the device from packing, remove all plastic, cardboard and foil covers and transport protections. Then carefully put the scale on planned place of its use. As instructed in the outline attached to scale, put pan and other parts in appropriate places. MGB microbalances A – pipettes calibration B – standard After scale installing at operating place, following should be set: 1 – bottom ring 2 – scale pan 3 – weighing chamber glass shield 5 – cover plate /for pipettes calibration/ After all elements setting, additional devices should be connected an d scale should be connected to power source. Supply socket is located on back of module casing equipped with display. For pipettes calibration: After scale starting, glass container (4) should be placed and after indication stabilization TARE button should be pressed. -7- XAB-Y analytic scales A – scale with d=0,01mg unit B – scale with d=0,1mg unit After scale installing at operating place, following shiuld be set: 1 – bottom ring 2 – scale pan 3 – pan shield After the elements setting, additional devices should be connected and scale should be connected to power source. Power socket is located on back side of scale casing. Pipettes calibration Remove the pan and put on its place: - pipettes calibration chamber - inside the chamber, pan and other elements should be set up. ASB-Y analityc scales A – csale with d=0,01mg unit B – scale with d=0,1mg unit After installing scale in its operating place, following should be set: 1 – bottom chamber shield 2 – Centre ring 3 – scale pan 4 – pan shield After the elements setting, additional devices should be connected and scale should be connected to power source. Power socket is located on back side of scale casing. -8- BPS-Y precise scales A – scale with d=1mg unit B – scale with d=10mg unit After installing scale in its operating place, following should be set: 1 – pan mandrels 2 – scale pan 3 – pan shield /for d=1mg/ After the elements setting, additional devices should be connected and scale should be connected to power source. Power socket is located on back side of scale casing. APPB-Y precise scales Before scale installing In its operating place, all transport protections should be removed(1), then scale pan should be set up (2). After the elements setting, additional devices should be connected and scale should be connected to power source. Power socket is located on back side of scale casing. 3.3. Scale cleaning Scale is supposed to be cleaned delicately with wet cloth. All elements should be removed from weighing chamber while cleaning. CAUTION!!! Cleaning installed pan can cause scale’s gear damage 3.4. Connecting to mains Scale can be connected to mains only with original feeder in which it is equipped. Turn on scale’s supply - power pack slip must be plugged in socket on back of scale’s casing. -9- 3.5. Additional equipment connecting Only additional equipment recommended by scale’s manufacturer can be connected to the scale. Before connecting or exchanging additional equipment (printer, PC computer, PS/2 keyboard or additional display), scale must be disconnected from the power. After devices have been connected turn on scale’s power supply. - 10 - 4. TURN ON/OFF THE SCALE Turning on the scale: press «On/Off». Internal scale’s test will be conducted and after that scale is ready for operating. Caution: if scale has not been levelled precisely, after switching it on a scale leveling command will appear. Leveling procedure can be found in chapter 5. If scale has been turned off with «On/Off» button, it can be turned on again: By pressing «On/Off» button or By pressing OPTIONAL display area Turning off the scale: press «On/Off», display will be turned off, led indicator signal will be on 5. SCALE LEVELING Scale is equipped with interior leveling sensor, which is constantly monitoring scale’s level state and, if needed, sends order to correct it. Level information is displayed in window’s top right corner next to date and time. CAUTION: First scale leveling with electronic level can be done 2 hours after turning on scale’s power . Level measuring device of scale needs the time for thermal stabilization reaching. During the 2 hours, level symbol is pulsing in top task bar and, when level option is activated, blue point indicating correct scale’s level is not switched on. - 11 - 5.1. Automatic level sensor operating – ,,ALARM” function If leveling sensor detects incorrect setting, level symbol will change(red smallest circle), warning note will appear. In order to level the scale, ENTER should be pressed Level function control panel will be displayed. Symbol of scale with pulsing arrows is showed next to level symbol. Pulsing arrows show direction of correct feet turning as to level the scale properly. Scale’s view depends on scale type. Views and arrows’ directions that change while leveling, help user to level the scale. Blue point indicates level state. Feet should be turned according to the pulsing indicators in such a way that the blue point is placed in the centre of internal circle. Scale is levelled properly if the blue point is placed in the centre of internal circle in „level view”. This state should be accepted. In order to exit leveling option and turn back to weighing mode, press „OK“ on bottom bar. - 12 - 5.2. Hand-operated leveling If electronic leveling function is not available In scale’s menu, In case or level lack user needs to activate its function hand-operated. Press the level state symbol. Level function control panel will appear. Symbol of scale with pulsing arrows is showed next to level symbol. Pulsing arrows show direction of correct feet turning as to level the scale properly. Level the scale and accept with OK button. If scale is lavelled correctly, state symbol can be seen in top right corner of display and its indicator is blue. - 13 - 6. SCALE’S MENU STRUCTURE 6.1. Operating mode choosing Each scale operator can have another chosen operating mode as DEFAULT. As a result, scale can report its readiness for operating with pieces or percentage deviations. At any operating time current operating mode can be changed into another one: PROCEDURE: o At any time press operating mode symbol o All modes programmed in scale will be displayed o Press needed operating mode field o Chosen operating mode with QUICK ACCESS BUTTONS set will be displayed. Information showed In GREY information field depends on „INFORMATION” function settings. Quick Access Buttons types visible on bottom bar depend on „BUTTONS” function settings. „Information” and „Buttons” functions internal settings may be different for various operating modes. So In fact, after operating mode choice, following can change: Information field (different descriptions) other buttons can be accessible. Information and buttons connecting to operating mode enables creating specific weighing applications required for certain aims or dedicated to certain users. - 14 - 6.2. Menu operating Thanks to colour touch panel display, scale’s programme menu is intuitive and simple. Main menu entry or Menu quick rewind „top” Menu rewind „up” Menu rewind „down” Quick menu rewind „bottom” Change accepting Change refusing Database item adding (e.g. users) Database item removing 6.3. Return to weighing function Scale’s memory recorded changes are saved for good after return to weighing with save changes procedure. Press repeatedly , until the message appears on display: After the message appears, choose one of following options: – accept the change – refuse the change - 15 - 6.3. Quick return to weighing Quick return to weighing from optional menu possible types are: record and no-record. Return to menu with NO-RECORD of loaded changes. and hold for about 2 seconds Scale returns to mass display. button, located on display top right corner. Return to menu with RECORD of loaded changes This procedure is allowed if return is performed from menu:Periphery, Calibration, User, Web, System info, Updating, Leveling. Press and hold (~2s) top left display corner (menu description area), programme returns to main menu display. Then press , a dialogue window with choice option will appear on display. Press appropriate button. Caution: Some parameters change inside function does not require this type of accepting because other value choosing means accepting at the same time. . - 16 - User menu structure consists of 8 main groups, accessible after pressing scale’s casing SETUP button or symbol Calibration function Printers Scaner External communication RS 232 [1] RS 232 [2] Web IP address Subweb mask Gate address Updating Max 10 users Scale ID Scale type Programme version Last calibration Temperature Settings print Web Periphery System info Users Internal External User’s Calibration test Automatic calibration Automatic calibration time Report print Report settings Calibration history Display calibration . Aplication Printers Language Server Leveling Setting Leveling USERS menu is the widest group. It contains the following sub-menu. Its modification enables scale parameters adapting to user’s needs. - 17 - − − − − − − − − − User details user password language administrator settings print View colour display lightness additional display lightness sound Readout filter result accepting refreshing autozero last figure Buttons Operating left sensor right sensor sensor sensitivity sensor sound keyboard sound Date/Time date format time format time date time display date display Print Standard prit ο Reading; line; text footer Non-standard print ο Texts; prints Code page Print cut Units Basic unit Additional unit Operating medes Weighing Pieces counting Checkweighing Feeding Deviations Animal weighing Density Formulations Statistics Access - 18 - 7. WEIGHING PROCEDURE To proceed simple weighing process, only terminal’s right side buttons need to be used. Scale is equipped with buttons separate for zeroing, tarring and print initiation. 7.1. Scale zeroing: Pressing the button causes new zero point indication. From now on all weights (tare including) are measured according to the point. After scale’s zeroing, tare and net(gross) are equal to 0. Before new weighing process starting, especially tarring value measuring, zero button should be always pressed. Zero range equals +/- 2% of maximal scale’s capacity. 7.2. Scale tarring: Press TARE button. „Net“ symbol means that all indicated values are net weight. Indication: negative value tarring is unacceptable and results in error indication. In such case scale should be zeroed and next tarring procedure ought to be conducted. Weighing process: Put product to be weighed on the scale’s pan. After indication stabilization, weighing result can be read. If TARE function was used before, NET symbol will appear on display. - 19 - 7.3. Constant tare using for weighing If similar packings of known masses are used for weighing, so called constant tares can be defined. While weighing, such tare can be recalled with QUICK ACCESS button. Then result is net mass. PROCEDURE o At any time of operating press grey information field o Internal menu connected with the function will be displayed o Rewind menu TARE field o press TARE field Caution: Names and values of max 10 tares can be changed in „Tare“ menu. They will be accessible after pressing „Tare” Quick Access button. o press ADD symbol In order to enter new tare o enter its name and value o In order to change tare value, press screen area with tare value displayed, then numeric keyboard will appear- enter value and accept with OK. o In order to change TARE name, press area with tare name. A window with keyboard will appear where name can be changed. Names can consist of max 15 signs. Constant tare recalling: o Press QUICK ACCESS Button and choose one of programmed tares. - 20 - 7.4. Automatic tare using for weighing Operation rules: each first measurement after stable state achieving is tarred. Net message will be displayed. Net mass can be defined now. PROCEDURE o At any time of operating press grey information field o Internal menu connected with the function will be displayed o Rewind menu to AUTOMATIC TARE field and press its area Caution: In „Tare“ menu, minimal mass value above which automatic tare starts operating, should be defined. o Set automatic tare ACTIVITY as YES o minimal mass, above which tare starts operating, should be defined Caution: Automatic tare does not have its own Quick Access Button. If Active=YES is set up, tare starts operating. Active=NO setting turns tare off. 7.5. Digital tare Digital tare is entered with QUICK ACCESS Button. After pressing the button, tare value should be entered with accuracy not higher than that of the scale. Entered tare preceded with MINUS sign is automatically displayed. - 21 - 8. BASIC TERMINAL AND SCALE’S SOFTWARE OPERATION The following chapter describes display and terminal operation elements and explains scale’s software operating rules. The description relates to all scales equipped with this terminal type, irrespective of metrology parameters. TERMINAL’S CHARACTERISTICS 1. Zoom in sensors. Both non-touchable sensors can be assigned to menu or button function (e.g. cabinet door opening , zeroing, printing etc.) In order to choose certain function user needs to move his hand over appropriate sensor (maximal hand- sensor distance: 5 centimetres. Sensor approves receiving the order by sound signal and then needed function starts operating. None of the sensors has assigned a certain function as a standard. It is up to the user what function will be assigned to each sensor. 2. «F1»«F1» button Pressing the button causes moving from any application optional menu level to user choosing, profile defining or edition of defined user’s profile( more information concerning application and users’ profile can be found in following manual part). User’s profile enables defining and recording of individual settings. It enables optimum scale’s adaptation to certain user or certain tasks. 3 «F2»button The button enables scale’s function choice (e.g. simple weighing, statistics, formulation, pieces counting, weighing In percentage terms and density defining). - 22 - 4 «F3»button The button enables internal scale adjusting. 5 «SETUP»button The button enables main programme’s setting defining. The settings relate to all used by the user applications. 6 «On/OFF»button The button enables switching on/off scale’s display; standby state. 7 «0»button The button enables scale’s indication zeroing. 8 «T»button The button enables tarring the weight of container, which is used during weighing process. 8 «PRINT/ENTER» button Pressing the button causes data transmitting by interface to external device The terminal’s display is backlit, colour and of „Touch Screen” type, that is, touch responding. It enables not only data readout but also setting loading and function operating through touching appropriate screen fields. Display is divided into various zones (the picture below shows active Weighing application on display). - 23 - 1. operating mode type (1a) symbol and (1b) name of currently used function. The field‘s pressing causes calling menu, where chosen function can be fund (menu can be also called with «F2»button). 2. user Name of user currently logged on. Pressing the space causes calling menu, where user can be chosen (menu can be also called with «F1» button). 3. date / time Current date and time indication. Pressing the space enables entering menu, where date and time setting changes can be done. 4. scale’s level Level device state informing about scale’s level position. Pressing the space enables leveling assistant calling. Leveling process description can be fund In following part of the manual. CAUTION: Pulsing blue point In the level centre gives information about warming process of level indicating device electronic components. Warming process takes about 2 hours. 5. mass indication Weighing result field. Measuring result (5a) is displayed in this place, weighting item (5b), usage range bar chart (5c) and weighing state symbols: stability, Net, autozero (5d). After weighing item field pressing (5b) appears window enabling chosing one of accessible items. After weighing result field pressing (5a) window with current result changes. Weighing result is displayed with big type figures and additional information field is switched off. It might be useful if user reads the result from distance. In order to close the window, the field should be pressed again. 6. Information field In the field additional information (information data) concerning active applications is displayed. The applications make scale’s using simpler. Programme allows for displaying up to 6 additional pieces of information. Each user chooses information data (and function buttons, as below) to be displayed. Once user is changed, data connected with certain function changes. Pressing the field causes moving to menu which enables application setting change. 7. scale’s menu access Main scale’s menu entering symbol 8. quick access buttons field The display part is assigned to functional buttons that enable quick access to most frequently used functions and chosen function setting. Each user chooses buttons (and information data ) that have to be displayed. After user’s change, functioning data also changes. - 24 - 8.1. What you should know about scale’s operating possibilities 1. Each user can have his own function, printing, colours and weighing units settings. 2. Each function has its own DEFAULT settings connected with QUICK ACCESS buttons. 3. Each function has its own settings connected with INFO Field, where information about weighing process is displayed. 4. Each user can have his own QUICK ACCESS buttons and his own variables In INFO field that he can dynamically change while scale operating by pressing INFO Field and choosing options: Buttons Information Caution: user can define three own Quick Access buttons operating as e.g. Tare or Print 5. Other parametres related to weighing and other functions’ settings can be also dynamically changed and used. 6. User’s various functions settings can be password protected which guarrantees high security standard. 7. While scale operating, TOUCH panel and external keyboard connected to USB port can be used. 8. Weighing result type size can be enlarged. 9. Zoom-in sensors are programmable and their intended use can be changed. - 25 - 9. SCALE SOFTWARE Software consists of following parts: – Users’ profiles – System setting – Functions 9.1. Users’ profiles Users’ profile enables adapting the scale and its applications to individual user’s needs and certain tasks. User’s profile is setting collection, which user can define and call by pressing single button. While switching on the scale, last used profile is automatically activated. “Default” profile is a starting point, to which user can turn back any time pressing <Default> user. The profile is standard factory settings collection, which can be used by each user. Saved in “Default” profile settings can be changed optionally. Apart from „Default” profile there are 10 more users’ profiles, whose settings can be optionally modified. «F1» button is used for required user choice. All settings loaded while certain profile is active, will be saved in the profile. To the settings belong both specific functions setting and individual user setting, but not system setting (see below). Scale’s protection system (see following part of the manual) enables defining user’s profile access authority, in order to protect it from unauthorized change loading. Settings enable adapting scale to operating mode and tasks performed by certain user. After a user has been chosen, his assigned individual settings are activated automatically. 9.2. System settings System settings (e.g. peripheral devices settings) are independent of user’s profile or function and concern all the system. System’s setting are available after pressing «SETUP» button or appropriate symbol. Certain settings hints can be found in following part of the manual. 9.3. Functions of operating modes • Functions are progrmme’s module used for specific weighing tasks carrying out. Scale is equipped by manufacturer with various application set (e.g. simple weighing , statistics, formulation, item counting, percentage weighing and density determining - 26 - After switching on a scale, last active user’s profile and last used function are activated. Functions are accessible after pressing«F2». Indicators according standard application operation can be fund in the following manual part. Programme enables following functions using: • Weighing • Items counting • Checkweighing • Feeding • Percentage deviations • Animal weighing • Density (solids, liquid, air) • Formulas • Statistics The settings enable adapting function to individual user needs. This enables new application connected to operator’s name creating.Several functions operating at the same time is possible, e.g. weighing+ statistics+ checkweighing. BUTTONS and INFORMATION are related to each mode. Quick access to Buttons and Information choice is possible after pressing information field. Accessible buttons number and information range depend on each operating mode. - 27 - 10. SCALE’S CALIBRATION In order to assure precise weighing process, it is required to load periodically to scale’s memory a correcting factor of scale’s indication relating to weight standard. Such operation is called scale’s calibration. Calibration types: automatic internal calibration half-automatic internal calibration external weight calibration Caution: While calibration process no load must be placed on the scale’s pan! Temperature change range as initial for temperature calibration depends on scale’s type, as shown below: 0,4°C – for MGB , XAB-Y with d=0.01mg, ASB-Y with d=0.01mg scales 0,8°C – for ASB-Y and XAB-Y with d=0.1mg scales 3°C – for BPS-Y i APPB-Y scales If needed, user can change the settings as instructed below. In order to enter adjusting setting option press SETUP button or symbol on bottom display bar Programme’s main settings window is displayed. Press<Calibration>, then dialog box with calibration procedure settings will be displayed. - 28 - 1 Internal calibration Pressing the field causes starting internal calibration process. It is completely automatic with no scale’s operator’s interference; if pan is loaded, appropriate command to remove loading will be displayed. 2 External calibration Pressing the field causes starting calibration with external weight, whose value is given in manufacturer’s menu. The function is not available for verified scales. Weight value change is not possible. 3 User calibration Pressing the field causes starting calibration with optional weight , which should be given before calibration starting. The function is not available for verified scales. 4 Calibration test Comparing internal calibration weight to its value recorded in scale’s memory. It results in deviation defining scale indication drift. 5 Weight correcting possibility of correcting internal calibration weight value; function not available for verified scales 6 Automatic calibration definition of factor deciding about internal automatic calibration starting; options: no – no calibration time – calibration by time set in <time cal.Aut.> parameter temperature – calibration by environment temperature changes both – calibration considering time and temperature changes 7 Automatic calibration time defining time intervals between following automatic calibration procedures – setting range: 1-12 hours 8 Report print defining if a report should be generated and printed after finishing adjusting or test procedure 9 Report setting Calibration content report setting 10 Calibration history History of calibration procedures - 29 - 10.1. Calibration report setting Scale calibration report procedure enables proving that device is correctly operating and that measurement series shows real measured product’s mass. According to approved system of procedure documentation, user can use In calibration report following information and symbols: operating mode type date time user scale type scale’s OD level state signature blank line dashes nominal mass current mass difference defined code to define codes to be used In calibration report, use User’s Profile /Operating Modes / Weighing / ID Definition / 10.2. History of calibration Programme of scale records all conducted calibration procedures and saves the information In its protected memory in case of mains failure. From the menu level it can be specified what kind of calibration should be placed on the list. Following types of information can be displayed: All calibrations Temperature calibrations Time calibrations External calibrations Internal calibrations User’s calibrations Hint: If memory is overloaded (after 50 adjustment procedures), the earliest list’s record will be removed automatically. If internal procedures require complete calibrations documentation, lists of records should be printed and stored. - 30 - 11. DISPLAY’S CALIBRATION ,,Touch Screen” type display operates by resistance changes readout, the resistance is a result of certain display field pressing. Some of functions and settings require precise choosing of active field in scale’s menu, display calibration function has been designed. It deals with resistance changes readout precision correction, if it is faulty. After display calibration function activating, 5 points on display field should be indicated precisely. Hint: If screen touch display works properly, display calibration function should not be used. 12. SCALE’S USER CHOOSING If all users have free access to scale’s menu, operation starting does not require any additional actions. In case of existing users’ profiles, before operation starting user’s own profile should be chosen. To do that, responsible for user service display field should be pressed, then appropriate user should be chosen. - 31 - 13. PERIPHERY In „Periphery“ menu it can be defined, what devices will be connected to the scale and scale’s ports configuration can be done. Chosen printer or communication port must be compatible with connected devices. Accessible USB ports operate at information devices standard configuration and do not require any scale parametres changes. For RS 232 ports, possible parameters setting range is: port type /RS 232-1, RS 232-2/ Transmission speed Eveness Data bits, stop bits Transmission monitoring 14. SYSTEM INFORMATION System information contains data enabling scale identification, e.g.: scale’s ID, scale type, programme version. Temperature field shows current scale’s internal temperature. „SETTINGS PRINT” function consists of a number of variables currently set In scale. For each of them print option: YES/NO can be defined. Variables available: calibration, periphery, system information, web, updating, level state, user’s details, view, readout, keyboard operating, date/time, prints, units, operating modes, access, print. - 32 - 15. WEB ,,Web” menu contains scale’s settings when it is one of information web elements. Way of scale addressing (its address), IP address, sub-web mask and gate address should be set. The data above should be compatible with information web settings to which scale is connected. 16. UPDATING Enables scale’s software user change; metrologic parameters remain unchanged. Updating can concern: Application Printers (connected to scale) Updating can be implemented through : - Ethernet - USB - RS 232 Then the server address should be given. Ethernet option requires connecting to computer net and scale’s web address. USB using requires loading USB memory in scale’s connector. USB memory contains Update catalogue with a file to be updated. RS232 connector – scale automatically searches present computer software for a file to be updated 17. LEVELING The function is connected with electronic level. In menu time intervals between following level checking can be set. Level can be checked: once every 15 minutes constantly Leveling function can be also off, if needed. Leveling rules are described In point 5. - 33 - 18. SCALE ADAPTING – USER’S SETTINGS The following chapter explains the way of introducing INDIVIDUAL settings for certain users. It enables optimal scale adapting to individual needs or required tasks. The settings are saved in currently active user’s profile and they apply to all available profile’s function. After choosing a user, certain settings are activated automatically. Panel related to users can be available after: pressing SETUP button on scale’s casing, then pressing users symbol pressing setup SYMBOL, then pressing users symbol pressing F1 button on scale’s casing pressing active field with active user indication Result of each of above actions will be users panel display, which enables: new user adding user eliminating user edition user choice, whose parametres are to be called and used - 34 - 18.1. New user adding In top display part symbol PLUS should be pressed. A panel will be displayed, where user’s name should be entered and <OK> should be pressed. New user’s name will be displayed in users’ panel Caution: Not each user can carry out the operation. It depends on what authority user has. 18.2. User elimination Press ,,MINUS” symbol on top of display window. Panel showing all users will be displayed. A user to be eliminated should be chosen. After pressing the user, he is eliminated automatically. The operation does not require acceptation, so user elimination should be considered carefully before the action. Caution: Ability to perform the operation depends on the user’s authority so not every user can do that. DEFAULT user cannot be eliminated. 18.3. User choosing To choose a user, who should be active at a certain time, an appropriate field on the left of user’s name should be pressed. Pressing causes choosing a user, whose parametres are displayed AUTOMATICALLY and the user’s name is displayed on top display part. Caution: Each user has some limits in scale using. The limits range is defined by scale’s administrator- DEFAULT USER. 18.4. User’s settings In order to get access to user’s settings, user’s name should be pressed. For ergonomics reasons and in order to enable active field quick sernice, all bar can be used, except the part concerning user choosing. a – area enabling settings access; b – user choosing area - 35 - Following functions are related to each user: User’s details View Readout Button operating Prints Units Operating modes Access Caution: Each user has some limits In scale using. The limits range is defined by scale’s administrator- DEFAULT USER. Chosen user name is displayed on top display part. 18.4.1. User’s details The menu contains information directly connected with USER, such as: User User’s name is displayed In the field, which can be edited and changed. USER name area should be pressed and then keyboard with dialogue window will be displayed. Using the keyboard, enter user’s name and accept it. The change is saved. Password The field anables scale’s settings access password entering. PASSWORD area should be pressed and a keyboard with dialogue window will be displayed. Using the buttons the password and accept it. The change is saved. Language The field enables choosing language version, which will be activated in scale. After LANGUAGE area pressing, available language versions will be displayed. Pressing appropriate area, language version is chosen. The choice is loaded automatically. Caution: In order to see all language versions, press side navigation buttons. Press return buttons if you want to get rid of choice. - 36 - Administrator The function enables assigning ADMINISTRATOR authority to optional user. It should be remembered that administrator has no limits as far as all scale’s settings access is concerned. ▪ Settings print Relates only to certain user’s settings and looks as below: ------------ User’s details ----------User Default Language Polish Administrator yes 18.4.2. View The menu contains information connected with VIEW and scale’s display operating, such as: Colour The field shows colours choice that can be used by operator. Chosen colour is connected with display information bar. Such solution can show clearly certain users- one colour for one user. Display brightness The field enables display brightness level defining at 0-9 range. In this way ability to assign display brightness to current lightening conditions can be reached. Additional display brightness The field enables additional display brightness level defining at 0-9 range. In this way ability to assign display brightness to current lightening conditions can be reached. Caution: Press side navigation buttons In order to see all possibilities of display brightness choice. If you want to get rid of choice, press return buttons. Sound The function has two setting options: sound: YES or sound: NO. Choose appropriate value. After active area choice, display returns to previous window, loading changes automatically. - 37 - 18.4.3. Readout The menu contains information connected with WEIGHING PROCESS such as: Filter Before displaying, each measuring signal is electronically converted In order to reach suitable parametres typical of stable, that is ready to be read signal. At certain state, user can influence the conversion range, choosing suitable FILTER. Range of choice, filter: o Very fast o Fasts o Medium o Slow o Very slow Choosing filter level, real scale’s operating conditions should be taken into account. For very good conditions, medium or Fast filter can be set, while for Bad conditions slow or very slow filter will be suitable. Caution: For precise scales very fast –medium range filters are reccomended ▪ For analytic scales and microbalances medium- very slow range filters are reccomended Result accepting decides about measurement result stability symbol displaying moment; one of 3 result accepting options can be set: o fast o fast + precisely / reccomended value/ ○ precisely Caution: Stable result reaching Speed depends on filter type and result accepting type. - 38 - Refreshing The function defines the number of shown momentary measurements while weighing series. All measurements can be shown, then many transitory states can be seen. Another extreme situation is showing as few as possible measurements number. For example only 3 measurements can be seen before stability reaching. Autozero Autozero Each measurement series starts with so called,,ZERO”, which is shown with symbol on scale’s display. In fact ,,ZERO” is an area usually of 0,25e quantity. Some processes like filling, feeding, evaporation require only autozero system operation, which can forge the measuring result. That is caused by very laminar process’ characteristics. AUTOZERO is active in most of scales. To turn it off, choose NO option. After moving on to weighing, ,,ZERO” symbol will not be seen on main display. Last figure The function has 2 setting options: sound: YES or sound: NO. Suitable value should be chosen. After active area choosing, display returns to previous window loading changes automatically. 18.4.4. Buttons operating The menu contains settings connected with SCALE REACTION on user’s action. The settings contain: Left sensor Choose one of operations to be performed by scale’s left zooming sensor. Accessible options: o off o print o tare o door opening /option accessible for XAB-Y, MGB scales o door closing / option accessible for XAB-Y, MGB scales o door changing / option accessible for XAB-Y, MGB scales ○ units - 39 - Right sensor Choose one of operations to be performed by scale’s right zooming sensor. Accessible options: o off o print o tare o door opening /option accessible for XAB-Y, MGB scales o door closing / option accessible for XAB-Y, MGB scales o door changing / option accessible for XAB-Y, MGB scales ○ units sensor’s sensitivity It is a parametr of 0 – 9 range, that decides about distance from which sensors will react. Its standard value ranges from 5 to7. sensor’s sound choose YES option if sound signal is expected to be zooming sensor additional activity reaction. If there is lack of sound signal – choose NO option. keyboard sound choose YES option if sound signal is expected to be additional reaction on pressing. If there is lack of sound signal – choose NO option. 18.4.5. Date /Time The menu contains DATE and TIME settings. The informatiton is shown on display top information field. Date format After active area pressing, suitable date format settings should be chosen: o D/M/Y (day/month/year) o M/D/Y (day/month/year) Time format After active area pressing, time settings should be chosen; accessible displaying formats: o 12 hours o 24 hours - 40 - Time /time setting/ After active area pressing, time should be set In format displayed in dialogue window top field. After value entering, press OK. button. Example 11:23:32 >> enter : 11.23.32 <OK> Caution: Error time value are ignored by scale software, time remains unchanged. Date After active area pressing, date should be set In format displayed In dialogue window top field. After value entering, press OK. button. Example: 10 Feb 2010 >> enter: 10.02.2010 <OK> Caution: Error date value are ignored by scale software, date remains unchanged. Time displaying After active „set” area pressing, choose YES option if time is to be visible In top information field, or NO option. Date displaying After active „set” area pressing, choose YES option if date is to be visible In top information field, or NO option. Hint Date and time setting is also accessible from level of main display window. Area with displayed date and time should be pressed, see the description, point 8. 18.4.6. Prints – standard print Print menu consists of two separate blocks. The first one is standard prints, the othernon- standard prints. Standard print It consists of three internal blocks, which contain various variables. For each variable option YES should be set i fit is to be printed or NO if no printing is required. - 41 - PROCEDURE: 1. Press active area (Heading – Line – text-foot) and choose variables that are to be printed 2. If non-standard print is chosen, it should be created. HEADING − Operating mede type − Date − time − User (Users/xxx/user details) − Scale type − Scale’s ID − Leveling − Signature /text constant/ − Blank line − Dashes − Product code − code 1 − non-standard print o LINE − Net − Tare − Gross − Additional unit (Users/ xxx /Units) − Meter (Users/ xxx /operating modes/ xxx / meter) − Current result - Non-standard print o o TEXT-FOOT − Operating mode type − Date − Time − User (Users/ xxx /user details) − Scale type − Scale’s ID − leveling − signature (text constant) − blank line − Dashes − Product code (Users/ xxx /operating modes / xxx / ID definition) − code 1 -- non-standard print - 42 - PRINTS USING BASIC RULES 1. PRINT buton pressing on scale’s casing causes painting variables, which are shown on field LINE of standard print if they have attribute = YES (see variables list below). 2. Variables with YES attribute, shown In HEADING or TEXT FOOT will be printed ONLY after Heading printing or Text Foot symbol pressing. The symbols should be placed In bottom display bar. Symbol placing procedure: CERTAIN USER symbol loading procedure: − move on to user’s parametres ( SETUP button can be also Pressed, then Users symbol) − choose user’a name; after displaying the functions connected with user, pass to the screen showing Units-Operating Modes- Access − Press active „OPERATING MODES” area, all scale’s implemented operating modes will be shown. − Choose an operating mode, e.g. WEIGHING, with which Text foot painting or Reading painting operation is to be connected. − Choose BUTTONS field − For HEADING and TEXT FOOT prints, YES attribute should be set Return to weighing: − Pressing repeatedly return button or Pressing and HOLDING SETTING SYMBOL (see point 6.3. Quick return to weighing) On bottom display bar two symbols will appear: heading print and text foot print. - 43 - A symbol- Print the heading information B symbol – Print the text foot information CAUTION: Each user can have different QUICK ACCESS buttons set ACTIVE. 18.4.6.1. Quick Heading Print and Text Foot Print buttons activation. PROCEDURE: o Press grey information field at any time of scale operating. o A screen will be displayed, where the following can be defined: − BUTTONS /can be seen on bottom display bar/ − INFORMATION /can be seen on grey field, under weighing result/ − OTHER parametres related to function operating Caution: While in Weighing mode, there is access to defining buttons and information connected with weighing; if mode [%] is active, there is access to defining buttons and information related to [%]. - 44 - 18.4.7. Prints – non-standard prints Non-standard print consists of two blocks: TEXTS and PRINTS First optional number of texts should be created, then they should be turned into a print. PROCEDURE: 1. Press active TEXTS area 2. a field enabling texts adding will be displayed 3. press ,,PLUS” button and add suitable texts number of which non-standard print will be constructed. Caution: Each following text Has its ordinal number, e.g. 1,2,3,4, which can be changed into a name. . The name is JUST A NAME of text, not its content. Texts adding - after pressing „ADD” button, a window with text’s number will be displayed. Text’s name can be changed using touch keyboard presented below the text number field. While text entering, alphanumeric signs can be used. Keyboard view should be switched over by pressing suitable button. Lower case / capital letters deleting accepting Backspace /sign deleting/ national signs Numerical keyboard - 45 - 1. 2. 3. 4. Entered and accepted text’s name will be displayed In texts specification. Such solution eases print procedure. Real definitions of texts’ content are used In such a way. 5. While texts creating, following relations ocure: 1. text highlighting Press and release the field with text’s name, then it will be pointed out with rectangular shape; now some new text can be added before or after the highlighted text. 2. text editing Press and release the field with text’s name for about 2 seconds it will be edited, its content can be changed. Caution: Adding a new text line can be performed in texts or prints submenus.Changes loaded in prints submenu are automatically saved in texts submenu. - 46 - Texts’ content loading - Press name /number/ of text, where the content will be loaded - press,,ADD” symbol, then there is possibility to choose an option for the text’s line: NEW, LOAD AFTER, LOAD BEFORE. Choose suitable one. LOAD BEFORE and LOAD AFTER options require defining the line, after which such operations is to be performed. In order to highlight text line, its active field should be pressed. It will be pointed out with rectangular shape. New line will be loaded after or before chosen line. If NEW option is chosen, active text field will be shown below Caution: max. 10 text fields can be added - Press text field area - keyboard with blank line will appear; load the text there. - 47 - - load the text /max 40 signs/ using keyboard, after loading accept it with ENTER Caution: National signs button is a multifunction one- see below: . Texts and lines eliminating eliminating operation can be done In relation to ο texts (In such case all text’s lines are eliminated) ο text’s line (single lines can be eliminated) PROCEDURE - press,,ELIMINATE” symbol - choose text number (name) to be eliminated - choose line number to be eliminated Caution: Eliminated text cannot be restored so texts eliminating operation should be carefully considered. - 48 - Non-standard print creating 5 non-standard prints can be created. Print creating is about adding texts to following prints. PROCEDURE - press,,PRINTS” field - press,,ADD” symbol - window with print number is displayed - enter your own name or accept the number - print has been created Caution: Each following text Has its ordinal number, e.g. 1,2,3,4, which can be changed into a name. - Press created print name field, then a window enabling texts adding appears - press ,,ADD” and choose text to be added to print from displayed window - in order to create a print, repeat the adding text procedure. . 18.4.8. Units After pressing „Units” symbol basic or additional unit can be chosen. To choose, press suitable field next to required unit Basic unit is visible next to weighing result Additional unit is visible In information field /grey field under weighing result/ Additional unit displaying attribute is set In menu: − /operating modes/ xxx/ Information /Additional unit : YES or NO/ Caution: 2 own measure units can be defined, they can be basic or additional units. User units defining is described In point 18.4.9.of Operating Modes - 49 - 18.4.9. Operating Modes – general information ,,Operation modes” function contains list of all functions that can be used. After displaying function list window, you can: − Choose default function − Defie its using conditions DEFAULT user choosing function: Each user can have his default function, that is called after choosing him: press choice field on the right of function name Using conditions defining: Press function name bar „Operating modes” menu enables each operating mode individual setting entering. The settings are assigned only to active user. If settings change is required, suitable user should be chosen and settings should be changed. Certain ACTIVITIES can be assigned to each operating MODE. Following options can be set for each of them: ο YES /if the activity is to be accessible/ ○ NO/if the activity is to be inaccessible/ Certain INFORMATION can be assigned to each operating MODE. Following options can be set for each of them: ο YES /if the activity is to be accessible/ ○ NO/if the activity is to be inaccessible/ Moreover, for each mode additional information is accessible, which defines rules of certain mede using. List of the information pieces and their description is specified for each operating mode. - 50 - 18.5. Quick access to operating modes parameters defining Operating mode parameter defining can be performed in two ways: o Throughout user’s profile User/Default/Operating Modes/weighing/ – it is the longer and more activities demanding procedure o Throught information field pressing it is a quick and RECOMMENDED method PROCEDURE: o At any moment during operation Press grey information field o Screen with defining possibility will be displayed: − BUTTONS /visible on bottom display bar/ − INFORMATION /visible In grey field, under weighing result/ − OTHER parametres connected with function operating Caution: while In Weighing mode, there is access to buttons and weighing information defining; if mode [%] is active, there is access to buttons and information connected with [%]. Operating mode quick change: press operating mode symbol and choose an operating mode to be used. - 51 - 18.6. Weighing operating mode parametres- quick access buttons Buttons accessible for weighing mode. If YES option is ser for button- it will be automatically shown on bottom navigation bar of the main display. This make it so called “HOT” button, that means quick access to the most frequently performed operations. CALIBRATION YES „Calibration“ of scale using internal calibration mass PRECISION 1/10 YES The button enables changing the displayed weighing result precision Caution: For metrological reasons Picture definition changing May not be possibile In some scales cases. TARE SETTING YES Numerical loading constant tare value. After pressing the button, numerical keyboard will be displayed, which is used for known tare loading. After pressing <OK> scale returns to weighing application and on display minus sign followed by loaded tare value appears. It should be remembered that tare value should be loaded with precision adequate to scale’s one. TARE RECALLING NO Calling initially defined tare value. After pressing the button, a list of tares declared is displayed and then the required tare should be chosen. After pressing <Enter>, scale returns to weighing application and minus sign followed by chosen tare value appears on display. HEADING PRINT NO TEXT FOOT PRINT NO The buttons enable heading and text foot of defined STANDARD print printing METER CLEARING NO The button enables defining the initial value of measuring meter. ID DEFINITION N0 „ID“ function button enables codes (description texts) assigning to individual weighing processes. The codes will be also placed on reports prints. After function button pressing a window appears, In which ID is chosen and required text is loaded. - 52 - Caution: Maximal number of quick access buttons is 5. If more buttons are chosen, 5 buttons first on the list are displayed. 18.7. Weighing operating mode parametres - information Information connected with weighing process are shown In grey information field. 6 pieces of information can be loaded there. If more are chosen, only the first 6 will be displayed. ADDITIONAL UNIT YES In the field weighing result given In unit declared In <Units> menu as additional is displayed. TARE YES In this field current tere value ( In the same basic unit) is displayed. GROSS YES In this field current gross value ( In the same basic unit ) is displayed. METER YES In this field information concerning carried out measurement content (order) is displayed. ID CODES NO „ID1“, „ID2“, „ID3“, „ID4“, „ID5“: the fields show indicators entered by „ID“ function button. Hint:Instead of „ID1“, „ID2“, „ID3“ and „ID4“ designations, also their recorded names are displayed. NON-STANDARD INFORMATION NO - 53 - For weighing mode additional options are accessible automatic print ο accessible: YES / NO ο minimal mass It is mass below which indication must decrease, to make following automatic print possible. definition of unit number 1 − active: YES / NIE − operation, that is, how the unit will be counted ο F x Net or ο F / Net − Parameter: value, by which Net value will be divided or multiplied − New unit symbol − Format of unit Example: setting „0.05“ defines two decimal places rounded to 5 ( it means that value 123.4777 will be rounded to 123.50) Hint: The function can be used only for weighing result picture definition decreasing. Value beyond scale’s maximal definition should not be entered. definition of unit number r 2 / like for unit number 1/ prints print type choice is generated after PRINT button pressing: standard or non-standard print - 54 - print button It contains «PRINT»button operation defining . Options accessible: ο „Stable“ After pressing « PRINT » button, result will be printed only if the indication is stable. ο „Always“ After pressing « PRINT » button result will be printed immediately, irrespective if the indication is stable or not. ○ „Off“: « PRINT » button is not active ID definition In „ ID definition“ 12 codes can be activated, they are accessible after function button pressing and their names can be changed. Codes („ID1 “ … „ID12 “): If there are no defined codes, symbol „ADD” should be pressed- a keyboard will appear. A new ID name should be loaded and accepted with «Enter» button. In order to change name of existing ID a code should be Chosen that is to be changed and a new name should be entered. Name can consist of maximum 15 signs. Using ,,DELETE” button, ID eliminating from the list operation is activated. Hint: Codes are given standard symbols: „ID1“, „ID2“, „ID3“ …“. They can be replaced with names. automatic tare ο active: YES / NO ο minima mass: it is mass over which automatic tare function is activated. weighing meter ο active: YES / NO ο number: defining how many weighings will be saved In scale’s memory /max 999/ ο footer after zeroing ο zeroing after footer ο statistics zeroing aftr footer ο max. number tare In „Tare” menu names and values of max 10 tares can be changed. They will be accessible after „Tare” function button pressing. In order to change data, tare to be changed name or “ADD” symbol should be pressed. Window with keyboard will appear, where name can be changed. Names can consist of max 15 signs. In order to change tare value, screen area with displayed tare value should be pressed; numeric keyboard will appear, where required value can be loaded. - 55 - 18.8. Details counting Details counting procedure consists of 2 stages: first, detail individual mass value should be defined /or drawn/, then on base of the value number of all details should be specified. To DETAILS COUNTING mode certain ACTIVITIES are assigned. For each of them the options can be set: ο YES /if the activity is to be accessible/ ο NO /if the activity is to be inaccessible/ To DETAILS COUNTING mode certain PIECES OF INFORMATION are assigned. For each of them the options can be set: ο YES /if the information is to be accessible/ ο NO /if the information is to be inaccessible/ Other functions are also available ,e.g.: o automatic print o prints /standard – non-standard/ o print button o ID definition o automatic tare o meter o tare o patterns base o pattern number defining for „pattern mass specffying” function o Automatic Precision Correction 18.8.1. Details counting – quick Access buttons Enable quick access to basic parametres of details counting process, such as: pattern mass, patterns base, pattern record etc. Calibration Pattern mass counting Tare setting Pattern number defining Tare calling Pattern calling or recording Heading print Default value of „pattern mass counting” function Footer print Checkweighing Meter clearing Feeding - 56 - ID definition Statistics Pattern mass defining DEFINED buttons Only those buttons /symbols/ functions will be described below that were not present In „Weighing” mode. After “Details counting” application starting, default symbols will be displayed, they enable immediate operation starting: − Tare setting − Tare recalling − Pattern mass defining /1item/ − Pattern amount choosing − Patterns base Pattern mass defining After pressing the symbol individual item mass should be entered. On the base following elements counting process will be carried out. Numerical keyboard – buttons description: - DEL: last figure deleting - C: all figures deleting - OK. amount accepting Caution: Pattern mass can be given with precision of four decimal places Pattern mass measuring Individual item mass will be measured by weighing. The information will be given In information field as „pattern mass”. Pressing the button causes return to weighing and displaying a message In BOTTOM COMMAND bar. Displayed number of items should be placed on scale’s pan and OK should be pressed. To give up- press C button. - 57 - Caution: Number of items shown on display In COMMAND bar depends on „Pattern amount counting” function setting. PROCEDURE: - Press GREY information field. - rewind internal menu to „Pattern amount counting” function - Press bar with the function name and enter number of items required for individual mass counting. - accept loaded value Standard procedure pattern amount giving Pattern amount from dialogue window should be Chosen or other value should be entered. Information on display shows following actions. Following options can be Chosen: − Optional amount − 10 pattern items − 20 pattern items − 50 pattern items − 100 pattern items Caution: Choosing the items number one conditio should be met: 1 item mass > scale’s elementary unit. After one option choosing, suitable information will be displayed In COMMAND BAR. Pattern recalling or recording Pressing the symbol causes PATTERN BASE displaying, where two operations can be performed: − Pattern mass recording /1 item/ In pattern base − Pattern mass drawing from pattern base PATTERN RECORDING IN BASE o During details counting PATTERN BASE symbol should be peressed o press ,,ADD” symbol - 58 - o a window will be shown on display where detail’s name should be entered o name should be accepted with ENTER button – detail will be automatically added to PATTERNS BASE. Individual mass will be given next to the name. PATTERN DRAWING FROM BASE o while details counting, Press PATTERNS BASE symbol o press field with name of pattern, which is to be drawn from base o programme will automatically return to details counting ○ pattern’s mass will be shown In information field. xxxx Default value for pattern mass counting function give the number of items of which individual mass will be counted while weighing /see symbol description: pattern mass counting/ checkweighing In menu there is Access to checkweighing function though a symbol on display bottom bar. YES option should be chosen. Pressing a symbol on display bottom bar, TOP and BOTTOM threshold values can be set. Total value of items number should be entered. In order to return to weighing, press direction arrow of return to weighing. feeding In menu there is Access to feeding function through a symbol In display bottom bar. YES option should be chosen. Pressing the symbol In display bottom bar, feeding target value can be set. Total value of items number should be entered. In order to return to weighing, press arrow of return to weighing. statistics Each pressing PRINT button or automatic print causes adding the result to STATISTICS. Statistics contains: amount, sum, average value, MIN value, MAX value, max-min difference, standard deviation, variance factor defined buttons Enable assigning certain activity to a button. - 59 - 18.8.2. Pattern base creating Using quick access button „Patterns base” that is located In bottom bar enables only adding patterns to base without deleting possibility. Full Access to Base is possible from internal menu depending on user’s authority PROCEDURE: o At any moment of scale’s operating Press grey information field o Screen with internal menu will be displayed o Rewind menu to Patterns Base field o Press Patterns Base button o Press „Add” symbol – numerical keyboard will appear, where individual pattern mass should be loaded. Then accept it with OK. o New pattern will have default name, that should be changed. o Press field with pattern’s name, a keyboard will appear, then change the name and accept it with ENTER. Caution: Pattern’s name and value can be changed At any time. Press name field or value field. Perform correction and save it. - 60 - 18.8.3. ACAI function – Automatic Accuracy Correction ACAI function is responsible for jest automatic correction of detail’s individual mass during counting. It results in higher counting precision standard – individual mass counted from larger sample size is a representative value. First ACAI function should be activated. PROCEDURE: o At any time of operation Press grey information field. o Screen with internal menu will be displayed o Rewind menu to Patterns ACAI field o press ACAI button o choose YES option from dialogue window ACAI function operating rules: 1. items number (after adding) located on pan must be higher than it was bafore 2. items number (after adding) located on pan must be lower that double amount that was visible on display before adding 3. current items number must be included In allowance field ± 0,3 from total value 4. result must be stable. ACAI function active state is indicated by black mark next to items number. If In information field „Pattern mass” information visibility is declared, after conditions 1-4 meeting automatic individual mass updating will take place. The new value can be saved In „Patterns base” using quick access button. - 61 - 18.8.4. Details counting operating mode parametres - information Information connected with weighing procedure are presented In grey information field. Max. 6 pieces of information can be loaded there. If you choose more, only first 6 will be shown. Bar chart YES It is a meter related to feeding and checkweighing operating. It shows the functions’ operating In graphic way. It is visible only if „Checkweing” or „Feeding” buttons have YES option (quick access buttons declaring). Additional unit YES In this field weighing result In declared unit is displayed, the unit is declared In <Units>menu as additional Tare YES In this field current tare value (In the same Basic unit) is displayed. Gross YES In this field current Gross value (In the same Basic unit) is displayed. Meter YES In the field information concerning amount (order) of measurements performed is displayed. Bottom threshold NO The information show bottom threshold value, that is declared for checkweighing function, e.g. 20 pcs Top threshold NO The information shows top threshold value that is declared for checkweighing function, e.g. 25 pcs Target mass NO The information shows item amount that should be reached while feeding procedure(amount feeding In this case) Statistic data NO For each of them option Yes or No should be Chosen. ID codes NO „ID1“, „ID2“, „ID3“, „ID4“, „ID5“: The fields show indicators introduced by „ID” function button. Hint: Instead of „ID1“, „ID2“, „ID3“ i „ID4“ their loaded names are displayed. - 62 - Non-standard information NO YES option – information will be shown In information field, NO option – information will not be presented in information field. Non-standard information defining Non- standard information defining is about your own text creating, that will be displayed In information field. Procedure: − Press „Non- standard information defining” fieldn − Press”ADD” symbol − Press text field to be edited − Enter optional text and accept it with ENTER Caution: 1. text line can constist of 40 signs 2. max 6 information lines can be used (grey info field capacity ) Each non-standard information can be edited or deleted. To edit, chosen field should be pressed – field content will be displayed. Change the text and when edition is finished, save changes pressing ENTER. To delete information, press “DELETE” and choose number of information to be deleted from dialogue window. Display view with information field and quick access buttons - 63 - 18.8.5. Feeding and Checkweighing functions graphic interpretation. CHECKWEIGHING In order to let bar chart work, choose: − “Checkweighing” quick access button − Mark „Bar chart” information as YES. On display, under weighing result a bar chart is shown; using colours, it shows current number of pieces. After pressing checkweighing function symbol, two values should be entered: - bottom threshold and - top threshold Both values should be given as number of pieces. The values entered should be complete ones. If values have decimal places, scale records only their complete value parts. While details counting, bar chart shows current number In form of colourful progress bar. − Number of pieces below bottom threshold /xxx< 20pcs/ − Number of pieces between weighing thresholds /20pcs< xxx >25pcs/ − Number of pieces above top threshold /xxx >25pcs/ FEEDING In order to let bar chart work, choose: − “Feeding” quick access button - Marking „Bar chart” information as YES. On display, under weighing result a bar chart is shown; using colours, it shows current number of pieces in relation to target mass. - 64 - After pressing the function’s symbol, target Mount should be entered. The value should be given as pieces number. The value entered must be a complete one, e.g. 50 pcs. If loaded values has decimal places, scale records only its complete value part. While details counting, bar chart shows current number In form of colourful progress bar. Permissible area- result is a correct one if it is situated In tolerance+/- 10% in relation to target mass. − Number of pieces below permissible area mass − Number of pieces In tolerance area +/- 10% in relation to target mass − Number of pieces beyond permissible area Caution: If checkweighing and feeding functions are chosen at the same time,two bar charts are shown on display. 18.9. Checkweighing Checkweighing is a procedure of monitoring mass of loading, whose bottom and top values are defined – they are so called checkweighing thresholds marked as LO oraz HI. Standard buttons connected with checkweighing function. Choose YES (visible) or NO (invisible) option for each button. Calibration /yes –no/ Meter clearing /yes –no/ Tare setting /yes –no/ ID definition /yes –no/ - 65 - Tare calling /yes –no/ Checkweighing /yes –no/ Heading print /yes –no/ Thresholds base /yes –no/ Footer print /yes –no/ Statistics /yes –no/ Non-standard buttons Functions and standard buttons using is described In point 18.6. Weighing operating mode parametres – buttons. Other buttons should be used as instructed in point 18.7. Weighing operating mode parametres – information Information related to checkweighing: o Bar chart o Additional unit o tare o gross o meter o bottom threshold o top threshold o statistic data /difference, amount, total, standard deviation etc./ o ID codes o non-standard information o Non-standard information defining For each information YES or NO option should be chosen as displaying criteria. CAUTION: Non-standard information defining is described In point 18.8.4. 18.9.1. Checkweighing thresholds base creating Checkweighing thresholds base contains digit values and default names of thresholds. New thresholds can be added to the base or thresholds that are not used can be deleted. Full access to the Base is possible from internal menu and it depends on user’s authority. PROCEDURE: o at any moment of operating, press grey information field o internal menu will be displayed - 66 - o rewind menu to Thresholds Base field o press Thresholds Base button o base does not contain any elements at the moment o press “Add” symbol o numerical keyboard will be displayed, then defined threshold’s name should be entered and accepted with OK button. o after the name entering, checkweighing thresholds’ default values are equal to 0.0. The fields are supposed to be edited and appropriate values should be loaded. o Using numeric keyboard, load values of top and bottom thresholds. o Return to weighing- direction arrow “return” Caution: − Loaded checkweighing thresholds are accessible after checkweighing function activating − Existing thresholds can be deleted; In order to do that, „DELETE” symbol should be Pressed and the threshold to be eliminated should be chosen from the list. 18.9.2. Checkweighing thresholds using While weighing, checkweighing thresholds saved In Thresholds Base can be used and personal thresholds can be defined. In case of Thresholds Base using, there is possibility of: − Collecting thresholds to be used − Recording personal thresholds In Thresholds Base Caution: From level of Quick Access Buttons thresholds existing In base cannot be deleted. - 67 - Personal checkweighing thresholds PROCEDURE: o Press Quick access button o Latest used bottom and top thresholds values will be displayed o Press threshold’s name field and enter thresholds’ values using numeric keyboard Caution: Top threshold must be of higher value than bottom threshold Numeric keyboard – buttons description: - DEL: last figure deleting - C: All figures deleting - OK.value accepting Adding personal checkweighing thresholds to thresholds base If personal thresholds are used, they can be saved In base from main menu level. PROCEDURE: o Press „THRESHOLDS BASE” Quick access button o Thresholds Base content will be displayed o Press “ADD” symbol o Load name and accept it with ENTER button. o The threshold is saved In the last base record. Thresholds Base using PROCEDURE: o Press Quick access button o Thresholds Base elements will be displayed on the screen o Suitable threshold should be found and chosen, its name should be Pressed o Values related to the threshold will be automatically recalled to be used. - 68 - 18.9.3. Bar chart using for checkweighing Bar chart is an element of Information field. The condition of bar chart operating is choosing YES option while the function’s information declaring. Permissible area presented by bar chart depends on current settings’ bottom and top thresholds. Bar chart colours: − yellow: mass value is below bottom threshold − green: mass value is between thresholds − red: massvalue is higher than top threshold 18.10. Dosing Dosing procedure is about product dosing till appropriate mass reaching, so called target mass. In case of laboratory scales, the procedure is of laminar characteristics, so Autozero system must be off, which enables real weighing result achieving. CAUTION: In main field of display it is possible to see the weight difference between the one on the pan and the one recorded as the target weight in DOSING function. Quick access buttons connected with feeding function. Choose YES option (visible) or NO (invisible) for each button Calibration /yes-no/ Meter clearing /yes-no/ Tare setting /yes-no/ ID Definition /yes-no/ Tare recalling /yes-no/ Dosing /yes-no/ Heading print /yes-no/ Target masses base /yes-no/ Text foot print /yes-no/ Statistics /yes-no/ Non-standard buttons - 69 - Use and operating of quick access buttons Has been described In poin 18.6. Weighing operating mode parameters- buttons. Other buttons’ use is described In point 18.7. Weighing operating mode parametersinformation Information connected with checkweighing: o bar chart o additional unit o tare o gross o meter o target mass o statistic data /difference, amount, total, standard deviation etc./ o ID codes o non-standard information o non-standard information defining For each information YES Or NO option should be chosen as displaying criteria CAUTION: Non-standard information defining has been described in point 18.8.4. 18.10.1. Target masses base creating Target masses base contains a list of names of products, for which target values In feeding process Have been defined. Full access to the Base is possible from function’s internal menu, depending on user’s authority. PROCEDURE: o at any moment of operating, press grey information field o screen with internal Feeding menu will be displayed o rewind menu to Target Masses Base field o Press Target Masses Base o If there are no elements In the base, Press „Add” symbol. o Numeric keyboard will be displayed, then enter TARGET MASS VALUE and accept with OK - 70 - o After VALUE entering, element Has default name which should be changed. o Press the name’s area o using alphanumeric keyboard,enter a name and accept it with ENTER. o If there are some elements in the base, they can be edited as far as name and target mass value is concerned o Return to weighing- direction arrow “return” or press operating mode symbol. Caution: − Loaded target masses are accessible after passing on to feeding function − Existing target masses can be deleted; press “DELETE” symbol and choose the element to be deleted. 18.10.2. Target masses using for weighing While weighing, target masses saved In Target Masses Base can be used or temporal personal target masses can be defined. In case of Masses Base using it is possible to: − Collect mass value for using it − Record temporal personal target mass in Masses Base Caution: From the level of Quick Access Buttons, Target Masses saved in base cannot be eliminated. Temporal personal target masses PROCEDURE: o Press Quick access button o Screen with field where target mass value should be entered will be displayed o Press target mass value field and enter a value using numeric keyboard. Caution: Values are rounded to scale’s unit value. Numeric keyboard- buttons description: - DEL: last figure deleting - C: All figures deleting - OK. value accepting - 71 - o After return to weighing, target value preceded by MINUS sign is displayed ( lacking amount of target value) o Product should be feeded till 0.0g result o Feeding process can be performed with bar chart assistance, where current product amount is shown. o Information field shows target mass value and current mass. Caution: Result is a correct one if it is located In tolerance +/- 10% in relation to target mass. Adding personal temporal target masses to the base If temporal target masses are used, they can be saved In base from the level of main menu. PROCEDURE: o Press „TARGET MASSES BASE” quick access button o Masses Base content will be displayed o Press”ADD” symbol o Enter the name and accept it with ENTER. o The mass is saved In the last base record. Target Masses Base using PROCEDURE: o Press Quick access button o Target Massess Base elements will be displayed o Find and choose appropriate name of Mass and press it o Value related to the name will be automatically recalled to be used. o Target mass value preceded with MINUS sign is displayed o Scale is ready for operating using chosen target mass Caution: Increasing of figures displaying results In swithing off info field and bar chart visual material. - 72 - o Dose product till 0.0g result o Information field will show additional information of weighing process. o The information range depends on INFORMATION field setting for dosing function. 18.10.3. Bar chart using for dosing Bar chart is an Information Field element. Bar chart operates if YES option is chosen while the function’s Information declaring. Bar chart colours: − yellow: mass is below permissible area − green: mass is In permissible area − red: mass is higher than permissible area Permissible area is the area +/- 10% In relation to target mass value - 73 - 18.11. Percentage deviations In relation to pattern’s mass Percentage deviations is a procedure of comparing weighed product to reference mass. The operation is expressed in [%]. While declaring, mass value should be given, e.g. 50.0g, that is 100%. It is a reference point for following measurements. Additionally, together with deviations, DOSING and CHECKWEIGHING functions can be active. Quick access buttons connected with deviations function. Choose Yes (visible) or No (invisible) option for each button. Calibration Reference mass Tare setting Checkweighing Tare recalling Dosing Heading print Reference masses base Text foot print Set 100% Meter clearing Statistics ID definition xxx Non-standard buttons Quick access buttons’ use and operating has been described In point 18.6. Weighing operating mode parametres- buttons. Other buttons should be used as instructed In point 18.7. Information connected with checkweighing: o bar chart o additional unit o tare o gross o meter o bottom threshold o top threshold o target mass o statistic data /difference, amount , total, standard deviation, etc./ o ID codes o non-standard information o non-standard information defining For each information YES or NO option should be chosen as displaying criteria. CAUTION: non-standard information defining has been described In point 18.8.4. - 74 - Only those buttons /symbols/ functions are described below, that did not appear In „Weighing” mode. After activating PERCENTAGE DEVIATIONS application, default symbols enabling immediate operating start are displayed: − tare setting − Reference mass − Reference masses base − set 100% − calibration Reference mass entering After pressing the symbol, mass should be entered, e.g. 350.0 g, that will be accepted as 100% pattern. On its base following samples inspection process will be conducted. For the mass decimal places number should be given. PROCEDURE: o Press Quick access button o Reference mass will be displayed o Press the mass content field and enter new value In dialogue window o Accept it with OK button. o Choose decimal places number. o Pressing the button results In automatic accepting the value. Checkweighing Two checkweighing thresholds should be given as [%] values. Weighed masses tolerance range is set, that is permissible area within which fed mass is accepted as a correct one. Tolerance range can be asymmetric, e.g. − Top threshold: +5% − Bottom threshold: - 2% The values can be visible In information field if feeding is chosen for them Dosing Target mass should be given; it is to be reached while comparing following loadings to reference mass. Example: Reference mass =100g Target mass = 60% --------------------------------------------- Real weighed mass = 62,0g Displayed value 62,000% Bar chart is green – sample is in permissible field, because target mass is achieved. - 75 - The example above shows that target mass does not always equal 100%. It can be a default value which enables simple mixtures preparing when ingredients need to be added In percentage way, not by weight measuring. Bar chart is one of INFO FIELD elements of deviations function and it does not have to be displayed. Target Mass Declaring PROCEDURE: o Press Quick access button o TARGET MASS will be displayed on screen o Press the mass value field and enter new value in dialogue window o Accept it with OK. RETURN TO CHECKWEIGHING o Press „return” direction arrow or press operating mode symbol Reference masses base Obtains a list of refernce masses for which following are defined: o Mass values in grammes, that are stated as 100% reference pattern o Personal names From the level of main deviation function window, operator can: o Collect reference masses o Add reference masses to the base REFERENCE MASS COLLECTING FROM BASE: o Press name of element to be used o It will be automatically collected and scale returns to weighing REFERENCE MASS SAVING IN BASE o Press “ADD” symbol – window with keyboard will be displayed, then enter name of reference mass that is being saved o Accept it with ENTER - 76 - Caution : From the level of Quick Access Buttons reference masses located In base cannot be eliminated. Set 100% After the symbol pressing, current display state is treated as100% pattern. It is REFERENCE MASS defining through weighing. After the operations performing, reference mass is updated automatically. Statistics Statistic data is expressed in [%]. After the symbol pressing, statistics content can be seen and it can be deleted. 18.11.1. Reference masses base creating Reference masses base contains numerical values and defined elements’ names. Within the base following reference masses can be either added or deleted if they are not used. Full access to the Base is possible from internal menu and depends on user’s authority. PROCEDURE: o in % operating mode, at any time, grey information field should be pressed o internal menu will be displayed o rewind menu to Reference Masses Base field o press Reference Masses Base button o if the base does not contain any elements, press „Add” symbol o Numeric keyboard will be displayed, then enter value of defined reference mass. Accept it with OK. o The mass you have entered Has default „Reference mass” name. o Press name and enter suitable one o accept it with ENTER - 77 - o while names entering, also special buttons can be used. ELEMENTS DELETING FROM BASE o Press „Delete” symbol and choose element to be deleted from the list. Caution: Deleting procedure should be considered as choosing an element In fact means its deleting RETURN TO WEIGHING o Press „return” direction arrow or press and hold operating mode symbol 18.11.2. Reference mass using for weighing. While weighing, saved in Reference Masses Base reference masses can be used or temporal personal reference masses can be defined. In case of using Masses Base, it is possible to: − Collect mass value for using − Save temporal personal reference mass In Masses Base. Caution: From the level of Quick Access Buttons, Reference Masses saved In base cannot be deleted. Temporal personal reference masses PROCEDURE: o Press Quick access button o Screen with a field where target mass value should be entered will appear o Press target mass value field and using numeric keyboard enter a value. o Choose decimal places number. BASE reference masses PROCEDURE: o Press Quick access button o BASE content will be displayed o Press name of reference mass that will be used o It will be automatically recalled to be used o If you give up the choice, return to weighing: Press operating mode symbol or Press „return” arrow caution: - personal temporal reference mass can be saved In BASE - Press „ADD” symbol and using alphanumeric keyboard, enter the name. - 78 - 18.11.3. Reference masses using for weighing. Bar chart is one of Information Field elements. There are two conditions of bar chart visibility: YES option choosing for „Bar chart” field while deviations information declaring. Choosing at least one function: „Checkweighing” or „Feeding” as visible In “BUTTONS” menu. After choosing at least one of the functions, it is visible as buick access button. Colours of bar chart: − yellow: mass is below permissible area − green: mass is within permissible area − red: mass is higher than permissible area Checkweighing function bar chart For checkweighing, top and bottom thresholds should be given in percentage values. It is Reference Mass tolerance. EXAMPLE 1. Reference mass = 50.0g 2. Checkweighing thresholds stated as: - bottom threshold: 95%; - top threshold 105% 3. A loading of mass 38,6g that is 77,400% of reference mass has been placed on the pan. Information of mass shortage is displayed. Caution; bottom threshold tolerance is– 5% of reference mass. 4. Loading’s mass has been increased to 51,2g that is 102,4% of reference mass. Information of the mass correctnesswithin permissible area – is displayed. Caution; top threshold tolerance is + 5% of reference mass; + 2,2% is displayed so the indication is acceptable. - 79 - 5. Loading’s mass has been increased to 53,2g that is 106,4% of reference mass. Too high mass information is displayed- beyond permissible area. Caution; top threshold tolerance is + 5% of reference mass: + 6,6% is displayed so indication is NOT acceptable. 18.12. Animal weighing Animal weighing function is a procedure of moving object mass measuring. It results In special structure and stable result algorithm of the function. After animal weighing function choosing, it is ready to use.Follow the instruction given on INSTRUCTION bar. After procedure performing, result is snapped on display. Internal function settings can be changed- QUICK access symbol on bottom display should be used. Quick access buttons connected with animal weighing function. Choose YES (visible) or NO (invisible) option for each button. Calibration Meter clearing Tare setting ID definition Tare recalling Animal weighing Heading print Statistics Text foot print xxx Non-standard buttons Use and operating of quick access buttons is described In point 18.6. Weighing operating mode parameters - buttons. Other buttons use is described In point 18.7. Information connected with animals weighing function o Bar chart o Additional unit o tare o gross o meter o filter o threshold o statistic data /difference, amount , total, standard deviation, etc./ o ID codes o non-standard information o non-standard information defining - 80 - For each informator YES or NO option should be chosen as displaying criteria. CAUTION: Non-standard information defining is described In point 18.8.4. 18.12.1. Animals weighing function internal settings Internal menu contains following settings: o Filter Defines the time of procedure performing. There are 5 levels of filters: − Very fast − fast − medium − slow − very slow Caution: choosing an option, the note should be taken into account: the more movable object, the higher filter level. The higher filter value, the longer measuring time. o Threshold Value Expressem In scale’s elementary units. If weighing result after object removing is lower than threshold value, following measurement In automatic series is possible. Accessible values: 10units, 20units, 50units, 100units, 200units, 500units, 1000units. o Auto Start Decides if measurements are performed manually (after button pressing) or automatically. Following objects measurements can be performed In automatic way if weighing result after object removing is lower than threshold value. Example of automatic operating: Following measurements are performerdautomatically after placing an object on scale’s pan. The condition should be fulfilled: result after object removing must be lower than threshold value. Choosing threshold’s value is defining precision of object mass measuring (measurement does not start with so-called precise zero). Threshold value = 50units. - 81 - 18.12.2. Animals weighing- manual operating 1. Filter level should be chosen for weighed object and Auto Start function should be set : NO 2. Return to weighing: Press settings symbol or RETURN ARROW button. 3. Bottom information field displays hints for the procedure- place the object and press OK. 4. While object’s mass measuring, horizontal lines are displayed 5. If bar chart is declared In INFO field, it will show operation progress. 6. After mass measuring processinformation field shows note: MEASURING COMPLETED. Press OK. 7. Next objects mass can be measured. - 82 - 18.13. Density of solids, liquids and air Density function consists of three problems: density of solids, density of liquids and air density. Algorithms of liquids and solids are accessible for each scale, but air density is accessible only for scales with d=0,1mg and 0,01mg. Quick access buttons connected with density function. Choose Yes (visible) or No (invisible) option for each button. Calibration ID definition Tare setting Solids Tare calling Air Heading print Liquids Text foot print Statistics Meter clearing xxx Non-standard buttons Quick access buttons’ use and operating is described In point 18.6. Weighing mode parameters- buttons. Other buttons should be used as instructed In point 18.7. Information connected with checkweighing: o Additional unit o tare o gross o meter o temperature o density o statistic data /amount, difference, total, standard deviation etc./ o ID codes o non-standard information o non-standardowych information defining For each information YES or No option should be chosen as displaying criteria. CAUTION:non-standard information defining is described In point 18.8.4. Use and operating of other buttons connected with DENSITY function is described In following part of the manual. Caution: Detailed description of procedures and dependences ocuring while solids and liquids density defining is attached in density defining set MANUAL. - 83 - 18.13.1. Default operating mode choice for density It can be defined which function is to be switched on after den sity function choosing. The choice is possible in internal function menu. Accessible options: solids or liquids. Default operating mode choice is justified if solids or liquids quick access buttons are not used. PROCEDURE: o Press grey information field at any time. o All functions and settings connected with the function will be displayed. o quick access buttons can be chosen o shown In INFO field information type can be defined ------------------------------------o rewind menu to Density field o from rewindable menu ,density type that is to be default mode should be chosen o chosen density mode will be automatically activated after return to weighing. Caution: after operating mode change, automatically default mode change takes place /automatic Density field value change , e.g. liquids → solids/ - 84 - 18.13.2. Solids’ density For the function it is recommended to use quick access button which enables settings changing. Solids’ density can be defined in three various liquids: − Distilled water − Alcohol − Other liquid of known density If distilled water or alcohol are chosen, product temperature should be given. After temperature entering, product density change will take place automatically. PROCEDURE: o Press SOLIDS quick access button o Option connected with the function will be displayed o Choose liquid type o measure and enter its temperature o if OTHER liquid is chosen- enter its density o After the parameters setting, press START FIELD. o Scale is ready for operating Caution: 1. Solid density measurement is about defining sample mass in air, then in chosen liquid. 2. While analysis, liquid temperature should be stable. 3. Air bubbles adjoined to sample surface can be measurement distorting factor while weighing in liquid. o Information given In Info field on COMMAND BAR should be followed − Object should be placed on top set pan: weighing in1 − After indication stabilization, OK button should be pressed − Object should be removed and placed on bottom set pan: weighing In 2 − After indication stabilization, OK button should be pressed − Density result is displayed. - 85 - 18.13.3. Liquids density Liquid density measurement is about plunger mass defying In air and In examined liquid. Before measurement, plunger volume should be entered- it is given on its hook. PROCEDURE: o Press LIQUIDS Quick access button o Options connected with the function will be displayed o Press plunger volume field o In dialogue window its volume should be entered and OK ought to be pressed o press START field o scale is ready for operating o Follow information given In Info field on COMMAND BAR. − Plunger should be placed on hanger: weighing In air; In 1 − After indication stabilization, OK button should be pressed − Plunger ought to be weighed in examined liquid: weighing in 2 − After indication stabilization, OK button should be pressed − Density result will be displayed. − After indication stabilization, OK button should be pressed − Density result will be displayed. 18.13.4. Air density Air den sity is one of information pieces needed for counting the weighing result correction connected with air UPLIFT PRESSURE. Another information piece necessary for the correction counting is weighed sample density. 1. Air density function is active only for scales with elementary units: d=0,1mg or 0,01mg. 2. While the procedure two patterns are needed: aluminium and steel ones of known masses; they are scales’ optional equipment. - 86 - PROCEDURE: o Press AIR Quick access button o Otions connected with the function will be displayed o Press steel pattern value field and enter its correct value o Press aluminium pattern value field and load its correct value o If other materials patterns are used, fields connected with material den sity should be changed o press START field- scal eis ready for operating o follow instruction given In Info field on COMMAND − place steel pattern − After indication stabilization, OK button should be pressed − Place aluminium pattern − After indication stabilization, OK button should be pressed − Display measures air density automatically. 18.14. Formulations Formulations enable max.10 mixtures preparing, each of them can consist of max.20 ingredients. Each ingredient has its own name and value that should be loaded into mixture. First, a formulation should be created and then it should be recalled to be used. Formulations creating is possible in internal formulation function menu. The operation procedure is described in following part. Quick access buttons connected with formulations function. Yes (visible) or No (invisible) options should be chosen for each button. Calibration Meter clearing Tare setting ID definition Tar recalling Formulations base Heading print Statistics Text foot print xxx Non-standard buttons Quick access buttons use and operating is described In point 18.6. Weighing operating mode parameters- buttons. Other buttons should be used as instructed In point 18.7. - 87 - Information connected with checkweighing: o Bar chart o Additional unit o tare o gross o meter o WGH o Ingredients total o statistic data /difference,amount , total, standard deviation etc./ o ID codes o non-standard information o non-standard information defining For each information YES or NO option should be chosen as displaying criteria. CAUTION: Non-standard information defining is described In point 18.8.4. Use and operating of other buttons connected with FORMULATIONS function is described in following part of the manual. 18.14.1. Formulation creating Formulations base consists of formulations names and names of ingredients of which formulations consist. While formulation creating, first its name should be given and then ingredients should be added. For each ingredient its name and mass should be given, therefore operator must know exact mixture content. PROCEDURE: o Press grey information field at any time of operating o Internal menu connected with FORMULATIONS function will be displayed o rewind menu to Formulations Base field o press Formulations Base button - 88 - o if base does not contain any elements, press „Add” symbol o alphanumeric keyboard will be displayed, then designed formulation’s NAME should be entered, e.g. mixture 4. Accept it with OK button. Adding ingredients to formulation o Press formulation name areawindow where ingredients can be defined will be displayed. o Press “Add” symbol o Using alphanumeric keyboard, ingredient’s name should be entered and accepted with ENTER. Then ingredient’s mass should be given and accepted with OK button. o The first ingredient has been added to the formulation- following ingredients should be added. o Each ingredient’s mass will be rounded up or down dependingly on scale elementary unit. Designed formulation will be ready to use after passing to Formulations mode. o Return to weighing- press “return” direction arrow or press operating mode symbol. Hints YES setting results In following ingredients names displaying. It is helpful when formulation consists of numerous ingredients. For NO option, ingredient’s name information is not displayed in INFORMATION FIELD. . - 89 - 18.14.2. Formulations base using for weighing. After FORMULATIONS function activating, default formulation creating can be started immediately. DEFAULT formulation: Default formulation choice is about marking Choice Field on the right of formulation name. If operating mode is changed and then formulation function is chosen again-user’s default formulation appears automatically. Formulation MONITORING: Press formulation name field and ingredients of which it is created will be displayed. Formulation CHOICE: a – formulation monitoring b – choice for using Press area between name and „c” field, c – default formulation choice formulation will be chosen for using. After formulation choosing, following ingredients should be weighed and after result stabilization, OK button should be Pressed. Each ingredient mass is zeroed after OK accepting, that is it Has been collected for mixture content checking. C button deletes all operations connected with mixture preparing. After its pressing, other mixtures can be chosen for using. Example of formulation performing PROCEDURE: o Press Quick access button o Screen with list of formulations will appear o Formulation to be used should be chosen Caution: Formulation content can be checked if its name field is pressed. o Formulation choice results In automatic return to weighing and additional information In INFO field displaying o Caution: INFO field content can be changedPress grey info field and set INFORMATION field content - 90 - o Place container and tare its mass- TARE button o Grey INFO FIELD shows formulation name, ingredient name and its amount in mass field. First ingredient should be dosed in suitable amount and OK. button should be pressed. Caution: Bar chart in INFO field is graphic interpretation of ingredient mass correctness with some +/-tolerance o First ingredient mass is zeroed o INFO field shows second ingredient name and MASS field shows its amount o IC field shows ingredient number o Secondo ingredient should be added to the first one and OK. button should be pressed. o Following ingredients should be added o After procedure completing, INFO field shows message: Weighing Completed. Continue o Total mixture mass is displayed. o The same formulation can be prepared again- Press OK. button. o Another formulation can be chosen- Press FORMULATION BASE button. o From formulation list the one to be prepared should be chosen. Caution: INFO field can show INGREDIENTS TOTAL, if the information is chosen to be displayed. - 91 - 18.15. Satatistics Statistics enable weighing series data collecting and statistics creating. Statistic data range depends on function internal settings. Quick access buttons connected with statistics function.Yes (visible) or No (invisible) option should be chosen for each button. Calibration Meter clearing Tare setting ID definition Tare recalling Statistics Heading print xxx Non-standard buttons Text foot print Quick access buttons use and operating is described In point 18.6. Weighing operating mode parameters- buttons. Other buttons should be used as instructed In point 18.7. Information connected with statistics: o Additional unit o tar o gross o meter o statistic data /difference, amount, total, standard deviation etc./ o ID codes o Non-standard information o Non-standard information defining For each information YES or NO option should be chosen as displaying criteria. CAUTION: Non-standard information defining is described In point 18.8.4. 18.15.1. Statistics function internal menu Internal menu contains of two entries: DELETE and RESULTS. Dependingly on needs, one option should be used. Results entry contains list of all statistic data: Measurements numbe, measurements total, average value, minima value, Maxima value, max – min difference, standard deviation, variance factor. INFO field can consist of max 6 lines and choice of variables displayed should be made In Information Submenu. Quick access buttons are defined in Buttons Submenu. - 92 - 19. ACCESS TO SCALE PARAMETERS Parameters access range efining is possible through user’s PROFILES which can be obtained by: Pressing user’s name field Pressing F1button on scale casing Pressing SETUP symbol or SETUP button and then Users symbol choosing. Scale parameters access concerns: Settings modifying Possibility of scale calibration For each user another access level can be defined and given by ADMINISTRATOR. SCALE’S MENU ACCESS MANAGING Administrator is a user that obtains all authorities. Several solutions are possible as far as scale access managing is concerned: First appears when there are no other users and everyone has free access to scale’s menu, that is, everyone is an administrator. Second, administrator does not have set up security password, there are a few users and they All have free access to scale’s menu and administrator settings. Third, administrator has got set up security password and users have assigned appropriate authorities. In such case a choice is possible- individual users choice, but if administrator is chosen, password entering is necessary. 19.1. Accass pasword loading Access password loading is possible for all users.First administrator’s access password should be loaded or personal user should be created who takes over administrator authority. - 93 - 19.1.1. Administrator password loading PROCEDURE: o Press user’s name field or F1 o press ADMINISTRATOR name field o window with possibilities of changing settings connected with user will be displayed. o Press USER symbol o Displayed options concern: − user’s names − passwords − language − Progress range choice − Settings print − Settings copying Scale’s updating is about scale user software changing- metrological parametres remain unchanged. Following can be updated: Aplication Printers (cooperating with scale) Updating can be performed through: Ethernet USB RS 232 For Ethernet option computer web connection and web scale address are required. USB using requires USB memory locating In scale’s coupling. USB memory contains Update catalogue, where file to be updated is located. RS 232 coupling – scale is automatically searching for file to be updated In current computer structure. - 94 - 20. TECHNICAL PARAMETERS 20.1. MGB series scales Calibration internal display 5,7” touch panel Interface 2 x USB, 2 x RS 232, Ethernet Operating temperature + 18o C - + 30o C supply feeder 100V-240V , 50-60 Hz / 15V DC sensitivity drifter 2 ppm/°C in +15 ° ÷ +35°C t emperature Max humidity 80 % Min humidity 35 % Max capacity Elementary unit Tare range MGB-2 MGB-5 MGB-11 MGB-21 MGB-31 2g 5g 11g 21g 31g 0,1µg 1µg -2g - 5g - 11g - 21g - 31g Repeatability 0,25µg 2µg 3µg 5µg 5µg Linearity ±0,3µg ±3µg ±5µg ±10µg ±10µg Pan ∅ 20 ∅ 30 MGB-5/F MGB-21/P Max capacity 5g 21g Elementary unit 1µg 1µg Tare range - 5g - 21g Repeatability 2µg 2µg Linearity ±3µg ±10µg Pan ∅ 100 ∅ 20 - 95 - 20.2. XAB-Y series scales Calibration internal Display 5,7” touch panel Interface 2 x USB, 2 x RS 232, Ethernet Operation temperature + 15o C - + 30o C Supply feeder 100V-240V , 50-60 Hz / 15V DC Sensitivity drift 2 ppm/°C in temperature +15 ° ÷ +35 °C Max humidity 80 % Min humidity 35 % XAB-52-Y XAB-110-Y XAB-210-Y XAB-60/220-Y Max capacity 52 g 100 g 210 g 60/220 g Min capacity 1 mg 1 mg 1 mg 1 mg 0,01 mg 0,01 mg 0,01 mg 0,01/0,1 mg -52 g -100 g -210g -220 g 0,01 mg 0,025 mg 0,03 mg 0,02/0,1 mg ± 0,02 mg ± 0,05 mg ± 0,1 mg ± 0,05/0,2 mg Elementary unit Tare range Repeatability Linearity Φ 85 mm Pan size XAB-100-Y XAB-160-Y XAB-220-Y XAB-310-Y Max capacity 100 g 160 g 220 g 310 g Min capacity 10 mg 10 mg 10 mg 10 mg Elementary unit 0,1 mg 0,1 mg 0,1 mg 0,1 mg Tare range -100 g -160 g -220 g -310 g Repeatability 0,1 mg 0,1 mg 0,1 mg 0,2 mg Linearity ± 0,2mg ± 0,2mg ± 0,2mg ± 0,3mg Φ 100 mm Pan size - 96 - 20.3. ASB-Y series scales Calibration internal Display 5,7” touch panel Interface 2 x USB, 2 x RS 232, Ethernet Operation temperature + 15o C - + 30o C Supply feeder 100V-240V , 50-60 Hz / 15V DC Sensitivity drift 2 ppm/°C in temperature +15 ° ÷ +35 °C Max humidity 80 % Min humidity 35 % ASB60-Y ASB60/220-Y ASB110-Y ASB160-Y ASB220-Y ASB310-Y Max capacity 60 g 220 g 110 g 160 g 220 g 310 g Min capacity 1 mg 1 mg 10 mg 10 mg 10 mg 10 mg 0,01 mg 0,01/0,1mg 0,1 mg 0,1 mg 0,1 mg 0,1 mg -60 g -220 g -110 g -160 g -220 g -310 g 0,02 mg 0,02/0,1mg 0,1 mg 0,15 mg 0,15 mg 0,2 mg ± 0,05 mg ± 0,05/0,2 mg ± 0,2 mg ± 0,2 mg ± 0,2 mg ± 0,3 mg Elementary unit Tare range Repeatability Linearity Pan size Φ 70 mm Φ 85 mm - 97 - 20.4. BPS-Y series scales Calibration internal Display 5,7” touch panel Interface 2 x USB, 2 x RS 232, Ethernet Operation temperature + 15o C - + 30o C Supply feeder 100V-240V , 50-60 Hz / 15V DC Sensitivity drift 2 ppm/°C in temperature +15 ° ÷ +35 °C Max humidity 80 % Min humidity 35 % BPS200/2000-Y BPS250-Y BPS450-Y BPS750-Y BPS1000-Y Max capacity 200 / 2000g 250g 450g 750g 1000g Min capacity 0,02 g 0,02 g 0,001/0,01 g 0,001 g -750g -1000g Elementary unit Tare range Repeatability Linearity -2000g -250g -450g 0,01/0,01 g 0,001 g 0,0015 g ± 0,002 / 0,01g ± 0,002 g ± 0,003 g Pan size Max capacity 128 x 128 mm BPS1500-Y BPS2500-Y BPS4500-Y BPS6000-Y BPS8000-Y 1500g 2500 g 4500 g 6000 g 8000 g -6000 g -8000 g Min capacity 0,5 g Elementary unit 0,01 g Tare range Repeatability Linearity -1500g -2500 g -4500 g 0,01 g 0,015 g ± 0,02 g ± 0,03 g Pan size 195 x 195 mm - 98 - 20.5. APPB-Y series scales Calibration internal Display 5,7” touch panel Interface 2 x USB, 2 x RS 232, Ethernet Operation temperature + 15o C - + 30o C Supply feeder 100V-240V , 50-60 Hz / 15V DC Sensitivity drift 2 ppm/°C in temperature +15 ° ÷ +35 °C Max humidity 80 % Min humidity 35 % APPB-25-Y Max capacity 25 kg Min capacity 1g 0,1 g Elementary unit -25 kg Tare range 0,1 g Repeatability Linearity ±0,1 g Pan size 346×258 mm - In case of electrostatics problems, humidity should be increased to 50 %, in special cases when 50% humidity maintaining is not possible, air ionizer should be used in order to eliminate electrostatics influence on scale’s indications. - 99 -