1
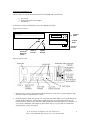
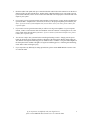
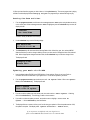
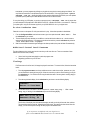
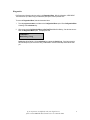
DMX MUSIC
Field Operations Manual
PProFusion
roFusion
Operation and Installation Manual
If you experience any difficulty with your digital server,
please contact DMX MUSIC Customer Care at 1-800-345-5000
1
Table Of Contents:
Unpacking and Initial Set-up.......................................................................................................................... 4
Diagram of Rear Panel: ............................................................................................................................. 4
Operating Instructions .................................................................................................................................... 6
To Adjust the Volume: ............................................................................................................................... 6
Changing the program that is currently playing: ........................................................................................ 6
Setting the date and time: ........................................................................................................................... 7
Updating your music via CD-ROM............................................................................................................ 7
To shut ProFusion down............................................................................................................................. 8
Additional Control Panel Features ............................................................................................................. 8
View Songs............................................................................................................................................. 8
Diagnostics ............................................................................................................................................. 9
Troubleshooting Guide................................................................................................................................. 10
RECOMMENDED ACTION............................................................................................................... 10
Equipment Specifications and installation requirements.............................................................................. 11
I. Technical Requirements....................................................................................................................... 12
A. Electrical Requirements:................................................................................................................. 12
II. Specifications and equipment siting ................................................................................................... 12
A. Dimensions (including cable clearance) and Weight:..................................................................... 12
B. Audio Output: ................................................................................................................................. 12
C. Equipment Siting: ........................................................................................................................... 12
D. Equipment conditions: .................................................................................................................... 13
III. Handling of the equipment ................................................................................................................ 13
A. Storage:........................................................................................................................................... 13
B. Carriage: .......................................................................................................................................... 13
IV. Installation requirements ................................................................................................................... 13
A. Electrical:........................................................................................................................................ 13
B. Telephone/Network: ....................................................................................................................... 13
C. Site conditions: ............................................................................................................................... 13
D. Other install requirements:.............................................................................................................. 13
E. Testing by an installing engineer: ................................................................................................... 14
F. Reporting:........................................................................................................................................ 14
V. Installation Details.............................................................................................................................. 14
A. Cable connections for normal operation:........................................................................................ 14
B. Installation and service: .................................................................................................................. 14
If you experience any difficulty with your digital server,
please contact DMX MUSIC Customer Care at 1-800-345-5000
2
Welcome to the future
Congratulations on your decision to experience DMX MUSIC’s latest
service…ProFusion. DMX MUSIC is proud that you chose to benefit from
our digital service; you now have one of the most technologically advanced
and best-sounding retail A/V playback systems in the world.
Our ProFusion service promises the benefits and advances of future
technology…today. Our ProFusion system unites all existing types of onpremise content: music, video, imaging, data and messaging, into an easy-touse, modular digital platform with a galaxy of features and benefits designed
with forward-thinking business in mind. Fully managed service, multiple
program zones, regionalization, incredible sound quality, expanded content
and immediate content refresh are just a few of the exciting features that will
soon be available under our ProFusion service menu.
Thanks for joining us on this voyage of technological discovery and
exploration. If you have any questions regarding your new service, please
call DMX MUSIC Customer Care at 1-800-345-5000.
Your partner in digital technology,
DMX MUSIC
If you experience any difficulty with your digital server,
please contact DMX MUSIC Customer Care at 1-800-345-5000
3
Unpacking and Initial Set-up
Check to make sure that all the items listed below are included with your ProFusion:
Power cord
Audio/Video patch cord or adapter
This manual
To familiarize yourself with ProFusion, review the diagrams that follow…
Diagram of Front Panel:
PROFUSION
CONTROL
PANEL
CD-ROM
DRIVE
CD EJECT
BUTTON
STATUS
INDICATOR
LIGHTS
RESET
BUTTON
POWER
BUTTON
Diagram of Rear Panel:
1.
Hook the power cord up to the connection labeled “Power In” on the above rear panel diagram. Plug
this power cord in to a functional power outlet.
2.
Hook the adapter or patch cord up to the 1/8” stereo mini-jack audio output (see rear panel diagram for
location of this connection). Another cable, supplied with the rest of your sound system or by an
install technician, will be used to connect this audio output jack to the audio input on your amplifier. If
your system is enabled for video playback, please follow step #3; if your system is not enabled for
video playback, you may skip step #3.
If you experience any difficulty with your digital server,
please contact DMX MUSIC Customer Care at 1-800-345-5000
4
3.
Hook the audio/video patch cord up to connection labeled “audio/video cable connection” on the above
diagram of the rear panel of ProFusion. Another cable, supplied with the rest of your sound system or
by an install technician, will be used to connect the audio and video output jacks to the audio and video
inputs in your system.
4.
If your music service agreement entails content updates via the internet, you may hook a telephone line
up from the RJ11 “telephone line” connection (see above) to the proper telephone jack located in your
store. If you are unsure of what telephone line you are able to use in your store, please contact your
corporate office.
5.
If your music service agreement states that you will be receiving content updates via your corporate
intranet, connect a Cat5 network cable from the RJ45 “network connector” on the digital server to the
proper input on the network hub in your store. If you are unsure of what network input to use, please
contact your corporate office.
6.
You are now ready to turn your ProFusion on and begin listening to music. Simply press the power
button in (locate the power button on the above diagram of the front panel) until the display lights up.
The machine will begin an initializing process which will last 2-3 minutes. The green and red lights on
the front panel of the machine will light as it begins its initializing process. Following this initializing,
music and/or videos will begin to play.
7.
If you experience any difficulty in setting up ProFusion, please contact DMX MUSIC Customer Care
at 1-800-345-5000.
If you experience any difficulty with your digital server,
please contact DMX MUSIC Customer Care at 1-800-345-5000
5
Operating Instructions
We’ve intentionally designed the operation of ProFusion to be very basic so that you simply turn the
machine on and leave the rest to DMX MUSIC Music.
Under normal operation, the power for ProFusion should be left switched on 24 hours a day. ProFusion
will automatically stop playing music after the last music/video schedule in the evening, and will start again
the following morning when you are ready for business.
Should you encounter any abnormalities, please reference this manual or call DMX MUSIC Customer Care
at 1-800-345-5000.
THE CONTROL PANEL:
When the machine is first turned on, you will see a Program Zone Menu. This menu informs you of all the program
zones that are programmed with music or video on your machine. By using the up and down arrows on the control
panel, you can navigate through this program zone menu. When a program zone is selected, the default display will
tell you the song title and artist name of the song/video that is currently playing.
To Adjust the Volume:
The volume on each zone of music is controlled individually by pressing the up and down arrows from default display
on each zone:
VOLUME
==============
If your machine is video enabled, the volume for the video zone will be controlled on your existing amplifier/television
system. ProFusion does not control the volume of video zones.
Changing the program that is currently playing:
1. From the song title/artist display, hit the select/enter key one time. The display will show the date & time, along with
the program that is currently playing:
Sat Jan 01 12:00 AM
House Quake
2. Using the up and down arrows from this menu will take you to a display that lists the programs that are installed on
your machine. You may scroll through this list using the arrow keys.
If you experience any difficulty with your digital server,
please contact DMX MUSIC Customer Care at 1-800-345-5000
6
3. When you have found the program you wish to listen to, hit the select/enter key. The current program that is playing
will fade out and the display will flash Changing Program. The program that you selected will begin to play.
Setting the date and time:
1.
From the program zone menu, scroll down to the Configuration Menu option using the down arrow key
on the control panel. When Configuration Menu is highlighted, press the select/enter key one time; the
display will read:
<CANCEL>
Set Date/Time
The Set Date/Time field will be flashing.
2.
Hit the select/enter key to see the following display:
Set Date/Time
01/01/00 12:00 AM
3.
The select/enter key will cause each of the following fields to blink: Month, day, year, hour, minute, AM/PM.
When the field that you wish to change is blinking, hit the up or down arrows to change the value of the selected
field. When all appropriate changes have been made, hit the select/enter key to confirm the change of time.
The display will read:
Changing Time!
Please Wait…
Updating your music via CD-ROM
1.
Insert the digital update CD-ROM in the CD-ROM drive of your machine. Please do not insert Prodisc or
consumer CDs in the CD-ROM drive of your digital server. The CD will be rejected by the server.
2.
From the program zone menu press the down arrow until “CD Update” flashes. When “CD Update”
flashes, hit the select/enter key. The display will read:
DON’T Update
Cont with CD update
3.
If you do not wish to update your music at this point, then make sure that “DON’T Update” is flashing,
then hit the select/enter key. This will bring you back to the zone menu.
4.
If you wish to continue to update your music, use the down arrow to highlight “Cont with CD
Update.” Hit the select/enter key when this flashes.
5.
The display will show a counter to inform you of how far along your update is. When the update reaches 100%,
the update is complete. If the display reads “Update Successful – Remove Disc,
If you experience any difficulty with your digital server,
please contact DMX MUSIC Customer Care at 1-800-345-5000
7
Discard” your new programming will begin to play after the song that is currently playing has finished. You
may follow the instructions on the panel and eject the CD and discard it. If the control panel reads “Update
FAILURE – Bad CD” please check that you have used the digital server CD-ROM for your music update.
If problems persist, please report to DMX MUSIC Customer Care at 1-800-345-5000.
If, at any time during your CD Update, you receive a message that says “FAILURE – BAD CD” this means that
you have attempted a CD update with a DMX MUSIC Prodisc CD, a standard CD-ROM, or a consumer CD. Please try
your update again, using the CD that was supplied to you by DMX MUSIC for use in your digital server.
To shut ProFusion down
Please do not ever turn the power off while your machine is in play. A shut-down procedure is listed below:
1.
2.
3.
From the Configuration Menu, use the down arrows to get to the option that reads “Shut down.” Press
the select/enter key to continue.
The next display will prompt whether you would like to continue with the shut-down or not – use the arrows to
select the appropriate response. If you choose to shut down the machine, press the select/enter key when the
“Cont with Shut Down” is highlighted.
Wait 30 seconds while the machine goes through a shut down procedure; the power will shut off automatically.
Additional Control Panel Features
The above features on the control panel are the ones that you will most often use. There are a number of other
features that ProFusion has, including:
•
•
View a list of songs that have played in a particular program zone
Diagnosing a problem on your ProFusion
View Songs
ProFusion stores a list of the last 1,000 songs that played in each zone. To access this list, follow the instructions
below:
1.
From the program zone menu, use the up and down arrows to select the zone (bar, restaurant, etc.) that
you are interested in viewing the song log for. When the zone that you wish to view is flashing, you may hit
the select/enter key. You will then see the song title and artist name of the song that is currently playing in
the selected zone.
2.
From the song title/artist display, hit the select/enter key two times to see the following display:
<CANCEL>
Return to Zone Menu
3.
Use the down arrow in this menu to scroll to the option for “View Song Log.”
Song Log is flashing, hit the select/enter key to see the following display:
When View
SG01 Thu 11/11 08:13
Sweetest Thing, U2
The first line of this display is an informational message, that tells you the day of the week, date, and time.
The second line gives the song title, followed by the artist’s name. By pressing the down arrows from this
display, you can view the previous songs that have played in the selected zone.
If you experience any difficulty with your digital server,
please contact DMX MUSIC Customer Care at 1-800-345-5000
8
Diagnostics
ProFusion stores information about its activity in the Diagnostics Menu. With this information, a DMX MUSIC
Technical Service rep is able to help you troubleshoot your system, should a problem arise.
To access the Diagnostics Menu, follow the instructions below:
1.
From the program zone menu, scroll down to the Configuration Menu option. When Configuration Menu
is flashing, hit the select/enter key.
2.
When you access the Configuration Menu, the Set Date/Time field will be flashing. Use the down arrow to
select the Diagnostics Menu option. The display will read:
<CANCEL>
Activity Log
Activity Log will be flashing. Hit the select/enter key to access the Activity Log. If you have a question
about an activity that your ProFusion is doing, a DMX MUSIC Technical Service Rep will be able to assist
you.
If you experience any difficulty with your digital server,
please contact DMX MUSIC Customer Care at 1-800-345-5000
9
Troubleshooting Guide
INCIDENT
No music/video
RECOMMENDED ACTION
• Be certain that the main volume control is turned up on the amplifier
• Be certain that the ProFusion input on the amp is turned up
• Be certain that there is power to each piece of equipment in your equipment rack.
• If, for any reason, the machine is not playing during business hours, check all the
volume controls and make sure they are turned to the correct position. Once you
have verified that the volume controls and the amplifiers are set properly, and all
other equipment in the rack has power, try re-booting the machine. (see “To shut
ProFusion down” in the “Operating Instructions” section of this manual).
No music during
non-business hours
•
ProFusion has been programmed with music start and stop times, according to
your store’s opening and closing times. When the music and videos have
stopped, there is no need to turn the machine off. The music will automatically
start playing the next morning when you open.
Music is too
loud/too soft
Rebooting
•
Locate the main volume control in the equipment rack and adjust accordingly.
•
If a reboot is necessary, follow the shut down procedure that is listed above. To
turn the machine back on, simply press the power button all the way in. The
device will take about one minute to boot up. During this time, the lights will
flash; do not touch the machine while these lights are flashing. Music and videos
should automatically begin playing when the lights stop flashing; if it does not,
please call DMX MUSIC Customer Care for technical support (1-800-345-5000).
If you experience any difficulty with your digital server,
please contact DMX MUSIC Customer Care at 1-800-345-5000
10
ProFusion
Equipment Specifications and installation requirements
I.
II.
III.
IV.
V.
Technical Requirements
A. Electrical
B. Telephone
C. Network
Specifications and Equipment Siting
A. Dimensions and Weight
B. Audio Output
C. Equipment Siting
D. Equipment Conditions
Handling of the Equipment
A. Storage
B. Carriage
Installation requirements
A. Electrical
B. Telephone/Network
C. Site conditions
D. Other Install Requirements
E. Testing
F. Reporting
Installation Details
A. Cable connections for normal operation
B. Cable connections of installation and service
C. Diagram of rear panel
If you experience any difficulty with your digital server,
please contact DMX MUSIC Customer Care at 1-800-345-5000
11
I.
Technical Requirements
A. Electrical Requirements:
Electrical supply must be a clean feed with grounded 3-pin outlet.
For particularly noisy areas, a surge suppressor is suggested.
An uninterruptable power supply (UPS) is recommended, but not essential to the operation of
ProFusion.
An uninterruptible power supply is not required. The server uses 145 Watts of power at 110-120V
AC, 60Hz.
FCC CLASS B CERTIFICATION NOTICE: This equipment has been tested and found to comply with the limits for a Class B digital
service, pursuant to Part 15 of the FCC Rules. These limits are designed to provide reasonable protection against harmful
interference in an installation. The manufacturer is not responsible for any radio or television interference caused by the use of
improperly grounded or shielded cables or by unauthroized changes or modifications to theis equipment. Modifications or changes to
this equipment without the express written consent of the manufacturer may nullify the user’s authority to operate this equipment as
granted by the FCC under Part 15 of the FCC Rules. To comply with FCC regulations on electromagnetic interference for a Class B
computing device, all cables must be properly shielded and grounded.
B. Telephone requirements (applicable if ProFusion is network updated):
Shared, analog telephone, fax, or credit card line with an RJ11 connector. (optional)
The server makes outgoing data calls at night to either a toll-free number or a local service
provider. The times and duration of these calls will be agreed with your DMX MUSIC Project
Manager .
The digital server will not answer incoming calls.
C. Network requirements (applicable if ProFusion is network updated):
Network connection via an RJ45 network connection. (optional)
TCP/IP interface only, at 10 or 100 Mbps
DHCP, NAT or IP Legal assigned IP address, netmask and router
DNS not required.
II.
Specifications and equipment siting
A. Dimensions (including cable clearance) and Weight:
Depth – 17”
Width – 15.5”
Height – 5.5”
Weight – 15 lbs.
B. Audio Output:
Audio output is mono or stereo, -12 volt 33 ohms impedance, unbalanced.
Output via 1/8” mini jack or adapter to Dual RCA connectors
C. Equipment Siting:
The equipment is designed to be compatible with standard audio equipment
If you experience any difficulty with your digital server,
please contact DMX MUSIC Customer Care at 1-800-345-5000
12
D. Equipment conditions:
Allowable operating temperature – 0-55 degrees Celsius
Allowable operating humidity – up to 95% at 30 degrees Celsius
If the equipment is to be rack mounted, at least one rack space should be left between the
equipment and any amplifiers or heat-generating equipment.
Rack mount via rack shelf – takes up 3 rack spaces.
III.
Handling of the equipment
A. Storage:
The equipment should not be subjected to extreme temperatures, or sudden temperature swings.
The equipment should never come into contact with any water or water vapor (e.g. condensation).
When not in use, the equipment should be stored in its original packaging.
B. Carriage:
The equipment should be transported in its original packaging and secured carefully in any
vehicle.
The equipment should never be subjected to any shocks (i.e. dropping, loose in vehicle).
Warning: shocks can cause boards to come loose in the equipment and can also cause permanent damage
to the hard disk or other components. Such damage is not covered under warranty.
IV.
Installation requirements
A. Electrical:
The electrical supply is protected against large power variances.
Warning: electrical surges can cause permanent damage which is not covered under warranty.
B. Telephone/Network:
Telephone and network lines must be installed by the customer (within 12 ft. of the location of the
machine), live and terminated in the correct socket if ProFusion is to be network updated.
The telephone number and/or network topology must be recorded if ProFusion is to be network
updated.
C. Site conditions:
The site must be clean and dust free prior to installation of the equipment.
No further dust should impact on the system (e.g. construction work, partitioning, heavy drilling,
carpet laying).
Warning: an excess of dust can seriously impair the cooling systems of the equipment and case
overheating. This can permanently damage the system’s circuitry and is not covered under
warranty.
D. Other install requirements:
If you experience any difficulty with your digital server,
please contact DMX MUSIC Customer Care at 1-800-345-5000
13
Engineer should carry extension telephone and network cabling.
E. Testing by an installing engineer:
A good quality audio presence should be obtained and tested with a spectrum analyzer.
A good quality video picture should be obtained (if applicable).
All telephone/network connections should be tested with the relevant equipment.
F. Reporting:
A report of the install and any service should be communicated to DMX MUSIC and the customer
by the installing engineer.
V.
Installation Details
A. Cable connections for normal operation:
Audio output from 1/8” stereo mini-jack to two female RCA jacks (adapter is supplied).
Standard power cord connected to live mains power outlet
RJ-11 telephone connection (if applicable)
RJ-45 network connection (if applicable)
B. Installation and service:
Any machines that need replacement will be serviced by a certified technician off of the customer’s site. A
new machine will be shipped to the customer via standard DMX MUSIC repair-exchange procedures. A
DMX MUSIC affiliate will not service ProFusion on-site.
Please refer to the diagram of ProFusion’s rear panel that is provided on page 4 of this manual.
If you experience any difficulty with your digital server,
please contact DMX MUSIC Customer Care at 1-800-345-5000
14