1
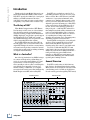
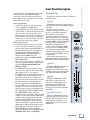
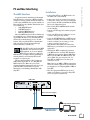
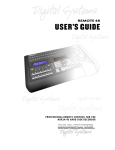
Baby HUI
User’s Guide
WARNING: TO REDUCE THE RISK OF FIRE OR ELECTRIC SHOCK, DO NOT
MANUFACTURING DATE
SERIAL NUMBER
EXPOSE THIS EQUIPMENT TO RAIN OR MOISTURE. DO NOT REMOVE COVER.
NO USER SERVICEABLE PARTS INSIDE. REFER SERVICING TO QUALIFIED PERSONNEL.
RISK OF ELECTRIC SHOCK
DO NOT OPEN
AVIS: RISQUE DE CHOC ELECTRIQUE — NE PAS OUVRIR
UTILISE UN FUSIBLE DE RECHANGE DE MÊME TYPE.
DEBRANCHER AVANT DE REMPLACER LE FUSIBLE
REPLACE WITH THE SAME TYPE FUSE AND RATING.
DISCONNECT SUPPLY CORD BEFORE CHANGING FUSE
IN
MIDI
EXTERNAL
POWER
OUT
ON
OFF
BABY
–
+
7.5 VDC
THE FOLLOWING ARE TRADEMARKS OR REGISTERED TRADEMARKS OF MACKIE DESIGNS INC "MACKIE" AND THE "RUNNING MAN" FIGURE.CONCEIVED,
DESIGNED, AND MANUFACTURED BY MACKIE DESIGNS INC. • WOODINVILLE • WA • USA • MADE IN USA • FABRIQUE AU USA • COPYRIGHT ©2001
BABY
-
+
-
+
-
+
-
+
-
+
-
+
-
+
-
+
REC RDY
REC RDY
REC RDY
REC RDY
REC RDY
REC RDY
REC RDY
REC RDY
SIGNAL
SIGNAL
SIGNAL
SIGNAL
SIGNAL
SIGNAL
SIGNAL
SIGNAL
SOLO
SOLO
SOLO
SOLO
SOLO
SOLO
SOLO
SOLO
MUTE
MUTE
1
MUTE
2
MUTE
3
MUTE
4
MUTE
5
MUTE
6
PAN
SEND 1
BYPASS/OFF
READ
FADERS
MUTES
WRITE
TOUCH
PANS
SEND LVLS
SEND 2
SEND 3
SEND 4
TRANSPORT
MEM LOC
UNDO
MIXER
EDIT
MUTE
7
SHIFT
8
+
+
+
+
+
+
+
+
0
0
0
0
0
0
0
0
–
–
–
–
–
–
–
–
RTZ
BANK SELECT
END
IN
OUT
REWIND
FAST FWD
CHANNEL
STOP
PLAY
RECORD
Compact Master Control Surface
for Digital Audio Workstations
Baby HUI
CAUTION
AVIS
RISK OF ELECTRIC SHOCK
DO NOT OPEN
RISQUE DE CHOC ELECTRIQUE
NE PAS OUVRIR
CAUTION: TO REDUCE THE RISK OF ELECTRIC SHOCK
DO NOT REMOVE COVER (OR BACK)
NO USER-SERVICEABLE PARTS INSIDE
REFER SERVICING TO QUALIFIED PERSONNEL
ATTENTION: POUR EVITER LES RISQUES DE CHOC
ELECTRIQUE, NE PAS ENLEVER LE COUVERCLE. AUCUN
ENTRETIEN DE PIECES INTERIEURES PAR L’USAGER. CONFIER
L’ENTRETIEN AU PERSONNEL QUALIFIE.
AVIS: POUR EVITER LES RISQUES D’INCENDIE OU
D’ELECTROCUTION, N’EXPOSEZ PAS CET ARTICLE
A LA PLUIE OU A L’HUMIDITE
The lightning flash with arrowhead symbol within an equilateral
triangle is intended to alert the user to the presence of uninsulated
"dangerous voltage" within the product’s enclosure, that may be
of sufficient magnitude to constitute a risk of electric shock to persons.
Le symbole clair avec point de fl che l’int rieur d’un triangle
quilat ral est utilis pour alerter l’utilisateur de la pr sence
l’int rieur du coffret de "voltage dangereux" non isol d’ampleur
suffisante pour constituer un risque d’ l ctrocution.
The exclamation point within an equilateral triangle is intended to
alert the user of the presence of important operating and maintenance
(servicing) instructions in the literature accompanying the appliance.
Le point d’exclamation l’int rieur d’un triangle quilat ral est
employ pour alerter les utilisateurs de la pr sence d’instructions
importantes pour le fonctionnement et l’entretien (service) dans le
livret d’instruction accompagnant l’appareil.
Important Safety Instructions
1. Read instuctions — Read, understand and follow all safety and
operating instructions before using this Mackie product.
D. The unit does not appear to operate normally or exhibits a
marked change in performance; or
E. The unit has been dropped, or its chassis damaged.
12. Servicing — Do not attempt to service this Mackie product. All
servicing should be referred to the Mackie Service Department.
13. Lightning — Unplug the product during lightning storms or
when unused for long periods of time.
14. Grounding and Polarization — To prevent electric shock, do not
use the polarized plug with an extension cord, receptacle or
other outlet unless the blades can be fully inserted to prevent
blade exposure. Do not defeat the grounding by plugging into an
ungrounded receptacle or ground lift adapter.
This apparatus does not exceed the Class A/Class B (whichever is
applicable) limits for radio noise emissions from digital apparatus as
set out in the radio interference regulations of the Canadian
Department of Communications.
ATTENTION — Le présent appareil numérique n’émet pas de bruits
radioélectriques dépassant las limites applicables aux appareils
numériques de class A/de class B (selon le cas) prescrites dans le
réglement sur le brouillage radioélectrique édicté par les ministere
des communications du Canada.
2. Retain Instructions — Keep these safety and operating
instructions for future reference.
3. Heed Warnings — Follow all warnings on this Mackie product
and in these operating instructions.
4. Water and Moisture — Do not use this Mackie product near
water – for example, near a bathtub, kitchen sink, garden hose,
incontinent poodle, sweaty drummer, etc. – or when condensation has formed on the unit.
5. Cleaning — Clean only with a dry cloth.
6. Heat and Ventilation — Locate this Mackie product away from
heat sources such as radiators, campfires, compost pits, heliarc
welders, magma flows, etc. Do not block the ventilation
openings or install in spaces that prevent adequate air circulation
to the unit.
FCC Information
NOTE: This equipment has been tested and found to comply
with the limits for Class B digital devices, pursuant to Part 15 of
the FCC Rules. These limits are designed to provide reasonable
protection against harmful interference when the equipment is
operated in a commercial installation. This equipment generates,
uses, and can radiate radio frequency energy and, if not installed
and used in accordance with the instruction manual, may cause
harmful interference to radio communications. Operation of this
equipment in a residential area is likely to cause harmful
interference in which case the user will be required to correct
the interference at his own expense.
7. Power Sources — Connect this Mackie product only to a power
source of the type described in these operating instructions or as
marked on the product.
8. Power Cord Protection — Route power supply cords so that they
are not likely to be walked upon, tripped over, or abraded by
items placed upon or against them. Pay particular attention to
cords at plugs, convenience receptacles, and the point where
they exit the product.
9. Object and Liquid Entry — Do not drop objects or spill liquids
into this Mackie product. Clean only with a damp cloth; do not
clean with liquid or aerosol cleaners.
10. Attachments — Use this Mackie product with only the
accessories specified in this manual.
11. Damage Requiring Service — This Mackie product should be
serviced only by qualified service personnel when:
WARNING — To reduce the risk of fire or electric shock, do
not expose this appliance to rain or moisture.
A. The power supply cord or the plug has been damaged; or
B. Objects have fallen onto, or liquid has spilled into the unit; or
C. The unit has been exposed to rain or water; or
2
Baby HUI
Part No. 0003964 Rev. A 07/02
© 2002 Mackie Designs Inc. All rights reserved.
Printed in the U.S.A.
Important Safety Instructions---------------------------- 2
Introduction -------------------------------------------------- 4
The History of HUI™ ---------------------------------- 4
What is a Controller? -------------------------------- 4
General Overview ------------------------------------ 4
Front Panel Description ------------------------------------ 5
Channel Strips ----------------------------------------- 5
Fader ------------------------------------------- 5
MUTE ------------------------------------------- 5
SOLO ------------------------------------------- 5
SIGNAL Indicator ---------------------------- 5
Rotary Encoder ------------------------------- 6
Master Section ---------------------------------------- 6
Encoder Assignment Section ----------------------- 6
PAN --------------------------------------------- 6
SEND 1-4 --------------------------------------- 6
Automation Section --------------------------------- 6
BYPASS/OFF ---------------------------------- 6
READ ------------------------------------------- 6
WRITE ------------------------------------------ 7
TOUCH ----------------------------------------- 7
◊ FADERS -------------------------------------- 7
◊ MUTES --------------------------------------- 7
◊ PANS ----------------------------------------- 7
◊ SEND LVLS----------------------------------- 7
Display Section---------------------------------------- 7
TRANSPORT ----------------------------------- 7
MEM LOC -------------------------------------- 7
MIXER ------------------------------------------ 8
EDIT --------------------------------------------- 8
Utility Section ----------------------------------------- 8
UNDO ------------------------------------------ 8
SHIFT ------------------------------------------- 8
Navigation Section ----------------------------------- 9
RTZ ---------------------------------------------- 9
END --------------------------------------------- 9
◊ IN --------------------------------------------- 9
◊ OUT ------------------------------------------ 9
Bank Select (Left and Right) -------------- 9
◊ Channel Select (Left and Right)-------- 9
Bank/Channel Display --------------------- 9
Transport Section ------------------------------------ 9
REWIND --------------------------------------- 9
FAST FWD ------------------------------------- 10
STOP ------------------------------------------- 10
PLAY -------------------------------------------- 10
RECORD --------------------------------------- 10
User’s Guide
Contents
Rear Panel Description ------------------------------------- 10
MIDI IN and OUT ---------------------------- 10
External Power ------------------------------- 10
Power Switch --------------------------------- 10
PC and Mac Interfacing ------------------------------------ 11
The MIDI Interface ----------------------------------- 11
Installation -------------------------------------------- 11
Supported DAW Platforms ------------------------- 12
Troubleshooting --------------------------------------------- 12
Power --------------------------------------------------- 12
MIDI ----------------------------------------------------- 12
Service --------------------------------------------------------- 12
Specifications ------------------------------------------------ 13
Please write your serial number here for future
reference:
Purchased at:
Date Of Purchase:
User’s Guide
3
Baby HUI
Introduction
Baby HUI gives you hands-on control of all of
your DAW’s parameters. Now you can create a fade
with a real fader. Move a HUI fader and your DAW
“makes note” of your action and mirrors it on the
computer screen. Similarly, when you make a fader
move on your screen, Baby HUI’s fader moves, too.
Adjust the pan control by turning one of Baby HUI’s
rotary encoder knobs and the DAW takes care of
the rest. In fact, mouse-clicking is practically a
thing of the past — with Baby HUI, what used to
take multiple mouse-clicks and key combinations can
now be accomplished with the push of a button or
two. You can use Baby HUI’s hands-on controls to
do everything from recording a single track to
adjusting aux send/return levels, automating mixes,
and mixing programs for surround-sound.
Touch-updatable moving faders, rotary and push
encoders, and an ergonomically laid-out control
surface make Baby HUI the logical choice for
returning analog-style control to your digital world.
You can do so much with Baby HUI. It’s a mix
control surface that sets new levels of interactivity
within today’s and tomorrow’s DAW environments —
it will grow with your system, DAW software
upgrades, etc. Baby HUI can greatly improve your
creativity while diminishing your workload and the
repetitive grind of multiple sessions.
Thank you for choosing Mackie Designs for your
Digital Audio Workstation (DAW) control solution.
Baby HUI™ provides the familiar feel of analog-style
mixing to your DAW environment. But it also
delivers the most complete feature set and software
compatibility of any control surface available today.
The History of HUI™
When Mackie Designs introduced HUI (Human
User Interface) in 1997, it was one of the industry’s
first affordable motorized touch-sensitive fader
controllers available for Digital Audio Workstations
(DAWs). Digidesign® was the first to provide support
for HUI with its Pro Tools® DAW, and over time
other DAW manufacturers have recognized the value
added by supporting HUI in their software.
Now in 2002, Mackie introduces Baby HUI. As
the name implies, it is a scaled-down version of the
original HUI. Though it doesn’t have as many buttons
and controls as its big brother, it retains the essential
controls that are most useful for tracking and mixing
on a Digital Audio Workstation.
What is a Controller?
One of the big drawbacks of any DAW is having to
use a mouse and keyboard to perform things you
used to do on an analog mixer. Clicking on a visual
representation of a fader and trying to drag the
mouse smoothly in order to achieve an amazing fadeout is difficult, if not impossible, for many of us.
Likewise, turning a “virtual knob” on a computer
screen just doesn’t cut it for some folks. And that’s why
Mackie Designs created HUI, and now, Baby HUI.
General Overview
Baby HUI’s control surface is divided into two
main sections—the Channel Strips Section and the
Master Section. It was designed to look and feel like
a small mixing console, but with one big difference.
No audio actually passes through Baby HUI. Instead,
CHANNEL SECTION
MASTER SECTION
BABY
-
+
-
+
-
+
-
+
-
+
-
+
-
+
REC RDY
REC RDY
REC RDY
REC RDY
REC RDY
REC RDY
SIGNAL
SIGNAL
SIGNAL
SIGNAL
SIGNAL
SIGNAL
SIGNAL
SOLO
MUTE
SOLO
MUTE
1
Baby HUI
+
REC RDY
SIGNAL
SOLO
4
-
REC RDY
SOLO
MUTE
2
SOLO
MUTE
3
SOLO
MUTE
4
SOLO
MUTE
5
SEND 1
READ
FADERS
MUTES
SEND 2
SEND 3
SEND 4
TRANSPORT
MEM LOC
UNDO
MIXER
EDIT
SOLO
MUTE
6
PAN
BYPASS/OFF
WRITE
TOUCH
PANS
SEND LVLS
MUTE
7
SHIFT
8
+
+
+
+
+
+
+
+
0
0
0
0
0
0
0
0
–
–
–
–
–
–
–
–
RTZ
BANK SELECT
END
IN
OUT
REWIND
FAST FWD
CHANNEL
STOP
PLAY
RECORD
it sends and receives control messages to and from
the host computer via the MIDI IN and OUT
connections on the back. That’s how the fader on
your monitor screen moves when you move a fader
on Baby HUI, and vice versa.
Channel Strip Features
• In addition to the faders, each channel strip
also has a MUTE and a SOLO button.
• A signal LED indicates when signal is present
on the channel, or when the channel is selected.
• At the top of the channel strip is the multifunctional rotary and push encoder. This serves
the dual-function of selecting and assigning a
channel strip, as well as providing pan control
and send level control for the channel.
Master Section Features
• In the Master Section, the top row of buttons
are used to assign the function of the rotary
encoders on the channel strips (PAN, SEND 1-4).
• The Automation Section has four buttons for
selecting the automation mode (READ,
WRITE, TOUCH, or BYPASS/OFF) and, by
holding down the SHIFT button, the
parameters to automate (FADERS, MUTES,
PANS, SEND LVLS).
• There are four display buttons to quickly open
and close the most commonly used windows in
your DAW (TRANSPORT, MEMORY LOC,
MIXER, and EDIT).
• The UNDO button tells the software to undo
the most recent operation. Pressing the UNDO
button again will “redo” the operation.
• The SHIFT button is a modifier that allows you
to perform a second function with several of
Baby HUI’s buttons. The second function is
indicated on the control surface with a box under
the button, and with a ◊ symbol in this text.
• The two navigation buttons, RTZ (Return to
Zero) and END, are used to quickly get to the
beginning or end of the session, and to select
points for setting up loops and punch-ins/outs
(IN and OUT function with the SHIFT button).
• The BANK SELECT buttons change the
assignment of the eight channel strips in banks
of eight, to the next eight channels (button right)
or the previous eight channels (button left).
Holding down the SHIFT button moves the
channels assignments one channel at a time
(rather than in banks of eight channels). The
display indicates which bank is currently selected.
• The Transport Section provides buttons for
MMC (MIDI Machine Control) of the five
common transport operations (REWIND, FAST
FORWARD, STOP, PLAY, and RECORD).
Channel Strips
Baby HUI has eight channel strips, each with the
following controls:
Fader
This 60 mm touch-sensitive motorized fader
controls the gain of the corresponding channel in
your DAW.
The fader’s touch-circuits are
designed to disengage the fader motor
as soon as you touch the fader knob.
The silver knob on the control is
electrically conductive and, when your
finger touches the knob, it senses your
+
touch and sends a message to the DAW
REC RDY
through the MIDI connection. The DAW
reacts by sending a message back to
SIGNAL
Baby HUI to disengage the motor.
When you release the fader, another
message is sent to the DAW via MIDI
SOLO
and, depending on how the DAW is
configured for that channel, it may send
a message back to Baby HUI to turn on
the fader motor.
MUTE
This feature is what allows you to
punch in automation moves at will when
Baby HUI is in Touch Automation mode.
MUTE
User’s Guide
Front Panel Description
1
Pushing the MUTE button turns off
that channel’s output signal and
illuminates the red LED on the button.
Pushing the button again disengages the
mute function and turns off the LED.
+
SOLO
Pushing the SOLO button isolates
that channel’s output signal to the
control room or monitoring bus and
illuminates the yellow LED on the
button. Pushing the button again
disengages the solo function and turns
off the LED.
0
SIGNAL Indicator
This green LED illuminates when a
signal is present in the channel. It also
indicates when the channel has been
selected either in the software or by
pushing the encoder at the top of the
channel strip.
User’s Guide
–
5
Baby HUI
Automation Section
Rotary Encoder
The rotary encoders are multifunction controls that can be used
+
as a pan control or a send level
REC RDY
control. The function for the rotary
encoder is assigned with the top
row of buttons in the Master Section (PAN, SEND 1-4).
But wait...there’s more! Baby HUI’s encoders are
also push buttons that are used to select a channel
as “active” in the software. An active channel is
indicated by the green SIGNAL LED illuminating on
the channel strip.
Holding down the SHIFT button and pressing the
encoder activates Record Ready status for that
channel, to prepare it for a recording pass. The
encoder button is also used to access various
automation parameters, which will be described in
more detail in the Automation Section.
Master Section
The Master Section can be subdivided into six
subsections:
• Encoder Assignment Section
• Automation Section
• Display Section
• Utility Section
• Navigation Section
• Transport Section
Encoder Assignment Section
Most digital audio workstations have very specific
interfaces for enabling and writing automation data.
Usually there are two basic operations that are
required in using an automation system—arming the
right parameters to be automated, and using the
appropriate automation mode. The former tells the
software specifically which set of parameters (faders,
mutes, pans, etc.) you want to enable for use in
automation, whereas the latter specifies exactly how
you want to use those parameters. The Automation
Section of Baby HUI is designed to give you easy,
one-button access to both of these types of commands.
Each of the four buttons in this section have
“dual-functionality”, which means each button can
be used to do two separate things. You will notice
that each button has a label above and below it help
you understand what function it serves. The label
above the button indicates the automation mode
selection, and the label in the box below the button
designates the parameter you are arming for
automation. Their respective functions are based on
whether or not the SHIFT button is held down when
the button is engaged.
These four buttons (BYPASS, READ, WRITE,
and TOUCH) are used with the push-select channel
encoders to assign the automation mode for each
channel. You must hold down the desired automation
mode button and then push the encoder on the
channel that you want to engage into that mode.
BYPASS/OFF
The upper right side of Baby HUI has five encoder
assignment buttons, which determine the function of
the rotary encoders on the channel strips. Only one
of these buttons can be selected at a time.
PAN
This mode bypasses all automation data until
another automation mode is selected. Think of it as
a “de-activation” button that lets you use Baby HUI
freely until the automation sequence(s) are needed.
READ
Pressing the PAN button assigns the encoders to
function as channel pan knobs. When PAN is active,
the green LED in the PAN button illuminates.
SEND 1-4
Pressing a SEND button assigns the encoders to
function as auxiliary send controls for the channel.
Most DAW’s support multiple sends to various
internal and external processors and buses. Baby
HUI can control up to four send levels. The active
SEND button is indicated by the illuminated green
LED in the button.
This mode enables the controller to follow any
pre-written automation events. You are not able to
write new automation moves when Baby HUI is in
Read Mode—it only follows what has been written
and “locks out” all new moves. Enable Read Mode,
and try moving a fader for a channel that has moves
written for it…and you’ll see what we mean!
BABY
PAN
6
Baby HUI
SEND 1
SEND 2
SEND 3
SEND 4
READ
FADERS
MUTES
WRITE
TOUCH
PANS
SEND LVLS
TRANSPORT
MIXER
MEM LOC
EDIT
WRITE
This is the button to engage when you want to
start writing new automation sequences with Baby
HUI. Use this mode to create specific fader moves,
mute sequences, panning moves, and any other
automated adjustments as needed.
TOUCH
This activates the touch-sensitivity feature of
Baby HUI’s eight motorized faders. When in Touch
mode, the computer automatically starts writing
events to the selected track as soon as your finger
touches the fader. This allows you to do quick and
timely “punch-ins” for new automation moves,
whether or not automation data already exists on
the track, just grabbing a fader and making a move!
Automation Parameters
The above four automation buttons also can
activate a specific set of controls for automation. For
example, you may want to write some Mute moves
in a certain song or piece, in which case you would
press the MUTES button while holding down the
SHIFT button. However, if you want to write moves
using both Mutes and Faders, you would engage
both parameters. Arming the right parameter that
you want to automate ensures that no accidental or
unwanted moves will be written (or wanted moves
overwritten) while operating Baby HUI.
To arm a parameter on Baby HUI for automation,
simply press and hold down the SHIFT button and
then press the automation button that corresponds
with the parameter you want to automate. You can
activate a single parameter to automate, or engage
multiple parameters at once to automate some or all
of Baby HUI’s channel strip controls.
◊ FADERS
This button either enables or disables the faders
from writing or reading automation sequences.
Fader automation is commonly used for creating
automatic level adjustments throughout a section of
audio, and Baby HUI’s faders can be used for this
purpose when this mode is activated.
◊ MUTES
This button either enables or disables the mute
buttons from writing or reading automation
sequences. Engage this parameter when you want to
write new mute events into your software, or have
Baby HUI follow the automated mutes you have
already written.
◊ PANS
This button either enables or disables the rotary
encoders from writing or reading panning automation
sequences. Make sure that the PAN button in the
Encoder Assignment Section is lit before using Baby
HUI’s encoders to write pan events.
User’s Guide
BYPASS/OFF
◊ SEND LVLS
This button either enables or disables the rotary
encoders from writing or reading send level
automation sequences. Make sure that the
appropriate SEND button in the Encoder Assignment
Section is active before using Baby HUI’s encoders
to write send level events.
Note: Unlike Baby HUI’s faders and mute
buttons, the rotary encoders do not
physically move when automated
sequences are being played back, even though the
tracks still perform the automated tasks as written.
Display Section
Digital audio workstations communicate their
various features to the user through multiple
floating or fixed windows, or displays. Baby HUI has
four buttons dedicated to immediate access of the
four most commonly used displays of a DAW. These
display buttons open and close the corresponding
windows with the press of a single button, thus
saving you valuable time and effort wandering
through various pull-down menus and sub-menus.
TRANSPORT
Pressing this button opens the Transport Display
in the software. This can be helpful for in-depth
positional reference and record/playback control, as
well as access to presets and other functions
(depending on your software). A second press of the
button either closes the Transport Display or makes
it inactive in the software.
MEM LOC
Pressing this button opens the Memory Locator
Display in your software. This can be helpful in
accessing and labeling/numbering specific location
points within a given piece of music or audio. A
second press of the button either closes the Memory
Locator Display or renders it inactive in the software.
User’s Guide
7
Baby HUI
TRANSPORT
MEM LOC
UNDO
There are two buttons in this section — UNDO
and the SHIFT Modifier.
MIXER
EDIT
UNDO
SHIFT
MIXER
Pressing this button opens the Mixer Display in
your software. This display is a visual rendition of
Baby HUI itself. You will notice that the screen has
channel strips that all follow the movements of Baby
HUI’s controls. Thus, you can use the Mixer Display
to verify that the software is “seeing” your controls
and reacting correctly to your use of Baby HUI. A
second press of the button either closes the Mixer
Display or makes it inactive in the software.
EDIT
Pressing this button opens the Edit Display in
your software. Most software Edit Displays have
their tracks laid out horizontally, with track headers
along the left hand side of the screen, a virtual
“playback head” (usually represented by a vertical
line) crosses from left to right across the screen as
the transport is used, giving the interface a tape
deck-style look.
TIP: The tracks in the Edit Display have
modes that can be set to display different
information, i.e., recorded data, track
volume, panning, etc. To help you use
Baby HUI, we recommend using the level/volume
data display as a visual accompaniment to writing
automation with Baby HUI’s faders. You will “see”
the movements you make with Baby HUI either in
real time or calculated after the automation pass,
depending on your software and computer’s resources.
CONTROL
Push Encoder
Bypass/Off
Read
Write
Touch
RTZ
END
BANK (Left)
BANK (Right)
8
Utility Section
Baby HUI
This is a single button undo command that tells
the software to undo the last thing you did. This
button performs the same common keyboard
commands CTRL+Z (for PCs) or APPLE+Z (for
Macs). The first push of Baby HUI’s Undo Button
will undo the last command, and a second push will
redo the last command.
TIP: Use Undo/Redo right after an
automation pass to make a quick A/B
comparison of your moves and save
yourself the time of going back later.
SHIFT
This is the one button on Baby HUI that requires
some understanding to use correctly. The SHIFT
button is a “Modifier,” which means it is used in
conjunction with other buttons and knobs on Baby
HUI. When pushed by itself, the SHIFT Button does
nothing. Only when held down and another parameter
is activated does the Shift function take place.
Notice the label of the SHIFT Button has the text
“SHIFT” enclosed in a white box. This is intentional.
The white box labeling is a visual association to all
of Baby HUI’s shift-supported controls. So, by holding
down the SHIFT button and pressing a shift-supported
control, you engage the function labeled in the
corresponding white box underneath that control.
To disable a shift-supported function, simply hold
down the SHIFT button and press the control
associated with that function.
Below is a chart of what happens when you hold
down the SHIFT button and engage the listed controls:
FUNCTION
Record Arms the selected track
Arms faders for automation
Arms Mutes for automation
Arms Pans for automation
Arms Send Levels for automation
Begins a new selection area
Ends a new selection area
Moves channel controls left by one channel
Moves channel controls right by one channel
LABEL (in box)
REC RDY
FADERS
MUTES
PANS
SEND LVLS
IN
OUT
CHANNEL (Left)
CHANNEL (Right)
END
IN
OUT
BANK SELECT
CHANNEL
Navigation Section
This section gives you quick access to
navigational shortcuts designed to help you “get
around” your DAW, which sometimes can be the
most time-consuming aspect of using a computer for
audio production. This section has four buttons and
a small two-character display.
controlling channels 1-8 and you push the right
Bank Select button, Baby HUI will now control
channels 9-16. When considering the extensive
numbers of channels supported by many of today’s
DAWs, bank selecting is a key navigational tool on
Baby HUI.
User’s Guide
RTZ
◊ Channel Select (Left and Right)
RTZ
RTZ stands for Return to Zero and returns the
playback head (in software) “to the top” of your
session (as they say in musician-land) or to
00:00:00:00.
END
This button jumps the playback head to the last
point in the session where audio or MIDI data was
recorded. Think of it as the opposite of the RTZ button.
◊ IN
The IN Button is used during playback only.
Holding SHIFT and pressing this button during
playback drops a new selection point indicator along
the timeline of the Edit Display. Playback continues
even though the selection point has been set.
◊ OUT
This button is also used during playback. The
OUT button drops in the ending point of the
selection established by the IN button (see previous)
and is indicated on the timeline.
TIP: Use IN and OUT (not the awesome
burger place) to mark sections of a song
for setting up loops, punching in
automation, or making specific edits.
Bank Select (Left and Right)
Even though Baby HUI only has eight faders, it
can control as many channels as the software can
support, even though it only provides access to eight
channels at any one time. Each group of eight
channels is commonly referred to as a “bank,” and
Baby HUI provides access to your software mixing
console one bank at a time.
Pressing the left or right Bank Select button
“jumps” Baby HUI over to the next adjacent eight
channels on either the left or right side of its current
location. For example, if Baby HUI is currently
Holding down the SHIFT button and pressing the
left or right Channel Select button “jumps” Baby HUI
over to the next adjacent channel on either the left
or right side of its current location. For example, if
Baby HUI is currently controlling channels 1-8 and
you hold SHIFT and push the right Channel Select
button, Baby HUI will now control channels 2-9.
Another push will jump Baby HUI to control
channels 3-10, and so on.
Note: When changing banks or channels, the
channel strips “remember” their settings even if they
are not currently active channels. So, when you see
the faders jump as you change banks/channels, you
are just seeing the controller react to the new
channel settings.
Bank/Channel Display
This two-digit display indicates the currently
selected bank of channels on Baby HUI. Upon
powering up Baby HUI, this display shows the
currently installed firmware build for a period of five
seconds, then reads “1” to indicate you are currently
on Bank 1. A single push of the right bank button
increases the display to “2” for Bank 2, and so on.
Bank 1 represents channels 1-8, Bank 2 channels
9-16, etc.
When navigating channel by channel (by holding
down the SHIFT button), the display shows you the
channel number associated with the first channel
strip on Baby HUI (the one farthest to the left).
Transport Section
Baby HUI has a tape-style transport in the lower
right corner of the control surface that provides
control for the position of the playback head for a
given song or session. In short, it controls the
software application like a tape machine. Included in
the Transport Section are five main buttons:
User’s Guide
9
Baby HUI
REWIND
STOP
FAST FWD
PLAY
RECORD
Rear Panel Description
REWIND
Pressing this button moves the current playback
position in the song/session backward along the
time line, and activates the yellow LED on the
button. Once the playback position is at the top (or
the beginning) of the song/session, the REWIND
button de-activates and the yellow LED turns off.
FAST FWD
Pressing this button moves the current playback
position in the song/session forward along the time
line, and activates the yellow LED on the button.
Once the playback position is at the very end of the
software’s overall timeline constraints, the FAST FWD
button de-activates and the yellow LED turns off.
STOP
The rear panel of the Baby HUI is used only for
power supply and MIDI interfacing with your host
computer and software application.
MIDI IN and OUT
Baby HUI has two female DIN5 ports, one for
MIDI IN and one for MIDI OUT. These ports provide
bi-directional communication between Baby HUI and
your host computer and software application. These
ports must be connected to your computer’s MIDI
interface for Baby HUI to perform to specification.
See “PC and Mac Interfacing” on page 11 for
more information on getting the controller set up
correctly in your host application.
External Power
Pressing this button immediately halts playback
of the song/session, and activates the yellow LED on
the button. The LED on the STOP Button deactivates
as soon as another transport mode is selected, such
as PLAY or REW.
PLAY
Pressing this button begins playback of the song/
session from the current position of the playback
head, and illuminates the green LED on the button.
When either the REWIND, FAST FWD, or STOP
button is pressed, the playback of the song/session
changes to the function of that button, and the green
LED on the PLAY button turns off.
This is where you connect the female end of the
external power supply provided with Baby HUI. The
other end of the cable needs to be connected to your
AC power supply (between 90 VAC and 264 VAC),
like a wall receptacle, a power conditioner, or a power
strip. The power supply converts the AC voltage into
the proper voltage for Baby HUI to operate.
Power Switch
This switch must be turned on for Baby HUI to
receive the power it needs to operate. Make sure
this switch is in the ON position before you attempt
to use Baby HUI. (It never hurts to be reminded!)
RECORD
This red button can be used to either a) begin
recording audio on any number of record-enabled
track(s), or b) begin writing automation moves to
those channels that are set to automation write
mode. Activation of the record function is indicated
by the red LED on the RECORD button.
WARNING: TO REDUCE THE RISK OF FIRE OR ELECTRIC SHOCK, DO NOT
RISK OF ELECTRIC SHOCK
DO NOT OPEN
REPLACE WITH THE SAME TYPE FUSE AND RATING.
DISCONNECT SUPPLY CORD BEFORE CHANGING FUSE
SERIAL NUMBER
MANUFACTURING DATE
EXPOSE THIS EQUIPMENT TO RAIN OR MOISTURE. DO NOT REMOVE COVER.
NO USER SERVICEABLE PARTS INSIDE. REFER SERVICING TO QUALIFIED PERSONNEL.
AVIS: RISQUE DE CHOC ELECTRIQUE — NE PAS OUVRIR
UTILISE UN FUSIBLE DE RECHANGE DE MÊME TYPE.
DEBRANCHER AVANT DE REMPLACER LE FUSIBLE
THE FOLLOWING ARE TRADEMARKS OR REGISTERED TRADEMARKS OF MACKIE DESIGNS INC "MACKIE" AND THE "RUNNING MAN" FIGURE.CONCEIVED,
DESIGNED, AND MANUFACTURED BY MACKIE DESIGNS INC. • WOODINVILLE • WA • USA • MADE IN USA • FABRIQUE AU USA • COPYRIGHT ©2001
10
Baby HUI
IN
MIDI
OUT
EXTERNAL
POWER
–
+
7.5 VDC
ON
OFF
BABY
Installation
The MIDI Interface
• Connect Baby HUI to your MIDI interface via
two MIDI cables (IN and OUT).
• Connect one end of the external power supply
to Baby HUI, and the other end to an AC power
source between 90 VAC and 264 VAC (50–60 Hz).
Refer to the illustration below.
• Turn on Baby HUI’s POWER switch and turn
on the computer.
• Launch your HUI-supported software program
of choice.
• Select your HUI-supported software’s console
or surface manager set-up window.
• Select the HUI MIDI Mapping or MIDI Control
Surface Personality. If it is not included in the
version of software you are using, go to the
software company’s website or to
www.mackie.com/babyhui and download the
MIDI map or personality file for your particular
application.
• Establish the MIDI communication between
your MIDI interface and Baby HUI. Examples
of MIDI interface software include OMS (Open
Music System), FMS (FreeMIDI System), and
others. Make sure your computer can “see”
Baby HUI as a MIDI device and has a port
dedicated to its use.
Note: Refer to the OMS or FMS documentation
and to the software application’s documentation
for instructions on configuring OMS or FMS for
Baby HUI.
• Once the appropriate MIDI map is selected
within your software’s preferences, Baby HUI
will be recognized automatically.
As you know from the introduction of this manual,
Baby HUI must be connected to a MIDI-compatible
computer in order to perform its functions. There are
a wide variety of MIDI interface options available for
Macs and PCs in today’s market, which include (but
are not limited to):
•
Audio/MIDI PCI Cards
•
USB MIDI Interfaces
•
Serial Port MIDI Interfaces
•
Multi-Port MIDI Interfaces
Since most MIDI interfaces work in a similar way,
it is outside the scope of this manual to recommend
specific MIDI Interfaces for use with Baby HUI. We
will not tell you which interface to use—we will,
however, help you get Baby HUI in communication
with your preferred audio application through
whatever interface you want to use.
TIP: Baby HUI works best when its MIDI
communication is isolated from all other
MIDI equipment. So, if you use multiple
MIDI devices hooked up to a multi-port
MIDI interface, you might consider establishing an
isolated pathway to and from Baby HUI and the
computer on a separate port.
The most important thing of all is getting your
DAW software application to “see” Baby HUI as a
MIDI control device. Make sure you read the
following Installation instructions and refer to your
particular DAW’s documentation for specific
instructions on establishing communication with
Baby HUI.
User’s Guide
PC and Mac Interfacing
Baby HUI
WARNING: TO REDUCE THE RISK OF FIRE OR ELECTRIC SHOCK, DO NOT
RISK OF ELECTRIC SHOCK
DO NOT OPEN
REPLACE WITH THE SAME TYPE FUSE AND RATING.
DISCONNECT SUPPLY CORD BEFORE CHANGING FUSE
SERIAL NUMBER
MANUFACTURING DATE
EXPOSE THIS EQUIPMENT TO RAIN OR MOISTURE. DO NOT REMOVE COVER.
NO USER SERVICEABLE PARTS INSIDE. REFER SERVICING TO QUALIFIED PERSONNEL.
AVIS: RISQUE DE CHOC ELECTRIQUE — NE PAS OUVRIR
UTILISE UN FUSIBLE DE RECHANGE DE MÊME TYPE.
DEBRANCHER AVANT DE REMPLACER LE FUSIBLE
IN
MIDI
EXTERNAL
POWER
OUT
OFF
BABY
–
+
7.5 VDC
THE FOLLOWING ARE TRADEMARKS OR REGISTERED TRADEMARKS OF MACKIE DESIGNS INC "MACKIE" AND THE "RUNNING MAN" FIGURE.CONCEIVED,
DESIGNED, AND MANUFACTURED BY MACKIE DESIGNS INC. • WOODINVILLE • WA • USA • MADE IN USA • FABRIQUE AU USA • COPYRIGHT ©2001
MIDI
IN
ON
MIDI
OUT
External Power Supply
Digital Audio Workstation
MIDI Interface
Computer Serial or
USB Connection
User’s Guide
11
Baby HUI
Supported DAW Platforms
As of this printing, the following systems support
Baby HUI MIDI mapping protocol as a controller. Be
aware that every version mentioned in this list is the
earliest possible version that supports Baby HUI.
Mac OS
Digidesign ProTools 4.1
MOTU Digital Performer 2.7
Steinberg Nuendo 1.5.3
Windows
Steinberg Nuendo 1.5.3
Mackie Soundscape32 3.1
Mackie Mixtreme 1.2
Please note that this list is an accounting of what
is available today. We are constantly pursuing other
DAW manufacturers to support Baby HUI, so make
sure you check any updates at www.mackie.com/
babyhui.
Note: Baby HUI uses the HUI MIDI
Mapping, which means you need to select
“HUI” in the respective software’s console
or controller interface menu. You will not
see “Baby HUI,” so select “HUI” instead.
Troubleshooting
Having trouble getting things to “cooperate”?
Please review the following troubleshooting
questions to help narrow down the problem. If the
problem is related to setting up and using Baby HUI
with your DAW software, contact your software
manufacturer’s technical support.
If you are absolutely, positively sure it is a
hardware related problem, then go to the repair
section next for further information.
Power
• Our favorite question: Is the POWER switch on?
• Is the external power supply properly
connected to the back of Baby HUI?
• Is the external power supply connected to a
live AC outlet? You can check it with a tester
or lamp.
MIDI
Baby HUI is a MIDI device. It must be able to
send and receive MIDI data to work with your DAW.
MIDI configuration software such as OMS (Open
Music System) and FMS (FreeMIDI System) are
commonly used to facilitate use of third party
12
Baby HUI
controllers such as Baby HUI. Therefore, it’s
important to make sure that Baby HUI is defined as
a controller device in your OMS or FMS software,
and also as a controller in the DAW environment.
First, answer the following OMS/FMS-related
questions before pressing the PANIC button (not
included on Baby HUI):
• Is AppleTalk off? The computer uses
AppleTalk to operate through its printer port;
AppleTalk can block MIDI transmission.
• Does OMS/FMS “see” the MIDI interface?
• Is the interface speed set the same in both the
OMS/FMS setup and the hardware interface?
MIDI won’t transfer information if the interface
is set to one speed and the software is set to
another.
• If you have multiple setups, is the setup
document being used the most current one (or
recommended)?
• Are the MIDI instruments connected to the
appropriate port?
• Are all MIDI connections made properly? (See
page 11 for a typical connection diagram.)
• Are your MIDI cables OK?
Many MIDI interface boxes provide indicators to
let you know when MIDI data is being sent and
received. Touch one of Baby HUI’s faders and move
it a little. Does the MIDI interface “receive” indicator
light? If it doesn’t, check or replace the MIDI cable
between Baby HUI’s MIDI OUT jack and the MIDI
interface’s IN jack.
Now move one of the faders in the DAW software.
Does the MIDI interface “transmit” indicator light?
If not, check or replace the MIDI cable between the
computer and the MIDI interface “To Computer”
connector.
• Is the device information configured properly?
• Is the correct MIDI channel defined to the proper
MIDI port? (Baby HUI operates on MIDI channel 1.)
• Is your MIDI interface working properly? Is it
connected to the correct port on your
computer?
• Ummm, is the MIDI interface turned on?
Service
Service for Baby HUIs bought and residing in the
United States is available only at Mackie Designs.
Baby HUI owners outside the U.S. should consult
their local Mackie dealer or distributor for service.
Now then, please follow these instructions:
1. Review the preceeding Troubleshooting
section. Assuming you’ve done so, and used up
your voluminous reserves of common sense…
2. Have your Baby HUI serial number ready —
hopefully you copied it down in the front of
this manual (page 3).
7. Ship the Baby HUI to Mackie. We recommend
you get insurance on the package. Send Baby
HUI to this address:
Mackie Designs Inc.
Service Department
16140 Wood-Red Rd. NE, Ste. 5
Woodinville, WA 98072
4. Pack the Baby HUI in the original box, with
the original foam innards or other packing
materials. You DID save that stuff, didn’t you?
If you didn’t, you’ll need to purchase a new
box and packing materials from Mackie.
Mackie is not responsible for any damage
resulting from shipments of product in “nonoriginal” packaging.
User’s Guide
6. Write the RA number in HUGE letters on top
of the box.
3. Call Mackie Tech Support at 800-258-6883
(8 AM to 5 PM, Pacific Time) to explain the
problem. If it can’t be solved over the phone,
you will be issued an RA (Return Authorization)
number. You must have an RA number before
you can obtain service from the factory.
8. We’ll try to fix Baby HUI within five
business days. Ask Tech Support for current
turnaround times when you call for your RA
number. We normally send everything back
prepaid using UPS Orange (three-day air).
However, if you rush your Baby HUI to us via
Next-Day Air, we’ll do the same for the return
trip. This does not necessarily apply to nonwarranty service.
5. Include a legible note stating your name,
return shipping address (no P.O. boxes of
course), daytime phone number, the RA
number, and a detailed description of the
problem, including how we can duplicate it.
Specifications
Baby HUI MIDI Implementation Chart
Function
Channel
Mode
Note
Number
Velocity
Aftertouch
Default
Changed
Default
Messages
Altered
True Voice
Note ON
Note OFF
Keys
Channels
Pitch Bend
Control Change
Version: 1.0.0
Transmitted
O
Recognized
O
Remarks
Channel 1 only
X
X
X
O
X
X
X
X
X
O
Not Applicable
X
X
Date: 7/01/02
90 00 00 Sent
90 00 7F Received
Used for compatibility with HUI
"Active Sense"
X
O
Used for Signal Present LEDs
X
X
X
X
00-07 Faders MSB 00-07 Faders MSB Fixed specification
20-27 Faders LSB 20-27 Faders LSB Fader resolution:
40-4C V-Pots
0C, 2C LEDs
(00-07 MSB)
0F, 2F Switches
(20-27 LSB)
Program
Change
true number
X
X
System Exclusive
X
O
7-Segment Display
System Common Song Pos
X
X
Song Sel
X
X
Tune
X
X
System
Clock
X
X
Real-time
Messages
X
X
Aux
Local Control
X
X
Messages
All Notes Off
X
X
Active Sense
X
X
System Reset
X
X
Notes:
A full description of System Exclusive and command architecture is available to
developers through Mackie Designs Inc. Software Engineering Department.
Mode 1: Omni On, Poly
Mode 3: Omni Off, Poly
Mode 2: Omni On, Mono
Mode 4: Omni Off, Mono
O: Yes
X: No
User’s Guide
13
Baby HUI
Power Requirements
Ext. Power Supply: 90 Vac to 264 Vac, 50-60Hz
Baby HUI:
7.5 Vdc
Physical
Height:
Width:
Depth:
Weight:
3.4 in (86 mm)
14.6 in (371 mm)
10.1 in (257 mm)
7.6 lbs (3.4 kg)
3.4"
(86 mm)
BABY HUI
WEIGHT
7.6 lbs.
(3.4 kg)
10.1" (257 mm)
14.6" (371 mm)
Please read the included warranty information,
then complete and return the Warranty Registration
card, or it’s straight to bed for you with no dinner.
“Mackie,” the “Running Man” figure, and “Baby
HUI” are trademarks or registered trademarks of
Mackie Designs Inc. All other brand names
mentioned are trademarks or registered trademarks
of their respective holders, and are hereby
acknowledged.
© 2002 Mackie Designs Inc.
All Rights Reserved.
Printed in the U.S.A.
14
Baby HUI
User’s Guide
BABY
-
+
-
+
-
+
-
+
-
+
-
+
-
+
-
+
REC RDY
REC RDY
REC RDY
REC RDY
REC RDY
REC RDY
REC RDY
REC RDY
SIGNAL
SIGNAL
SIGNAL
SIGNAL
SIGNAL
SIGNAL
SIGNAL
SIGNAL
SOLO
SOLO
SOLO
SOLO
SOLO
SOLO
SOLO
SOLO
MUTE
MUTE
1
MUTE
2
MUTE
3
MUTE
4
MUTE
5
MUTE
6
PAN
SEND 1
BYPASS/OFF
READ
FADERS
MUTES
WRITE
TOUCH
PANS
SEND LVLS
SEND 2
SEND 3
SEND 4
TRANSPORT
MEM LOC
UNDO
MIXER
EDIT
MUTE
7
SHIFT
8
+
+
+
+
+
+
+
+
0
0
0
0
0
0
0
0
–
–
–
–
–
–
–
–
RTZ
BANK SELECT
END
IN
OUT
REWIND
FAST FWD
CHANNEL
STOP
PLAY
RECORD
User’s Guide
15
16220 Wood-Red Rd. NE • Woodinville, WA 98072 • USA
US & Canada: 800/898-3211
Europe, Asia, Central & South America: 425/487-4333
Middle East & Africa: 31-20-654-4000
Fax: 425/487-4337 • www.mackie.com
E-mail: [email protected]