1
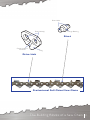
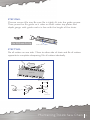
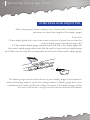
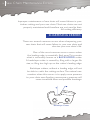
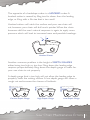
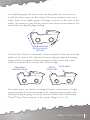
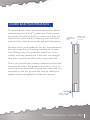
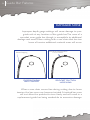
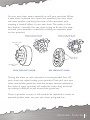
Product Knowledge Guide
Product Information
Maintenance
Trouble Shooting
Your Link To Quality
At TriLink® Saw Chain we believe that quality is the key to success. Our
guide bar and saw chain factory is ISO 9001:2000 cer tified. This cer tification gives our customers the confidence that they are buying from a
company that is committed to providing quality products and services.
TriLink® Saw Chain also offers a complete line of professional saw chain
as well as low kickback saw chain that has been tested, approved, and
listed by Underwriter’s Laboratories to meet all standards for low kickback chain in accordance with the American National Standard Safety Requirements (ANSI B175.1) for gasoline powered chain saws. Our manufacturing facilities are audited quar terly by Underwriter’s Laboratories to
maintain this listing and your confidence in our products.
TYPE 2: LOW KICKBACK S AW CHAIN IN ACCORDANCE WIT H
AMERICAN N ATIONAL STANDARD SAFETY REQUIREMENTS
FOR GASOLINE POWERED CHAIN S AWS
(ANSI B175.1 2000), PARAGRAPH 5.11.2.4
LA CHAINE A FAIBLER RECUL SELON
ANSI B175.1-2000, PARAGRAPHES 5.11.2.4
TYPE C LOW KICKBACK S AW CHAIN IN ACCORDANCE
WITH CSA Z62.3-04 (28DX)
CETTE CHAINE A RECUL MINIMISE DE TYPE C
SATISFAIT AUX EXIGENCES DE RENDEMENT DE LA
NORME CSA Z62.3-04 (28DX)
SA 13355
INFORMATION
Clear and concise definitions of chain variations, components, and
proper maintenance allow you to get the most of your saw chain.
MAINTENANCE
TriLink® Saw Chain’s product knowledge guide will advise you on how
to safely and properly extend the life of your saw chain, guide bars,
sprockets, and chain components through proper maintenance.
TROUBLE SHOOTING
The safest chain is a sharp chain. Knowing how and when to
properly maintain your saw chain and saw chain components will
give you their best performance and long lasting component life.
Saw Chain Building Blocks
4-7
Understanding Saw Chain
8 - 11
Maintaining Saw Chain
12 - 15
Saw Chain Maintenance Errors
16 - 17
Saw Chain Wear
18 - 19
Guide Bars
Understanding Guide Bars
20 - 21
Guide Bar Building Blocks
22
Maintaining Guide Bars
23
Guide Bar Failures
24 - 27
Sprockets
Understanding Sprockets
28
Sprocket Failure
29
Additional Info
Kick-Back Prevention
30 - 31
Reference Guide and Notes
32 - 35
This manual is provided to help you maximize the performance,
life and efficiency of your TriLink® Saw Chain by giving you a better
understanding of our chain, guide bars, and sprockets.
TABLE OF CONTENTS
Saw Chain
04
The Building Blocks of a Saw Chain
Safety Saw Chain incorporates ramped depth gauges to allow
smooth high speed cutting while reducing kickback and vibration.
Safety saw chain is low kick-back UL tested and approved.
Bumperlink Safety Saw Chain
Bumperlink
(Safety Drive Link)
Rivet Hole(s)
Depth
Gauge
Setting
Centri-Lube™
Channel
Tang
Gullet
Cutter Tooth
Lead Edge
Top Plate
Cut
Clearance
Depth Gauge
Side Plate
Cutting
Edge
Rivet Hole(s)
Toe
Tie Strap
Rivet Hole(s)
Heel
Rivet Hubs
Flange Bearing
Rivet Hole(s)
Centri-Lube™
Channel
Rivet
Tang
Drive Link
Rivet Hole(s)
Guardlink
(Safety Link)
Guardlink Safety Saw Chain
The Building Blocks of a Saw Chain
05
06
The Building Blocks of a Saw Chain
Professional Saw Chain is designed specifically for professional
cutters. Professional saw chains are engineered for fast, smooth cutting
at high speeds in clean cutting conditions. Professional saw chains are
not UL low kick-back tested.
Professional Semi-Chisel Saw Chain
Tie Strap
Rivet Hole(s)
Depth
Gauge
Setting
Gullet
Cutter Tooth
Lead Edge
Top Plate
Cut
Clearance
Depth Gauge
Side Plate
Cutting
Edge
Rivet Hole(s)
Toe
Heel
Rivet Hubs
Rivet Hole(s)
Flange Bearing
Rivet
Centri-Lube™
Channel
Tang
Drive Link
Professional Full Chisel Saw Chain
The Building Blocks of a Saw Chain
07
08
Understanding Saw Chain
PITCH
PITCH is determined by measuring
the distance between the centers of any
3 consecutive rivets and dividing by two.
÷2
GAUGE of a chain is the thickness
GAUGE
f the drive link measured at the tang. o
It’s essential that the drive link thickness
correctly matches the width of the
groove in the guide bar.
KERF is the width of the cut in the
KERF
ood made by the saw chain cutter.
w
Optimum kerf for a saw chain is dependent
on the chain saw’s horsepower, saw chain
speed, length of the guide bar and the size,
hardness and type of timber being cut.
TriLink® saw chain is available with the ideal
kerf for every combination of equipment
and timber.
Saw Chain Pitch
.325" pitch (15.87mm)
Distance Between
Center of Rivets
5/8" approx.
3/8" LP pitch (19.05mm)
3/4"
3/8" pitch (19.05mm)
3/4"
.404" pitch (20.62mm)
13/16"
SAW CHAIN SEQUENCES:
There are 3 different sequences of saw chain:
Full Complement Chain: One tie strap between each cutter
Semi Skip: Chain pattern alternates one tie strap and two tie
straps between each cutter
Full Skip: Chain has two tie straps between each cutter
(half the cutting teeth of full complement chain)
CUTTER STYLES:
Leading
Edge
Semi-Chisel Cutters have a smaller radius than the Chipper
Cutter’s leading edge allowing it to stay sharper longer and cut
faster in dirty and gritty cutting conditions. Ideal for consumer use.
Leading
Edge
Full Chisel Cutters are designed for fast, smooth cutting at
Leading
Edge
Chipper Cutters have a larger radius then other leading edges
high-speeds in clean conditions.The square cutter edge is specifically
designed to reduce cutting friction for an extremely smooth, clean
cut and fast chip clearance. Preferred by professional users.
giving the chain a long lasting cutting life, but requiring more power
from your chain saw.
Understanding Saw Chain
09
10
Understanding Saw Chain
Better lubrication increases the life of your chain
Lubrication is the key element in maintaining and extending the life
of your chain and guide bar. Lack of proper lubrication develops
friction between chain components and the guide bar. This results in
decreased cutting performance, lower chain life, and increased stress
on engine and drive components. Increased lubrication along the bar
and between chain components will increase the life of the chain and
provide better cutting performance.
In an effor t to enhance cutting performance and chain life, TriLink®
Saw Chain has introduced our Centri-Lube™ Oiling System. CentriLube™ saw chain has a specially designed channel in each drive link
that picks up oil from the bar and distributes it to the rivets that act
as bearings on a chain. As the saw chain travels around the bar tip
and drive sprocket, centrifugal force moves the oil up this channel
and distributes it to the rivets in each link. This reduces friction and
heat build-up on the saw chain and guide bar thereby increasing
the cutting performance and saw chain life. Your saw chain lasts
longer and the job is done faster.
CUTTING MOTION
Understanding how your TriLink® Saw Chain cuts is important in understanding
how your chain will wear, the proper manner in which to maintain your chain,
and getting the most life out of your chain. When making a cut, the Cutter will
catch, rise, roll, and fall as it travels along the guide bar.
WO O D SURFACE
The Cutter’s leading edge
CATCHES the wood surface.
GU IDE B A R
WO O D SURFACE
GU IDE B A R
The depth gauge sinks into the wood
and causes the Cutter to RISE off the
guide bar.
WO O D SURFACE
The cut clearance causes the Cutter to
ROLL out of the wood surface.
GU IDE B A R
WO O D SURFACE
The Cutter FALLS back into place
along the guide rail.
GU IDE B A R
Saw chain, when preforming properly, will cut without needing to
apply excessive pressure.
Understanding Saw Chain
11
12
Maintaining TriLink Saw Chain
WARNING: Dull chains are dangerous!
The safest saw chain is a sharp chain. The sharpest chain is a new
saw chain. As your saw chain ages and wears, we highly recommend
either replacing the saw chain or maintaining and keeping it sharp.
TriLink® Saw Chain highly recommends following the
manufacturer’s recommendations.
SHARPENING CHAIN
Use the correct size file guide and file for your saw chain. Please see
the cross reference char t to match the file size to the correct pitch.
Improper maintenance and sharpening of saw chain will greatly
increase danger of kickback.
Saw Chain Pitch
3/8" LP
.325"
Round File Size
5/32" (4.0mm)
3/16" (4.8mm)
3/8"
.404"
7/32" (5.5mm)
7/32" (5.5mm)
STEP ONE:
Choose correct file size. Be sure file is tightly fit into the guide groove.
Then, press the file guide so it rides on both cutter top plater and
depth gauge, with guide marks in line with the length of the chain.
Top View
File N Guide Fit Up
Guide Marks
STEP TWO:
File all cutters on one side. Move to other side of chain and file all cutters
opposite to complete sharpening. File all cutters identically.
Guide Bar
All top plates must be
filed to same length
90º
30º
Filing
Direction
Maintaining TriLink Saw Chain
13
14
Maintaining TriLink Saw Chain
CHECKING AND ADJUSTING
After sharpening a chain’s cutters 3 or 4 times with a round file, it is
necessary to check the height of the depth gauge.
To do this:
1. Place depth guide tool over chain, near mid point of guide bar, so that the
chain’s depth gauge extends through slot.
2. If the cutter’s depth gauge extends above the slot in the depth gauge, file
the cutter’s depth gauge down with flat file until it is level with the depth gauge
tool. Make sure to keep the round profile on the front of the cutter’s depth gauge.
.025"
(.6mm)
The depth gauge must be filed down, as your leading edge is shortened, to
allow the leading edge to catch the cutting surface. A depth gauge that is not
maintained will cause insufficient cutting. However, if the depth gauge is filed
too low it will cause a rough cut and rise the chances of kickback.
Depth Gauge Setting
New Cutter
Depth Gauge Setting
Depth Gauge Setting
Cutter Filed Down
Depth Gauge Untouched
Cutter Filed Down
Depth Gauge Filed Down
Once cutter has been filed, the leading edge, when viewed from the side,
should hook slightly forward (A). The cutting edge at the outermost tip of
the top plate should be slanted at 60°. The chain will cut best when all cutters are filed to the same length (B).
TWO
A
THREE
B
60º
C
FOUR
CAUTION: Do not alter guard link tangs (C) except when filing depth
gauges. Do not file cutter more than recommended and do not exceed
depth gauge clearance. Any deviation from these recommendations will
greatly increase the danger of kickback.
Maintaining TriLink Saw Chain
15
16
Saw Chain Maintenance Errors
Improper maintenance of saw chain will cause failures in your
timber cutting and your saw chain. Most saw chains are not
properly maintained and therefore are not used to their
full cutting efficiency.
SHARPENING ERRORS
There are several common errors when sharpening your
saw chain that will cause failure in your saw chain and
shor ten your saw chain’s life.
One of the most common errors occurs when
the leading edge is essentially filed away. This creates
what is commonly known as a BACKSLOPED cutter.
A backslope cutter is caused by filing with a larger file
size, or filing too high up on the cutter’s leading edge.
Backslope cutters, without a leading edge, will not
be able to catch the cutting surface. The natural user
reaction when this occurs is to apply more pressure
to your chain saw. Applying unnecessary pressure will
cause increased wear and possible breakage.
Backslope Cutter
The opposite of a backslope cutter is a HOOKED cutter. A
hooked cutter is caused by filing too far down from the leading
edge, or filing with a file size that is too small.
Hooked cutters will catch the surface and your saw chain will
cut, however, your chain will dull much quicker. When the chain
becomes dull the user’s natural response is, again, to apply more
pressure which will lead to increased wear and possible breakage.
Hooked Cutter
Another common problem is the height of DEPTH GAUGES
either being too high or too low. Filing down the leading edge
requires propor tionately filing down the depth gauge in order for
your saw chain to cut properly.
A depth gauge that is too high will not allow the leading edge to
properly catch the cutting surface. A low depth gauge will cause a
rough cut and increase the chance of kickback.
Depth Gauge Setting
Correct Depth Gauge
Depth Gauge Setting
High Depth Gauge
Depth Gauge Setting
Low Depth Gauge
Saw Chain Maintenance Errors
17
18
Saw Chain Wear
Errors in sharpening your saw chain will increase the wear on
your chain, shor ten your chain’s life efficiency, and increase the
possibility of chain breakage.
SIGNS OF SAW CHAIN WEAR
The natural response when a saw chain is not properly
cutting is to apply more pressure to your chain saw. The
additional applied pressure translates into additional
tension, friction, pressure, and heat on saw chain
and guide bars.
The additional pressure causes an increase in friction
between the guide rail and the bottom of the cutters and
tie straps. This additional friction will cause wear on the
bottom of your cutters and tie straps (shown in gray).
WEAR
WEAR
The wear on the bottom of cutters and tie straps can be
caused by backsloped cutters and is commonly derived
from high depth gauge settings.
Low depth gauges will cause wear on the guide bar rail, however,
it will also show wear on the cutters. The wear patterns seen on a
cutter from a low depth gauge will begin to show on the heel of the
cutter (as shown in gray below) and in time these wear patterns will
match the low depth gauge setting.
WEAR MATCHES
DEPTH GAUGE
SETTING
TriLink® Saw Chain is industrially chrome plated on the top and side
plates of all cutters. The industrial chrome plating helps the leading
edge hold it’s sharpness. When damaged and/or worn, the cutter
must be sharpened to restore the chrome edge.
DAMAGED
LEADING EDGE
FILED BACK
DEPTH
GAUGE SET
Saw chain wear can lead to breakage. Proper maintenance is highly
recommended. Correct procedures for sharpening the cutter and
setting the depth gauge correctly can be found in the ‘Maintaining
TriLink® Saw Chain’ section of this guide (Pages 12 to 15).
Saw Chain Wear
19
20
Understanding Guide Bars
TriLink® Guide Bars are designed to provide a guide and
suppor t rail for the moving saw chain. Our guide bar types
include: Mini Laminate Sprocket Nose, Laminate Sprocket
Nose, Replacement Sprocket Nose and Hard Nose.
TRILINK® GUIDE BARS
TriLink® MINI LAMINATE SPROCKET NOSE BARS have a
single bearing inside a rotating sprocket located at the tip of the
bar. As the chain moves along the bar, the sprocket teeth carry
the chain around the tip quickly with little friction or reduction in
cutting speed. These bars are available in 6” - 18” configurations.
MINI LAMINATE SPROCKET NOSE BAR (ALL 3/8" LP)
TriLink® LAMINATE SPROCKET NOSE BARS are light weight
bars that are typically used on consumer saws for the occasional or
semi-professional user. These bars are available in many applications
from 11” - 24” and are the best value for the consumer.
LAMINATE SPROCKET NOSE BAR
TriLink® REPLACEMENT SPROCKET NOSE BARS have a solid
steel body with a replaceable sprocket nose tip. This tip can be
changed as it wears out without having to replace the entire bar.
These bars are manufactured for high speed, heavy duty saws and
are preferred by the professional and semi-professional cutter ; available in 16” - 42” configurations.
SOLID REPLACEMENT SPROCKET NOSE BAR
TriLink® SOLID HARD NOSE BARS are constructed from one solid
piece of steel with Stellite™ alloy laser welded onto the tip. Solid
nose bars are designed for dir ty cutting conditions as they have no
moving bearings to get clogged. These bars are also frequently used
for bore cutting. TriLink® Solid Hard Nose Bars are typically used by
professional cutters because of their extreme strength and durability.
SOLID HARD NOSE BAR
Understanding Guide Bars
21
22
The Building Blocks of a Guide Bar
Sprocket
Roller
Bearings
Saw Chain
Lead-In Edge
Adjustment
Hole
Mounting Slot
Sprocket Rivet(s)
Bar Groove
Bar Rails
Oil Hole
Bar Rails
Mount
Body
Sprocket
Tip
GUIDE BAR MAINTENANCE
There are three major points to remember when
maintaining your TriLink® guide bars. First, inspect
the guide rails and oil holes to make sure they are
clear of saw dust and dir t. Keeping both the rails
and oil holes clean ensures the optimal lubrication.
File Burrs
Away From
Rail
Clean and
Check Bar
Groove
Second, check your guide rail for any imperfections;
this can mean burrs, cracking, twisting, or uneven
rails. Making sure the guide bar stands on a flat
surface will help determine if the rails are straight.
Any burrs need to be filed away using a flat file.
Third, you should have already cleaned out the saw
dust and dir t from the guide rails, now it’s time to
make sure the drive links of your saw chain will run
smoothly in the bar groove. Be sure to check the
depth and the straightness of the bar groove.
Check for
Straight Rails
Maintaining Your Guide Bar
23
24
Guide Bar Failures
DAMAGED RAILS
Over time, guide rails may become worn and uneven. These
damaged rails will cause your saw chain to cut unevenly
through the timber. As the saw chain travels through the guide
rails the cutters will pull the saw chain in the direction of its
cut. When a cutter is angled to the left it will pull the chain to
the left and when angled to the right a cutter will pull the saw
chain to the right.
A saw chain that is sharpened and cutting properly will
balance out it’s natural pull. Saw chains that are improperly
sharpened or are running on uneven rails will have uneven
pull from the saw chain cutters and will cause more wear on
the rails and the bar groove.
Pressure on the guide rails will cause the wire edge rail effect.
The wear on the rails, if not filed down, will result in possible
chipping or breakage.
WIRE EDGE RAILS
WORN RAILS
UNEVEN RAILS
In addition to poor saw chain maintenance, the added pressure
and friction of forcing a cut will lead to damage and wear on your
guide bar. Heat will continue to build up from the added pressure
softening the guide bar rails. The additional pressure from the saw
chain on the chain lead-ins will bend the guide bar rails outwards.
BENT RAILS
PINCHED RAILS
The risk of pinching the guide rails is also high when applying
added pressure to your cut. A pinched guide rail will cause your
saw chain to catch on the compressed areas resulting in your
saw chain binding.
Excessive damage to the guide rails and guide bar (bending,
cracking, twisting) will result in needing a replacement bar.
Proper maintenance of your saw chain will ensure a longer life
for your guide bar, limit the damage and wear to the guide rails,
and provide a cleaner, safer cut.
Guide Bar Failures
25
26
Guide Bar Failures
DAMAGED NOSE
Improper depth gauge settings will cause damage to your
guide rails at any location of the guide bar. The nose of a
sprocket nose guide bar, though, is susceptible to additional
damage and wear. When cutting with a saw chain that has too
loose of tension additional material wear will occur.
Wear/Chipping
EXCESSIVE WEAR
AND CHIPPING
Nose Area Discoloration
From Friction
SPROCKET FRICTION
NOSE WEAR
When a saw chain comes free during cutting, due to loose
tension, the bar nose may become twisted. A twisted bar nose
will not allow the sprocket to turn freely and will result in a
replacement guide bar being needed do to excessive damage.
The nose of a guide bar that has been twisted or pinched
will create additional friction in and around the sprocket.
This additional friction will cause discoloration to the nose
area of the guide bar. This excessive damage will result in a
replacement guide bar being needed.
Nose Assembly
Opened From Bar
Twisting and Misuse
BROKEN SPROCKET NOSE
Misuse of your chain saw, such as using it as leverage to fell
a tree or as a felling wedge, as well as cutting while a saw
chain’s tension is too tight will cause a damaged or possible
broken nose sprocket and will result in a replacement guide
bar needed.
Guide Bar Failures
27
28
Understanding Sprockets
SPROCKETS
Drive Sprockets are as impor tant to your chain saw as the engine
and the saw chain. The Sprocket is the stepping block between
the power from the engine and the saw chain using centrifugal
force to drive the chain.
There are two types of sprockets. SPUR SPROCKETS are a machine
produced, one-piece solid construction. Spur sprockets incorporate
both the clutch drum and the drive sprocket into a single piece.
RIM SPROCKET
SPUR SPROCKET
CENTER DRIVE
The RIM SPROCKETS are a two piece construction that
allow the chain to be aligned with the bar groove because
the rim rides on the hub splines. The rim sprocket will take the
majority of the wear, reducing wear to the center drive sprocket.
Sprockets are a lot like saw chain and guide bars. The pitch
of a sprocket must match that of the saw chain and that
of the sprocket nose guide bar.
As your saw chain wears, naturally, so will your sprocket. When
a new chain is placed on a worn out sprocket your new chain
will wear quicker, matching the wear of the sprockets and
creating a ‘stretch’ effect in your saw chain. The reality is that
this ‘stretch’ is actually the saw chain trying to fit into the wear
on both your sprockets, essentially creating an improper pitch
on the sprocket.
Wear on Sprocket will
Create ‘Stretch’ effect
Wear on Sprocket will
Create ‘Stretch’ effect
Notch From
Wear
Wear From
Drivelink
Notch From
Wear
SPUR SPROCKET WEAR
RIM SPROCKET WEAR
Testing the wear on your sprocket is recommended. Turn off
your chain saw when testing your sprocket. Then pull your saw
chain around the guide bar with the proper tension applied to
the chain. A worn sprocket will make the chain drag and bind
up making it difficult to pull around the guide bar.
Once a sprocket is worn it will need to be replaced in order to
prevent quicker wear on your saw chain and guide bar.
Sprocket Failures
29
30
Preventing Kick-Back
Essentially, TriLink® Saw Chain carries two types of chain:
LOW KICK-BACK (SAFETY) and PROFESSIONAL chain.
PREVENTING KICK-BACK
Low Kick-Back chains are specifically made to reduce the kickback energy, however they do not completely eliminate kick-back.
There are two types of kick-back: LINEAR KICK-BACK and
ROTATIONAL KICK-BACK. A clear understanding of both of
these will help in reducing kick-back.
Linear Kick-Back is caused when the saw chain and guide bar
become pinched at the top of the guide bar during the cut. The
pinched chain and bar will cause a strong backward motion (kickback) as the chain catches in the pinched cut. The use of a felling
wedge will prevent the wood surface from pinching the guide bar
and allow a smoother, faster cut.
Rotational Kick-Back is caused by the tip of the guide bar and saw
chain catching an object and pushing back in an upwards motion
(kick-back). A proper cut, one where the user does not lead with
the nose, will help prevent rotational kick-back from occurring.
Improperly sharpening or filing of guardlinks will increase the risk
of kick-back.
CAUTION: Kick-Back can lead to dangerous loss of control of the chain
saw and result in serious or fatal injury to the operator and anyone
standing close by.
GUARD AGAINST KICK-BACK
ALWAYS use two hands to operate the chain saw. KEEP the saw below
shoulder height as this gives you, the operator, better control over kickback reactions. MAINTAIN a balanced stance with the left elbow braced
as straight as possible and the handles held firmly between the thumb
and fingers. KEEP a firm grip with both hands at all times.
REV up the engine to full throttle before letting the chain touch the
wood. DO all your cutting at full throttle; a slow chain can catch the
wood and throw the saw from your hands. DO all cutting on the
straight por tions (top and bottom rails) of the guide bar to avoid
kick-back reactions. NEVER cut with the bar tip.
KEEP watch that the tip of the bar does not contact any object
while chain is moving. KEEP your chain properly maintained and
properly tensioned.
READ your chain saw User Manual and operating instructions before
attempting to use the saw. Be sure you understand all instructions. If in
doubt, consult your dealer for instructions before using.
NEVER stand directly behind the chain saw while cutting; stand slightly
to the left of the guard bar. NEVER remove, modify, or make inoperative
any safety device or guard provided.
REMEMBER a chain saw is a very dangerous tool when
used improperly.
Preventing Kick-Back
31
32
ANSI Standards
REFERENCE GUIDE
CHAIN SAW MAKE
TRILINK CHAIN PART NO.
TRILINK GUIDE BAR PART NO.
NOTES:
CHAIN SAW MODEL
TRILINK FILE AND GUIDE SIZE
TRILINK SPROCKET NO.
NOTES:
Reference Guide and Notes
33
34
Notes
NOTES:
NOTES:
Notes
35
www.trilinksawchain.com
TriLink Saw Chain, LLC
4400 Commerce Circle
Atlanta, GA 30336
404.419.2900
1.877.492.9829
TriLink Saw Chain Sales
P.O. Box 661
Ponte Vedra Beach, FL 32004
[email protected]
904.285.0687