1
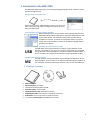
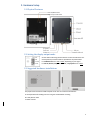
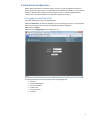
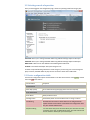
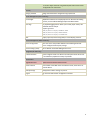
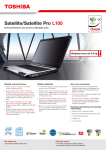
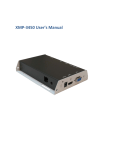
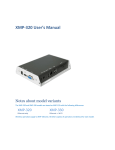
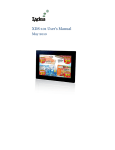
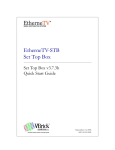
NMP-200U User’s Manual November 2008 Contents 1 Introduction to the NMP-200U .......................................................................................................................................................4 1.1 Package Contents .................................................................................................................................................................4 2. Hardware Setup ............................................................................................................................................................................5 2.1 Physical Features ..................................................................................................................................................................5 2.2 Setting the display output mode ...........................................................................................................................................5 2.3 Suggested hardware installations..........................................................................................................................................5 2.4 Connecting power and signal cables......................................................................................................................................6 2.5 Completing Hardware Setup .................................................................................................................................................6 3 Initial Device Configuration.............................................................................................................................................................7 3.1 Logging in to the NMP-200U .................................................................................................................................................7 3.2 Selecting a mode of operation ..............................................................................................................................................8 3.3 Device configuration table ....................................................................................................................................................8 4 Managing player contents with Adfotain Manager Express ........................................................................................................... 10 4.1 Management options using Adfotain Manager Express ....................................................................................................... 10 4.2 Using NMP-200U without an Ethernet network .................................................................................................................. 10 5 Specifications table ...................................................................................................................................................................... 11 Appendix 1: Setting up the player without network ......................................................................................................................... 12 Appendix 2: Troubleshooting and FAQ............................................................................................................................................. 15 2 Revision History Revision # Change logs 1.0 First manual release 1.1 1. Description of each mode 2. Added SI mode function 1.2 Updated USB mode operations 1.3 Updated Adfotain Manager Express 1.0 work flow 2.0 General revision Frequently used references Please fill in the following data for future reference. MODEL NMP-200U SERIAL (COA): LOG IN USER*: PASSWORD*: MAC ADDRESS: DEVICE IP: The device IP may change after player restart. The actual IP can be seen on your display for 1020 seconds during player startup. Default Account*: admin Default Password*: digiSignage *Denotes a case-sensitive field (paSSwOrd≠PASSword) 3 1 Introduction to the NMP-200U The IAdea NMP-200U media player is an industrial-grade digital signage system suitable for remote and local management use. Configuration in a web browser Connect player with the supplied Ethernet cable to a PC to set time zone, access player logs, perform configuration backups and more from your web browser. Essential digital signage software included Adfotain Manager Express lets you harness the full signage potential of the NMP-200U. This bundled PC application is designed to deliver dynamic DVDquality videos, photos, and PowerPoint slides (stills) for public viewing anywhere on a network. For details on management features such as dayparting and content distribution, please see the Adfotain Manager Express Software User's Manual. USB USB mode for stand-alone operation The NMP-200U is fully functional without a network, using a USB mass-storage device or a removable CF card to sync your content. Simply export to a removable storage device and connect the device to the player to initiate automatic update. A built-in clock plays your program on the schedule even during network outages. MZ Advanced management options For large networks, the optional Adfotain Central Management MZ Server lets you group-manage an entire network of cost-effective IAdea media players anywhere in the world using a powerful web-browser interface. Learn more at www.IAdea.com. MZ 1.1 Package Contents Media player unit Quick start guide (not shown) Installation and Documentation Kit CD AC Power Adapter: 5V DC output Standard Ethernet cable: 1M length (not shown) Audio Adapter Cable: RCA male to 3.5 mm female (not shown) Audio Cable: 3.5 mm male to 3.5 mm male (not shown) CF card slot protective plate and screw set (not shown) 4 2. Hardware Setup 2.1 Physical Features 2.2 Setting the display output mode Set the Video mode using the DIP switches on the back side of the unit. Switch positions per video mode are provided on the product label. For traditional TV: set to PAL or NTSC, depending on your region For LCD TV, Plasma, computer monitors, and projectors: set to VGA 2.3 Suggested hardware installations The player enclosure features VESA-compliant screw-slots for convenient attachment: A. directly behind self-standing monitors using the standard VESA mounting B. inside partition walls C. below counters 5 Notes on security features The Reset/Set clock button and Video mode switches are located on the player’s back panel to avoid tampering. If you don’t need to change display types often, you can cover both panels by fixing the player to a flat surface to lock settings. Clock settings can be performed from your web browser. You can prevent the player’s CF card from being removed from its slot. Locking the CF card inside the player with the bundled CF protective plate and screw set discourages unauthorized removal. 2.4 Connecting power and signal cables Connect the player to a screen and a computer using the supplied cables and adapter. Connect the media player to a screen and AC power as shown above. Turn on your display monitor and switch it to the corresponding video mode: VGA (sometimes referred to as “RGB”), S-video, or Composite. 2.5 Completing Hardware Setup When you see on screen text messages on your display, congratulations! You have properly completed the hardware setup. The next step is to configure player software settings such as time and date from your Internet browser. If you do not have a network capable computer at hand, please refer to Appendix 1 to set up your player for playback without a network. 6 3 Initial Device Configuration IAdea media players feature a software interface, similar to a router configuration interface, to greatly simplify the setup process. It is compatible with standard Internet browsers such as Internet Explorer or Mozilla Firefox. Simply connect your player to your PC with the supplied Ethernet network cable, and type the default IP in the browser’s address bar to log in. 3.1 Logging in to the NMP-200U Using your web browser, type in the following data: Default IP: 169.254.1.1 (for browser URL field) if you are connecting your player to a local network, please sees the player’s boot-up screen to determine the player’s assigned IP. Default Account: admin Default Password: digiSignage (Note the upper-case “S”) The device Information area on the top right corner of the page shows device ID network MAC address network IP address model name firmware version local time 7 3.2 Selecting a mode of operation Once you have logged in the configuration page, choose an operating mode from the gray bar: LAN mode allows you to manage the NMP-200U using Adfotain Manager Express LAN export USB mode allows you to manage the NMP-200U using Adfotain Manager Express USB export WAN mode is ONLY for use with Adfotain Central Management MZ Server SI Mode is reserved for developer and system integrator use A reboot is required following each device mode change. If you are using a CF card to change the player contents, the NMP-200U can play the new contents in either LAN or USB mode. 3.3 Device configuration table The browser configuration options are described in this table. Start with the ones in green, and use the ones in red with caution! Function Name Description Documentation Online Help (www) Link to IAdea online support page (Internet access required). Device Information Device Name Modify the device name IP Configuration Automatically obtain an IP from DHCP server or assign a static IP Extra Routing Advanced network function. Allows device to be configured under complex network environments. Please obtain the configuration data from your network administrator. Date/time setting This is the easiest way to set the clock. Select your time zone from the list and click “Sync now” to update player clock. The clock settings will now run on built-in battery for up to several years. 8 You can also adjust the clock using the Reset/Set clock button. Please see Appendix 2 for instructions. Security Change password Change the web browser configuration login password. Device Management (LAN mode only) File manager Add/delete media files for simple playback. For advanced scheduling features, use the Adfotain Manager Express bundled solution. View logs The playback logging feature allows you to check player activity and download data for analysis. Sample Log format: 2008/11/18-13:11:20 play: CD99EC1F.MPG 2008/11/18-13:14:27 play: 3D26CCA8.JPG 2008/11/18-13:14:34 play: C7F240AD.JPG OSD Display input text/text file using OSD (on screen display) function. Service Management (WAN mode only) Server configuration Select the server that provides Adfotain Central Management MZ Server. Configure network proxy settings. Service settings (www) Link to Adfotain Central MZ Management server. Integration (SI mode only) Protocol selection System integrate mode is an advance control option which allows user to control device playback via variety of protocols. Maintenance Upgrade firmware Update device to latest firmware version. Driver selection Some models of the NMP series have RS232 control, select driver for external devices. Backup settings Backup/restore device settings to your PC. Logout Sign out from web browser configuration interface. 9 4 Managing player contents with Adfotain Manager Express Once you have set up your signage player and display system, you are ready to load content into the player for playback on a schedule. 4.1 Management options using Adfotain Manager Express You have the following playback options when using Adfotain Manager Express: Looping playback You can select files, re-order them, and export via LAN, USB drive, or CF card for auto-repeating playback. Weekly schedule playback This mode plays specific files exported via LAN, USB drive, or CF card at specific times of the week. Please refer to the Adfotain Manager Express User’s Manual on content scheduling and publishing functions of your NMP-200U. 4.2 Using NMP-200U without an Ethernet network You can use the NMP-200U in areas without Ethernet connections by synchronizing contents from a USB device. 1. 2. 3. 4. 5. From Adfotain Manager Express, export your scheduled programming to a USB drive (instead of selecting the Export to network option). Insert the drive to the USB port of the NMP-200U. Check the instructions displayed on screen. The screen will go black during file transfer; playback will be resumed once all files are copied to device. All previous existing media clips will be removed in this process. After the update is completed (from minutes to hours, depending on file size), the device will reboot and start to play the new program. Remove USB drive. 10 5 Specifications table Video codec support Image codec support Management options I/O ports Local storage Power requirements Environmental Dimensions Weight MPEG 1 MP@ML 480P MPG MPEG 2 MP@ML 480P MPG MPEG 4 ASP@L2 480P AVI JPEG 640x480 Adfotain Manager Express Adfotain Central MZ Server LAN mode API for development VGA out S-Video out Composite out 3.5mm stereo audio jack 10/100 BASE-T Ethernet port USB port 2.0 host (for mass storage devices) CF card slot CF card required, not supplied (a 4GB card holds approx. 180 minutes of video @3Mbps) AC Power adapter output: 5V, 2A DC Power consumption: 10W max, 5W avg. Operating Temperature: 0 to 40deg C Humidity: 5-85%RH @40deg C 133.5 x113.5 x25 (mm) (excluding projections) 5.3 x4.4 x1 (inches) (excluding projections) 1.8 lbs. 0.8kg 11 Appendix 1: Setting up the player without network The following operations are alternatives methods available in web browser configuration or Adfotain Manager Express, and are provided for your reference when needed. Setting the clock manually The clock settings run on built-in battery for up to several years, but initially you will need to set it to your time zone for properly scheduled playback. After powering on both the player and the display, "PLEASE WAIT..." appears on the screen for 10 seconds. After video appears on screen, set the clock by pressing and holding the RESET/SET CLOCK button. You will see the following on screen display: YYYY/MM/DD Press RESET/SET CLOCK button BRIEFLY to increase each digit value Hold button to advance to the next digit REMINDER: You should set the clock before you physically mount the player or keep the button accessible if you are not planning the network clock set feature. Setting a player password and resetting forgotten passwords NMP-200U also features password protection to prevent unauthorized USB drive updates. 1 Create a file named “password.txt”. 2 Edit password file and enter desired password 3 Copy the password.txt file to USB device 4 Retrieve device's CF card and copy password file to device's CF card under uppermost (root) folder 5 Once device is inserted with CF card that contains password.txt file, only a USB storage device with the same password file can perform updates to the device 6 The password.txt file should be placed under USB device’s root (top level) folder Note USB drive authentication password and the web configuration password are 2 distinct sets of passwords. The Reset/ Clock set button can be used to clear all passwords. USB update without Adfotain Manager Express The player will play back compatible media files repeatedly in alphanumerical order from a CF card. 12 1. 2. 3. 4. 5. 6. Format a CF card using FAT or FAT32 file system (NTFS is not supported) Rename files in the alphanumerical order you want them to play Insert CF card to the player Unplug and replug player power (reboot) Files will play automatically with the following transitions: a. Images: 3 seconds per file, cross-fade transition b. Videos: (varies) full duration of the file All compatible files will be played in sequence and then repeated until user initiated power-off Note: You can make multiple copies of the same image with successive alphanumerical file names to increase slideshow duration by multiples of 3 seconds. USB update without Adfotain Manager Express You will still need an Ethernet connection to your PC to set your player to USB mode for this method. Please refer to the previous section to change device mode. 1. 2. 3. 4. 5. From Adfotain Manager Express, export your scheduled programming to a USB drive. Insert the drive to the USB port of the NMP-200U. Pay attention to the instructions on screen, waiting until the whole update process is completed before removing the USB drive. After the update is completed, the device will start to play the media. Remove USB drive. Uploading media files using File Manager Adfotain Manager Express is the preferred method for scheduling and uploading complex programs, but you can also upload files for basic looping (repeating) playback from the browser. 1. Log in to Adfotain Foundation. 2. Switch to LAN mode (if you are in WAN mode). Choose “reboot device” when prompt box pops up. 3. Click File Manager under Device Management. If device has been rebooted in step two, please login to Adfotain Foundation prior to executing this step. 4. Double click on media folder in the File browser text area. 13 5. Click on the browser buttons to select media files to upload to device. Up to five media files can be transferred at once. 6. Click Upload button to transmit media files to device. After files have been uploaded to media processor, the playback won't occur immediately. The playback will start when user leaves File manager. The design ensures uninterrupted playback of the original programming until the replacement media files are fully uploaded. 7. Click on View logs under Device Management, and system will prompt to inform playback will start now. 8. The View logs page has detail playback information. Since there are no playlists assigned in this example, AUTOPLAY will trigger and continuously loop through all media files alphabetically. 14 Appendix 2: Troubleshooting and FAQ What is a firmware? Should I upgrade my media player to the latest firmware version? Firmware is the system software that makes the hardware work. For example, your personal computer stores its firmware (called built-in operating system or BIOS) on a chip in its motherboard. Usually firmware updates provide bug fixes or adds new features to the system. IAdea does not recommend installing firmware updates unless it addresses a critical operation flaw, outlined in each firmware's release notes. Since upgrades involve erasing an old firmware and replacing it with a newer one, a failed firmware upgrade will leave you without a working system software, rendering the device unusable. Therefore you should exercise caution when upgrading the firmware, and be ready to send the player back for repairs (under warranty terms) should failure occur. How can I perform a proper firmware update? IAdea player firmwares are upgraded via the browser configuration interface, as described in the manual. When you click on the “Update Firmware” button in the configuration web page, the BIOS files you acquired from IAdea are copied to its destination device and then used to initiate updates. The process takes from a few seconds to a few minutes, during which time you should keep the power plugged in. Look for on screen display (OSD) for the “upgrade successful” message. Could it play Flash, or MS PowerPoint Presentation file? PC could play all formats, since each different media player software already reside in your PC. RISCbased Media Player only could play a limited of video formats. (Please see spec for details). While, MS PowerPoint native file could not play directly on a RISC-based player, if the file is converted thru other software (i.e. Adfotain Manager Express) into a correct format, the converted file could be played on a RISC-based player. Why won’t some media files play smoothly? The video bit-rate may be too high. The bit-rate is the amount of video or audio data used per second to store or play the contents, usually expressed in Mbps (mega-bits per second). Video encoded with excessive bit-rates will not playback smoothly in the media player. Recommended bit rates for standard definition players (IAdea CMP-100S or NMP-200U) is 3~6 Mbps, while for high-definition video media players (IAdea HMP series) the recommended bit rate is 5 ~ 8 Mbps. You can try using a faster CF card or recompressing unplayable video files at lower bit rates using the free and open source Handbrake tool at http://handbrake.fr/. Once you have found the right output settings for size and quality, save them in Handbrake profiles for future use. Then you can easily recompress any unplayable files you encounter in the future. Why won’t some media files play at all? Even though IAdea player license and conform strictly to industry standard video formats, sometimes videos you acquire may fall outside of the compatibility matrix. When files play on your PC but not on your player, you should recompress the file to ensure playback. For greatest compatibility, we recommend outputting to the MPEG2 format (3 to 5 Mbps bit-rate) for standard-definition players (IAdea CMP-100S or NMP-200U), and the WMV HD format (5 to 8 Mbps bit-rate) for high-definition video media players (IAdea HMP, XMP series). You can try recompressing unplayable video files with recommended file formats and bit rates using the free and open source Handbrake tool at http://handbrake.fr/. Once you have found the right output settings for size and quality, save them in Handbrake profiles for future use. Then you can easily recompress any unplayable files you encounter in the future. The media playback looks different on PC than on media player’s screen. (Wrong aspect ratio) There are 2 major aspect ratios (width-to-height ratios) for video content, but many kinds of displays. If you play 4:3 video on a 16:9 display (or vice versa), a circle becomes oval, and the picture takes on a squeezed or stretched look. To avoid this distorted look, adding black bars are a common technique. CMP and NMP players always stretch the video to the full extents of your display. If you wish to correct the distortion this introduces, you need to add black bars into the video file itself, using a 15 video editing program such as Windows Movie Maker, which is included free with Windows XP or Vista OS. HMP and XMP players can be configured to automatically add black bars for certain types of displays. You can set the output resolution in HMP-500’s browser configuration page to match the native resolution of your display unit. Some JPEG files cannot play on media player. JPEG images can be created with either baseline or progressive compression. Baseline JPEG has better support among devices. Progressive method is specifically for web site images which allow large images to be displayed “progressively” as it downloads. Make sure to save images as baseline JPEG in your photo editor, or resave them as baseline JPEGs using free tools such as Paint.net (http://www.paint.net/). Does my media player support video streaming? No. IAdea media player downloads entire contents to player’s local storage before presenting them on screen. This ensures the best possible presentation and impact of your video message. Video streaming raises many playback quality issues such as stuttering, blocking, or blue-screens, costing you valuable “air time” and losing your audience's attention. Could the media player be controlled by external input devices or interfaces? No, unless specifically developed for. Touch panel, bar code scanner, and motion sensors are popular input devices for PC based digital signage media players, but RISC based players require considerable effort to develop special hardware drivers for each I/O device. Can I use a password-enabled USB drive to update a non-password-protected media player? No, the password.txt on USB flash drive must be identical to the one on device’s storage. If there is no corresponding password file on device side, the files will not be updated. In this case, delete or rename the password file on your USB device to continue updates. The media player is not playing. What should I do? Since RISC-based media player usually lack of input devices such as keyboard or mouse like PC does, troubleshooting are usually based on user’s knowledge and experience with the specific media player. Always check on screen message and stats report (available to networked devices only). Bad play list and timing issue are two major causes of playback problem. To determine if the problem is caused by a bad play list, simply delete the play list and resume playback. The player should loop through all media files, thus you'll know the play list is at fault. If the playback is scheduled to play at specific time, check if device is set to right time zone. Wrong time zone setting delays or accelerates playback from the intended time. 16