1
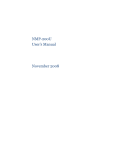
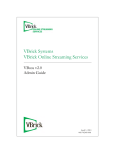
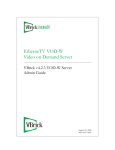
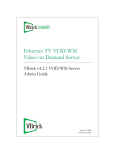
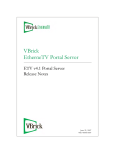
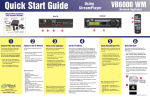
EtherneTV-STB
Set Top Box
Set Top Box v3.7.3b
Quick Start Guide
September 14, 2006
4410-0134-0005
Copyright
© 2006 VBrick Systems, Inc. All rights reserved.
12 Beaumont Road
Wallingford, Connecticut 06492, USA
www.VBrick.com
This publication contains confidential, proprietary, and trade secret information. No part of this document may be
copied, photocopied, reproduced, translated, or reduced to any machine-readable or electronic format without
prior written permission from VBrick. Information in this document is subject to change without notice and
VBrick Systems assumes no responsibility or liability for any errors or inaccuracies.VBrick, VBrick Systems, the
VBrick logo, StreamPlayer, and StreamPlayer Plus are trademarks or registered trademarks in the United States and
other countries. Windows Media is a trademarked name of Microsoft Corporation in the United States and other
countries. All other products or services mentioned in this document are identified by the trademarks, service
marks, or product names as designated by the companies who market those products. Inquiries should be made
directly to those companies. This document may also have links to third-party web pages that are beyond the
control of VBrick. Use these links at your own risk. The use of such links does not imply that VBrick endorses or
recommends the content of any third-party web pages. Some VBrick products use open source software provided
by third parties. VBrick supports the Open Source Initiative (OSI) and this source code is freely available at http:/
/www.vbrick.com/opensource.
About VBrick Systems
Founded in 1997, VBrick Systems, an ISO 9001 certified vendor, is a privately held company that has enjoyed rapid
growth by helping our customers successfully introduce mission critical video applications across their enterprise
networks. Since our founding, VBrick has been setting the standard for quality, performance and innovation in the
delivery of live and stored video over IP networks—LANs, WANs and the Internet. With thousands of video
appliances installed world-wide, VBrick is the recognized leader in reliable, high-performance, easy-to-use
networked video solutions.
VBrick is an active participant in the development of industry standards and continues to play an influential role in
the Internet Streaming Media Alliance (ISMA), the MPEG Industry Forum, and Internet2. In 1998 VBrick
invented and shipped the world's first MPEG Video Network Appliance designed to provide affordable DVDquality video across the network. Since then, VBrick's video solutions have grown to include Video on Demand,
Management, Security and Access Control, Scheduling, and Rich Media Integration. VBrick solutions are
successfully supporting a broad variety of applications including distance learning and training, conferencing and
remote office communications, security, process monitoring, traffic monitoring, business and news feeds to the
desktop, webcasting, corporate communications, collaboration, command and control, and telemedicine. VBrick
serves customers in education, government, healthcare, and financial services markets among others.
STB v3.7.3b Quick Start Guide
This guide explains how to get your EtherneTV Set Top Box up and running in a few easy
steps as shown below. For more detailed installation and configuration instructions, see the
Set Top Box Admin Guide.
Step 1. Choose a Start Mode . . . . . . . . . . . . . . . . . . . . . . . . . . . . . . . . . . . . . . . . . . . . . . . . . . 1
Step 2. Connect the Set Top Box . . . . . . . . . . . . . . . . . . . . . . . . . . . . . . . . . . . . . . . . . . . . . . . 1
Step 3. Set the IP Address . . . . . . . . . . . . . . . . . . . . . . . . . . . . . . . . . . . . . . . . . . . . . . . . . . . . 2
Step 4. Configure the Start Mode . . . . . . . . . . . . . . . . . . . . . . . . . . . . . . . . . . . . . . . . . . . . . . 4
Step 1. Choose a Start Mode
The first step is to choose a Start mode from among the following options. This determines
how the Set Top Box will behave when started. A network administrator will generally
determine the Start mode based on your network configuration. In Step 4, you will actually
configure the Start mode.
MCS Mode
When installed with an ETV Portal Server (formerly MCS), the
features and options of the VBrick EtherneTV Set Top Box are
controlled through the Portal Server. See the ETV Portal Server
Admin Guide for more information.
Local Mode
The VBrick EtherneTV Set Top Box contains software that enables it
to work as a standalone device. When used in standalone applications,
the set top box features and options are similar to MCS Mode but are
controlled locally—not by the ETV Portal Server.
Local-Fullscreen
Mode
The VBrick EtherneTV Set Top Box also can operate in a fullscreen
mode. This allows the user to tune in one channel and display the
received stream on the entire screen of the attached monitor.
Step 2. Connect the Set Top Box
The VBrick EtherneTV Set Top Box is shipped with Audio/Video, S-Video, and power
cables and a handheld IR remote control unit. An optional wireless keyboard is also available.
T
To connect the Set Top Box:
1.
Using the provided cables, attach the set top box video out to a monitor using the left
(yellow) connector or the S-Video connector.
Using the provided cables, connect the set top box audio out (left and right) to a monitor
(left and right) monitor.
Using customer provided cables, connect the set top box to the network, using the left
(LAN1) Ethernet port as viewed from the back of the unit.
The set top box comes configured to assign an IP address using DHCP. To find the IP
address it is necessary to attach a keyboard using the PS/2 port connection or use the
VBrick software application VBDirectory.
Connect the power cord, and if desired, connect a VGA monitor.
2.
3.
4.
5.
STB Quick Start Guide
1
Table 1. Front Panel – Left to Right
Infrared Sensor
Above LEDs. Used for IR remote control and wireless keyboard.
Waiting
Blinks red during initial start-up.
Transfer
Blinks white when accessing flash memory.
Power
Steady green when power is applied.
On/Off
On/Off push button.
Table 2. Rear Panel – Left to Right
Power Plug
Connects to power cord.
VGA Port
Used to view video on a VGA monitor.
Serial Port
Used for Serial Port Passthrough or to open a Command Prompt.
PCI Card Slot
Not Used.
S-Video
Connect to standard TV.
Video
Composite video out.
Audio Left/Right
Audio out left and right.
USB Ports (2)
Connect USB mouse and/or keyboard.
SPDIF
Digital audio. Not supported.
LAN1
Connect to local area network.
LAN2
Not used.
PS/2
Connect PS/2 keyboard or mouse.
Step 3. Set the IP Address
You need to know the IP address in order to run the web-based STB Admin Configuration
application. By default, the set top box is configured for DHCP (Dynamic Host
Configuration Protocol) and will automatically retrieve an IP address from a DHCP server if
2
EtherneTV Media Distribution System
STB v3.7.3b Quick Start Guide
present. If a DHCP server is not available, you can configure the set top box with a static IP
address. The STB is set to a default IP address of 172.17.11.111 as a convenience. In most
cases, this should be changed to avoid conflicts. You can find this IP address using a
keyboard connected to the PS/2 port or by using a terminal connected to the serial port as
explained below.
Note By default, DHCP is used to retrieve a dynamic IP address for the STB. If you are not
using a DHCP server, you must configure the STB to use a static IP address. The
default static address is 172.17.11.111.
T
To determine the STB IP address:
1.
If a DHCP server is present, go to Finding the DHCP IP Address to determine the IP
address of your STB in DHCP mode.
If a DHCP server is not present, go to Assigning a Static IP Address to manually assign an
IP address other than the default.
2.
Finding the DHCP IP Address
T
To determine the IP address of the set top box when configured using DHCP:
1.
Connect a keyboard and TV monitor to the set top box and apply power. (Use the
optional wireless keyboard or a PS/2 keyboard). Wait for the box to completely power up
before continuing.
Press Ctrl-Alt-F1 on the keyboard to open a Command Prompt window.
Login using root and admin for User name and Password . (To change the password, go
to the Configuration: General > Security page in IWS.)
At the prompt type ifconfig and press Enter. This shows the IP address, the network
interface configuration, and other parameters.
Reboot by powering the STB on and off using Power push button on front of unit.
2.
3.
4.
5.
Assigning a Static IP Address
T
To assign a static IP address using a Command Prompt window:
1.
Connect a keyboard and TV monitor to the set top box and apply power. (Use the
optional wireless keyboard or a PS/2 keyboard). Wait for the box to completely power up
before continuing.
2. Press Ctrl-Alt-F1 to open a Command Prompt window.
3. Login using root and admin for User name and Password . (To change the password, go
to the Configuration: General > Security page in IWS.)
4. To enter the setup program, type pman and press Enter.
5. Select Parameters (using the arrow keys and Enter ).
6. Select Network > Ethernet .
7. Change DHCP Enable to Static
8. When prompted, enter the default (case sensitive) user name and password: root and
admin.
9. Click Enter to reach OK and then click Enter.
10. Change DNS via DHCP to No.
11. Select IP address using the down arrow and the Enter key. Using the keyboard, enter the
IP address obtained from your network administrator and press Enter.
STB Quick Start Guide
3
12. Select and enter the NetMask , Gateway addresses, and Hostname using the same
procedure as selecting the IP address above.
13. Leave the Ethernet interface Mode of operation at the default Auto (auto-negotiate).
(Other options are selectable but in most networks you should only select a different
option if necessary to interoperate with your network equipment.)
14. Enter the IP address of the Nameserver as follows:
a. Select Network (using the down arrow and Enter key).
b. Select Network again.
c. Select Domain NameServer IP Addresses and enter the Nameserver IP addresses. (If
there is more than one, separate the entries with the pipe character (|), for example
172.16.1.11|172.16.1.10.)
15. When done, use the up arrow key to reach <. . . > and select using the Enter key on each
screen. Answer Yes when prompted to apply changes and Exit to return to the user
prompt level. Wait until the changes are applied and the interface returns; otherwise the changes
may be lost.
16. Reboot by powering the STB on and off using Power push button on front of unit.
Step 4. Configure the Start Mode
Select the application Start Mode. This determines how the Set Top Box will behave when
started. See the STB Admin Guide for more information.
Setup for MCS Mode
T
To configure the STB for MCS Mode:
1.
On your PC, open Internet Explorer and enter the IP address of the EtherneTV-STB in
the URL (address) window.
2. Log in as root.
3. Password admin.
4. Click on Start .
5. Click on Configuration>Video>Setup>Start Mode.
6. Select MCS from pull down menu.
7. Click on Configuration>Video>Setup>MCS Location .
8. Enter your ETV Portal Server IP address.
9. Click on Apply.
10. Click on Logout .
11. Click on Exit . The EtherneTV STB will restart in MCS mode.
Selecting Video in MCS Mode
Use the IR remote control unit to Watch live broadcasts or Browse video library and use the
left mouse button to enter. Alternately, you can press TV or VOD on the remote or select
menu items by pressing Menu .
Watching TV in MCS Mode
The Watch live broadcasts menu displays a list of multicast streams. Unless there is a channel
assigned, the list is in alphabetical order and contains brief information about the program.
The Browse video library provides a matching user interface.
4
EtherneTV Media Distribution System
STB v3.7.3b Quick Start Guide
Navigating in MCS Mode
Select Channel
Using the handheld IR remote control and press the up/down
channel button to highlight the desired channel selection. Once the
stream is highlighted, use the Select IR remote control button to
start the selected video in the Preview Window.
Play Control
To Stop, Start and Pause the video, use the buttons on the bottom
of the preview window or use the buttons along the top of the IR
remote control unit. (Note that the video must be playing before
control buttons on the IR remote control unit or on the screen can
be used.)
Channel Assignments
If the entry has been assigned a specific channel assignment, it will
appear to the left of the text. Channel assignments are made in the
ETV Portal Server configuration. For more information, see the
ETV Portal Server Admin Guide.
Full Screen
Press Full Screen on the IR remote for full screen viewing; press
again to exit full screen viewing.
Exit Full Screen
To exit full screen, press the Full Screen (blue) button on the IR
remote control.
Setup for Local Mode
T
To configure the STB for Local (standalone) Mode:
1.
On your PC, open Internet Explorer and enter the IP address of the STB in the URL
address window.
Log in as root.
Password admin.
Click on Start .
Click on Configuration > Video Setup > Start Mode.
Select Local from pull down menu.
Click on Apply.
Click on Logout .
Click on Exit . The EtherneTV STB will restart in Local mode.
2.
3.
4.
5.
6.
7.
8.
9.
Selecting Video in Local Mode
Press the up/down Channel button on the remote control to highlight the desired selection.
Once the stream is highlighted, use the (yellow) Select button to start the selected stream.
Watching TV in Local Mode
The menu displays a list of multicast streams and contains brief information about the
program.
Navigating in Local Mode
An XML file defines the stream addresses and port numbers when operating in Local mode.
In most cases this file will need to be modified to reflect your actual network. See Sample
XML File Entries below for instructions to modify this file. Note that a video must be
playing before control buttons on the IR remote control unit or on the screen can be used.
STB Quick Start Guide
5
Select Channel
Using the handheld IR remote control, press the up/down Channel
button to highlight the desired selection. Once the stream is
highlighted, use the (yellow) Select button to start the selected
video in the Preview Window.
Play Control
To Stop, Start and Pause the video, use the buttons on the bottom
of the preview window or use the buttons along the top of the IR
remote control unit.
Channel Assignments If specific entries are desired, see the Modifying the Local Mode
XML File below or refer to the XML Configuration Examples in
the STB Admin Guide.
Full Screen Mode
Press Full Screen on the IR remote for full screen viewing; press
again to exit full screen viewing.
Exit Full Screen
Mode
To exit full screen, press the Full Screen (blue) button on the IR
remote control.
Modifying the Local Mode XML File
This file is edited for Local mode installations only and does not apply when operating in
MCS or Local-Fullscreen mode. Below is an excerpt of the local XML file that contains local
mode program information. This file will need to be modified for each network installation
so that IP addresses, port numbers, encoder types and program listings correspond to actual
network settings. A keyboard must be attached or use the wireless keyboard available from
VBrick to make these changes. See the STB Admin Guide for detailed XML configuration
examples.
T
To access the XML configuration file:
1.
2.
3.
4.
5.
Press Ctrl-Alt-F1 keys simultaneously
Type cd /wfs/localui
Type ls
Locate the file stbLocalUIData.xml
After the file has been modified to contain the correct addressing and title information,
it must be saved using the correct text editor tools.
To return to the view mode, press Ctrl-Atl-F2 .
6.
Note This XML file can be edited locally using a text editor (such as vi, included with the
system) or it can be uploaded to a Windows desktop, modified with Notepad, and
downloaded to the STB.
Sample XML File Entries
<!-- this is MPEG4 multicast live stream with SDP file stored locally-->
<Stream type=”SDP”>
ProgramName>Sample MPEG4 multicast through SDP file stored locally </
ProgramName>
<Message>SDP file stored locally</Message>
<SDP>file:///wfs/mpg/mySDP.sdp</SDP>
</Stream>
<!-- this is MPEG2 live stream -->
6
EtherneTV Media Distribution System
STB v3.7.3b Quick Start Guide
<Stream type=”MPEG2”>
<ProgramName>Sample MPEG2 stream</ProgramName>
<Message>This is CNN.</Message>
<Channel>2</Channel>
<IP>239.16.120.3</IP>
<Port>4444</Port>
</Stream>
FTPing Files to the Set Top Box
Use this method when moving xml files in Local mode or running MPEG-4 multicast with an
SDP file.
T
To decode multicast MPEG-4 in Local mode, one method is to place an SDP file on the
set top box:
1.
First, obtain an SDP file for the MPEG-4 multicast stream. (See the VB4000-5000-6000
Admin Guide for more about SDP files.)
Then use an FTP client to place the SDP file on the set top box. A sample FTP session is
shown below;
2.
C:\> ftp 172.22.117.70
User (172.22.117.70:(none)): root
Password: admin
ftp> bin
ftp> cd wfs/mpg (cd wfs/localui for
ftp> put vbs1d1.sdp
ftp> bye
C:\>
the xml file)
Setup for Local-Fullscreen Mode
T
To configure the STB for Local-Fullscreen mode:
1.
On your PC, open Internet Explorer and enter the IP address of the EtherneTV-STB in
the URL address window.
2. Log in as root.
3. Password admin.
4. Click on Start .
5. Click on Configuration > Video > Setup > Start Mode.
6. Select Local-Fullscreen from pull down menu.
7. Click on Receive Address. (See the table below for some common stream types; see the
STB Admin Guide for a complete list.)
8. Enter the appropriate parameter syntax with IP address based on table below.
9. Click Apply.
10. Click Logout .
11. Click Exit . The EtherneTV-STB will restart with Local-Fullscreen displayed.
Table 3. Receive Address Syntax
Stream Type
Command Syntax
Multicast MPEG-1
RTSP@MULTICAST_MPEG1://multicast address:port/
Multicast MPEG-2
RTSP@MULTICAST_MPEG2_TRANSPORT://multicast address:port/
Multicast MPEG-4
(local)
RTSP@ISMA_SDP_FILE:///wfs/<path to file>
(e.g. RTSP@ISMA_SDP_FILE:///wfs/mpg/currentmp4.sdp)
STB Quick Start Guide
7
Stream Type
Command Syntax
Multicast MPEG-4
(remote)
http://<ipaddr>/<path to sdp file>
(e.g. http://172.22.2.2/myPath/myStream.sdp)
Unicast MPEG-1
RTSP@UNICAST_MPEG1://#dataPort=<port>
Unicast MPEG-2
RTSP@UNICAST_MPEG2_TRANSPORT://#dataPort=<port>
RTSP MPEG-1
(EtherneTV-NXG)
RTSP@KASENNA_MPEG1://<ipaddr>/program
RTSP MPEG-2
(EtherneTV-NXG)
RTSP@KASENNA_MPEG2_TRANSPORT://<ipaddr>/program
RTSP MPEG-1
(EtherneTV-VOD W)
RTSP@INFOVALUE_MPEG1://<ipaddr>/program
RTSP MPEG-2
(EtherneTV-VOD W)
RTSP@INFOVALUE_MPEG2_TRANSPORT://<ipaddr>/program
RTSP MPEG-4
RTSP@ISMA://<ip addr>/program
Watching TV in Local-Fullscreen Mode
In this mode the STB will display the stream you selected in Step 8 above. It covers the entire
screen and there are no user controls available. Volume and Mute are the only controls
available from either the wireless keyboard or the IR handheld remote control. When the
STB is running in Local-Fullscreen mode, you can only view one channel and it is displayed at
full screen on the monitor. You cannot select other videos or navigate to other channels.
8
EtherneTV Media Distribution System
VBrick Systems, Inc.
12 Beaumont Road
Wallingford, Connecticut 06492, USA