1
D9412GV3/D7412GV3 | Operation and Installation Guide | 9.0
.
9.3.4
Wiring Data Expansion Loops to POPEX
Modules
For the D9412GV3, Points 73 to 127 and
193 to 247 must use the D9127 POPITs.
Points 9 to 72 and 129 to 192 can use
either D8127 or D9127 POPITs.
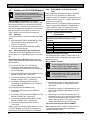
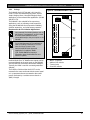
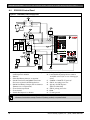
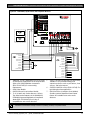
Each POPEX Module has two positive (+) and two
negative (-) data expansion loop terminals. Up to 119
POPITs can be connected to one D8125 on the
D9412GV3; up to 67 POPITs for the D7412GV3
(Figure 15 on page 40 and Figure 16 on page 41).
For the D7412GV3, Points 9 to 72 can use
either D8127 or D9127 POPITs; however,
D9127 POPITs must be used for Points 73
to 75.
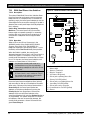
To connect the data expansion loops to the D8125
POPEX Module:
1. Connect the positive (+) data terminal from the
first POPIT on the data expansion loop to one of
the D8125’s positive (+) terminals.
2. Connect the negative (-) data terminal from the
first POPIT on the data expansion loop to one of
the D8125’s negative (-) terminals.
9.3.5
POPIT Sensor Loops
The number of normally-open and normally-closed
detection devices each sensor loop can supervise is
limited only by the resistance on the loop. Resistance
on each sensor loop must be less than 100 Ω, not
including the EOL resistor.
Certain UL and NFPA applications can
limit the number of detection devices.
Consult the appropriate UL or NFPA
standards.
POPITs detect open, shorted, normal, and grounded
circuit conditions on their sensor loops. They send the
condition of their loops to the control panel. A ground
on the sensor loop sends a general system groundfault condition report. Each POPIT is programmed
and sends signals to the control panel separately.
Terminate each POPIT sensor loop with the 33 kΩ
end-of-line (EOL) resistor (D106F) included with each
POPIT.
Use a twisted-pair wire (six twists per foot) in all
POPEX and POPIT installations for the data
expansion loop wiring and the POPIT sensor loops.
Run wires away from AC sources to prevent AC
induction. If you suspect a noisy environment, use
shielded cable. Refer to Section 9.3 Installing the
D8125 POPEX Module on page 41.
9.3.6
Off-Board Points
9.3.7
Program Record Sheet
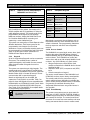
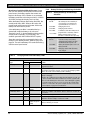
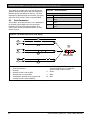
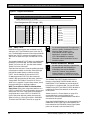
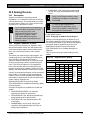
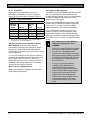
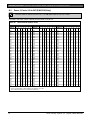
The first column of the table in Figure 17 on page 44
contains the POPIT Switch Settings for the D8127
POPITs. On the D8127 POPITs, the switches are
numbered 1 to 6, from left to right. On the D9127T/U
POPIT, switches are numbered 0 to 6, from left to
right. Set the indicated switches to the ON position. If
a dash (−) appears in the switch position, set the
switch to the OFF position.
The second column contains the Translation of the
point number into the Zonex format. Refer to Point
User Flag in the D9412GV3/D7412GV3 Program
Entry Guide (P/N: F01U143071) for an explanation of
this feature.
The third column contains the Point Number as
shown at keypads.
The fourth column contains the Point Index. Refer to
Point Index Parameters in the D9412GV3/D7412GV3
Program Entry Guide (P/N: F01U143071) for an
explanation of the point index.
The fifth column, Area Assign, shows the area to
which the point is assigned.
The sixth column shows the Debounce Count for the
point. Refer to Debounce Count in the
D9412GV3/D7412GV3 Program Entry Guide
(P/N: F01U143071).
The seventh column shows the BFSK/Relay report
code, which associates a relay to an individual point.
The eighth column contains the Custom Point Text
displayed at keypads for the point. The text is sent to
the receiver when the control panel uses the Modem
IIIa2 format.
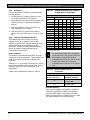
POPIT Module Point Assignments
Six switches on each POPIT assign the module to a
point number. For POPIT switch settings, refer to
Point Assignment in the D9412GV3/D7412GV3
Program Record Sheet (P/N: F01U143072). The
program record sheet provides information about the
Point Assignments tables. Figure 17 on page 44 is an
example of the tables.
Bosch Security Systems, Inc. | 2/10 | F01U143070-01
43