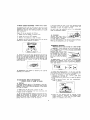
1
21 O59O
CO_O_"
MODEL
23-DK
MODEL
18-DK
This
instruction
manual is important
PLEASE
READ IT THOROUGHLY.
to you.
This manual
witl show you how to assemble,
operate and maintain
your heater for best performance.
It shows you simple things to check before
you
Contact your Corona
dealer...so
you may save the cost of unnecessary
service.
ii
Before
1. WARNING:
areas
to
using
your
heater,
read
these
Use
your
heater
only
}n well-ventilated
elinninate
the risk
of indoor
Air Pollution,
In a house
of typical
cor_struction,
not
Ot unusually
tight
Consttucl_n
thBt
iS, one
due
to
that iS
heavy
9.
10.
(5 7h!) of air space
is provided
for each
1000
Btu per
hour
Of heater
rating
(conslde_,ng
the
maximum
clear NO.I=K
kerosene
(ASTM
for use with kerosene-fired
3.
WARNING:
4,
operating
removing
WARNtNG:
NEVER
add
tuS_
when
or
hot.
Turn
the heater
the Fuel Tank for refilling
NEVER
use your heater
your
in
areas
Ifammab_e
vapors
ar high
dUSt contritions
are
to avo_
possibility
of explosion
S. ALWAYS
refuel
the heater
outdoors
tO avoid
NEVER
used
for other
alcohol. Small
use
containers
that
have
gasoline
d_,ngerously
increase
fire
NEVER
store or transpo_
flammabdt_y
and
the fuel
_n other
meter or plastic
corltP_iner that _s:
t t ) acceptable
for use with the specific
(2) honied
_n COlOr.
COuld be bumped
or
on a level
surface
or
servlce
cook on top Of your heater.
DO
NOT
attempt
to modify
1e.
shut-off
System.
DO NOT usa your
is
where
present
17.
of
refuel
your
heater
living
area
or* the
or
heater
been
the
damaged
18.
19,
only
in WelIwentilated
areas
People
with
problems
ShOUld consult
a physician
before
heater.
Be sure the Grille Guard
is in place
before
or
as
t_e
Risk
of
output
is
indoor
Air
reduced
as
Pollution-Use
to
Automatic
burning
irregularly.
See
your
selling
Corona
immediately.
Independent
testing
has conti_ed
that
this
complies
with emission
standards
at elevatlons
Heating
OUt of
top or attempt
repai_"
if ithas
and
7.000
feet,
+noreases.
WARNING:
beer}
fLielS such as gasoline+
paint thinRer
amounts
ot other vo_ati_e fuels such
handle,
lS.
tire.
Use
the
Siphon
Pump
that
came
packed
with
your heater
to fill the Fuel Tank.
Be
certain
to wipe
away
ac_y fuel
spilled
on the
exterior
of the Fuel Tank Or the Heater
Cabinet.
S, WARNING:
move,
14.
before
risk
NEVER
ventilated
place
outside
the
reach
of chttdren
DO NOT piece
a pan of water
any
fuels
heater
"OFF"
Heater
is, si_ing
white it is o_lrating
or stilt hot.
12. NEVER
use your he_ter
=n a moving
vehicle.
Motion
can CaUSe fuel spillage
and increase risk of fire,
Store
fuel
in
a
clean,
tighHy
sealed
approved
safety
13.
co_tainer.
Store the fue_ container
in a cool. dn/, well-
NEVER
use any fuel other
than the fuels specifically
identified
for use in the heater.
NEVER
use gasoline,
benzol,
a_ohol,
NO.2 fuel oil, diesel
oil, white
gas or
of
or hallways.
s%lre heater
unattended
while
_n use.
before
sleeping,
in high
traffic
areas
such
during
operation.
NEVER
place
your heater
in windy
or drai'_y locations,
Uneven
burning
and poor performance
may result
WARNING:
Your
kerosene
heater
is hot
while
in
11.
t-K) or syntl_etic
portable
heaters.
camping
stove
fuel
iR your
heater.
The
use
substance
other
than
kerosene
or synlhetic
could result in an EXPLOSION
OR FIRE.
of caution:
heater
heater
heater
operation.
_o r_ot touch
it, and keep
chitdrsn.'clothing
and
furniture
away
t_'om the
heater.
NEVER
allow
children
to operate
or refuel
heater.
NEVER
I:dace
heater
closer
than
three
feet
from
combustible
matenals
such as furniture,
d_apetiea,
and clothing,
adjustment),
the door(s)
tO adjacent
ro0m(s)
be kept
open
or the
window
to the outside
be opened
at least
t inch
(25.4mm}
tO guard
against
potential
buildup
of indoor
Air Pollution,
Do
r4Ot use the heater in a bathroom
or any other sma_I
room with the door closed.
2. WARNING:
Risk
of explosion
or fire,
Use
only
water
fuels
words
leave
your
extinguish
place
your
as doorways
letted,
ee
insulat_0n
_nd
tighl
seals
against
air infiltratio_,
an
adequate
supply
of air for combustion
and ventilation
is provided
through
infiltration.
However,
if the heater
is used in a small
room where
tess than 200 cubic- feet
but'nat
ShOUtd
should
important
7, NEVER
ALWAYS
8. NEVER
iiiiiiiiiiiiii
or is
dealer
heater
up to
elevation
healer
breathing
using the
operating
he_ter
risk of
than a
fuel,
r3) for t-K kerosene
cle_dy n'_arKed, "kerosene". or
{a) iS in the original comtamer
for the Synthetic Fuel
Never
store fuel in the living space
iii iiiiiiIH, II
III
TABLE
Wol'dS
Of
Caution
.............
OF
1
Me{or Parts ...............
Genera_
Speciticatlons
...........
Asset_4_ing
You_" Corona Heater
........
Setting the Automatic
Shut=off System
Operating
Your Heater
..........
Filling the Fuel Tank with Fuel .....
Lighting the Heater ........
Adjusting
the Wick Dunng Operahon
......
2
2
3
4
4
4
5
5
Turning
6
Your
Heater
Off ....
I ,lllllll
CONTENTS
Dally
I_@plJctioPf
anti
Ma=ntenan¢_
C_e=ning the WE:k
.......
w=ck Replacement
........
Wick Guide Assembly
Automalic
Shul-off
System
Jgnitlo_System
Cabmet
....
F_e[ Tank
Storage of Your Heale_
1
Trouble
Shool,ng
Guide
....
.....
e
6
6
a
@
8
9
9
9
tO
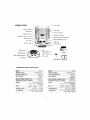
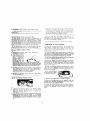
= Major
Parts
Plate
ylng
Handle
Window
HelndJe
ACCess=;
Adjustment
Door
Knob
Cap
Base
m, -
•
Ignition
i
Wck
Plug
P_I
Wick
Guide
Assembly
Fuel
_
_
Gauge
=
_
.....
_
Nurr_ber _0_OlC}
Bur_er
....
_:--
Siphon
n GENERAL
Fuel
23_DK
Output:
Tank
Burning
Batteries
SPECIFICATIONS
Mo_let
Heating
Pump
22,800
Capacl,
ty:
Model
8TLI!hr
I 6gallons
Rate:
18-0K
Heating
Fuel
68qtihr.
18,000
Output:
Tank
Burning
Capacity:
f6
Rate:
Continuous
Heating
Hours
of
Area:
ignition:
26 4'h
{670_
Weightt(em_ty)
Acce@sories:
X
X
26.5
2'D"
ft.
Ibs.
SiZe
Ory Celt
and
refilling
X
X
18 1"0
4GO_,}
(12.0k
batteries
S_;3hon
Recommended
Continuous
ignition
PILAU:
cet!
batteries,
35 v each
18 1_ v/
460_,,
_t/ht
(1325gals,)
About95
28v,
dry
2"D"size
Size:
81Qsq
Heating:
gallons
.53
(.17 gats}
Recommended
BTU/hr
9)
Heating
Hours
Area:
of
Ignition:
2"bSize:
650sq
Aboul
Heating:
size
249"h
_630 "_
28v
dry
x
;_
Weight:{ernpty)
Accessories:
181"w
460_ _
dry
and
5
Ignition
Plug:
cell
battedes+
t,_,v
e_lch
232
2"O'_size
ff
t0
IbS.
ceil
refilling
X
X
181"0
460_
(t0,SKg)
batteries
Siphon
i
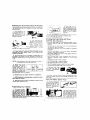
•" Assembling
1. Read
assembly
2.
Your
Corona
this entire
Instruction
and operation.
Open
top
of
carton¸
:3. Remove
the
Man_Jal
NOTE:
Batleries,
Battery
Case
at side
of carton),
Top
and
Carrying
Handle
Cover,
Guard,
batteries,
Heater
before
C;arton
2)
you
will
contain:
Top
Plate.
Base
Stphon
Pump
for
battery
case
begin
cover
(in slot
fueling,
and
top
Hair, stalling
the
front
grilt:
t_on ot rods
of the
gr_ll
mto
the
holes
located
uppe_
than
lhe
holes
where
_rlsert
they
wele
the tower
Then.
portion
-
_.
of rods
of the
g_dt,
by
_ushing
u_ward,
into
the
_,nd
='ight side
of the heate_,
_ -
hole_
located
cabinet
;st
•
the
_eff
pad
4.
Remove
Carrying,
Siphon
Handle
5. Remove
carton
and
are
Lift
out
7.
Fa._ten
the
the
Base
place
it
indications
6.
Pump,
from
Plate.
marked
and
p_ace
heater
Top
Guard,
in the
Front
side
and
and
Plate
from
its place
on
the
floor,
clearly
heater
Top
carton.
on
the
it on the
NOTE:
packing
from
the
Be
8.
Lift
plastic
sure
Iwo
brackets
18-DK
the
has
three
brac_-._t5
NOTE:
ir_side
tl_e
he;_ter
C_{3lr_et
4)
IQ_IaH
_)
Rei_stalliag
Pla<3e
not
in place
in the bottom
from
Base
on the
heater
of the carton
They
rt_ay have
during
shipping
heater
arid
save
base,
among
separated
it for
late?
Of
inet.
lariat
The
burner
chimney
the
be
the
F_ter'_ng
with
Carry-Top
the
hOleS
in
_nside
lhe
to
rear
grills
is
packed
Be
@u_-_ you
h_v_
removed
from
the
Burner
inside
the
in
the
Ihe
Heater
_eater
p,3c_.lng
Cablmel
Cabr_,_-
the
heater
the
front
_nd
first,
side
of
[he
same
the
healer
procedure
e'_s
the
of
the
r_ar
then
i_
by
metal
act
tlorl
gr_lfs
_aste_
rear
CAUTION:
=,._[h_ul
th_
12
frc_t
_rl_l
top
using
arid
be
and
F;_slen
per
must
grill:
the
rear
front
_nd
feint
a_SQ
gi'ill
the
brackets
front
in
the
Fasten
_f_ll
rea_
r_3_le
if'ant
w_{ch
Handle
the
Drovldedv
9.
Carrying
reinstall
11.
use
the
c_P_i_g
Then,
cover
n_usl
Cabinet
cabl_et
screws
materials.
Heater
on
Tabs Place
aiign
3)
tng
Handle
the
C abi_et
base.
to
I1 screws
are
book for them
the
certain
holes
Base
the Base
using
the two
screws
already
in place
on
the
Base.
Flrlge¢
tighten
base
screws.
USe of a screw-driver
or
pliers
wilt Cause
to Crack
or split.
on
Make
of the
back
the
b_ackets
Risk
gu_Id
5ur_
_f burnS.
or g_llk_
Do
not operate
the
COmpletely
_ttached
heater
burlier
._rt_ney
h, lndle
iS
tOL_(.3hable
through
the
a_;c ass
door
located
_n the
front
side
of
the
he_ter
cabinet¸
Check
the alignment
Of
the
Burner
by
rotating
thre_
t)trtes
t3,
packir_g
YOur
heater
material
iS
to
it
now
carton
LFFT
and
assembled
and
store
RtGHT
two
Return
it_ a Ory
place.
or
all
=Setting
the
Automatic
Y_r
Corona
Heater
wilt
the
Automatic
Shut-off
Outlined
below
t,
Press
Automatic
DOWN
on
Shut-off
ver. The
System
is
set and
will
allow
heater
to operate
not
Shut-off
operate
,System.
System
unless
Follow
2.
cell
yo_j have
set
the
steps
W
the
le
now
your
3. Irtstall
the
Batteries
as indicated
by
polarity
msrkmgs
as illustrated
on battery
Close
the Battery
Case
Cover.
.....
_
......
2.
.,
justment
heavy
'WISE
This
__,_
_
should
turn
freely
and
3.
If your heater's
activated
you must
heater
wilt operate.
4. The
activateO
NOTE:
Weak
If the
will
trying
heater
Wick
Knob
use
L
Automatic
Shut-off
System
is
reoeat
Steps
1 and
2 before
ever
your
Or a gentle
Automatic
heater,
use
Shut-off
some
NEVER
move
System
smoke
and
theCa-
Handle.
Lift
completely
incline
will
not
{s acflvated,
it
the
,_
in
be
store
fuel
container,
in
in
fuel
in a glass
NEVER
store
fuel
in
Remove
direct
the
heater
Fuel
l-K)
or
portable
specifically
is
where
container
capped,
operating
flammable
space.
in
ALWAYS
other
than
an
a Cool
dark
sunlight.
container
living
space
without
fuel tonger
Fuet
than
Cap
in place
6 months
Cap
Fuel
Tank
COUNTER-
fuels
heater
in living
any
tightly
fuel
the
the
area
Tank
store
from
the
turning
CLOCKWISE,
Fuel
while
an
store
store
(--)
present
NEVER
heater
while
it is In operation.
or modify
the
2, Always
Auto-
Shut-Off
spills.
System
clean
and
Heater
use
the
heater
to transfer
Fuel Tank.
|_,_,,_=
_,
by
the
Siphon
fuel from
Battery
Pump
the
Siphon
provided
Storage
with
Container
your
to the
Pump
free
Case
Your
may
Z
Using
t Operating
heater
_? NEVER
and
System.
7.
NEVER
attempt
to disassemble
matic
Shut-off
System.
!1.
Keep
the Automatic
of OUSt and kerosene
use
operate
the
(+)
case
kerosene
(ASTM
kerosene-fired
Tank
_: NEVER
1.
RONO
Fuel
Ot dust
_Q NEVER
with
rue! other
than
in the heater
fill heater
Fuel
Tank
outdoors.
NEVER
approved
place
odo_
the
off
your
'O"
which
Explosion
clear
No.loK
for
use
with
NEVER
refll
or stillhot.
vapors
D
water
f_els
_ny
use
Z.', NEVER
set
of
use
for
G, NEVER
fill Fuel
vibrations
p_oOuce
NEVER
identified
%_didk
Kt_ob
Fuel Tank
Rtlk
USa cnty
synthetic
heaIers
sound
notice
In sub a
the
the
WARNING:
CLOCK-
clicking
will
is You
normal.
sequent
Adjustmenl
Ad-
smooth_y.
the
floor.
Carry
the
heater
in a level
position
to avoid
setting
off
the Automatic
Shut-off
6,
the
Automatic
Shut-off
System
is designed
to be
If the
heater
is jarred,
bumped
or vibrated
ex-
cessively
it off.
•your
Turn
two
power
the Automatic
{g.
niter
in t;ne Battery
Case
located
on
the
lower
back
of
the
heater
Cabinet¸
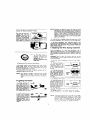
• Filling
_-;
P)ace
the
Batteries
as
shown
and
in-
sert the two (2) "D"
size
Batteries
with
the
(+)
A. Unscrew
the Battery
and
(_)
marking
factrig as shown.
__[--_111
B.
ble
InseM
tl_e non-flexitube
as Shown
into
the
storage
container
and the flexible
tube into
the Fuel
Tank
Start
the
fitMng
operation
You
Could
over
Pump
DO
Unit
flow
unattended
the
Fuel
NOT
LEAVE
during
Tank
NOTE:
Using
the
taned
Release
Manual
Siphon
Pressing
the
Ignition
the Ignition
Plug
too
Pump
too hard
into
the
will
Wick
push
and
will
produce
white
smoke
instead
of a ctean
ignition,
if this
Occurs.
release
the pressure
On the
Ignition
Lever
slightly
Holding
the
lever
in
place
too long
wtft produce
smoke
and
odor,
Be
the
Vacuum
Knob
on
the
certain
lighting
Siphon
Pump
Bulb
by
turning
it CLOCKWISE,
After
the
Fuel
Tank
has
Ioeen
properly
filled,
COUNTER-CLOCKWISE
Lever
deeply
the
the
Ignition
heater.
Plug
is
fully
retracted
after
_GHTEN
3.
turn
to
the
Vacuum
Release
drain
the Siphon.
Knob
After
Burner
the
Wick
is lighted,
by rotating
it LEFT
check
and
the
RIGHT
alignment
two
of
or three
the
times
4.
DO
NOT
OPERATE
THE
IGNITER
WHILE
THE
HEATER
IS IN OPERATION.
YOU
WILL
DAMAGE
THE
WICK
AND
THE
IGNITION
PLUG
AND
PRODUCE
SMOKE
AND
ODOR.
'- Adjusting
3.
The
Fuel
properly
needle
Tank
filled
on
when
the
gauge
is on _'F',
DO NOT
OVERFILL
Fuel
Tank.
4.
Replace
5.
BEFORE
the
Fuel
Cap
USING
and
THIS
hand
NOTE:
allows
lighting
HEATER
It
the
the
Wick
to
and burning
heater
is
ignited
after
the
tank
is
weakly
for a short
itself.
• Lighting
1.
NOT
After
LESS
the
waiting
than
30
filled,
while
the
FOR
absorb
in
than
FIRST
UNTIL
THE
AT
LEAST
enough
tess
the
and
THE
30
fuet
for
mlnules
flame
may
persFst
then
may
exhngu_sb
n,_
Gently
nitlon
press
Lever
the
Ig-
DOWN.
until the flame
appears.
(Approximately
3 to
5
Hold
the Laver
in place
• econds).
Then
gently
release
the
Ignition
Lever.
Du[ing
Operation
Risk
Operate
heater
wick-stop
of
{ndoor
at a wick
air
pollution
_.elting
lower
and
than
fire.
the
DO
not
m_nimum
setting.
the
WIck
Adjustment
Knob
to
_he
"Nigh"
2. When
your heater
is
prOpedy
adjusted,
the
flame
witl
burn
in an
evenly
_'* to
Burner
3,
the
balanced
_'," over
top
if the
walt
circle
of the
flame
touches
of the
heater,
the Wick
IS adjusted
too
high.
NOTE:
Smoke
and
odor
will
be
produced
when
flame
is
Adlustme#t
Of
¸'LOW¸¸
FLAME
TOO
PIIGH
Kr_ob
COUNTEd-CLOCKWiSE
a00earatth0tOpOflhe
!
_
Burner,
the "Wick
_s ad.
justed
tOO low.
Smoke
and
soot
may
result
if
•
ute@,
raise
the
Wick
to
Its full height
by turning
the
Wick
Adjustment
Knob
CLOCKWISE
to
the "HIGH'"
position
until it comes
to a firm
@top
2.
WARNING;
too high.
Turn the Wick
_n _he direCt;On
Heater
for
min-
Wick
After
the
heater
is IlL
it will
warm
gradually
until
it
reaches
full heating
power
This normally
takes
ten to fifteen
minutes.
You
can
controt
your
heater's
output
by
using
the Wick
Adjustment
Knot)
to raise
or lower
the
Wick,
1. Set
position
tighten,
TIME
MAKE
SURE
TO
FILL
THE
FUEL
POINTER
MOVES
TO °F" AND
WAlT
FOR
30 MINUTES
BEFORE
LIGHTING
This
time
satisfactory
ts
the
luei
the
heater
te operated
w_th
the flame
1oo tow.
Tutr_
_he W_Ck
A_justme_1
d_fect_or_
of "HIGH
¸¸
5. NEVER
operaze
Seeing
indicated
_
m_
___._.__._._
_
_
TOO
LOW
__
Knob
your
Heate_
or_
lh_
fro_t
OLOCKWISE
below
_anel
----
_f
.........
_r_ _ne
the
¸'LOW'"
of the
Heater
_'_lll=
i
NOTE:
It the
flame
wavers,
burros
too high
or_ one
side,
o{
smokes,
adjust
the
Burr_er
to make
sure
t_at
it is _rooerly
seateo,
centered
in the Correct
13osit_on
and
not
m_sahgned
or_
the
Wick,
HOLJS_n_j
F_liure
to proDerly
13osttion
the
BtJtner
[t_y
_,_use
th_ Heater
to o{3er_te
_mDro_erly
• Turning
your
Heater
off
1. Turn
the
Wick
Ac_lustment
Knob
COUNTERCLOCKWISE
in the
direction
of rOFF.'
pushing
the
small
buttotl
On the wICk ad}ustment
krtob untd it comes
to a hrm
stop You wt{I riot be able Io turn the knob counterclockwise
unless
you have
pushed
the knob
button
The heater
wdl be
Completely
off in approximately
3 to 4 minutes
2.
arid
Always
b<lfors
turn your heater
off wheP,
retiring
for the evening.
leavin
0 the
room
3. NEVER
kDave _r
heater
burning
overnight
or while
ultattl_P, diKI, blceu_l
you may
not be aware
of vanillalion
changes
of
children
and
pete
bumping
into
_e healer.
4. The
heater
This
is normal
DALLY
will
produce
INSPECTION
CAUTION:
Let
the
torily
barge's
making
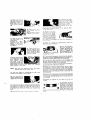
• Cleaning
the
could
cause
3.
Allow
and
Leave
wind
the
and
Burner
drafts
in the
which
during
the
posilioned+
Outlined
in
Light
the
the healer
"Lighting
to
fuel
burn
has
until
burned
first
burning
be C_'ushed
betwee_
an Old toothbrush
8. tf this
depoalts,
• Wick
If cteaning
will need
the
flame
operation
Trouble
cond_tiorts
yOUl
r
fi{_gers
proce(:tul'e
does
riot remove
replace
the Wick.
Seepages
_s comaltows
fuel
of the
)
the Wick
replace
Symptoms"
under
and
Heater
remove
Cabinet
Cabinet.
screws
on
,_l_f.,
/
5o Use
the
Carrying
Handle
to lilt
the Cabinet
straight
up
and
away
from
1"he heater.
6.
Gently
of/ the
heate{,
ad_ustmer_t
pull
tt_e
pushlr_g
Wick
Adjustment
the
small
huron
on
Knot:)
the
wick
knob
or
does
not
the Wick,
which
7.
brushed
the
by
back
Drea_-
lilting
and
it
tilt.
ing
It forwan_
to clear
the
Wick
Adjustment
Assembly
8, Trip
the
Pendulum
on the
Automatic
Shut-
away
all Carbon
6 ?
and
Off
improve
perlormance,
Refer
to the "Checklist
which
be
System
to activate
it.
tar
g.
Sectiot_,
page
to.
the Wick
should
Remo_
tng
Plate
from
Ihe
arty
carbon
through
noror_ the
WICk
Replacement
to
loosen
fothe
away.
5. These
procedures
will noImal_y
remove
Or tar deposits
that may
have
accumulaled
mal
use.
Any
remair_ing
carbon
deposits
can
with
to
of the
by turning
the Wick
AdBefore
li_htJng,
be cellain
4. Wait
15 minutes
and re-light
the heater
_h_s
time
for the
Wick
to absorb
eve_i
bit of available
which
may
have
remained
in the
lower
podion
Wick
Pliers
side
S
heater
al!
satisfacwork.
Use
burning.
Wick
to '*HIGH"
CLOCKWISE,
the
out
4.
either
MAINTENANCE
heater
Cool
and
f_aiv_n_nce
outdoors.
heate_
from
the
Burner
Is prop6rly
ilowin_
the
procedures
Heater'*
section,
paoa
pletely
shut-off.
regularly
will keep
it in good
condia week
is recommended
during
seaTo clean
the Wick
follow
the steps
irregular
the
Knob
upofl
Wick
your heater
Protect
the
2.
Raise
justment
odor
AND
extinguished
ileal)action
Cleaning
the Wick
lion.
Once
or twice
sons
of heavy
use
outlined
betow:
1. Move
Cabinet
some
you
for
outli_es
reptaCedr
USe
ONLY
a _Sl_uine
Cororta
Replacement
Wick,
• COFIONA
Ie-DK
- CORONA
23_DK
Pall
Number
_02_CI1C
Pa_
Number
tO3
0tO
DO NOT
attempt
to Substitute
any other
type
O! Wick
device or a Wick
designed
for el'lethal
brand
or model
healer.You
COUld damage
the
heater
arid
c_-ea, tea
potential
fire hazard
Remove
wing
nuts
the
Wick
the heater
the
fou_
hold
Assembty
to
and
carefully
which
lift
the
Wick
Assembly
from
the heater
1,
10.
Replace
tile
Wick
Adjustrllent
Turn
the
Knob
CLOCKWISE
to raise
set the Automatic
Shut-Off
System¸
11, Piece
lhc
white
on the
Wick
Cover
Knob
temporarily.
lhe Wick
and
to
plastic
StriD, packed
with
to
protect
your
fiddlers.
ll'_e
Wick,
re-
t2.
While
still
holding
the WiCk
Assembly
up.
aide-Qown,
grasp
the
WiCk
Cover
firmly
and
PULL
it oft with
a sharp
tug.
13.
Remove
t_le
W_ck
while
folding
_t to
t_e
_nside
Remove
the Wick
S_eeve
to(JeThef
wrth
the Wtck
14, Insert
into
three
the Wick
pins
holes
of the
__
(Position
the
"t UP'
marking
of
the
WiCk
Sleeve
in
the
upward
direction
of
the
W_Ck
and
attach.)
23,
While
Automatic
your
heater
is
Shut-off
System
disassembled,
securely
NOTE:
17. The
correct
in
the
height
height
again
of
the
three
pros,
inserting
27.
Remove
Wtck
por_rily
repla_ed
Adiugtment
tO test
WiCk
Koob
which
operation
wile automaticaNy
of 3/8"(1Orate).
and
set
be
check
to
the
_8.
the
Replace
Aotomat_¢
the
Adjustment
ROd,
priafe
stots
in the
ahd
gently
Snap
V_ick Assembly
:29. Replace
Guard
prongs
On the h_ater,
OI the heater
30.
Fasten
screws
D_essing
S_t.off
lg.
Align
the four tabs
on
screw
holes
on the Bottom
;tO.
Hold
the
S_t
the
of
place
Be
the
arrow
Lever
Trip
the
it
certaim
it
is
you
had
tern
Plate
System
making
Lever
{o
Wick
Cover
the Assembly,
certain
or_ the
down
with
the four
as shown,
Of firm
contact
Wick
Cover
to
posthon
by
hriger
the
Cabins{
to
the
I
at
the
- _
must
to allgn
lhe
Wick
the heater
Cabinet
Make
certain
the Grille
_re inserte_
_eeurely
into the prope_
boles
and
tP_e Cabinet
Fro_t
matches
the froni
"-_ll
knob
panel
certain
and
which
hoId_
the Knob,
with
the app_o.
Dress,rig
Plate
Begin
by aligning
them
the
D_'esslng
Ptate
it1 place
over
the
heater
31,
it into
Place
make
hOleS
lB.
Turn
the
Wick
Assembly
upside
down
to
l'eplace
the Wick
Cover.
ae_
snap
all points
front
pressing
DOWN
to
26.
Test
Ignition. Rahse
the
Wic_
to its full height.
The
Ignition
Plug
_hould
be within
?." to y=." (1 mm
to 2ram)
of
the Wick
when
the Lever
is fully
depreSs_.
Turn the Wick
Adjustment
Knob
that th_ VV_Ck moves
up and down
wick
burning
stem
by
Set Level
inside
25. Turn the Wick
Adiustment
Knob
to test its operation.
Be certain
the Wick
operates
Smoothly
as the
Knob
turned
CLOCKWtSE
and COUNTER-CLOCKWrSE
16. While
pressing
each
of the three
pins
of the
Wick
(attached
to the
Wick
sleeve)
toward
the
inside,
insert
the
three
Pies
into the slanted grooves
Of the Wick
Guide.
Press
on each
them
the
"i>4. Trip
the
Automatic
Shut
off
System
by
r_udging
the
Brass
Pendulum,
Reset
the
Sy-
15.
Atl_ch
the
Wick
So
that
the
retainer
teeth
of the Wick
Sleeve
stick
into
it, fitting
the
Wick
evenly
around
the
tO avoid
wrinkles
CheCk
llne
up
with
the
word
Replace
with
the
the
two
Wick
be
certain
it isKnob.
properly To
Adjustment
positioned
on the Wick
Ad_iustment
Shaft,
raise
the
Wick
!O its
full
height
The mark
om the
"HtGH"On
the
cOntrOl
• Wick
Guide
Assembly
Tar deposits
wilt
build
assembly
where
the
prevent
the
chimney
POOr combustion
Clean
off
the
tar
Make
sure
the
2.
Lowe{
the
wtck
3.
Remove
the
4. Remove
cabinet
and
up over
time
on the
bucner
chimney
seats.
from
seating
properly
deposits
1.
-Check once a month
as
heater
to
iS
OFF
batteries
wick
guide
This
may
and
cause
DO
AND
does
rot
drop
or the
wick
adjusting
to
the
off
pos_t_on,
perform
wick
O/ h_ve
the
heater
serviced
NOT
USE
THE
IN WORKING
HEATER
ORDER.
UNTIL
and
COOl
B. CLEANING
Vacuum
_r_d
rear
the
_v.'O (2) cabinet
guard
assembly
as
Of
soft
cloth
or more
heater
screws
shown,
and
lift
o_'_ the
clean
every
oflen
IS
REPAIRED
•
with
a
other
month
if
needed
DO NOT
DISASSEMBLE
TION
as
its
sensitivity
• Ignition
THE
will
SHOCK
DETECTOR
be
char_ged
the
wick
does
not
!. 8altet'ies
- Dead
batteries
Son, The
batteries
are located
in the
baftecy
case
5, Adjust
the top of the
wick
to be even
with
the top
of the wick
guiUe
arid
scrape
off the
tar del3osits
with
the
tip of a flat blade
screwdriver,
Take
care
not to tat
the
ta¢ deposits
drop
into
the
wick
guide
grooves,
Llae
a portable
vacuum
Cleaner
to Suck
up the
deposit.5
cleaning¸
2.
ignition
I
Igl%l
Plug
-
the
batler(es,
procedure
below)
t {Oft
It
you
or
Is hard
to
light
______.=_e?;._-----_
_.4
,
I
still
Check
plrovtded
Plug
light
are
the
most
likely
rea_
at the
rear
Of the heater
Replace
with
two
(2}
fresh
O size
_tteries
Make
sure
the
_3oJaritJas (plus
sod minus)
ate
in
the
same
direction
as shown
inside
the
battery
case.
te01ecing
FOllOW
the
ment
(see
S_C-
System
-Whenever
while
IT
knob
ma_
follows:
Off
position.
at
If the
wick
not
_eturn
intenance
have
a
the
gl0w
for Ignition
p_oblern
coil
Plug
after
fii_ent,
Replace-
Filament
J
6. Reassemble
asaembty
and
the
heater
batteries
• Automatic
-Check
A.
Shut-off
once or
replaong
the
Cabinet
3. Ignition
Plug
Replacement
_ If the
glow
coil
iliamerit
15 broken
or _s bent
and
car_not
be aligned
with
a malch
or toolhpick,
it
must
be
reptaced
(1_ Remove
the
batte,ies
and
cabinet
{ See
Wick
Flep_acement
On page
6)
(2) Press
the
Ignition
Lever
down
to raise
the
Ignition
Pl_g.
(31 Push
the
ignition
Plug
in
and
turn
countercIock
=
wise
to
remove,
System
twice a month
TESTING
The
shOCk
detector
section
sitive
and
can
be
affected
ma_ers
A good
t_me to test
yOU
use
the
heater
1.
by
Make
2. Turn
_t Stops
Sure
the
set
lever
the wick
adjusting
at
the
H_ POsition¸
of the System
by dust
and
the operation
_s down
knob
fully
is very
senother
foreign
is lust
before
1o
set.
clockwtse
until
3. J_
o€ shake
the heater
sharply
This
action
of s_mulatlng
am earthquake
ot
someone
walking
_nto
the
heater
shcuJ_d
actua/_a
the
automattc
Shut-off
device
The
wick
should
drop
immediately
and
the
wick
ad
|usting
knob
sp_n
back
to
the
Off
position
14) Ir13tatl
turning
check
polarity
the
t'_ew
Ignition
clockwise,
o_et_t_on
(tt
of
batteries
Ptug
by
pushing
Relnstal_
the
_t stil_ does
not
_nd
w_rlng
}
batlenes
ignite,
im
at3d
and
check
Cabinet-Check
•
1.
Keep
fhe
a _emp
2.
each
lime
before
L;
use
DIspOse
Heater
Cabot;el
clean
Dy wFr_,_r_g r gn!_y
,._tth
cloth,
Atway_,
w_pe
away
f;Je_
_plHS
w_lh
-3 _o_t,
t.
the
Poor
FUeJ
quality
fuel
or
Tenk
wtfl Cause
IJghflng,
OdOr,) Poor
will
cause
whiCh
wilt
result
2.
- When using poor
Clr_ Cloth
Tar_k
{he
teJlk
of
remove
must
pump
Using
a
fuel
Containing
poor
performance
the
fhe
inferior
poor
qL_ality
Fuel
Tank
Battery
of
the
dry
Siphon
FOllow
Fue_
of
a ba_
water
Wick,
and
Tank
fuel
these
Disassemble
steps:
items
Guide
remove
Tube
as much
Assembly
"_,
'_,
1.
The
3.
tank
and
D, Replete
#1t-28
Using
dispose
process
should
the
on
the
of it safely
be
old
Wick
pages
6-7
Manual
done
with
Siphon
of
with
healers
Your
Heater
only
new
Sfar_
as
tube
on
Showr_
water
al'e
removed
fuel
remairls
i_q the
THt the
T_mk
Follow
ifems
your
unfit
k_nit
to
S_phoe
all
fuel
be
Certa,n
Pump
arid
nO
following
fhe procedure
Wick"
section,
page
not restore
it to go4_
outlined
in the
6
If c!saning
COridition,
follow
outlined
the
for
No
for
the
l-K
use
with
"Filhng
tee
ar_y
to
de
is used
Gond_tior_
the
At
fuel
spi!ls
Changed
or'_ce
the
st_tl
of the
of the
W_¢k
a_d
seasot_
_Jith
r_ew
Bat-
the
in
areas
fhe
the
fuel
Or
Shut-off
yOU
outdoors
the
heater
Fuel
Took
dusf
On
System,
Clean
cloth
them
faces
heater
"Cleaning
has
as
reach.
the
Cabinet
follow
on
interior
and
the
page,
and
cloth
exterior
solution
Avoid
procedures
6,
remove
this
Assembty
clean,
dry
Use
a mi/C
Oetergent
dry
with
a soft
ctoth
of yOUr heater
the
page
cooied,
shown
the
Wick
using
a
can
end
Wick",
Cabinet
Clear=
oft
all
the
Automatic
Wipe
clean
aH
with
if necessary
scratching
a damp
ar_y
Wipe
sur
off
System
as
shown.
Pump
insert
the
nora-flexible
iOtO the
Fuel
Tank.
procedure
ir_
clean
6. Trip
the
PenC_ulum
of', fhe
AufomafiC
Shut-
one
3.
the
6-7,
have
Plug
Ah_ayS
a_d
n_._
_#=ck
tO
45
to remove
fuel
the
Replace
9. Cover
the
cover
provided
ing
cation
for
place
Wick
the
does
Follow
pages
the
Cebinet
8, Remove
the
Batteries
discard
them.
Replace
the
the start
of the nexl
heating
B. Clean
the
"C:leenlng
the
Wick
fuels
Cabic_ef
should
L_sed
water-clear
synthetic
on
T_r_
around
oL_tdoors
clean,
or
fL_el
have
it safety
#roper
oheck
After
Drain
7.
A.
you
FL_eJ
_r_cctqta_t_in_ted
the
outdoors.
outdoors*
a
Heater
wick
Move
4.
Padialiy
fill the Fuet Tank
with clean,
uncontaminated
fuel
Replace
the
Cap
and
slosh
the fuel
around
Jn
the Tank.
Retnove
the fuel
you
t_ave
used
lo clean
This
l-K)
e Storage
5,
the
Tank
the
outflned
to
fuel
as
possible.
A few
ounces
may
be left.
Use a large
household
syringe
to
draw
OU! the remaining
few
Ounces.
Stretch
s On/ rag
over the e_
of s screwdriver
and remove
the I_qutci that
n_mslns.
Repeat
the procedure
until the tank
is dry.
C.
FtJet
proceoures
Wipe
fuBi
of
b_,STM
c_ean,
s_o_t}
2.
Proper
storage
of your
heater
takes
lust
a few mm
utes
and will prolong
the
life
of your
heater,
The
most
convenient
way
to afore
enO protect
it from damage,
is in
the
original
shipping
carton
and
packing
materials.
# 1-9
B. Ins, err Electric
Pump
into
hole
fortrted
by
Wick
Assembly
5,
the
dispose
rr_ tile
wtth
arid
portable
Tank"
Ignitio_
teiles
Wick
and
the
remaining
Tarlk
Cap
Remove
each
season
if
t_eating
_eason
Pump
Heater
f_J;4_Pagee,
Fuel
yoL{
3.
A.
F_II
fuer
Fue!
tr_e
t_erose_e-flred
water
entering
(Le
s_ow
Ot conlamlnafed
_ny
the
and
kerosene
low
heal
output.
_rregu_ar
f3urnlng,
or
quality
rue! Or fuel
contaminated
with
carbon
and
far accumulation
Or_ the
interfere
with
the heaters
performance
in corrosion
TO
fuel
f'li
Fleplac_
the
4.
• Fuel Tank
0€
Pa_l;_l_
fue_
Replacing
Wick,
pages
outlined
as
from
lhe
Bafleries
eeasonk
hlea_er
Cabinet
and return
the
storage,
Place
on
page
7
Battery
Case
and
with
new
ones
at
with
the plastic
shipping
unit
to the original
shippthe
heater
in a saf{_,
dry
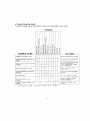
•, Trouble
In
case
Shooting
of
trouble,
check
Guide
here
before
you
take
your
I0
Corona
Heater
to your
dealer,
LIMITED
Thai
ws/'f_n_
fOIIowlr_:
1 Equip,
2.
WARRANTY
USe
r_ot
I_K)
Be_eries.
4
WiCkS
5
Ignition
ObOs
8
S_phon
pum;_s
7.
Amy
breSkage
8
US_
Of
TH_S
LIMITED
IN
EXPRESS
THIS
NO
WARRANTY
EVENT
li_itStion
_,r
CLAIMS
If
f_o¢,
HOT
o_
th_
on
PURCHASER
BUT
NOT
PART_C;ULAR
OR
_Ow
tN
kSrO_
hea_rs,
in
IN
UEU
UNITED
is
your
UEU
Of:
TO
PURPOSE.
CORONA
tong
s_al_s
so
the
do
;]bore
TH£
usedv
t_re_t
OF
AlL
THE
ALL
OTHER
OTHER
WARRANTIES
REMEDY
CORPORATK)N
an
_o_
irr_pt_tl
_l_ow
h_i_lor_
Aul:hOr_Z_d
p_o_lem,
wr_
_e_ei_
PROVIDIED
R_MEDfES;.
BE
IN
LIAIBLE
FOR
w_u'_anty
th_
or
_;ts.
_xclusi_tl
e_cqusior_
ot
_O
t_
8boys
_irr_t_tti_fl
Of
ir_¢i.
_y
no_
to
y'ou
explain
you_
apl_y
_etwce
CORONA
_how_
d_le
of
Cen_
at_
U _ A
detai_i_g
purcr_ase
Sen_
_h_
]efl_t
ptobl@ffl
t_eat_.r
mo(/e_
_he
_0 _t_e
alle_tion
Of
_uite
450
07024
o_
_ORONA
BE
you
_
U
soecifl_
THE
CORONA
CORONA
TO
BY
Kerosene
by
wiI_
lega_
EQUIPMENT
CONTACT£D
Portable
by
S A
co_ac_
_hts.
_ou
and
00
you
NOT
m;_y
RETURN
_tlso
h_ve
THE
Other
H_ATER
rights
TO
which
Sla_e
STATED
MstlufBctured
water_le_r
fue_
:_CeSSo_,es
THE
IS; GRANTED
5om_
ne_res_
the
PREC_UI"IONS
D=sttibuted
dear%
porl_b_e
_aliIy
_he
CORP
_ives
stat_
Rf_'TURN
WILL
than
good
wil_h
Ave_u_
N J
waftant_
vary
you
the
sa_es
Dep_
v
A representatrve
CORONA
U.SA
This
YOU
Plaza.
0thef
keroser_-fir_
of
_nc_ud_d
FOLLOWS¸
t_so_v_
Cenlet
Lee.
pns_t=Jcfio_
DAMAGE!S.
d_mage_
copy
o_
Cla_rqs
TO
A
fu_l
the
m,suse
ar_
CORP_
limitatE_ns
to
CIo_ler
U S A
Po_yQon
FOrt
_)O
aPPly
Cannot
CORONA
AND
U.S.A.
atfow
AS
your
they
I_ro_lem_
_W_trrsr_ty
3.
not
HANDLED
20_0
t_XCLUSIVE
_ortseQu_nti_I
• Conf_a=ct
2
not
_ny
_wth
_NCLUDING;
FOR
CONS_OUENT_AL
do
tray
IMPLIED_
FITNESS
CORONA
OR
st_te_
dental
I$
_
INCIDENTAL
_o_Re
OF
GIVEN
wrth
_v_ilabili_¥
p_._s
IS
OR
MERCHANTAB_UTY
if
u_e
_he
_h?Ough
_on*s_a_d_i_
WARRANTy
WARRANTIES;.
to_
_or
_r_red
O_
C_?orff_;_y
_s void
tue_s
respor_Eble
dam_g_s
u_th0_iz_d
in
warra_ly
synthetic
is _oI
or
the
m_in_amP_
Thi_
or
U.SA
3.
or
fueL
(ASTM
CORONA
COVer
used
O_ imp_'o_(_r
sene
OF
not
_._s
truant
_N
U
THfS
$ A
OUR
CORONA
Heater
CORP
CORPORATION
U.S.A,
REPRESENTATIVE
OWNER'S
MANUAL.
ALWAY_
OBSERVE
THE
SAFETY