1
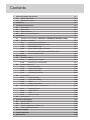
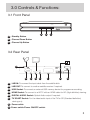
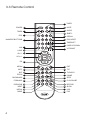
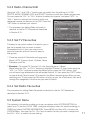
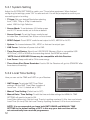
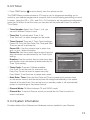
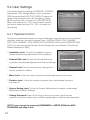
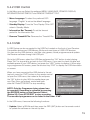
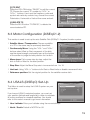
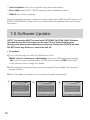
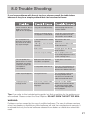
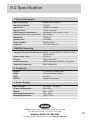
Signal
Stand by
HD Digital Satellite Receiver
HD Digital Receiver
User Manual
MODEL NUMBER
HDR-6110USB
Please read this Manual thoroughly before using your
Receiver and then retain for future reference.
Contents
1. Important Safety Instructions
1.1
2.
3.
4.
5.
6.
Safety Information
1.2
General Information
In the Box
Controls and Functions
3.1
Front Panel
3.2
Rear Panel
3.3
Remote Control
3.4
Remote Control Functions
Installation
4.1
Satellite Dish Installation (REFER TO SEPARATE INSTRUCTIONS)
4.2
Receiver Installation
4.2.1
Connecting your Receiver
4.2.2
Preparing your Remote Control
4.2.3
TV Format Set-Up
4.2.4
Check Satellite Signal Reception
4.2.5
Fast Channel Set-Up Astra 2/A/B/D/Eurobird 1
4.2.6
Chosen Satellite Scan
Menu System
5.1
Installation Menu
5.1.1
Selecting your Satellite
5.1.2
Selecting your SCAN Mode
5.2 Channel Edit Menu
5.2.1
TV Channel Edit
5.2.2
Radio Channel Edit
5.2.3
Set TV Favourites
5.2.4
Set Radio Favourites
5.3 System Menu
5.3.1
System Setting
5.3.2
Local Time Setting
5.3.3
Timer
5.3.4
System Information
5.4 User Settings Menu (User’s Conference)
5.4.1
Parental Control
5.4.2
OSD Control
5.4.3
USB
5.4.4
Factory Default
5.5 Games Menu
Advanced Installation
6.1
Antenna Setting
6.2
Transponder
6.3
Motor Configuration (DiSEqC1.2)
6.4
USALS (DiSEqC) Set-Up
p1
p1
p2
p2
p3
p3
p3
p4
p5
p7
p7
p7
p7
p7
p7
p8
p8
p8
p9
p9
p9
p9
p9
p10
p11
p11
p11
p11
p12
p12
p13
p13
p14
p14
p15
p15
p16
p16
p17
p17
p18
p19
p19
7. Software Update
8. Trouble Shooting
p20
p21
9. Specification
p22
1.0 Important Safety Instructions
1.1 Safety Information
•
Read these Instructions carefully and retain for future reference. If you sell, or give
this Receiver away be sure to pass on the Instructions.
•
There are no user serviceable parts inside this unit. DO NOT remove the cover there
are dangerous voltages inside. Electric shock hazard.
•
•
This unit operates from a 100~240V 50/60Hz Supply. Consumption is ~20W.
During use, this device may become warm, this is normal. DO NOT allow anything
to block the ventilation slots as this may cause overheating and a consequent risk
of fire.
•
•
•
•
•
•
DO NOT place naked flames (such as candles) on this equipment.
•
•
•
DO NOT overload the wall socket, this can be dangerous and lead to a fire hazard.
•
•
DO NOT stand items such as water filled vases on this Receiver.
•
•
•
•
DO NOT stand other equipment on this unit.
DO NOT operate close to heaters or other heat sources.
DO NOT stand on soft furnishings.
MAKE SURE there is a minimum clearance of 5cm on all sides of the unit.
DO NOT allow anything to trap, pinch or otherwise damage the Power Cord. If the
power cord should become damaged IMMEDIATELY switch the Receiver off at
the wall and unplug it. You should then contact your Service Centre to carry out a
repair.
MAKE SURE you have easy access to the mains plug in case of emergency
DO NOT unplug the unit by pulling the Power Cord, always grasp the plug firmly
and pull from the wall socket.
DO NOT operate this unit in damp conditions or allow water or other fluids to enter
the enclosure. If this happens, switch off IMMEDIATELY and refer the device to the
Ross Helpline.
DO NOT touch the mains plug or power cord with wet hands. Electric shock Hazard.
DO NOT connect or disconnect cables from this receiver when it is turned on.
Switch off the power first or this unit or other equipment may be damaged. This is
most important for the cable from the Dish (LNB).
MAKE SURE the LNB cable outer is earthed.
DO NOT clean this device using solvent based products. Use only a soft dry cloth.
1
1.2 General Information
•
Thank you for choosing a Ross Digital Satellite TV Receiver. Treated with care and
used in accordance with the contents of this manual it will provide many years of
reliable service.
•
This symbol indicates that, at the end of its useful life, this product must
not be disposed of with normal domestic waste. To prevent possible harm
to the environment or human health from uncontrolled waste disposal,
please recycle it responsibly. You can return your used device using the
return and collection service or contact the retailer where the product was
purchased.Batteries used in operating this product may contain toxic
agents that are hazardous to the environment. Therefore, as with the unit
itself, dispose of the batteries according to the prevailing statutory regulations. Never
put the batteries in normal household waste.
•
This receiver conforms to all applicable EU Legislation for this type of
product. Further information can be obtained from Ross if required.
2.0 In the Box
Please open your box carefully and check the contents which should be as per the list
below. If anything is missing please contact the Ross Helpline.
• HD Satellite Receiver (Set Top Box)
• Remote Control (NOTE: 2 x AAA Batteries not included)
• User Manual
2
3.0 Controls & Functions:
3.1 Front Panel
Signal
Stand by
HD Digital Satellite Receiver
A
B
C
A - Standby Button
B - Channel Down Button
C - Channel Up Button
3.2 Rear Panel
A
B
C
D
E
F
G
H
A - LNB IN: To connect the input cable from the satellite dish.
B - LNB OUT: To connect to another satellite receiver if required.
C - USB Socket: To connect an external USB memory device for programme recording.
D - HDMI Socket: To connect to a HDTV with an HDMI cable for HD (High definition) viewing.
E - DIGITAL AUDIO Socket: Optical Audio output if required.
F - TV SCART Socket: For the video/audio input of the TV for SD (Standard definition)
viewing only.
G - Power cable.
H -Power switch/Power ON/OFF switch.
3
3.3 Remote Control
20 TIMER
POWER
1
TIMER 2
EPG 3
NUMERIC BUTTONS 4
21 MUTE
22 AUDIO
23 SUBTL
24 RECALL
25 FAVOURITE
26 TIMESHIFT
16:9 5
LANG 6
27 PAGE UP/DOWN
28 V-FORMAT
CH+/- 7
VOL+/- 8
OK 9
MENU 10
29 EXIT
INFO 11
30 TXT
SAT 12
ZOOM 13
BACKWARD 14
32 PAUSE
33 STOP
FORWARD 15
34 PLAY/PAUSE
PREVIOUS 16
NEXT 17
35 RECORD
36 SLOW
MEDIA 18
GAME 19
4
31 TV/RADIO
37 HDD
38 PVR
3.4 Remote Control Functions
Button
Function
1
POWER: Turns on the power or switches the unit to standby mode
2
TIMER: To select upto 8 timer sequences of your choice.
3
EPI: Shows Now and Next EPG for the programme being viewed.
4
NUMERIC BUTTONS: Enter a number to select a channel directly or to select the
menu options.
5
16:9: Adjusts screen format between 16:9 and 4:3.
6
LANG: Press to select OSD language preference.
7
CH +/-: Up and down select for channels. Also used in menu operations.
8
VOL +/-: Volume up/down. Or change pages on the channel list. Also used in
Menu operations.
9
OK: Displays the channel list and selects the item on the menu. When in the menu
press OK to save setting and exit.
10
MENU: Open the main menu during TV viewing.
11
INFO/EPG: Displays satellite and transponder information for the current programme.
12
SAT: To display the satellite list or channel list in the viewing mode. In the Antenna
Setting or the Transponder menu press SAT to initiate a scan. (Red button to add
satellite)
13
ZOOM: (NOT AVAILABLE ON THIS MODEL). (Green button to add satellite).
14
Press to rewind. (select FR*2, FR*4, FR*8, FR*16 for different speeds)
15
Press to fast forward. (select FF*2, FF*4, FF*8, FF*16 for different speeds )
16
Press to choose the previous media file.
17
Press to choose the next media file.
18
MEDIA: Press the button to directly enter USB memory device.
19
GAME: Press the button to directly enter game menu
20
TIMER (Sleep): Press to set the power off time periods-available; 10mins, 30mins,
60mins, 90mins and press the OK button to set SLEEP timer on. Alternatively use
numeric keys to set your preferred time in user default mode.
21
MUTE: Turns the sound off and then back on with a second press.
22
AUDIO: Change audio mode between; left, right and stereo. In the Antenna Setting
menu press AUDIO to edit the satellite. In the Transponder menu press AUDIO to edit TP.
5
Button
Function
23
SUBTL: Sets broadcast dependant subtitles for the current TV programme.
24
RECALL: Press to switch to previously watched channel.
25
FAV: Select favourite channel list or current channel list in the view mode.
26
TIMESHIFT: (NOT AVAILABLE ON THIS MODEL).
27
PAGE UP/DOWN: Press to jump one page up or down.
28
V-FORMAT: Press to select the video output mode between; 1080I, 720 P and 576P.
When changing video format, there will be a flicker for a few seconds as the format
adjusts.
29
EXIT: Press to exit and save from current menu.
30
TXT: (NOT AVAILABLE ON THIS MODEL).
31
TV/RADIO: Switches between TV and Radio channels. (Blue button to delete Satellites).
32
PAUSE: Freeze the screen. (Yellow button to edit Satellite).
33
STOP: Press to STOP playback when watching a recording playing back a media file or
to stop a recording.
34
PLAY/PAUSE: Press to start watching a recording or media file or to pause.
35
RECORD: Press to start recording to an external USB Memory Device
36
SLOW: (NOT AVAILABLE ON THIS MODEL).
37
HDD: (NOT AVAILABLE ON THIS MODEL).
38
PVR: To directly enter the folder information of the attached USB memory device.
Please observe the following when using your Remote Control –
• Change the batteries when operation becomes poor or erratic.
• Always use two new batteries, DO NOT mix old and new.
• Dispose of old batteries in an environmentally responsible way.
• DO NOT place spent batteries in a fire or attempt to recharge them.
• If you are not going to use the Remote Control for an extended period then remove the
batteries to avoid the risk of leakage.
6
4.0 Installation:
Introduction
This manual will help you learn the basic use of your receiver such as installation,
selecting channels and many other functions of the set top box.
4.1 Satellite Dish Installation
Please refer to the separate documentation “Satellite Dish Installation Guide” to install
your dish. You will need to assemble, erect and roughly align your dish to your chosen
satellite before connecting up and turning on your Receiver.
4.2 Receiver Installation
4.2.1 Connecting your Receiver
Having completed the assembly and erection of your dish connect the satellite cable from
your dish to the LNB IN terminal on your receiver and your HDMI lead from the rear of your
receiver to an available socket on your TV or AV Amplifier. If you are not using an HD
compatible TV then you will need to connect to your TV using a SCART lead and optionally
the Optical Audio Out to an AV Amplifier. If you are using the HDMI socket then you only
need to connect this as it feeds both high quality audio and video to your TV. Finally, plug
your Receiver mains plug into a wall socket but do not switch it on yet.
4.2.2 Preparing your Remote Control
Your Remote Control requires 2 x AAA (LR03) batteries to operate. Open the cover on the
rear of the Remote Control by sliding it downwards and insert two batteries taking care to
observe the polarity markings inside the compartment.
4.2.3 TV Format Set-Up
You are now ready to switch on and adjust your dish to complete alignment (for this refer
to the separate instructions). Turn on your TV and your Satellite Receiver (both at the wall
socket and on the rear of the unit). Proceed as follows:–
•
Press the POWER button on your Remote Control or the STANDBY Button on the Front
Panel of the Receiver to turn the unit on.
•
If you get a ‘Mode not supported’ message on your TV - You need to alter the Receiver
resolution to match the resolution of your TV – The factory default is 720p.
The Resolution is changed by pressing the ‘V Format’ button on your remote control.
Adjust between 480, 576, 720 and 1080i TV Resolutions as required. 1080i is the
highest available resolution for HD channel reception.
•
Make sure your TV source is set to receive the signal from your Receiver.
NOTE: If you are using this Receiver in conjunction with a pre-installed dish which is
already aligned to ASTRA/EURO1 then after the unit has powered up you will see “NO
CHANNEL” being displayed. At this point press the “OK” button and your Channel list
should be displayed showing all the programmes that were loaded onto the receiver during
manufacture. Your Receiver is now ready to use.
7
4.2.4 Check Satellite Signal Reception
•
•
•
•
•
•
Press the Menu Button on the Remote Control.
The Installation Menu will be displayed.
Using the CH- Button select Antenna Setting and then press OK.
Please note that ASTRA 2A/B/D and Eurobird 1 satellite is labelled 4.ASTRA/EURO1.
Your Receiver has a large number of the available Satellites already programmed in to
make setting up easier for you. You can see the Satellite name at the top right of the
OSD (On-Screen Display).
Using the VOL+ Button select the SATELLITE you are aligning your dish to (usually this
will be the ASTRA 2A, 2B, 2D / EUROBIRD 1 if you want the most common Free to Air
English language channels such as BBC 1 ,2, etc….) and then press OK.
NOTE: DO NOT change any of the other settings
on the Antenna Setting Menu, these have already
been programmed into your receiver in the
Factory.
•
•
Now refer back to your “Satellite Dish Installation Guide” to fine tune your signal
reception.
Use the signal level indicators as displayed in the two bars (Q= Quality, L=Level) towards
the bottom of the Antenna Setting Menu to help fine tune reception (try to obtain better
than 50% for both).
4.2.5 Fast Channel Set-Up Astra 2A/B/D/Eurobird 1
The HD Satellite Receiver is pre-programmed with the most popular English Language
channels from the Astra2A/B/D and Eurobird 1 Satellites, so there is no need to scan these
channels. Simply press the Exit button to come out of the Installation menu screen, then the
Red SAT button to go into the channel list. All channels should now be available.
4.2.6 Chosen Satellite Scan
Should you wish to obtain channels from a satellite other than Astra2A/B/D and Eurobird
1, follow 4.2.4 to check your chosen satellite signal reception strength, then press the Red
(Scan) button to scan for channels from your chosen satellite.
•
8
•
•
•
Your receiver will now scan for all available programmes on your selected Satellite. This
may take several minutes.
When the Scan has completed, the Programmes will be saved automatically.
Press EXIT to leave the Installation Menu
You can now enjoy all the available Programmes on your chosen Satellite.
5.0 Menu System:
5.1 Installation Menu
In this part of the manual only the basic installation is covered. If you wish to set up your
receiver to work with a motorised dish then please refer to SECTION 6, “Advanced Installation”. The MENU provides access to many features and functions which will help to
improve your enjoyment of your new product. Press MENU to enter the INSTALLATION
Menu, then use the CH-, CH+ keys to select the item you wish to adjust and the VOL-,
VOL+ to select the new setting. Then press OK to store.
5.1.1 Selecting your Satellite
Use this option within the ANTENNA SETTING menu to select your desired Satellite.
NOTE: If you change the selected Satellite you may need to re-adjust your dish.
5.1.2 Selecting your SCAN Mode
Select the Scanning mode of your chosen satellite; FTA only, ALL, FTA+NIT or ALL+NIT.
FTA only: To Search for all the Free Channels available with the selected satellite or
transponders.
ALL: To Search for all the Free Channels + Scrambled Channels available with the
selected Satellite or Transponders.
FTA + NIT: To Search for all the Free Channels available with the selected Satellite or
Transponders including the new transponders that are not pre-programmed in your set
top box but broadcasted by the Satellite Stream.
ALL + NIT: To Search for ALL Channels available with the selected Satellite or
Transponders including the new transponders that are not pre-programmed in your set
top box but broadcasted by the Satellite Stream.
NOTE: Changing this setting from, for example, ALL to FTA or FTA+NIT will
reduce the number of Programmes stored as it will remove encrypted
programmes. This will make the task of editing / sorting programmes easier.
5.2 Channel Edit Menu
This section describes how you can edit your programmes. To enter the CHANNEL EDIT
menu, press MENU and then VOL+ and OK
9
5.2.1 TV Channel Edit
Using the “VOL-” and “VOL+” buttons you can select from the options of; LOCK, DELETE, MOVE, RENAME, EDIT and SELECT functions to edit your TV programmes. You
can press the “CH-” or “CH+” buttons to select the channel, and press “VOL-” or “VOL+”
button to choose the functions which are displayed
towards the bottom of the OSD. Press the “OK”
button to activate your choice.
•
Parental Lock - To prevent the viewing of
channels that are not suitable for Children.
Select the channel to Lock, and choose the
Lock function, then press the “OK” button.
This will lock the selected channel from
unauthorised viewing. Pressing the “OK”
button one more time, will unlock the channel.
When you press exit you will be prompted to confirm your choice if you have
unlocked a channel by entering your password. The channel will then be unlocked.
•
Delete - Select the channel you want to delete, and select the Delete function,
then press the “OK” button to delete the selected channel from the set top box.
Pressing the “OK” button again will cancel this operation. When you exit the menu you
will be prompted to confirm the delete and asked to enter your password. The channel
will then be deleted.
•
Move - Select the channel you want to move, and select the Move function, then
press the “OK” button to bring up the pop-up Move-To menu box. Then input the
channel number you want to move your selected channel to, and press the “OK”
button again to move.
•
Rename - Select the channel you want to rename, and then select the rename
function. Press the “OK” button to bring up the pop-up Rename menu. To edit the
channel name, select the letters to rename using
the “VOL” and “CH” buttons. Select the save logo
and press the “OK” button to save and exit.
•
Edit - Select the channel you want to edit and
select the Edit function, press the “OK” button
to bring up the pop-up Edit menu, input the
PID value for; Video, Audio, PMT, PCR, and
Tele by the numeric keys. Press the “EXIT”
button to save and exit.
NOTE: USE THIS FUNCTION WITH CAUTION
•
Select - Highlight the “Select” function, press the “CH-” or “CH+” buttons to select the
channels. Press the “OK” button, you can select multiple channels at any one time,
then you can lock or delete them together.
10
5.2.2 Radio Channel Edit
Using the “VOL-” and “VOL+” buttons you can select from the options of; LOCK,
DELETE, MOVE, RENAME, EDIT and SELECT functions to edit your Radio programmes.
You can press the “CH-” or “CH+” buttons to select the channel, and press “VOL-” or
“VOL+” button to choose the functions which are
displayed towards the bottom of the OSD. Press the
“OK” button to activate your choice.
•
The procedure for editing Radio channels is
identical to that for TV Channels as described
in Section 5.2.1.
5.2.3 Set TV Favourites
This easy to use option makes it simple for you to
find the channels that you want to watch.
Personalise the list in your own way to sort
favourite channels and put them into easy to
find groups.
•
There are a total of 8 favourite sorting groups:
Music, HDTV, Finance, Sport, Children, News,
Education and Film.
•
Example - To include TV Channel 10 in the favourite group – Music:
Move using the “CH-” or “CH+” buttons to highlight Channel 10, then move using the
“VOL-” or “VOL+” buttons to select the Music group, press the “OK” button, then
you will see a logo displayed at the left beside channel 10, then press the “EXIT” button
to save and exit. Now channel 10 is saved in the Music favourite group.When you are
watching your TV just press the FAV button to bring up your list of favourites, then scroll
through the categories to find the one you want to watch.
5.2.4 Set Radio Favourites
The procedure for setting Radio Favourites is identical to that for TV Channels as
described in Section 5.2.3.
5.3 System Menu
The options in this section enable you to set up options within SYSTEM SETTING to
match your TV, set the LOCAL TIME, configure and setup timers for timed recordings in
TIMER and check SYSTEM INFORMATION. Press MENU and then VOL+ to enter the
SYSTEM Menu, then use the CH-, CH+ keys to select the item you wish to adjust and
the VOL-, VOL+ to select the new setting.
11
5.3.1 System Setting
Adjust the SYSTEM SETTINGS to match your TV and other equipment. When finished
configuring the settings, press “OK” to save and exit. You will be prompted to confirm your
new settings prior to exiting.
•
TV type: Set your desired Resolution selecting
from; 1080i, 720p or 576p It is advised to
select 1080i for High Definition.
•
Screen Mode: To set between 16:9 wide screen
and 4:3 TV screen mode, set to Auto as default.
•
Screen Format: To set the Screen mode format
to Letter Box, Combined, Pan & Scan or Auto format
•
SPDIF Output: To set SPDIF audio format output to AC3, MPEG2 or AUTO.
•
System: To choose between; PAL, NTSC or Auto as the output type.
•
LNB Power: Switches off power to the LNB.
•
Timer Record Device: Select from USB DEVICE (Memory Stick or compatible USB
HDD Drive*), VCR or NONE as the recording device. Set NONE as default.
*NOTE: Not all USB HDD Drives may be compatible with this Receiver.
•
Low Power: Keep switched to ON to save energy.
•
Three Hours Shut Down Reminder: If set to ON the Receiver will go into STANDBY after
three hours of inactivity.
5.3.2 Local Time Setting
Here you can set the TIME and DATE on your Receiver.
•
GMT Usage: To activate GMT Time Offset
settings. Set the GMT Time Offset (number of
hours from -12 to 12, default set to OFF).
•
Manual Time Setting: (Default set to OFF)
•
Manual Date / Time Setting: To edit the time and date settings the MANUAL TIME
SETTING will need to be set to ON.
Local Date (dd/mm/yy): Set the Local Time by inputting numbers 0~9 for hour and minute.
Local Time (hh /mm): Set the Local Time by inputting numbers 0~9 for hour and minute.
NOTE: It is recommended you leave both GMT USAGE and MANUAL TIME
SETTING to the default setting of OFF. In this way your date and time will be
set automatically from received programmes.
12
5.3.3 Timer
•
Press TIMER button 2 to enter directly from the remote control.
The TIMER Menu provides access to 8 Timers for you to programme enabling you to
switch to your desired programme at a specific time to avoid missing something you want
to watch. Using the VOL+, VOL- and CH+, CH- buttons to set the preferred configuration,
press the OK button to set the timer, you can also set the preferred Power On mode for
TV or Radio.
•
Timer Number: Select from Timer 1 to 8, you
can set 8 different Timers in total.
•
Timer Set: To activate each Timer, if the
Timer Set is off, no other changes can be made.
•
Timer Control: There are 3 Timer Control settings:
Power Off: Only the Start Date (One Time) and Start
Time can be set to activate the
Power Off: - Use the numeric keys to enter time
and / or time / date information.
Power On: Use the numeric keys to enter time and
date information as determined by the Timer Cycle
setting.
Duration: Use the numeric keys to enter time, date
and duration time information as determined by the
Timer Cycle setting.
•
Timer Cycle: There are 3 Modes available;
One Time: To set the timer for one event only
Every Day: To set the timer to repeat every day
Every Week: To set the timer to repeat every week
•
Start Date / Time: Enter the Start Date and Time by pressing the numeric keys
on the remote control, and the set top box will change automatically to the preset
channel at the start time, if the set top box is in standby mode; it will automatically
power on and change to the preset channel.
•
Channel Mode: To Select between TV and RADIO mode.
•
Channel No: To set the Channel, which you would like the Timer to switch to,
when it activates.
5.3.4 System Information
Provides details of the Software and Hardware versions installed in your Receiver.
13
5.4 User Settings
This section allows the setting of PARENTAL CONTROL
preferences, OSD settings, details of any connected
USB device and finally FACTORY DEFAULT (resets the
whole receiver back to how it left the factory). Press
MENU and then VOL+ to enter the USER SETTINGS
Menu, then use the CH-, CH+ keys to select the item
you wish to adjust and the VOL-, VOL+ to select the
new setting.
5.4.1 Parental Control
To prevent unauthorised access of a range of features on your set top box or to selected
channels. Areas you can restrict access to are – INSTALLATION LOCK, CHANNEL
EDIT LOCK, CHANNEL LOCK, MENU LOCK, RECEIVER LOCK and SYSTEM SETTING
LOCK. You can also set the Parental Control Password to your Receiver. (The Factory
Default Password is: 0000)
•
Installation Lock: To lock the installation menu to
prevent unauthorised adjustment of the Installation.
•
Channel Edit Lock: To lock the Channel Edit menu
to prevent unauthorised adjustment of Channel settings.
•
Channel Lock: To lock channels from viewing which
are not suitable for children.
•
Menu Lock: To lock the menu to prevent unauthorised access to the menu.
•
Receiver Lock: To lock the receiver to prevent from unauthorised viewing of
any channel
•
System Setting Lock: To lock the System Setting menu to prevent unauthorised
adjustment of System Settings
•
Change Password: Press OK to bring up the pop-up menu, input the new
password using the numeric keys, and then repeat again to verify the new password.
NOTE: If you change the password REMEMBER to WRITE DOWN the NEW
PASSWORD and keep it safe.
14
5.4.2 OSD Control
In this Menu you can Select the preferred MENU LANGUAGE, STANDBY DISPLAY,
INFORMATION BAR TIMEOUT and REMOVE TIMESHIFT FILE.
•
Menu Language: To select the preferred OSD
language. “English” is set as the default language.
•
Standby Display: Turns the Time Display ON or OFF
when in Standby Mode.
•
Information Bar Timeout: To set the timeout
period for the Information Bar.
•
Remove Timeshift File: Removes the Timeshift File.
5.4.3 USB
A USB Device can be connected to the USB Port located on the front of your Receiver.
Compatible devices are USB Memory Sticks and most types of USB HDD devices.
You can use the USB device to: play files, play games, record programmes and update
the Receiver software through the USB port.
Go to the USB menu, select the USB files and press the “OK” button to start playing.
Press “Exit” to stop and to go back to the USB menu. If you want to check the size and
available space of your USB device, just press the “HDD” button to display it. When playing a programme full-screen, press the shortcut key “PVR” to display the USB information
on screen.
When you have connected the USB device to the set
top box, press the “PVR” button on the remote control
to open the USB menu, then select a file and press
the “OK” button to play. With the media player you
can: Play, Stop, go forward, rewind and open
other file. Press STOP/EXIT to stop recording.
NOTE: Only the Programme being viewed can
be recorded. Recording is activated by pressing
the RECORD button on the Remote Control
(Button 35). Press STOP/EXIT to stop recording.
The recorded programme can be found in the folder “PVR”.
In the USB menu, there are the following functions:
•
Update: Select a BIN file and then press the RED (SAT) button on the remote control
to update the software on the set top box.
15
NOTE: Further information on this Procedure is available in SECTION 7. This
function MUST be used with EXTREME CAUTION. ONLY Software provided
by your Service Centre can be used. Use of other Software may damage your
device and invalidate your warranty. During the UPDATE process DO NOT press
any buttons or switch the unit off.
•
Delete: Choose a file with the remote control, and then press the GREEN (ZOOM)
button on the remote control to delete the selected file.
•
Format: Select the USB device, and then press the YELLOW (PAUSE) button on the
remote control to format the complete USB device.
NOTE: CAUTION Reformatting will erase all data on the USB device.
•
Edit: Select a file on the USB device, and then press the blue (TV/RADIO) button on
the remote control to rename the file.
5.4.4 Factory Default
This option deletes all stored programmes and user settings and restores the receiver to
the original factory settings. The factory default password is: 0000.
NOTE: Use with CAUTION
5.5 Games
For your entertainment and enjoyment this Receiver has two pre-loaded classic games,
TETRIS and SNAKE.
Press the “GAME” button on the remote control to enter the games section directly.
•
Tetris: The classic game of Tetris. Press OK to enter the game then input the speed
and level by pressing the numeric keys. Then press any key on the remote control to
start the game. You can press the keys shown in the information box beside the
game to play the game.
•
Snake: The classic game of Snake. Press OK to enter the game, then choose the
type of game mode, and select the speed by inputting numbers 1~6, then press “OK”
to start game. You can press the keys shown in the information box beside the game
to play the game.
16
6.0 Advanced Installation:
This section is aimed at the more experienced Satellite Receiver (Set Top Box) user.
Specifically, it describes how to set up your unit to work with a Motorised Dish and how to
add additional Satellites that are not present in the Factory pre-loaded list.
Press MENU to enter the INSTALLATION Menu, then use the CH-, CH+ keys to select the
item you wish to adjust and the VOL-, VOL+ to select the new setting. Then press OK to
store.
6.1 Antenna Setting
This section enables you to adjust the Receiver to match your LNB and set other
parameters for your installation.
•
LNB Type: Select the type of LNB used with your
dish. Options are, UNIVERSAL, C BAND or NORMAL.
•
LNB Low Frequency / LNB High Frequency:
Input the LNB LOW and LNB HIGH FREQUENCY
for your LNB using the numeric keys if required.
•
22kHz Tone Control: If the LNB frequency is not
universal, the 22 KHz should be set to “OFF”.
•
DiSEqC Control: If your satellite receiver has been connected to a DiSEqC switch,
select the port (LNB1-LNB4) of DiSEqC or the TONE BURST A or B as appropriate.
•
Scan Mode:
Select the desired Scanning mode for the satellite; FTA only, ALL, FTA+NIT or ALL+NIT.
FTA only: To Search for all the Free Channels available with the selected satellite
or transponders.
ALL: To Search for all the Free Channels + Scrambled Channels available with the
selected Satellite or Transponders.
FTA + NIT: To Search for all the Free Channels available with the selected Satellite or
Transponders including the new transponders that are not pre-programmed in your set
top box but broadcasted by the Satellite Stream.
ALL + NIT: To Search for ALL Channels available with the selected Satellite or Tran
sponders including the new transponders that are not pre-programmed in your set top
box but broadcasted by the Satellite Stream.
17
[1] SCAN
Press the RED button “SAT”, to search for channels from the current satellite.
[2] ADD SATELLITE
Press the GREEN button “ZOOM”, to add a new satellite,
configure the settings such as; satellite name,
east/west and longitude then press “OK” to
save and exit.
[3] EDIT SATELLITE
Press the YELLOW button “PAUSE”, to edit the
current satellite. Edit the satellite name, east/west and
Longitude, then press “OK” to save and exit.
[4] DELETE SATELLITE
Press the BLUE button “TV/RADIO” to delete the current satellite. Choose the
“YES” option to delete or the “Cancel” option to exit.
6.2 Transponder
This Menu allows you to edit the various options for
the (TP) transponder settings and specifications.
You can also manually search for single transponders
programs by selecting SCAN.
•
Transponder Number: Select the TRANSPONDER
you wish to edit (e.g. 5/95).
•
•
•
•
Frequency: Check or set the FREQUENCY of the selected Transponder
Symbol Rate: Check or set the SYMBOL RATE for the selected Transponder
Polarisation: Set to HORIZONTAL or VERTICAL Polarisation as required.
Scan Mode
[1] SCAN
Press the RED button “SAT”; to scan the current TP. The scan mode is the same as
satellite; FTA ONLY, FTA+NIT, ALL+NIT and ALL
[2] ADD TP
Press the GREEN button “ZOOM”; to add a new TP.
Input the frequency value and symbol rate value by numeric key, choose the correct
Polarization, Horizontal or Vertical, then save and exit.
18
[3] TP EDIT
Press the YELLOW button “PAUSE” to edit the current
TP. Choose the current TP number by “VOL-” or
“VOL+” buttons, then input the frequency value and
symbol rate value by numeric key, choose the correct
Polarization, Horizontal or Vertical then save and exit.
[4] DELETE TP
Press the BLUE button “TV/RADIO”, to delete the
current selected TP.
6.3 Motor Configuration (DiSEqC1.2)
This section is used to set up the auto Satellite Dish (DiSEqC1.2 system) location system.
•
Satellite Name / Transponder: Choose a satellite
or a TP in the same way as previously described.
•
Continuously Move: Using the ”VOL-” and “VOL+”
buttons select West or East movement of the dish,
use the signal strength and quality bars at the bottom
of the screen to judge the best position for the dish.
•
Move steps: Dish moves step by step, adjust the
dish to East or West for the best position.
•
•
•
Step Size: Adjust the Move Step size in increments from 1 to 10.
Limit set: Using “VOL-/+” buttons to fix East or West limits or disable movement limits.
Reference position: Set the original position for the satellite receiver dish.
6.4 USALS (DiSEqC) Set-Up
This Menu is used to setup the USALS system on your
set top box.
If you have a USALS motorized system, you must set
your position (latitude and longitude) in order to calculate
all motor positions for viewable satellites. You should
refer to the motor’s manual to get more information.
•
•
User Latitude: Enter your Latitude using the numerical keys.
North / South: Default is NORTH for UK
19
•
•
User Longitude: Enter your Longitude using the numerical keys
•
USALS: Set to ON as required.
East / West: Select EAST / WEST depending on the Satellite locations
Enter the required information as above and then press OK to SAVE and EXIT back to the
INSTALLATION MENU. Please refer to your Motorised Dish Installation Manual for further
information.
7.0 Software Update:
NOTE: This function MUST be used with EXTREME CAUTION. ONLY Software
provided by your Service Centre can be used. Use of other Software may
damage your device and invalidate your warranty. During the UPDATE process
DO NOT press any buttons or switch the unit off.
• Procedure:
1) Turn on the set top box, insert the USB device, enter;
MENU->User’s Conference ->Multimedia, select the USB device and press the
“OK” button to enter, and then select the BIN file, and press the RED button (SAT)
on the remote control to begin the update.
2) After erasing the original software, the new software will be installed. This may take
several minutes.
3) When the update is finished, the set top box will restart automatically.
1)
20
2)
3)
8.0 Trouble Shooting:
If you have problems with the set top box, please consult the table below
because it may be a simple problem that can be solved at home.
Plug not inserted correctly.
Remove plug and reinsert
into the socket.
Switch on the back of the
set top box is switched off.
Check the switch and switch
to the on position once all
connections are installed.
Is the Satellite dish installed
correctly.
Reinstall the dish and
calibrate it.
LNB input is not connected
correctly.
Reconnect the cable to the
LNB and receiver.
Bad weather.
Attempt again later during
better weather.
Incorrect setup of settings.
Set the proper parameters
of received programme in the
system settings menu.
The set top box has
power but on TV shows
“No signal” or cannot
switch to the input the
set top box is
connected to.
Bad connection between
TV and the set top box.
Check all the connection
cables.
Incompatible video format.
Press the V-format button on
the remote control. To cycle
between the different formats.
Video stops/disappears.
Changed V-format.
The set top box needs time
to change output format,
wait for a few seconds and
video and audio will return.
TV program plays a
strange sound.
Channel may contain more
than one audio track or
languages.
User can use the “Audio”
button on the remote control
to select the correct audio
track or audio languages for
the TV program.
Power turned on, but no
display on screen or
lights on the set top box.
The set top box has
power but cannot find
any channels or shows
any signal strength.
Tips: If you refer to this troubleshooting guide, but find no solution for the problem you
encountered. Please contact the Ross Helpline. DO NOT OPEN THE SET TOP BOX.
WARNING:
Problems can be caused by the use of unofficial software. The use of software versions
other than dealers or distributors official software will void the manufacturer’s warranty. It
is advised that only the formal software released from dealers or distributors should be
used.
21
9.0 Specification
1.Tuner & Modulator
Input Frequency:
Input Impendence:
Input Level:
Input socked:
LNB Power & Polarization:
Current: (short circuit protection)
Waveform:
Symbol rate:
Outer decoder:
Code rate:
950MHz to 2150MHz
75 ohms
-65dBm to-25dBm
F type connector
Horizontal:+18V; Vertical: +13V;
Max 500mA;
QPSK S2
2~45MS/s
RS(204,188,8)
1/2,2/3,3/4,5/6,7/8
2.MPEG2 Decoding
Transport Stream & Profile Level: MPEG-4/H.264,MPEG-2 MP@ML MP@HL,
MPEG-4/AVC
Aspect ratio: Video
4:3/16:9
Format:
576p,720p,1080i
Audio Decoding:
MPEG-2A Dolby & MPEG-1 Layer I&II
Sampling Frequency:
3244/14896 KHz
3. Connector
SCART:
HDMI:
USB:
S/PDIF:
TV and VCR (CVBS,RGB)
HD Video/Audio Output
2.0 Host
Digital audio output
4. Power Supply
Input Voltage:
Power Consumption:
Weight:
Operating Temperature:
StorageTemperature:
100-240V~, 50/60Hz.
Max.25W
Appr. 1.5KG
00C – 400C
-400C - 650C
UK Office: Stafford Park 1, Telford, Shropshire, England, TF3 3BD
Tel: +44 (0) 1952 238 100 • Fax: +44 (0) 1952 238 180
Helpline: 0845 194 7584 (UK)
For further product information please go to: www.ross-style.com
22