1
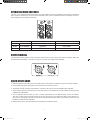
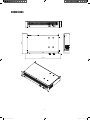
WX-1 & WX-3 Professional Power Amplifier OPERATING MANUAL AND USER GUIDE 3 www.wharfedalepro.com WX-1 and WX-3.indd 1 2014-7-16 10:23:16 TABLE OF CONTENTS TABLE OF CONTENTS.............................................................................. 1 IMPORTANT WARNINGS & SAFETY INSTRUCTIONS............................ 2 INTRODUCTION........................................................................................ 3 ABOUT THE WX SERIES.......................................................................... 3 FEATURES................................................................................................. 3 FRONT PANEL FEATURES AND CONTROLS......................................... 4 REAR PANEL FEATURES AND CONTROLS............................................ 4 OPERATING MODE SWITCHES............................................................... 5 OUTPUT WIRING...................................................................................... 5 QUICK START GUIDE............................................................................... 5 DIMENSIONS............................................................................................. 6 WIRING DIAGRAMS.................................................................................. 7 BLOCK DIAGRAM..................................................................................... 8 SPECIFICATION........................................................................................ 9 WARRANTY............................................................................................. 10 WX-1 and WX-3.indd 1 2014-7-16 10:23:16 IMPORTANT WARNINGS & SAFETY INSTRUCTIONS 1. 2. 3. 4. 5. 6. 7. 8. Read these instructions Follow all instructions Keep these instructions Heed all warnings Do not use this apparatus near water Clean only with dry cloth. Do not block any ventilation openings. Install in accordance with the manufacturer’s instructions. Do not install near any heat sources such as radiators, heat registers, stoves, or other apparatus (including amplifiers) that produce heat. 9. Do not defeat the safety purpose of a polarised or grounding plug. A polarised plug has two blades with one wider than the other. A grounding plug has two blades and a third grounding blade. The wide blade or the third blade is provided for your safety. If the provided plug does not fit into your outlet, consult an electrician for replacement of the obsolete outlet. 10.Protect the power cord from being walked on or pinched, particularly at the plug, receptacle and or the point where it exits from the apparatus. 11.Only use attachments/accessories specified by the manufacturer. 12.Only use a stand, tripod, bracket or rack specified by the manufacturer, or sold with the apparatus. When a rack is used, use caution when moving the rack and apparatus combination to avoid tip-over or injury. 13.Unplug the apparatus during lightning storms or when unused for long periods of time. 14.Refer all servicing to qualified personnel. Servicing is required when the apparatus has been damaged in any way including but not limited to power supply cord or plug damage, liquid ingress, foreign objects in the chassis, exposure to rain/moisture or impact damage. In addition the unit must be serviced when you experience any abnormal operation. 15.CAUTION: These servicing instructions are for use by qualified service personnel only. To reduce the risk of electric shock, do not attempt to perform any servicing other than that contained in the operating instructions unless you are qualified to do so. In addition opening the casing will result in your warranty becoming null and void. 16.Do not install this apparatus in a confined space such as a book case or similar unit. Good ventilation should be maintained around the apparatus. Any vents, air-inlets or fans should not be obstructed by objects such as paper, table-cloths, curtains etc. 17.WARNING: To reduce the risk of fire or electric shock, do not expose the apparatus to rain or moisture. The apparatus should not be exposed to dripping or splashing and objects filled with liquids, such as vases, should not be placed on the apparatus. 18.WARNING: The mains plug/appliance coupler is used as a disconnect device, the disconnect device shall remain readily operable. ATTENTION: RISQUE DE CHOC ELECTRIQUE-NE PAS OUVRIR 19.The lightning flash with arrowhead symbol within an equilateral triangle is intended to alert the user to the presence of non-insulated “dangerous voltage” within the product’s enclosure that may be of sufficient magnitude to constitute a risk of electric shock. - Warning: To reduce the risk of electric shock, do not remove the cover (or back) as there are no user-serviceable parts inside. Refer servicing to qualified personnel. - The exclamation point within an equilateral triangle is intended to alert the user to the presence of important operating and maintenance instructions in the literature accompanying the appliance. (Protective earthing terminal) The apparatus should be connected to a mains socket outlet with a protective 20. earthing connection. Correct Disposal of this product. This marking indicates that this product should not be disposed with other 21. household wastes throughout the EU. To prevent possible harm to the environment or human health from uncontrolled waste disposal, recycle it responsibly to promote the sustainable reuse of material resources. To return your used device, please use local return and collection systems or contact the retailer where the product was purchased. They can take this product for safe environmentally friendly recycling. WX-1 and WX-3.indd 2 2014-7-16 10:23:16 INTRODUCTION Congratulations on the purchase of your WX series professional power amplifier. Wharfedale Pro WX amplifiers are the result of many years of experience in the use, design and manufacture of professional audio equipment. We take great pride in engineering and building every Wharfedale Pro product and wish to thank you for entrusting us with your sound. From the time Gilbert Briggs built his first loudspeaker in 1932, to the present day, Wharfedale have maintained the same standard of quality in components, workmanship and performance. Please take the time to read this manual completely in order to ensure that you get the most from your WX power amplifier. ABOUT THE WX SERIES Suitable for portable sound reinforcement or fixed installations, the series features 2 models that deliver between 300W and 500W per channel into a 4 ohm load in a rugged 2U, 19” rackmount enclosure. An advanced SMPS (Switched Mode Power Supply) and Class AB topology deliver high power with low distortion in a compact and lightweight form factor. A full suite of protection includes thermal, over and under voltage, over-current, DC, short circuit protect and power on/off mute. The WX Series features XLR inputs and link outputs with a maximum input level of +22dBu allowing integration with any typical professional audio system. A variable speed fan keeps the amplifier rack quiet when not in use. The WX series features a built in in switched 100Hz LPF/HPF on each channel, allowing the amplifier to drive a bi-amplified system without any external processing. FEATURES •SMPS - Lightweight and Efficient •Class AB Topology amplifier modules - For Great Sound Quality and Reliability •Internal LPF/HPF/Fullrange Filtering •Speakon Outputs •Internal Circuit Breaker With Reset Switch •Ultra Quiet Variable Speed Fan •XLR Inputs and Parallel Wired Thru Outputs •Front Panel Input Trim Controls •Signal, Peak, Power and Protect LED Indicators •Road Ready 2U Chassis •IEC Mains Input Receptacle WX-1 and WX-3.indd 3 2014-7-16 10:23:16 FRONT PANEL FEATURES AND CONTROLS 1. Power Switch: Push to power the amplifier up or down. 2. Power LED: Illuminates when the amplifier is connected to mains power and switched on. 3. Protect LED: Illuminates when the amplifier is in protect mode due to short circuit, over current or thermal overload. 4. Peak LED: Illuminates when the amplifier is being driven into clipping. 5. Signal LED: Illuminates when signal is present at the input stage. 6. Input Trim: The front panel attenuators can be used to match the maximum output level of the device connected to the input to the maximum output of the loudspeakers. REAR PANEL – FEATURES AND CONTROLS 1. HPF / LPF / Fullrange Mode Switch: A 100Hz LPF / HPF for driving subwoofers or mid / hi enclosures. This allows the amplifier to be used in an active bi-amplified system without any additional hardware. Switch to LPF for a subwoofer, HPF for a mid/hi or to Fullrange to bypass the filter entirely. 2. XLR Input: Balanced XLR input for connection to +4dBu line level sources. 3. XLR THRU Output: Balanced XLR output to facilitate parallel wired loudspeaker arrays. 4. SPEAKON Output: For connection to passive loudspeakers, rated for 4-8Ω operation. 5. IEC Mains Receptacle: An appropriate mains cord is included in the original packaging. WARNING: DO NOT ATTEMPT TO BYPASS THE GROUND CONNECTION OF THE POWER CORD! 6. Circuit Breaker Reset: Resets the circuit breaker. WX-1 and WX-3.indd 4 2014-7-16 10:23:17 OPERATING MODE SWITCHES The HPF / LPF / Fullrange Mode Switches allow your WX amplifier to drive a bi-amplified system without an additional active crossover network. LPF is used to drive subwoofers, HPF to drive a Mid/Hi enclosure and Fullrange is used to drive a Mid/Hi enclosure without a subwoofer. OPERATING MODE Built-in filter Frequency response of the amplifier Top HPF 6dB/oct 100Hz High Pass Filter 100Hz-20KHz Middle FULL RANGE Bypassed 20Hz-20KHz Bottom LPF 6dB/oct 100Hz Low Pass Filter 20Hz-100Hz OUTPUT WIRING The WX Series employ Speakon output connectors. Ensure that only heavy gauge two conductor speaker cables with professionally wired Speakon connectors are used for connection from amplifier to loudspeaker. QUICK START GUIDE 1. Make sure that the power switch is set at the OFF position while making connections to and from the power amplifier. 2. Connect all devices in the signal path and ensure that each connection is secure. 3. Set all level and gain controls to their minimum. Connect the IEC power cord to the amplifiers IEC receptacle. 4. After powering up all other devices first, turn the power switch on the amplifier to the ‘ON’ position and verify that the POWER LED is illuminated. 5. Turn the amplifier volume control up to the “7” setting. (This setting can be adjusted higher or lower, as needed, after set-up). With source signal present start to set each gain stage in your signal path, starting at the beginning of the chain. It is best practice to make overall volume changes with the master fader of your mixing console once the amplifier input trim has been calibrated. 6. When powering down, make sure that the power amplifiers are switched off first. WX-1 and WX-3.indd 5 2014-7-16 10:23:18 DIMENSIONS WX-1 and WX-3.indd 6 2014-7-16 10:23:18 WIRING DIAGRAM WX-1 and WX-3.indd 7 2014-7-16 10:23:25 BLOCK DIAGRAM WX-1 and WX-3.indd 8 2014-7-16 10:23:27 SPECIFICATION Model Name WX-1 WX-3 8 ohms*2 180 Watts 260 Watts 4 ohms*2 300 Watts 500 Watts 2 ohms*2 260 Watts 330 Watts (Peak @1kHz) 4 ohms*2 650 Watts 1050 Watts Sensitivity +4dBu (1.2V) +4dBu (1.2V) Balanced XLR input 20kΩ 20kΩ Voltage Gain 29dB 31dB Slew Rate >40V / us >40V / us Crosstalk >76dB >76dB S/N >102dB >103dB Distortion (1W) <0.05% <0.05% ±1dB @ 4 Ohms 20Hz - 20kHz 20Hz - 20kHz ±3dB @ 4 Ohms 5Hz - 50kHz 5Hz - 50kHz (8 Ohms, 1KHz) >120 >120 Topology SMPS + Class AB amp SMPS + Class AB amp Signal Input and Output Female XLR and Male XLR Female XLR and Male XLR Power Output Speakon Speakon AC Switch, AC Switch, CH A and CH B Gain Knobs CH A and CH B Gain Knobs HPF 100Hz (6dB/oct) 100Hz (6dB/oct) LPF 100Hz (6dB/oct) 100Hz (6dB/oct) Full range Bypass Bypass Stereo Power Output (RMS @ 1kHz THD=1%) Input Sensitivity & impedance Frequency Response Damping Factor Connectors Controls Front panel Rear panel (Optional EQ) Thermal protect, Over/Under-voltage protect, Over-current protect, Output DC Protection protect, Output short-circuit protect, Power on/off mute Indictors Power, Fault, Peak, Signal Power, Fault, Peak, Signal Cooling Variable Speed Fan Variable Speed Fan Net Weight 8.2KG 8.5KG Gross Weight 9.5KG 9.5KG Dimensions 481.6*286*88mm 481.6*286*88mm WX-1 and WX-3.indd 9 2014-7-16 10:23:27 WHARFEDALE PRO LIMITED WARRANTY Wharfedale Pro products are warranted of manufacturing or material defects for a period of one year from the original date of purchase. In the event of malfunction, contact your authorized Wharfedale Pro dealer or distributor for information. *Be aware that warranty details may differ from country to country. Contact your dealer or distributor for information. These terms do not infringe your statutory rights. 10 WX-1 and WX-3.indd 10 2014-7-16 10:23:27 Wharfedale Professional IAG House 13/14 Glebe Road Huntingdon Cambridgeshire PE29 7DL UK www.wharfedalepro.com Wharfedale Professional reserves the right to alter or improve specifications without notice. All rights reserved © 2012 Wharfedale Pro. Wharfedale Pro is a member of the IAG Group. WX-1 and WX-3.indd 11 2014-7-16 10:23:31