1
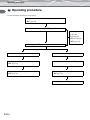
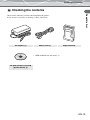
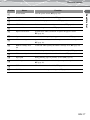
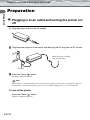
ENGLISH
ESPAÑOL
FRANÇAIS
Introduction
Introduction
Read this manual carefully prior to use to ensure correct use of this product.
For customers in Europe
“CE” mark indicates that this product complies with the European requirements for safety,
health, environment and customer protection. “CE” mark printers are intended for sales in
Europe.
Note: This symbol mark is for EU countries only.
This symbol mark is according to the directive 2002/96/EC Article 10
Information for users and Annex IV.
Your MITSUBISHI ELECTRIC product is designed and manufactured with high quality
materials and components which can be recycled and reused.
This symbol means that electrical and electronic equipment, at their end-of-life, should be
disposed of separately from your household waste.
Please, dispose of this equipment at your local community waste collection/recycling
centre.
In the European Union there are separate collection systems for used electrical and
electronic product.
Please, help us to conserve the environment we live in!
Trademarks
• Windows is registered trademark of Microsoft Corporation.
• Macintosh and Apple are trademarks of Apple Computer, Inc.
• All brand names and product names contained in this manual are trademarks or registered trademarks of their
owners.
EN-2
Features
Features
Direct print
This printer conforms to PictBridge, which is a standard common to digital cameras and printers.
If you connect this printer to a PictBridge-compatible digital camera using a USB cable, you can print
pictures stored in the digital camera directly from the camera.
Variety of print
This printer supports various printing options, including printing multiple instances of the same picture on
one sheet (multi-printing), printing multiple different pictures on one sheet (index printing), printing pictures
with date and time included, and printing with edged or not edged pictures.
Note
Some printer functions may be restricted depending on the digital camera connected.
Printing from a PC
You can connect this printer to a PC using a USB cable to print pictures stored on a PC.
Printing on high-quality overcoat paper
Printing on high-quality overcoat paper ensures long lasting, durable prints of high quality. This is especially
useful for printing photographs you can treasure for years to come.
EN-3
Operating procedure
Operating procedure
Use the following flowchart for reference:
Plugging in to an outlet and turning the printer on/off
(gpage 18)
Loading the ribbon cartridge (gpage 19)
Loading the
paper and
replacing the
ribbon cartridge
(gpage 32)
Loading paper (gpage 22)
Digital camera
Connecting a digital camera to the printer
PC
Installing the printer driver (gpage 27)
(gpage 25)
Using a digital camera to print
Connecting a PC to the printer
(gpage 26)
(gpage 28)
Printing pictures (gpage 28)
EN-4
Table of contents
Table of contents
Introduction . . . . . . . . . . . . . . . . . . . . . . . . . . . . . . . . . . . . . . . . . . . . . . . . . . . . . . . . . . . . . . . . . . . 2
Features . . . . . . . . . . . . . . . . . . . . . . . . . . . . . . . . . . . . . . . . . . . . . . . . . . . . . . . . . . . . . . . . . . . . . . 3
Operating procedure . . . . . . . . . . . . . . . . . . . . . . . . . . . . . . . . . . . . . . . . . . . . . . . . . . . . . . . . . . . . 4
Table of contents . . . . . . . . . . . . . . . . . . . . . . . . . . . . . . . . . . . . . . . . . . . . . . . . . . . . . . . . . . . . . . . 6
Read this first
Safety regulations . . . . . . . . . . . . . . . . . . . . . . . . . . . . . . . . . . . . . . . . . . . . . . . . . . . . . . . . . . . . . . 8
Precautions. . . . . . . . . . . . . . . . . . . . . . . . . . . . . . . . . . . . . . . . . . . . . . . . . . . . . . . . . . . . . . . . . . . 13
Checking the contents . . . . . . . . . . . . . . . . . . . . . . . . . . . . . . . . . . . . . . . . . . . . . . . . . . . . . . . . . . 15
Parts and controls. . . . . . . . . . . . . . . . . . . . . . . . . . . . . . . . . . . . . . . . . . . . . . . . . . . . . . . . . . . . . . 16
Front . . . . . . . . . . . . . . . . . . . . . . . . . . . . . . . . . . . . . . . . . . . . . . . . . . . . . . . . . . . . . . . . . 16
Rear . . . . . . . . . . . . . . . . . . . . . . . . . . . . . . . . . . . . . . . . . . . . . . . . . . . . . . . . . . . . . . . . . . 16
Preparation
Plugging in to an outlet and turning the printer on/off . . . . . . . . . . . . . . . . . . . . . . . . . . . . . . . . . 18
Loading the ribbon cartridge . . . . . . . . . . . . . . . . . . . . . . . . . . . . . . . . . . . . . . . . . . . . . . . . . . . . . 19
About the paper/ink ribbon set . . . . . . . . . . . . . . . . . . . . . . . . . . . . . . . . . . . . . . . . . . . . . 19
Setting the ribbon cartridge. . . . . . . . . . . . . . . . . . . . . . . . . . . . . . . . . . . . . . . . . . . . . . . . 19
Removing the ribbon cartridge . . . . . . . . . . . . . . . . . . . . . . . . . . . . . . . . . . . . . . . . . . . . . 20
Loading paper . . . . . . . . . . . . . . . . . . . . . . . . . . . . . . . . . . . . . . . . . . . . . . . . . . . . . . . . . . . . . . . . 22
Loading paper into the paper-cassette. . . . . . . . . . . . . . . . . . . . . . . . . . . . . . . . . . . . . . . . 22
Setting the paper-cassette into the printer . . . . . . . . . . . . . . . . . . . . . . . . . . . . . . . . . . . . . 23
Printing
Printing pictures from a digital camera . . . . . . . . . . . . . . . . . . . . . . . . . . . . . . . . . . . . . . . . . . . . . 24
About PictBridge-compatible digital cameras . . . . . . . . . . . . . . . . . . . . . . . . . . . . . . . . . 24
Connecting a digital camera to the printer . . . . . . . . . . . . . . . . . . . . . . . . . . . . . . . . . . . . 25
Using a digital camera to print . . . . . . . . . . . . . . . . . . . . . . . . . . . . . . . . . . . . . . . . . . . . . 26
Printing pictures from a PC . . . . . . . . . . . . . . . . . . . . . . . . . . . . . . . . . . . . . . . . . . . . . . . . . . . . . . 27
Installing the printer driver (during initial setup) . . . . . . . . . . . . . . . . . . . . . . . . . . . . . . . 27
Connecting a PC to the printer . . . . . . . . . . . . . . . . . . . . . . . . . . . . . . . . . . . . . . . . . . . . . 28
Printing pictures . . . . . . . . . . . . . . . . . . . . . . . . . . . . . . . . . . . . . . . . . . . . . . . . . . . . . . . . 28
EN-6
Table of contents
Additional information
Loading the paper and replacing the ribbon cartridge . . . . . . . . . . . . . . . . . . . . . . . . . . . . . . . . . . 32
If paper runs out during printing . . . . . . . . . . . . . . . . . . . . . . . . . . . . . . . . . . . . . . . . . . . . 32
If the ribbon runs out during printing . . . . . . . . . . . . . . . . . . . . . . . . . . . . . . . . . . . . . . . . 32
Error signals. . . . . . . . . . . . . . . . . . . . . . . . . . . . . . . . . . . . . . . . . . . . . . . . . . . . . . . . . . . . . . . . . . 33
Troubleshooting . . . . . . . . . . . . . . . . . . . . . . . . . . . . . . . . . . . . . . . . . . . . . . . . . . . . . . . . . . . . . . . 34
When paper is jammed . . . . . . . . . . . . . . . . . . . . . . . . . . . . . . . . . . . . . . . . . . . . . . . . . . . 36
If the ribbon cartridge is removed during printing . . . . . . . . . . . . . . . . . . . . . . . . . . . . . . 37
If the paper-cassette is removed during printing. . . . . . . . . . . . . . . . . . . . . . . . . . . . . . . . 37
About the paper/ink ribbon set . . . . . . . . . . . . . . . . . . . . . . . . . . . . . . . . . . . . . . . . . . . . . . . . . . . 38
Specifications. . . . . . . . . . . . . . . . . . . . . . . . . . . . . . . . . . . . . . . . . . . . . . . . . . . . . . . . . . . . . . . . . 40
Before you contact us . . . . . . . . . . . . . . . . . . . . . . . . . . . . . . . . . . . . . . . . . . . . . . . . . . . . . . . . . . 41
EN-7
Safety regulations
Read this first
Read this first
Safety regulations
Various icons are used in this manual to indicate correct product usage and to help prevent property damage
and injury to customers and others. The meanings of these icons are described below.
Icon
Description
WARNING
CAUTION
Failure to follow instructions indicated by this icon may lead to serious injury or
death.
Failure to follow instructions indicated by this icon may lead to injury or property
damage.
Precautionary notations are indicated by the following symbols.
Icon
Description
Do not perform this action.
You are strongly encouraged to perform this action.
Unplug the device from the power source.
Do not disassemble.
Avoid contact with water and other liquids.
Do not touch if your hands are wet.
EN-8
Safety regulations
WARNING
Read this first
If this device acts abnormally, unplug it
Do not use the printer if it emits smoke, unusual smells, strange sounds, or becomes
unusually warm.
Use under these conditions may cause fire or electric shock.
Turn off and unplug the printer. Then contact your dealer.
Should any liquid or foreign objects get into the printer,
unplug the power cord
Do not allow any liquids, metals, or flammable objects to get into the printer.
This may cause fire or electric shock.
Turn off and unplug the printer. Then contact your dealer.
If the printer cabinet is damaged, unplug the power cord
Do not use this device if the cabinet (body) is damaged.
Use in this condition may cause fire or electric shock.
Turn off and unplug the printer. Then contact your dealer.
If the power cord is damaged, unplug it
Do not use a damaged power cord.
Use in this condition may cause fire or electric shock.
Turn the printer off, and unplug the power cord being careful not to touch any exposed
wires. Then contact your dealer.
Do not damage the power cord
Do not damage or modify the power cord.
A damaged power cord may result in fire or electric shock. To prevent damage, do not
bend the cord excessively or pull on the cord when unplugging. Take care no heavy
objects are placed on or roll over the cord.
If the power cord is damaged, contact your dealer.
EN-9
Safety regulations
WARNING
Read this first
Do not disassemble or modify the printer
The printer has both hot and high voltage parts on the inside. Touching these parts may
result in burns, electric shock, and/or damage to the printer. Never attempt to
disassemble or modify the printer as this may lead to electric shock or printer
malfunction.
For service or repair, contact your dealer.
Do not allow liquids near the printer
If liquid gets into the printer, it may result in fire or electric shock.
Do not place heavy objects on the printer
Heavy objects may damage the printer cabinet, resulting in fire or electric shock.
Damage may also result from the printer being dropped or falling.
Do not install the printer in the following places
To prevent fire, electric shock, and printer malfunction, do not install the printer in the
following places:
• Dusty, humid, or oily places
Should any dust or liquid get into the printer, it may result in fire or electric shock.
• Extremely hot places
Do not expose the printer to direct sunlight, such as inside a car or near a window or
extremely high temperatures, such as near a heater. Doing so may damage the printer
cabinet, resulting in fire or electric shock.
Use the printer in an environment with an ambient temperature between 10 to 35°C
(50 to 95°F) and humidity of 30 to 80%.
Do not use the printer in the following places
• Unstable or inclined surfaces.
• Outdoors (particularly on beaches, etc.), or places that expose the printer to excessive
dust or debris.
• Places subject to rain, dripping, or enclosed places where condensation could occur
such as inside a plastic bag.
EN-10
Safety regulations
WARNING
Read this first
Do not use the printer with an AC adapter or power cord other
than that specified/provided
Do not use the provided AC adapter or power cord with any
other devices
Provide correct voltage
Incorrect voltage may damage printer parts.
Use with incorrect voltage may cause fire or electric shock.
Connect the power cord correctly/safely
If the power cord is plugged in loosely, it may cause a fire or electric shock.
Push the plug all the way into the outlet.
Make sure that excessive dust and debris do not accumulate
on the power cord
Dust and debris may conduct electricity, which can cause fire and electric shock.
If excessive dust and debris accumulate on the cord, unplug the cord and clean it.
Always unplug the power cord during an electrical storm
The induced electricity from storms may cause fire, electric shock, or printer
malfunction.
Do not hold the power plug with wet hands
Doing so may result in fire, electric shock, or printer malfunction.
Be sure your hands are dry before handling.
Plug the printer directly into an outlet
Avoid overloading outlets with use of extensions and adapters, etc.
Do not move the printer when the power cord is taut
Moving the printer when the power cord is taut may damage the cord.
Using the printer when damaged may cause fire or electric shock.
When moving the printer, unplug and bundle the power cord.
EN-11
Safety regulations
CAUTION
Read this first
Ensure there is adequate ventilation around the printer
Do not put the printer where there is poor ventilation, or on a soft surface such as a rug
or bed.
Do not put the printer on an unstable surface
Do not put the printer on an unstable surface such as a shaky table. Injury may result
from the printer being dropped or falling. This could also damage the printer or cause
the printer to malfunction.
Do not touch the non-user-serviceable parts inside the printer
Doing so may cause injury or burns. This applies especially to children and those
unfamiliar with the printer.
Do not unplug the printer by jerking or pulling on the power
cord
To unplug the power cord, hold it by the plug. Pulling on the cord may damage it,
possibly resulting in fire or electric shock.
Unplug the printer for servicing
Always unplug the printer before servicing or performing maintenance.
Unplug the printer if it will not be used for an extended period
of time
Unplug the printer if it will not be used for an extended period of time, such as while
you are away on a long trip.
Otherwise, deteriorated insulation or current leakage may cause fire or electric shock.
EN-12
Precautions
Precautions
Condensation is the occurrence of water droplets forming on surfaces, and may occur under the following
conditions:
• The room where the printer is located is heated quickly.
• Cool air from an air-conditioner blows directly onto the printer.
• The printer is moved from a low-temperature location to a high-temperature location.
When condensation occurs, print paper may become moist. This may cause printing quality deterioration or
paper jams. If condensation has occurred or is expected to occur, refrain from using the printer until
condensation is no longer present or likely to occur.
When cleaning the printer, do not use thinner, benzine, or any other solvent
If the printer comes into contact with insecticide or is wiped with thinner or benzine, the finish may
deteriorate or peel.
To clean the printer exterior, wipe with a soft cloth. If stains are persistent, dampen the soft cloth with water
or a diluted mild detergent, wring it carefully, and then wipe the exterior with the cloth.
Do not allow the printer to remain in contact with rubber or plastic products
for an extended period of time
Deterioration and discoloration may occur if the device remains in contact with rubber or plastic products
for an extended period of time.
Operate the printer at least once every six months
If the printer is not used for a long period of time, it may malfunction.
Run the printer at least once every six months.
When lifting or transporting the printer
When lifting or transporting the printer, grasp it with both hands.
When transporting the printer
When transporting the printer, place it in the original box with the original packing material.
If the original packing material is not available, pack the printer with enough cushion to absorb any impacts
during transportation.
EN-13
Read this first
When condensation occurs
Precautions
Appropriate installation locations
Install the printer on a flat stable surface. Allow for suitable clearance around the printer.
Read this first
at least 100 mm
(4")
Notes
• A space of at least 100 mm (4") is required behind the printer because paper is partially ejected from the rear of the printer
during printing.
• The cables on the rear of the printer should be directed straight out or away from the printer so they won't interfere with
paper during printing.
EN-14
Checking the contents
Checking the contents
Read this first
Check for the following contents when unpacking the printer.
If one or more accessories are missing, contact your dealer.
AC adapter (1)
Power cord (1)
Paper-cassette
• USER’S MANUAL (this book) (1)
CP-D2E software CD-ROM
(printer driver) (1)
EN-15
Parts and controls
Parts and controls
Read this first
Front
Rear
EN-16
Parts and controls
Number
Name
Function
Power button
Turns the power on/off (gpage 18).
B
Power indicator
Indicates the power is on/off (gpage 18).
C
PAPER indicator
Blinks when a paper error occurs (gpage 33).
D
RIBBON indicator
Blinks when a ribbon cartridge error occurs (gpage 33).
E
Access indicator
Indicates the printer status (gpage 33).
F
Paper-cassette door
Open this door when you install or replace the paper-cassette
Read this first
A
(gpage 22).
G
Paper-cassette door tab
Use this tab when opening the paper-cassette door (gpage 22).
H
Ribbon cartridge door
Open this door when you install or replace the ribbon cartridge
(gpage 19).
I
Ribbon cartridge door
Use this tab when opening the ribbon cartridge door (gpage 19).
tab
J
Tab
Pull this tab up when taking out the ribbon cartridge (gpage 20).
K
Ribbon cartridge slot
The ribbon cartridge is inserted into this slot (gpage 20).
L
Paper path
During printing, paper is partially ejected (gpage 14).
M
PictBridge connector
USB cable connector for a PictBridge-compatible digital camera
N
USB connector
USB cable connector for a PC (gpage 28).
O
DC-IN jack
Connect the AC adapter to this port (gpage 18).
(gpage 25).
EN-17
Plugging in to an outlet and turning the printer on/off
Preparation
Preparation
Plugging in to an outlet and turning the printer on/
off
1
Plug the power cord into the AC adapter.
2
Plug the power plug into a wall outlet, and then plug the DC plug into the DC-IN jack.
Insert the power cord plug
into the wall outlet.
DC plug
3
Press the Power (
) button.
The Power indicator turns on.
Note
If the DC plug is accidentally unplugged from the printer during printing, turn the printer off, plug the DC plug into
the DC-IN jack, and then turn the printer on again. Leaving the printer unplugged may cause it to malfunction.
To turn off the printer
Press the Power (
) button.
The Power indicator turns off.
EN-18
Loading the ribbon cartridge
Loading the ribbon cartridge
Preparation
About the paper/ink ribbon set
For printing, paper/ink ribbon set (not supplied) are required.
For details, refer to “About the paper/ink ribbon set” (gpage 38).
Notes
• Use ribbon cartridges and paper that are packaged together.
• Do not use paper that has already been printed on or ejected.
Setting the ribbon cartridge
1 Open the ribbon cartridge door.
2
Remove slack from the ribbon.
Turn the roll in the direction indicated by the arrow while holding the roller in place.
If the ribbon cartridge has been used before, take in any ribbon slack before loading.
EN-19
Loading the ribbon cartridge
3
Insert the ribbon cartridge into the printer following the direction of the arrow, and
then close the ribbon cartridge door completely.
Preparation
• Push the cartridge in until it clicks.
• If the ribbon cartridge door cannot be closed completely, take out the ribbon cartridge and then
reinsert it.
Removing the ribbon cartridge
Open the ribbon cartridge door, and raise the tab. When the ribbon cartridge comes free, take it out.
Note
When opening the ribbon cartridge door, be careful not to touch the inside of the ribbon cartridge slot as it may be very hot.
EN-20
Loading the ribbon cartridge
• When setting a ribbon cartridge aside, keep it upright to protect it from dust.
Do not touch the ribbon or leave a ribbon cartridge in a dusty environment.
Preparation
Fingerprints or dust on a ribbon may cause printing quality to deteriorate.
• If the ribbon has torn, replace the ribbon cartridge with a new one.
Note on ribbon cartridge storage
Store ribbon cartridges in a place that is free from high temperature, humidity, dust, and direct sunlight.
EN-21
Loading paper
Loading paper
Preparation
Loading paper into the paper-cassette
1 Open the paper-cassette cover.
• Slide and pivot the paper-cassette cover following the direction of the arrow.
2
Fan the paper stack properly and load the paper into the paper-cassette with the
protection sheet facing up.
Protection sheet
Note
Do not load more than 50 sheets in the paper-cassette.
Tip
Use only one pack (25 sheets) of paper at a time. Keep another pack in its original plastic sealed.
3
EN-22
Close the cover until it clicks into place.
Loading paper
Preparation
Setting the paper-cassette into the printer
1 Open the paper-cassette door.
When closing the paper-cassette door, push the paper-cassette door tab in as you close the door until it
clicks into place and locks.
2
Remove the protection sheet.
Protection sheet
3
Insert the paper-cassette all the way.
• Push the paper-cassette until it clicks into place.
• To remove the paper-cassette, pull it out holding both sides.
Tip
Printed paper is ejected onto the top of the paper-cassette.
Note
Do not leave more than paper 25 sheets (1 pack) on the top of the paper-cassette.
EN-23
Printing pictures from a digital camera
Printing
Printing
Printing pictures from a digital camera
About PictBridge-compatible digital cameras
You can print pictures directly by connecting your PictBridge-compatible digital camera to the printer.
You can specify the pictures to be printed and the number of prints by following the instructions displayed on
the LCD screen of the camera while it is connected to the printer.
The printing procedure varies from one digital camera to another. Refer to the manual supplied with your digital
camera.
You can print pictures based on the print order you entered in Digital Print Order Format (DPOF).
Tips
In PictBridge mode, the initial printer settings are as follows.
• Paper size automatically selected according to the paper loaded in the printer.
• One-sheet printing selected.
• Not edged printing selected.
• Date printing disabled.
• File name printing disabled.
Notes
• Images not taken by a digital camera must be printed by a PC.
• The maximum number of digital camera images you can print (both index and regular size) is 200 at one time. If you set
more, only the first 200 are printed.
• While the printer is cooling off, if you cancel the printing, the last image queued will be printed.
About DPOF (Digital Print Order Format)
You can record the following print order on a card.
• Selected images for printing taken by digital camera.
• Number of prints.
• Date and time.
The information is saved on the card in DPOF format. You can take the card to a photo developer service
supporting DPOF and ask them to print the images based on the print order recorded on the card.
EN-24
Printing pictures from a digital camera
Connecting a digital camera to the printer
Printing
The procedure below assumes that you are connecting a PictBridge-compatible digital camera.
Use the USB cable supplied with the digital camera to connect.
1
Turn on the printer.
For details, refer to “Plugging in to an outlet and turning the printer on/off” (gpage 18).
2
3
Plug one end of the USB cable into the USB connector on the digital camera, and
then plug the other end into the PictBridge connector on the rear of the printer.
Turn on the digital camera and prepare it for printing.
The Access indicator on the printer turns on for a few moments and then turns off.
For details on how to use the digital camera, refer to the instruction manual supplied with the digital
camera.
EN-25
Printing pictures from a digital camera
Printing
Using a digital camera to print
1 Print the desired picture by following the instructions displayed on the digital camera
screen.
Sample digital camera screen
The Access indicator on the printer blinks when printing is in progress. The indicator turns off when
printing ends. For details on how to use the digital camera, refer to the manual supplied with the digital
camera.
2
When printing is complete, turn off the printer and digital camera, and then
disconnect the USB cable.
Notes
• Printing will stop if you unplug the power plug during printing. The paper should be automatically ejected when you turn
on the printer again. If it is not, refer to “When paper is jammed” (gpage 36).
• Do not open the ribbon cartridge door or remove the paper-cassette during printing.
• Do not move the printer during printing.
• Do not turn off the printer or digital camera, or disconnect the AC adapter during printing. If you inadvertently turn off the
printer or disconnect the AC adapter, turn on the printer and then retry printing. If you leave the printer as is, a failure might
occur.
• Do not unplug the USB cable during printing.
• Wait at least 10 seconds after unplugging the USB cable before plugging it back in, or vice versa.
EN-26
Printing pictures from a PC
Printing pictures from a PC
Printing
Note
Images that were not taken by a digital camera must be printed by a PC.
Installing the printer driver (during initial setup)
Supported Windows operating systems: Windows 2000/XP
Supported Macintosh operating systems: Mac OS X v10.4
Note
Before connecting the printer to a PC, you must install the printer driver.
1
Start up your PC, and then insert the software CD-ROM supplied with the printer into
the CD-ROM drive.
If you are using Macintosh, double click the [Installer] icon displayed on the desktop to begin
installation.
Tip
For details, refer to the Installation Guide on the software CD.
2
Install the printer driver by following the instructions displayed on the screen.
For details, refer to the instruction manual supplied with the PC.
Tip
If your PC with a USB connector is one of the following, operation is not guaranteed.
– The operating system is Windows 95/NT 4.0/98/98SE/ME.
– Mac OS 8.6-9.2.
– Your PC’s USB connector was added using an extension card or similar means.
– Your PC was shipped without a pre-installed OS or was home-built.
EN-27
Printing pictures from a PC
Connecting a PC to the printer
Printing
Use a commercially available USB cable (A-B type, less than 3m (9.8 ft.)).
1
2
Plug one end of the USB cable into the USB port on the PC, and then plug the other
end into the USB connector on the rear of the printer.
Turn on the printer.
Notes
• When this printer is connected both to a PC and a PictBridge-compatible digital camera, it assigns higher priority to the
digital camera. Disconnect the digital camera.
• This printer's performance is not guaranteed in a network environment.
• This printer's performance is not guaranteed when connected to a USB hub.
Printing pictures
1 In your application, display and select the pictures to be printed.
2 On the print screen, select [CP-D2E] from the available printer list.
Note
[Print] operations and printer selection vary depending on the application. Refer to the manual supplied with your
application.
3
On the print setting screen, check the properties, and then start printing.
For details, refer to “Setting the print properties” (gpage 29).
Notes
• Printing will stop if you unplug the power cord during printing. The paper should be automatically ejected when you turn
on the printer again. If it is not, refer to “When paper is jammed” (gpage 36).
• Do not open the ribbon cartridge door or remove the paper-cassette during printing.
• Do not move the printer during printing.
• Do not turn off the printer or PC, or disconnect the AC adapter during printing. If you inadvertently turn off the printer or
disconnect the AC adapter, turn on the printer and then try printing again. If you leave the printer as is, a failure might
occur.
EN-28
Printing pictures from a PC
Setting the print properties
Select [Printing Preferences] from the File menu. On the [MITSUBISHI CP-D2E Printing Preferences]
screen, use the [Paper] and [Color Adjustment] tabs to change the number of copies, and to make adjustments
to the color settings.
Paper setup screen
Color Adjustment screen
Paper setup screen: The following items can be set.
Item
Contents
Paper Size
4 × 6 inch (100 × 148 mm)
Copy Count
Select from 1 to 50.
Orientation
Select [Landscape] or [Portrait].
Print Area
Select [Not Edged] or [Edged].
Enlarge/Reduce
Set the print size from 25 to 400%.
Sharpness
Select the [Sharpness] among [OFF], [Soft], [Normal], or [Hard].
Color Adjustment screen: The following items can be set.
Item
Tone
Contents
Adjust the [Tone] from -5 (Lightest) to +5 (Strongest) among the [Red], [Green],
and [Blue].
Saturation
Set the [Saturation] from 0 to +10 (Strongest).
Brightness
Set the [Brightness] from -5 (Darkest) to +5 (Brightest).
Contrast
Set the [Contrast] from -5 (Lightest) to +5 (Strongest).
EN-29
Printing
If you are using Windows:
Printing pictures from a PC
If you are using Macintosh:
Select [Page Setup] and [Print] from the File menu to change the paper size, number of copies, and to make
Printing
adjustments to the color settings.
Note
The screens are those in Mac OS X v10.4. They may differ depending on the operation system.
Page Setup screen
Page Setup screen: The following items can be set.
Item
Contents
Settings
Select [Page Attributes].
Format for
Select [CP-D2E].
Paper Size
Select one of the following paper styles.
• Edged 4 × 6 inch (100 × 148 mm).
• Not Edged 4 × 6 inch (100 × 148 mm).
Orientation
Select print orientation.
Scale
Enter the scale.
EN-30
Printing pictures from a PC
Sample: Print screen 1
Sample: Print screen 2
Printing
Print screen: The following items can be set.
Item
Printer
Contents
Select [CP-D2E].
Presets
Select [Standard], then select [Printer Features]. From the [Feature Sets],
select [Setting 1] or [Setting 2].
Setting 1
Setting 2
Saturation
Set the [Saturation] from 0 to +10 (strongest).
Brightness
Set the [Brightness] from -5 (darkest) to +5 (brightest).
Contrast
Set the [Contrast] from -5 (lightest) to +5 (strongest).
Sharpness
Select the [Sharpness] among [OFF], [Soft], [Normal], or [Hard].
Tone
Adjust the [Tone] from -5 (lightest) to +5 (strongest) from [Tone Red],
[Tone Green], and [Tone Blue].
EN-31
Loading the paper and replacing the ribbon cartridge
Additional information
Additional information
Loading the paper and replacing the ribbon
cartridge
If paper runs out during printing
The PAPER indicator blinks slowly. Load paper into the paper-cassette. The remaining data is automatically
printed.
Under normal circumstances the ribbon will end at the same time as the paper runs out. Replace the ribbon
cartridge with a new one.
If the ribbon runs out during printing
The RIBBON indicator blinks slowly. Wait until paper is ejected, and then replace the ribbon cartridge with a
new one. When you close the ribbon cartridge door, the remaining data will be automatically printed.
EN-32
Error signals
Error signals
Power
Access
Indicator
status
Printer status
Solution
On
Power ON
Off
Power OFF
On*
Connected to a
Wait for a while. Do not disconnect
digital camera, or
the digital camera or PC.
–
the printer is
18
–
cooling off
Blinking
Page(s)
Communicating
slowly
Blinking
Printing
–
very slowly
PAPER
Blinking
–
Out of paper
Load paper into the paper-cassette.
22, 32
Blinking
End of ink
Replace the ribbon cartridge with a
19, 32
slowly
ribbon
new one.
No ribbon
Set a ribbon cartridge into the printer.
19
Paper jam
Remove jammed paper.
36
slowly
RIBBON
cartridge is set
Access and PAPER
Blinking
together
Access and
Blinking
Communication
Check whether the digital camera
RIBBON
together
error
supports PictBridge.
–
Turn the printer off and on, then try
printing again. If the error persists,
–
contact your dealer.
Access, RIBBON,
Blinking
and PAPER
together
Internal problem
Contact your dealer.
–
* This light goes off when the connection is complete.
EN-33
Additional information
Indicator
Troubleshooting
Troubleshooting
Additional information
Before asking for repairs, check the printer using the following checklist. If the problem still occurs, contact
your dealer.
Problem
The power does not
Cause / status
Solution
The AC adapter is not connected.
Connect the AC adapter.
The power turns off during printing.
Push the ribbon cartridge until it
Page(s)
18
turn on.
The ribbon
cartridge cannot be
clicks. Turn on the printer again,
removed.
and wait until the operation
–
sound stops.
Printing a picture
The printer takes a long time to open
The loading time varies
from a digital
a TIFF file.
depending on the image size.
camera does not
Wait until loading is complete.
start soon.
The size of a JPEG file is large.
Printing does not
No ribbon cartridge is set in the
start.
printer.
No paper in the paper-cassette.
–
–
–
Set a ribbon cartridge.
19
Load paper into the paper-
22
cassette.
Paper is jammed in the paper ejection
Remove the jammed paper.
36
The printer driver is not correctly
Install or re-install the printer
27
installed on the PC.
driver on the PC correctly.
area.
Indicators lights or blinks.
EN-34
–
33
Troubleshooting
Problem
Cause / status
The printer does not support
specification is
trimming.
ignored although it
is included in the
Page(s)
–
–
27
print reservation
information.
Noise interferes
Pictures that were not taken with a
Images that were not taken by a
with printed
digital camera were printed from a
digital camera must be printed
images.
digital camera.
from a PC.
The printing
The printer is designed to prevent
This is not a malfunction. Be
interval has
overheating by automatically
patient.
become longer.
prolonging the printing interval as
–
printing proceeds continuously.
EN-35
Additional information
Trimming
Solution
Troubleshooting
When paper is jammed
Additional information
When paper is jammed, the Access and PAPER indicators blink and printing stops.
Follow these steps to remove jammed paper.
1
2
3
Turn off the printer.
Remove the paper-cassette.
Turn on the printer again. The paper should be ejected automatically.
• If the paper is automatically ejected, go to Step 8.
• If the paper is not automatically ejected, turn off the printer and go to Step 4.
4
Check the inside of the paper-cassette door to see whether paper is visible at the
rear.
• If it is, go to Step 5.
• If it is not, contact your dealer.
Notes
• Do not pull the jammed paper too hard. The paper may tear inside the printer.
• Jammed paper that has been removed cannot be used for printing. If it is used, a printer failure might occur.
5
Open the ribbon cartridge door. Use a flathead screwdriver to turn the screw in the
counterclockwise or clockwise direction.
Screw
EN-36
Troubleshooting
Pull the paper out.
Turn on the printer.
Re-set the paper-cassette.
If the printer operates normally, the paper jam problem has been solved. You can continue printing.
If the ribbon cartridge is removed during printing
1 Turn off the printer.
2 Insert the ribbon cartridge all the way, and then be sure to close the ribbon cartridge
door.
3
Turn on the printer.
If the paper-cassette is removed during printing
1 Turn off the printer.
2 Insert the paper-cassette all the way.
3 Turn on the printer.
Tips
• Printing ends when the sheet in process is printed.
• An error also occurs if you remove the paper-cassette before printing starts. Retry the procedure from the beginning. For
details, refer to “Loading paper” (gpage 22).
EN-37
Additional information
6
7
8
About the paper/ink ribbon set
About the paper/ink ribbon set
Additional information
• When ordering, please specify the models indicated in the table below.
Type of Paper/Ink ribbon set
Paper/ink ribbon set for 4 × 6 (3.9" × 5.8") printing
Model
Capacity
CK-D2S
50
• The used ribbon cartridge is not reusable.
• Handle ribbon cartridges carefully to ensure that they remain clean.
• Do not disassemble ribbon cartridges.
• Fingerprints, dust, scratches, oil, or other debris on the print surface may degrade printing quality.
• Do not use sheets of paper that have already been printed on. A failure might occur. Do not use sheets of
paper that have been ejected.
• Do not unpack paper/ink ribbon set until you are ready to use them.
• Ribbon cartridges are made of plastic. When disposing, check local regulations.
Storage considerations
Avoid the following places or conditions when storing paper and ribbon cartridge.
- Do not store paper and ribbon cartridge in places subject to extreme temperatures (30°C (86°F) or higher
or 5°C (41°F) or lower), or in places exposed to excessive dust or moisture.
- Do not leave paper and ribbon cartridge in the places that are exposed to direct sunlight or other sources
of strong light. Observe this instruction also when the paper and ribbon cartridge are loaded on the printer.
- Do not store paper and ribbon cartridge together with chemicals.
Storage paper
Close the paper-cassette cover until it clicks into place.
When printing, open the paper-cassette cover until it clicks into
place.
EN-38
About the paper/ink ribbon set
Notes on storing printed paper
• Do not store printed paper with their printed surfaces facing each other.
for a long time. Discoloration might occur.
• Do not apply organic solvent to printed surfaces. Discoloration might occur.
• Do not expose printed surfaces to sunlight or other strong light sources for a long time. Discoloration might
occur.
• Use an oil felt-tipped pen when writing on printed surfaces.
• Do not store printed paper in a place that is exposed to direct sunlight or will become hot or moistened. Keep
printed paper away from children.
• MITSUBISHI ELECTRIC will not compensate for discoloration or fading of printed sheets of paper.
EN-39
Additional information
• Do not leave the printed surface in contact with an adhesive tape, desk mats, plastic erasers, or similar objects
Specifications
Specifications
Additional information
Printer
Printing method
Dye sublimation thermal transfer printing
Resolution
306 dpi
Paper size
4 × 6 paper
: 3.9" × 5.8" (H × W)
(after perforated)
Color representation
Printing speed
Over 16.77 million colors
4 × 6 paper
: Approx. 88 seconds per sheet
(excluding data transmission time from digital camera or PC)
Interfaces
Connection to a PictBridge-compatible digital camera: USB A-type
connector
Connection to a PC: USB B-type connector
Compatible OS
Windows 2000/XP
Mac OS X v10.4
Ink ribbon cartridge
Compatible image file formats
Yellow+Magenta+Cyan layers and coating (protective layer)
Exif 1.0 to 2.2 (JPEG/TIFF)
DPOF 1.1
Power source
DC 25V (dedicated AC adapter)
Power consumption
47.5 W (printing), 2.5 W (standby)
Operating temperature
10 - 35°C (50 - 95°F)
Operating humidity
30 to 80%
Dimensions
167 × 145 × 73 mm (6.6" × 5.7" × 2.9") (W × D × H)
Base machine mass
1.1 kg (38.8 oz.)
(protruding parts excluded)
AC adapter
Type
Switching regulator
Input voltage
AC 100-240V, 50/60 Hz
Output voltage
DC 25V
• Requires a power cord that meets the safety standards of your country.
• The specifications and design are subject to change without notice.
EN-40
Before you contact us
Before you contact us
• Confirm the following points before contacting us so that we can provide quick and accurate answers.
• Please fill out this check sheet if you want to contact us by fax or mail.
• Symptom, displayed messages, frequency, and other details of the problem:
PC-related problems are difficult to accurately identify. Please provide as much detail as possible.
• Name:
• Contact information: Postal code
Address (your residential address or office address)
Phone/Fax
E-mail
• Product name (model):
• Serial number (located on the bottom of the product):
• Purchase date:
• Error message displayed on the camera screen:
* If you are using this printer connected to a PC, or if you are using third party application software, please
provide as much detail as possible, as follows.
• Type of PC:
Manufacturer, model, and others
• Memory size and free hard disk space:
• OS name and version:
For Mac OS, check settings on the Control Panel and the extensions in use.
For Windows, check settings on Control Panel/System/Device Manager.
• Other peripheral devices connected:
• Name and version of the application software related to your problem:
• Name and version of the MITSUBISHI software product related to your problem:
EN-41
MEMO
MEMO