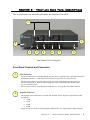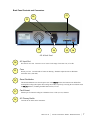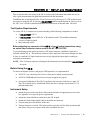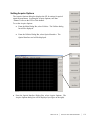
1
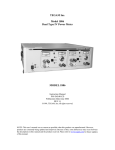
WAVECREST Corporation
OE-2
Optical to Electrical Signal Converter
User’s Guide and Reference Manual
200005-01
REV A
This page intentionally left blank.
WAVECREST Corporation continually engages in research related to
product improvement. New material, production methods, and design
refinements are introduced into existing products without notice as a
routine expression of that philosophy. For this reason, any current
WAVECREST product may differ in some respect from its published
description but will always equal or exceed the original design
specifications unless otherwise stated.
Copyright 2002
WAVECREST Corporation
A Technologies Company
7626 Golden Triangle Drive
Eden Prairie, Minnesota 55344
(952) 831-0030
(800) 733-7128
www.wavecrest.com
All Rights Reserved
U.S. Patent Nos. 4,908,784 and 6,185,509, 6,194,925, 6,298,315 B1, 6,356,850
and 6,393,088; other United States and foreign patents pending.
ATTENTION: USE OF THE SOFTWARE IS SUBJECT TO THE WAVECREST SOFTWARE LICENSE TERMS
SET FORTH BELOW. USING THE SOFTWARE INDICATES YOUR ACCEPTANCE OF THESE LICENSE
TERMS. IF YOU DO NOT ACCEPT THESE LICENSE TERMS, YOU MUST RETURN THE SOFTWARE FOR A
FULL REFUND.
WAVECREST SOFTWARE LICENSE TERMS
The following License Terms govern your use of the accompanying Software unless you have a separate written
agreement with Wavecrest.
License Grant. Wavecrest grants you a license to use one copy of the Software. USE means storing, loading, installing,
executing or displaying the Software. You may not modify the Software or disable any licensing or control features of
the Software.
Ownership. The Software is owned and copyrighted by Wavecrest or its third party suppliers. The Software is the
subject of certain patents pending. Your license confers no title or ownership in the Software and is not a sale of any
rights in the Software.
Copies. You may only make copies of the Software for archival purposes or when copying is an essential step in the
authorized Use of the Software. You must reproduce all copyright notices in the original Software on all copies. You
may not copy the Software onto any bulletin board or similar system. You may not make any changes or modifications
to the Software or reverse engineer, decompile, or disassemble the Software.
Transfer. Your license will automatically terminate upon any transfer of the Software. Upon transfer, you must deliver
the Software, including any copies and related documentation, to the transferee. The transferee must accept
these License Terms as a condition to the transfer.
Termination. Wavecrest may terminate your license upon notice for failure to comply with any of these License
Terms. Upon termination, you must immediately destroy the Software, together with all copies, adaptations and
merged portions in any form.
Limited Warranty and Limitation of Liability. Wavecrest SPECIFICALLY DISCLAIMS ALL OTHER
REPRESENTATIONS, CONDITIONS, OR WARRANTIES, EITHER EXPRESS OR IMPLIED, INCLUDING BUT
NOT LIMITED TO ANY IMPLIED WARRANTY OR CONDITION OF MERCHANTABILITY OR FITNESS
FOR A PARTICULAR PURPOSE. ALL OTHER IMPLIED TERMS ARE EXCLUDED. IN NO EVENT WILL
WAVECREST BE LIABLE FOR DIRECT, INDIRECT, SPECIAL, INCIDENTAL, OR CONSEQUENTIAL
DAMAGES ARISING OUT OF THE USE OF OR INABILITY TO USE THE SOFTWARE, WHETHER OR NOT
WAVECREST MAY BE AWARE OF THE POSSIBILITY OF SUCH DAMAGES. IN PARTICULAR,
WAVECREST IS NOT RESPONSIBLE FOR ANY COSTS INCLUDING, BUT NOT LIMITED TO, THOSE
INCURRED AS THE RESULT OF LOST PROFITS OR REVENUE, LOSS OF THE USE OF THE SOFTWARE,
LOSS OF DATA, THE COSTS OF RECOVERING SUCH SOFTWARE OR DATA, OR FOR OTHER SIMILAR
COSTS. IN NO CASE SHALL WAVECREST'S LIABILITY EXCEED THE AMOUNT OF THE LICENSE FEE
PAID BY YOU FOR THE USE OF THE SOFTWARE.
Export Requirements. You may not export or re-export the Software or any copy or adaptation in violation of
any applicable laws or regulations.
U.S. Government Restricted Rights. The Software and documentation have been developed entirely at private
expense and are provided as Commercial Computer Software or restricted computer software.
They are delivered and licensed as commercial computer software as defined in DFARS 252.227-7013 Oct 1988,
DFARS 252.211-7015 May 1991 or DFARS 252.227.7014 Jun 1995, as a commercial item as defined in FAR 2.101 (a),
or as restricted computer software as defined in FAR 52.227-19 Jun 1987 or any equivalent agency regulations or
contract clause, whichever is applicable.
You have only those rights provided for such Software and Documentation by the applicable FAR or DFARS clause or
the Wavecrest standard software agreement for the product.
OE-2™ User’s Guide and Reference Manual
Table of Contents
Preface
Organization and Inspection ........................................................... v
SECTION 1
Introduction ...................................................................................... 1
Features .......................................................................................... 1
How the OE-2 Works ...................................................................... 2
Laser Safety .................................................................................... 3
SECTION 2
Front and Back Panel Descriptions................................................ 5
Front Panel Controls and Connectors ............................................. 5
Back Panel Controls and Connectors.............................................. 7
SECTION 3
Instrument Set-up and Measurement ............................................. 9
Test System Requirements ............................................................. 9
Before Using the OE-2 .................................................................... 9
Instrument Setup ............................................................................. 9
VISI™ Software Setup and Configuration...................................... 10
Manually Assigning GPIB Addresses ............................................ 11
Automatically Assigning GPIB Addresses ..................................... 11
Setting Acquire Options................................................................. 13
External Calibration ....................................................................... 15
Output Setting Options .................................................................. 16
Trigger Options.............................................................................. 17
View Options ................................................................................. 17
Taking a Measurement.................................................................. 18
Appendix A
Specifications and Maintenance ................................................ 19
Appendix B
GPIB Commands ......................................................................... 23
Appendix C
Preprogrammed Measurement Limits ....................................... 27
iii
This page intentionally left blank
iv
PREFACE
Organization
The manual is divided into three Sections and three Appendices. The following is a brief description of
the information contained in each section. For quick reference to specific information, refer to the Table
of Contents.
SECTION 1 — Introduction
This section introduces the user to the OE-2. Features and capabilities are described. An overview of the
internal operation of the OE-2 is also included.
SECTION 2 — Description
Describes the front and back panels of the OE-2.
SECTION 3 — Set-up and Measurement
Describes the installation and set-up of the OE-2 as well as using Virtual Instruments Signal Integrity™
software through a WAVECREST SIA-3000 or DTS-207x instrument.
APPENDIX A — Specifications
This section contains a comprehensive set of specifications for the OE-2.
APPENDIX B — GPIB Commands
Includes various parameters, values and codes necessary for implementing remote control of the OE-2 via
the IEEE-488 interface.
APPENDIX C — Preprogrammed Measurement Limits
Includes a series of tables that show the preprogrammed measurement limits for each OE-2 model.
WARNING
Operating the OE-2 outside of the maximum operational specifications
published in Appendix A of this manual can damage the instrument.
The Wavecrest Warranty does not cover damage resulting from
improper operation or mishandling of the OE-2.
OE-2 Preface | v
Inspection
If the contents are incomplete or damaged, contact WAVECREST
Service: 1-800-733-7128.
Corporation Customer
Inspect the shipping box for damage.
If the shipping box is damaged, or the cushioning materials show signs of stress, notify
the shipping carrier as well as the WAVECREST Corporation office. Keep the shipping
materials for the carrier’s inspection.
Check for accessories.
Power cord
Two (2) build-out SMA connectors for Dual-channel instrument; one (1) connector
for Single-channel instruments
Two (2) optical build-out connectors for Dual-channel instrument; one (1) connector
for Single-channel instruments
OE-2 User’s Guide and Reference Manual
Inspect the instrument.
If there is mechanical/physical damage, or if the instrument does not power up properly,
notify WAVECREST Corporation. Keep the shipping materials for the carrier’s
inspection. WAVECREST Corporation will arrange for repair or replacement at their
option.
vi
| OE-2 Preface
SECTION 1– Introduction
The WAVECREST OE-2 converts optical communications signals into electrical signals. In
combination with a WAVECREST DTS or SIA system, the OE-2 enables accurate, high performance
jitter measurements on optical signals. The OE-2 can be operated in local mode or it can be
controlled through its GPIB interface using WAVECREST’s Virtual Instruments™ Signal Integrity
(VISI) software.
Features
The OE-2 incorporates all of the features needed for making single- or dual-channel, high
performance optical signal measurements.
Fully Calibrated - The OE-2 is fully calibrated from the optical input to the electrical output permitting
accurate signal level measurements without the need for additional instruments.
High Bandwidth - Enables measurement of high-speed data communication signals.
Built-in Amplifiers - Boosts low power signals to measurable levels.
Built-in Filters - Used to establish the noise bandwidth of optical signals. Available filter options include Fibre
Channel, Fibre Channel 2X, Gigabit Ethernet, InfiniBand™, XAUI, and SONET OC-48.
Power Meter - Each channel of the OE-2 includes an average optical power meter.
High-Speed Measurements - WAVECREST DTS or SIA system with an OE-2 can quickly make highly
accurate jitter measurements.
GPIB Interface - The OE-2 can be run remotely via the GPIB or locally via the front panel.
Dual Channel Capability - The OE-2 is available in single-channel or dual-channel models.
Figure 1 – Dual-Channel OE-2 shown with WAVECREST SIA-3000
Section 1 | Introduction | 1
How the OE-2 Works
The OE-2 consists of a high-performance optical-to-electrical converter followed by widebandwidth, signal processing devices. Dual-channel models incorporate two identical channels.
The block diagram below shows the structure of one OE-2 channel.
Figure 2 – Block diagram of an OE-2 channel
The optical input signal is converted to an electrical current using a low-noise, temperaturestabilized photo receiver. The electrical signal is then amplified by a wideband transimpedance
amplifier (TIA) integrated within the photo receiver.
Because optical signals may have high levels of wideband noise, filters are often used to improve
the signal-to-noise ratio. Communications standards require a fourth-order Bessel-Thomson
low-pass filter characteristic with a cut-off frequency of 75% of the data rate. Each channel of
the OE-2 has four filters—for different communications protocols—selectable by electronic
switches. In addition, a fifth setting bypasses the filters for full-bandwidth operation.
Filter settings can be independently selected for each channel using front panel controls or
through the GPIB interface.
A bank of wideband electronic amplifiers follows the filters. These electronically switched
amplifiers amplify the electrical signal by approximately 10 dB, 20 dB, 30 dB or 40 dB. The
amplifier setting can be independently selected for each channel using front panel controls or
through the GPIB interface.
The average current in the photo receiver is measured to determine the average optical power of
the input signal and is available only through the GPIB interface.
The signal gain in every filter and amplifier path in the OE-2 is measured and stored locally in
the OE-2. These calibration values are used by WAVECREST’s VISI software to display accurate
optical signal power levels.
A central processor controls all OE-2 functions. The processor also handles communication with
the GPIB interface port.
2 | Section 1 | Introduction
Laser Safety
Although the OE-2 optical to electrical converter does not emit laser energy, it does process
optical signals from laser devices. Therefore, laser signals will be present at the OE-2 inputs.
These signals present retinal and/or personal hazards because they are invisible and might not be
detected until injury to the eye or skin has occurred. To prevent injuries, basic precautions
should be followed.
•
NEVER look directly into an optical signal connector. Always assume a laser beam is present.
•
NEVER direct an optical output signal connector in a direction that could cause harm to
personnel nearby.
•
Always turn optical output signal devices OFF when not in use.
•
Where practical, protective eyewear that is designed for the signal wavelengths used should
be worn.
Section 1 | Introduction | 3
This page intentionally left blank.
4 | Section 1 | Introduction
SECTION 2 – Front and Back Panel Descriptions
This section describes the front and back controls and connectors of the OE-2.
1
2
9
3
4
5
6
7
8
Dual Channel OE-2 Front panel
Front Panel Controls and Connectors
1
Filter Selection
The OE-2 routes the converted signal through low-pass filters to establish a finite, repeatable measurement
bandwidth for the OE-2. Fourth-order Bessel-Thomson low pass filters are exclusively used.
The filter selection knob selects one of the four low pass filters or full bandwidth. Filter options are
described in Appendix A. Filters are independently selected for each channel; dual channel models
can use two different filters.
Filter selection can also be made through the GPIB interface. See Appendix B for GPIB commands.
2
Amplifier Selection
The amplifier selection knob selects one of the four amplifier settings. The gain is approximately 10dB
per amplifier.
•
10 dB
•
20 dB
•
30 dB
• 40 dB
Amplifier selection can also be made through the GPIB interface. See Appendix B for GPIB commands.
Section 2 | Front and Back Panel Descriptions | 5
3
Over range LED/Signal LED
Two LEDs on the front of the OE-2 indicate optical input signal status. The lower “SIGNAL” LED is lit
when the OE-2 senses an optical signal. If the upper “OVERRANGE” LED is blinking red, the optical
signal power is beyond the input range of the instrument and should be removed to prevent damage to the
optical detector.
If both LEDs are blinking, the O/E receiver temperature stabilization is not within range. Measurements
made during this condition are not valid. If this occurs, turn off the unit for a few minutes and turn it back
on. It may be necessary to move the OE-2 to a cooler location. If this condition persists, the unit should
be serviced by an authorized WAVECREST service representative.
4
Channel 1 Optical Input
This FC/UPC input connector accepts either single-mode or multi-mode (up to 62.5 um) optical fibers.
Optical signals from 770 to 1650 nm can be used.
Before attaching any connector to the OE-2, clean all optical connections using an optical
fiber connector cleaner such as the NTT-ME CLETOP.
CAUTION: Do not exceed +3 dbm peak optical power.
5
Channel 1 Electrical Output
The electrical output signal is available at this 50 Ohm SMA connector. The converted electrical signal is a
linear representation of the optical signal.
CAUTION: This output port is sensitive to electrostatic discharge. Use ESD protection when
connecting to this port.
6
Channel 2 Optical Input
This FC/UPC input connector accepts either single-mode or multimode (up to 62.5 um) optical fibers.
Optical signals from 770 to 1650 nm can be used.
Before attaching any connector to the OE-2, clean all optical connections using an optical
fiber connector cleaner such as the NTT-ME CLETOP.
CAUTION: Do not exceed +3dbm peak optical power.
7
Channel 2 Electrical Output
The electrical output signal is available at this 50 Ohm SMA connector. The converted electrical signal is a
linear representation of the optical signal.
CAUTION: This output port is sensitive to electrostatic discharge. Use ESD protection when
connecting to this port.
8
9
Front Panel On/Off Switch
The front panel switch turns the internal power supply on or off.
Local/Remote Switch
The Local/Remote switch selects between local mode and remote GPIB operation. In local mode,
settings are selected using the Filter and Amplifier Selection knobs. In GPIB remote operation, settings
are selected by using OE-2-specific commands via the GPIB. The Local/Remote pushbutton is lit when
in local operation.
6 | Section 2 | Front and Back Panel Descriptions
Back Panel Controls and Connectors
12
10
11
13
14
15
16
OE-2 Back Panel
10
11
12
AC Input Port
IEC Inlet for AC cord. Connect to an AC source in the range of 100-264 VAC, 47-63 Hz.
Fuse
Primary AC fuse. Located inside of connector housing. Should be replaced with two Wickman
4AT/250V fuses (5x20 mm).
Reset Pushbutton
The Reset Pushbutton resets the microprocessor in the OE-2 and sets the instrument to default filter
and amplifier settings (the topmost filter setting and 10 dB, respectively). Pressing the reset button causes
the OE-2 hardware, including the IEEE-488 interface, to reset.
13
Fan Exhaust
14
AC Primary Switch
Exhaust port for internal cooling fan. Maintain at least 1-inch (2.5 cm) clearance.
Controls the AC mains to the instrument.
Section 2 | Front and Back Panel Descriptions | 7
15
16
GPIB Input Connector
Connector for GPIB cable. Used for controlling the OE-2 with a computer or other instrument. A GPIB
device address can be set using the 32-position DIP switch (see below), with address 0 reserved for the
controller and the remainder of the settings available at the user’s discretion. A full GPIB command set is
provided in Section 3.
GPIB Port Address Switch
Sets the address of the GPIB port. The address can be set from 1 to 31. Address 0 is reserved for the
controller; the default OE-2 address is 6.
The switch settings are in binary format as shown in the drawing below. For example, the switch setting
shown below selects port 6. The last three switches are not used.
IEEE-488 Port Address
Not Used
1
0
MSB
LSB
8 | Section 2 | Front and Back Panel Descriptions
SECTION 3 – Setup and Measurement
This section describes the set-up of the OE-2 and provides instructions that enable the user to
take a quick measurement for rapid familiarization with the instrument.
In addition, this section describes the Virtual Instrument Signal Integrity™ (VISI) software tools
necessary for using the OE-2 with any WAVECREST measurement instrument. Please refer to
the VISI User’s Guide for detailed definitions and instructions of this and other VISI tools.
Test System Requirements
To use the OE-2, a complete test system consisting of the following components is needed:
•
A WAVECREST OE-2
•
A WAVECREST SIA or DTS (PC or Workstation with VISI installed) instrument
•
•
A source of optical signals
Interconnecting cables
Before attaching any connector to the OE-2, clean all optical connections using
an optical fiber connector cleaner such as the NTT-ME CLETOP.
To prevent damage to the optical-to-electric (O/E) input connector, a build-out connector is
included with the OE-2. The build-out connector can be replaced if it becomes damaged or dirty.
A dirty or scratched O/E input connector can severely degrade the input signal, resulting in
inaccurate measurements.
NOTE: If the O/E input connector is damaged, the instrument must be returned to WAVECREST
for repair.
Before Using the OE-2
To ensure the highest accuracy and proper GPIB operation, it is important that:
All OE-2’s are warmed up for at least ½ hour prior to taking a measurement.
All OE-2 GPIB addresses have been correctly assigned (see page 8).
An external calibration of the OE-2 is performed at least once each day (see page 12).
The OE-2 should also be recalibrated if there has been a change of more than 5 C° in
ambient temperature.
Instrument Setup
Attach the power cord to the back of the instrument and to an appropriate power source.
See Appendix A for specific power requirements.
Attach the cleaned build-out connector to the OE-2 input.
Attach the cleaned input signal cable to the build-out connector.
Turn on main power on the back of the unit.
Turn on front power switch. The front switch is typically used for daily operations and
also allows easy access to power if the unit is mounted in a rack.
Section 3 | Setup and Measurement | 9
VISI SOFTWARE SETUP
Controller Mode
Edit | Configuration Menu
In order for the OE-2 to communicate with the SIA-3000™ using the GPIB bus, the SIA3000 must be in the “Controller” mode. To select Controller mode:
Select Edit | Configuration on the
(pull-down) Menu Bar
Select OE-2 in the Target
Device pull-down Menu
Select Controller in the GPIB
Board Mode pull-down menu.
Click “Apply”
Click “Close”
Optical Configuration
The Optical Configuration menu enables the user to:
•
•
Set up the IEEE-488 (GPIB) addresses for one or more OE-2’s (up to five OE-2’s can
be addressed in a single VISI-based system).
Assign each OE-2 channel to a WAVECREST SIA or DTS instrument channel.
•
Set preliminary optical measurement parameters.
To access the Optical Configuration menu in VISI, select Edit|Optical Configuration on the (pulldown) Menu Bar (see figure below).
10 | Section 3 | Setup Measurement
Manually Assigning GPIB Addresses
The GPIB Address Assignment window will appear (see figure below). The fields in this dialog
box will be blank unless device assignments were previously made. The GPIB Address
Assignments dialog box manages the address settings for both the GPIB host and all OE-2’s.
Optical Configuration Dialog Box – GPIB Address Assignment
The Optical GPIB Board field controls the host GPIB address, that is, the GPIB address of the SIA
controller or host controller computer. In most installations, this will be set to 0. In cases where a
host computer has more than one GPIB interface bus connected to it, the Optical GPIB Board
address should be set to the card address for the bus connected to the OE-2’s.
The Optical GPIB Device field sets the address of the OE-2’s connected to the GPIB bus. Set
the Optical GPIB Device to the DIP switch setting on the back panel of the OE-2 and select the
Add Device button. The OE-2 address will appear in the Remote Device List. In the case of
multiple OE-2 installations, each remote device will have to be individually added.
The default address for the OE-2 is 6.
The Device Name (UNIX Only) field is not used at this time.
Automatically Assigning GPIB Addresses
To automatically assign GPIB addresses, click on the “OE Device Search” button to have VISI
automatically search the GPIB network and identify all connected OE-2’s.
Section 3 | Setup and Measurement | 11
When all OE-2’s connected to the system are addressed, the next step is to poll the GPIB bus to
see that each OE-2 is correctly addressed. This is done with the Optical Channel Assignment
dialog box. Clicking on the Optical Channel Assignment tab will initiate the polling process.
Each correctly addressed OE-2 will be shown in the Optical Input window along with its GPIB
device address.
If a connected OE-2 does not appear in the dialog box, its address may be incorrectly set.
Return to the GPIB Address Assignments window to correct the address settings.
Dual-channel OE-2’s will occupy two lines in the Optical Input window - one for each opticalto-electrical channel path in the OE-2. The left-hand OE-2 channel will be named “Port 1” and
the right-hand channel will be named “Port 2.”
Optical Configuration Dialog Box - Optical Channel Assignments
Finally, it is necessary to assign each OE-2 channel to a channel of the WAVECREST DTS or
SIA instrument by highlighting one line in the Optical Input field (corresponding to one channel
path) and selecting the DTS or SIA input channel in the SIA Channel field. To activate this
channel, click the “Active” box.
For example, if you have an optical signal connected to the left hand input port of the OE-2, and
the electrical output of this same channel connected to the channel 3 input on a WAVECREST
SIA-3000, the Optical Channel Assignment should read:
OE-2, GPIB Device 6, Port 1
3
Active
Channel Ports left in the inactive state will still pass signals, but VISI software will not recognize
the channel port.
12 | Section 3 | Setup Measurement
Setting Acquire Options
The Acquire Options dialog bar displays the OE-2 settings for optical
signal measurements. In setting the Acquire Options, note that
“channel” refers to the DTS or SIA channel.
To set the Acquire Options:
From the Main Dialog Bar, select Utilities. The Utilities dialog
bar will be displayed.
From the Utilities Dialog Bar, select Optical Interface. The
Optical Interface tool will be displayed.
From the Optical Interface Dialog Bar, select Acquire Options. The
Acquire Options dialog bar will be displayed (see figure to the right).
Section 3 | Setup and Measurement | 13
Select the channel to view. (“Channel” refers to the DTS or SIA
channel.) The software will poll the OE-2 configured to that channel
to determine which filter bank options are installed.
WAVECREST’s VISI software has preprogrammed set-ups for several
popular communication standards, including Fibre Channel, Gigabit
Ethernet, and Infiniband. When you select one of these filter set-ups,
VISI will automatically select the filter and amplifier in the OE-2 and
set the wavelength for measurements. In addition, VISI will set
measurement limits from the standard’s requirements such as rise and
fall time, extinction ratio, optical modulation amplitude and average
optical power. A Pass or Fail message will appear on the VISI display
indicating whether the signal satisfies the standards limits. The default
values for the preprogrammed settings are listed in Appendix C.
Select the “Standard” drop-down menu. Standards corresponding to
the filters installed in the OE-2 will be listed in the “Standard”
window. For example, if the OE-2 has filter option 1, with Fibre
Channel, Gigabit Ethernet and Infiniband filters installed, those
standards will appear in the drop-down list.
Select a protocol from the drop down menu in the “Protocol” field for
the type of signal to be measured. The protocol identifies the subsection of the communication standard. Once the standard and
protocol are selected, the preprogrammed settings will be shaded,
preventing you from changing them.
If “User-Defined” is selected, all settings and limits may be selected or changed.
Select
(RUN) and VISI will continuously make measurements.
If the signal level is too low, the gain of the OE-2 amplifier can be increased in the
Amplifier window.
14 | Section 3 | Setup Measurement
External Calibration
An external calibration must be performed for each channel. Keep in mind that, when you press
the “External Calibration” button, only the channel that is selected in the “Channel” field will be
calibrated.
To perform the external calibration:
From the Optical Interface Dialog Bar, click on Acquire Options
Remove the optical signal from the input connector
Select the SIA Channel that you would like to calibrate
On the Acquire Options menu, select the External Calibration button
The calibration will be performed and, when complete, the message, “The calibration was
successfully completed,” will appear. Reconnect your signal after the calibration process is done.
In the event that a calibration error warning appears, repeat the calibration process making sure:
All optical signals are removed from the optical input
The correct channel is selected
The OE-2 GPIB Address and Optical Channel Assignments are correct (under
Edit|Optical Configuration pull-down menu)
Section 3 | Setup and Measurement | 15
Output Setting Options
The Output Settings dialog bar enables the user to set the units of measure, such as milliwatt or
microwatts, for optical measurements. Pass/fail limits for optical power, modulation and rise and
fall time measurements are accessible through this selection.
To access the Output Settings, select the Output Settings button on the Dialog Bar. Select the
appropriate optical settings from the drop-down menus or enter the desired value into the
available data fields. The following output settings are available when a specific “Protocol” on
the Acquire Options menu has not been selected. The settings are preset when a specific
“Standard” has been selected (see Appendix C).
Power units - Select from units of dBm, mW or mW for all power
measurements.
Average power limit - Pass-Fail limit value.
(The minimum average optical power limit, specified
in [power units])
Modulation Measure - Select either "extinction ratio" or
"optical modulation amplitude".
Modulation units - Select unit of measure for modulation
When extinction ratio is selected
o Ratio
o dB
o Percentage
When Optical Modulation Amplitude is selected
o Milliwatts
o Microwatts
Modulation limit - Pass/Fail limit for modulation.
(The minimum average extinction ratio or OMA (as
selected), specified in [modulation units])
Rise Time limit - Pass-Fail limit for rise time measurement.
(The maximum rise time in picoseconds)
Fall Time limit - Pass-Fail limit for fall time measurement.
(The maximum fall time in picoseconds)
Select any of the devices on the list to display the current settings.
16 | Section 3 | Setup Measurement
Trigger Options
The Trigger Dialog Bar enables the user to set up trigger sources and conditions on the DTS or
SIA instrument.
Trigger - Select trigger source.
Trigger Method - Select Auto to set the trigger threshold voltage to
the 50% voltage point of the Pulsefind values on the selected
trigger channel. Voltage is displayed in "Trigger Voltage." Select
"User" to manually enter a threshold voltage in "trigger Voltage."
Limits are +/- 1.1 volts.
Trigger Voltage - Displays the threshold voltage used to trigger the
instrument. If User is selected in the Trigger Method box, the user
can enter a value. Limits are +/- 1.1 volts.
Trigger Edge - Selects the rising or falling edge to trigger the
instrument.
View Options
The View Options menu enables the user to change the
oscilloscope display. The following settings can be specified
or modified to customize your view:
Mode
Dot Connect - Measurements are displayed as a point-to-point,
straight-line plot.
Persistence - Measurements are displayed as individual dots in
the plot window.
Delay - the minimum time delay from the trigger event to the
measure event
Range - the full time span of the display
Resolution - the granularity of the display
Hits per Measure - Determines the number of time measurements
that will be made for each edge or point on the plot.
The View pull-down menu at the top of the dialog bar provides
the user with two ways to see the acquired measurement data.
Time – Time domain plot of the signal
Summary – Text in a table format, used for pass/fail testing,
displays the comparisons to the output settings
Section 3 | Setup and Measurement | 17
Taking a Measurement
Two types of measurements are available once the setup of the instrument has been completed
and are available from the Tool Bar or the Action pull-down menu.
•
Single/Stop command
(Action menu)
Use this command to acquire a single measurement in VISI. It is also used to stop a series of measurements
from being taken after the Run command is issued. This command affects the current tool only.
•
Run command
(Action menu)
Use this command to repetitively acquire new measurements in VISI. Measurements will be acquired until
either the Single/Stop command is issued or an error occurs. This command affects the current tool only.
As shown below, you may also display multiple windows to allow monitoring of more than
one channel.
Adding a view (
) opens a new (default) tool window associated with the active tool. There
may be many opened window views of one tool, but all views reflect any measurements or
settings for that tool.
To see both a measurement plot and summary page:
Open a tool.
Select Add from the View pull-down menu or click on the
Select Summary from the View menu on the Dialog Bar.
18 | Section 3 | Setup Measurement
(New View) button.
APPENDIX A – Specifications and Requirements
OE-2™ SPECIFICATIONS
Functional Specifications—Optical
Wavelength Range ...................................................770 to 1650 nm
Conversion Gain(850nm)1,2......................................5,500 V/W (850 nm/40 dB amp)
Conversion Gain(1550nm) 1,2 ...................................20,000 V/W (1550 nm/40 dB amp)
Maximum Input Level3 ............................................+3 dBm
Input Damage Level.................................................+10 dBm
Polarization Dependent Loss4 ..................................<0.1 dB
Input Return Loss4....................................................>20 dB
Input Connector Type ..............................................FC/UPC Multimode
Input Connector Core Diameter ...............................62.5 µm
Optical Power Measurement Accuracy5...................±0.5 dB
Functional Specifications—Electrical and System
Input Data Rate ........................................................155 Mb/s to 6 Gb/s
Frequency Response1,6,7,8 .........................................100 kHz – 4 GHz
Passband Ripple1,6,7,8 ................................................±0.5 dB
Rise time (20-80%)1,6,7,9 ...........................................90 ps
Intersymbol Interference1,10......................................2.6% of UI
Filter Response.........................................................4th Order Bessel-Thompson
Amplifier Block Gain Accuracy11 ............................8.5 ±1.0 dB
Output Impedance ....................................................50 Ohms Nominal
Output Return Loss1 .................................................20 dB
Output Return Loss ..................................................>15 dB
Output Connector .....................................................SMA
Notes:
1. Typical value.
2. With maximum amplifier gain selected.
3. Peak operational signal level.
4. Measured in Single Mode fiber.
5. Over the range of –18 to +3 dBm at 850 nm or over the range of –22 to +3 dBm for 1310 and 1550 nm
operation
6. Measured by 650 fs (FWHM) mode-locked laser impulse.
7. Calculated –3 dB frequency response from an FFT of impulse response.
8. Full Bandwidth, 20 dB amplifier positions selected.
9. Measured with 20 GHz oscilloscope.
10. Peak-to-Peak ISI contribution simulated from mode-locked laser response using a 2.5 Gb/s PRBS 27-1
pattern with the Infiniband filter and 20 dB amplifier positions selected.
11. Per amplifier at 100 MHz.
Low Pass Filter Response Characteristics
The OE-2 includes four switchable filters. The following filter options are available. A fifth path provides full-bandwidth
operation (no filter).
Model
OE-2-1
Fibre
Channel
2X Fibre
Channel
Gigabit
Ethernet
Infiniband
Model
OE-2-2
2X Fibre
Channel
Gigabit
Ethernet
Infiniband
XAUI
Model
OE-2-3
Fibre
Channel
2X Fibre
Channel
Gigabit
Ethernet
XAUI
Model
OE-2-4
Fibre
Channel
2X Fibre
Channel
Gigabit
Ethernet
OC-48
Standard
Fibre Channel
2X Fibre Channel
Gigabit Ethernet
Infiniband
XAUI
SONET OC-48
Design Cut-off
Frequency
797 MHz
1.594 GHz
937.5 MHz
1.875 GHz
2.344 GHz
1.866 GHz
APPENDIX A | Specifications | 19
Calculated Measurement Accuracy
1
Extinction Ratio12 ..................................................±1 dB
Notes:
12. Using an SIA-3000, M3.2 Channel Card, VISI software with
a 100-125 MHz square wave, 850 nm, average optical power
level of –5 dBm (per Fibre Channel or Gigabit Ethernet
standards)
0
-1
Responsivity (dB)
Optical Modulation Amplitude12,13 ....................... ±12%
-2
-3
-4
-5
-6
-7
13. Percent of reading.
-8
-9
700
Miscellaneous Characteristics
800
900
1000
1100
1200
1300
1400
1500
1600
1700
Wavelength (nm)
Calibration Interval................................................1 year
AC Mains Voltage .....................................90-264 VAC
Typical OE-2 Responsivity versus Wavelength.
AC Mains Frequency........................................50/60 Hz
1.2
1.0
0.8
0.6
0.4
0.2
0.0
Notes:
A. Typical measurements provide nonwarranted information about system
performance or capabilities.
B. Wavecrest continually engages in research
related to product improvement.
New
material, production methods, and design
refinements are introduced into existing
products without notice as a routine
expression of that philosophy. For this
reason, the OE-2 may differ in some respect
to the specifications stated in this document.
C. The OE-2 will comply with these
specifications after a 30-minute warm-up
period.
-0.2
0
200
400
600
800
1000
1200
1400
Picoseconds
OE-2 Impulse Response to a 650 femtosecond mode-locked
laser impulse (full bandwidth, 20 dB amplifier selected).
0
-1
-2
-3
-4
-5
-6
0
1
2
3
4
5
OE-2 Frequency Response (calculated from the FFT of a
650 femtosecond mode-locked laser impulse; full bandwidth,
20 dB amplifier selected).
20 | APPENDIX A | Specifications
Interface Requirements
The optical inputs are high return loss FC/UPC connectors. Either single mode or multi-mode fibers can
be accepted.
The electrical outputs are SMA connectors.
The OE-2 includes an IEEE-488 interface. The connector and address selection switch are located on the
rear panel of the instrument.
Power Requirements
The OE-2 operates on 100-120 VAC & 200-240 VAC (±10%), 47-63Hz. The OE-2 is rated for 275 Watts.
Fuses: (2) two 2AT/250V, 5 x 20 mm.
Power supply is auto ranging.
The AC input appliance coupler or separable plug on the power cord is the disconnect device. For safe
operation, the OE-2 should be installed to allow easy operator access to the disconnect device.
Communications Requirements
The OE-2 uses English-language IEEE-488.2 commands. The command list is shown in Appendix III.
Environmental Requirements
Temperature Range
Operating .......................... +15°C to +35°C
Storage.............................. -40°C to + 55°C
Humidity.................................. 0-85% RH, non-condensing
Ventilation - A minimum of two inches of unobstructed airflow must be maintained on each side and rear
panel of the instrument (air inlet and exhaust openings) to provide adequate ventilation for the
OE-2. To maintain the highest accuracy, the OE-2 air intake should not be near sources that
would cause ambient temperature fluctuations. Temperature fluctuations greater than 5°C will
require that OE-2 be recalibrated.
Elevation (Altitude) ................. to 6500 feet (2000 meters)
Indoor Use Only ...................... The OE-2 is intended for indoor use only.
Installation Category................ CAT II
Pollution Degree ...................... 2 per IEC 664
Product Life Requirements
Product lifetime is five years minimum with recommended factory calibration intervals of one year.
APPENDIX A | Specifications | 21
Maintaining Proper Instrument Grounding
Both 120VAC and 230VAC power sources require an earth ground at the power connection. Failure to provide this
safety ground could result in improper measurements and/or electrical shock danger to the operator.
Only qualified service personnel should perform maintenance procedures on the OE-2. When maintenance is
performed, NO protective earth ground connections should be removed.
NOTE: Where this product is installed at areas requiring main power connections other than the three-pronged
North American power plug, the main power cord must be replaced with the cord and plug appropriate to the
location. The main supply cord must be rated to meet or exceed the current rating on the IEC connector (10 amps)
and must meet the requirements of H05VV power cords in IEC 227 or IEC 245. If the appropriate power cord
cannot be obtained locally, contact the WAVECREST Corporation factory and one will be provided.
Fuse Replacement
The IEC plug-in at the back of the OE-2 provides the input connection for the AC power cord. A small compartment
on the IEC plug houses two Wickman 2AT/250V fuses (5x20mm). To gain access to the fuses, remove the power to
the OE-2 and disconnect the power cord. With a small screwdriver, pry open the fuse compartment on the IEC plug.
Remove the fuses and install the new fuses prior to closing the compartment and reinstalling the power cord.
Cleaning Instructions
Periodic cleaning of the OE-2 cabinet may be required. Use a clean, lint-free cloth to dust outer surfaces after
electrical power has been removed. If needed, dampen cloth with light amounts of water or alcohol.
Intended Use Of Equipment
The OE-2 should be used only for its intended purpose as outlined in this manual. To avoid possible injury, the OE2 should not be operated with the top cover or other panels removed. Refer installation and maintenance to qualified
service personnel.
To avoid explosion, do not operate the OE-2 in or near an atmosphere of explosive gases
22 | APPENDIX A | Specifications
APPENDIX B - GPIB Commands
The following GPIB commands are supported in the OE-2.
Table B1. IEEE.2 Common Commands
Command
*CLS
*ESR?
*LRN?
*OPC?
*RCL
*SAV
Definition
Clear Status
Event Status Register Query
NS
Operation Complete Query
*rcl <0/1> Recall settings from register 0 or register 1
*sav <0/1> Save current settings to register 0 (powerup) or register 1
Status Byte Query
NS
NS
Identification Query
Operation Complete Command
NS
Reset
NS
NS
NS
*STB?
*TST?
*ESE
*IDN?
*OPC
*OPT?
*RST
*SRE
*TRG
*WAI
Note: NS = Not Supported
Table B2. WAVECREST Common Commands
Command
Command Syntax
Query Syntax
SYSTEM
:SYSTEM
:SYSTEM
HEADer
:HEADER<ON|OFF|1|0>
:HEADER ?
LONGform
:LONGFORM<ON|OFF|1|0>
:LONGFORM ?
VERsion
:VERSION ?
WAVECREST,
MODEL#,
NN.NN
APPENDIX B | GPIB Commands | 23
Table B3. OE-2 Specific Commands
Command
Command Syntax
Query Syntax
CHANnel (Root
command)
:CHANnel <string>
Valid strings:
1 - Channel1,
2 – Channel2
CHANnel ?
INStalled
No write command.
:INStalled ?
Return value: comma delimited string as follows:
<TYPE, FILT, AMPL,WAVE,MODEL,VERSION>
TYPE, FILT,AMPL,WAVE are defined later in the table.
MODEL refers to the # of channels, SING or DUAL.
VERSION refers to the hardware release (6 charactrers,
BXX.XX for Beta and RXX.XX for production.
FILTer
:FILTer <string>
Valid strings:
FC
FC2X
GBE
IB
XAUI
OC48
FBW
:FILTer ?
Return the current filter setting string.
AMPLifier
WAVElength
- Fibre Channel
- Fibre Channel 2X
- Gigabit Ethernet
- Infiniband
- XAUI
- SONET OC48
- Full Bandwidth
:AMPLifier <string>
Valid strings:
10DB
- 10 dB Gain
20DB
- 20 dB Gain
30DB
- 30 dB Gain
40DB
- 40 dB Gain
:WAVElength<Float1>
Floating point string representing a wavelength from
770E-9 to
1650E-9 m.
:AMPLifier ?
Return the current amplifier setting string.
:WAVElength ?
Returns a string representing the floating point value of
the wavelength.
ACResponse
:ACResponse<Float>
Written only during calibration.
(units: W/V)
:ACResponse ?
Returns a string representing the AC Response for the
current filter, amplifier and wavelength settings.
AVEPwr
No write command.
:AVEPwr ?
Returns a string representing the floating point value of
the current average optical power into the OE-2.
TYPE
No write command.
:TYPE
Return value :
delimited ASCII String representing the type of RFM
installed
FC/FC2X/GBE/IB/FBW
FC2X/GBE/IB/XAUI/FBW
FC/FC2X/GBE/XAUI/FBW
FC/FC2X/GBE/OC48/FBW
1
A floating-point number is given in scientific notation format as X.XXXXXXE-YY or X.XXXXXXE+YY.
24 | APPENDIX B | GPIB Commands
Table B3. OE-2 Specific Commands cont.
Command
Command Syntax
Query Syntax
NULLoffset
:NULLoffset<Float>
Used to calibrate the OE-2 when no optical power is
present. When using a short calibration no string is
required. When using a long cal the string represents the
null offset in bits.
:NULLoffset ?
Return value: Floating point value representing the last
stored null offset of the OE-2.
AVEraging
AVEraging <string>
Valid strings:
OFF – averaging off
1-40 – set number of samples averaged in firmware
AVEraging ?
returns current state of averaging
:ADF <string>
Valid Strings:
BITS
VOLTS
:ADF ?
return a string representing the current format.
System (root
command)
ADFormat
CALibrate (root
command)
CALType
:
CALType <string>
Valid strings:
0 – Short cal
1 – Long cal
SHORT – short cal
LONG – long cal
:CALType ?
return a string representing the current calibration
type.
OE-2 Specific Commands Description
CHANnel (CHANx): Root command that specifies the channel to which a subcommand applies. On a Dual Channel OE-2,
‘x’ may take on values of ‘1’ or ‘2’. On a Single Channel OE-2, ‘x’ may only take on a value of ‘1’.
ACResponse: Channel subcommand that provides a query response only. The AC response of the OE-2 Channel is
determined from the current wavelength, filter, and amplifier settings. This constant, in units of W/V, is used to
convert the electrical output of the OE-2 in volts to optical input power. When combined with the average
power reading the level and magnitude of the input optical signal can be determined. The AC Response is valid
at 100MHz. Example read: ‘:CHAN1:ACR?’.
AMPLifier: Channel subcommand that sets the amplifier for the specified channel or reads the current setting.
Valid amplifier settings are ‘10DB’, ‘20DB’, ‘30DB’, and ‘40DB’. Example write: ‘CHAN1:AMPL 20DB’.
AVEPwr: Channel subcommand that provides a query response only. The average power of the input optical signal
is returned in units of watts. Example read: ‘:CHAN1:AVEP?’.
AVEraging: Channel subcommand that specifies the amount of firmware averaging of the O/E average power
measurement. When off, an average power query retrieves the instantaneous measurement. When averaging is
on, the firmware averages some number of 40 samples taken every second. For example, for the command
“:CHAN1: AVE 10”, the firmware would average every 10 samples. An AVEP query will return the last
averaged value. When averaging is on, the number of independent readings available every second is reduced.
In the example above, the number of independent readings is reduced from 40 to 4.
APPENDIX B | GPIB Commands | 25
FILTer: Channel subcommand that sets the filter for the specified channel or reads the current setting. Valid filter
settings depend upon the type of channel that is installed in the OE-2. Valid settings can be determined from
the TYPE field of the INStalled query. Example read: ‘:CHAN1:FILT?’.
INStalled: Channel subcommand that provides a query response only. When queried the command returns a comma
delimited field with information pertaining to the specified channel. The fields returned are channel type (or
option), current filter setting, current amplifier setting, current wavelength setting, OE-2 Channel Status
(Single/Dual), and OE-2 release (B01.00 – Beta 1.00, R01.00 Production 1.00). Example read: ‘:CHAN1:INS?’.
NULLoffset: Channel subcommand that sets or reads the null offset of the specified channel. The null offset value
is computed from a calibration that is performed when the specified channel’s optical input is dark. The null
offset is then used to compensate the power monitor for this ‘null’ condition. When performing a null offset
calibration, the null offset must first be written to zero. Example write: ‘:CHAN1:NULL 0’.
TYPE: Channel subcommand that provides a query response only. The type (or option) of the OE-2 channel is
returned in a ‘/’ delimited field. The return string contains the filter positions that are available for the specified
channel. Valid strings are given in the chart above. Example read: ‘:CHAN1:TYPE?’.
WAVElength: Channel subcommand that set the wavelength for the specified channel or reads the current setting.
The wavelength setting determines the calibration constant that is used in the average power measurement. Any
wavelength setting that does not match the input optical wavelength will result in an incorrect average power
reading. Wavelength units are meters. Example write: ‘:CHAN1:WAVE 1550E-9’.
SYSTEM: Root command for system wide commands.
ADFormat: System subcommand that sets or reads the current A/D format. The A/D format specifies the way
results are returned. When set to BITS the AVEP command returns the bit reading from the A/D Converter in
the power monitor. When set to WATTS the AVEP command converts the A/D voltage into a power reading.
The BITS mode is used during a null offset calibration.
CALIBRATE: Root command for calibration commands.
CALType: Calibrate subcommand that sets or reads the current calibration type. A short calibration does not
require any external readings but may be less accurate than a long cal. During a long cal the ADFormat is set to
BITS and readings are taken with the AVEPwr command. The readings can be averaged over several seconds
to improve the accuracy of the calibration. The averaged value (in BITS) is then written using the NULLoffset
command. Example Cal sequence:
Short Cal:
:CAL:CALT SHORT
:CHAN1:NULL
Long Cal:
:CAL:CALT LONG (set long cal mode)
:SYSTEM:ADFORMAT BITS (set format to BITS)
:CHAN1:NULL 0 (Zero out the current null)
:CHAN1:AVEP? (Read this multiple times over a period of several seconds and average the results)
:CHAN1:NULL <AVERAGED DATA> (write the averaged data)
:SYSTEM:ADFORMAT WATTS (return format to WATTS)
26 | APPENDIX B | GPIB Commands
APPENDIX C – Preprogrammed Measurement Limits
The following Charts show the preprogrammed measurement limits for each OE-2 model. See Section 3 for more
information on the measurement limit presets.
Table C1. OE-2 Option 1
Filter
Protocol
Wavelength Power Units
Average Power
Limit
Modulation
Measure
Modulation
Units
Modulation Rise/Fall times
Limit
Limits (in ps)
“User Defined”
Defaults
“Filter 1”
850 nm
dBm
(1)
OMA
uW
(1)
(1)
Gigabit Ethernet
1000BASE-SX
GE
850 nm
dBm
-9.5
ER
dB
9
260 rise
210 fall
Gigabit Ethernet
1000BASE-LX
Single Mode
GE
1300 nm
dBm
-11.0
ER
dB
9
260
Gigabit Ethernet
1000BASE-LX
Multimode
GE
1300 nm
dBm
-11.5
ER
dB
9
260
Fibre Channel
100-SM-LC-L
FC
1300 nm
dBm
-9.5
OMA
mW
(4)
320
Fibre Channel
200-SM-LC-L
FC2X
1300 nm
dBm
-11.7
OMA
mW
(4)
160
Fibre Channel
100-M5-SN-I
FC
850 nm
dBm
-10
OMA
mW
0.156
300
Fibre Channel
100-M6-SN-I
FC
850 nm
dBm
-10
OMA
mW
0.156
300
Fibre Channel
200-M5-SN-I
FC2X
850 nm
dBm
-10
OMA
mW
0.196
150
Fibre Channel
200-M6-SN-I
FC2X
850 nm
dBm
-10
OMA
mW
0.196
150
Infiniband
1X-SX
IB
850 nm
dBm
(2)
OMA
mW
0.196
150
Infiniband
1X-LX
IB
1300 nm
dBm
(2)
OMA
mW
0.186
150
Infiniband
4X-SX
IB
850 nm
dBm
(2)
OMA
mW
0.150
150
Infiniband
12X-SX
IB
850 nm
dBm
(2)
OMA
mW
0.150
150
(1) Leave blank for user setting
(2) Not specified or multiple specs in the standard. The user must establish the limit.
(3) The Fibre Channel standard offers a tradeoff between spectral center wavelength, RMS spectral width, and
minimum OMA. The user must establish the limit.
APPENDIX C | Preprogrammed Measurement Limits | 27
Table C1. OE-2 Option 2
Filter
Protocol
Wavelength
Power
Units
Average Power
Limit
Modulation
Measure
Modulation
Units
Modulation
LImit
Rise/Fall times
Limits (in ps)
“User Defined”
Defaults
“Filter 1”
850 nm
dBm
(1)
OMA
uW
(1)
(1)
Gigabit Ethernet
1000BASE-SX
GE
850 nm
dBm
-9.5
ER
dB
9
260 rise
210 fall
Gigabit Ethernet
1000BASE-LX
Single Mode
GE
1300 nm
dBm
-11.0
ER
dB
9
260
Gigabit Ethernet
1000BASE-LX
Multimode
GE
1300 nm
dBm
-11.5
ER
dB
9
260
Fibre Channel
200-SM-LC-L
FC2X
1300 nm
dBm
-11.7
OMA
mW
(4)
160
Fibre Channel
200-M5-SN-I
FC2X
850 nm
dBm
-10
OMA
mW
0.196
150
Fibre Channel
200-M6-SN-I
FC2X
850 nm
dBm
-10
OMA
mW
0.196
150
Infiniband
1X-SX
IB
850 nm
dBm
(2)
OMA
mW
0.196
150
Infiniband
1X-LX
IB
1300 nm
dBm
(2)
OMA
mW
0.186
150
Infiniband
4X-SX
IB
850 nm
dBm
(2)
OMA
mW
0.150
150
Infiniband
12X-SX
IB
850 nm
dBm
(2)
OMA
mW
0.150
150
(1)
(2)
(3)
(4)
Leave blank for user setting
Not specified or multiple specs in the standard—leave blank
Future product—reserved. Do not show in OE-2 software, available with SIA-3000
The Fibre Channel standard offers a tradeoff between spectral center wavelength, RMS spectral width, and
minimum OMA. Leave OMA limit blank for user to input a limit.
28 | APPENDIX C | Preprogrammed Measurement Limits
Table C1. OE-2 Option 3
Protocol
Filter
Wavelength
Power
Units
Average Power
Limit
Modulation
Measure
Modulation
Units
Modulation
Limit
Rise/Fall times
Limits (in ps)
“User Defined”
Defaults
“Filter 1”
850 nm
dBm
(1)
OMA
uW
(1)
(1)
Gigabit Ethernet
1000BASE-SX
GE
850 nm
dBm
-9.5
ER
dB
9
260 rise
210 fall
Gigabit Ethernet
1000BASE-LX
Single Mode
GE
1300 nm
dBm
-11.0
ER
dB
9
260
Gigabit Ethernet
1000BASE-LX
Multimode
GE
1300 nm
dBm
-11.5
ER
dB
9
260
Fibre Channel
100-SM-LC-L
FC
1300 nm
dBm
-9.5
OMA
mW
(4)
320
Fibre Channel
200-SM-LC-L
FC2X
1300 nm
dBm
-11.7
OMA
mW
(4)
160
Fibre Channel
100-M5-SN-I
FC
850 nm
dBm
-10
OMA
mW
0.156
300
Fibre Channel
100-M6-SN-I
FC
850 nm
dBm
-10
OMA
mW
0.156
300
Fibre Channel
200-M5-SN-I
FC2X
850 nm
dBm
-10
OMA
mW
0.196
150
Fibre Channel
200-M6-SN-I
FC2X
850 nm
dBm
-10
OMA
mW
0.196
150
(1)
(2)
(3)
(4)
Leave blank for user setting
Not specified or multiple specs in the standard—leave blank
Future product—reserved. Do not show in OE-2 software, available with SIA-3000
The Fibre Channel standard offers a tradeoff between spectral center wavelength, RMS spectral width, and
minimum OMA. Leave OMA limit blank for user to input a limit.
APPENDIX C | Preprogrammed Measurement Limits | 29
Table C1. OE-2 Option 4
Protocol
Filter
Wavelength
Power Average Power
Units
Limit
Modulation
Measure
Modulation
Units
Modulation
Limit
Rise/Fall times
Limits (in ps)
“User Defined”
Defaults
“Filter 1”
850 nm
dBm
(1)
OMA
uW
(1)
(1)
Gigabit Ethernet
1000BASE-SX
GE
850 nm
dBm
-9.5
ER
dB
9
260 rise
210 fall
Gigabit Ethernet
1000BASE-LX
Single Mode
GE
1300 nm
dBm
-11.0
ER
dB
9
260
Gigabit Ethernet
1000BASE-LX
Multimode
GE
1300 nm
dBm
-11.5
ER
dB
9
260
Fibre Channel
100-SM-LC-L
FC
1300 nm
dBm
-9.5
OMA
mW
(4)
320
Fibre Channel
200-SM-LC-L
FC2X
1300 nm
dBm
-11.7
OMA
mW
(4)
160
Fibre Channel
100-M5-SN-I
FC
850 nm
dBm
-10
OMA
mW
0.156
300
Fibre Channel
100-M6-SN-I
FC
850 nm
dBm
-10
OMA
mW
0.156
300
Fibre Channel
200-M5-SN-I
FC2X
850 nm
dBm
-10
OMA
mW
0.196
150
Fibre Channel
200-M6-SN-I
FC2X
850 nm
dBm
-10
OMA
mW
0.196
150
(1)
(2)
(3)
(4)
Leave blank for user setting
Not specified or multiple specs in the standard—leave blank
Future product—reserved. Do not show in OE-2 software, available with SIA-3000
The Fibre Channel standard offers a tradeoff between spectral center wavelength, RMS spectral width, and
minimum OMA. Leave OMA limit blank for user to input a limit.
30 | APPENDIX C | Preprogrammed Measurement Limits
WAVECREST Corporation
World Headquarters:
7626 Golden Triangle Drive
Eden Prairie, MN 55344
TEL: (952) 831-0030
FAX: (952) 831-4474
Toll Free: 1-800-733-7128
www.wavecrest.com
West Coast Office:
1735 Technology Drive, Ste. 400
San Jose, CA 95110
TEL: (408) 436-9000
FAX: (408) 436-9001
1-800-821-2272
Europe Office:
Hansastrasse 136
D-81373 München
TEL: +49 (0)89 32225330
FAX: +49 (0)89 32225333
Japan Office:
Otsuka Sentcore Building, 6F
3-46-3 Minami-Otsuka
Toshima-Ku, Tokyo
170-0005, Japan
TEL: +81-03-5960-5770
FAX: +81-03-5960-5773
200005-01
REV A