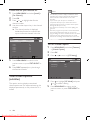
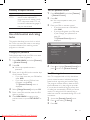
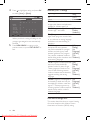
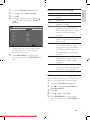
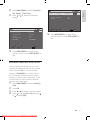
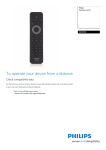
1
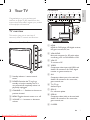
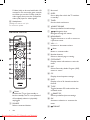
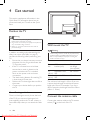
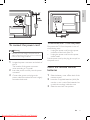
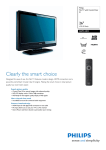
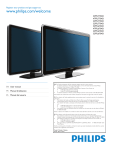
Register your product and get support at
19PFL3403/77
EN User manual
Downloaded From TV-Manual.com Manuals
3
Downloaded From TV-Manual.com Manuals
1 Notice
4
2 Important
5
5
6
6
Safety
Screen care
Environmental care
3 Your TV
TV overview
Remote control
Select your language
Automatically install channels
Fine tune channels
Exclude channels from a list
26
26
26
27
10 Troubleshooting 28
11 Product information 29
7
7
8
4 Get started 10
Position the TV
Wall mount the TV
Connect the antenna cable
To connect the power cord
Insert the remote control batteries
10
10
10
11
11
5 Use your TV 13
Switch your TV on/off or to standby 13
Switch channels
13
Adjust volume
13
6 Use more of your TV 14
Adjust picture and sound settings
Use timers
Create and use lists of favorite channels
17
View closed captions (subtitles)
Use child control and rating locks
14
16
18
19
7 Use your TV as a PC monitor 23
Configure your TV in PC mode 23
Adjust display settings for PC mode 23
8 Use your TV in HDTV mode 24
Configure your TV in HD mode 24
Adjust display settings in HD mode 24
9 Install channels 26
EN
Downloaded From TV-Manual.com Manuals
Eng lis h
Contents
1 Notice
2008 © Koninklijke Philips Electronics N.V. All
rights reserved.
Specifications are subject to change without
notice. Trademarks are the property of
Koninklijke Philips Electronics N.V. or their
respective owners.
Philips reserves the right to change products at
any time without being obliged to adjust earlier
supplies accordingly.
The material in this manual is believed
adequate for the intended use of the system.
If the product, or its individual modules or
procedures, are used for purposes other than
those specified herein, confirmation of their
validity and suitability must be obtained. Philips
warrants that the material itself does not
infringe any United States patents. No further
warranty is expressed or implied.
Warranty
No components are user serviceable. Do not
open or remove covers to the inside of the
product. Repairs may only be done by Philips
Service Centres and official repair shops. Failure
to do so shall void any warranty, stated or
implied.
Any operation expressly prohibited in
this manual, any adjustments, or assembly
procedures not recommended or authorised in
this manual shall void the warranty.
Pixel characteristics
This LCD product has a high number of
colour pixels. Although it has effective pixels of
99.999% or more, black dots or bright points of
light (red, green or blue) may appear constantly
on the screen. This is a structural property of
the display (within common industry standards)
and is not a malfunction.
Compliance with EMF
Koninklijke Philips Electronics N.V. manufactures
and sells many products targeted at consumers,
which, like any electronic apparatus, in
general have the ability to emit and receive
electromagnetic signals.
EN
Downloaded From TV-Manual.com Manuals
One of Philips’ leading Business Principles is to
take all necessary health and safety measures
for our products, to comply with all applicable
legal requirements and to stay well within
the EMF standards applicable at the time of
producing the products.
Philips is committed to develop, produce and
market products that cause no adverse health
effects. Philips confirms that if its products are
handled properly for their intended use, they
are safe to use according to scientific evidence
available today.
Philips plays an active role in the development
of international EMF and safety standards,
enabling Philips to anticipate further
developments in standardisation for early
integration in its products.
Copyright
VESA, FDMI and the VESA Mounting Compliant
logo are trademarks of the Video Electronics
Standards Association.
® Kensington and Micro Saver are registered
US trademarks of ACCO World corporation
with issued registrations and pending
applications in other countries throughout the
world.
All other registered and unregistered
trademarks are the property of their respective
owners.
•
Read this user manual before you start to use
this product.
Pay close attention to this section and follow
the safety and screen care instructions. The
product warranty does not apply if damage is
caused by failing to follow these instructions.
The model and serial number of your TV can
be found on the back of the TV as well as on
the packaging.
•
•
Safety
•
•
•
•
•
•
Two people are required to lift and carry a
TV that weighs more than 25 kilos (55lb).
Improper handling of the TV can result in
serious injury.
If transporting the TV in low temperatures
(less than 5°C), open the box and
wait until the TV matches the ambient
temperature of the room before
unpacking.
To avoid short circuit, do not expose the
TV, remote control or remote control
batteries to rain or water.
To avoid risk of fire or electric shock,
do not place the TV, remote control or
remote control batteries near naked flame
sources (e.g. lighted candles) and other
heat sources including direct sunlight.
Do not place vessels filled with water on
top of or near to the TV. Spilling water into
the TV can result in electric shock. If you
spill water into the TV, do not operate the
TV. Immediately disconnect the TV from
the power and have the TV checked by a
qualified technician.
Do not install the TV in a confined space
such as a bookcase. Leave a space of
at least 10cm (four inches) around the
TV for ventilation. Be sure air flow is not
obstructed.
•
•
•
1
2
3
•
If placing the TV on a flat, solid surface be
sure to use only the supplied stand. Do not
move the TV if the stand is not properly
screwed to the TV.
Wall mounting of the TV should only be
performed by qualified personnel. The TV
must only be mounted on an appropriate
wall bracket and on a wall that can safely
hold the weight of the TV. Improper wall
mounting can result in severe injury or
damage. Do not attempt to wall mount
the TV yourself.
If the TV is mounted on a swivel base or
swivel arm, ensure no strain is placed on
the power cord when the TV is swivelled.
Strain on the power cord can loosen
connections and cause arcing or fire.
Disconnect the TV from the mains and
antenna before lightning storms. During
lightning storms do not touch any part of
the TV, mains cord or antenna cable.
Be sure that you have full access to the
mains cord for easy disconnection of the
TV from the mains.
When disconnecting the TV from the
mains, be sure to:
Turn off the TV, then the mains power (if
available).
Unplug the mains cord from the mains
socket outlet.
Unplug the mains cord from the power
connector at the back of the TV. Always
pull the mains cord by the plug. Do not
pull the mains cord.
Permanent hearing loss can occur if you
use earphones or headphones at high
volumes. Though high volume may sound
EN
Downloaded From TV-Manual.com Manuals
Eng lis h
2 Important
normal over time, it can damage your
hearing. To protect your hearing, limit the
amount of time you use earphones or
headphones at high volume.
and reused. When you see the crossed-out
wheel bin symbol attached to a product, it
means the product is covered by the European
Directive 2002/96/EC:
Screen care
•
•
•
•
Turn off and unplug the mains cord before
cleaning the screen. Clean the screen with
a soft, dry cloth. Do not use substances
such as household cleaning agents as these
may damage the screen.
To avoid deformations or colour fading,
wipe off water droplets as soon as possible.
Do not touch, push, rub or strike the
screen with hard objects as this may
damage the screen permanently.
Where possible, avoid stationary images
that remain on-screen for extended
periods of time. Examples include screen
menus, teletext pages, black bars or stock
market tickers. If you must use stationary
images, reduce the screen contrast and
brightness to avoid screen damage.
Environmental care
Recycling your packaging
The packaging of this product is intended to
be recycled. Contact your local authorities for
information on how to recycle the packaging.
Disposing your used product
Your product is manufactured with high-quality
materials and components that can be recycled
EN
Downloaded From TV-Manual.com Manuals
Do not dispose your used product with
household waste. Ask your dealer for
information on how to safely dispose of the
product. Uncontrolled waste disposal harms
both the environment and human health.
Disposing used batteries
The supplied batteries do not contain
mercury or cadmium. Dispose supplied and all
other used batteries according to your local
regulations.
Power consumption
The TV consumes minimal energy in standby
mode to minimize environmental impact. Active
power consumption is displayed at the back of
the TV. For more product specifications, see the
product leaflet at www.philips.com/support.
3 Your TV
Connectors
2
3
4
5
6
7
Eng lis h
1
Congratulations on your purchase, and
welcome to Philips! To fully benefit from the
support that Philips offers, register your product
at www.philips.com/welcome.
10
9
TV overview
8
This section gives you an overview of
commonly-used TV controls and functions.
Side controls and indicators
VOLUME
5
4
b VGA AUDIO
Mini-jack connector for PC audio when
connecting a PC via DVI-HDMI or VGA.
3
c VGA PC
To connect a PC.
MENU
CHANNEL
2
POWER
1
a Standby indicator / remote control
sensor
b POWER: Switches the TV on from
standby or back to standby. The TV is
not powered off completely unless it is
physically unplugged.
c CHANNEL + / -: Switches to the next or
previous channel.
d MENU: Toggles the main menu on or off.
e VOLUME + / -: Increases or decreases
volume.
a HDMI
HDMI for DVD player, HD digital receiver,
HD game console, PC, etc.
d YPBPR
Component video input with YPbPr and
Audio L/R connectors for DVD, digital
receiver or game console, etc.
e AV1
Composite video input to be used with
Audio L/R connectors for camcorder,
game console, etc.
f TV (75 )
Antenna input
g SERV C
For software update.
h SIDE AV
Composite video (side) to be used with
Audio L/R connectors for camcorder,
game console, etc.
i S-VIDEO
EN
Downloaded From TV-Manual.com Manuals
S-Video (side) to be used with Audio L/R
connectors for camcorder, game console,
etc. When you use the S-Video (side) for
video signals, do not use the Composite
video (side) input for video signals.
j Headphones
Headphone stereo mini jack.
For software update.
Remote control
1
2
13
3
c Not used.
d SLEEP
Sets a delay after which the TV switches
to standby.
e TIMER
Sets the clock and timers.
f
SMART SOUND
Selects pre-defined sound settings.
g
Navigation keys
Navigates through the menus.
h MENU/BACK
Toggles the menu on or off or returns to
a previous screen.
4
5
15
16
i VOL + / Increases or decreases volume.
6
17
j
14
7
18
8
19
9
20
11
l STATUS/EXIT
Displays status information or exits the
menu.
n CC
Displays closed captions settings.
12
21
Power
Switches the TV on from standby or
back to standby. The TV is not powered
off completely unless it is physically
unplugged.
b SOURCE
Selects connected devices.
k Number buttons
Selects a channel, page or setting.
m SAP
Selects Secondary Audio Program (SAP),
stereo or mono.
10
a
Mute
Mutes or unmutes audio.
EN
Downloaded From TV-Manual.com Manuals
o SURF
Displays a list of all channels marked as
favorite.
p TV/PC
Toggles between PC mode and the last
accessed mode.
q
SMART PIC
Selects pre-defined picture settings.
r OK
Activates a selection or accesses the
menu.
s
FORMAT
Selects a picture format.
Eng lis h
t CH + / Switches to the next or previous channel.
u A/CH
Toggles between the current channel and the
last viewed channel.
EN
Downloaded From TV-Manual.com Manuals
4 Get started
This section supplements information in the
Quick Start. For information about how to
mount and install your TV, refer to the Quick
Start.
Position the TV
Warning
• Do not insert the power plug into the wall socket
before all the connections are made.
• Large screen TVs are heavy. Two people are required to
carry and handle a large screen TV.
• Before you move the TV, disconnect the cables to
Wall mount the TV
prevent breakage.
In addition to reading and understanding the
safety instructions (see ‘Safety’ on page 5),
consider the following before positioning your
TV:
• Ensure that you always have easy access to
the power cord or plug to disconnect the
TV from the power.
• If the TV is mounted on a swivel base,
ensure that no strain is placed on the
power cord when the TV is swiveled.
Strain on the power cord can loosen
connections.
• The ideal viewing distance for watching TV
is three times its screen size.
• Position the TV where light does not fall on
the screen.
• Connect your devices before you position
the TV.
Warning
• Wall mounting of the TV should only be performed by
qualified installers. Koninklijke Philips Electronics N.V.
bears no responsibility for improper mounting that
results in accident or injury.
Screen
size
VESA-compatible
bracket (mm)
19”
(48cm)
26”
(66cm)
Adjustable 100 x
100
Adjustable 200 x
100
Bolt type and
min length
(not supplied)
M4 x 10mm
M4 x 10mm
The minimum bolt length is 10mm. If you use
a spacer, the bolt length should be the spacer
length plus 10mm. For example, if you use a
40mm spacer, the bolt length should be 50mm
(40mm + 10mm).
Use a Kensington lock
There is a Kensington security slot at the back
of the TV. If you connect a Kensington lock
(not supplied), position the TV near a heavy or
immovable object that you can attach the cable
to.
10
EN
Downloaded From TV-Manual.com Manuals
Connect the antenna cable
Connect the antenna cable to the TV antenna
socket (75 ) at the back of the TV.
Eng lis h
Cable
To connect the power cord
Warning
• Verify that your mains voltage corresponds with the
voltage printed at the back of the TV. Do not insert the
mains cord if the voltage is different.
1
2
3
Locate the power connector at the back of
the TV.
The location of the power connector
varies according to TV model.
Insert the power cord fully into the power
connector.
Connect the power cord plug to the
power outlet. Ensure that the cord is tightly
secured at both ends.
To disconnect the TV from the power
Disconnect the TV from the power in one of
the following ways:
• Unplug the power cord from the power
connector at the back of the TV.
• Unplug the power cord from the power
socket outlet.
Pull the power cord by the plug; do not pull on
the power cord.
Insert the remote control
batteries
1
2
3
Slide the battery cover off the back of the
remote control.
Insert the 2 supplied batteries (AAA). Be
sure the + and - ends of the batteries line
up with the markings inside the case.
Slide the cover back into position.
EN
Downloaded From TV-Manual.com Manuals
11
Note
• Remove the batteries if you are not going to use the
remote control for an extended period of time.
12
EN
Downloaded From TV-Manual.com Manuals
5 Use your TV
Eng lis h
CHANNEL
This section helps you perform basic TV
operations.
Switch your TV on/off or to
standby
•
•
Press CH + / - or key in the number on
the remote control.
Press CHANNEL + / - on the side of the
TV.
Adjust volume
To switch on
• If the standby indicator (2) is off, press
POWER (1) at the side of the TV.
• If the standby indicator (2) is red, press
on the remote control.
To switch to standby
• Press on the remote control.
» The standby indicator (2) switches to
red.
To switch off
• Press POWER (1) at the side of the TV.
To increase or decrease volume
• Press VOL + / - on the remote control or
press VOLUME + / - on the side of the TV.
To mute or unmute sound
• Press on the remote control to mute
the sound.
• Press again to restore the sound.
To adjust headphone volume
• Press VOL + / - on the remote control or
press VOLUME + / - on the side of the TV.
When headphones are plugged into the TV,
the loud speakers are automatically muted.
Switch channels
EN
Downloaded From TV-Manual.com Manuals
13
6 Use more of
your TV
•
•
Adjust picture and sound
settings
Use smart picture settings
You can use smart picture instead of the
manual picture adjustments to set your TV to a
predefined setting.
The settings are pre-defined to suit different
viewing environments.
This section describes how to adjust picture
and sound settings.
Adjust picture settings
1
2
3
4
Press MENU/BACK and select [Picture].
Press OK.
Press
or
to highlight [Picture].
Press
or
to adjust the settings.
Picture
Sound
Features
Ch. Setup
Smart Pic
Brightness
Contrast
Tint
Color
Sharpness
Color Temp
Noise Reduction
: SEL
: ADJ
Normal
Off
4
75
60
0
50
75
MENU : EXIT
5
Press MENU/BACK to return to the
previous menu, or press STATUS/EXIT to
exit.
The following smart picture settings can be
configured. Depending on the format of the
picture source, some picture settings are not
available.
• [Brightness]: Adjusts the intensity and
details of dark areas.
• [Contrast]: Adjusts the intensity of bright
areas, keeping dark areas unchanged.
• [Tint]: Adjusts the color balance in an
image.
• [Color]: Adjusts color saturation.
• [Sharpness]: Adjusts the level of sharpness
in image details.
14
1
2
3
Install
Personal
EN
Downloaded From TV-Manual.com Manuals
[Color Temp.]: Makes colors more vivid
and improve the resolution of details in
bright colors. You can switch this feature
on or off.
[Noise Reduction]: Filters and reduces
noise in an image.
Press MENU/BACK and select [Picture].
Press OK.
Press
or
to highlight [Smart Pic] and press
to select a setting.
Press MENU/BACK to return to the
previous menu, or press STATUS/EXIT to
exit.
Tip
• Press
SMART PIC on the remote control repeatedly
to toggle the available settings.
The following settings are pre-defined factory
settings to match your viewing environment.
• [Rich]
• [Natural]
• [Soft]
• [Personal]
Change picture format
1
2
Press MENU/BACK and select [Features]
> [Format]
Press or
formats.
to select the following picture
• Toggle
FORMAT on the remote control to access
the formats.
•
•
[4:3]: Shows the classic 4:3
format.
•
[Widescreen]: Stretches
the classic 4:3 format to
16:9.
Use smart sound settings
You can use smart sound instead of the manual
sound settings to set your TV to a predefined
setting.
The settings are pre-defined to suit different
listening environments.
Adjust sound settings
This section describes how to adjust sound
settings.
1
2
3
Press MENU/BACK and select [Sound].
Press OK.
Press or to select an item and press
or to adjust the setting.
Picture
Sound
Features
Ch. Setup
Smart Sound
Treble
Bass
Balance
AVL
MTS
: SEL
4
: ADJ
•
1
2
3
4
Install
Personal
Off
Mono
40
60
50
MENU : EXIT
Press MENU/BACK to return to the
previous menu, or press STATUS/EXIT to
exit.
Summary of sound settings
•
[Bass]: Adjusts the low frequency sound
levels.
[Balance]: Adjusts the balance of the right
and left speakers to best suit your listening
position.
[AVL]: Reduces sudden changes in volume,
for example, during commecials or when
switching channels. Set on or off.
[MTS]: Multi-channel TV sound. Select
mono, stereo or a Secondary Audio
Program (SAP).
[Smart Sound]: Pre-defined sound settings
to suit your listening environment.
[Treble]: Adjusts the high frequency sound
levels.
Press MENU/BACK and select [Sound].
Press OK.
Press
press
to highlight [Smart Sound] and
or to select a setting.
Press MENU/BACK to return to the
previous menu, or press STATUS/EXIT to
exit.
Tip
• Toggle SMART SOUND to access the settings.
The following settings are pre-defined to match
your listening environment.
• [Movie]
• [Music]
• [Voice]
• [Personal]
Use Back Light
Adjust the brightness of the TV backlight to suit
your surrounding ambient lighting.
1
2
Press MENU/BACK and select [Features]
> [Back Light].
Press
or
to adjust the level.
EN
Downloaded From TV-Manual.com Manuals
15
Eng lis h
•
Tip
Automatically switch the TV to
standby (Sleeptimer)
Sleeptimer switches the TV to standby after a
delay. You can always switch off your TV earlier
or reset the sleeptimer during the countdown.
1
3
Press MENU/BACK to return to the
previous menu, or press STATUS/EXIT to
exit.
Toggle SLEEP on the remote control to
cycle through the sleep timer settings:
off, 15, 30, 45, 60, 90, 120, 180 and 240
minutes.
Tip
• Press SLEEP once to view the remaining time before
the TV switches to standby. Press SLEEP repeatedly to
change the setting or to turn off sleep timer.
Use Contrast +
Optimizes the contrast settings for overall
picture quality.
1
2
Press MENU/BACK and select [Features]
> [Contrast +].
Press
Picture
to turn on [Contrast +].
or
Sound
Features
Ch. Setup
Format
Timer
Closed Caption
Parental Control
Back Light
Contrast +
Geometry
Mode Selection
: SEL
3
Set the clock
: ADJ
1
2
3
Install
Widescreen
>
>
>
On
>
PC
4
Press MENU/BACK and select [Features]
> [Timer].
Press OK.
Press to highlight [Current Time]
and press or to select the hours or
minutes.
Press or
minutes.
5
Picture
Press MENU/BACK to return to the
previous menu, or press STATUS/EXIT to
exit.
Use timers
This section describes how to set the clock and
switch the TV on or off at a specified time.
EN
Downloaded From TV-Manual.com Manuals
Sound
Timer
Sleep
Current Time
Activate
Start Time
Stop Time
Source
Channel No.
MENU : EXIT
: SEL
16
to adjust the hours or
5
: ADJ
Features
Install
Off
09:30
Off
--:---:-TV
2
MENU : EXIT
Press MENU/BACK to return to the
previous menu, or press STATUS/EXIT to
exit.
Activate the timer
2
3
Press MENU/BACK and select [Features]
> [Timer].
Press
and select [Activate] > [On].
Sound
Timer
Sleep
Current Time
Activate
Start Time
Stop Time
Source
Channel No.
: SEL
: ADJ
Features
Install
: SEL
Off
09:30
On
--:---:-TV
2
5
6
7
8
Features
Install
Off
09:30
On
10:00
11:00
TV
5
: ADJ
MENU : EXIT
12Press MENU/BACK to return to the
previous menu, or press STATUS/EXIT to
exit.
MENU : EXIT
Set the TV timer
2
3
4
Sound
Timer
Sleep
Current Time
Activate
Start Time
Stop Time
Source
Channel No.
Press OK.
Picture
1
Picture
Eng lis h
1
Press MENU/BACK and select [Features]
> [Timer].
Check timer status
Check the status of the timers that you set for
current time, sleep timer and TV timer.
1
Press OK.
Press
to highlight [Start Time].
Press
or
to select the hour field, then press
to adjust the hours.
Press
press
to select the minute field, then
or to adjust the minutes.
Press
to highlight [Stop Time].
Press
or
to select the hour field, then press
to adjust the hours.
Press
press
to select the minute field, then
or to adjust the minutes.
9 Press to highlight [Source].
10Press or to select the source.
11If you select the TV source, set the channel
for the TV to switch to from standby. Press
to highlight [Channel No.], then press
or to select the number.
Press TIMER on the remote control.
» The TV timer status is displayed.
Sleep
Current Time
Activate
Start Time
Stop Time
Source
Channel No.
2
Off
09:30
On
10:00
11:00
TV
5
You can change the timer settings from
this screen.
Press TIMER again to exit the timer display.
Create and use lists of
favorite channels
This section describes how to set up a list of
your preferred TV channels.
EN
Downloaded From TV-Manual.com Manuals
17
Create and use your favorite list
1
2
3
4
Press MENU/BACK and select [Install] >
[Fav. Channel].
Press or to highlight the favorite
channel number.
Use the number keys to key in the channel
number.
» The channel number is displayed
beside the favorite list number. Enter
up to six favorite channels in the list.
FAV
FAV
FAV
FAV
FAV
FAV
Sound
Features
Fav. Channel
1
2
3
4
5
6
: SEL
6
•
•
Turn on Closed Caption
5
12
22
25
30
38
: ADJ
•
captioning that conforms with the EIA-608 standard
and in accordance with Sections 15.119 of the
FCCrules.
If you connect your set-top box via HDMI or
component video input, you cannot select closed
caption through the TV. You can select closed caption
through the set-top box only.
The captions do not always use correct spelling and
grammar.
Not all TV programs and product commercials include
closed caption information. Refer to your area TV
program listings for the TV channels and times of closed
caption shows. The captioned programs are usually
noted in the TV listings with service marks such as ‘CC’.
Install
1
MENU : EXIT
Press MENU/BACK to return to the
previous menu, or press STATUS/EXIT to
exit.
2
3
The caption service displays transmitted
closed caption text. The captioned text can be
displayed permanently or only when the TV is
muted.
EN
Downloaded From TV-Manual.com Manuals
Press MENU/BACK and select [Features]
> [Closed Caption].
Press OK.
Press
Picture
or
to turn on [CC Setting].
Sound
Features
Closed Caption
CC Setting
CC Mode
Press SURF repeatedly to cycle through
the favorite channels.
View closed captions
(subtitles)
18
• This television provides a display of television closed
Press OK.
Picture
5
Note
: SEL
4
5
Press
or
Install
On
CC1
: ADJ
MENU : EXIT
to highlight [CC Mode] and press
to select a setting.
Press MENU/BACK to return to the
previous menu, or press STATUS/EXIT to
exit.
Service
Description
CC-1 and Dialog and descriptions for the
CC-2
action on the captioned TV
program show on screen. Usually
CC1 is the most used. CC 2 can
be used for alternate languages if
they are transmitted.
Turn on parental control
1
2
3
Use child control and rating
locks
This section describes how to lock or unlock
the TV. You can set a PIN code or use ratings
to prevent children from watching certain
programs or channels.
3
4
5
6
Press MENU/BACK and select [Features]
> [Parental Control].
Press OK.
» You are prompted to enter a
password.
Enter your 4-digit PIN on the number keys
of the remote control.
• If you have never set your PIN before,
enter 0000.
• If you have set your PIN but have
forgotten it, enter 0711.
The [Parental Control] menu is
displayed.
Select [Change Password] and press OK.
Enter a new PIN, and then enter the PIN
again to confirm.
Press MENU/BACK to return to the
previous menu, or press STATUS/EXIT to
exit.
Enter your PIN on remote control.
• If you have never set a PIN before,
enter 0000.
• If you have forgotten your PIN, reset
it (see ‘Change your password’ on
page 19).
The [Parental Control] menu is
displayed.
Sound
Features
Parental Control
Change Password
Parental Control
TV Rating
Movie Rating
Unrated Block
No Rating Block
Follow these steps to set your PIN or to reset
your PIN if you have forgotten it.
2
Press OK.
» You are prompted to enter your
password.
Picture
Change your password
1
Press MENU/BACK and select [Features]
> [Parental Control].
: SEL
4
Press
press
: ADJ
Install
>
Off
>
>
Off
Off
MENU : EXIT
to highlight [Parental Control] and
to turn on [Parental Control].
Use TV ratings lock
Your TV is equipped with a V-chip that allows
you to control access to individual programs
based on their age rating and content rating.
The program content advisory data are from
the broadcaster or by the program provider.
If you receive channels through a set-top box
or cable box connected by HDMI, you cannot
use the TV ratings lock. Your set-top box or
cable box must be connected through RF or AV
connectors.
1
2
3
Access the [Parental Control] menu.
Press
and select [TV Rating].
Press OK.
EN
Downloaded From TV-Manual.com Manuals
19
Eng lis h
Summary of caption services
4
Press to highlight a rating and press OK
to select [View] or [Block].
Picture
None
TV - Y
TV - Y7
TV - G
TV - PG
TV - 14
TV - MA
: SEL
5
Sound
Features
TV Rating
All
V
V
V
V
V
V
V
: ADJ
FV
Install
V
S
L
D
V
V
V
V
V
V
V
V
V
V
V
V
MENU : EXIT
When you block a rating, all ratings in the
younger age categories are automatically
blocked.
Press MENU/BACK to return to the
previous menu, or press STATUS/EXIT to
exit.
Summary of TV ratings
Age rating
Content
rating
All
None
TV-Y: Appropriate for children of
all ages with themes and elements
suitable for children aged 2-6.
TV-Y7: Programs designed for
children age 7 and older.
None
None
None
TV-G: Programs suitable for all
ages. These programs contain little
or no violence, no strong language
and little or no sexual dialog or
situations.
TV-PG: Programs contain
elements that some parents
may find unsuitable for younger
children and which may need
parental guidance. The program
may contain moderate violence,
sexual dialog and/or situations and
some strong language.
TV-14: Programs contain elements
that may not be suitable for
children under 14 years of age.
These programs include one or
more of the following: intense
violence, intense sexual situations,
suggestive dialog and strong
language.
TV-MA: Programs are designed to
be viewed by adults and may be
unsuitable for children under the
age of 17. These programs may
contain graphical violence, explicit
sexual activity and/or crude or
indecent language.
[(FV)
Fantasy
Violence]
None
[(D)
Dialog]
[(L)
Language]
[(S) Sex]
[(V)
Violence]
[(D)
Dialog]
[(L)
Language]
[(S) Sex]
[(V)
Violence]
[(L)
Language]
[(S) Sex]
[(V)
Violence]
Use movie ratings lock
This section describes how to control viewing
of movies based on their Motion Picture
Association of America (MPAA) rating.
20
EN
Downloaded From TV-Manual.com Manuals
Access the [Parental Control] menu.
Summary of US movie ratings
Rating
Description
Press OK.
All
Press to highlight a rating and press
or to change the setting to [View] or
[Block].
NR
G
All items in the ratings list are
locked.
Not rated.
Movies with a mild content,
suitable for all ages.
Movies for which parental
guidance is recommended. They
may contain a few racy or violent
scenes or maybe some bad
language.
Movies for which parental
guidance may be recommended if
under age 13.
Restricted. The movies usually
contain offensive sex or bad
language and may be unsuitable
for children under the age of 17.
Parental guidance or permission
needed.
Even with parental permission,
forbidden under age 17. More
offensive sex, violence or bad
language.
Movies which generally focus on
sex, violence and/or bad language.
Also known as pornography.
Press
and select [Movie Rating].
PG
Picture
Sound
Features
Movie Rating
N/R
G
PG
PG-13
R
NC-17
X
: SEL
5
Install
View
Block
View
View
View
View
View
: ADJ
PG -13
MENU : EXIT
R
When you block a movie rating, all items
for ages below that movie rating are
automatically blocked.
Press MENU/BACK to return to the
previous menu, or press STATUS/EXIT to
exit.
NC-17
X
Block unrated or no rating programs
Block unrated programs such as “director’s cut”
edition or programs with no advisory data.
1
2
3
4
5
Access the [Parental Control] menu.
Press to highlight [Unrated Block] or
[No Rating Block].
Press OK.
Press
or
to select [On].
Press MENU/BACK to return to the
previous menu, or press STATUS/EXIT to
exit.
EN
Downloaded From TV-Manual.com Manuals
21
Eng lis h
1
2
3
4
Unlock blocked channels or programs
To view programs or channels blocked with the
parental control blocking options, unlock them
with the password or turn off parental control.
Turn off parental control
1
2
Access the [Parental Control] menu.
Press to highlight [Parental Control]
and press or to turn off [Parental
Control].
Picture
Sound
Features
Parental Control
Change Password
Parental Control
TV Rating
Movie Rating
Unrated Block
No Rating Block
: SEL
3
22
: ADJ
Install
>
Off
>
>
On
On
MENU : EXIT
Press MENU/BACK to return to the
previous menu, or press STATUS/EXIT to
exit.
EN
Downloaded From TV-Manual.com Manuals
For information about how to connect a PC to
the TV, see the Quick Start.
If necessary, adjust the picture position to the
center of the screen with the cursor buttons.
Adjust display settings for PC
mode
Adjust your TV display settings in PC mode.
1
Caution
• Before you connect your PC, set the PC monitor
refresh rate to 60Hz.
2
Press MENU/BACK and select [Features]
> [Geometry].
Press OK.
Picture
Configure your TV in PC
mode
1
: SEL
Tip
• Toggle TV/PC to switch to PC and the last accessed
mode.
Note
• Certain picture and sound features are not available in
PC mode.
Supported screen resolutions
The following screen resolutions are supported
in PC mode:
Install
Auto Adjust
Horizontal Shift
Vertical Shift
Clock
Phase
Press SOURCE and select PC, then press
OK.
Resolution
640 x 480
800 x 600
1024 x 768
1280 x 768
1280 x 1024
Sound
Features
Geometry
3
4
5
: ADJ
+50
+50
100
100
MENU : EXIT
Press
or
to select an item.
Press
or
to adjust the setting.
Press MENU/BACK to return to the
previous menu, or press STATUS/EXIT to
exit.
You can configure the following display settings
for PC mode:
• [Auto Adjust]: Synchronizes the phase and
clock on the TV and PC.
• [Horizontal Shift] and [Vertical Shift]:
Adjusts the horizontal and vertical position
of the picture.
• [Clock] and [Phase]: Fine-tunes the TV to
match the display settings of the PC.
Refresh rate
60Hz
60Hz
60Hz
60Hz
60Hz
EN
Downloaded From TV-Manual.com Manuals
23
Eng lis h
7 Use your TV as
a PC monitor
8 Use your TV in
HDTV mode
Note
• Certain picture and sound features are not available in
HDMI and YCbCr modes.
Not all models can be configured in high
definition (HD) mode. For information about
your set, see the specification.
When you connect an HD device to your TV,
configure the display format of your TV. You
might also have to configure the display format
of your HD device. For information about
configuring your device, see the documentation
of the device.
Configure your TV in HD
mode
1
2
3
4
5
Connect your HD device to the TV. Refer
to the Quick Start.
Press SOURCE and select HDMI or
YPBPR, then press OK.
Press MENU/BACK and select [Features]
> [Mode Selection].
Press OK.
Press
Picture
or
to select a mode.
Sound
Features
Ch. Setup
Format
Timer
Closed Caption
Parental Control
Back Light
Contrast +
Geometry
Mode Selection
: SEL
6
: ADJ
Supported screen resolutions
The following screen resolutions are supported
in HDMI and YPbPr modes:
Resolution
480i
480p
576i
576p
720p
720p
1080i
1080i
If necessary, adjust the picture position to the
center of the screen with the cursor buttons.
Adjust display settings in HD
mode
Adjust your TV display settings in HD mode.
1
Install
Widescreen
>
>
>
Off
>
HDMI
2
5
Press MENU/BACK to return to the
previous menu, or press STATUS/EXIT to
exit.
Downloaded From TV-Manual.com Manuals
Press OK.
Sound
Features
Geometry
Install
Horizontal Shift
Vertical Shift
MENU : EXIT
EN
Press MENU/BACK and select [Features]
> [Geometry].
Picture
: SEL
3
24
Refresh rate
60Hz
60Hz
50Hz
50Hz
50Hz
60Hz
50Hz
60Hz
Press
: ADJ
or
+50
+50
MENU : EXIT
to select an item.
4
5
Press
or
to adjust the setting.
Eng lis h
Press MENU/BACK to return to the
previous menu, or press STATUS/EXIT to
exit.
The following display settings can be configured
when an HD device is connected to the TV.
• [Horizontal Shift] and [Vertical Shift]:
Adjusts the horizontal and vertical position
of the picture.
EN
Downloaded From TV-Manual.com Manuals
25
9 Install channels
Picture
Tuner Mode
System
Auto Program
Fine Tune
The first time you setup your TV, you are
prompted to select a menu language and to
install TV and digital radio channels (if available).
This chapter provides instructions on how to
reinstall and fine-tune channels.
: SEL
Select your language
a Press MENU/BACK and select [Install] >
[Language].
Picture
Sound
Features
Ch. Setup
Language
Ch. Setup
List
Fav. Channel
: SEL
3
4
c Press MENU/BACK to return to the
previous menu, or press STATUS/EXIT to
exit.
Automatically install channels
This section describes how to search and store
channels automatically. Instructions are for both
digital and analogue channels.
1
2
26
Press MENU/BACK and select [Install] >
[Ch. Setup] > [Tuner Mode].
Press or
[Cable].
and select [Antenna] or
EN
Downloaded From TV-Manual.com Manuals
6
MENU : EXIT
and select [System].
Press or and select [AUTO], [PAL M],
[PAL N] or [NTSC].
: SEL
5
Install
Antenna
Auto
>
193.25Mhz
: ADJ
Sound
Features
Ch. Setup
Tuner Mode
System
Auto Program
Fine Tune
MENU : EXIT
to select a language, then
Press
Picture
English
>
>
>
: ADJ
b Press or
press OK.
Install
Sound
Features
Ch. Setup
Install
Antenna
NTSC
>
195.30Mhz
: ADJ
MENU : EXIT
Press to highlight [Auto Program] and
press OK.
• The TV detects the [Antenna] or
[Cable] signal that you have selected
and search for all the available
channels.
• When the search completes, the TV
switches to the first channel found.
Press MENU/BACK to return to the
previous menu, or press STATUS/EXIT to
exit.
Fine tune channels
You can manually fine tune channels when the
reception is poor.
1
Press CH + / - or use the number keys to
select the channel to fine tune.
3
Press MENU/BACK and select [Install] >
[Ch. Setup] > [Fine Tune].
Press or
setting.
Picture
Sound
Features
Ch. Setup
Tuner Mode
System
Auto Program
Fine Tune
: SEL
4
Picture
to adjust the frequency
Install
Antenna
Auto
>
195.30Mhz
: ADJ
Sound
List
Current Channel
In List
: SEL
5
: ADJ
Features
Install
Eng lis h
2
30
Off
MENU : EXIT
Press MENU/BACK to return to the
previous menu, or press STATUS/EXIT to
exit.
MENU : EXIT
Press MENU/BACK to return to the
previous menu, or press STATUS/EXIT to
exit.
Exclude channels from a list
You can exclude a channel from your list of
channels. Excluded channels are not accessed
when you press CH + / - on the remote
control or CHANNEL + / - on the side of
the TV. Excluded channels can be accessed,
however, by pressing the number keys on the
remote control. It can be useful to exclude
channels with weak signals.
1
2
3
4
Press MENU/BACK and select [Install] >
[List].
Press OK.
Press
or
to select a channel number.
Press to highlight [In List], and press
or to select [Off].
EN
Downloaded From TV-Manual.com Manuals
27
10Troubleshooting
This section describes commonly-encountered
issues and accompanying solutions.
Some problems you encounter with your TV
can be corrected by consulting the following list:
No picture, no sound
1
2
3
4
Check if the fuse or circuit breaker works.
Plug another electrical device into the
outlet to make sure it works or is turned
on.
Power plug is in a bad contact with the
outlet.
Check the signal source.
No color
1
2
3
Change the color system.
Adjust the saturation.
Try another program. Black-white program
may be received.
Remote control does not work
1
2
3
Change the batteries.
Batteries are not installed correctly.
Main power is not connected.
No picture, normal sound
1
2
Adjust the brightness and contrast.
Broadcasting failure may happen.
Normal picture, no sound
1
2
3
4
Press the VOLUME + button to increase
volume.
Volume is set to mute, press MUTE to
restore sound.
Change the sound system.
Broadcasting failure may happen.
Ripples on the picture
Usually caused by local interference such as
cars, daylight lamps and hair driers. Adjust the
antenna to minimize the interference.
Blank screen in VGA(PC) mode
Perhaps the TV can not recognize the resolution
set by the PC. Change to the best resolution or
other standard resolutions of the PC system.
28
EN
Downloaded From TV-Manual.com Manuals
Check the connections.
Set the PC refresh rate to 60Hz.
Snowy dots and interference
If the antenna is located in the fringe area of a
television signal where the signal is weak, the
picture may appear snowy. When the signal is
weak, it may be necessary to install a special
antenna to improve the reception.
• Adjust the position and orientation of
the indoor/outdoor antenna.
• Check the connection of antenna.
• Fine tune the program.
• Try another program. Broadcasting
failure may happen.
Ghost
“Ghosting” occurs when the television signal
follows two paths. One is the direct path,
the other is reflected from tall buildings, hills,
or other objects. Changing the direction or
position of the antenna may improve the
reception.
Radio frequency interference
This interference produces moving ripples
or diagonal streaks, and in some case, loss of
contrast in the picture. Find out and remove the
radio interference source.
Connections (Rear)
•
•
Note
• Product information is subject to change without prior
notice.
Supported display resolutions
•
•
Computer formats (see ‘Supported screen
resolutions’ on page 23)
Video formats (see ‘Supported screen
resolutions’ on page 24)
Tuner/Reception/
Transmission
•
•
•
Antenna input: 75ohm coaxial (IEC75)
TV system:
Video playback: NTSC, PAL
•
•
•
Connections (Side)
•
•
•
•
Sound system:
• Mono/Stereo/SAP
Power output:
• 2 x 3W (19PFL3403)
• 2 x 5W (26PFL3403)
Remote control
•
•
Type: PF05L08B
Batteries: 2 x AAA size (LR03 type)
Headphone out (stereo mini-jack)
AV1: Composite video (CVBS) in, AUDIO
L/R in
SVIDEO: 1x S-Video in
Power
•
•
•
•
Sound
•
AV 1: Composite video (CVBS in), Audio
L/R in
YPBPR: Component video (CVI in), Audio
L/R in
PC: VGA in, VGA Audio in
HDMI: 1x
TV: TV ANTENNA
Mains power: AC 100-240V (±10%)
Power power consumption: 50 W
(19PFL3403), 80 W (26PFL3403)
Standby power consumption: < 0.3 W
Specifications are subject to change
without notice. For detailed specifications
of this product go to www.philips.com/
support.
Weight
•
•
TV weight: 4.2 kg (19PFL3403), 7.7 kg
(26PFL3403)
TV weight with stand: 4.9 kg (19PFL3403),
9.1 kg (26PFL3403)
Dimensions
•
TV dimensions:
• Height: 35.3 cm (19PFL3403), 45.8 cm
(26PFL3403)
EN
Downloaded From TV-Manual.com Manuals
29
Eng lis h
11Product
information
•
Width: 47.3 cm (19PFL3403), 67.1 cm
(26PFL3403)
• Depth: 6.9 cm (19PFL3403), 9.0 cm
(26PFL3403)
• TV dimensions with stand:
• Height: 39.4 cm (19PFL3403), 50.3 cm
(26PFL3403)
• Width: 47.3 cm (19PFL3403), 67.1 cm
(26PFL3403)
• Depth: 16.0 cm (19PFL3403), 21.5 cm
(26PFL3403)
This information is correct at the time of press.
For updated contact information, refer to www.
philips.com/support.
30
EN
Downloaded From TV-Manual.com Manuals
31
Downloaded From TV-Manual.com Manuals
© 2008 Koninklijke Philips Electronics N.V.
All rights reserved.
Document order number:
Downloaded From TV-Manual.com Manuals