1
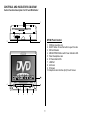
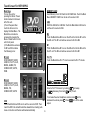
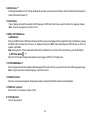
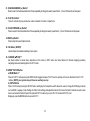
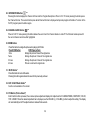
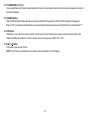
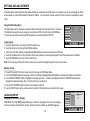
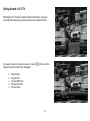
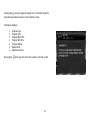
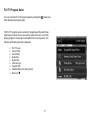
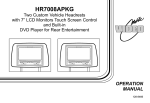
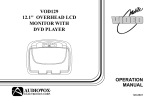
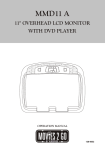
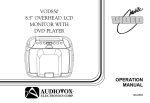
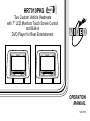
HR7010PKG Two Custom Vehicle Headrests with 7” LCD Monitors Touch Screen Control and Built-in DVD Player for Rear Entertainment AUX AUX OPERATION MANUAL 128-8770 IMPORTANT An LCD panel and/or video monitor may be installed in a motor vehicle and visible to the driver if the LCD panel or video monitor is used for vehicle information, system control, rear or side observation or navigation. If the LCD panel or video monitor is used for television reception, video or DVD play, the LCD panel or video monitor must be installed so that these features will only function when the vehicle is in “park” or when the vehicle’s parking brake is applied. An LCD panel or video monitor used for television reception, video or DVD play that operates when the vehicle is in gear or when the parking is not applied must be installed to the rear of the driver’s seat where it will not be visible, directly or indirectly, to be operator of the motor vehicle. An LCD panel or video monitor used for television reception, video or DVD play that operates when the vehicle is in gear or when the parking is not applied must be installed to the rear of the driver’s seat where it will not be visible, directly or indirectly, to be operator of the motor vehicle. Licensed under one or more of the following patents: Patent NOS. 7,245,274 , 6,899,365 and 6,678,892 I HR7010PKG The HR7010PKG contains two vehicle specific head-rests. Each has a 7” Monitor with touch screen control and built-in DVD Player. This system allows the users to either watch individual DVD’s or watch the same DVD on both monitors. Both users can also share each others program. The full function remote control can operate either unit by selecting M1 or M2 on the remote. This system is also FLO Ready and can be enhanced with the addition of a FLO TV kit (AUDIOVOX model AVXFRK1 / ADVENT model ADVFRK1.) Quick Start Guide 1. 2. 3. 4. Turn on the M1 monitor, to gain access to the DVD slot push at the top center of the screen frame, the screen will tilt forward. Insert a DVD, CD or MP3 disc into the slot, disc label toward driver. Push down gently on the disc until the player pulls the disc in. Use the touch screen to access the DVD mode. Tilt the monitor to a comfortable viewing position (the headrest itself can be tilted forward to help achieve a comfortable viewing position). 5. Each wireless headphone has a CH A/CH B switch. Turn the volume down to its lowest setting before putting them on your head. When sitting in front of the M1 screen, use the CH A switch setting. When sitting in front of the M2 screen, use the CH B switch setting. Set the headphone to the proper channel and press the Power On/Off switch. The power indicator will light up red. 6. When the DVD menu appears, select the menu item using the cursor keys and touch the OK or play button. 7. If audio playback through the vehicle radio is preferred, use the FM transmitter On/Off button on the remote control. Set the vehicle radio to the channel selected on the M1 monitor. If interference with a local radio station occurs, set the FM modulator to one of the other 15 radio frequencies using the CHANNEL SELECT button on the remote control. 8. Turn on the M2 Monitor using the power button on the front of the screen or remote control. 9. Tilt the screen to a comfortable viewing position (the headrest itself can be tilted forward to help achieve a comfortable viewing position). 10. Touch the screen and touch on M1 or use remote control to press SOURCE button to view program from M1 or select from the other available sources DVD, MEMORY CARD, USB, FLO TV, AUX and MEDIA for M2 Monitor. NOTE: To operate the M1 screen, press M1 on the remote control. To operate the M2 screen, press M2 on the remote control. 1 HR7010PKG SYSTEM OVERVIEW 1) The HR7010PKG SYSTEM is a versatile headrest system. The headrests are referred to as M1 and M2 in this manual. 2) The M1 Monitor is comprised of a 7" Touch Screen TFT LCD monitor with built-in DVD player that allows the user to select from several sources (DVD, SD, USB, M2, *FLO TV (AV), AUX, MEDIA and GAME Source). The M1 monitor has a built-in infrared audio transmitter channel (CH A) for use with the two-channel wireless headphones (CH A) NOTE: When the DVD menu appears on the screen, touch the desired DVD menu selection to start the DVD playing. Refer to page for 4 operation. 3) The M2 monitor is comprised of a 7" Touch Screen TFT LCD monitor with built-in DVD player that allows the user to select from several sources (DVD, SD, USB, M1, *FLO TV (AV), AUX and MEDIA Source). The M2 monitor has a built-in infrared audio transmitter channel (CH B) for use with the twochannel wireless headphones (CH B). NOTE: When the DVD menu appears on the screen, touch the desired DVD menu selection to start the DVD playing. Refer to page for 4 operation. 4) The monitors will display all of the functions with the comprehensive Graphical User Interface (GUI) and can be accessed using the touch screen. 5) The two-channel wireless headphone sets have an A-B switch that allow the users to select the audio from either the M1 (CH A) or the M2 (CH B). 6) When using the IR remote control, the M1 Monitor will only respond to the remote control unit when the Monitor Select (M1) button on remote control is pressed. The M2 Monitor only respond to the Remote Control unit when the Monitor Select (M2) button on remote control is pressed. 7) Optional wired headphones allow the user to listen to audio from the system. 8) The M1 and M2 Monitor will accept an audio / video input through the 1/8” jack located on the front of the unit. The audio / video device could be a video game system, video camera or other input device. NOTE: FLO TV is an option that can be added to your HR7010PKG system. If FLO TV is installed the Touch Screen will display the FLO TV icon. If FLO TV is not installed, there is an optional AV Input available and the Touch Screen will display an AV icon. TOUCH SCREEN GRAPHICAL USER INTERFACE (GUI) AUX AUX USB WIRED HEADPHONE 2 9) Press and release the screen at the top of the screen to release the screen for disc insertion. Pressing it again will lock the screen back in the closed position. The headrest itself can be tilted forward to help achieve a comfortable viewing position. PUSH IN AUX USB JACK PULL UP WIRED HEADPHONE 10) Insert/Eject disc and SD Card 19 degrees Insert/Eject Disc Insert/Eject SD Card 19 Degrees 3 HR7010PKG Touch Screen The touch screen of the unit allows the user to start DVD play by touching PLAY MOVIE or any of the DVD menu features on the LCD screen. Some DVD’s will not allow this function. One method is to use the remote control instead of the touch screen. The other method is to touch any of four corners of the screen to pop up the DVD menu navigation screen (below) Use the up/down/left/right icons to select an item from the DVD menu. Use the Enter / 4 to start DVD play. CONTROLS AND INDICATORS DIAGRAM Control Function Description for M1 and M2 Monitor 1 M1/M2 Panel Control 2 3 1. DVD disc insertion slot. 2. EJECT Button -Press this button to eject the disc. 3. SD Card Reader 4. MENU/POWER Button with Power Indicator LED. 5. Wired Headphone Jack 6. IR Transmitter LEDS. 7. USB Port 8. AUX Jack 9. IR Sensor 10. Graphical User Interface (GUI) Touch Screen 4 AUX 5 6 7 8 5 Touch Screen For HR7010PKG Main Page Turn on the unit by pressing the Menu / Power button located on the lower left of the unit. I) Touch the panel then touch the Home icon to display the Main Menu. The Main Menu can also be accessed by pressing the Menu / Power button on the unit’s front panel. ii) The Main Menu screens for M1 and M2 contains the following icons: M1 Unit DVD, MEMORY CARD, USB, M2, FLO TV, AUX, MEDIA, GAME, PIX, SCREEN OFF, MUTE, FMM. MEMORY CARD Insert Memory Card / SD Card into SD CARD slot. Touch the Main Menu MEMORY CARD icon to set unit’s source to SD. USB Insert the USB to the USB Slot. Touch the Main Menu USB icon to set the unit’s source to USB. Main Menu M2 Touch the Main Menu M2 icon on the M1 unit to link the M1 unit to the M2 unit. The M1 unit will now receive its AV from M2. M1 Touch the Main Menu M1 icon on the M2 unit to link the M2 unit to the M1 unit. The M2 unit will now receive its AV from M1. Main Menu DVD MEMORY CARD USB M2 FLO TV AUX MEDIA GAME PIX SCREEN OFF MUTE FMM FLO TV Touch the Main Menu FLO TV icon to access the FLO TV mode. M1 CH Main Menu M2 Unit DVD, MEMORY CARD, USB, M2, FLO TV, AUX, MEDIA, PIX, SCREEN OFF, MUTE CH VOLUME DVD MEMORY CARD USB M1 FLO TV AUX MEDIA GAME PIX SCREEN OFF MUTE FMM M2 DVD Touch the Main Menu DVD icon to set the source to DVD. Then insert the DVD into slot with label face toward driver. Gently push down on the disc and the disc will load automatically. 16 MUTE Select a FLO TV channel by touching CH (increase) or CH (decrease), then touch (enter) to exit. To increase the wired headphone volume press and to decrease the volume press . Press MUTE turn off the audio output. 6 The on screen DVD menu of most DVD’s can be used to select a DVD menu feature such as “Play Movie”, “Scene Select”, etc. by touching the menu item on the touch screen. For example, touching “Play Movie” in the below screen will start movie play. AUX Touch the Main Menu AUX icon to route external audio and video supplied to the unit via the cable adapter. MEDIA Touch the Main Menu MEDIA icon to select the MEDIA display. • Play Movie • Scene Select • Extras • Audio • ETC GAME Touch the Main Menu GAME icon on (for M1 only). The GAME selection is controlled by wireless game controller. COLOR The game source can only be selected from the M1 monitor. When playing two-player games, select the GAME source on the M1 monitor and select the M1 source on the M2 monitor. NOTE: A small number of DVD discs will not function like this. In that event use the remote control to start the movie or select the different DVD options. PIX Touch the Main Menu PIX icon to gain access to the display’s picture controls. The controls available are BRIGHTNESS, CONTRAST, COLOR, TINT and RESET. Adjustment of each control is made by touching (decrease), then touch (enter) to exit. 16 SCREEN OFF Touch the Main Menu SCREEN OFF icon and the screen will shut off. Touch the screen again to turn it back on. The screen will turn back on after cycling power. (increase) or MUTE Touch the Main Menu MUTE icon to toggle the unit’s audio between on and off. COLOR 16 PIX 7 REMOTE CONTROL WITH WIRELESS GAME CONTROL OPERATION FMM Touch the Main Menu FM MODULATOR icon (For M1 only) to gain access to the FM Modulator controls. Back View DIRECTION KEYS To turn on FM Modulator touch +or - icon, then select the FM modulator transmission frequency by touching (decrease) or (increase) [88.1MHz ~ 91.1MHz]. Touch (enter) to exit. Set the vehicle radio to the selected frequency to listen to the movie over the vehicle sound system. M1/M2 P1/P2 SELECT TB TA A RESET FMM 88.1 MHZ B OFF START GAME/REMOTE SELECTOR SWITCH BATTERY COVER To turn off the FM Modulator function, touch OFF icon. Then touch (enter) to exit. Battery Installation Before attempting to operate your remote control, install the batteries as described below. 1) Turn the remote control face down. Using a finger, slide battery cover off in the direction of the arrow. 2) Install three “AAA” batteries. Make sure that proper polarity (+ or -) is observed. 3) Align the cover tabs with the remote control and slide the cover until it locks. The remote control will operate the M1 and M2 monitors. It is not a universal remote control and will not control equipment from other manufacturers. 8 WIRELESS GAME CONTROLLER FUNCTIONAL DESCRIPTION 1. Position the GAME/REMOTE selector switch to Game position. Two-Player Games 2. Use the select button (page up & page down) to display the games (1-32). Then use the direction buttons to move the arrow to the desired game. Press Start to select the game. The game source can only be selected from the M1 monitor. When playing two-player games, select the GAME source on the M1 monitor and select the M1 source on the M2 monitor. 3. A Key : “A Function Key” activates the jump and optional Weapons. When playing two-player games use two remote controls and set the remote controls as follows: Player 1 (M1 Monitor) sets their remote to Game/M1/P1 Player 2 (M2 Monitor) sets their remote to Game/M1/P2. 4. B Key : “ B Function Key” activates Bullet fire and attack. 5. TA Key : TURBO “A” Function Key. Single player games can be played on the M2 monitor but the M1 monitor must be turned on and set to the GAME source. You cannot watch a DVD on the M1 monitor and play a game on the M2 monitor. When playing a single player game on the M2 monitor set the remote control to GAME/M1/P1 and point the remote control to the M2 monitor. 6. TB Key : TURBO “B” Function Key. 7. Press Start to begin the game. Press Start again at any time to pause the game. 8. Return the GAME/REMOTE selector switch to Remote position after use. 9 * Function control is available on the unit and the remote control. ** Function control is not available on the unit and the remote control. *** FLO TV function only available when optional FLO TV module is installed. Note: Refer to Appendix A FLO TV for FLO TV operating instructions. 1. POWER Button* Press this button to turn the unit ON and OFF. MAIN FUNCTION DESCRIPTION 1 2 3 4 5 6 7 8 POWER EJECT M1 M2 FLO DVD DVD SOURCE SOURCE 1 2 3 FMM ON/OFF 4 5 6 FMM SELECT 7 8 9 IRT ON/OFF 0 18 19 20 21 SUBTITLE DISPLAY DAY NIGHT PIX REPEAT A-B ZOOM MUTE i RETURN MENU SETUP AUDIO 36 2. MONITOR SELECT M1 Button – Sets the remote control codes to enable the control of M1 Monitor. M2 Button – Sets the remote control codes to enable the control of M2 Monitor. 3. FLO TV Button*** Press this button to access FLO TV mode. Also switches the function keys on the remote control to correspond to FLO TV functions. 4. DVD Mode Select Button* Press this button when playing DVDs. Switches certain function keys on the remote control for DVD functions. 5 SOURCE Button* For M1: Each time the button is pressed, the unit will select various sources in the following sequence: DVD > M2 > FLO TV > AUX > MEDIA > GAME. For M2: Each time the button is pressed, the unit will select various sources in the following sequence: DVD > M1 > FLO TV > AUX > MEDIA 35 34 VOLUME 9 10 11 12 13 14 15 16 17 37 MODE 33 32 31 30 29 28 27 26 SYSTEM MENU OK 25 24 23 22 6. 10 FMM ON/OFF Button* Turn the wireless FM Modulator on or off. 7. FMM SELECT Button* Select the wireless FM Modulator Frequency: (CH1 88.1MHz, CH2 88.3MHz, CH3 88.5MHz, CH4 88.7MHz, CH5 88.9MHz, CH6 89.1MHz, CH7 89.3MHz, CH8 89.5MHz, CH9 89.7MHz, CH10 89.9MHz, CH11 90.1MHz, CH12 90.3MHz, CH13 90.5MHz, CH14 90.7MHz, CH15 90.9MHz, CH16 91.1MHz). 8. IRT ON/OFF Button Turn the Infrared Transmitter ON or OFF for IR Wireless Headphones. Pressing M1 then IRT ON/OFF will control the IR Transmitter for M1. Pressing M2 then IRT ON/OFF will control the IR Transmitter for M2. 9. SUBTITLE Button Press to display and select the available subtitle language in DVD mode. Each time you press the button, the subtitle language changes. Note: The type and number of subtitle languages vary from disc to disc. 10. DISPLAY Button Press to display current disc information while the disc is playing. Press cursor (pq) buttons to select the Title or Chapter. For Title/Chapter selection use the numeric buttons to enter the desired Title Chapter selection. 11. REPEAT Button Allows the user to repeat a selected title, chapter or track. 12. A-B Button Allow user to repeat disc playback from point A to point B. Press A-B button On-Screen Display DVD Player Once Repeat AMark the beginning of the section to repeat (Set point A) Twice Repeat A-B Mark the end of the section to repeat (Set point B) 3 Times AB Off Cancel the A-B repeat function 13. RETURN Button Press Return Once: Go to disc menu. Press Return Twice: Go to movies playback. 11 14. BACK Button *** Pressing the Back Button in FLO TV mode will allows the user back one screen when in the Menu, Show Information, Show Description or Guide. Path ends at full screen TV. 15. AUDIO Button Press to display and select the available AUDIO languages in DVD mode. Each time you press the button, the language changes. Note: The audio languages vary from disc to disc. 16. MENU / SETTINGS Button a.) MENU Button Pressing the MENU button in DVD mode will cause the DVD root menu to be displayed. When using the SD card or a USB device, pressing the MENU button will cause the root menu to be displayed. Pressing the MENU button while listening to MP3 files has no effect. The operation is prohibited. Note: Pressing the FLO TV button will disable the DVD, SD, and USB functions. To return to DVD control functions, press the DVD button. b.) SETTINGS Button ( ) *** When in FLO TV mode the Settings button allows the user to toggle on/off the FLO TV setting menu. 17. SYSTEM MENU Button** Press to display and select the available subtitle language in DVD mode. Each time you press the button, the subtitle language changes. Note: The type and number of subtitle languages vary from disc to disc. 18. PAUSE ( II ) Button* Allows the user to pause the playback. Pressing pause again or pressing the Play Button will resume normal playback. 19. PREVIOUS (9) Button* Press to return to the previous chapter or track. 20. STOP (n) Button* Press to stop playback. 12 21. SCAN BACKWARD (7) Button* Press to search in the backward direction. Press repeatedly to change the search speed from 2, 4, 8 and 16 times the normal speed. 22. PLAY (u) Button* Press to activate the play mode when a disc is loaded in the disc compartment. 23. SCAN FORWARD (8) Button* Press to search in the forward direction. Press repeatedly to change the search speed from 2, 4, 8 and 16 times the normal speed. 24. NEXT (:) Button* Press to skip to the next chapter or track. 25. OK Button (ENTER)* Used to implement a selected setting or menu option. 26. CURSOR (pqt u)*** Use these buttons to access menu selections on the screen in DVD mode. Use these buttons for channel changing (up/down), navigating menus and selecting items in FLO TV mode. 27. MODE**/SETUP Button a.) MODE Button ** When in FLO TV mode pressing the MODE button toggles between FLO TV and an auxiliary A/V source attached to the FLO TV module. (NOTE: your system may not have an auxiliary source). b.) SETUP Button When in DVD mode pressing the SETUP button will display the Setup Menu which allows the user to change the DVD player options such as OSD Language, Video, Rating etc. Refer to the settings and adjustment section for more information. Selects an audio / video device connected to the AUX Input or the optional FLO TV module. If you are in FLO TV mode and FLO TV is not Displayed, press the MODE button to access FLO TV. 13 28. INFORMATION Button ( ) *** Pressing this button displays the Channel Info bar and the Program Description. When in FLO TV mode pressing the button opens the Channel Info bar. The second button press while Channel Info bar is displayed will provide program information. To return to the FLOTV program press the button again. 29. CHANNEL GUIDE Button ( )*** When in FLO TV mode pressing this button allows the user to turn the Channel Guide on and off. The Channel Guide opens with the current channel and show title highlighted. 30. ZOOM Button Press this button to enlarge the picture when playing a DVD disc. Press ZOOM button DVD Player perform Once Enlarge the picture 2 times of the original size Twice Enlarge the picture 3 times of the original size 3 times Enlarge the picture 4 times of the original size 4 times Picture is returned to original size 31. MUTE Button* Press this button to mute all the audio. Pressing the button again restores the sound to the previously set level. 32. DAY / NIGHT Mode Button** Function not available in this model. 33. PIX Button (Picture Select)* Each time this button is pressed, the on screen picture adjustment displays the “adjustment bar” for BRIGHTNESS, CONTRAST, COLOR, TINT or RESET. Once the desired adjustment bar is displayed, use the VOLUME (+) / VOLUME (-) button to adjust the setting. The display will automatically turn off if no adjustments are made within 6 seconds. 14 34. VOLUME DOWN (-) or UP (+)* Press to select the level of the picture adjustments when the unit is in picture adjustment mode or to increase or decrease the volume for the wired headphones. 35. NUMBER Buttons When in DVD mode these buttons allow the user to enter numbers 0 to 9 for selection of CD tracks, DVD Chapters and password. When in FLO TV mode these buttons allow the user to select favorite channels and are also used for PIN entry for parental controls. *** 36. DVD Source* This button is only active when remote control is in DVD mode. Each time the button is pressed one of the sources (DVD, Card Reader and USB) will be selected.. Press to change source in the sequence of DVD > SD > USB. 37. EJECT () Button This button is used to eject the disc. NOTE: This function is not available on this model. Use the eject button on the DVD player. 15 SETTINGS AND ADJUSTMENTS The Setup Menu contains features and options that let you customize your DVD player. For example, you can set a language for the onscreen display or control DVD playback content for children. You can use the remote control or the touch screen to navigate the setup menu. Using the DVD Setup Menu The Setup Menu can be accessed using either the remote control or the touch screen. To access the Setup Menu using the touch screen you must have a DVD in the unit and be in DVD Mode. The remote control can access the DVD Setup Menu by pressing DVD and SETUP. Language Vi deo Language : English Subtitle : Off Audio : English Rating Misc Touch Screen: 1. Touch the touch screen to bring up the DVD control menu. 2. Touch the (tool) icon to bring up the DVD Setup Menu. 3. Touch any of the four settings (Language/Video/Rating/Misc) to access the submenu for that item. 4. Touch the submenu item on the right side of the screen to select it, a submenu will appear. Touch the submenu item to select it. 5. Touch the RETURN icon to return to the DVD movie. Note: The cursor keys at the bottom of the screen can be used to navigate through the touch screen menu. Remote Control: 1. Press DVD and SETUP on the remote control to bring up the DVD Setup Menu. 2. Use the UP/DOWN buttons to select any of the four settings (Language/Video/Rating/Misc) to access the submenu for that item. 3. Use the RIGHT ARROW button to highlight the desired menu item. A submenu will appear. Use the UP/DOWN arrow button to highlight the desired submenu item. Press the OK key to set the item. 4. Use the LEFT ARROW button to return to the settings on the left. 5. Use the SETUP button on the remote control to exit the DVD Setup Menu and return to the movie. Language LANGUAGE SETUP Language Subtitle Vi deo Language for On-Screen Display OSD MENU: The OSD MENU setup allows you to select the language for the on-screen display. The user can either select English, French, Spanish, German or Italian for the OSD language. 16 Rating Misc Audio ü English French Spanish Ge rma n Italian SUBTITLE SETUP Language Select "SUBTITLE" using pqbutton, then press ubutton to enter the Sub menu. Select the subtitle you desire using pqbutton, then press OK / to confirm the setting. Press tbutton to return. Note: The subtitle selection is only available for discs that are recorded in the above listed languages. If the selected, language is not available, the player will play and display on the screen the original language contained in the disc. Language ü English French Spanish Ge rma n Italian Japanese Thai Chinese Of f ü English French Spanish Ge rma n Italian Japanese Thai Chinese Of f ü 4:3 16 : 9 ü NTSC PAL Subtitle Vi deo Audio Rating Misc AUDIO SETUP Select "AUDIO" using pqbutton, then press ubutton to enter the Sub menu. Select the audio you desire using pqbutton, then press OK / to confirm the setting. Press tbutton to return. Note: The audio selection is only available for discs that are recorded in the above listed languages. If the selected, language is not available, the player will play and display on the screen the original language contained in the disc. Language Language Subtitle Vi deo Audio Rating Misc VIDEO SETUP TV Display The TV DISPLAY setup allows you to adjust screen setting (aspect ratio) from 4:3 or 16:9. Depending on the DVD format, the screen will appear full or with black bands. Language TV Di splay TV Ty pe Vi deo Rating Misc TV Type The TV Type setup allows you to select the system to fit to the color system of the TV to be connected. NTSC - Select this type for NTSC TV PAL - Select this type for PAL TV Language TV Di splay TV Ty pe Vi deo Rating Misc 17 RATING SETUP Parental Control Language Parental control : Adult Set Password Vi deo This item allows you to limit the content of movie playback from G to Adult. The lower the value, the more strict the control. 1. G 2. PG 3. PG – 13 4. R 5. NC – 17 6. Adult The rating level can only be changed when the correct password is provided. For first time use to change the parental control, use cursor u button to enter parental mode. Press OK / and key in the default password (3308) and press OK / . Press OK / button again to select the parental level, select the level and press OK / . Rating Mi sc Language Parental control : Adult Set Password Vi deo Enter Password Rating 1 2 3 4 Mi sc 7 8 9 0 5 6 DEL Change Password To change the password to your own password select “Set Password” mode and press OK / . Enter the default password (3308) and press OK / . Press OK / button again and key in a new four digit password. A prompt will appear to “Confirm Password” Enter the new password again and press OK / . You will then see a prompt that states “Set Password Successful”. Note: The Default Password is 3308. This password is always effective even after you have selected your own password and changed it. To avoid the possibility of others using the default password to set the parental level and change the password, you can record this default password in another area and delete it from this manual. Playback of some discs can be limited depending on the age of users while some discs cannot. 18 Misc SETUP Select "MISC” using pq button, then press u button to enter the Misc menu. Select the option you want to change using pq button, then press “OK” / . Language Use De fault Settings Screen Sa ver Vi deo Rating Use Default Setting This option allows you to reset all options to settings. * This function will not affect the Rating control settings. Do you wa nt to us e de fault setting ? Yes Misc Screen Saver This option allows the operator to set the Screen saver mode. ON -Screen saver will appear OFF -Screen saver will not appear Note: The DVD player will enter Screen Saver mode if the unit is inactive for approximately 2 minutes. Touch Cal This option allows you to calibrate the touch screen. Select ‘TOUCH CAL” and press OK / . Use the q button to select ‘YES”. Press OK/ . Touch each of the panel calibration symbols (+) on the panel’s four points. Once the four points have been touched the unit will display “CAL OK” or “INVALID CAL”. If the calibration is invalid, repeat the procedure until the prompt “CAL OK” is displayed. After the calibration, the new record will overwrite the old one. Language No Use De fault Settings Screen Sa ver Vi deo Touch Ca l Off ü On Rating Misc Language Use De fault Settings Screen Sa ver Vi deo Touch Ca l Rating Misc Playing DVDs 1. Press the DISPLAY button on the remote control to display the status banner. The banner includes title, chapter, angle, audio, subtitle, tittle selection and chapter selection . 2. Title Selection Press numeric (0~9) buttons to initiate a change of title selection. Then press OK button to implement the selection. 3. Chapter selection Press numeric (0~9) buttons to initiate a change of chapter selection. Then press OK button to implement the selection. 19 : On Touch Ca l Off ü No Yes Playing MP3 Discs MP3 is a format for storing digital audio. An audio CD-quality song can be compressed into the MP3 format with very little loss of quality, while taking up much less space. CD-R discs that have been encoded in MP3 format can be played on DVD player. The DVD player plays the songs in the order they were burned on to the disc. When playback is started the elapsed time of the track that is playing will be displayed. Selecting Folders and Songs When a device containing MP3 files is loaded in the player, the navigation menu appears automatically. 1. Press p or q to move the highlight to the desired folder (if present) on the left side of the menu and press OK. The songs in the folder will be displayed on screen. 2. Press p or q to move the highlight to the desired track containing the song and press OK to begin track playback or touch on the track title on the screen. Skipping Songs Use the Next (:) button on the remote control to move to the next song. Use the Previous (9) button to move to the previous song. Selecting a Play Mode 1/15 00:00:59 Filter Track 001 Filter (For MP3 & JPEG only) Track 002 Filter Mode enables or disables the display of files contained on the media based on their file extension. Track 003 Mo de Track 004 Track 005 Select Track 006 Program Mo de The filter function applies to the following formats: Audio - Audio data format (MP3, WMA) Photo - Photo data format (JPEG) Video - Video data format (MPEG , ) Repeat 1/15 00:00:59 Filter Track 001 Track 002 Track 003 Repeat ü ü ü Mo de Track 004 20 Track 005 Select Track 006 Program Mo de Audio Photo Vi deo Repeat: Repeat function has 4 options : Off, Single, Folder, All. Move cursor to Repeat function and press OK / . Each time OK / is pressed the unit will cycle through the available options. Off/Single/Folder/All are displayed in that order. Repeat default is Off; 1/15 00:00:59 Filter Track 001 Track 002 Repeat Track 003 Mo de ü Off Single Folder All Turn off repeat function Repeat the song being played until STOP is pressed. Play all songs in a folder repetitively Play all songs on the disc repetitively Track 005 Select Track 006 Program Mo de Mode: play mode The Mode function has 4 options: Normal, Shuffle, Random and Music Intro. Move cursor to the Mode function area and press OK / repeatedly till the desired mode is displayed. Normal/Shuffle/Random/Music Intro are displayed in that order. The Mode function default is Normal. 00:00:59 1/15 Normal: Play all songs in folder once. Track 001 Shuffle: Play songs in a folder in a shuffle order. Each song in the folder is played only once. Track 002 Track 003 Random: Play songs in a folder in a random order. Each song in a folder is played only once. Track 004 Track 005 Music Intro: Play each song in order in the folder for 10 seconds. The purpose of the Music Intro Track 006 function is to provide a sample of each song for 10 seconds, thereby making it easy to select and listen to a favorite song. Off Single Folder Track 004 All Filter Repeat Mo de ü Norma l Shuffle Select Random Program Mo deIntro Select: Set the select mode to Off or On for selected songs. 1/15 00:00:59 Filter Track 001 Track 002 Track 003 Repeat Mo de Track 004 21 Of f Track 005 Select Track 006 Program Mo de ü On Program Mode: Add Set the “Select Mode“ to ON. Select the desired songs from the song list on the left side of the screen. A check mark will appear next to the song. Touch “Program Mode”and select “Add”. Touch “Program” to view the play list. Press the “Play” to hear the play list. 1/15 00:00:59 Filter Track 001 Track 002 Track 003 Mo de Track 004 Track 005 Track 006 Program The selected songs that are added into a new play list will be displayed. Repeat Select Program Mo de Clear üAdd Browser Program Browser Touch “Browser” to see the songs contained on the disc. Clear Move cursor to the selected song in the play list and select the songs which you want to delete. Touch “Clear”. The selected songs will be deleted from the play list. NOTE: Disc playback should be off when selecting or deleting a song from the play list. 22 Region 1- USA, Canada Region 2- Japan, Europe, South Africa, Middle East, Greenland Region 3- S. Korea, Taiwan, Hong Kong, Parts of South East Asia Region 4- Australia, New Zealand, Latin America (including Mexico) Region 5- Eastern Europe, Russia, India, Africa Region 6- China DVD Region Code The DVD player is preset to a region code at the factory depending on where the DVD player is sold. DVD from a different region cannot be played in this unit and the unit will display "WRONG REGION”. 23 DVD Basics To get the optimum use out of the DVD section, make sure you read this section completely. Types of Discs your DVD will play • DVD* disc - DVD discs which contain video. • Audio disc - Audio CDs contain musical or sound content only. • MP3 disc - A disc that contains audio files (for example, a CD-R with downloaded MP3 files). * This system is capable of playing most recordable DVD formats. However, due to the variety of disc manufacturers and software, playback cannot be guaranteed. Loading and Playing Discs Before you load a disc, make sure that it is compatible with the player. Insert the disc with the disc label facing toward the driver. Note: the following Discs CANNOT be used with this player : • MiniDisc • Laserdisc • CD-1, CD-ROM, DVD-ROM, Super Audio CD (SACD), DVD Audio, JPEG (KODAK), BD (Blu-ray Disc) To load and Play a Disc Press the Power button to turn the unit on. Select DVD mode and insert the disc (label facing toward the driver) into the disc compartment. Push down gently on the disc and the player will pull the disc in. Audio / Video Inputs and Outputs Audio Output The Audio output will provide the Audio signal from the M1 unit. This output can be heard on the Built-In Wireless Modulator. 24 TROUBLESHOOTING SOLUTION PROBLEM IR sensor inoperative Verify that the batteries in the remote are fresh. Verify that the remote sensor eye is not obstructed. Verify that M1 or M2 has been selected correctly. Disc won't play Disc is scratched or damaged. Try another disc. Check the type of disc you put into disc tray. This unit only plays DVDs, audio CDs and MP3s. Both the unit and the disc are coded by region. If the regional codes don’t match, the disc can’t be played Verify that the disc label is toward the driver. Play starts, but then stops immediately Picture pixelates or plays intermittently The disc is dirty. Clean it. Condensation has formed. Allow player to dry out. Disc is scratched, replace the disc. 25 TROUBLESHOOTING SOLUTION PROBLEM No sound or distorted sound Make sure your DVD is connected properly. Make sure all cables are securely inserted into the appropriate jacks. Disc loaded backwards, turn disc around so that the disc is facing towards the driver. OSD Displays “Incorrect Disc Format” Disc loaded backwards, turn disc around so that the disc label is facing towards the driver. Touch screen operation is erratic Re-calibrate the touch screen. Refer to page 19. FLO TV not functioning See Troubleshooting Guide at the end of Appendix A. Technical Support 1-800-645-4994 26 CAUTION 1. Keep the monitor clean and dry. 2. Always seek qualified personnel to perform repairs. Never attempt your own repairs. 3. Do not drop the monitor or expose to strong impacts. 4. Do not expose to direct sunlight for extended periods of time. MONITOR SPECIFICATIONS 1. Type :TFT Active Martix LCD 7. Operating Temperature : 32°F ~ 125°F (-0°C ~+52°C) 2. Resolution : 1440(W) x 234 (H) 8. Storage Temperature : -22°F ~ 150°F (-30°C~ +70°C) 3. Pixels : 336, 960 9. Video Display System : NTSC 4. Back Light : Edge Light Tube 10. Backlight life : 10,000 hours 5. Power Source : +12 VDC 11. Headphone Audio Output : 0.03W @ 32 ohm 6. Power Consumption : 28W 27 APPENDIX A FLO TV Copyrights and Trademarks © 2009 Audiovox Corporation. All rights reserved. FLO, FLO TV and the FLO TV logo are trademarks of QUALCOMM Incorporated. QUALCOMM is a registered trademark of QUALCOMM Incorporated in the United States and may be registered in other countries. AUDIOVOX is a registered trademark of Audiovox Corporation. ADVENT is a registered trademark of Audiovox Corporation. MACROVISION is a registered trademark of ROVI Corporation. This item incorporates copy protection technology that is protected by U.S. Patents and other intellectual property rights of ROVI Corporation. Reverse engineering and disassembly are prohibited Technical Information The FLO TV ™ service operates on UHF channel 55 (720 MHz) and is multicast from terrestrial towers. Coverage will vary and reception is dependent upon the FLO TV module in your vehicle being within range of the towers. Coverage area can be viewed on the FLO TV web site (www.flotv.com). The FLO (Forward Link Only) TV service is transmitted over the FLO TV ™ network and received by the FLO TV module in your vehicle. Along with the television program material, data is transmitted for the program guide and is updated on a regular basis. If you are out of the coverage area the program guide will be updated when the vehicle returns to the coverage area. This product incorporates copyright protection technology that is protected by U.S. patents and other intellectual property rights. Use of this copyright protection technology must be authorized by Macrovision, and is intended for home and other limited viewing uses only unless otherwise authorized by Macrovision. Reverse engineering or disassembly is prohibited. 28 FLO TV OPTION (AVXFRK1 / ADVFRK1) Your HR7010PKG is designed for adding an optional FLO TV Tuner. If you do not have the FLO TV Tuner installed, this section can be ignored. To have the FLO TV Tuner added to your system contact the business that installed your HR7010PKG. Activation/Subscription Information Your FLO TV module will need to be activated before you can begin enjoying the FLO TV service. Activation takes place after you subscribe to the FLO TV service. To activate the FLO TV module, call 1-888-99FLOTV (1-888-993-5688). You may also activate on line at www.flotv.com. You must be over the age of 13 to activate your subscription. You will need the following information before you can activate your subscription: 1. 2. 3. 4. 5. 6. Activation Instructions Card Device ID Number Authorization Code A valid credit card AMEX/MC/VISA (have your credit card information ready when you call) Note: The credit card will be used to verify your account and will not be charged if service was included with your product purchase. An active email address Billing information (Home/business address linked to your credit card) To locate your Device ID and Authorization Code turn on the overhead video display in your vehicle and set the source to FLO TV. Press the FLO TV button on the remote control view FLO TV. Press the (Settings) key on the remote to access the Settings Menu. Press the q (down arrow) key to highlight Subscription Information and press the ENTER key on the remote. Your Device ID and Authorization Code will be displayed on the overhead screen. Write these numbers down before calling FLO TV. The FLO TV module is activated over the air and your vehicle must be within the coverage area and running. Keep the vehicle on and powered for about ten minutes after you have activated the unit with FLO TV Services for the activation to take place. Test your FLO TV to make sure that you are subscribed and all channels work prior to shutting off the vehicle. 29 FLO TV Introduction Please refer to the following as an overview to use the FLO TV service: 1. Turn the vehicle ignition key to the ON position. Turn on your HR7010PKG and select the FLO TV source by pressing the Source button on the overhead or by pressing the FLOTV Button on the remote. (Note: Watching the FLO TV service for an extended period of time with the engine OFF will run down the vehicle's battery.) 2. The HR7010PKG screen will show the FLO TV splash screen which will appear for about 30 seconds and then the FLO TV preview channel or the last channel that was being viewed. 3. Press the ▲ (up arrow) or ▼ (down arrow) key on the remote to change channels. 4. Press the (Guide) key on the remote to access the FLO TV Channel Guide. 5. The arrow keys (pqt u) on the remote allow for navigation through the Channel Guide. 6. Press the ENTER key on the remote to select a desired channel/show from the Channel Guide. 7. Press the (Information) key on the remote to display the program information related to the current program. 8. Press the (Settings) key on the remote to access the FLO TV user settings menu (e.g. Parental Control, etc.). 9. The Mode key on the remote allows the user to switch between the FLO TV service and an auxiliary A/V source if one is connected. 10. Visit www.flotv.com for more info. Controlling the FLO TV Module with the HR7010FR headrest system FLO TV can be selected and controlled by either the M1 or the M2 headrest by selecting the OSD (On Screen Display) FLO TV icon or using the wireless remote control. If using the remote control, for the M1 monitor, press the M1 button on the remote control and press the FLO button. The remote control can then be used to change channels, navigate the FLO TV Guide and control other functions. For the M2 monitor press the M2 button and the FLO button to access FLO TV. When not using FLO TV press the DVD button to return the remote control to DVD mode. Note: FLO TV is on a first come, first served basis. If M1 is used to select FLO TV then all controls for FLO TV are done by the M1 monitor (or M1 remote control). The M1 touch screen can control channel up and channel down. If M2 is used to select FLO TV then all controls for FLO TV are done by the M2 monitor (or M2 remote control). The M2 touch screen can control channel up and channel down. Both monitors can watch FLO TV at the same time but only one monitor can control FLO TV. If you do not have the FLO TV option installed the FLO TV icon on the main menu will not appear and will be replaced by AV. 30 FLO TV Operation You can operate the FLO TV module with the wireless remote control. When FLO TV is powered on, the FLO TV logo screen will be displayed until the receiver tunes to a channel. This may take up to 30 seconds after the vehicle and overhead turned on. Upon power up, the FLO TV service will default back to the last viewed channel. If the screen does not appear press the Mode key on the remote control to switch back to FLO TV. Are You Subscribed? If you are not subscribed to FLO TV a Preview Channel will be displayed. Changing to another channel will display a screen similar to the adjacent one. (Note: Screen background in this example has diagonal bars in it) Some channels may not be available for viewing if they are not included in the FLO TV service package you are subscribed to. 31 Are You Covered? FLO TV service coverage is available in many metropolitan areas and travel corridors within the United States. Please visit the FLO TV web site (www.flotv.com) to check the coverage maps in your area. If you are travelling in an area that is not covered by the FLO TV network or travel out of the areas covered by the FLO TV network the adjacent screen will be displayed: Once you have returned to an area covered by the FLO TV network, FLO TV programming will resume. If you are planning a trip, check the FLO TV web site (www.flotv.com) to see if your route is within the FLO TV network coverage area. 32 Remote Control Functions Function Symbol Use for channel changing (up/down), navigating menus, and selecting items pqtu OK (ENTER) Use to select a channel or setting Information key - use to display program information. Channel Guide - use to select the channel guide Back key - takes the user back one screen when in the Menu, Show Information, Show Description, or Guide. Path ends at full screen TV Number keys - use to select favorite channels and for PIN entry for parental controls 1,2,3,4,5,6,7,8,9,0 Settings key - allows the viewer to toggle on/off the FLO TV settings menu Mode key - toggles between FLO TV and an auxiliary A/V source (Note: Your system may not have an auxiliary source) 33 MODE How is FLO TV Programming Rated? Parental controls are built into FLO TV so that you can filter the program and movie content that can be watched on the FLO TV service. Adjacent is a ratings chart based on content type for TV program material and movie material: Movie ratings information, if provided, is available in the FLO TV programming guide. Audio content can be restricted as well based on the adjacent chart: Notes o o o o o Unrated content (NR) does not have a rating exposed in the user interface, and the rating string value will be blank when this occurs. FLO TV blocks or allows unrated programs based on whether the unrated program is allowed to play with Parental Controls enabled. Specific programs identified as most restrictive must challenge the user to enter the PIN, even if parental controls are turned on at the least restrictive level. Specific programs identified as least restrictive must NOT challenge the user to enter the PIN, even if parental controls are turned on at the most restrictive setting. If the correct PIN is entered, the restrictive content can be displayed. 34 Getting Around in FLO TV Watching the FLO TV service limits the channel information or pop-ups occurring while viewing the program as shown on the adjacent screen: If you want to see what channel you are on, press the adjacent screen and information will appear: o o o o o (Info) key and the Channel Logo Program Title Program Start Time Program End Time Program rating 35 Pressing the (Info) key again will display more information about the channel being viewed as shown in the adjacent screen: Information displayed: o o o o o o o Channel Logo Program Title Program Start Time Program End Time Program Rating Episode Title Episode Summary Pressing the (Info) key will return the viewer to the full screen. 36 FLO TV Program Guide You can access the FLO TV program guide by pressing the which displays the program guide: (Guide) key The FLO TV program guide is a matrix of programs and their start times, organized by channel. A user can view the guide and tune to a currently playing program or view program descriptions for future programs. The following information generally is displayed: o o o o o o o o o FLO TV Logo Current Time Current Day Guide Day Guide Time Channel Logo Program Title Parental Block Icon (lock symbol) More Icon u 37 Notes ! Programs that are blocked due to Parental Controls display the locked icon. ! The channel logo column is not selectable. ! The guide loops vertically when you press the ▲ (up arrow) or ▼ (down arrow) key. ! The guide is bounded horizontally by time. The user cannot navigate into the past or beyond the amount of guide data available. ! Current program tuned is designated by darker cell color and vertical right color bar when not in focus. ! Guide Day refers to the day within the guide data the user is currently viewing. ! Guide Time refers to the time within a particular day of guide data the user is currently viewing. These values change as the user scrolls right and left through guide data. ! Current Day and Current Time are independent of Guide Day and Guide Time. ! The More u Icon is visible when a show's length extends beyond the bounds of the current guide view. They are visible when going forward in time and going back in time. 38 Settings Menu Press the (Settings) key to enter the Settings Menu and the adjacent screen will be displayed: Parental Controls In the Settings Menu, the first selection is Parental Controls, which is highlighted in light gray. Press the ENTER key to access the parental controls menu. The adjacent following screen will be displayed: 39 Use the u (right arrow) key to highlight the parental on/off control and press OK to enable it or disable it. Once enabled, press the OK key and you will be prompted to create a PIN (Personal Identification Number) as shown in the adjacent screen: Use the remote control keypad to enter a 4 digit PIN. When the fourth digit is entered the adjacent screen will appear to confirm the new PIN. 40 Re-enter the same 4 digit PIN to confirm the PIN number. The adjacent screen will be displayed: (NOTE: Write the PIN down in a secure location. If it is lost you will have to call 1-888-99FLOTV to reset the PIN. The PIN cannot be reset online. Do not share your PIN with the person whose access to programming is being restricted.) Once you have set your PIN, you can now change the ratings limit on TV, Movies and Audio content. To change the ratings: Use the q (down arrow) key to highlight TV Rating, Movie Rating or Audio Limit or Restricted Channels and press the OK key on the remote control. The adjacent screen will appear: Use the u (right arrow) and t (left arrow) key to change the TV rating. Once you get to the rating you want, press the OK key to select it. Press the (Back) key to return to TV viewing. 41 Favorite Channels Up to 10 channels can be programmed into the numeric keys on the remote. Once they are programmed, pressing any one of them tunes your FLO TV to the channel that you have pre-programmed to the number key. If you have not pre-programmed favorites, when you press a numeric key, you will be prompted by the info bar at the bottom of the screen asking you if you want to add the channel to your favorites: To program favorite channels press the (Settings) key to access the settings menu. Use the ▼ (down arrow) key to highlight Favorite Channels and press the ENTER key. The adjacent screen will appear which lists each channel available on the FLO TV service. Use the ▲ (up arrow) or ▼ (down arrow) key to highlight a channel and press a numeric key to set the highlighted channel to a favorite. In the example below, the Nickelodeon channel is set to the number 1 key. Once you are back watching the FLO TV service you can press a number key to quickly access your favorite channels. Up to 10 channels can be programmed with the numeric keypad (0-9). 42 Subscription Information In the Settings Menu, use the ▲ (up arrow) or ▼ (down arrow) key to highlight Subscription Information and press the ENTER key, the adjacent screen will be displayed: This screen tells you the basic information of your FLO TV system. (Note: The Authorization Code and Device ID will be different from the above screen, which is for reference only.) System Information In the Settings Menu, use the ▲ (up arrow) or ▼ (down arrow) key to highlight System Information and press the OK key, the adjacent screen will be displayed: This screen tells you the signal strength of the FLO TV signal. If you are having reception problems, go to this page to see if the FLO TV signal is available at your location. (Note: The Device ID will be different from the adjust screen, which is for reference only.) 43 Legal Information Use the ▼ (down arrow) key to highlight Legal Information. This information governs the terms and conditions of your use of the FLO TV service and the FLO TV network. To see the full text and the privacy policy go to www.flotv.com. 44 Troubleshooting Explanation FLO TV Screen Observed You are not subscribed and are not able to access any channel except the FLO TV channel. Unable to access any channel; you are out of the coverage area. You are either out of the coverage area or your FLO TV module has not updated the program guide information. The FLO TV Service will return to normal when you are back in the coverage area. 45 Troubleshooting (cont’d) FLO TV Screen Observed Explanation You are in a fringe coverage area; programming will return to normal when you are back in the coverage area.. You are out of the coverage area; programming will return to normal when you are back in the coverage area. Contact the car dealer or the retailer where this product was installed or purchased. 46 Troubleshooting (cont'd) Problem Poor or No Video Root Cause FLO TV Input not selected Solution Change the source inputs on the overhead until the FLO TV signal is displayed. Wireless Remote Control does not work Batteries installed incorrectly Verify that the two AAA batteries are installed properly per the polarity markings. Batteries are dead Replace the two AAA batteries. Customer Care - This number is for questions about the FLO TV Service and is not for the HR7010PKG Call 1-800-99FLOTV (1-800-993-5688) For questions about the HR7010PKG call 1-800-645-4994. 47 48 © 2010 Audiovox Electronic Corp., Hauppauge, NY 11788 128-8770