1
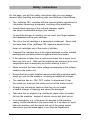
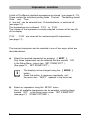
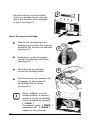
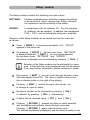
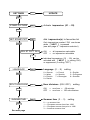
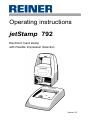
Operating instructions
jetStamp 792
Electronic hand stamp
with Flexible Impression Selection
Version 2.2
© 2003 Ernst Reiner GmbH & Co. KG
All rights reserved. Translations, reprints, or any other form
of reproduction of this manual, even in part and regardless of form,
require prior written permission.
This operating instruction is subject to change without prior notice.
It has been compiled with the utmost care and diligence, however
we cannot assume any form of liability for errors or omissions or for
damage resulting from them.
2
Table of contents
Safety instructions ....................................................................................... 4
Control elements ......................................................................................... 5
Commissioning ............................................................................................ 6
Display zones and button functions .............................................................7
Impression selection ....................................................................................8
Stored impressions ......................................................................................9
Customer-specific impressions ...................................................................11
Setting time and date ..................................................................................12
Setting numbering device or figures ...........................................................13
Setting pre-texts ...........................................................................................
15
Stamping ......................................................................................................
16
Changing the ink cartridge ...........................................................................
17
Setup module ...............................................................................................
19
Description of the Setup module ............................................................... 20
Troubleshooting ...........................................................................................
24
Reset button .................................................................................................
24
Sales and Technical Service .......................................................................25
Technical data .............................................................................................26
i
=
Information / Notice
=
Caution
=
Safety hints
Note
!
Warning
Safety instructions
On this page, you will find safety instructions that you must always
observe when handling and working with your Electronic Hand Stamp
•
The jetStamp 792 complies with the relevant safety regulations for
information technology equipment, including office machinery
•
Unauthorised opening of the unit and improper repairs
can cause considerable danger (fire hazard)
To avoid the danger of crushing, do not insert your finger between
the baseplate and the print carriage
•
The ink in the ink cartridge is a hazardous substance! Never hold
the lower face of the jetStamp 792 against a person's face
Keep ink cartridges out of the reach of children
•
Transport the machine only in its original package or other suitable
package that provides protection against shock and impact
•
If the machine is taken from a cold environment into a warm room,
dew may form on it. Wait until the machine has warmed up to room
temperature and is absolutely dry before starting to use it
•
Make sure that the local mains voltage corresponds to the voltage
stated on the mains unit
•
Ensure that the locally-installed mains socket with protective earth,
which you use for the machine, is readily accessible at all times
•
The machine has no ON / OFF switch; to disconnect it from
the mains you must pull the mains unit out of the mains socket
•
Arrange the connection leads so that they do not create
a hazard (danger of tripping) and cannot be damaged
•
Take care that no objects (e.g. necklaces, paper clips, or liquids)
fall into the machine - danger of electric shock and short circuit.
•
In an emergency, e.g. in the event of damage to the machine
casing, control elements or the mains lead, or if an object or liquid
falls into machine, pull the mains unit out of the mains socket
and inform your the sales agent or our Service Department
4
Control elements
9
3
2
4
5
6
7
1
8
1
2
3
4
5
6
7
8
9
=
=
=
=
=
=
=
=
=
Base station
jack bush for power supply
Trigger
Display
Buttons
Locking rail for ink cartridge
Ink cartridge
Locating tab
jack bush for remote triggering
5
Commissioning
Unpack the stamp, connect the mains unit to jetStamp 792, plug in
the mains unit and switch on the power supply.
Note:
Use only original REINER components!
Place jetStamp in the base station, take care of the following points:
•
Engage the notch (8) and place jetStamp in the base station
•
When jetStamp 792 is connected to power, the stamps data like
date and time can be set for starting the stamp. After 5 minutes
being connected to power a power-off indicator will become effective.
•
In case of a power failure an empty battery logo will be indicated
on the display. Date and time are only stored for a short while.
At the same time the triggering of the stamp, the buttons and data
transmission are disabled. The menu bar (see p. 7) is also extracted.
•
Avoid exposing the jetStamp to direct sunlight.
For permissible ambient temperature, see page 26, 'Technical data'
Installing ink cartridge:
Press [ MODE ] if necessary repeatedly, until the menu item
“INKJET” appears in the lower line of the display (menu bar)
Press [ INKJET ] : For easier handling, the print
carriage moves automatically to the centre of its travel
Take the ink cartridge out of its packing (follow the manufacturers
instructions!)
Press the locking rail (6) to the rear and insert the ink cartridge
into the print carriage with its grip (7) towards you
Pull the locking rail (6) forwards again until it engages
Press [ INKJET ] to transport the print carriage back
to its start position
6
7
8
6
Display zones and button funcitons
The display is divided into three zones:
A
The top line is the status line.
On the left is the number of the impression selected (P:01 ... P:29) .
To the right of that, if the impression includes numbering, is the
repetition setting (e.g. R:02/02) .
At the right of the top line is the battery symbol, showing the state
of charge of the battery.
B
The middle of the display shows the impression currently
selected on one or two lines.
C
The bottom line of the display contains the menu bar.
The menu items and commands displayed here can be selected
by pressing the appropriate button.
D
Below the display there are four buttons.
Each button is associated with the menu field in the display
immediately above it, i.e. a button function always depends
on the menu or command displayed.
Example of a display:
Pre-text
A
B
C
P : 25
R : 01 / 01
SENT
24. APR
CLOCK
Numbering device
00000000
2006 14 : 47
NO/TXT
NEXT
MODE
D
7
Impression selection
A total of 25 different standard impressions are stored (see pages 9 / 10).
These contain the individual printing fields 'Pre-text' 'Numbering device'
'Date' and 'Time .
A 'pre-text' can be selected from 12 standard texts, or switched off
(see page 15).
The impressions are numbered 'P:01' to 'P:25'.
The number of the impression currently selected is shown at the top left
of the display.
'P:26' ... 'P:29' are reserved for customer-specific impressions
(see page 11) .
The required impression can be selected in one of two ways, which are
described below:
a)
Select the required impression by pressing [ NEXT ]
Only those impressions can be selected that are marked 'ON'
in the Setup Menu (menu item ‘SET STAMP PICT’ ) .
(See page 21, 'SET STAMP PICT' ).
i
Note
b)
8
The display can be changed using the [ MODE ]
button.
Press this button, if necessary repeatedly, until
the menu item “NEXT” appears in the menu bar.
Select an impression using the SETUP menu.
Here, all available impressions can be selected, including those
marked 'OFF' in the Setup menu under 'SET STAMP PICT'
(see page 21, 'STAMP PICTURE' )
Stored impressions
Impressions P : 01 ... P : 04 = pre-text + date
P : 01
RECUD
CLOCK
24. SEP
NO/TXT
P : 03
RECUD
CLOCK
NEXT
2006
MODE
2006 - 09 - 24
NO/TXT
NEXT
MODE
P : 02
RECUD
CLOCK
NO/TXT
P : 04
RECUD
CLOCK
24. 09. 2006
NEXT
SEP
NO/TXT
MODE
24. 2006
NEXT
MODE
Impressions P : 05 ... P : 07 = pre-text + numbering device
P : 05
R : 01 / 01
RECUD
00000000
NO/TXT
P : 07
NEXT
P : 06
R : 01 / 01
RECUD 0 0 0 0 0 0 0 0
MODE
NO/TXT
NEXT
MODE
R : 01 / 01
RECUD
NO/TXT
00000000
NEXT
MODE
Impressions P : 08 ... P : 10 = pre-text + figures
P : 08
RECUD 0000000000
NO/TXT
NEXT
MODE
P : 09
RECUD 0 0 0 0 0 0 0 0
NO/TXT
NEXT
MODE
P : 10
RECUD 000000000000
NO/TXT
i
NEXT
MODE
On selection of one of the impressions P:08 ... P:10 ,
the numbering-device setting is automatically cleared.
Note
9
Stored impressions
Impressions P : 11 ... P : 14 = numbering device + pre-text + date
P : 11
R : 01 / 01
00000000
RECUD 10. SEP
2006
CLOCK
NO/TXT
MODE
P : 13
R : 01 / 01
CLOCK
NO/TXT
NEXT
00000000
RECUD 2006 - 09 - 24
NEXT
MODE
P : 12
R : 01 / 01
CLOCK
NO/TXT
P : 14
R : 01 / 01
CLOCK
NO/TXT
00000000
RECUD
10. 09. 2006
NEXT
MODE
00000000
RECUD SEP 10. 2006
NEXT
MODE
Impressions P : 15 ... P : 19 = pre-text + date + time
P : 15
RECUD
10. SEP 2006
CLOCK
NO/TXT
NEXT
P : 16
14 : 47
MODE
P : 17
RECUD
2006 - 09 - 10
CLOCK
NO/TXT
NEXT
RECUD
10. 09. 2006 14 : 47
CLOCK
P : 18
14 : 47
MODE
NO/TXT
NEXT
SEP
RECUD
10. 2006
CLOCK
NO/TXT
NEXT
MODE
14 : 47
MODE
P : 19
RECUD
SEP 10. 2006 PM 02 : 47
CLOCK
NO/TXT
NEXT
MODE
Impressions P : 20 ... P : 25 = pre-text + numb. device + date + time
P : 20
R : 01 / 01
CLOCK
NO/TXT
P : 22
R : 01 / 01
CLOCK
NO/TXT
P : 24
RECUD
00000000
SEP 10. 2006 PM 02 : 47
R : 01 / 01
RECUD 0 0 0 0 0 0 0 0
10. SEP
2006 14 : 47
CLOCK
NO/TXT
RECUD
10. SEP
00000000
2006 14 : 47
NEXT
MODE
RECUD
00000000
2006 - 09 - 10 14 : 47
10
NEXT
NEXT
MODE
MODE
P : 21
R : 01 / 01
CLOCK
NO/TXT
P : 23
R : 01 / 01
CLOCK
NO/TXT
P : 25
R : 01 / 01
CLOCK
NO/TXT
RECUD
00000000
10. 09. 2006 14 : 47
NEXT
MODE
RECUD
00000000
SEP 10. 2006 14 : 47
NEXT
NEXT
MODE
MODE
Customer-specific impressions
Impressions P : 26 ... P : 29 = customer-specific
P : 26 ... P : 29
------------------------------------NO/TXT
NEXT
MODE
P:26 ... P:29 are intended for individual, customer-specific impressions.
Each impression can have two lines with up to 20 characters in each.
Characters can be entered as follows:
Select impression required (P:26 ... P:29)
Press [ NO/TXT
The top line of the
MODI TEXT 01 =
MODI TEXT 02 =
MODI TEXT 03 =
MODI TEXT 04 =
]:
display shows 'INPUT - MODI TEXT 01'
first entry block (10 characters) in the top line
second entry block (10 characters) in the top line
first entry block (10 characters) in the bottom line
second entry block (10 charac.) in the bottom line
To change from one entry block to the next, press [ NEXT ]
Using [ VARY ] , a block is selected for entry or changing,
you can then enter characters with [ DEC ] or [ INC ]
The following characters are avaibable:
0 ... 9
Ç Ä Å É Æ Ö Ü £ Ø Ñ Á À ¥
A ... Z
Ê È Ó Ú € Í $ & * + , - . / : @
[ RIGHT ] is used to select the next entry position
Press [ RETURN ] to go back to the previous menu
i
Note
The customer-specific impressions P:26 ... P:29 have
the fields Date 2 , Time 2, Numbering device 2 and
Pre-text assigned to them. When using a PC-Set,
the appropriate fields can be individually entered in these
impressions, and then selected for data entry.
If you have any questions, please contact your dealer.
11
Setting time and date
To set the time and date, an impression must first be selected that contains
the date, or date and time as appropriate.
First select an impression that contains the date, or date and time
as appropriate (see also pages 8 and 9).
Press [ MODE ] if necessary repeatedly, until the menu item
“CLOCK” is displayed
Press [ CLOCK ] to select the required menu item
The display shows “INPUT - TIME 1” * and below it
you will see the time currently set
i
This menu may be protected by a password.
In that case the correct password must first be entered.
Note
Press [ VARY ] to select the minutes figures and set the
minutes by pressing [ INC ]
Press [ NEXT ] to select the hours figures and set the
hours by pressing [ INC ]
Press [ RETURN ] and then [ NEXT ] to change
to the date display (display shows “INPUT - DATE 1” *)
Press [ VARY ] to select the year figures and set the year
by pressing [ INC ]
Press [ NEXT ] to change to the month display and use
[ INC ] to set the month
Press [ NEXT ] to change to the days figures and use
[ INC ] to change the setting
Press [ RETURN ] if necessary twice, to exit the menu.
The impression selected will be displayed, and the stamp is ready for use
* When using a customer-specific impression (P:26 ... P:29) ,
you can change to “INPUT - TIME 2 or “INPUT - DATE 2”
at this point by pressing [ NEXT ] (see page 10)
12
Setting numbering device or figures
The numbering device is used for the successive numbering of forms.
Numbering can be increasing or decreasing. Further, various functions
of the numbering device can be coupled together, e.g. repetition, zeroing,
counting, activation of a minimum or maximum value, advance step, etc.
Before the numbering device can be set, an impression, which uses the
numbering device or figures, must be selected (see pages 9 / 10).
Selecting the numbering device:
Press the [ MODE ] button, if necessary repeatedly, until
the menu item “NO / TXT” appears in the menu bar.
Pressing [ NO / TXT ] then activates the menu.
i
This menu may be protected by a password. In that case
the correct password must first be entered.
Note
Depending on the impression selected, the following functions may be
available. By pressing [ NEXT ] , you can scroll through them.
¥ INPUT - REPETITION = for setting the repetition factor
¥ INPUT - NUMBERER 1 or INPUT - NUMBERER 2 * =
for entering the starting point of a numbering device
¥ INPUT - PRE TEXT = for selecting the pre-text
¥ INPUT - NUMBER 1 or INPUT - NUMBER 2 * = for setting figures
* These functions are only available with a customer-specific
impression (P:26 ... P:29), which has been prepared using PC-Set
Setting the repetition factor (INPUT - REPETITION):
Press [ NEXT ] if necessary repeatedly, until the display
shows “INPUT - REPETITION”
Press [ VARY ] to select the units position of the entry
Set the units position by pressing [ INC ] to increase
the setting, or press [ DEC ] to reduce it
By pressing the [ LEFT ] button, you can move to the tens
position, which can also be set with [ INC ] or [ DEC ]
Press [ RETURN ] to exit the setting
13
Numbering device - setting starting point or figures :
Press [ NEXT ] if necessary repeatedly, until the display shows
“INPUT - NUMBERER 1”
“INPUT - NUMBER 1” or
INPUT - NUMBER 2 *
INPUT - NUMBERER 2 *
* Only available with a customer-specific impression (P:26 ... P:29),
which has been prepared using PC-Set
Press [ VARY ] to select the first position of the entry
Set this digit by using [ INC ] to increase, or [ DEC ] to decrease it
With the [ LEFT ] and [ RIGHT ] buttons, you can move to the
other positions. They can be set using [ INC ] and [ DEC ]
To exit the setting press [ RETURN ]
Press [ RETURN ] again to exit the menu. The selected
impression is displayed again, and jetStamp is ready for use
Numbering device - additional functions
Increasing and / or decreasing numbering between limits.
Press [ MODE ] if necessary repeatedly, until the following functions
appear in the menu bar:
[ N1 MAX
]
[ N1 MAX ]
[ N1 MIN
=
=
]
=
upper limit is activated (pressing this button again
displays the upper limit)
upper limit is de-activated
[ N1 MIN ]
=
lower limit is activated (pressing this button again
displays the lower limit)
lower limit is de-activated
[ N1 CLR ]
=
all limits de-activated
[ COUNT ]
=
increases or decreases the counter reading by one step
[ CLEAR ]
=
sets the counter back to the limit
For further notes on additional numbering-device functions, see page 22
14
Setting pre-texts
There are 12 different standard pre-texts stored in the stamp for each
language. The set pre-text (or blanks if pre-text is switched off) is printed
with all standard impressions which include a pre-text.
The following standard pre-texts are stored :
RECUD
SENT
FILE
_____
INU.
ORDER
ENT.D
( = pre-text switched off)
DRAFT
PAID
RECPT
FAX
ORIG
REG.D
To select a pre-text proceed as follows:
Press [ MODE ] if necessary repeatedly, until
“NO / TXT” appears in the menu bar
Press [ NO / TXT ] to select this menu item
i
Note
This menu may be protected by a password. In that case
the correct password must first be entered.
If you need more information, please contact your dealer.
Depending on the impression selected, the display will now offer
entry of the numbering device ( = INPUT - NUMBERER 1),
the repetition factor ( = INPUT - REPETITION)
or the pre-text ( = INPUT - PRE TEXT)
Press [ NEXT ] if necessary repeatedly, until the display
shows “INPUT - PRE TEXT”
Pressing the [ VARY ] button will cause the present pre-text
to be shown blinking
Press the [ NEXT ] button, if necessary repeatedly, until the
required pre-text appears
Press [ RETURN ] to accept this pre-text
Press [ RETURN ] again to exit the menu. The selected
impression will be displayed again, and the stamp is ready for use
15
Stamping
Stamping will be triggered by pressing the red trigger, which is located
in the grip.
Depending on the impression selected, the impression will have one
or two lines. The position of the two lines, relative to the base of the
stamp, can be seen in the illustration below.
i
Note
Stamping may be protected by a password. In that case
the correct password must first be entered.
To block stamping again, press [ MODE ] repeatedly
until 'CLOSE' appears in the menu bar.
Pressing [ CLOSE ] will block stamping.
If you need more information, please contact your dealer.
• The ink in the ink cartridge is harmful!
Never hold jetStamp gainst a person’s face!
• The cable lenght of an external trigger amount to max. 1 m
• If you apply a higher voltage than 1V to the socket
you risk damage of the device!
Stamping is not possible under the following circumstances:
• When the battery is discharged - the display shows
“EMPTY BATTERY NO IMPRINT POSSIBLE”
• In Setup or Setting mode
• When jetStamp is in the charging station
• Printing is blocked - the display shows “IMPRINT BLOCKED” :
The blockade can be released by pressing [ QUIT ]
(see also page 23, menu item 'BLOCK IMPRINT')
ORDER 00000000
11. Jul 2006 14 : 36
max. width
of both print lines
16
first print line
second print line
Changing the ink cartridge
i
• The change of the ink cartridge may be necessary if the
imprint is incomplete or if dots are missing
Note
• For an optimal print performance the ink cartridge
should be changed at least all six months
• The ink cartridge is ready to print that neans there is no
preparation necessary before using it
• Replacement ink cartridges are available with the order
number 801 307 - 000 on REINER stock
The ink in the ink cartridge is harmful. Never swallow it!
Always keep the ink cartridge out of the reach of children!
!
Warning
Removing a used ink cartridge:
Press [ MODE ] , if necessary repeatedly, until
the menu item “INKJET” appears
Press [ INKJET ] : The print carriage will go automatically
to the centre of its travel to make handling easier
Push the locking rail (7) back until it clicks into position,
and then withdraw the ink cartridge forwards
7
17
Dirt and dried up ink at the holder
of the ink cartridge can be removed
with a soft cleaning cloth moistened
in spirit (see figure 2)
2
2
Insert the new ink cartridge:
Take the ink cartridge from the
packaging and remove the coloured
protection film from the ink cartridge
(see figure 3)
3
Residual ink on the silver plate
can be removed with a soft cloth
(see figure 4)
Put in the new ink cartridge
into the ink cartridge holder
4
Push the locking clip upwards until
it engages, by this means the
ink cartridge will be locked
(see figure 5)
i
Note
18
When jetStamp is in the
charging station, a cleaning
sequence for the ink cartridge
can be activated by pressing
[ CLEAN ]
If necessary, press [ MODE ]
repeatedly until [ CLEAN ]
appears in the menu bar.
5
Setup module
The Setup module contains the following two main menus:
SETTINGS:
Enables comprehensive, extensive changes to settings
to be carried out, which, among other things, influence
the impression and the handling of the stamp.
UPDATE:
In combination with the optional PC - Set, the program
in jetStamp can be updated. In addition, the impressions
P:26 ... P:29 can be individually replaced or modified.
Selection of the Setup module can be carried out from the menu bar
as follows:
Press [ MODE ] , if necessary repeatedly, until “SETUP”
appears in the menu bar
On pressing [ SETUP ] , the first main menu 'SETTINGS'
is displayed and with [ NEXT ] you can switch between
the two menu items 'SETTINGS' and 'UPDATE' .
Whichever is displayed can be selected by pressing [ CALL ]
i
Note
Selection of the Setup module may be protected by a password. In that case the correct password must first be entered.
If you need further information, please contact your dealer
By pressing [ NEXT ] , you can scroll through the menu items
(see also pages 19 and 20). The value or status of the current
item is always shown on the right of the display.
Pressing [ VARY ] selects the menu item shown, e.g.
to change its value or status
Numerical values can be increased by pressing [ INC ]
or reduced by pressing [ DEC ] (decreasing)
A status can be changed using [ OFF ] and [ ON ]
Pressing [ RETURN ] accepts the value or status selected,
and the display automatically shows the next menu item.
Pressing [ RETURN ] again exits the Setup menu.
The selected impression is displayed, and the stamp is ready for use
19
Description of the Setup module
MODE
Press, repeatedly if necessary
SETUP
(Enter password if required)
SETTINGS
CALL
NEXT
UPDATE
CALL
FIRMWARE ALL
NEXT
See next page
FIRMWARE PART
NEXT
STAMP PICTURE
NEXT
PRE TEXT
START
Update firmware,
standard impressions and standard
pre-texts.
START
Update Firmware
without impressions
and without pretexts
START
Replace or modify
impressions
26 to 29
START
Replace or modify
pre-texts
20
SETTINGS
UPDATE
NEXT
CALL
STAMP PICTURE
VARY
Activate impression (01 ... 29)
CALL
Add impression(s) to favourites list
NEXT
SET STAMP PICT
Only impressions marked 'ON' are shown
when [ NEXT ] is pressed
(see also page 8, 'Impression selection')
NEXT
SEL ST PICT ALL
ON
OFF
=
=
all impressions selectable
no impression selectable
1
Individual impressions (01 ... 29) can be
activated with [ NEXT ] (= setting 'ON')
or suppressed (= setting 'OFF')
LANGUAGE
VARY
0
3
6
9
NEXT
SPLIT HOUR 60M
VARY
NEXT
See next page
=
=
=
=
German
Italian
Flemish
Danish
VARY
setting
1 = French
4 = Spanish
7 = Norwegian
2 = English
5 = Portuguese
8 = Swedish
Hour divisions (ON / OFF)
ON
OFF
NEXT
SUMMERTIME
Language (0 ... 9)
= one hour = 60 minutes
= one hour = 100 sub-divisions
Summer time (0 ... 3)
0
1
2
3
=
=
=
=
setting
setting
no summer time
European summer time from 1996
European summer time prior to 1996
American summer time
21
CHANGE LINE
VARY
ON = top and bottom lines of impression
exchanged
NEXT
PRE CHAR 0
VARY
VARY
VARY
VARY
NEXT
Mode setting for numbering device 2
1 = increase to a maximum
2 = decrease to a minimum
NEXT
SKIP NUM 2
Step setting for numbering device 1
Step can be set between 0 and 99
NEXT
MODE NUM 2
Mode setting for numbering device 1
1 = increase to a maximum
2 = decrease to a minimun
NEXT
SKIP NUM 1
Leading zeros on numbering device
ON = leading zeros displayed and printed
OFF = leading zeros suppressed
NEXT
MODE NUM 1
Exchange lines (OFF / ON)
VARY
Step setting for numbering device 2
Step can be set between 0 and 99
*
See next page
22
numbering device 2 is used
for customer-specific impressions
*
PRT CARTRIDGE
VARY
VARY
Print blockade setting
0
1
2
3
NEXT
PASSW SETUP
settings
1 = standard ink cartridge
2 = ink cartridge with quick-drying ink
rinsing every 8 seconds
3 = ink cartridge with quick-drying ink
rinsing every 6 seconds
4 = ink cartridge with quick-drying ink
rinsing every 4 seconds
NEXT
BLOCK IMPRINT
Ink cartridge
=
=
=
=
no print blockade
printing blocked after 60 seconds
printing blocked after 30 seconds
printing blocked after 15 seconds
*
VARY
Password for Setup
VARY
Password for time setting
VARY
Password for numbering device /
pre-texts *
VARY
Password for stamping
NEXT
PASSW CLOCK
*
NEXT
PASSW NO/TXT
NEXT
PASSW PRINT
*
NEXT
* Password setting:
See page 21
Select desired menu item with [ VARY ]
then activate with [ ON ] or
de-activate with [ OFF ] , press
[ RETURN ] and enter your chosen
password.
23
Troubleshooting
Display
Cause
Recommendation
IMPRINT
Time allowed by ‘Block Imprint’
BLOCKED has expired, disappears trigger
has been pressed
Press [ QUIT ] :
jetStamp is then ready
for use again
Error 04
Memory error
Press [ QUIT ]
Error 09
• Sensor or motor defective
• print carriage blockade
Press [ QUIT ]
and start stamping again
Reset button
i
Note
• If the Reset button is pressed, various settings are lost,
e.g .date and time and the battery charge indication.
jetStamp must then be placed in the charging station for
about 3 hours to synchronise the state-of-charge indicator.
• If the battery has been discharged too far, the charging
process may cause confused signs to appear in the display.
Pressing the Reset button will cure this condition.
• To operate the Reset button, insert a straightend paper clip
or similar object through the opening in the rear face
of the stamp
24
Sales and Technical Service
For further information, please contact one of the following:
Sales - Germany:
REINER Customer Service in Furtwangen
Telephone:
+ 49 7723 657 221
E - mail:
www.reiner.de/service
Export Sales:
REINER Customer Service in Furtwangen, Germany
Telephone:
+ 49 7723 657 230
E - mail:
www.reiner.de/service
Your sales partner:
25
Technical data
Stamping time
approx. 0,7 seconds
Stamping cycle
> 2 seconds
Print capacity per ink cartridge
approx. 300.000 characters
Dimensions, jetStamp 792 only
(W x D x H in mm)
Dimensions, charging station only
(W x D x H in mm) 102 x 135 x 32
95 x 70 x 170
Height of jetStamp in base station 187 mm
Weight of jetStamp 792
approx. 490 g
Weight of baseg station
approx. 430 g
Ambient temperature for operation
+ 8° C ... + 35° C (temperat. limits)
down to - 8° C conditional
Temper. for transport and storage
- 20° C ... + 60° C (up to 48 hours)
Humidity for operation
30% ... 70%
relative humidity
Humidity for transport and storage
10% ... 90%
relative humidity
Power supply using mains supply
by REINER AC adapter model
A30950G, Protection class II
Manufacturer
Ontop European Div. of SAC Group
Mains voltage
12 V DC
Max. power consumption
13,2 W
Storage of data at power failure
> 30 seconds
Noise level
< 60 dB(A) (Workplace related
emissions to ISO 7779)
Tested safety
jetStamp is manufactured to the safety standards
IEC 950, EN 60950 and VDE 0805 .
Markings
jetStamp complies with EC directive 89/336/EEC
‘Electromagnetic compatibility’, and therefore carries
the CE symbol.
26
Ernst REINER GmbH & Co. KG
Postfach 1351
D - 78115 Furtwangen
Telephone
Fax
E-Mail
Internet
790 103 - 021 b
+ 49 7723 6570
+ 49 7723 657200
[email protected]
www.reiner.de
04 / 07