1
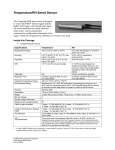
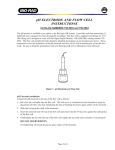
User Guides
Additional instructions and guides for the Handheld Inkjet Marker
A division of Trend Agencies International Pty Ltd.
ACN 081 018 911 ABN 33081 018 911
PO Box 1311 Castle Hill NSW 2154 Australia
TEL: (02) 9629-9535 FAX: (02) 9629-7535
INTERNET: www.trendmarking.com.au
EMAIL: [email protected]
These user guides are provided as additional clarification for the operation of the jetStamp inkjet markers.
For more comprehensive instructions please refer to the manufacturer’s user manual
A division of Trend Agencies International Pty Ltd.
ACN 081 018 911 ABN 33081 018 911
PO Box 1311 Castle Hill NSW 2154 Australia
TEL: (02) 9629-9535 FAX: (02) 9629-7535
INTERNET: www.trendmarking.com.au
EMAIL: [email protected]
Changing messages using the provided software
“PCSet Easy”
This relates to messages:
- positions #26-29. (P:26, P:27, P:28, P:29) (older model with preset messages)
- positions #01-10. (P:01, ….., P:10) (newer model without presetmessages)
In order to change the jetStamp messages using the provided (PC only) software, the following procedure should
be followed.
a)
b)
c)
d)
Plug-in the cables to the PC and the jetStamp charging station
Place the jetStamp in “Transfer mode”
Program the message using the PC Set Easy software
Transfer the message to the jetStamp
a) Plug-in the cables to the PC and the jetStamp charging station
Model: 790
(battery operated)
Model: 792
(mains powered)
A division of Trend Agencies International Pty Ltd.
ACN 081 018 911 ABN 33081 018 911
PO Box 1311 Castle Hill NSW 2154 Australia
TEL: (02) 9629-9535 FAX: (02) 9629-7535
INTERNET: www.trendmarking.com.au
EMAIL: [email protected]
b) Place the jetStamp in “Transfer mode”
1.
On the jetStamp screen, press ❶ “SETUP. If you do
not see “SETUP” press ❹ “MODE” until the option
“SETUP” appears.
P:01
SETUP
CLEAN
❶
2.
❷
SETUP - MODULE
SETTINGS
RETURN
NEXT
CALL
❷
❸
❶
SETUP - MODULE
UPDATE
RETURN
NEXT
CALL
❷
❸
❶
SM - UPDATE
FIRMWARE ALL
RETURN
NEXT
CALL
❷
❸
❶
SM - UPDATE
FIRMWARE PART
RETURN
NEXT
CALL
❷
❸
❶
❹
You will see “SM – UPDATE STAMP PICTURE ”
SM - UPDATE
STAMP PICTURE
Press ❸ “START”
RETURN
NEXT
❶
7.
❹
You will see “SM – UPDATE FIRMWARE PART ”
Press ❷ “NEXT”
6.
❹
You will see “SM – UPDATE FIRMWARE ALL ”
Press ❷ “NEXT”
5.
❹
You will see “SETUP – MODULE UPDATE”
Press ❸ “CALL”
4.
❹
You will see “SETUP – MODULE SETTINGS”
Press ❷ “NEXT”
3.
❸
MODE
You will see “SM – UPDATE
STAMP PICTURE ACTIVE ”
You can now place the jetStamp in the cradle and
transfer messages using the PC Set Easy software for
Windows.
A division of Trend Agencies International Pty Ltd.
ACN 081 018 911 ABN 33081 018 911
❷
START
❸
❹
SM - UPDATE
STAMP PICTURE ACTIVE
RETURN
❶
PO Box 1311 Castle Hill NSW 2154 Australia
TEL: (02) 9629-9535 FAX: (02) 9629-7535
❷
❸
❹
INTERNET: www.trendmarking.com.au
EMAIL: [email protected]
c) Program the message using the PC Set Easy software
This is achieved using the supplied “PC Set Easy” software. Install and open the software to begin. Note, this is a
brief guide only. For more detailed instructions choose “Help” from the PC Set Easy menu.
1.
1. Type your text in the text area provided, eg; “TR3205 S6 X 12”
2. Drag the pen icon underneath the text area to an available box
1
2
2.
3. Re-type the text “SN:” in the edit box and drag the icon to the bottom line
4. Double-click the “Numberer” icon and choose the number of digits in your serial number.
Now drag the icon to a spare box.
5. Note: The 5 “Up Down” arrows allow you to program 4x different messages. These will be
messages #01 – #10 on the JetStamp
4
3
4
3
5
4
TRANSFER
* Note that the preview will update to reflect the message entered
A division of Trend Agencies International Pty Ltd.
ACN 081 018 911 ABN 33081 018 911
PO Box 1311 Castle Hill NSW 2154 Australia
TEL: (02) 9629-9535 FAX: (02) 9629-7535
INTERNET: www.trendmarking.com.au
EMAIL: [email protected]
d) Transfer the message to the jetStamp
3.
When programming is completed, press the
“transfer” button on the software.
A progress bar should appear.
Transfer button
This progress bar should appear
Note: You cannot click “Transfer’ twice in succession. The JetStamp must be placed in “transfer mode”
should you need to change the existing messages again.
4.
“STAMP PICTURE OK” means transfer was
successful.
SM - UPDATE
STAMP PICTURE
OK
RETURN
❶
❷
❸
❹
“STAMP PICTURE DEFECT” means
transfer failed. Try procedure again.
SM - UPDATE
STAMP PICTURE DEFECT
RETURN
❶
5.
Now, keep pressing ❶ “RETURN” (3 times)
until you are back on the main screen.
❷
❸
❹
SM - UPDATE
STAMP PICTURE
OK
RETURN
❶
6.
You should now see your messages in P:01
– P:10. Advance from P:01 to P:10 using the
“NEXT” button
❷
❹
P:01
TR3205 S6 x 12
SN: 00000
MO/TXT
❶
A division of Trend Agencies International Pty Ltd.
ACN 081 018 911 ABN 33081 018 911
❸
❷
PO Box 1311 Castle Hill NSW 2154 Australia
TEL: (02) 9629-9535 FAX: (02) 9629-7535
NEXT
MODE
❸
❹
INTERNET: www.trendmarking.com.au
EMAIL: [email protected]
Changing message manually on the Handheld Inkjet
This relates to messages positions P:01-P:10 (newer models) or P:26-P:29 (older models)
A simple message can be created and modified without connecting to a PC and employing the PCSet
Easy software. In some cases, where only a single character needs to change, this can be a faster way to
quickly change your code.
Messages created via the PCSet Easy software cannot be modified using this method. Using the PCSet
software to load messages will override and clear all manually entered messages.
(A) Initial message entry
(B) Editing a message created in step (A)
(A) Initial message entry.
!
On the main screen, if you do not see “MO/TXT”, only
“SETUP” “CLEAN” and MODE” (other other menu
options), press ❹ “MODE” and the display will change
to show “MO/TXT”, “NEXT” and “MODE”
P:01
SETUP
CLEAN
❶
1.
On the main screen, press ❸ “NEXT” until you see
P:01 (or P:27, P:28 & P:29) appear on the screen. A
number of blank “placeholder” bars will appear.
❷
❶
Press ❷ “MO/TXT” and an “INPUT” screen will
appear.
❷
Once you are at “MODI TEXT 1”, Press ❸ “VARY”
one of the placeholder bars will begin to flash
❸
❹
VARY
❷
❸
❹
P:01
02.
01.
BEST
BEFORE:28/06/14
03.
04.
BATCH
NUMBER:1234567
NO/TXT
❷
NEXT
MODE
❸
❹
VARY –MODI TEXT 01
VALUE:
RETURN
RIGHT
❶
A division of Trend Agencies International Pty Ltd.
ACN 081 018 911 ABN 33081 018 911
MODE
NEXT
❶
4.
NEXT
INPUT –MODI TEXT 01
VALUE:
❶
Press ❷ “NEXT” will allow you to skip through the
message, which is divided into 4 portions:
MODI TEXT 1: Top line (left) 10 characters
MODI TEXT 2: Top line (right) 10 characters
MODI TEXT 3: Bottom line (left) 10 characters
MODI TEXT 4: Bottom line (right) 10 characters
❹
P:01
RETURN
3.
❸
P:01
MO/TXT
2.
MODE
PO Box 1311 Castle Hill NSW 2154 Australia
TEL: (02) 9629-9535 FAX: (02) 9629-7535
❷
DEC
❸
INC
❹
INTERNET: www.trendmarking.com.au
EMAIL: [email protected]
5.
Change the character by pressing ❸ “DEC” or ❹
“INC” to increase or decrease the character value.
The number value will change in sequence
“0..1..2..3..4..5..6..7..8..9..A..B..C…”.. etc with symbols
at the end (which can be reached faster from the
beginning in “reverse’ by pressing “DEC”)
6.
To advance to the next character in the message, press
❷ “RIGHT” and the next placeholder bar will begin to
flash.
VARY–MODI TEXT 01
VALUE: B
❶
❷
RIGHT
❶
8.
Repeat this procedure until you have achieved the
message you require. Press ❶ “RETURN” when your
message entry is finished.
Note that the “E” for the word “BEFORE” will need to be
put in the second portion of the top line, since only 10
characters are allowed in one portion.
Press ❷ “NEXT” and you will advance to “MODI TEXT
02”.
Press ❸ “VARY” and repeat steps 6-8 to change your
message, in this example on MODI TEXT 02 you would
continue with the letter “E”.
Once your message entry on all 4 portions is complete,
press Press ❶ “RETURN”
RETURN
NEXT
VARY
❷
❸
❶
You can now print this message by pressing the “Print”
button in the handle.
RETURN
RIGHT
DEC
❷
❹
❸
INC
❹
INPUT –MODI TEXT 04
VALUE: ER:1234567
NEXT
VARY
❷
❸
❹
P:01
BEST BEFORE:28/06/14
BATCH NUMBER:1234567
MO/TXT
❶
A division of Trend Agencies International Pty Ltd.
ACN 081 018 911 ABN 33081 018 911
❹
VARY –MODI TEXT 02
VALUE: E:
❶
On the main screen, you should now see your entire
message.
❸
INC
INPUT –MODI TEXT 01
VALUE: BEST BEFOR
RETURN
10.
DEC
❷
❶
9.
❹
VARY –MODI TEXT 01
VALUE: B
RETURN
7.
❸
PO Box 1311 Castle Hill NSW 2154 Australia
TEL: (02) 9629-9535 FAX: (02) 9629-7535
❷
NEXT
MODE
❸
❹
INTERNET: www.trendmarking.com.au
EMAIL: [email protected]
(B) Editing message created in step (A)
!
1.
On the main screen, if you do not see “MO/TXT”, only
“SETUP” “INKJET” and MODE”, press ❹ “MODE” and
the display will change to show “MO/TXT”, “NEXT” and
“MODE”
On the main screen, you should now see your current
message.
P:01
BEST BEFORE:28/06/14
BATCH NUMBER:1234567
SETUP
INKJET
❶
❷
❸
BEST BEFORE:28/06/14
BATCH NUMBER:1234567
❶
Press ❷ “MO/TXT” and the “INPUT” screen will
appear.
❷
❷
❸
NEXT
VARY
❷
❸
RIGHT
❶
Press ❷ “RIGHT” to advance to the character in the
message which requires alteration, and change it by
using the ❸ “DEC” or ❹ “INC” to increase or
decrease the character value. Press ❶ “RETURN”
when your message entry is finished.
❷
You can now repeat this process by pressing ❷
“NEXT” to advance to another “MODI TEXT” and
pressing ❸ “VARY” again to modify the characters,
followed by ❶ “RETURN” when you have made your
changes.
RETURN
RIGHT
❷
DEC
❸
INC
❹
DEC
❸
INC
❹
INPUT –MODI TEXT 02
VALUE: E:28/07/12
RETURN
NEXT
VARY
❷
❸
❶
A division of Trend Agencies International Pty Ltd.
ACN 081 018 911 ABN 33081 018 911
❹
VARY –MODI TEXT 02
VALUE: E:28/07/12
❶
6.
❹
VARY –MODI TEXT 02
VALUE: E:28/06/12
RETURN
5.
❹
VARY
❶
Once you are at the required “MODI TEXT”, Press ❸
“VARY”, one of the characters will begin to flash
❸
INPUT –MODI TEXT 02
VALUE: E:28/06/12
RETURN
4.
MODE
NEXT
❶
Press ❷ “NEXT” to skip to the portion of your
message you need to change, MODI TEXT 1-4.
NEXT
INPUT –MODI TEXT 01
VALUE: BEST BEFOR
RETURN
3.
❹
P:01
MO/TXT
2.
MODE
PO Box 1311 Castle Hill NSW 2154 Australia
TEL: (02) 9629-9535 FAX: (02) 9629-7535
❹
INTERNET: www.trendmarking.com.au
EMAIL: [email protected]
7.
To finish entering the message, press ❶ “RETURN” to
go back to the main screen
INPUT –MODI TEXT 04
VALUE: ER:5544332
RETURN
NEXT
VARY
❷
❸
❶
8.
On the main screen, you should now see your changed
message.
You can now print this message by pressing the “Print”
button in the handle.
❹
P:01
BEST BEFORE:28/07/14
BATCH NUMBER:5544332
MO/TXT
❶
❷
NEXT
MODE
❸
❹
Messages created via the PCSet Easy software cannot be modified using this method. Using the PCSet
software to load messages will override and clear all manually entered messages.
A division of Trend Agencies International Pty Ltd.
ACN 081 018 911 ABN 33081 018 911
PO Box 1311 Castle Hill NSW 2154 Australia
TEL: (02) 9629-9535 FAX: (02) 9629-7535
INTERNET: www.trendmarking.com.au
EMAIL: [email protected]
Maintenance for the MP2-BK non-porous ink cartridge
The MP2-BK black ink cartridge contains a solvent-based “fast-dry” non-porous ink formulation designed to dry on a surface via
evaporation. Consequently, this cartridge requires more maintenance than an ordinary water-based cartridge designed to dry
via absorption into a porous material like paper.
New cartridges:
Ink cartridges are shipped from the factory sealed in a foil bag and placed in a nozzle sealing cartridge clip.
Using a cartridge for the first time
There should be no “activation” required. Simply remove the cartridge from the clip and insert into the printer.
* MP2-BK ink is a dye-based ink and will appear as coloured from black to shades of grey according to the material being printed
upon.
** The MP2-BK ink is alcohol-based and may not adhere to all materials with the same strength.
Darker printing
For a bolder/darker print, navigate to "MODE>SETUP>MODULE SETTINGS>DOUBLE PRINT" then selecting "VARY>ON".
This will cause the printer to make 2 passes with each trigger button press.
Maintaining an opened cartridge
After opening, the cartridge should be used up as quickly as possible until depleted. Gradually after opening, the cartridge will
begin to “dry out” and the print quality will begin to deteriorate. How quickly the cartridge deteriorates depends on the individual
circumstances/environment.
Return the inkjet to it’s cradle
When idle, the inkjet should be returned to it’s cradle. Whilst in it’s cradle, the inkjet will remain in an intermittent cleaning cycle
which will slow the drying out of the cartridge.
Place the cartridge in the storage clip and return to bag.
For longer term storage (a few hours/overnight/long-term), the cartridge should be placed in the storage clip and returned to the
foil ziplock bag. Please store the cartridge in a cool place out of direct sunlight.
Restoring a cartridge
There is no guaranteed fix for a cartridge once deterioration begins. However, the steps outlined below have had much success
in restoring print quality to cartridges.
IMPORTANT: Ink spillage/leakage may occur. Wearing protective disposable gloves, protective eyewear
and clothing is recommended. Work in a well ventilated area.
A division of Trend Agencies International Pty Ltd.
ACN 081 018 911 ABN 33081 018 911
PO Box 1311 Castle Hill NSW 2154 Australia
TEL: (02) 9629-9535 FAX: (02) 9629-7535
INTERNET: www.trendmarking.com.au
EMAIL: [email protected]
These steps should be followed in sequence. For example, if you try (a) and still encounter print quality issues, then try (b) – if still problems
then try (c) etc.
Short periods of dryout/small print quality issues
(a)
(a) Wipe Nozzles.
This can be done while the cartridge is still in the inkjet. Wipe lightly in the direction of
the nozzles. Use only a soft tissue or lint/fibre-free cloth.
If problems persist, try this step again or proceed to step (b)
(b)
(b) Wipe Nozzles with solvent.
The solvent must be alcohol-based such as Isopropyl Alcohol, Methylated Spirits or
Trend’s Printer Solvent 3400EP. This can be done while the cartridge is still in the
inkjet. You may need to repeat step (a) after this step to remove the solvent.
If problems persist, try this step or previous steps again or proceed to step (c)
(c)
(c) Flick Cartridge.
Remove the cartridge from the printer. Wrap a bit of tissue paper over the nozzles.
Grip the cartridge firmly and “flick” like a mercury thermometer. [CAUTION] ink
droplets may be thrown from the nozzles. Wear protective clothing and complete this
action above a sheet of paper. When completed, repeat step (a) to remove any
surface ink.
If problems persist, try this step or previous steps again or proceed to step (d)
If these steps do not resolve the problem, but improvement is noticed – then you may need to repeat any of these steps to get further
improvement. If insufficient improvement is seen, then you will need to take further action.
Longer periods of dryout/persistent print quality issues
(d)
(d) Prime Cartridge
Use only a small amount of air in the supplied syringe to expel only a small amount of
ink onto a soft tissue. To finish, wipe with a soft tissue (a).
If problems persist, try this step or previous steps again or proceed to step (e)
(e)
(e) Soak Cartridge
Remove the cartridge from the printer. Fill a small container to a level of 3-4mm of
solvent. Place the ink cartridge in the solvent, immersing the nozzles. Leave
immersed for approximately 30 seconds – 5 minutes according to the severity of the
blockage (start with smaller time). Then remove the cartridge and blot dry on some
clean paper towel. Now re-do step (c) or (d) and finish with a wipe of a soft tissue (a).
If problems persist, try this step or previous steps again or proceed to step (f)
You may need to repeat these steps until improvement is seen. The longer dried nozzles on cartridges are left, the more difficult it will be to
restore them. Some cartridges may have deteriorated beyond repair. Cartridges that are left opened for a long period will likely be
unrestorable.
The solvent must be alcohol-based such as Isopropyl Alcohol, Methylated Spirits or Trend’s Printer
Solvent 3400EP. Do NOT use water, acetone or other unknown solvents.
A division of Trend Agencies International Pty Ltd.
ACN 081 018 911 ABN 33081 018 911
PO Box 1311 Castle Hill NSW 2154 Australia
TEL: (02) 9629-9535 FAX: (02) 9629-7535
INTERNET: www.trendmarking.com.au
EMAIL: [email protected]