1
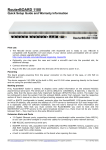
10:31
Page 1
Rega Research Limited, England
26/02/2004
p9
P9 manual 2.qxd
P9 manual 2.qxd
26/02/2004
10:31
Page 2
owners manual
P9 manual 2.qxd
26/02/2004
10:31
Page 3
2g 1g
Mission Statement
Rega’s philosophy is to make high quality products at sensible
prices, as a means of reproducing music as faithfully as
possible. Rega is committed to the design and development of
new and existing products, both in hi-fi and other areas, that will
perpetuate Rega’s values of quality and value for money.
P9 manual 2.qxd
26/02/2004
10:31
Page 4
Contents
Introduction.......................................1
Design Innovation..........................2-3
Caring for your P9............................4
Power Supply...............................5-6
Setup................................................7
Hints and Tips...................................8
Introduction
P9 manual 2.qxd
26/02/2004
10:31
Page 5
Your Rega P9 has been designed to be effective, easy
to use and above all - to reproduce music better than
any other turntable. We have omitted all the usual
gimmicks and genuinely concentrated the
manufacturing costs on the high quality components
and design necessary to reproduce records accurately.
For example: a complex sub-chassis suspension is
normally necessary to reduce motor noise. However
they are difficult to maintain and degrade performance.
Rega have designed a unique phase adjustable power
supply which eliminates motor vibration at source and
therefore eradicates the need for a suspension.
Rega's design skill and the use of extremely high quality
components ensure that your turntable will perform at
its optimum. The tips we give here may help to give you
maximum musical enjoyment and ease of use for many
years.
1
P9 manual 2.qxd
26/02/2004
10:31
Page 6
The New P9 has an extensively redesigned tonearm, the all new RB1000.
Many changes have been made to improve the original RB900 even further.
The aluminium tube has been polished rather than lacquered so as to reduce
the weight. The entire bearing housing is now manufactured from stainless
steel and all parts have been manufactured to exacting tolerances which are
apparent from the tonearms appearance.
The tonearm tube itself (which is a one piece silicone/aluminium casting) is
very rigid, whilst being low mass. The tonearm assembly is concentrated
around precision, hardened stainless steel, miniature ball races of the
highest quality. The bearings fit on to ground shafts and into the tonearm
using interference fits. This means that no adhesive is required and therefore
none of the associated (component - adhesive - component) losses in rigidity
prevail. It is fitted to the plinth by a 3-point fixing. This technique will cause
less stress on the plinth and the bearing housing of the tonearm, and
therefore the least possible resonance.
The RB1000 tonearm is designed to maximize the cantilever acceleration
and travel as much as possible with the utmost accuracy within the cartridge
body, thus providing new levels of information.
2
Design Innovation
Tonearm
p9
Design Innovation
P9 manual 2.qxd
26/02/2004
10:31
Page 7
Platter
The platter is produced from a ceramic oxide powder which is compressed,
fired and diamond ground to size. (Because this platter is as stiff and hard
as sapphire, the only improvement that can be made would me to make it
from diamond.) This is again a first in the industry at volume production
levels. Even so, each platter takes many hours to produce. Expensive detail
design ensures it only sits on three points on the centre hub.
Plinth
The new P9 plinth is made from an even lighter material than the original
Planar which again offers advantages over its predecessor.
The plinth is of a skeletal design. This allows the mass to be reduced and the
rigidity increased in comparison to a solid section construction. All organic
materials used in the production of the plinth and surround are obtained from
sustainable sources.
Motor
The motor is a high specification, 24V twin phase synchronous unit
controlled by Rega's unique and innovative power supply. The motor drives
the computer-numerically-controlled (cnc) machined pulley and sub
platter/hub-bearing assembly via a twin belt drive. Two belts are used so that
any small inaccuracies in one belt will be cancelled out by the second, giving
unusually low levels of wow and flutter. A Mu-metal shield is used to minimise
extraneous electromagnetic radiation interfering with the cartridge.
3
P9 manual 2.qxd
26/02/2004
10:31
Page 8
The New Logo
The logo was designed to complement the turntable and tonearm from the
aspect of them being “cutting edge”. The design is clean, sharp and very
precise... which adds to the overall look of the turntable.
p9
4
Design Innovation
Interconnects
We have used the highest quality XLR and phono connectors and low noise,
wide bandwidth interconnect cable. These are genuine professional products
and are the best available for the job. Do not attempt to fit any other wires or
cables.
Caring for your P9
P9 manual 2.qxd
26/02/2004
10:31
Page 9
Transporting your P9
Should you need to transport your P9, to avoid any possible transit damage,
the following recommendations must be followed.
1. Remove tonearm balance weight and secure the arm in its rest with tape
or covered wire. This will ensure no sudden or violent movement is
transmitted to the delicate bearings.
2. Remove ceramic platter. When removing, hold down the metal hub at the
same time as lifting the platter on each side. When removing or replacing,
ensure it is done evenly to avoid chipping to the platter.
3. NEVER place your P9 upside-down or on its side. This would allow oil in
the hub/bearing assembly to leak and cause speed and or wear problems.
4. If you have to ship your turntable or use a carrier, use ALL the original
packaging. If in doubt ask your dealer.
5
P9 manual 2.qxd
26/02/2004
10:31
Page 10
When the power supply is first switched on, the power L.E.D. in the power
switch will flash. 33 rpm is selected by pressing the 33 rpm button. Once
pressed 33 rpm is selected and the L.E.D will flash until the turntable has
settled. To deactivate 33 rpm press the button again or press 45 rpm. If 45
rpm is pressed then the L.E.D will flash again until the turntable has settled
at 45 rpm. To deactivate 45 rpm press the 45 rpm button again or 33 rpm.
When in the idle state the power L.E.D will flash. This is to show the power
supply is in standby mode and no output is present. The unit remains
powered up but in an idle state. i.e. the drive amplifier is disconnected
(muted) from the motor.
To switch off at any time, simply press the power switch.
33
45
P9PSU
Speed Change
Power Switch
The external power supply unit is a quart crystal locked system. To ensure
accurate speed stability of the platter motor, two quartz crystal control
reference oscillators have been utilised. This system produces a high
frequency (3 MHz for 33 and 4 MHz for 45) signal, which is then divided
6
Power Supply
p9
Power Supply
Power Supply
P9 manual 2.qxd
26/02/2004
10:31
Page 11
down to feed generously rated, high
current power fet amps.
The output from these is very pure
(<0.03 THD, this is a lower value than
many power amplifiers output). The
beauty of this power supply is that a
dual phase is supplied to the motor,
the phases of which may be varied in
relation to each other. This means
that the power supply phases can be
(and are) trimmed to eliminate all
vibration from the motor. In turn, this
means that there is no need for plinth
suspension, which would ordinarily be
required to eliminate motor
resonance.
To minimise the risk of hum pick up by
the cartridge, the power supply should
be situated as far from the P9 as the
interconnect cable will allow.
7
p9
P9 manual 2.qxd
26/02/2004
p9
10:32
Page 12
Blue:LH Earth
Green:RH Earth
Red:RH Signal
White:LH Signal
p9
Bias adjustment
2g 1g
Grooves on the bias shaft
indicate bias weight in
Grams. When fully
extended, bias
adjustment is at 0g. Push
in to the first mark for 1g
and to the second for 2g.
With the cartridge fitted and aligned
using the protractor supplied, set the
tracking force dial and bias
adjustment shaft to zero. Adjust the
balance weight along its shaft until the
stylus is "floating" just clear of the
record. (N.B. it's quite normal for the
tonearm to swing away from the
centre of the record by itself. This is in
the main caused by very low friction
bearings.)
Return the tonearm to it's rest, and
the tracking force can now be applied
by setting the tracking force dial to the
upper limit of the cartridge
manufacturers recommended range,
taking note of the mark on the
tonearm. Set the bias adjustment
shaft to the same number as the
tracking force dial i.e. 1.75g tracking
force for Rega cartridges = 1.75g on
the bias shaft (see left).
8
Setup
Setting tracking force
Hints & Tips
P9 manual 2.qxd
26/02/2004
10:32
1) Mount the turntable on a rigid,
level surface. A light shelf or
turntable support (such as our
own) screwed to a wall or in an
alcove is ideal. Avoid mounting
on hollow or heavy cabinets or
anything mounted on a wooden
floor.
2) Try to keep the lid closed while
playing the records. This will
prevent dust falling on to the
records and make cleaning
unnecessary. There may also be
a sonic improvement.
3) Don't use any record cleaner
that works while the record is
playing or any cleaners that use
water or solvents. If you keep
your records stored in their
sleeves, avoid touching the
playing surfaces, play with the lid
down and keep all water and
fluids away, cleaning should not
be necessary. Don't worry about
visible dust on the record
surface, the stylus brushes this
aside and any that collects on the
stylus can be easily blown away.
In general, record cleaning is
Page 13
overdone and one should not
believe all the claims made by
record cleaner manufacturers.
4) Leave the turntable running
during a record playing session.
Switch on before the session
and only switch off after you have
finished. Use the electronic
speed control to change speeds.
5) Don't lift the centre hub out
from the main bearing. The
bearing is factory assembled
with a film of special thick
lubricant. If the centre hub is
removed this film may be
disturbed.
6) Rega turntables are designed
to optimise performance for
music reproduction and
therefore no compromises have
been made to give quick start
times. The normal time taken for
full speed to be reached is
between 5-10 seconds.
7) The arm earth (or ground) is
automatically connected through
the arm cable screening. No
9
other earthing should be
necessary.
8) Save the original packing in
case you ever need to transport
the turntable.
9) Don't use any polishes on the
turntable or lid. To clean or dust,
wipe gently with a soft cotton
duster (slightly damp only if
necessary).
10) Always deactivate the power
supply before disconnecting the
turntable.
Should you experience
any problem with your
turntable or wish to
enquire about servicing
please contact your Rega
dealer.