1
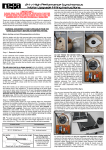
-
CONTENTS
INTRODUCTION / EVOLUTION OF REVOLUTION
1
TURNTABLE DESIGN & MYTHOLOGY
2
DESIGN AND INNOVATION
3-7
SETTING UP YOUR RB808
7
SETTING UP YOUR TURNTABLE
8
TTPSU / CONNECTION TO THE AMPLIFIER
9
TTPSU CONTROL AND CONNECTION
CARE OF THE TURNTABLE
10
11-12
TRANSPORTING YOUR TURNTABLE
12
OWNERS LOG
13
INTRODUCTION
The RP8 has been designed and engineered to achieve outstanding performance way
beyond the expectations of a product at this price point. Excellent build quality,
reliability and ease of use combine to make a product which, if used correctly, will offer
you a lifetime of musical enjoyment.
The RP8 takes Rega’s design philosophy further than ever before. A radical new plinth
using custom designed materials, a new tonearm bearing assembly, a 24V low voltage
motor controlled by a hand tuned electronic power supply and a custom version of our
Planar 9 engineered hub bearing assembly. These are just some of the features of this
amazing new turntable designed to extract more music from your vinyl than ever
before.
THE EVOLUTION OF REVOLUTION
Evolution is a well proven and documented process in many areas of our lives. This
applies in particular to design engineers and machines. Over the past forty years our
cars have become more reliable and economical whilst we take for granted the safety
and speed of modern aircraft. Rega is no exception to evolution. Rega’s experience and
previous achievements allow us to continually develop and produce better products.
The RP8 represents probably the biggest step forward in the evolution of Roy Gandy’s
turntable design philosophies. Low mass, high rigidity plinths combined with
electronically controlled low vibration motors, high flywheel effect platters and lower
mass, higher stability tonearms. The RP8 is the first of our new “skeletal” design
turntables offering groundbreaking levels of performance and amazing value for
money.
1
TURNTABLE DESIGN & MYTHOLOGY
Today there are many approaches to Hi-Fi design which follow established and informed
engineering or electronic principles. Amplifier and loudspeaker design has been well
documented over the years with excellent technical publications. These subjects have
been based on tried and tested acoustic criteria and many computer software
programs now exist that enable a near amateur to design a passable working
loudspeaker based on known acoustic and mathematical parameters.
Enter turntable design: When it comes to turntable design we are limited to a few poorly
informed articles describing only very limited aspects of design. This is a subject full of
mythology. Designers propose theories that counter the basic laws of physics, use
terminology that doesn’t actually exist in the engineering world, build products that are
more like beautiful sculptures than acoustic reproduction machines and sell items
costing tens of thousands of pounds that hardly function as intended and often fail to
work at all. For instance a very common myth is “the heavier the better”. Turntable
bases weighing tens of kilograms are not uncommon. The reality is that the base
actually needs to be as light as possible to prevent unwanted bearing and motor noise
being transferred to the turntable or record. Platters also fall under a similar myth
with many platter designs becoming so heavy that it is impossible to design a correctly
functioning bearing (and some so light that anyone can hear the speed inconsistency).
The turntable platter itself needs to be of enough weight to spin at a constant speed
within the confines of the chosen bearing and motor drive system. Many amateur
designers in any field choose one component in a design and try to achieve an extreme
in size, weight and quality. They believe that by taking one theory to its extreme the
design will become “perfect”. The reality of all engineering, design (and life) is that
perfection is not possible. Based on this reality, Rega’s goal has always to optimise a
mixture of numerous “correct compromises” thus bringing the designer nearer to the
unachievable goal of perfection.
2
DESIGN AND INNOVATION
SKELETAL PLINTH DESIGN WITH POLYOLEFIN FOAM CORE
Controversially Rega has always researched methods of producing light but stiff and
rigid plinths. The technology is simple: unwanted noise at microscopic levels is
developed by the turntable motor and main bearing. The plinth can also pick up airborne
vibration from the music. From the beginning in the 1970’s Rega pioneered the use of a
stressed skin structure for the plinth. This uses two layers of phenolic resin with a
lightweight particle or fibre board sandwiched between the skins. This technique has
been used in many applications where stiff, light structures are needed such as an
aircraft wing or a Formula 1 chassis.
The current revival in turntables has allowed Rega to research and develop higher
technology structures for the customer who is happy to pay a little more for higher
sound quality. The RP8 turntable utilises a unique new stressed skin structure
produced from thin phenolic skins sandwiching a featherweight nitrogen expanded,
closed cell, polyolefin foam core. This material has been developed exclusively for Rega
over a three year period. The RP8 plinth is 7 times lighter than the weight of the original
Planar 3 plinth. In addition Rega has added even more stiffness in the crucial area
between the arm and the main bearing.
SUPER FLYWHEEL EFFECT TRIPLE LAYER GLASS PLATTER
The new RP8 three piece laminated glass platter is the result of a collaboration with a
small, emerging, young British glass engineering company. As a general rule the only
part of a turntable that requires extra mass is the turntable platter in order to achieve
constant rotational speed. However a heavier platter creates more problems for the
main bearing design so again an ideal compromise creates the best solution.
3
Practically this means keeping as much of the mass to the outside rim of the glass
platter to create more flywheel effect while keeping the inside of the platter as light as
possible without sacrificing stiffness.
The RP6 was the first Rega turntable to use a precision engineered glass ring laminated
to the outside using modern CNC techniques to ensure concentricity. The RP8 takes it
one step further by laminating three rings together to produce the RP8 super flywheel
effect glass platter which we consider an engineering triumph !
MAGNESIUM AND PHENOLIC - DUAL BRACING
A super lightweight plinth combined with a double brace mounted specifically where the
increased rigidity is required (between the tonearm mounting and the main hub
bearing) forms a structurally sound “stressed beam” assembly. This design prevents
energy absorption and unwanted resonances which will add unnatural distortions to the
music.
The RP8 takes our double brace technology to the next level. Not content with an
unprecedented stiffness to mass ratio, Rega has obsessively reduced any resonant
properties by using two different materials for the new stressed beam. The top layer is
magnesium and the bottom layer is phenolic (two of the lightest and stiffest materials
available). Incorporating two different materials into the brace structure lowers their
ability to pick up unwanted airborne vibrations.
Simply put, different materials have different natural resonances. By using two
different materials together they decrease the natural frequency of each other by self
damping.
4
MOTOR
The motor is a high specification, 24V twin phase synchronous unit which has a board
mounted anti vibration circuit hand tuned to each motor. It is controlled by Rega's
unique and innovative TTPSU power supply. The motor drives the CNC machined pulley,
sub platter and hub-bearing assembly via the twin belt drive.
TTPSU - POWER SUPPLY
Your RP8 turntable motor is hand tuned and matched to the supplied TTPSU, this
ensures the maximum reduction of motor noise and vibration is achieved.
The compact TTPSU itself uses a high stability crystal locked low distortion sine wave
generator. This, along with an efficient drive amplifier fed from a stabilised DC power
supply, generates a 24V AC balanced signal of less than 0.1% distortion, which is
completely un-affected by any changes in the mains/line voltage and conditions. This
then drives the improved Rega anti-vibration circuit, which is situated beneath the
turntable.
The speed change is achieved by changing the frequency of the drive voltage; this is
because the speed of the platter and motor is directly proportional to the motor drive
frequency. A relay changes the required phase compensation & the anti vibration
circuit which eradicates motor vibration to a minimum at both speeds.
5
TONEARM
The RB808 tonearm is packed with new features pushing the boundaries of tonearm
design. As with all Rega tonearms each one is meticulously hand built by a team of
highly skilled technicians.
The RB808 has improved bearings and a tightened spindle fit tolerance over previous
models (each bearing is individually selected to find the perfect match for the chosen
spindle). This is a Rega developed method of increasing the amount of detail retrieved
from the record surface.
A brand new low mass precision engineered vertical bearing assembly has been
manufactured to further compliment the inherent design philosophy of the RP8
turntable. The RB808 uses the latest Rega arm tube. Completely redesigned to
redistribute mass, further reduce stresses and resonances. This advanced design tube
increases the stiffness and rigidity of the overall assembly using CAD design to blend
the multiple varying tapers.
NTERCONNECTS
I
Externally we have fitted a bespoke Rega designed low capacitance phono cable which
uses an advanced phono plug assembly. This has only two parts to minimise joints and
incorporates a twist and clamp design locking the plug to the terminal. The design
increases connectivity and ensures the signal path is kept as clean as possible.
6
DE-COUPLED OUTER FRAME AND DUST COVER
A common problem for many skeletal design turntables is the inability to incorporate
an effective dust cover into the design. We have constructed an outer frame that
minimises contact between the inner and outer plinth. The only points of contact are
three location devices on the feet which centralises the inner and outer plinths
perfectly. This makes set-up extremely easy and allows the use of a dust cover. The RP8
can be used without the outer frame if so desired.
PLEASE NOTE: ALWAYS REMOVE THE GLASS PLATTER BEFORE
LIFTING OR RELOCATING THE RP8
Always remove the glass platter before locating the RP8 central plinth into the outer
frame or when lifting the whole turntable to relocate it. The ‘o’ rings will not centralise
the plinth within the frame if the weight of the platter is present.
SETTING UP YOUR RB808
With the cartridge mounted correctly and set up using the alignment protractor
supplied, ensure that the tracking force control and bias adjustment slider are set to
zero. (Pull the bias adjustment fully out to set zero). Slide the balance weight along its
shaft until the stylus is “floating” just 1mm clear of the record.
The recommended tracking force can now be applied via the tracking force control
shown on page 8. Always use a force which corresponds to the upper limit of the
cartridge makers recommended range. Push the bias adjustment slider to the same
number as the tracking force control. ie a recommended 2.0g tracking force = 2.0 on
the bias slider. Note: It is not necessary to use the alignment protractor if the turntable
has a factory fitted Rega cartridge.
7
SETTING UP AND POSITIONING YOUR RP8 TURNTABLE.
Always take great care when unpacking the turntable. Extra care must be taken if your RP8 is
supplied with a cartridge factory fitted so as not to damage the stylus. Place the turntable on a
sound and level surface.
The RP8 inner plinth sits within the outer frame, locates and self centralises via three rubber
triangulated ‘o’ rings. Ensure correct alignment and check that the tonearm phono lead assembly
and motor lead are clear of the feet and are not contacting the plinth.
Drive Belts
Drive Pulley
Top Brace Balance Weight
Tracking
Force
Control
Bias Adjustment
Glass Platter
Alignment Protractor
2g 1g
8
TTPSU
Connect the turntable power interconnect between the TTPSU and the turntable. Make
sure the PS1 mains transformer is plugged in and connected to the 24V AC input
terminal in the back of the TTPSU. Switch the mains power on. To minimise the risk of
hum pick up by the cartridge, the power supply should be situated as far from the
turntable as the interconnect cable will allow.
Push the power button on the front panel to turn the TTPSU on - When the power supply
is switched on, the Rega logo will illuminate RED, This indicates that 33 rpm is selected.
To activate 45 rpm, press the button again and the Rega logo will illuminate GREEN,
indicating 45 rpm has been selected.
CONNECTION TO THE AMPLIFIER
The tonearm external phono leads must be connected to your amplifier’s phono stage.
Connect as follows : Red right channel / Black left channel. If your amplifier does not
have an integrated phono stage you will require an external stage (sold separately).
9
FRONT PANEL CONTROLS
Rega logo
‘speed indicator’
Power switch
331/3 / 45RPM
Speed change
REAR PANEL CONNECTIONS
Connect to Rega PS1
24V transformer
Turntable power connection
.
10
CARE OF YOUR TURNTABLE
Mount the turntable on a rigid, level surface. Avoid mounting on hollow or heavy
cabinets or anything mounted on a flexible wooden floor. The Rega turntable support is
the ideal solution.
Keeping the lid closed while playing records will prevent dust falling on to the record
surface and should make cleaning unnecessary. Depending on the room environment
and ambient temperature, playing with the lid open may offer sonic improvements. You
can experiment to optimise the performance best suited to your room.
Do not use any record cleaner that works while the record is playing or any cleaners
that use water or solvents. If you keep your records stored in their sleeves, avoid
touching the playing surfaces and keep all water and fluids away, cleaning should not
be necessary. Do not worry about visible dust on the record surface as this is brushed
aside by the stylus during play. Dust collected on the stylus can be easily blown away.
In general, record cleaning is overdone and one should not believe all the claims made
by record cleaner manufacturers.
It is recommended to leave the turntable running during a record playing session.
Switch on before the session and only switch off after you have finished.
Do not lift the centre hub out from the main bearing. The bearing is factory assembled
with a film of special thick lubricant. If the centre hub is removed this film may be
disturbed and the accuracy of the turntable could be affected.
The arm earth (or ground) is automatically connected through the arm cable screening.
No other earth method should be necessary.
11
Do not use any polish on the turntable or lid. To clean, wipe gently with a soft cotton
duster (slightly damp only if required).
Rega turntables are designed to optimise performance for music reproduction and
therefore no compromises have been made to give quick start times. The normal time
taken for full speed to be reached is between 2 and 5 seconds.
Warning: Any attempt to repair or modify the turntable or tonearm by persons other
than Rega approved personnel may invalidate the guarantee. Should you experience any
problem with your turntable please contact your Rega dealer.
TRANSPORTING YOUR RP8
Should you need to transport your RP8, to avoid any possible transit damage, the
following recommendations must be followed. Remove tonearm balance weight and
secure the arm in its rest with tape or covered wire. This will ensure no sudden or
violent movement is transmitted to the delicate bearings. To remove platter , hold down
the hub centre at the same time as lifting the platter on each side.
NEVER place your RP8 upside-down or on its side. This would allow oil in the
hub/bearing assembly to leak and cause speed and/or wear problems. If you have to
ship your turntable or use a carrier, save and use ALL of the original packaging.
12
OWNERS LOG
(1)
Owner.......................................................................................................................................................
Date...........................................................................................................................................................
Where Purchased.................................................................................................................................
(2)
Owner.......................................................................................................................................................
Date...........................................................................................................................................................
Where Purchased................................................................................................................................
(3)
Owner.......................................................................................................................................................
Date...........................................................................................................................................................
Where Purchased................................................................................................................................
(4)
Owner.......................................................................................................................................................
Date...........................................................................................................................................................
Where Purchased................................................................................................................................
(5)
Owner.......................................................................................................................................................
Date...........................................................................................................................................................
Where Purchased................................................................................................................................
13