1
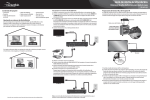
5 Switch the Power switches on the transmitter and receiver to the ON position (it does not
matter which one you power on first). The HDMI input port LED on the transmitter should
light continuously (stop blinking) to indicate that the desired input is selected. If this doesn't
happen automatically, use the included remote control or HDMI Select Switch on the back of
the transmitter to select the desired input port. For more details on HDMI port switching,
see your User Guide.
Note: The Power and Link Status indicator LED will flash while the transmitter and receiver
establish a connection. Once the connection has been established, these indicators will light
continuously (stop flashing).
Note: The transmitter and receiver are pre-paired and should discover each other shortly
after being powered on. However, should you experience an excessively long delay (over five
minutes) for the link to be established, press the HDMI/WVAN switch on the back of the
transmitter for at least three seconds to establish the link (the receiver must also be
powered on during this process).
For more detailed instructions on operating the WirelessHD kit, please refer to the included User
Guide section, “Using the WirelessHD kit”.
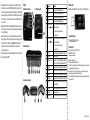
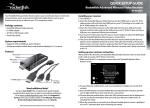
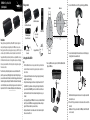
Features
Transmitter front/top panel
Receiver front/top panel
#
Component
Description
Remote control
1
2
3
4
5
HDMI 4
HDMI 3
HDMI 2
HDMI 1
Power and link status
indicator (transmitter)
Note: Remove the plastic film from the remote control before to using it for the first time.
6
Power and link status
indicator (receiver)
Lights to indicate that this HDMI input is selected.
Lights to indicate that this HDMI input is selected.
Lights to indicate that this HDMI input is selected.
Lights to indicate that this HDMI input is selected.
Blinking—Power is on and the transmitter is in sleep mode or
searching for the receiver.
On—The transmitter and receiver are linked.
Off—The power is off.
Blinking—Power is on and the receiver is in sleep mode or
searching for the transmitter.
On—The transmitter and receiver are linked.
Off—The power is off.
Connect the power adapter labeled “Transmitter” to this jack.
Turns the unit on or off.
Press quickly (<1 second) to switch HDMI inputs; or hold for at
least 3 seconds to join a Wireless Video Area Network (WVAN).
Connect an HDMI source device with a high-speed HDMI cable.
Connect an HDMI source device with a high-speed HDMI cable.
Connect an HDMI source device with a high-speed HDMI cable.
Connect an HDMI source device with a high-speed HDMI cable.
Connect this port to an HDMI input on the TV or projector, using
high-speed HDMI cable.
Connect the power adapter labeled “Receiver” to this jack.
Turns the receiver on or off.
Insert HDMI cable into these clips for receiver placement stability.
Transmitter back panel
Receiver back and side panels
7
8
9
DC IN jack
Power switch
HDMI select switch
10
11
12
13
14
HDMI 1 jack
HDMI 2 jack
HDMI 3 jack
HDMI 4 jack
HDMI jack
15
16
17
DC IN jack
Power switch
Cable routing clips
One-year limited warranty
Visit www.rocketfishproducts.com for details.
Contact Rocketfish:
For customer service, please call 1-800-620-2790.
www.rocketfishproducts.com
Distributed by Best Buy Purchasing, LLC
7601 Penn Avenue South, Richfield, MN 55423-3645 USA
© 2011 BBY Solutions, Inc., All Rights Reserved. ROCKETFISH is a trademark of BBY Solutions, Inc. All other products
and brand names are trademarks of their respective owners.
Best Buy Imports, S. de R.L. de C.V. Av. Santa Fe 485, Segundo Piso, Colonia Cruz Manca, Programa Parcial de
Desarrollo Santa Fe, Delegación Cuajimalpa, Distrito Federal, México 05349
© 2011 Best Buy UK Distributions Limited. All rights reserved. Distributed by Best Buy Europe Distributions Limited.
1 Portal Way, London W3 6RS
ENGLISH 11-0538