1
Contact 8AMSUNG WORLDWIDE
if you have any questions or comments relating to Samsung products, please contact the SAMSUNG customer care center.
Comuniquese con 8AMSUNG WORLDWIDE
Si desea formular alguna pregunta o comentario en relaci6n con los productos de Samsung, comunJquese con el centro de
atenci6n al cliente de SAMSUNG.
Samsung Electronics Canada Inc., Customer
Service 55 Standish Court Mississauga,
Ontario L5R 4B2 Canada
CANADA
1-800-SAMSU NG(726-7864)
www.samsung.com/ca
Samsung Electronique Canada Inc., Service
la Clientele 55 Standish Court Mississauga,
Ontario L5R 4B2 Canada
U.S.A
1-800-SAMSUNG(726-7864)
www.samsung.com/us
iiiiiiiiiiiiiiiiiiiiiiiiiiiiiiiiiiii!_
Samsung Electronics America, Inc.
105 Challenger Road
Ridgefield Park, NJ 07660-0511
imagine the possibilities
Thank
To
you for purchasing
receive
register
your
more
product
this Samsung
complete
service,
at
www.samsu ng.com/reg ister
I
ModeJ
BN68-02089F-00
Serial
No
product.
please
C3 important
Warranty information
Regarding
Television
Format Viewing
See the warranty card for more information on warranty terms.
Wide screen format LCD Displays (16:9, the aspect ratio of the screen width to height) are primarily designed to view wide screen
format full-motion video. The images displayed on them should primarily be in the wide screen 16:9 ratio format, or expanded to
fill the screen if your model offers this feature and the images are constantly moving. Displaying stationary graphics and images
on screen, such as the dark sidebars on nonexpanded standard format television video and programming, should be limited to no
more than 5% of the total television viewing per week.
Additionally, viewing other stationary images and text such as stock market reports, video game displays, station Iogos, web sites
or computer graphics and patterns, should be limited as described above for all televisions. Displaying stationary images that
exceed the above guidelines can cause uneven aging of LCD Displays that leave subtle, but permanent burned-in ghost images in
the LCD picture. To avoid this, vary the programming and images, and primarily display full screen moving images, not stationary
patterns or dark bars.
On LCD models that offer picture sizing features, use these controls to view different formats as a full screen picture.
Be careful in the selection and duration of television formats used for viewing. Uneven LCD aging as a result of format selection
and use, as well as burned-in images, are not covered by your Samsung limited warranty.
•
U.S.A Only
The product unit accompanying this user manual is licensed under certain intellectual property rights of certain third parties.
In particular, this product is licensed under the following US patents: 5,991,715, 5,740,317, 4,972,484, 5,214,678, 5,323,396,
5,539,829, 5,606,618, 5,530,655, 5,777,992, 6,289,308, 5,610,985, 5,481,643, 5,544,247, 5,960,037, 6,023,490, 5,878,080,
and under US Published PatentApplication No. 2001-44713-A1.
This license is limited to private non-commercial use by end-user consumers for licensed contents. No rights are granted for
commercial use. The license does not cover any product unit other than this product unit and the license does not extend to
any unlicensed product unit or process conforming to ISO/IEC 11172-3 or ISO/IEC 13818-3 used or sold in combination with
this product unit. The license only covers the use of this product unit to encode and/or decode audio files conforming to the
ISO/IEC 11172-3 or ISO/IEC 13818-3. No rights are granted under this license for product features or functions that do not
conform to the ISO/IEC 11172-3 or ISO/IEC 13818-3.
Other countries
•
The product unit accompanying this user manual is licensed under certain intellectual property rights of certain third parties.
This license is limited to private non-commercial use by end-user consumers for licensed contents. No rights are granted for
commercial use. The license does not cover any product unit other than this product unit and the license does not extend to
any unlicensed product unit or process conforming to ISO/IEC 11172-3 or ISO/IEC 13818-3 used or sold in combination with
this product unit. The license only covers the use of this product unit to encode and/or decode audio files conforming to the
ISO/IEC 11172-3or ISO/IEC 13818-3. No rights are granted under this license for product features or functions that do not
conform to the ISO/IEC 11172-3 or ISO/IEC 13818-3.
SAMSUNG ELECTRONICS NORTH AMERICAN LIMITED WARRANTY STATEMENT
Subject to the requirements, conditions, exclusions and limitations of the original Limited Warranty supplied with Samsung
Electronics (SAMSUNG) products, and the requirements, conditions, exclusions and limitations contained herein, SAMSUNG
will additionally provide Warranty Repair Service in the United States on SAMSUNG products purchased in Canada, and
in Canada on SAMSUNG products purchased in the United States, for the warranty period originally specified, and to the
Original Purchaser only.
The above described warranty repairs must be performed by a SAMSUNG Authorized Service Center. Along with this
Statement, the Original Limited Warranty Statement and a dated Bill of Sale as Proof of Purchase must be presented to the
Service Center. Transportation to and from the Service Center is the responsibility of the purchaser.
Conditions covered are limited only to manufacturing defects in material or workmanship, and only those encountered in
normal use of the product.
Excluded, but not limited to, are any originally specified provisions for, in-home or on-site services, minimum or maximum
repair times, exchanges or replacements, accessories, options, upgrades, or consumables.
For the location of a SAMSUNG Authorized Service Center, please call toll-free:
in the United States : 1-800-8AMSUNG (t-800-72G7864)
in Canada : 1-800-SAMSUNG
[]
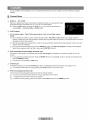
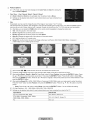
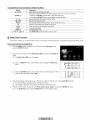
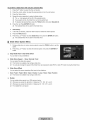
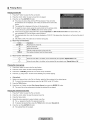
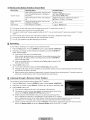
Precautions
When Displaying
a Still image
A still image may cause permanent damage to the TV screen
•
Do not display a still image on the LCD panel for more than 2 hours as it can cause screen image retention. This image
retention is also known as screen burn. To avoid such image retention, reduce the degree of brightness and contrast of the
screen when displaying a still image.
•
Watching the LCD TV in 4:3 format for a long period of time may leave traces of borders displayed on the
left, right and center of the screen caused by the difference of light emission on the screen. Playing a DVD or
a game console may cause a similar effect to the screen. Damages caused by the above effect are not
covered by the Warranty.
•
Displaying still images from Video games and PC for longer than a certain period of time may produce partial after-images. To
prevent this effect, reduce the 'brightness' and 'contrast' when displaying still images.
© 2009 Samsung Electronics Co., Ltd. All rights reserved.
CONTENTS
[] List of Features..................................................................................2
" Accessories .......................................................................................2
iViewing the Contro] Panel .................................................................3
eeViewing the Remote Control ..............................................................4
[] Instalhng Batteriesin the Remote Control ........................................ 5
iViewing the menus .......................................................................... 5
,-Plug & Pla_ Feature..........................................................................."1
,-Connecting VHF and UHF Antennas .................................................8
,- Connecting CaNe TV ........................................................................ 9
,- Viewing the Connection Panel .........................................................10
[] Channel Menu ............................................................................. 13
,- Managing Channels.........................................................................14
,- Configuring the Picture Menu ................................
16
,- Viewing Picture-in-Picture................................................................20
! Using Your TV as a Computer (PC) Displa} .................................... 2!
•" Setting up the TV with your PC........................................................22
"Configuring the Sound Menu...........................................................23
" Configuring the Setup Menu ............................................................25
,- Setting the Time...............................................................................28
,- Network Connection ........................................................................30
,- Setting the Network .........................................................................33
u Sorting the Music List ................................................................... 46
" Music _ist Option Menu ................................................................. 47
" Playing Music .................................................................................48
" Music Play option Menu ............................................................... 49
Ill Sorting the Movie List ......................................................................49
,- Movie List Option Menu ................................................................ 50
,- Playing a Movie File ....................................................................... 50
,- Movie Play Option Menu ............................................................... 53
,- Using the Setup Menu .....................................................................54
" Connecting Anynet+ Devices.......................................................... 55
" Setting UpAnynet+ ........................................................................ 56
" Switching betweenAnynett Devices ............................................... 56
,- Recording ........................................................................................57
,- Listening through a Receiver (Home Theater)................................. 57
,- Troubleshooting for Anynet÷............................................................58
,- Using InfoLink................................................................................ 59
,- Using the Weather Service ............................................................ 59
,- Using the News Service .............................................................. 60
,- Using the Stock Service ..................................................................60
mEInfoLink Setu;c .................................................................................61
,- Troubleshooting ...............................................................................62
,- Installingthe Stand..........................................................................63
,- Disconnectingthe Stand................................................................ 63
,- Assembling the Cables.................................................................. 64
,- Wall Mount Kit Specifications (VESA) .............................................64
,- Anti-Theft Kensington Lock .............................................................65
,- Securingthe Installation Space .......................................................65
,- Securingthe TV to a Wa I or Cabine[ .............................................66
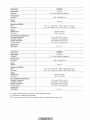
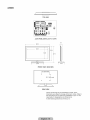
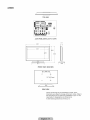
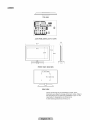
,- Specifications ..................................................................................67
•- Dimensions......................................................................................71
,- Input Menu.......................................................................................36
,- Support Menu ..................................................................................36
,- Connecting a USB Device ...............................................................38
,- Media Pla_ Function ........................................................................39
,- Sorting the Photo List ................................................................... 41
•- Photo List C ;tion Menu ...................................................................42
,- Wewlng a Photo or Slide Sho.......................................................... 43
,- Slide Show Option Menu...................................
44
J
License
I
$R$(0)
TruSurround
technology
[I]
OOLBY
HD. SRS and (,)
is _ncorporated
symbol are trademarks
of SRS Labs. tnc. TruSurround
HD
under license from SRS Labs. Inc.
Manufactured under license from Dolby Laboratories. Dotby and the double-D symbol are
trademarks of Dolby Laboratories.
oIr;|TAL
DivX® Certified to play DivX® video, including premium content.
Symbol
!
Press
Note
One-Touch
E.g:Hsh,_l
Button
TOOL Button
To use your TV, you first have to set it up to suit your environment.
Figures and illustrations in this User Manual are provided for reference only and may differ from actual product appearance.
Product design and specifications may be changed without notice in order to enhance product performance.
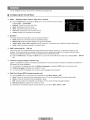
List of Features
•
•
Adjustable picture settings that can be stored in the TV's memory.
Automatic timer to turn the TV on and off.
•
Aspecial sleep timer.
•
Excellent Digital Interface & Networking : With a built-in HD digital tuner, nonsubscription HD broadcasts can be viewed with
no Cable Box/Satellite receiver (Set-Top Box) needed.
•
HDMI/DVl connection of your PC to this TV.
•
Excellent Picture Quality
•
SRS TruSurround HD provides a virtual surround system.
•
Media Play: Allows you to play music files, pictures, and movies saved on a USB.
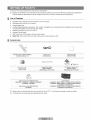
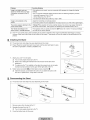
Accessories
Remote
control (BN59,00853A)Power
& Batteries (AAA x 2)
Cord
(3903-000144)
Cleaning Cloth
(BN63-01798B)
(M4xL16)
warran _ card]
ty
Safety Guide
Holder,wire Cable
(BN61'05596A)(BN96,10788A)
(Depending on the model)
TV-Holder & screw (xi)
(Depending on the model)
(M4xL16)
+=°==+=°_7+°=stan+d
screw (x4i(6002-001294)_:_:_
LN37B650, LN40B630, LN46B630, LN52B630,
LN40B640 LN46B640
Stand Screw (XS) (6002,001294)(LN40B640:
LN32B650
_+=+_++=+
=_
cover_.+Bottom
(LN32B650: BN63-05284A, LN37B650: BN63-05285A)
(LN40B630; BN63-05286A LN46B630: BN63.05287A
LN52B630: BN63.05478A)
BN63-05385A, LN46B640: BN63-05254A;
LN55B640: BN63-05452A)
Please make sure the following items are included with your LCD TV. If any items are missing, contact your dealer.
The items color and shape may vary depending on the model.
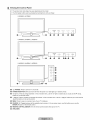
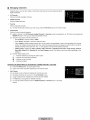
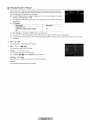
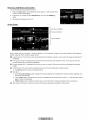
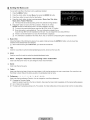
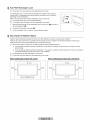
Viewing the Control Panel
The product color and shape may vary depending on the model.
The front panel buttons can be activated by touching them with your finger.
LN32B650, LN37B650
]
SOURCE
MENU
-
VOL +
v
CH ^
_ fl_
|
]
LN40B630, LN46B630, LN52B630
__._J .
s%cE_voL+ CL_'_
/ vc.^ MENU
]
1
LN40B640, LN46B640, LN55B640
SOURCE
MENU
_,
o0
+
VOL_
^
_0
SaMS_N_
0
0 (POWER): Press to turn the TV on and off.
POWER INDICATOR: Blinks and turns offwhen the power is on and lights up in stand-by mode.
V CH A: Press to change channels. In the on-screen menu, use the V CH A buttons as you would use the T and A
buttons on the remote control.
O
=VOL+: Press to increase or decrease the volume. In the on-screen menu, use the =VOL+
and 1_buttons on the remote control.
buttons as you would use the
MENU: Press to see an on-screen menu of your TV's features.
SOURCE C,,J:Toggles between all the available input sources. In the on-screen menu, use this button as you use the
ENTERI:B# button on the remote control.
O
REMOTE CONTROL SENSOR: Aim the remote control towards this spot on the TV.
0
SPEAKERS
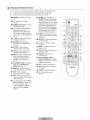
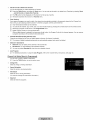
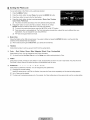
Viewing the Remote Control
You can use the remote control up to a distance of about 23 feet from the TV.
The performance of the remote control may be affected by bright light.
The product color and shape may vary depending on the model.
O
POWER : Turns the TV on and
off.
TV : Selects the TV mode
directly.
O
NUMERIC BUTTONS : Press to
change the channel.
O
[_]: Press to select additional
channels (digital) being
broadcast by the same station.
For example, to select channel
'54-3', press '54', then press '[_]'
and '3'.
_) ON/OFF _: Pressing the
ONIOFF F_q light button toggles
between on and off. When the
remote control is on, and a button
is pressed on the remote control,
the remote control buttons will
be lit for a moment. (Using the
remote control with the ON/OFF
light button set to On will
reduce the battery usage time.)
PRE-CH : Enables you to return
to the previous channel you were
watching.
=VOL+
: Press to increase or
decrease the volume.
O
SOURCE: Press to display
and select the available video
sources.
CH LIST : Used to display
Channel Lists on the screen.
O
TOOLS : Use to quickly select
frequently used functions.
O
INFO.L : Press to use the News,
Stock Market and Weather
Forecast information services
available over Samsung's
network.
_) COLOR BUTTONS : Use these
buttons in the Channel list,
Media Play menu, etc.
MEDIA.P: Allows you to play
music files, pictures, and movies.
li_ INFO: Press to display
information on the TV screen.
t_) MTS: Press to choose stereo,
mono or Separate Audio Program
(SAP broadcast).
Use these buttons in the Media
Play and Anynet + modes. ([_]:
This remote can be used to
control recording on Samsung
recorders with the Anynet +
feature)
MUTE _ : Press to temporarily
cut off the sound.
t_) v CH A
channels.
: Press to change
_) MENU : Displays the main onscreen menu.
FAV.CH : Press to switch to your
favorite channels.
RETURN : Returns to the
@--
previous menu
_) UPA 1 DOWNY/LEFT_
1
RtGHT_. /ENTER _',J : Use to
select on-screen menu items and
change menu values.
EXIT : Press to exit the menu.
_) SRS: Selects SRS TruSurround
HD mode.
Q
P.SIZE: Picture size selection.
CO: Controls the caption
decoder.
@._
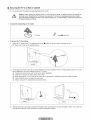
Installing Batteries
in the Remote Control
1,
Lift the cover at the back of the remote control upward as shown in the figure.
2.
Install two AAA size batteries.
Make sure to match the '+' and '-' ends of the batteries with the diagram inside
the compartment.
3,
Replace the cover.
Remove the batteries and store them in a cool, dry place if you won't be using the
remote control for a long time. (Assuming typical TV usage, the batteries should
last for about one year.)
If the remote control doesn't work, check the following:
-
Is the TV power on?
-
Are the plus and minus ends of the batteries reversed?
Are the batteries drained?
-
Is there a power outage or is the power cord unplugged?
-
Is there a special fluorescent light or neon sign nearby?
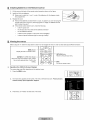
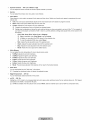
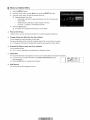
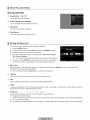
Viewing the menus
Before using the TV, follow the steps below to learn how to navigate the menu in order to select and adjust different functions.
MENLIButton
Display the main on-screen menu.
I
v_-°_
_L_
I
I
@__
'_,
_
RETURN Button
Move the cursor and select an item. Select
the currently selected item. Confirm the
setting.
ENTER _/DIRECTION
Button-
[]
Operation
___
EXIT
Return to the previous menu.
Exit the on-screen menu.
the OSD (On Screen Display)
The access step may differ depending on the selected menu.
1. Press the MENU button.
2.
The main menu appears on the screen. The menu's left side has icons • Picture, Sound,
Channel, Setup, input, Application, Support.
3.
Press the A. or T button to select one of the icons.
4. Then
press
theENTERIB_
button
toaccess
theicon's
sub-menu.
6. Press
theAorTbutton
toselect
theicon's
submenu.
6.
Press the _ or _. button to decrease or increase the value of a particular item. The
adjustment OSD may differ depending on the selected menu.
Help icon
7.
Press the ENTER _
button to complete the configuration. Press the EXtT button to exit.
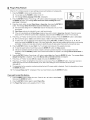
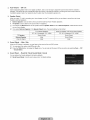
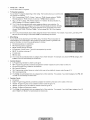
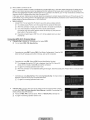
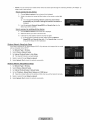
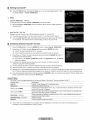
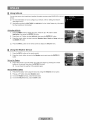
Plug & Play Feature
When the TV is initially powered on, basic settings proceed automatically and subsequently.
1.
Press the POWER (b button on the remote control.
You can also use the POWER O button on the TV.
The message Select Language of the OSD. is displayed.
2.
Press the ENTERIB,_ button. Press the A or T button to select the language, then press
the ENTERIB,_ button. The message Select 'Home Use' when installing this TV in
your home. is displayed.
3.
Press the _ or _. button to select Store Demo or Home Use, then press the ENTER _,_
button. The message Select the Antenna source to memorize, is displayed.
We recommend setting the TV to Home Use mode for the best picture in your home
environment.
Stere Dome mode is only intended for use in retail environments.
If the unit is accidentally set to Store Demo mode and you want to return to Home Use (Standard): Press the volume
button on the TV. When the volume OSD is displayed, press and hold the MENU button on the TV for 5 seconds.
4.
Press the A or T button to memorize the channels of the selected connection. Press the ENTER_
button to select Start.
Air: Air antenna signal. / Cable: Cable antenna signal. / Auto: Air and Cable antenna signals.
In Cable mode, you can select the correct signal source among 8TD, HRC, and IRC by pressing the A., T, 4 or I_
button, then press the ENTER IB,# button. If you have Digital cable, select the cable system signal source for both Analog
and Digital. Contact your local cable company to identify the type of cable system that exists in your particular area.
6.
Press the ENTERIB,# button to select Start. The TV will begin memorizing all of the available channels.
To stop the search before it has finished, press the ENTERIB,# button with Stop selected.
After all the available channels are stored, it starts to remove scrambled channels. The Auto program menu then
reappears. Press the ENTER _,_ button when channel memorization is complete. The message Set the Clock Mode. is
displayed.
6.
Press the ENTERIB,# button. Press the A or T button to select Auto, then Press the ENTERIB,_ button. The message Set to
daylight saving time. is displayed. If you select Manual, Set current date and time, is displayed.
7.
Press the A or T button to select Off, On or Auto, then press the ENTER _
8.
Press the A or _' button to highlight the time zone for your local area. Press the ENTER[E# button. If you have received a
digital signal, the time will be set automatically. If not, refer to the 'Setting the Time' instructions to set the clock.
(see page 28)
9.
The description for the connection method providing the best HD screen quality is displayed. Check the description and press
the ENTER _ button.
button.
10. The message Enjoy your TV. is displayed. When you have finished, press the ENTER _
If you want to reset this feature...
1.
Press the MENU button to display the menu. Press the A or T button to select Setup,
then press the ENTER _ button.
2.
Press the ENTERE}# button again to select Plug & Play.
The Plug & Play feature is only available in the TV mode.
button.
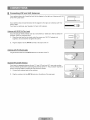
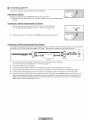
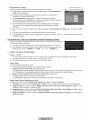
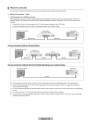
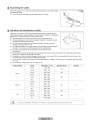
Connecting VHF and UHF Antennas
If your antenna has a set of leads that look like the diagram to the right, see 'Antennas with 300
O Flat Twin Leads' below.
If your antenna has one lead that looks like the diagram to the right, see 'Antennas with 75 O
Round Leads'.
If you have two antennas, see 'Separate VHF and UHF Antennas'.
Antennaswith 300Q FlatTwinLeads
If you are using an off-air antenna (such as a roof antenna or 'rabbit ears') that has 3000 twin
flat leads, follow the directions below.
1.
Place the wires from the twin leads under the screws on a 300-75 O adapter (not
supplied). Use a screwdriver to tighten the screws.
2.
Plug the adaptor into the ANT IN terminal on the back of the TV.
Antennaswith 75 Q RoundLeads
Plugthe antennalead intothe ANT IN terminalon the backof the TV.
Separate VHF and UHF Antennas
If you have two separate antennas for your TV (one VHF and one UHF), you must combine
the two antenna signals before connecting the antennas to the TV. This procedure requires an
optional combiner-adaptor (available at most electronics shops).
1. Connect both antenna leads to the combiner.
2.
Plug the combiner into the ANT IN terminal on the bottom of the rear panel.
Connecting Cable TV
To connect to a cable TV system, follow the instructions below.
Cable without a Cable Box
Plug the incoming cable into the ANT IN terminal on the back of the TV.
Because this TV is cable-ready, you do not need a cable box to view unscrambled cable
channels.
Connecting to a Cable Box that Deserambles All Channels
1.
Find the cable that is connected to the ANT OUT terminal on your cable box.
This terminal might be labeled 'ANT OUT', 'VHF OUT' or simply, 'OUT'.
2.
ANTIN
Connect the other end of this cable to the ANT IN terminal on the back of the TV.
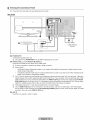
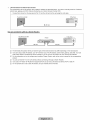
Connecting to a Cable Box that Deserambles Some Channels
If your cable box descrambles only some channels (such as premium channels), follow the instructions below. You will need a twoway splitter, an RF (A/B) switch and four lengths of RF cable. (These items are available at most electronics stores.)
Incoming cable
I
CA_E
_m
/J
RF {NB) Switch
Cabb
Box
1.
Find and disconnect the cable that is connected to the ANT IN terminal on your cable box.
This terminal might be labeled 'ANT IN', 'VHF IN' or simply, 'IN'.
2.
Connect this cable to a two-way splitter.
3.
Connect an RF cable between the OUTPUT terminal on the splitter and the IN terminal on the cable box.
4.
Connect an RF cable between the ANT OUT terminal on the cable box and the B-IN terminal on the RF(A/B) switch.
6.
Connect another cable between the other OUT terminal on the splitter and the A-IN terminal on the RF (A/B) switch.
6.
Connect the last RF cable between the OUT terminal on the RF (A/B) switch and the ANT IN terminal on the rear of the TV.
After you have made this connection, set the A/B switch to the 'A' position for normal viewing. Set the A/B switch to the 'B'
position to view scrambled channels. (When you set the A/B switch to 'B', you will need to tune your TV to the cable box's
output channel, which is usually channel 3 or 4.)
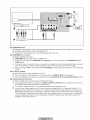
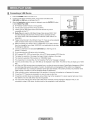
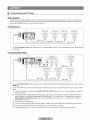
Viewing the Connection Panel
The product color and shape may vary depending on the model.
Rear Panel
Cable Television
Network
O
POWER INPUT
Connects the supplied power cord,
The location of the POWER INPUT may be different depending on its model.
HDMI iN I(DVI), 2, 31DVt AUDIO iN [R-AUDIO-L]
Connects to the HDMI jack of a device with an HDMI output.
No sound connection is needed for an HDMI to HDMI connection.
What is HDMI?
-
HDMl(High-Definition Multimedia Interface), is an interface that enables the transmission of digital audio and video
signals using a single cable.
-
The difference between HDMI and DVl is that the HDMI device is smaller in size and has the HDCP (High Bandwidth
Digital Copy Protection) coding feature installed.
The TV may not output sound and pictures may be displayed with abnormal color when DVD / Blu-ray player / Cable Box /
Satellite receiver (Set-Top Box) supporting HDMI versions older than 1.3 are connected. When connecting an older HDMI
cable and there is no sound, connect the HDMI cable to the HDMI IN I(DVl) jack and the audio cables to the DVl AUDIO
IN JR-AUDIO-L] jacks on the back of the TV. If this happens, contact the company that provided the DVD / Blu-ray player /
Cable Box / Satellite receiver (Set-Top Box) to confirm the HDMI version, then request an upgrade.
HDMI cables that are not 1.3 may cause annoying flicker or no screen display.
Use the HDMI IN I(DVl)jack for DVl connection to an external device. Use a DVl to HDMI cable or DVI-HDMI adapter
(DVl to HDMI) for video connection and the DVl AUDIO IN [R-AUDIO-L] jacks for audio. When using an HDMI / DVl cable
connection, you must use the HDMI IN I(DVl)jack.
O
ANT iN
Connects to an antenna or cable TV system.
1
or
L
O
KENSINGTON LOCK
The Kensington Lock (optional) is a device used to physically fix the system when used in a public place. If you want to use a
locking device, contact the dealer where you purchased the TV.
The location of the Kensington Lock may be different depending on its model.
O
COMPONENT IN 1, 2 / AV IN 1
Connects Component video / audio.
The COMPONENT IN 1 jack is also used as the AV iN 1 jack.
Connect the video cable to the COMPONENT iN 1 [YNIDEO] jack and the audio cable to the COMPONENT iN 1 [RAUDIO-L] jacks.
If you have a 'mono' (non-stereo) VCR, use a Y-connector (not supplied) to connect to the right and left audio input jacks
of the TV. Alternatively, connect the cable to the 'R' jack. If your VCR is stereo, you must connect two cables.
When connecting to AV iN 1, the color of the AV iN 1 [Y/VIDEO] jack (Green) does not match the color of the video cable
(Yellow).
O
PC iN [PC] / (AUDIO)
Connects to the video and audio output jacks on your PC.
If your PC supports an HDMI connection, you can connect this to the HDMmiN I(DVl), 2, 3 or 4 terminal.
If your PC supports a DVI connection, you can connect this to the HDMmiN I(DVm)/ DVmAUDIO IN JR-AUDIO-L] terminal.
DIGITAL AUDIO OUT (OPTICAL)
Connects to a Digital Audio component such as a Home theater receiver.
When a Digital Audio System is connected to the DiGiTAL AUDIO OUT (OPTICAL) jack: Decrease the volume of the TV
and adjust the volume level with the system's volume control.
5.1CH audio is possible when the TV is connected to an external device supporting 5.1CH.
When the Home Theater receiver is set to On, you can hear sound output from the TV's Optical jack. When the TV is
displaying a DTV(air) signal, the TV will send out 5.1 channel sound to the Home theater receiver. When the source is a
digital component such as a DVD / Blu-ray player / Cable Box / Satellite receiver (Set-Top Box) and is connected to the
TV via HDMI, only 2 channel sound will be heard from the Home Theater receiver. If you want to hear 5.1 channel audio,
connect the digital audio out jack on DVD / Blu-ray player / Cable Box / Satellite receiver (Set-Top Box) directly to an
Amplifier or Home Theater, not the TV.
O EX-LINK
Connector
forservice
only.
O AUDIO
OUT
Connects
totheaudio input jacks on your Amplifier/Home
theater.
When an audio amplifier is connected to the AUDIO OUT JR-AUDIO-L] jacks: Decrease the volume of the TV and adjust
the volume level with the Amplifier's volume control.
@
LAN
Connecta LAN cabletothis
porttoconnecttotheNetwork.
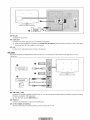
Side Panel
For devices frequently connected/disconnected from your TV, it is convenient to use the jacks on the side of your TV (e.g.
Camcorder).
o
o
0
0
@
;_,iiiiii_i,!_i,!!,_!i!!i!i!ii!i!i!iiiiii!i!ii_'i
'
O
i!i!ii!iiiii!ii!ili
i i i i'i i i i
O USBI(HDD)
/ USB2
Connector for software upgrades and Media Play, etc. You can connect to Samsung's network wirelessly using the 'Samsung
Wireless LAN Adapter' (Sold separately).
For USB HDD, use the USBI(HDD) port.
0
HDMI IN 4
Connect to the HDMI jack of a device with HDMI output.
O
AV IN 2 [VIDEO] / [R-AUDIO-L]
Video and audio inputs for external devices, such as a camcorderor VCR.
You
can
configure
various
settings
foryour
TVchannels
with
features
such
asAuto
Program,
Favorite
Channels,
andSignal
Strength.
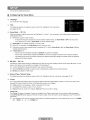
Channel Menu
[]
Antenna -_ Air / Cable
Before your television can begin memorizing the available channels, you must specify the type
of signal source that is connected to the TV (i.e. an Air or a Cable system).
__
[]
Press the TOOLS button to display the Tools menu. You can also set the Antenna by
selecting Tools _ Switch to Cable (or Switch to Air).
Auto Program
Air: Air antenna signal, / Cable: Cable antenna signal. / Auto: Air and Cable antenna
signals
When selecting the Cable TV system: Selects the cable system. STD, HRC and IRC identify various types of cable TV
systems. Contact your local cable company to identify the type of cable system that exists in your particular area. At this point
the signal source has been selected.
After all the available channels are stored, it starts to remove scrambled channels (Removing scrambled channel). The Auto
program menu then reappears.
If you want to stop Auto Programming, press the ENTER IB,_ button. The Stop Auto Program? message will be displayed.
Select Yes by pressing the 4 or _ button, then press the ENTER C_ button.
[]
Clear Scrambled
Channel (digital
channels only)
This function is used to filter out scrambled channels after Auto Program is completed. This process may take up to 20--30
minutes.
To stop searching scrambled channels: Press the ENTER _
press the ENTERIB,_ button.
button to select Stop. Press the 4 button to select Yes, then
This function is only available in Cable mode.
[]
Channel
List
For detailed procedures on using the Channel List, refer to the 'Managing Channels' instructions. (see pages 14~15)
You can select these options by simply pressing the CH LIST button on the remote control.
[]
Fine Tune (analog
channels only)
Use fine tuning to manually adjust a particular channel for optimal reception.
If you do not store the fine-tuned channel in memory, adjustments are not saved.
'*' will appear next to the name of fine-tuned channels.
To reset the fine tuning setting, press the T button to select Reset, then press the ENTER _,_ button.
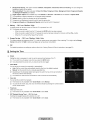
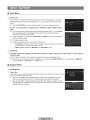
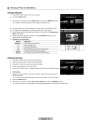
Managing Channels
Using this menu, you can add / delete or set favorite channels and use the program guide for
digital broadcasts.
All Channels
Shows all currently available channels.
Added Channels
Shows all added channels.
Favorite
Shows all favorite channels.
To select the favorite channels you have set up, press the FAV.CH button on the remote control.
Programmed
Shows all current reserved programs.
Select a channel in the All Channels, Added Channels or Favorite screen by pressing the ,& / V buttons, and pressing the
ENTERIB,,Jbutton. Then you can watch the selected channel.
Using the color buttons with the Channel List
Red (Antenna): Switches to Air or Cable.
Green (Zoom): Enlarges or shrinks a channel number.
Yellow (Select): Selects multiple channel lists. You can perform the add/delete or add to Favorite/delete from Favorite
function for multiple channels at the same time. Select the required channels and press the yellow button to set all the
selected channels at the same time. The ..,/ mark appears to the left of the selected channels.
TOOLS (Tools): Displays the Add (or Delete), Add to Favorite (or Delete from Favorite), Timer Viewing, Channel
Name Edit, Select All (or Deseleet All) and Auto Program menus (The Options menus may differ depending on the
situation.)
Channel Status Display Icons
_/
: A channel selected by pressing the yellow button.
V
: A program currently being broadcast.
: A channel set as a Favorite.
(_) :Areserved program.
Channel
List Option
Menu (in All Channels
/ Added
Channels
/ Favorite)
Press the TOOLS button to use the option menu.
Option menu items may differ depending on the channel status.
Add / Delete
You can delete or add a channel to display the channels you want.
All deleted channels will be shown on the All Channels menu.
A gray-colored channel indicates the channel has been deleted.
The Add menu only appears for deleted channels.
You can also delete a channel from the Added Channels or Favorite menu in the same
manner.
Add
toFavorite / Delete from
Favorite
You can set channels you watch frequently as Favorite.
_-_ Press the TOOLS button to display the Tools menu. You can also set the add to (or delete from) Favorites by selecting Tools
Add to Favorite (or Delete from Favorite).
The 'V' symbol will be displayed and the channel will be set as a favorite.
All favorite channels will be shown on Favorite menu.
Timer Viewing
If you reserve a program you want to watch, the channel is automatically switched to the reserved channel in the Channel List;
even when you are watching another channel. To reserve a program, set the current time first.
Only memorized channels can be reserved.
You can set the channel, day, month, year, hour and minute directly by pressing the number buttons on the remote control.
Reserving a program will be shown in the Programmed menu.
Digital Program Guide and Viewing Reservation
When a digital channel is selected, and you press the _ button, the Program Guide for the channel appears. You can reserve
a program according to the procedures described above.
Channel Name Edit (analog channels only)
Channels can labeled so that their call letters appear whenever the channel is selected.
@ The names of digital broadcasting channels are automatically assigned and cannot be labeled.
Select All I Deselect All
=
Select All: You can select all the channels in the channel list.
•
Deselect Alt: You can deselect all the selected channels.
You can only select Deselect All when there is a selected channel.
Auto Program
For detailed procedures on using the Auto Program, refer to the 'Channel Menu' instructions. (see page 13)
Channel
List Option
Menu (in Programmed)
You can view, modify or delete a reservation.
Press the TOOLS button to use the option menu.
Change Info
Select to change a viewing reservation.
Cancel Schedules
Select to cancel a viewing reservation.
information
Select to view a viewing reservation.
(You can also change the reservation information.)
Select All
Select all reserved programs.
You
can
configure
various
picture
options
such
asthepicture
mode,
aspect
ratio,
and
color
tosuityour
personal
preferences.
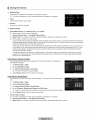
Configuring the Picture Menu
[]
Mode
You can select the type of picture which best corresponds to your viewing requirements.
_-_ Press the TOOLS button to display the Tools menu. You can also set the picture mode by
selecting Tools _ Picture Mode.
Dynamic
Selects the picture for increased definition in a bright room.
Standard
Selects the picture for the optimum display in a normal environment.
Natural
Selects the picture for an optimum and eye-comfortable display.
Natural is not available in PC mode.
Movie
Selects the picture for viewing movies in a dark room.
[] Backlight / Contrast / Brightness / Sharpness / Color / Tint(G/R)
Your television has several setting options that allow you to control the picture quality.
•
Backlight: Adjusts the brightness of LCD back light.
•
Contrast: Adjusts the contrast level of the picture.
•
Brightness: Adjusts the brightness level of the picture
•
Sharpness: Adjusts the edge definition of the picture.
•
Color: Adjusts color saturation of the picture.
•
Tint(G/R): Adjusts the color tint of the picture.
When you make changes to Backlight, Contrast, Brightness, Sharpness, Color or Tint(GIR) the OSD will be adjusted
accordingly.
In PC mode, you can only make changes to Backlight, Contrast and Brightness.
Settings can be adjusted and stored for each external device you have connected to an input of the TV.
The energy consumed during use can be significantly reduced if the brightness level of the picture is lowered, which will
reduce the overall running cost.
[] Advanced
Settings
Samsung's new TVs allow you to make even more precise picture settings than previous
models.
Advanced Settings is available in Standard or Movie mode.
In PC mode, you can only make changes to Dynamic Contrast, Gamma and White
Balance from among the Advanced Settings items.
Black Tone -_ Off / Dark / Darker / Darkest
You can select the black level on the screen to adjust the screen depth.
Dynamic
Contrast _
Off / Low / Medium / High
You can adjust the screen contrast so that the optimal contrast is provided.
Gamma
You can adjust the primary color (red, green, blue) intensity.
Color Space
Color space is a color matrix composed of red, green and blue colors. Select your favorite color space to experience the most
natural color.
•
Auto: Auto color space automatically adjusts to the most natural color tone based on program sources.
•
Native: Native color space offers deep and rich color tone.
•
Custom: Adjusts the color range to suit your preference.
Changing the adjustment value will refresh the adjusted screen.
Settings can be adjusted and stored for each external device you have connected to an input of the TV. For example, if
you have a DVD player connected to HDMI 1 and it is currently selected, settings and adjustments will be saved for the
DVD player.
-
Color: Red, Green, Blue, Yellow, Cyan or Magenta
Color is available when Color Space is set to Custom.
In Color, you can adjust the RGB values for the selected color.
To reset the adjusted RGB value, select Reset.
-
Red: Adjusts the red saturation level of the selected color.
-
Green: Adjusts the green saturation level of the selected color.
-
Blue: Adjusts the blue saturation level of the selected color.
-
Reset: Resets the color space to the default values.
White Balance
You can adjust the color temperature for more natural picture colors.
•
R-Offset: Adjusts the red color darkness.
•
G-Offset:Adjusts the green color darkness.
•
B-Offset: Adjusts the blue color darkness.
•
R-Gain: Adjusts the red color brightness.
•
G-Gain:Adjusts the green color brightness.
•
B-Gain: Adjusts the blue color brightness.
•
Reset: The previously adjusted white balance will be reset to the factory defaults.
Flesh Tone
You can emphasize the pink 'flesh tone' in the picture.
Changing the adjustment value will refresh the adjusted screen.
Edge Enhancement _ Off / On
You can emphasize object boundaries in the picture.
xvYCC -, Off / On
Setting the xvYCC mode to on increases detail and color space when watching movies from an external device (ie. DVD player)
connected to the HDMI or Component IN jacks.
xvYCC is available when the picture mode is set to Movie, and the external input is set to HDMI or Component mode.
[]
Picture
Options
In PC mode, you can only make changes to the Color Tone and Size from among the
items in Picture Options.
Color Tone _ Cool / Normal 1Warm1 / Warm2 1Warm3
@ Warm1, Warm2 or Warm3 is only activated when the picture mode is Movie.
@ Settings can be adjusted and stored for each external device you have connected to an
input of the TV.
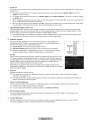
Size
Occasionally, you may want to change the size of the image on your screen. Your TV comes
with several screen size options, each designed to work best with specific types of video input. Your cable box/satellite receiver
may have its own set of screen sizes as well. In general, though, you should view the TV in 16:9 mode as much as possible.
Alternately, you can press the P.SiZE button on the remote control repeatedly to change the picture size.
•
16:9 : Sets the picture to 16:9 wide mode.
•
Zoom1: Magnifies the size of the picture on the screen.
•
Zoom2: Magnifies the size of the picture more than Zoom1.
•
Wide Fit: Enlarges the aspect ratio of the picture to fit the entire screen.
•
4:3 : Sets the picture to 4:3 normal mode.
•
Screen Fit: Use the function to see the full image without any cutoff when HDMI (720p/108Oi/108Op),Component
(1080i/I080p) or DTV (1080i) signals are input.
16:9
Zoom1
Zoom2
Wide Fit
4:3
Screen Fit
%
%
%
When Double ([_], H)
%
After selecting Screen Fit in HDMI (1O80i/1O8Op)or Component (1O80i/108Op) mode, you made need to center the picture:
Press the _ or _. button to select Position, then press the ENTER _ button. Press the A, T, 41 or _. button to move the
picture.
%
%
HD (High Definition): 16:9 - 1O80i/1O8Op(1920xi080), 720p (1280x720)
mode has been set in PIP, the Picture Size cannot be set.
Temporary image retention may occur when viewing a static image on the set for more than two hours.
After selecting Zoom1, Zoom2 or Wide Fit: Press the _. button to Select Position, then press the ENTER [E# button. Press
the A or • button to move the picture up and down. Then press the ENTER[E_ button. Press the _- button to Select Size,
then press the ENTER[E_ button. Press the A or T button to magnify or reduce the picture size in the vertical direction. Then
press the ENTER _ button.
Reset: Press the _ or _- button to select Reset, then press the ENTER[B_ button. You can initialize the setting.
Settings can be adjusted and stored for each external device you have connected to an input of the TV.
Input Source
Picture Size
ATV,AV, Component (480i, 480p)
16:9, Zoornl, Zoom2, 4:3
DTV(1080i), Component (1080i, 1080p),
HDMI (720p, 1080i, 1080p)
16:9, 4:3, Wide Fit, Screen Fit
PC
16:9, 4:3
Digital
NR-, Off / Low / Medium
I High / Auto
If the broadcast signal received by your TV is weak, you can activate the Digital Noise Reduction feature to help reduce any static
and ghosting that may appear on the screen.
When the signal is weak, select one of the other options until the best picture is displayed.
HDMi Black Levet -_ Normal / Low
You can select the black level on the screen to adjust the screen depth.
This function is active only when an external device is connected to the TV via HDMI. The HDMI Black Level function may not
be compatible with all external devices.
Film Mode -_ Off/Auto1/Auto2
The TV can be set to automatically sense and process film signals from all sources and adjust the picture for optimum quality.
•
Film Mode is supported in TV, Video, Component (480i/1080i)
Off: Turns the Film Mode function off.
and HDMI (480i/I080i).
•
Auto1: Automatically adjusts the picture for the best quality when watching a film.
•
Auto2: Automatically optimizes the video text on the screen (not including closed captions) when watching a film.
Blue Only Mode _ Off / On
This function is forAV device measurement experts. This function displays the blue signal only by removing the red and green
signals from the video signal so as to provide a Blue Filter effect that is used to adjust the color and Tint of video equipment such
as DVD players, Home Theaters, etc. Using this function, you can adjust the color and Tint to preferred values appropriate to
the signal level of each video device using the Red / Green / Blue / Cyan / Magenta /Yellow color Bar Patterns, without using an
additional Blue Filter.
@ Blue Only Mode is available when the picture mode is set to Movie or Standard.
Auto Motion Plus 120Hz _ Off I Clear / Standard / Smooth / Custom / Demo
Removes drag from fast scenes with a lot of movement to provide a clearer picture.
•
if you enable Auto Motion Plus 120Hz, noise may appear on the screen. If this occurs, set Auto Motion Plus 120Hz to Off.
Off: Switches Auto Motion Plus 120Hz off.
•
Clear: Sets Auto Motion Plus 120Hz to minimum.
•
Standard: Sets Auto Motion Plus 120Hz to medium.
•
Smooth: Sets Auto Motion Plus 120Hz to maximum.
•
Custom: Adjusts the blur and judder reduction level to suit your preference.
Blur Reduction: Adjusts the blur reduction level from video sources.
Judder Reduction: Adjusts the judder reduction level from video sources when playing films.
Reset: Reset the custom settings.
•
[]
Demo: Displays the difference between Auto Motion Plus 120Hz on and off modes.
Picture Reset -_ Reset Picture Mode / Cancel
Resets all picture settings to the default values.
Reset Picture Mode: Current picture values return to default settings.
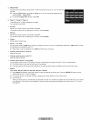
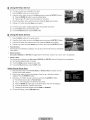
Viewing Picture-in-Picture
You can use the PIP feature to simultaneously watch the TV tuner and one external video
source. This product has one built-in tuner, which does not allow PIP to function in the same
mode. Please see 'PIP Settings' below for details.
_-_ Press the TOOLS button to display the Tools menu. You can also configure PIP related
settings by selecting Tools _ PIP.
If you select the PIP picture sound, refer to the 'Configuring the Sound Menu' instructions.
(see page 24)
PiP Settings
_=:'_Main picture
..........
_8_ub=pi_ct_ure
..............................
Component 1, 2
HDMII/DVI, HDMI2, HDMI3, HDMI4
PC
TV
While V-Chip is in operation, the PiP function cannot be used.
If you turn the TV off while watching in PIP mode and turn it on again, the PIP window will disappear.
You may notice that the picture in the PIP window becomes slightly unnatural when you use the main screen to view a game
or karaoke.
[]
PiP _ On / Off
Youcanactivateor deactivatethe PiPfunction.
Size _ _
l [_;_ l H
l _
You can select a size of the PIP-picture.
Position _ [_
/ _
1_
/ C_
You can select a position of the PIP-picture.
In Double (_],
H)
mode, Position cannot be selected.
AidCable _ Air / Cable
Select either Air or Cable as the input source for the sub-screen.
Channel
You can select the channel for the sub-screen.
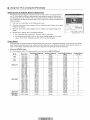
Using Your TV as a Computer (PC) Display
Setting Up Your PC Software (Based on Windows
XP)
The Windows display-settings for a typical computer are shown below. The actual screens on
your PC will probably be different, depending upon your particular version of Windows and
your particular video card. However, even if your actual screens look different, the same basic
set-up information will apply in almost all cases. (If not, contact your computer manufacturer or
Samsung Dealer.)
1.
First, click on 'Control Panel' on the Windows start menu.
2.
When the control panel window appears, click on 'Appearance and Themes' and a display
dialog-box will appear.
3.
When the control panel window appears, click on 'Display' and a display dialogbox will
appear.
4.
Navigate to the 'Settings' tab on the display dialog-box.
•
The correct size setting (resolution) - Optimum: 1920 X 1080 pixels
•
If a vertical-frequency option exists on your display settings dialog box, the correct
value is '60' or '60 Hz'. Otherwise, just click 'OK' and exit the dialog box.
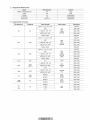
Display Modes
If the signal from the system equals the standard signal mode, the screen is adjusted automatically. If the signal from the system
doesn't equal the standard signal mode, adjust the mode by referring to your videocard user guide; otherwise there may be no
video. For the display modes listed below, the screen image has been optimized during manufacturing.
D-Sub and HDMIIDVI Input
When using an HDMI / DVI cable connection, you must use the HDMI IN I(DVl) jack.
VESA GTF
640 x 350
720 x 400
640 x 480
832 x 624
1152 x 870
720 x 576
1152 x 864
1280 x 720
1280 x 720
1280 x 960
640 x 480
640 x 480
640 x 480
800 x 600
800 x 600
800 x 600
1024 x 768
1024 x 768
1024 x 768
1152 x 864
1280 x 1024
1280 x 1024
1280 x 800
1280 x 800
1280 x 960
1360 x 768
1440 x 900
1440 x 900
1680 x 1050
1280 x 720
1280 x 1024
31.469
31.469
35.000
49.726
68.681
35.910
53.783
44.772
56.456
75.231
31.469
37.861
37.500
37.879
48.077
48.875
48.363
56.476
60.023
67.500
63.981
79.976
49.702
62.795
60.000
47.712
55.935
70.635
65.290
52.500
74.620
70.086
70.087
66.667
74.551
75.062
59.950
59.959
59.855
74.777
74.857
59.940
72.809
75.000
60.317
72.188
75.000
60.004
70.069
75.029
75.000
60.020
75.025
59.810
74.934
60.000
60.015
59.887
74.984
59.954
70.000
70.000
25.175
28.322
30.240
57.284
100.000
32.750
81.750
74.500
95.750
130.000
25.175
31.500
31.500
40.000
50.000
49.500
65.000
75.000
78.750
108.000
108.000
135.000
83.500
106.500
108.000
85.500
106.500
136.750
146.250
89.040
128.943
VESA DMT /
DTV CEA
1920 x I080p
67.500
60.000
148.500
IBM
MAC
VESA CVT
VESA DMT
+/-/+
-/-/-/-
-/+
-/+
-/+
-/+
-/+
-/-/-/-
+/+
+/+
+/+
-/-/-
+/+
+/+
+/+
+/+
-/+
-/+
+/+
+/+
-/+
-/+
-/+
-/+
-/-
+/+
Setting up the TV with your PC
Preset: Press the SOURCE button to select PC mode.
[]
Auto Adjustment
Use the Auto Adjust function to have the TV automatically adjust the video signals it receives.
The function also automatically fine-tunes the settings and adjusts the frequency values and
positions.
_-_ Press the TOOLS button to display the Tools menu. You can also set the Auto Adjustment
by selecting Tools _ Auto Adjustment.
This function does not work in DVI-Digital mode.
[]
Screen
Coarse / Fine
The purpose of picture quality adjustment is to remove or reduce picture noise. If the noise is
not removed by Fine-tuning alone, then adjust the frequency as best as possible (Coarse) and
Fine-tune again. After the noise has been reduced, readjust the picture so that it is aligned on
the center of screen.
PC Position
Adjust the PC's screen positioning if it does not fit the TV screen.
Press the A or T button to adjusting the Vertical-Position. Press the 4 or i_ button to adjust
the Horizontal-Position.
Image Reset
You can replace all image settings with the factory default values.
You
can
configure
thesound
mode,
volume,
multi-track
sound
options,
etc.
Configuring the Sound Menu
[]
Mode _ Standard / Music / Movie / Clear Voice / Custom
_-_ Press the TOOLS button to display the Tools menu. You can also set the sound mode by
[]
•
selecting Tools _ Sound Mode.
Standard: Selects the normal sound mode.
•
•
Music: Emphasizes music over voices.
Movie: Provides the best sound for movies.
•
Clear Voice: Emphasizes voice over other sounds.
•
Custom: Recalls your customized sound settings.
Equalizer
The sound settings can be adjusted to suit your personal preference.
[]
•
Mode: Selects the sound mode among the predefined settings.
•
Balance L/R:Adjusts the balance between the right and left speaker.
•
100Hz / 300Hz / IKHz / 3KHz / 10KHz (Bandwidth Adjustment): To adjust the level of different bandwidth frequencies.
•
Reset: Resets the equalizer settings to the default values.
SRS TruSurround
HD _ Off/On
SRS TruSurround HD is a patented SRS technology that solves the problem of playing 5.1 multichannel content over two
speakers. TruSurround delivers a compelling, virtual surround sound experience through any two-speaker playback system,
including internal television speakers. It is fully compatible with all multichannel formats.
_-_ Press the TOOLS button to display the Tools menu. You can also set the SRS TruSurround HD by selecting Tools _ SRS TS
HB.
[]
Preferred Language
(digital
channels
only)
DigitaI-TV broadcasts are capable of simultaneous transmission of many audio tracks (for example, simultaneous translations of
the program into foreign languages).
You can listen in a language other than the Preferred Language by pressing the MTS button on the remote control.
Preferred Language is available only in Digital TV mode.
You can only select the language from among the actual languages being broadcast.
[]
Multi-Track Sound (MTS) (analog channels only)
Press the MTS button on the remote control repeatedly to select Mono, Stereo or SAP.
•
Mono: Choose for channels that are broadcasting in mono or if you are having difficulty receiving a stereo signal.
•
Stereo: Choose for channels that are broadcasting in stereo.
•
SAP: Choose to listen to the Separate Audio Program, which is usually a foreign-language translation.
Multi-Track Sound is available only in Analog TV mode.
Depending on the particular program being broadcast, you can listen to Mono, Stereo or SAP.
[]
Auto Volume
-_ Off/On
Each broadcasting station has its own signal conditions, and so it is not easy to adjust the volume every time the channel is
changed. This feature lets you automatically adjust the volume of the desired channel by lowering the sound output when the
modulation signal is high or by raising the sound output when the modulation signal is low.
[]
Speaker Select
When you watch TV with it connecting to a Home theater, turn the TV speakers off so you can listen to sound from the Home
theater's (external) speakers.
•
External Speaker: Used to listen to the sound of the External (Home Theater) Speakers.
•
TV Speaker: Used to listen to the sound of the TV Speakers.
The volume and MUTE buttons do not operate when the Speaker Select is set to External Speaker. Please set the volume
on your Home theater.
If you select External Speaker in the Speaker Select menu, the sound settings will be limited
Mute
[]
Sound Select -_ Main / Sub
When the PIP feature is activated, you can listen to the sound of the sub (PIP) picture.
You can select this option when PIP is set to On.
_-_ Press the TOOLS button to display the Tools menu. You can also set the sound of the sub picture by selecting Tools _ PIP
Sound Select.
[]
Sound Reset -_ Reset All / Reset Sound Mode / Cancel
You can restore the Sound settings to the factory defaults.
Reset Sound Mode: Current sound values return to default settings.
You
can
setupadditional
functions.
Configuring the Setup Menu
[]
Language
You can set the menu language.
[]
Time
For detailed procedures on setting up options, refer to the 'Setting the Time' instructions.
(see pages 28~29)
[]
Game Mode _ Off / On
When connecting to a game console such as PlayStation TM or Xbox TM, you can enjoy a more realistic gaming experience by
selecting game menu.
Restrictions on game mode (Caution)
To disconnect the game console and connect another external device, set Game Mode to Off in the setup menu.
If you display the TV menu in Game Mode, the screen shakes slightly.
Game Mode is not available in regular TV and PC mode.
While PiP is in operation, the Game Mode function cannot be used.
If the picture is poor when external device is connected to TV, check if Game Mode is On. Set Game Mode to Off and
connect external devices.
If Game Mode is On:
Picture mode is automatically changed to Standard and cannot be changed.
Sound mode is automatically changed to Custom and cannot be changed. Adjust the sound using the equalizer.
The Reset Sound function is activated. Selecting the Reset function after setting the equalizer resetsthe equalizer
settings to the factory defaults.
[]
BD Wise _ Off / On
Provides the optimal picture quality for SAMSUNG DVD, Blu-ray and Home Theater products which support BD Wise. You can
enjoy a richer picture when using them connected to this Samsung TV.
Connect SAMSUNG products that have BD Wise using an HDMI cable.
When the BD Wise set to On, the picture mode is automatically changed to the optimal resolution.
BD Wise is available in HDMI mode.
[]
Network Type / Network Setup
For detailedprocedureson settingup options,referto the 'Settingthe Network'instructions.(seepages30~35)
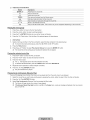
[]
V-Chip
The V-Chip feature automatically locks out programs that are deemed inappropriate for children. The user must enter a PIN
(personal ID number) before any of the V-Chip restrictions are set up or changed.
V-Chip function is not available in HDMI, Component or PC mode.
The default PIN number of a new TV set is '0-0-0-0'
Allow all: Press to unlock all TV ratings. / Block all: Press to lock all TV ratings.
Change PiN
The Change PIN screen will appear. Choose any 4 digits for your PIN and enter them. As soon as the 4 digits are entered,
the Confirm New PIN screen appears. Re-enter the same 4 digits. When the Confirm screen disappears, your PIN has been
memorized.
If you forget the PIN, press the remote-control buttons in the following sequence, which resets the pin to 0-0-0-0 : POWER
(off) _ MUTE _ 8 _ 2 _ 4 _ POWER (on).
V-Chip
Lock
_ Off/ On
You can block rated TV Programs.
TV Parental Guidelines
You can block TV programs depending on their rating. This function allows you to control what
your children are watching.
•
TV-Y: Young children / TV-YT: Children 7 and over / TV=G:General audience / TV-PG:
Parental guidance / TV-14: Viewers 14 and over / TV-MA: Mature audience
•
ALL: Lock all TV ratings. / FV: Fantasy violence / V: Violence / S: Sexual situation / L:
Adult Language / D: Sexually Suggestive Dialog
The V-Chip will automatically block certain categories that are more restrictive. For
example, if you block TV-Y category, then TV-Y7 will automatically be blocked. Similarly,
if you block the TV-G category, then all the categories in the young adult group will be
blocked (TV-G, TV-PG, TV-14 and TV-MA). The sub-ratings (D, L, $, V) work together
similarly.
The V-chip will automatically block certain categories that are 'More restrictive'. For example, if you block L sub-rating in TVPC, then the L sub-ratings in TVo14and TV-MA will automatically be blocked.
MPAA Rating
You can block movies depending on their MPAA rating. The Motion Picture Association of
America(MPAA) has implemented a rating system that provides parents or guardians with
advance information on which films are appropriate for children.
•
G: General audience (no restrictions).
•
PC: Parental guidance suggested.
•
PG=13:Parents strongly cautioned.
•
R: Restricted. Children under 17 should be accompanied by an adult.
•
N0-17: No children under age 17.
•
•
X:Adults only.
NR: Not rated.
The V-Chip will automatically block any category that is 'More restrictive'. For example, if you block the PC-13 category, then
R, NC-17 and X will automatically be blocked also.
Canadian English
•
C: Programming intended for children under age 8.
•
C8+: Programming generally considered acceptable for children 8 years and over to watch on their own.
•
•
G: General programming, suitable for all audiences.
PG: Parental Guidance.
•
•
14+: Programming contains themes or content which may not be suitable for viewers under the age of 14.
18+:Adult programming.
The V-Chip will automatically block any category that is 'More restrictive'. For example, if you block G category, then PC, 14+
and 18+ will automatically be blocked also.
Canadian French
•
G: General
•
8 arts+: Programming generally considered acceptable for children 8 years and over to watch on their own.
•
13 arts+: Programming may not be suitable for children under the age of 13.
•
16 arts+: Programming is not suitable for children under the age of 16.
•
18 arts+: Programming restricted to adults.
@ The V-Chip will automatically block any category that is 'More restrictive'. For example, if you block 8 ans+ category, then 13
ans+, 16 ans+ and 18 ans+ will automatically be blocked also.
Downloadable U,8, Rating
The number of all rating information
Parental restriction information can be used while watching DTV channels
Rat+rigtitle
-1
The number of current rating informat+on I
If information is not downloaded from the broadcasting station, the Downloadable U.8.
rating menu is deactivated.
Parental restriction information is automatically downloaded while watching DTV
channels. It may take several seconds.
The Downloadable U.8. rating menu is available for use after information is
downloaded from the broadcasting station. However, depending on the information from
the broadcasting station, it may not be available for use.
Parental restriction levels differ depending on the broadcasting station. The default
menu name and Downloadable US rating changes depending on the downloaded
information.
Even if you set the On-screen display to your desired language, the Downloadable U.S. Rating menu will appear in English
only.
The rating will automatically block certain categories that are more restrictive.
The rating titles (For example: Humor Level..etc) and TV ratings (For example: DH, MH, H..etc) may differ depending on the
broadcasting station.
How to Reset the TV after the V-Chip Blocks
a Channel
(Emergency
Escape)
If the TV is tuned to a restricted channel, the V-Chip will block it. The screen will go blank and
the following message will appear:
1.
Enter your PIN, then press the A or v' button to temporarily disable the V-Chip Lock.
If you forget the PiN, press the remote-control buttons in the following sequence, which
resets the pin to 0-0-0-0 : POWER (off) _ MUTE _ 8 _ 2 _ 4 _ POWER (on)
[]
Caption (On-Screen Text Messages)
Caption _ Off / On
You can switch the caption function on or off. If captions are not available, they will not be displayed on the screen.
Press the CC button on the remote control to turn the Caption on or off.
(Z_ The Caption feature doesn't work in Component, HDMI or PC modes.
Caption Mode
You can select the desired caption mode.
The availability of captions depends on the program being broadcast.
•
Default I CCt-C04
/ Textl~Text4 (analog channels only)
The Analog Caption function operates in either analog TV channel mode or when a signal is supplied from an external device
to TV. (Depending on the broadcasting signal, the Analog Caption function may operate on digital channels.)
•
Default I Servicel~Service6 / 001~004 / Textl~Text4 (digital channels only)
The Digital Captions function operates on digital channels.
Service1~6 in digital caption mode may not be available depending on the broadcast.
Digital Caption Options (digital channels only)
•
Size: This option consists of Default, 8mall, Standard and Large. The default is Standard.
•
Font Style: This option consists of Default, Style 0 ~ Style 7. You can change the font you want. The default is Style 0.
•
Foreground Color: This option consists of Default, White, Black, Red, Green, Blue, Yellow, Magenta and Cyan. You can
change the color of the letter. The default is White.
•
Background Color: This option consists of Default, White, Black, Red, Green, Blue, Yellow, Magenta and Cyan. You can
change the background color of the caption. The default is Black.
•
Foreground Opacity: This option consists of Default, Transparent, Translucent, Solid and Flashing. You can change the
opacity of the letter.
•
Background Opacity: This option consists of Default, Transparent, Translucent, Solid and Flashing. You can change the
background opacity of the caption.
•
Return to Default: This option sets each of Size, Font Style, Foreground Color, Background Color, Foreground Opacity
and Background Opacity to its default.
Digital Caption Options are available only when Default and Service1 ~ Service6 can be selected in Caption Mode.
@ The availability of captions depends on the program being broadcast.
@ Default means to follow the standard set by the broadcaster.
@ Foreground and Background cannot be set to have the same color.
@ Foreground Opacity and Background Opacity cannot be both set to Transparent.
[]
Melody
_ Off / Low / Medium / High
A melody sound can be set to come on when the TV is powered On or Off.
The Melody does not play.
When no sound is output from the TV because the MUTE button has been pressed.
When no sound is output from the TV because the volume has been reduced to minimum with the VOL = button.
When the TV is turned off by Sleep Timer function.
[]
Energy Saving
-_ Off / Low / Medium / High / Auto
This feature adjusts the brightness of the TV in order to reduce power consumption. When watching TV at night, set the Energy
Saving mode option to High to reduce eye fatigue as well as power consumption.
[]
PiP
For detailedprocedureson settingup options,referto the 'ViewingPicture-in-Picture'instructions.(seepage20)
Setting the Time
[]
Clock
Setting the clock is necessary in order to use the various timer features of the TV.
The current time will appear every time you press the INFO button.
If you disconnect the power cord, you have to set the clock again.
Clock Mode
You can set up the current time manually or automatically.
•
Auto: Set the current time automatically using the time from the digital broadcast.
•
Manual: Set the current time to a manually specified time.
Depending on the broadcast station and signal, the auto time may not be set correctly. If
this occurs, set the time manually.
The Antenna or cable must be connected in order to set the time automatically.
Clock Set
You can set the current time manually.
This function is only available when Clock Mode is set to Manual.
You can set the month, day, year, hour and minute directly by pressing the number buttons
on the remote control.
Time Zone
Select your time zone.
This function is only available when Clock Mode is set to Auto.
DST (Daylight Saving Time) _ Off / On 1Auto
Switches the Daylight Saving Time function on or off.
This function is only available when Clock Mode is set to Auto.
[]
Sleep Timer
The sleep timer automatically shuts off the TV after a preset time (30, 60, 90,120,150 and 180
minutes).
_-_ Press the TOOLS button to display the Tools menu. You can also set the sleep timer by
selecting Tools -, Sleep Timer.
To cancel the Sleep Timer function, select Off.
[]
Timer 1 / Timer 2 / Timer 3
Three different on / off timer settings can be made.
You must set the clock first.
On Time
Set the hour, minute, am/pm, and activate / inactivate.
(To activate the timer with the setting you've chosen, set to Activate.)
Off Time
Set the hour, minute, am/pm, and activate / inactivate.
(To activate the timer with the setting you've chosen, set to Activate.)
Volume
Set the desired volume level.
Source _ TV / USB
You can select the TV or USB device content to be played when the TV turns on automatically. Select TV or USB. (Make sure that
an USB device is connected to your TV.)
When there is only one photo file in the USB, the Slide Show will not play.
Antenna (when Source is set to TV)
Select Air or Cable.
Channel (when Source is set to TV)
Select the desired channel.
Contents (when Source is set to USB)
You can select a folder on the USB Device with music or photo files to be played when the TV turns on automatically.
If the folder name is too long, the folder can not be selected.
If you are using two of the same type USB device, be sure the folder names are different so the correct USB is read.
Repeat
Select Once, Everyday, Mon~Fri, Men~Sat, Sat~Sun or Manual.
When Manual is selected, press the _ button to select the desired day of the week. Press the ENTER _
desired day and the v _ mark will appear.
button over the
You can set the hour, minute and channel by pressing the number buttons on the remote control.
@ Auto Power Off
When you set the timer on, the television will eventually turn off, if no controls are operated for 3 hours after the TV was turned
on by the timer. This function is only available in timer on mode and prevents overheating, which may occur if a TV is on for
too long time.
Network Connection
You can set up the Internet Protocol so that you can communicate with various connected networks.
[]
Network
Connection
- Cable
LAN Connection for a DHCP Environment
The procedures to set up the network using Dynamic Host Configuration Protocol (DHCP) are described below. Since an IP
address, subnet mask, gateway, and DNS are automatically allocated when DHCP is selected, you do not have to enter them
manually.
1. Connect the LAN port on the rear panel of the TV and the external modem with a LAN Cable.
2.
Connect the Modem port on the wall and the external modem with a Modem Cable.
TheModem Port on the Wall
External Modem
TV Rear Panel
(ADSL / VDSL / Cable TV)
Modem Cable
You can connect the LAN via a Sharer (Router).
The Modem Porton the Wall
TV Rear Panel
ExternalModem
IPSharer
(ADSL / VDSL / Cable TV)
Modem Cable
You can connect the LAN port and the TV directly
LAN Cable
depending
on your
network status.
The LAN Port on the Wall
TV Rear Panel
LAN Cable
The terminals (the position of the port and the type) of the external device may differ depending on the manufacturer.
If the IP address allocation by the DHCP server has failed, turn the external modem off, turn it on again after at least 10
seconds and then try again.
For the connections between the external modem and the Sharer (Router), refer to the owner's manual of the corresponding
product.
You can connect the TV to the LAN directly without connecting it through a Sharer (Router)
You cannot use a manual-connection-type ADSL modem because it does not support DHCR You have to use an automaticconnection-type ADSL modem.
LAN Connection for Static IP Environment
The procedures to set up the network using a static IP address are described below. You have to manually enter the IP address,
subnet mask, gateway, and DNS that are provided by your Internet Service Provider (ISP).
1.
Connect the LAN port on the rear panel of the TV and the LAN port on the wall using the LAN cable.
The LAN Port on theWall
TV Rear Panel
O LAN Cable
You can connect the LAN via a Sharer (Router).
The LAN Porton the Wall
TV Rear Panel
IPSharer
The terminals (the position of the port and the type) of the external device may differ depending on the manufacturer.
If you are using a static IP address, your ISP will inform you of the IP address, subnet mask, gateway, and DNS. You must
enter these values to complete the network settings. If you do not know the values, ask your network administrator.
For the information on how to configure and connect a Sharer (Router), refer to the owner's manual for the corresponding
product.
You can connect the TV to the LAN directly without connecting it through a Sharer (Router).
If you use an IP Sharer (IP Router) that supports DHCP, you can set up the device as either DHCP or static IR
For the procedures to use a static IP address, ask your Internet Service Provider.
[]
Network Connection =Wireless
Youcanconnectto the networkwirelesslythrougha wirelessIPsharer.
TV Side Panel
LAN Cable
1,
Connect the 'Samsung Wireless LAN Adapter' into the USBI (HDD) or LISB2 terminal of the TV.
You must use the 'Samsung Wireless LAN Adapter'(WlS09ABGN) to use a wireless network.
Samsung's Wireless LAN adapter is sold separately. The WIS09ABGN Wireless LAN adapter is offered by select retailers,
Ecommerce sites and Samsungparts.com.
To use a wireless network, your TV must be connected to a wireless IP sharer. If the wireless IP sharer supports DHCP,
your TV can use a DHCP or static IP address to connect to the wireless network.
Samsung's Wireless LAN adapter supports IEEE 802.11A, IEEE 802.11B, IEEE 802.11G, IEEE 802.11N.
If the wireless IP sharer allows you to turn the Ping connection function on/off, turn it on.
Select a channel for the wireless IP sharer that is not currently being used. If the channel set for the wireless IP sharer is
currently being used by another device nearby, this will result in interference and communications may fail.
If you apply a security system other than the systems listed below, it will not work with the TV.
-
When applying the security key for the AP (wireless IP sharer), only the following is supported.
1) Authentication Mode : OPEN, SHARED, WPAPSK, WPA2PSK
2) Encryption Type : WEP, TKIE AES
-
When applying the security key for the Ad-hoc mode, only the following is supported.
1) Authentication Mode : SHARED, WPANONE
2) Encryption Type : WEP, TKI£ AES
If your AP supports WPS(Wi-Fi Protected Setup), you can connect to the network via PBC (Push Button Configuration) or
PIN (Personal Indentification Number). WPS will automatically configure the SSID and WPA key in either mode.
If the device isn't certified, it may not connect to the TV via the 'Samsung Wireless LAN Adapter'.
Setting the Network
[]
Network Type
Select Cable or Wireless as the method to connect to the network.
The menu is activated only if the 'Samsung Wireless LAN Adapter' is connected.
Cable
Connect to the network using a cable.
Wireless
Connect to the network wirelessly.
[]
Network Setup
Cable Network Setup (when Network Type is set to Cable)
Please check if the LAN cable is connected.
•
Internet Protocol Setup _ Auto Setup / Manual Setup
=
Network Test: You can test or confirm the network connection status after setting up the network.
When unable to connect to a wired network
If your Internetservice provider has registered the MAC address of the device used to connect to the Internet for the first time
and authenticates the MAC address each time you connect to the Internet, your TV may not be able to connect to the Internet
as the MAC address differs from that of the device (PC).
In this case, ask your Internet service provider about the procedures to connect devices other than your PC (such as your TV)
to the Internet. If your Internet service provider requires an ID or password to connect to the Internet (network), your TV may
not be able to connect to the Internet. In this case, you have to enter your ID or password when connecting to the Internet
using an Internet Sharer (Router).
The internet connection may fail due to a firewall problem. In this case, contact your Internet service provider. If you cannot
connect to the Internet even if you have followed the procedures of your Internet service provider, please contact Samsung
Electronics at 1-800-SAMSUNG.
Cable Network
Setup=Auto
Setup
If you connect the LAN cable and it supports DHCP, the Internet Protocol (IP) Settings are
automatically configured.
1.
Set Network Type to Cable.
2.
Select Cable Network Setup.
3.
Set Internet Protocol Setup to Auto Setup.
4.
Select Network Test to check the network connectivity.
The Internet Protocol is set automatically.
Cable Network
Setup=Manual
To connect the TV to the LAN using a static IP address, you must set up the Internet Protocol
dP).
1.
Set Network Type to Cable.
2.
Select Cable Network Setup.
3.
Set Internet Protocol Setup to Manual Setup.
4.
Set up mPAddress, Subnet Mask, Gateway and DNS Server,
&
Select Network Test to check the network connectivity.
Press the number buttons on the remote control when you set the Network manually.
Wireless Network Setup
The menu is activated only if the 'Samsung Wireless LAN Adapter' is connected.
•
Internet Protocol Setup _ Auto Setup / Manual Setup
=
Network Test: You can test or confirm the network connection status after setting up the network.
%
When unable to connect to an AP
Your TV may fail to locate an AP that is configured as a private SSID type. In this case, please change the AP settings and try
again. If your Internet service provider has registered the MAC address of the device used to connect to the Internet for the
first time and authenticates the MAC address each time you connect to the Internet, your TV may not be able to connect to the
Internet as the MAC address differs from that of the device (PC).
In this case, ask your Internet service provider about the procedures to connect devices other than your PC (such as your TV)
to the Internet. If you cannot connect to the Internet even if you have followed the procedures of your Internet service provider,
please contact a Samsung Electronics at 1-800-SAMSUNG.
Select a network
Access Point: You can select the IP sharer to use when using a wireless network.
If a wireless Access Point is not in the Access Point list, press the Red button.
When the connection is made, you will be returned to the screen automatically.
If you have selected an Access Point with a security authentication:
The Security Key input screen appears. Enter the security key and press the
Blue button on the remote control.
If security encryption type is WEP, 0--9,A~F will be available when you input
security key.
Connecting
=
WPS (Wi-Fi Protected Setup)
If Security Key is already set: In access point list, select WPS.
You can select PBC, PiN, Security Key.
Connecting by using PBC: Select a PBC (Push Button Configuration). Press the PBC
button on the AP (access point) within 2 minutes, and wait for connection.
Connecting by using PiN: Select a PiN (Personal Identification Number).
The message showing the PIN Code is displayed. Input the PIN Code at AP
device within 2 minutes. Select OK and wait for connection.
Try again if connecting operation doesn't work
When the connection is not established although tried again, reset the access point. Please refer to a manual of each
access point.
Connecting by using Security Key: When selecting Security Key, the input window is
displayed. Input the security key and press Blue button.
Try again if connecting operation doesn't work.
If Security Key is not set: When the security setting of AP that supports WPS is NONE,
you can select PBC, PiN, None Security. None Security is capable of connecting to AP
directly without using WPS function.
Process of PBC, PiN is same as above. Refer to if Security Key is already set.
Try again if connecting operation doesn't work.
Ad-hoc:
You
can
connect
toamobile
device
without
anaccess
point
through
the'Samsung
Wireless
LAN
Adapter'
by
using
apeer
topeer
network.
Now to connect to new Ad-hoc
1.
Choose Select a network, then a device list is displayed.
2. While in the device list, press the Blue button on the remote or select Ad=
hoc.
@ The message The existing network system may have limited
functionality, Do you want to change the network connection?
displayed.
3.
is
Input the generated Network Name(SSID) and Security Key into the
device you want to connect.
Now to connect
an existing Ad=hoc device
1.
Choose Select a network, the device list is displayed.
2.
Select the device you want in the Device list.
3.
If security key was applied, input the security key again.
If network doesn't operate normally, please check the Network
Name(SSID) and Security Key again. If the Security Key is incorrect,
it may be the reason for the malfunction.
Wireless
Network
Setup=Auto Setup
If you want to connect AID,AP should support DHCR Only devices which support Ad-hoc mode
can be connected without DHCR
1.
Set Network Type to Wireless.
2.
Select Wireless Network Setup.
3.
Set Internet Protocol Setup to Auto Setup,
The Internet Protocol is set automatically.
4.
Select a network through Select a network.
6.
Select Network Test to check the network connectivity.
Wireless
Network
Setup=Manual
Setup
1.
Set Network Type to Wireless.
2.
Select Wireless Network Setup.
3.
Set Internet Protocol Setup to Manual Setup.
4.
Set up mPAddress, Subnet Mask, Gateway and DN8 Server.
@ Press the number buttons on the remote control when you set the Network manually.
5.
Select a network through Select a network.
6.
Select Network Test to check the network connectivity.
input Menu
[]
Source
List
Use to select TV or other external inputsources such as DVD / Blu-ray players / Cable Box /
Satellite receivers (Set-Top Box) connected to the TV. Use to select the input source of your
choice.
Press the SOURCE button on the remote control to view an external signal source.
TV/AVI/AV2
USB
/ Component1 / Component2 / PC / HDMII/DVI / HDIVII2/ HDMI3 / HDMI4 /
You can choose only those external devices that are connected to the TV. In the Source
List, connected inputs will be highlighted and sorted to the top. Inputs that are not
connected will be sorted to the bottom.
If USB devices are connected to the USBI(HBD) and USB2 jacks, they are displayed as
USBI and USB2 in order.
PC always stays activated.
Using the color buttons on the remote with the Source list
Red (Refresh): Refreshes the connected external devices. Press this if your Source is
on and connected, but does not appear in the list.
TOOLS (Tools): Displays the Edit Name and Information menus.
[]
Edit Name
VCR / DVD / Cable STB / Satellite STB / PVR STB / AV Receiver / Game / Camcorder / PC / DVl / DVl PC / TV / IPTV / Blu-ray
/ HD DVD 1 DMA
Name the device connected to the input jacks to make your input source selection easier.
When a PC with a resolution of 1920 x I080@60Hz is connected to the HDMI IN I(DVm)port, you should set the HDMiI/DVl
mode to DVl PC in the Edit Name of the input mode.
Support
Menu
Picture Test
If you think you have a picture problem, perform the picture test. Check the color pattern on the
screen to see if the problem still exists.
•
Yes: If the test pattern does not appear or there is noise in the test pattern, select Yes.
There may be a problem with the TV. Contact Samsung's call center for assistance.
•
No: If the test pattern is properly displayed, select No. There may be a problem with your
external equipment. Please check your connections. If the problem still persists, refer to the
external device's user manual.
Sound Test
If you think you have a sound problem, please perform the sound test. You can check the sound by playing a built-in melody sound
through the TV.
If you hear no sound from the TV's speakers, before performing the sound test, make sure Speaker Select is set to TV
speaker in the Sound menu.
The melody will be heard during the test even if Speaker Select is set to External Speaker or the sound is muted by pressing
the MUTE button.
•
Yes: If during the sound test you can hear sound only from one speaker or not at all, select Yes. There may be a problem with
the TV. Contact Samsung's call center for assistance.
•
No: If you can hear sound from the speakers, select No. There may be a problem with your external equipment. Please check
your connections. If the problem still persists, refer to the external device's user manual.
Signal Strength (digital channels only)
Unlike analog channels, which can vary in reception quality from 'snowy' to clear, digital (HDTV) channels have either perfect
reception quality or you will not receive them at all. So, unlike analog channels, you cannot fine tune a digital channel. You can,
however, adjust your antenna to improve the reception of available digital channels.
If the signal strength meter indicates that the signal is weak, physically adjust your antenna to increase the signal strength.
Continue to adjust the antenna until you find the best position with the strongest signal.
[]
Software Upgrade
Samsung may offer upgrades for the TV's firmware in the future. These upgrades can
be performed via the TV when it is connected to the Internet, or by downloading the new
firmware from samsung.com to a USB memory device.
TV Side Panel
Current Version is the software already installed in the TV.
Alternative Software (Backup) shows the previous version that will be replaced.
Software is represented as 'Year/Month/Day_Version'. The more recent the date, the
newer the software version. Installing the latest version is recommended.
By USB
Insert a USB drive containing the firmware upgrade downloaded from samsung.com into the
TV. Please be careful to not disconnect the power or remove the USB drive while upgrades
are being applied. The TV will turn off and turn on automatically after completing the firmware
upgrade. Please check the firmware version after the upgrades are complete (the new
version will have a higher number than the older version).
When software is upgraded, video and audio settings you have made will return to their
default (factory) settings. We recommend you write down your settings so that you can easily
reset them after the upgrade.
By Online
Upgrades the software using the Internet.
First, configure your network. For detailed procedures on using the Network Setup, refer to the 'Setting the Network'
instructions. (see pages 30~35)
If the internet connection doesn't operate properly, connection can be broken, please retry downloading. If the problem still
happens, download by USB and upgrade.
Alternative Software (Backup)
If there is an issue with the new firmware and it is affecting operation, you can change the software to the previous version.
If software was changed, existing software is displayed.
You can change current software to alternative software by 'Alternative Software'.
[]
HD Connection
Guide
This menu presents the connection method that provides the optimal quality for the HDTV. Refer to this information when
connecting external devices to the TV.
[]
Contact
Samsung
View this information when your TV does not work properly or when you want to upgrade the software. You can view the
information regarding the call center, product and software file download method.
Connecting a USB Device
1,
Press the POWER button to turn the TV on.
2.
Connect a USB device containing photo, music and/or movie files to the
USBI(HDD) or USB2 jack on the side of the TV.
3,
When the Application selection screen is displayed, press the ENTER C_ button
to select Media Play (USB).
TV Side Panel
MTP (Media Transfer Protocol) is not supported.
%
%
The file system supports FAT16, FAT32 and NTFS.
%
Media Play only supports USB Mass Storage Class devices (MSC). MSC
is a Mass Storage Class Bulk-Only Transport device. Examples of MSC
Certain types of USB Digital camera and audio devices may not be
compatible with this TV.
are Thumb drives, Flash Card Readers and USB HDD (USB HUB are not
supported.).
%
Please connect directly to the USB port of your TV. If you are using a separate
cable connection, there may be a USB compatibility problem.
%
Before connecting your device to the TV, please back up your files to prevent
them from damage or loss of data. SAMSUNG is not responsible for any data
file damage or data loss.
%
Connect a USB HDD to the dedicated USBI(HDD) port. Warning: Do not
exceed 1.5 amperes.
%
%
%
%
%
%
Do not disconnect the USB device while it is loading.
%
MP3 files with DRM that have been downloaded from a non-free site cannot be played. Digital Rights Management (DRM)
is a technology that supports the creation of content, the distribution and management of the content in an integrated
and comprehensive way, including the protection of the rights and interests of the content providers, the prevention of the
MSC supports MP3, JPEG and movie files, while a PTP device supports JPEG files only.
The higher the resolution of the image, the longer it takes to display on the screen.
The maximum supported JPEG resolution is 15360X8640 pixels.
For unsupported or corrupted files, the 'Not Supported File Format' message is displayed.
If sort key is set to Basic View, up to I000 files can be displayed in each folder. The other sort key can display up to I0000
files.
illegal copying of contents, as well as managing billings and settlements.
%
%
%
When moving to a photo, loading may take a few seconds. At this point, the loading icon will appear at the screen.
%
If an over-power (Fail add new device USB1/USB2 Power Overload) warning message is displayed while you are
connecting or using a USB device, the device may not be recognized or may malfunction.
If more than 2 PTP devices are connected, you can only use one at a time.
If more than one MSC device is connected, some of them may not be recognized. If a device requires high power (more
than 500mA or 5V), the USB device may not be supported.
Using the Remote Control Button in Media Play Menu
Button
A/T/*,I/_
Operations
Move the cursor and select an item.
Select the currently selected item. While playing a slide show, movie, or music file:
ENTER _
[:_]/[_]
RETURN
TOOLS
[_
- Pressing the ENTER _
button during play pauses the play.
ause resumes the
Play or pause the Slide Show, music or movie.
Return to the previous menu.
Run various functions from the Photo, Music and Movie menus.
Stop the current slide show, Music or Movie file.
[_]/_]
INFO
Jump to previous group/Jump to next group.
Show file information.
MEDIA.P
Exit Media Play mode.
V CH A,
EXIT, TV
Stop Media Play mode and Returns to TV mode.
Media Play Function
This function enables you to view and listen to photo, music and/or movie files saved on a USB Mass Storage Class (MSC) device.
Entering the Media Play (USB) Menu
1.
Press the MENU button. Press the A or T button to select Application, then
press the ENTER _,P button.
2.
Press the A or T button to select Media Play (USB), then press the ENTERIB,p
button.
The Media Play (USB) menu is displayed.
Press the MEDIA.P button on the remote control to display the Media Play
menu.
EA3
Press the SOURCE button on the remote control to view the source list. Then
Press the A or T button to select USB.
3.
Press the Red button, then press the A or T button to select the USB Memory. Press the ENTER C_ button.
This function differs depending on the USB Memory Device.
The selected USB device name appears at the bottom left of the screen.
4.
Press the _ or I_ button to select an icon (Photo, Music, Movie, Setup), then press the ENTER C_ button.
To exit Media Play mode, press the MEDIA.P button on the remote control.
Removing
a USB Memory
Device Safely
You can remove the device safely from the TV.
1.
Press the TOOLS button in the Media Play file list screen, or while a Slide Show,
music or movie is being played.
2.
Press the A or T button to select Safe Remove, then press the ENTER _,,J
button.
3.
Remove the USB device from the TV.
Screen Display
Sort key List Section
_
Group List Section
File List Section
Move to either 'Sort key List Section', 'Group List Section' or 'File List Section' using the Up and Down buttons. After selecting a
section, press the _1or _. buttons to select an item.
O
Current Sort key: This field shows the current standard for sorting files. Press the *,i or _ button to change the standard for
sorting files.
O
View Groups: Shows the detailed groups of the files sorted according to the selected Sort key. The sort group where the
currently selected file is contained is highlighted.
Currently selected file: The selected file is the file you can now control. Photo and movie files are displayed as thumbnail
images.
O
Current Device: Shows the currently selected device name. Press the Red button to select a device.
0
Help Items
•
Red (Device) button: Selects a connected device.
•
Green (Favorites Setting) button: Changes the Favorites Setting for the selected file. Press this button repeatedly until
the desired value appears.
•
Yellow (Select) button: Selects file from the file list. Selected files are marked with a symbol _/. Press the Yellow button
again to cancel a file selection.
•
TOOLS (Tools) button: Displays the option menus. (The option menu changes according to the current status.)
Item Selection Information: Shows the number of files that are selected by pressing the Yellow button.
Sorting the Photo List
You can sort photos in the Photo List by a particular standard.
1.
Press the MEDIA.P button.
2.
Press the _ or _. button to select Photo, then press the ENTER _,_ button.
3.
Press the A button to move to the Sort key Section.
4.
Press the _ or _- button to select a sorting standard. (Basic View, Timeline,
Color, Folder, Preference)
6.
Press the • button to move to the File List Section. Press the _ (Play)/
ENTERI_--;
,,Jbutton to start the Slide Show in the order you selected.
The photos are sorted according to the newly selected sorting standard.
To move to the previous/next group, press the [_
(REW) or _
(FF) button.
Photo information is automatically set. The Color information extracted from a photo file may be different from your
expectations. You can change the Color and preference.
PTP does not support folder sort mode.
[]
Basic View
Shows the folders on the USB memory device. If you select a folder and press the ENTER _,_ button, only the photo files
contained in the selected folder are displayed.
When sorted according to the Basic View, you cannot set Favorite files.
[]
Timeline
Sortsphotosby date.It sortsby yearandmonthfromthe earliestphoto.
[]
Color -- Red / Yellow / Green / Blue / Magenta / Black / Gray / Unclassified
Sorts photos by Color. You can change the photo Color information.
You should set the Use Color View to on in the Setup menu before sorting photos by Color.
[]
Folder
Sorts photos by folder. If there are many folders in USB, the photos files are shown in order in each folder. The photo file in the
Root folder is shown first and the others are shown in alphabetical order by name.
[]
Preference
-_
/
_÷ /
_ _
/ _ dr. _.
Sorts photos by preference (Favorite). You can change the photo preferences.
Changing the Favorites Setting
Select the desired photo in the File List Section, then press the Green button repeatedly until the desired setting appears.
Up to 3 stars can be selected.
The stars are for grouping purposes only. For example, the 3 star setting does not have any priority over the one star setting.
Photo List Option Menu
1.
Press the MEDIA.P button.
2.
Press the _ or _. button to select Photo, then press the ENTER C,_ button.
3.
Press the _ or _ button to select the desired photo file.
Selecting Multiple Photos
-
4.
Press the _ or _ button to select the desired photo file. Then press the
Yellow button.
-
Repeat the above operation to select multiple photo files.
-
The mark _,z appears to the selected photo file.
Press the TOOLS button.
The option menu changes according to the current status.
[]
Slide Show
Usingthismenu,you can playa SlideShowusingthe photofileson the USBmemorydevice.
[]
Play Current Group
Usingthismenu,you can playa SlideShowusingonlythe photofilesinthe currentlyselectedsortinggroup.
[]
Change
Group Info (When the Sort key is the Color}
You can change a selected photo file's (or group of files) Color information in order to move it from one Color group to another.
This does not change the actual Color of the photo.
The group information of the current file is updated and the photos are moved to the new Color group.
To change the information of multiple files, select the files you want by pressing the Yellow button.
[]
Deselect All (When at least one file is selected}
You can deselect all files.
The _
[]
mark indicating the corresponding file is selected is hidden.
Information
The photo file information including the name, the size, the resolution, the date
modified and the path is displayed.
You can view the information of photo files during a SlideShow using the same
procedures.
Press the INFO button to viewing the information.
[]
Safe Remove
You can remove the device safely from the TV.
Viewing a Photo or Slide Show
Viewing a Slide Show
1.
Press the T button to select the File List Section.
2.
Press the TOOLS button.
3.
Press the A or T button to select Slide Bhow, then press the ENTER _
button.
All files in the File List Section will be used for the Slide Show.
During the slide show, files are displayed in order from the currently shown file.
The Slide Show progresses in the order sorted in the File List Section.
Music files can be automatically played during the Slide Show if the Background
Music is set to On,
While a photo list is displayed, press the [_(Play)/ENTER
remote control to start slide show.
C_ button on the
81ideBhow Control Buttons
ENTER I:E_
Play/Pause the Slide Show.
Play the Slide Show.
_]
Pause the Slide Show.
[_
Exit Slide Show and return to the photo list.
[_]/_]
TOOLS
Change the SlideShow playing speed.
Run various functions from the Photo menus.
Playing current group
1.
Press the A button to move to the Sort key Section.
2.
Press the 41or I_ button to select a sorting standard.
3.
Press the T button to move to the Group List Section.
4.
Select a group using the _ and 1_ buttons.
6.
Press the _
o
Alternatively
1.
Select a Sort key and then in the File List Section, select the photos contained in
the desired group.
(Play) button. A slideshow begins with the files of the selected group.
To move to the previous/next group, press the _
(REW) or _
(FF) button.
2.
Press the TOOLS button.
3.
Press the A or V' button to select Play Current Group, then press the ENTERIB,,Jbutton.
Only the photos in the sorting group including the selected files will be used for the Slide Show.
To perform a Slide Show with only the selected
files
1.
Press the T button to select the File List Section.
2.
Press the _ or _ button to select the desired photo in the File List Section.
3.
Press the Yellow button.
4.
Repeat the above operation to select multiple photos.
The _/ mark appears to the left of the selected photo.
If you select one file, the Slide Show will not be performed.
To deselect all selected files, press the TOOLS button and select Deselect All.
6.
Press the [_ (Play)/ENTERIB_ button.
The selected files will be used for the Slide Show.
•
Alternatively
1.
In the File List Section, press the Yellow button to select the desired photos.
2.
Press the TOOLS button.
3.
Press the A or _' button to select Slide Show, then press the ENTER C_ button.
The selected files will be used for the Slide Show.
Slide Show Option Menu
[]
1.
During a slide show (or when viewing a photo), press the TOOL8 button to set the
option.
2.
Press the A or T button to select the desired option, then press the ENTER _,_
button.
Stop Slide Show / Start Slide Show
Youcanstart or stop a SlideShow.
[]
Slide Show Speed -_ Slow / Normal
/ Fast
You can select the slide show speed.
This function is available only during a slide show.
You can also change the speed of the Slide Show by pressing the [_
[]
(REW) or _
Slide Show Effect
You can select the screen transition effect used in the slideshow.
None / Fade1 / Fade2 / Blind / Spiral 1Checker / Linear / Stairs / Wipe / Random
This function is available only during a slide show.
[]
Rotate
You can rotate photos saved on a USB memory device.
Whenever you press the 41button, it rotates by 270°, 180°, 90, and 0 °.
Whenever you press the _ button, it rotates by 90 °, 180°, 270, and 0 °.
The rotated file is not saved.
(FF) button during the Slide Show.
[]
Zoom
You can magnify photos saved on a USB memory device. (xl _ x2 _ x4)
To move the enlarged photo image, press the ENTER C,,Jbutton, then press the ,_,/T/_I/_,- buttons. Note that when the
enlarged picture is smaller than the original screen size, the location change function doesn't work.
The enlarged file is not saved.
[]
Background
Music
You can select background music when watching a Slide Show.
To use this feature, there must be music and photo files stored on the USB device.
Loading music files is needed to change BGM mode. Play music files in music category to load.
Background Music _ Off / On
=
Off: Background music is not played.
•
On: When the background music is available, if you select On, the music is played back.
BGM Mode _ Mood / Selected File 1 Shuffle
You can select a mode to use for the background music.
BGM Mood -, Energetic / Rhythmical / Sad / Exciting / Calm / Unclassified
Music with the mood you selected is set as the background music.
If you set BGM Mode to Mood, you can select a mood.
Select Music File (0 File(s) Selected)
Only the selected music file is set as the background music.
If you set BGM Mode to Selected File, you can select a music file.
[]
Picture Setting / Sound Setting
Youcanselectthe pictureandsoundsettings.
[]
Information
Thephotofileinformationis displayed.
[]
Safe Remove
Youcanremovethe devicesafelyfromthe TV.
Sorting the Music List
You can sort music files in the Music List by a particular standard.
1.
Press the MEDIA.P button.
2.
Press the _ or _. button to select Music, then press the ENTER _,_ button.
3.
Press the A button to move to the Sort key Section.
4.
Press the _ or _. button to select a sorting standard. (Basic View, Title, Artist,
Mood, Genre, Folder, Preference)
6.
Press the T button to move to the File List Section. Press the _ (Play)/
ENTERIB# button to start playing music in the order selected by the user.
The Music files are sorted according to the newly selected sorting standard.
To move to the previous/next group, press the [_
(REW) or _
(FF) button.
Music information is automatically set. The mood information extracted from a
music file may differ from the expectations of the user. You can change the mood and preference.
If there is no title information for a music file, the filename is displayed.
If no information is available for the Artist, Album, Year, or Genre the corresponding item is displayed as blank.
[]
Basic View
Shows the folders of the USB memory device. If you select a folder and press the ENTER _
contained in the selected folder are displayed.
button, only the music files
When sorted according to the Basic View, you cannot set Favorite files.
[]
Title
Sortsthe musictitlesin symbol/number/alphabet/special
order,andshowsthe musicfile.
[]
Artist
Sortsthe musicfile byartistinsymbol/number/alphabet/special
order.
[]
Mood -_ Energetic / Rhythmical / Sad / Exciting / Calm / Unclassified
Sortsmusicfilesbythe mood.Youcanchangethe musicmoodinformation.
[]
Genre
Sortsmusicfilesbythe genre.
[]
Folder
Sorts music files by the folder. If there are many folders in USB, the files are shown in order in each folder. The music file in the
Root folder is shown first and the others are shown in alphabetical order by name.
[]
Preference
-_
/
_
/
_ _, / _ ;_ dr.
Sorts music files by preference (Favorite). You can change the music files preferences.
Changing the Favorites Setting
Select the desired music file in the File List Section, then press the Green button repeatedly until the desired setting appears.
Up to 3 stars can be selected.
The stars are for grouping purposes only. For example, the 3 star setting does not have any priority over the one star setting.
Music List Option Menu
1.
Press the MEDIA.P button.
2.
Press the 41or _. button to select Music, then press the ENTER C_ button.
3.
Press the 41or _. button to select the desired Music file.
Selecting Multiple Music Files
-
4.
Press the _ or _. button to select the desired music file. Then press the
Yellow button.
-
Repeat the above operation to select multiple music files.
-
The mark _,/ appears to the selected music file.
Press the TOOLS button.
The option menu changes according to the current status.
[]
Play Current Group
Usingthismenu,you canonly playmusicfilesinthe currentlyselectedsortinggroup.
[]
Change
Group Info (When the Sort key is Mood)
You can change the mood information of music files.
The group information of the current file is updated and the file is moved to the new group.
To change the information of multiple files, select files by pressing the Yellow button.
[]
Deselect All (When at least one file is selected)
You can deselect all files.
The _/ mark indicating the corresponding file is selected is hidden.
[]
Information
The music file information including the name, the size, the date modified and the path is displayed.
You can view the music file information during Play Current Group using the
same procedures.
Press the INFO button to viewing the information.
[]
Safe Remove
Youcanremovethe devicesafelyfromthe TV.
Playing Music
Playing a music file
1.
Press the T button to select the File List Section.
2.
Press the _ or _. button to select a music file to be played.
3.
Press the _
(Play)/ENTERI_--}#button.
This menu only shows files with the MP3 file extension. Files with other
file extensions are not displayed, even if they are saved on the same USB
device.
The selected file is displayed at the top with its playing time.
To adjust the music volume, press the volume button on the remote control.
To mute the sound, press the MUTE button on the remote control.
If the sound is odd when playing MP3 files, adjust the Equalizer and SRS TruSurround HD in the Sound menu. (An
over-modulated MP3 file may cause a sound problem.)
The playing duration of a music file may be displayed as '00:00:00' if its playing time information is not found at the start of
the file.
[_
(REW) or _
(FF) buttons do not function during play.
Music Play Control Buttons
%
Music function information icon
When all music files in the folder (or the selected file) are repeated. Repeat Mode is On.
(_
Playing the music
When all music files in the folder (or the selected file) are played once. Repeat Mode is Off.
group
1.
Press the A button to move to the Sort key Section.
2.
Press the .,_or _. button to select a sorting standard.
3.
Press the T or ENTERI_--}#button to move to the Group List Section.
4.
Press the [_
•
Alternatively
1.
Select a sort key and then in the File List Section, select the files contained in the desired group.
2.
Press the TOOLS button.
3.
Press the A or T button to select Play Current Group, then press the ENTER _
(Play) button. The files of the selected group will start playing.
To move to the previous/next group, press the [_
(REW) or _
(FF) button.
The music files in the sorting group including the selected file are played.
Playing the selected
music files
1.
Press the T button to select the File List Section.
2.
Press the _ or _ button to select the desired music file.
3.
Press the Yellow button.
4.
Repeat the above operation to select multiple music files.
The _,/ appears to the left of the selected music file.
To deselect all selected files, press the TOOLS button and select Deselect All.
6.
Press the _
(Play)/ENTER[B`_ button.
The selected files will be played.
button.
Music Play option Menu
Music Play Option Menu
[]
Repeat Mode _
On ! Off
You can play music files repeatedly.
[]
Picture Setting / Sound Setting
You can configure the picture and sound settings.
[]
Information
The music file information is displayed.
[]
Safe Remove
You can remove the device safely from the TV.
Sorting the Movie List
You can sort movies in the Movie List by a particular standard.
1.
Press the MEDIA.P button.
2.
Press the 41or _. button to select Movie, then press the ENTER _
3.
Press the A button to move to the Sort key Section.
4.
Press the _1or I_ button to select a sorting standard. (Basic View, Timeline,
Title, Folder, Preference)
button.
The movie files are sorted according to the newly selected sorting standard.
5.
Press the _
(Play)/ENTER_# button to play the movie in the order selected.
Movie information is automatically set. You can change the preference.
[]
Basic View
Shows the folders of the USB memory device. If you select a folder and press the ENTER _,_ button, only the movie files
contained in the selected folder are displayed.
When sorted according to the Basic View, you cannot set Favorite files.
[]
Timeline
Sortsmoviesby date.It sortsbyyearandmonthfromthe earliestmovie.
[]
Title
Sortsanddisplaysthe movietitles insymbollnumber/alphabet/special
order.
[]
Folder
If there are many folders in USB, the movies files are shown in order in each folder. The movie file in the Root folder is shown first
and the others are shown in alphabetical order by name.
[]
Preference
-_
/
_
/
_;_
/ ;_ dr. _.,
Sorts movies by preference. (Favorite) You can change the movie preferences.
Changing the Favorites Setting
Select the desired movie file in the File List Section, then press the Green button repeatedly until the desired setting appears.
Up to 3 stars can be selected.
The stars are for grouping purposes only. For example, the 3 star setting does not have any priority over the one star setting.
Movie List Option Menu
1.
Press the MEDIA.P button.
2.
Press the 41or _. button to select Movie, then press the ENTER _
3.
Press the 41or _ button to select the desired Movie file.
button.
Selecting Multiple Movie Files
-
4.
Press the*,i or _ button to select the desired movie file. Then press the
Yellow button.
-
Repeat the above operation to select multiple movie files.
-
The mark _,/ appears to the selected movie file.
Press the TOOLS button.
The option menu changes according to the current status.
[]
[]
Play Current Group
Usingthismenu,you canonly playmoviefilesinthe currentlyselectedsortinggroup.
Deselect All (When at least one file is selected)
You can deselect all files.
The _/ mark indicating the corresponding file is selected is hidden.
[]
Information
The movie file information including the name, the size, the date modified and the path
is displayed.
Press the INFO button to viewing the information.
[]
Safe Remove
Youcanremovethe devicesafelyfromthe TV.
Playing a Movie File
Playing a movie file
1.
Press the T button to select the File List Section.
2.
Pressing the _ or 1_ button to select a movie file to be played.
3.
Press the _
(Play)/ENTERL--;_button.
The selected file is played.
The selected file is displayed at the top with its playing time.
The playing duration of a movie file may be displayed as '00:00:00' if its
playing time information is not found at the start of the file.
You can watch exciting gaming multimedia files, but the gaming function is not
supported.
%
%
Supported Subtitle Formats
Name
File extension
MPEG-4 time-based text
.ttxt
Format
XML
SAMI
.smi
HTML
SubRip
SubViewer
Micro DVD
.srt
.sub
.sub or .txt
string-based
string-based
string-based
Supported Movie Formats
File extension
Container
Video Decoder
_°:°°=Audio codec
Divx 3.11 / 4.x / 5.1/6.0
XviD
*.avi
AVI
H.264 BP / MP / HP
MPEG4 SP/ASP
720x576
MP3
AC3
LPCM
ADPCM
Motion JPEG
*.mkv
MKV
H.264 BP / MP / HP
MPEG4 SP/ASP
MP3
AC3
LPCM
ADPCM
Motion JPEG
XviD
ASF
H.264 BP / MP / HP
MPEG4 SP/ASP
ASF
*.mp4
MP4
(SMP4)
VC1
H.264 BP / MP / HP
MPEG4 SP/ASP
XVlD
H.264 BP / MP / HP
*.3gp
3GPP
MPEG4 SP/ASP
MPEG2
*.vro
VRO
VOB
MPEG1
MPEG1
*.mpg
*.mpeg
*.ts
*.tp
*.trp
PS
MPEG2
TS
VCl
1920x1080
1920x1080
1920x1080
720x576
MP3
AC3
LPCM
ADPCM
WMA
1920x1080
WMA
1920x1080
1920x1080
1920x1080
800x600
MP3
ADPCM
AAC
1920x1080
1920x1080
1920x1080
ADPCM
AAC
1920x1080
AC3
MPEG
LPCM
1920x1080
AC3
MPEG
PCM
1920x1080
MPEG2
H.264
1920x1080
800x600
Motion JPEG
*.wmv
1920x1080
720x576
Divx 3.11 / 4.x / 5.1/6.0
*.asf
1920x1080
800x600
Divx 3.11 / 4.x / 5.1/6.0
XviD
Resotution
1920x1080
1920x1080
1920xi080
1920x1080
AAC
MP3
1920x1080
1920xi080
%
Video Play Control Buttons
Button
=O_pera_ion_
===...............................................................................................................................................................
ENTER IB_
Play/Pause the movie file
Play the movie file
TOOLS
[_
Pause the movie file
Run various functions from the Movie menus.
Exit play mode and return to the movie list.
/ _A / T
Skip forwards or backwards through the movie file.
Move to the first/last of the file.
Play the file at double speed. This function may not be supported depending on the movie file.
Playing the movie
group
1.
Press the A button to move to the Sort key Section.
2.
Press the _ or _. button to select a sorting standard.
3.
Press the T or ENTERI_--}
,# button to move to the Group List Section.
4.
Press the [q_ (Play) button. Only the files of the selected group will start playing.
•
Alternatively
1.
Select a Sort key and then in the File List Section, select the files contained in the desired group.
2.
Press the TOOLS button.
3.
Press the A or T button to select Play Current Group, then press the ENTERIB_ button.
To move to the previous/next group, press the _
(REW) or _
(FF) button.
The movie files in the sorting group including the selected file are played.
Playing the selected
movie files
1.
Press the T button to select the File List Section.
2.
Press the _ or _. button to select the desired movie file.
3.
Press the Yellow button.
The _/ mark appears to the left of the selected movie file.
To deselect all selected files, press the TOOLS button and select Deselect All.
4,
Repeat the above operation to select multiple movie files.
6.
Press the _
(Play)/ENTERL--}
,# button.
Only the selected file is played.
Playing movie continuously
(Resume
Play)
If you exit the playing movie function, the movie can be played later from the point where it was stopped.
1.
Select the movie file you want to play continuously by pressing the 4 or _. button to select it from the File List Section.
2.
Press the _
3.
Select Play Continuously (Resume Play) by pressing the Blue button.
(Play)/ENTERIB# button.
The Movie will begin to play from where it was stopped.
If Continuous Movie Play Help function is set On in the Setup menu, a pop-up message will appear when you resume
play a movie file.
Movie Play Option Menu
Movie Play Option Menu
[]
Repeat Mode -_ On / Off
Youcanplay moviefilesrepeatedly.
[]
Picture Setting / Sound Setting
Youcanconfigurethe pictureandsoundsettings.
[]
Picture Size
Fit
Play video at the TV screen size.
Original
Play video at the original size.
[]
Caption
Setting
You can set the captions for the movie.
Caption _ On / Off
You can turn the captions for the movie on or off.
Caption Size _ Small 1Standard I Large
You can change the font size of the captions.
Caption Sync
You can adjust the caption sync.
Caption Sync Reset
You can reset the adjusted caption sync.
[]
Information
Themoviefile informationis displayed.
[]
Safe Remove
Youcanremovethe devicesafelyfromthe TV.
Using the Setup Menu
Setup displays the user settings of the Media Play menu.
1.
Press the MEDIA.P button.
2.
Press the _ or _. button to select Setup, then press the ENTER _
3.
Press the A or _' button to select the desired option.
4.
Press the 4 or _, button to select the desired option.
button.
To exit Media Play mode, press the MEDIA.P button on the remote control.
Use Color View _ On / Off
You can select sorting photos by Color. If this option is set to On, the loading time may
be increased to collect Color information from the photos.
Continuous Movie Play Help -_ On I Off
Select to display the help pop-up message for continuous movie playback.
Get DivX® VOD registration code
Shows the registration code authorized for the TV. If you connect to the DivX web site
and register the registration code with a personal account, you can download the VOD
registration file.
If you play the VOD registration using Media Play, the registration is completed.
For more information on DivX® VOD, visit www.DivX.com.
Get DivX® VOD deactivation code
When DivX® VOD is not registered, the registration deactivation code is displayed.
If you execute this function when DivX® VOD is registered, the current DivX® VOD registration is deactivated.
Screen Saver Run Time _ 4 hours 18 hours / 10 hours
Select to set the waiting time before the screen saver appears.
information
Select to viewing the informationof the connected device.
Safe Remove
You can remove the device safely from the TV.
Connecting Anynet + Devices
What is Anynet+?
Anynet + is a function that enables you to control all connected Samsung devices that support Anynet+ with your Samsung TV's
remote. The Anynet + system can be used only with Samsung devices that have the Anynet+ feature. To be sure your Samsung
device has this feature, check if there is an Anynet + logo on it.
To connect to a TV
TV
Anynet+ Device I
Anynet+ Device 2
Anynet+ Device 3
HDMI1.3 Ca_
HDMI1.3 Cable
1.
Anynet+ Device 4
_;
Connect the HDMI iN (I(DVI), 2, 3 or 4) jack on the TV and the HDMI OUT jack of the corresponding Anynet + device using an
HDMI cable.
To connect to Home Theater
TV
Home Theater
Anynet+ Device 1
A
=
HDMI t.3 Cable
Anynet+ Device 2
HDMI 1.3 Cable
Anynet+ Device 3
Anynet+ Device 4
HDMI1.3 Cable
HDMI 1.3Cabl
1,
Connect the HDMI iN (1 (DVl), 2, 3 or 4) jack on the TV and the HDMI OUT jack of the corresponding Anynet + device using an
HDMI cable.
2.
Connect the HDMI IN jack of the home theater and the HDMI OUT jack of the corresponding Anynet + device using an HDMI
cable.
Connect the Optical cable between the DIGITAL AUDIO OUT (OPTICAL) jack on your TV and the Digital Audio Input on
the Home Theater.
When following the connection above, the Optical jack only outputs 2 channel audio. You will only hear sound from the
Home Theater's Front Left and Right speakers and the subwoofer. If you want to hear 5.1 channel audio, connect the
DIGITAL AUDIO OUT (OPTICAL) jack on the DVD / Satellite Box (ie Anynet Device I or 2) directly to the Amplifier or
Home Theater, not the TV.
Connect only one Home Theater.
You can connect an Anynet + device using the HDMI 1.3 cable. Some HDMI cables may not support Anynet + functions.
Anynet + works when the AV device supporting Anynet + is in the Standby or On status.
Anynet + supports up to 12 AV devices in total. Note that you can connect up to 3 devices of the same type.
Setting Up Anynet +
_-_ Press the TOOLS button to display the Tools menu. You can also display Anynet+ menu
by selecting Tools _ Anynet + (HDMm-CEC).
Anynet + (HDMI-CEC) _ Off / On
To use the Anynet + Function, Anynet + (HDMI-CEC) must be set to On.
When the Anynet + (HDMI-CEC) function is disabled, all the Anynet+ related operations
are deactivated.
Auto Turn Off _ No / Yes
Setting an Anynet + Device to turn Off automatically when the TV is turned Off.
The active source on the TV remote must be set to TV to use the Anynet + function.
If you set Auto Turn Off to Yes, connected external devices are also turned off when the
TV is turned off. If an external device is still recording, it may or may not turn off.
Switching
between Anynet + Devices
1,
Press the TOOLS button. Press the ENTER_
2,
Press the A or T button to select Device List, then press the ENTER _
button to select Anynet + (HDMI-CEC).
button.
Anynet + devices connected to the TV are listed.
If you cannot find a device you want, press the red button to scan for devices.
3,
Press the A or T button to select a particular device and press the ENTER_
is switched to the selected device.
button. It
Only when you set Anynet + (HDMI=CEC) to On in the Application menu, the Device
List menu appears.
Switching to the selected devices may take up to 2 minutes. You cannot cancel the
operation during the switching operation.
The time required to scan for devices is determined by the number of connected devices.
When the device scan is complete, the number of devices found are not displayed.
Although the TV automatically searches the device list when the TV is turned on via the power button, devices connected to
the TV may not always be automatically displayed in the device list. Press the red button to search for the connected device.
If you have selected external input mode by pressing the SOURCE button, you cannot use the Anynet + function. Make sure to
switch to an Anynet + device by using the Device List.
Anynet + Menu
The Anynet+ menu changes depending on the type and status of the Anynet + devices connected to the TV.
Anynet + Menu
Description
View TV
Device List
Anynet + mode changes to TV broadcast mode.
Shows the Anynet + device list.
Shows the connected device menus. E.g. If a DVD recorder is connected, the disc menu
of the DVD recorder will appear.
(device_name) MENU
(device_name) INFO
Recording: (*recorder)
Shows the play menu of the connected device. E.g. If a DVD recorder is connected, the
menu of the DVD recorder will aEpear.
Stop Recording: (*recorder)
Starts recording immediately using the recorder. (This is only available for devices that
support the recording function.)
Stops recording.
Receiver
Sound is played through the receiver.
If more than one recording device is connected, they are displayed as (*recorder) and if only one recording device is
connected, it will be represented as (*device_name).
"iV Remote Control
Buttons Available
in Anynet + Mode
Device Type
Operating Status
Anynet + Device
After switching to the device, when the menu
of the corresponding device is displayed on
the screen.
_
_ Available Buttons
Numeric buttons
A/_r/4/_./ENTERIB,_ buttons
Color buttons / EXIT button
After switching to the device, while playing a
file
[_](Backward search) / _](Forward
[_(Stop) / [_](Play) / _](Pause)
Device with built-in
Tuner
After switching to the device, when you are
watching a TV program
v
Audio Device
When Receiver is activated
=VOL+
CH A
search) /
button
/ MUTE button
The Anynet+ function only works when the active source on the TV remote control is set to TV.
The [_
button works only while in the recordable state.
You cannot control Anynet+ devices using the buttons on the TV. You can control Anynet + devices only using the TV remote
control.
The TV remote control may not work under certain conditions. If this occurs, reselect the Anynet+ device.
The Anynet+ functions do not operate with other manufacturers' products.
The [_], _
operations may differ depending on the device.
Recording
You can make a recording of a TV program using a Samsung recorder.
1.
Press the TOOLS button. Press the ENTER _# button to select Anynet + (HDMI-CEC).
2.
Press the A or T button to select Recording Immediately and press the ENTER _,_
button. Recording begins.
When there is more than one recording device
When multiple recording devices are connected, the recording devices are listed.
Press the A or T button to select a recording device and press the ENTER _,_
button. Recording begins.
When the recording device is not displayed select Device List and press the Red
button to search devices
3.
Press the EXIT button to exit.
You can record the source streams by selecting Recording: (device_name).
Pressing the _ button will record whatever you are currently watching. If you are watching video from another device,
the video from the device is recorded.
Before recording, check whether the antenna jack is properly connected to the recording device. To properly connect an
antenna to a recording device, refer to the recording device's users manual.
Listening through
a Receiver (Home Theater)
You can listen to sound through a receiver instead of the TV speaker.
1.
Press the TOOLS button. Press the ENTER _
2.
Press the A or T button to select Receiver. Press the 4 or _. button to select On or Off.
button to select Anynet + (HDMI-DEC).
3.
Press the EXIT button to exit.
If your receiver supports audio only, it may not appear in the device list.
The receiver will work when you have properly connected the optical in jack of the
receiver to the DIGITAL AUDIO OUT (OPTICAL) jack of the TV.
When the receiver (home theater) is set to On, you can hear sound output from
the TV's Optical jack. When the TV is displaying a DTV(air) signal, the TV will send
out 5.1 channel sound to the Home Theater receiver. When the source is a digital component such as a DVD and is
connected to the TV via HDMI, only 2 channel sound will be heard from the Home Theater receiver.
If there is a power interruption to the TV when the Receiver is set to On (by disconnecting the power cord or a power
failure), the Speaker Select may be set to External Speaker when you turn the TV on again.
Troubleshooting for Anynet +
Problem
Anynet + does not work.
I want to start Anynet +.
I want to exit Anynet +.
Possible Solution
•
Check if the device is an Anynet + device. The Anynet + system supports Anynet + devices only.
•
Connect only one receiver (home theater).
•
Check if the Anynet + device power cord is properly connected.
•
Check the Anynet + device's Video/Audio/HDMI 1.3 cable connections.
•
Check whether Anynet+ (HDMI-CEC) is set to On in the Anynet + setup menu.
•
Check whether the TV remote control is in TV mode.
•
Check whether it is Anynet+ exclusive remote control.
•
Anynet + doesn't work in certain situations. (Searching channels, Operating Media Play, Plug &
Play, etc.)
•
When connecting or removing the HDMI 1.3 cable, please make sure to search devices again or
turn your TV off and on again.
•
Check if the Anynet + Function of Anynet+ device is set on.
•
Check if the Anynet+ device is properly connected to the TV and check if the Anynet + (HDMICEC) is set to On in the Anynet + Setup menu.
•
Press the TV button on the TV remote control to switch to TV. Then press the TOOLS button to
show the Anynet+ menu and select a menu you want.
•
Select View TV in the Anynet + menu.
•
Press the SOURCE button on the TV remote control and select a device other than Anynet +
devices.
•
Press V CH A, CH LIST, PRE=CH,and FAV.CHto change the TV mode. (Note that the
channel button operates only when a tuner-embedded Anynet + device is not connected.)
You cannot use the remote control when you are configuring Anynet+ or switching to a view
mode.
The message 'Connecting to
Anynet+ device...' appears on
the screen.
•
•
Use the remote control when the Anynet + setting or switching to view mode is complete.
The Anynet + device does not
play.
The connected device is not
•
You cannot use the play function when Plug & Play is in progress.
•
Check whether or not the device supports Anynet+ functions.
displayed.
•
Check whether or not the HDMI 1.3 cable is properly connected.
•
Check whether Anynet + (HDMI=C_:C)is set to On in the Anynet+ setup menu.
•
SearchAnynet + devices again.
•
You can connect an Anynet + device using the HDMI 1.3 cable only. Some HDMI cables may not
support Anynet+ functions.
•
The TV program cannot be
recorded.
•
If it is terminated by an abnormal situation such as disconnecting the HDMI cable or power cord
or a power failure, please repeat the device scan.
Check whether the antenna jack on the recording device is properly connected.
The TV sound is not output
through the receiver.
•
Connect the optical cable between TV and the receiver.
Using InfoLink
You can view news, stock market and weather information services using SAMSUNG's InfoLink
service.
For more information on how to configure your network, refer to 'Setting the Network'.
(see pages 30~35)
Information provided by USA TODAY via IrffoLink is for the United States only. Information
for other countries is not provided.
Activating
InfoLink
1.
Press the MENU button to display the menu. Press the ,& or T button to select
Application, then press the ENTER C,# button.
2.
Press the A or _' button to select InfoLink, then press the ENTER[B,# button.
3.
Press the _ or _. button to select a service (Weather, News, 8teeks or Setup) and press
the ENTER C_ button.
Press the INFO.L button on the remote control to display the InfoLink menu.
Using the Weather Service
1.
Press the INFO.L button on the remote control.
2.
Press the _ or _. button to move to the Weather service and press the ENTER _
button.
Set up the Region
3.
Press Yellow button. Input the postal (zip) code of the region by pressing the number
buttons on the remote, then press the ENTER _,# button.
You can check the weather of the selected region.
Set up Weather Option
4. Press the Red button while using the service to change the Weather service option.
6. Press A or T button and select Weather option.
% To exit the Weather service, press the Blue button.
% To exit the IrffoLirtk service, press the EXIT button.
Using the News Service
The news provider may be changed in the future.
1.
Press the INFO.L button on the remote control.
2.
Press the _ or _ button to move to the News service and press the ENTER _,_ button.
Press the ENTER _,_ button to view the detailed article.
Press the A or _' button to view the previous or next article.
3.
Press the Red button while using the service to change the News service Option.
4.
Press A or V button and select News service option.
The News service option changes depending on the provided web service.
To exit the News service, press the Blue button.
To exit the InfoLink service, press the EXIT button.
Using the Stock Service
1.
Press the INFO.L button on the remote control.
2.
Press the _ or _ button to move to the Stocks service and press the ENTERC,_ button.
3.
Press the Red button while using the service to change the Stocks service option.
4.
Press A or V button and select Stocks service option, then press the ENTER C,_ button.
Favorite Stocks
The Favorite stock information is displayed. You can set up the Favorite Stocks by pressing the
Yellow button.
Market Summary
Dow Jones, NASDAQ and S&P 600 are toggled and the entire index, amount of up or down, and % are displayed.
Stocks & News
The Favorite stock information and Dow Jones, NASDAQ and 8&P 500 index and Financial news are displayed.
Stock quotes delayed at least 15 minutes.
To exit the Stocks service, press the Blue button.
To exit the mnfoLink service, press the EXIT button.
Setting
1.
Favorite
Stocks
items
Press the Yellow button when Favorite Stocks or Stocks & News is selected. The Set
Favorite Stocks screen appears.
2.
Press _ or _. button to move to the Category. Press the A or T button to select a
Category. Press the ENTERIB_ button.
3.
Press the A or _' button to select a stock item and press the ENTER _,,J button.
The selected stock is set as a Favorite Stock.
The _/ mark will appear to the left of the stock name.
Press the ENTER[B,,Jbutton again to cancel the setting. The mark will disappear.
To cancel all selections, press the Green button.
Pressing the Red button toggles between NYSE and NASDAQ.
4,
To finish the settings, press the RETURN button.
InfoLink Setup
1.
Press the INFO.L button on the remote control.
2.
Press the _ or _. button to select Setup, then press the ENTER[B,,J button.
3.
Press the A or T button to select the desired option, then press the ENTER _,,J button.
To exit the Setup service, press the RETURN button.
To exit the mnfoLink service, press the EXIT button.
Auto Launch
Determines whether to launch InfoLink automatically when the TV is turned on. You can select either Off or On.
Display Time
Determines the time to display the news service on the TV screen. You can select 4 Hours, 8 Hours, 10 Hours, or Always.
Font Size
You can select letter size Standard or Large through InfoLink service.
Background Color
You can select the Background Color of InfoLink service. The color is applied to each service, option and setup window.
InfoLink's Position
You can set the position of each InfoLink service on the screen. You can select from six preset InfoLink positions (Position
1~Position 6).
ALL THE MATERIALS AVAILABLE THROUGH INFOLINK [INFOLINK CONTENT'] ARE THE PROPERTY OF THE
ORIGINATOR OF THE CONTENT ["CONTENT OWNER'] AND/OR ITS AFFILIATES OR LICENSORS, AND ARE
PROTECTED BY COPYRIGHT, TRADEMARK, AND OTHER INTELLECTUAL PROPERTY LAWS. ALL INFOLINK CONTENT
IS PROVIDED SOLELY FOR YOUR PERSONAL NONCOMMERCIAL USE. YOU MAY NOT USE ANY INFOLINK CONTENT
IN A MANNER THAT CONSTITUTES AN INFRINGEMENT OF THE CONTENT OWNERS' RIGHTS OR THAT HAS NOT
BEEN AUTHORIZED BY THE CONTENT OWNER.
MORE SPECIFICALLY, UNLESS EXPLICITLY AUTHORIZED IN THIS DISCLAIMER OR BYTHE CONTENT OWNER,
YOU MAY NOT MODIFY, COPY, REPRODUCE, REPUBLISH, UPLOAD, POST, TRANSMIT, TRANSLATE, SELL, CREATE
DERIVATIVE WORKS, EXPLOIT, OR DISTRIBUTE IN ANY MANNER OR MEDIUM (INCLUDING BY EMAIL OR OTHER
ELECTRONIC MEANS)ANY INFOLINK CONTENT OR ANY OTHER MATERIAL FROM THE INFOLINK SERVICE.
CONTENT PROVIDED CONTENT OWNERS IN CONNECTION WITH THE INFOLINK SERVICE MAY BE TIME-DELAYED AS
SPECIFIED BY THE CONTENT OWNER AND/OR ITS AFFILIATES.
INFOLINK IS PROVIDED THROUGH AGREEMENT BETWEEN SAMSUNG AND THE CONTENT OWNER. INFOLINK MAY
BE TERMINATED OR INTERUPTED AT ANY TIME BY EITHER SAMSUNG OR THE CONTENT PROVIDER OR THROUGH
TERMINATION OF THE AGREEMENT BETWEEN THEM. UNDER NO CIRCUMSTANCES, INCLUDING NEGLIGENCE,
SHALL SAMSUNG OR THE CONTENT PROVIDER BE HELD LIABLE, WHETHER IN CONTRACT OR TORT, FOR ANY
DIRECT, INDIRECT, INCIDENTAL, SPECIAL OR CONSEQUENTIAL DAMAGES, ATTORNEY FEES, EXPENSES, OR
ANY OTHER DAMAGES WHATSOEVER ARISING OUT OF, OR IN CONNECTION WITH, SUCH TERMINATION OR
INTERUPTION.
SINCE CONTENT TRANSMITTED VIA INFOLINK IS RECEIVED BY MEANS OF NETWORKS AND TRANSMISSION
FACILITIES OVER WHICH SAMSUNG HAS NO CONTROL, SAMSUNG EXPRESSLY DISCLAIMS ANY RESPONSIBILITY
OR LIABILITY FOR ANY INTERRUPTION OR SUSPENSION OF INTERLINK SERVICE OR FOR THE ABSENCE OF
CONTENT RESULTING THEREFROM.
INFORMATION IN THE INFOLINK IS PROVIDED 'AS IS,' AND CONSEQUENTLY, SAMSUNG DOES NOT WARRANT
THE INFORMATION SO PROVIDED, EITHER EXPRESSLY OR IMPLIEDLY, FOR ANY PARTICULAR PURPOSE; AND
SAMSUNG EXPRESSLY DISCLAIMS ANY IMPLIED WARRANTIES, INCLUDING BUT NOT LIMITED TO, WARRANTIES OF
MERCHANTABILITY OR FITNESS FORA PARTICULAR PURPOSE.
SAMSUNG DOES NOT GUARANTEE THE ACCURACY, VALIDITY, TIMELINESS, LEGALITY, OR COMPLETENESS OF
ANY INFORMATION OR DATA MADE AVAILABLE THROUGH INFOLINK FOR ANY PARTICULAR PURPOSE AND UNDER
NO CIRCUMSTANCES, INCLUDING NEGLIGENCE, SHALL SAMSUNG BE HELD LIABLE, WHETHER IN CONTRACT
OR TORT, FOR ANY DIRECT, INDIRECT, INCIDENTAL, SPECIAL OR CONSEQUENTIAL DAMAGES, ATTORNEY
FEES, EXPENSES, OR ANY OTHER DAMAGES WHATSOEVER ARISING OUT OF, OR IN CONNECTION WITH, ANY
INFORMATION CONTAINED IN, OR AS A RESULT OF THE USE OF INFOLINK BY YOU OR ANY THIRD PARTY, EVEN IF
ADVISED OF THE POSSIBILITY OF SUCH DAMAGES.
Troubleshooting
If the TV seems to have a problem, first try this list of possible problems and solutions. If none of these troubleshooting tips apply,
call Samsung customer service at 1-800-SAMSUNG.
Problem
Possible Solution
°'
Poor picture.
Try another channel. /Adjust the antenna. / Check all wire connections.
Poor sound quality.
Try another channel. /Adjust the antenna.
No picture or sounc
Try another channel. / Press the SOURCE button.
Make sure the TV is plugged in. / Check the antenna connections.
No sound or sound is too low at
maximum volume,
First, check the volume of units connected to your TV (digital broadcasting receiver, DVD,
cable broadcasting receiver, VCR, etc.). Then, adjust the TV volume accordingly.
Picture rolls vertically.
Check all wire connections.
There is a problem with the picture
Run the Picture test in the Self diagnostic menu.
There is a problem with the sound
Run the Sound test in the Self diagnostic menu.
The TV operates erratically.
Unplug the TV for 30 seconds, then try operating it again.
The TV won't turn on
Make sure the wall outlet is working.
Remote control malfunctions.
Replace the remote control batteries.
Clean the upper edge of the remote control (transmission window).
Check the battery terminals.
'Check signal cable' message.
Ensure that the signal cable is firmly connected to the PC source.
'Not Supported Mode' message.
Check the maximum resolution and connected device's Video frequency.
Compare these values with the data in the Display Modes.
Digital broadcasting screen
problem.
Please check the digital signal strength and input antenna.
The image is too light or too dark.
Adjust the Brightness and Contrast. / Adjust the Fine tuning.
Black bars on the screen.
Make sure the broadcast you're receiving is High Definition (HD).
HD channels sometimes broadcast Standard Definition (SD) programming, which can
cause black bars.
Set your cable/satellite box to stretch or widescreen mode to eliminate the bars.
Picture has a Red/Green or Pink
tint.
Make sure the Component cables are connected to the correct jacks.
Closed Captioning not working.
If you are using a Cable/Satellite box, you must set Closed Captioning on the box, not
your TV.
Snowy picture.
Your cable box may need a firmware upgrade. Please contact your Cable company.
Ghosting on picture.
This is sometimes caused by compatibility issues with your cable box.
Try connecting Component cables instead.
Horizontal bars appear to flicker
jitter or shimmer on the image.
Adjust the Coarse tuning and then adjust the Fine tuning.
Vertical bars appear to flicker, jitter
or shimmer on the image.
Adjust the Coarse tuning and then adjust the Fine tuning.
Screen is black and power indicator
light blinks steadily.
On your computer check: Power, Signal Cable.
The TV is using its power management system.
Move the computer's mouse or press any key on the keyboard.
Problem
Possible Solution
Image is not stable and may
appear to vibrate when you have
a computer connected to the PC
input.
If the setting is not correct, use your computer utility program to change the display
settings.
Your TV supports multiscan display functions within the following frequency domain:
- Horizontal frequency (KHz): 30~60
- Vertical frequency (Hz): 60~75
- PC Maximum refresh rate (at 60 Hz): 1920 x 1080
Image is not centered on the
screen.
Adjust the horizontal and vertical position.
The picture appears distorted in the
corner of the screen.
If Screen Fit is selected with some external devices, the picture may appear distorted in
the corner of the screen. This symptom is caused by the external devices, not TV.
The 'Resets all settings to the
default values.' message appears.
This appears when you press and hold the EXIT button for a while. The product settings
are reset to the factory defaults.
%
The screen position must be adjusted on the output source (i.e. STB) with a digital signal.
This TFT LCD panel uses a panel consisting of sub pixels (6 220 800) which require sophisticated technology to produce.
However, there may be few bright or dark pixels on the screen. These pixels will have no impact on the performance of the
product.
Installing the Stand
The product color and shape may vary depending on the model.
Preset: Place the Guide Stand and Cover Neck onto the stand and fasten it using
the screws. Applicable to models (LN32B650) only.
1,
Attach your LCD TV to the stand.
Two or more people should carry the TV.
Make sure to distinguish between the front and back of the stand when
attaching it.
To make sure the TV is installed on the stand at a proper level, do not apply
excess downward pressure to the upper left of right sides of the TV.
2,
Fasten screws at position 0
and then fasten screws at position O.
Stand the product up and fasten the screws. If you fasten the screws with
the LCD TV placed down, it may lean to one side.
Disconnecting the Stand
The product color and shape may vary depending on the model.
1.
Remove screws from the back of the TV.
2.
Separate the stand from the TV.
3.
Cover the bottom hole with the cover.
Two or more people should carry the TV.
Assembling the Cables
Enclose the cables in the Holder-Wire Cable so that the cables are not visible through
the transparent stand.
The product color and shape may vary depending on the model.
Wall Mount Kit Specifications
(VESA)
Install your wall mount on a solid wall perpendicular to the floor. When attaching to
other building materials, please contact your nearest dealer. If installed on a ceiling or
slanted wall, it may fall and result in severe personal injury.
Standard dimensions for wall mount kits are shown in the table above.
A
When purchasing our wall mount kit, a detailed installation manual and all parts
necessary for assembly are provided.
Do not use screws longer than the standard dimension, as they may cause
damage to the inside of the TV set.
For wall mounts that do not comply with the VESA standard screw specifications,
the length of the screws may differ depending on their specifications.
Do not use screws that do not comply with the VESA standard screw
specifications.
Do not fasten the screws too strongly, this may damage the product or cause the product to fall, leading to personal injury.
Samsung is not liable for these kinds of accidents.
Samsung is not liable for product damage or personal injury when a non-VESA or non-specified wall mount is used or the
consumer fails to follow the product installation instructions.
Our 57" and 63" models do not comply with VESA Specifications. Therefore, you should use our dedicated wall mount kit for
this model.
Do not exceed 15 degrees tilt when mounting this TV.
Product Farmly
inches
19~22
VESA Spec, (A B)
Standard Screw
iO0 X iO0.............................
M4
M6
LCD-TV
80~
42~50
58~63
I
600 X 400
70~
_
800 X 400
80~
I
1400 X 800
PDP-TV
M8
M6
400 X 400
LFD
M8
//_
Do not install your Wall Mount Kit while your TV is turned on. It may result in personal injury due to electric shock.
Quantity
Anti-Theft Kensington Lock
The product color and shape may vary depending on the model.
The Kensington Lock is a device used to physically fix the system when using it in
a public place. The appearance and locking method may differ from the illustration
depending on the manufacturer.
Refer to the manual provided with the Kensington Lock for proper use.
The locking device has to be purchased separately.
The location of the Kensington Lock may depending on its model.
1.
Insert the locking device into the Kensington slot on the LCD TV (O) and turn it in
the locking direction (O).
2.
Connect the Kensington Lock cable (_).
3.
Fix the Kensington Lock to a desk or a heavy stationary object.
Securing the Installation Space
Keep the required distances between the product and other objects (e.g. walls) to ensure proper ventilation.
Failing to do so may result in fire or a problem with the product due to an increase in the internal temperature of the product.
Install the product so the required distances shown in the figure are kept.
When using a stand or wall-mount, use parts provided by Samsung Electronics only.
•
If you use parts provided by another manufacturer, it may result in a problem with the product or an injury due to the
product falling.
•
If you use parts provided by another manufacturer, it may result in a problem with the product or fire due to an increase in
the internal temperature of the product due to poor ventilation.
The appearance may differ depending on the product.
The product color and shape may vary depending on the model.
When installing the product with a stand
-I
10cm
When installing the product with a wall=mount
-[
10 cm
1Ochre
lOcm
10 crn
Securing the TV to a Wall or Cabinet
The product color and shape may vary depending on the model.
/|_,
Caution:Pulling pushing or climbing on the TVmay cause the TV to fal, !n particular ensure your children do
net hang over Ordestabilize the TV; doing so may cause the TVto tip over, causing serious injuries or death.
.... Fellow all safety precautions provided on the included safety Ftyer, For added stability, install the anti:fall device
for safety purposes; as follows,
Components (Depending on the model):
TV-Holder
Screw O (M4XL16)
To prevent the TV from falling:
1.
Attach the TV-Holder to the TV by fastening the screws O (M4XL16) into the holes in the center of the TV.
Make sure to only use the supplied screws.
cabinet
2. Firmly fasten the screws to the wall or cabinet where the TV is to be installed. Tie the TV-Holder attached to the TV and the
screws fastened on the wall or cabinet so that the TV is fixed.
Purchase the screws to be used on the wall or cabinet separately.
Install the TV close to the wall so that it does not fall.
When attaching the TV to the wall, tie the cord level with the ground or slanted downwards for safety purposes.
Confirm that the cord or link does not come loose.
Before moving the TV, separate the connected cord first.
::::::::[
........................
/
_._.j cabinet (i._!......
3,
Verify all connections are properly secured. Periodically check connections for any sign of fatigue or failure. If you have any
doubt about the security of your connections, contact a professional installer.
Model Name
32 inches
Screen Size
(31.6 inches measured diagonally)
_Diagonal)
PC Resolution
1920 x 1080@60 Hz
(Optimum)
Sound
10Wx2
_Output)
Dimensions (W×DxH)
Body
With stand
31.6 x 3.0 x 21.5 (inch) / 802.9 x 77.1 x 544.9 (mrn)
31.6 x 9.4 x 23.7 (inch) / 802.9 x 239.0 x 601.0 (mm)
Weight
Without Stand
With Stand
23.8 Ibs / 10.8 Kg
31.I Ibs / 14.1 Kg
Environmental
Considerations
I0°C to 40°C (50°F to 104°F)
10% to 80%, non-condensing
-20°C to 45°C (-4°F to 113°F)
5% to 95%, non-condensing
Operating Temperature
Operating Humidity
Storage Temperature
Storage Humidity
Stand Swivel
-20 --20
(Left t Right)
37 inches
(Diagonal)
(37.1 inches measured diagonally)
PC Reso ution
(optimum)
1920 x 1080 @ 60 Hz
(Output)
10W x 2
(W*D,H)
Body
With stand
W Tg ,TCT,°
:::-:
: :
-----=
Without stand
Environmenta! Considerations
operat ng Temperature
operating Humidity
storage Temperature
Storage Humidity
(Left t Right)
36.5 x 3.1 x 24.0 (inch) / 926.7 x 78.2 x 608.4 (ram)
36.5 x 10.0 x 26.3 (inch) / 926.7 x 255.0 x 668.2 (mm)
29.5 _bs/ 13.4 Kg
38.1 Ibs/17.3 Kg
I0°C to 40°C (50°F to 104°F)
10% to 80%, non-condensing
-20°C to 45°C (-4°F to 113°F)
5% to 95%, non-condensing
-20° -- 20
Screen Size
(Diagonal)
40 inches
(40.0 inches measured diagonally)
PC Resolution
(Optimum)
(Output)
Body
With stand
Without Stand
With Stand
1920 x 1080 @ 80 Hz
10Wx2
39.2 x 3.1 x 25.6 (inch) / 995.1 x 78.6 x 650.4 (ram)
39.2 x 10.0 x 27.8 (inch) / 995.1 x 255.0 x 705.9 (mm)
32.4 Ibs / 14.7 Kg
41.2 Ibs / 18.7 Kg
Environmental Considerations
Operating Temperature
OPerating Hum!dity
Storage Temperature
Storage Humidity
I0°C to 40°C (50°F to 104°F)
10% to 80%, non-condensing
-20°C to 45°C (-4°F to 113°F)
5% to 95%, non-condensing
(Left /Right)
-20 ° ~ 20
Model Name
LN46B630
Screen Size
(Diagonal)
48 inches
(46.0 inches measured diagonally)
PC Resolution
(Optimum)
1920 x 1080 @ 60 Hz
Sound
(Output)
Dimensions (WxDxH)
Body
With stand
Weight
Without Stand
With Stand
10Wx2
44,0 x 3.1 x 30.7 (inch) / 1118,5 x 78,6 x 779,6 (ram)
44,0 x 10.9 x 28.5 (inch) / 1118.5 x 277.0 x 724.5 (mm)
43.0 Ibs/19.5 Kg
54.0 Ibs / 24.5 Kg
Environmental Considerations
Operating Temperature
Operating Humidity
Storage Temperature
Storage Humidity
I0°C to 40°C (50°F to 104°F)
10% to 80%, non-condensing
-20°C to 45°C (-4°F to 113°F)
5% to 95%, non-condensing
Stand Swivel
(Left / Right)
-20 ° ~ 20
Screen Size
(Diagonal)
52 inches
(52,0 inches measured diagonally)
PC Resolution
(Optimum)
(Output)
Body
With stand
Without Stand
With Stand
1920 x 1080 @ 80 Hz
10Wx2
49.7 x 3.1 x 32.3 (inch) / 1261.5 x 79.9 x 819.3 (mm)
49.7 x 12.0 x 34.5 (inch) / 1261.5 x 305.0 x 877.2 (mm)
56.4 Ibs / 25.6 Kg
68.3 Ibs / 31 Kg
Environmental Considerations
Operating Temperature
OPerating Hum!dity
Storage Temperature
Storage Humidity
I0°C to 40°C (50°F to 104°F)
10% to 80%, non-condensing
-20°C to 45°C (-4°F to 113°F)
5% to 95%, non-condensing
(Left /Right)
-20 ° ~ 20
Model Name
LN40B640
Screen Size
(Diagonal)
40 inches
(40.0 inches measured diagonally)
PC Resolution
(Optimum)
1920 x 1080 @ 60 Hz
Sound
(Output)
Dimensions (WxDxH)
Body
With stand
Weight
Without Stand
With Stand
10Wx2
40.9 x 3,1 x 25,1 (inch) / 1040,0 x 79.3 x 638,0 (mm)
40,9 x 10,0 x 27.4 (inch) / 1040.0 x 253.0 x 695.4 (mm)
31.4 Ibs / 15.6 Kg
42.8 Ibs / 19.4 Kg
Environmental Considerations
Operating Temperature
Operating Humidity
Storage Temperature
Storage Humidity
I0°C to 40°C (50°F to 104°F)
10% to 80%, non-condensing
-20°C to 45°C (-4°F to 113°F)
5% to 95%, non-condensing
Stand Swivel
(Left / Right)
-20 ° ~ 20
46 inches
Screen Size
(46.0 inches measured diagonally)
(Diagonal)
PC Resolution
1920 x 1080@60 Hz
(Optimum)
10Wx2
tCJutnut_
D mensions (W×DxH)
Body
With stand
46.1 x 3.1 x 28.0 (inch) / 1172.0 x 79.3 x 711.5 (ram)
48.1 x 10.9 x 30.4 (inch) / 1172.0 x 277.0 x 771.4 (mm)
43.41bs/19.7 Kg
53.81bs/24.4 Kg
Without Stand
With Stand
Environmental Considerations
Operating Temperature
Operating Humidity
Storage Temperature
Storage Humidity
10°C to 40°C (50°F to 104°F)
10% to 80%, non-condensing
-20°C to 45°C (-4°F to 113°F)
5% to 95%, non-condensing
-20°~ 20
(Left J Right)
LN55B 40
Model Name
55 inches
Screen Size
(54.7 inches measured diagonally)
(D agonal],
PC Resolution
1920 x 1080@60 Hz
(Opt=mum)
Sound
15W x2
_Output)
.... i
Dimensions (W×DxH)
53.7 x 3.3 x 32.4 (inch) / 1362.9 x 83.0 x 824.2 (mm)
53.7 x 12.1 x 34.8 (inch) / 1362.9 x 308.0 x 884.4 (ram)
Bod_
With stand
Weight
Without Stand
With Stand
Environmental
65.2 Ibs / 29.6 Kg
76.1 Ibs / 34.5 Kg
Considerations
Operating Temperature
Operating Humidity
Storage Temperature
Storage Humidity
Stand Swivel
(Left I Right)
I0°C to 40°C (50°F to 104°F)
10% to 80%, non-condensing
-20°C to 45°C (-4°F to 113°F)
5% to 95%, non-condensing
-20° -- 20
Design and specifications are subject to change without prior notice.
This device is a Class B digital apparatus.
For the power supply and Power Consumption, refer to the label attached to the product.
Dimensions
LN32B650
F-------3
I
I
TOP VIEW
JACK PANEL DETAIL 5.2"H X 6,6"W
3,0
31.6
27.5
2.5
23.7
I-9.4-1
17.6
FRONT VIEW / SIDE VIEW
7.9 (200 ram)
o
7.9 (200
;
ram)
REAR ViEW
NOTE: All drawings are not necessarily to scale. Some
dimensions are subject to change without prior notice. Refer to
the dimensions prior to performing installation of your TV. Not
responsible for typographical or printed errors.
© 2009 Samsung Electronics America, Inc
LN37B650
!
I
]
I
TOP VIEW
@
JACK PANEL DETAIL 6.2"H X 6,G"W
3.1
36.5
2!0
26.3
32.3
11.2
,
I- lOO
_1
20.5
FRONT VIEW 1SIDE VIEW
7.9 (200 ram)
o
7.9 (200
;
ram)
REAR VIEW
NOTE: All drawings are not necessarily to scale. Some
dimensions are subject to change without prior notice. Refer to
the dimensions prior to performing installation of your TV. Not
responsible for typographical or printed errors.
© 2009 Samsung Electronics America, Inc
LN409630
!
I
I
I
TOP ViEW
JACK PANEL DETAIL &2"H X 6,6"W
3.1
I- lO.O
20.5
FRONT ViEW 1SIDE ViEW
7.9 (200 ram)
o
7.9 (200
;
ram)
REAR ViEW
NOTE: All drawings are not necessarily to scale. Some
dimensions are subject to change without prior notice. Refer to
the dimensions prior to performing installation of your TV. Not
responsible for typographical or printed errors.
© 2009 Samsung Electronics America, Inc
LN46B630
_/-
!
I
I
I
-fl
TOP ViEW
i
_
.N
:;_®
JACK PANEL DETAIL &2"H X 6,6"W
3.1
I- lO9-1
21.7
FRONT ViEW / SIDE ViEW
15.7 (400 mm)
15.7(4ooram)
o
;
REAR ViEW
NOTE: All drawings are not necessarily to scale. Some
dimensions are subject to change without prior notice. Refer to
the dimensions prior to performing installation of your TV. Not
responsible for typographical or printed errors.
© 2009 Samsung Electronics America, Inc
LN52B630
!
I
I
I
TOP ViEW
,
.N
JACK PANEL DETAIL 5.2"H X 6,G"W
3.1
49.7
45.5
2{.7
'
I- 12o_1
21.7
FRONT VIEW / SIDE VIEW
15.7 (400 mm)
15.7(4ooram)
o
;
REAR ViEW
NOTE: All drawings are not necessarily to scale. Some
dimensions are subject to change without prior notice. Refer to
the dimensions prior to performing installation of your TV. Not
responsible for typographical or printed errors.
© 2009 Samsung Electronics America, Inc
LN40B640
!
!
I
I
Z
Z
TOP VIEW
i
.N
JACK PANEL DETAIL 6.2"H X &6"W
3.1
40.9
34.9
19.6
I_
27.4
20.5
_1
FRONT VIEW / SIDE VIEW
15.7 (400 mm)
15,7(4ooram)
o
;
REAR VIEW
NOTE: All drawings are not necessarily to scale. Some
dimensions are subject to change without prior notice. Refer to
the dimensions prior to performing installation of your TV. Not
responsible for typographical or printed errors.
© 2009 Samsung Electronics America, Inc
LN46B640
!
t
I
I
E
TOP ViEW
,
_
.N
::_®
JACK PANEL DETAIL &2"H X 6,6"W
3.1
46.1
40.1
22.6
30.4
FRONT ViEW / SIDE ViEW
15.7 (400 mm)
15.7(4ooram)
o
;
REAR VIEW
NOTE: All drawings are not necessarily to scale. Some
dimensions are subject to change without prior notice. Refer to
the dimensions prior to performing installation of your TV. Not
responsible for typographical or printed errors.
© 2009 Samsung Electronics America, Inc
LN559640
i
!
I
I
J
TOP VIEW
!oor
JACK PANEL DETAIL 6,2"H X 6,6"W
3.3
53.7
47.6
3:L4
26.8
I
21.6
34.8
I-121-I
I
FRONT VIEW / SiDE VIEW
15.7 (400 mm)
15.7(4ooram)
o
;
REAR VIEW
NOTE: All drawings are not necessarily to scale. Some
dimensions are subject to change without prior notice. Refer to
the dimensions prior to performing installation of your TV. Not
responsible for typographical or printed errors.
© 2009 Samsung Electronics America, Inc
o
This product uses parts of the software from the Independent JPEG Group.
o
This product uses parts of the software owned by the Freetype Project (www.freetype.org).
This product uses some software programs which are distributed under the GPL/LGPL license. Accordingly, the following
GPL and LGPL software source codes that have been used in this product can be provided after asking to vdswmanager@
samsung.com.
GPL software: Linux Kernel, Busybox, Binutils
o
LGPL software: Glibc, ffmpeg, smpeg, libgphoto, libusb, SDL
GNU GENERAL PUBLIC LICENSE
Version 3, 29 June 2007
Copyright (C) 2007 Free Software Foundation, Inc. <http://fsf.org/>
Everyone is permitted to copy and distribute verbatim copies of this license document, but changing it is not allowed.
Preamble
The GNU General Public License is a free, copyleft license for software and other kinds of works.
The licenses for most software and other practical works are designed to take away your freedom to share and change the
works. By contrast, the GNU General Public License is intended to guarantee your freedom to share and change all versions
of a program--to make sure it remains free software for all its users. We, the Free Software Foundation, use the GNU General
Public License for most of our software; it applies also to any other work released this way by its authors. You can apply it to your
programs, too.
When we speak of free software, we are referring to freedom, not price. Our General Public Licenses are designed to make sure
that you have the freedom to distribute copies of free software (and charge for them if you wish), that you receive source code or
can get it if you want it, that you can change the software or use pieces of it in new free programs, and that you know you can do
these things.
To protect your rights, we need to prevent others from denying you these rights or asking you to surrender the rights. Therefore,
you have certain responsibilities if you distribute copies of the software, or if you modify it: responsibilities to respect the freedom of
others.
For example, if you distribute copies of such a program, whether gratis or for a fee, you must pass on to the recipients the same
freedoms that you received. You must make sure that they, too, receive or can get the source code. And you must show them
these terms so they know their rights.
Developers that use the GNU GPL protect your rights with two steps: (1) assert copyright on the software, and (2) offer you this
License giving you legal permission to copy, distribute and/or modify it.
For the developers' and authors' protection, the GPL clearly explains that there is no warranty for this free software. For both users'
and authors' sake, the GPL requires that modified versions be marked as changed, so that their problems will not be attributed
erroneously to authors of previous versions.
Some devices are designed to deny users access to install or run modified versions of the software inside them, although the
manufacturer can do so. This is fundamentally incompatible with the aim of protecting users' freedom to change the software.
The systematic pattern of such abuse occurs in the area of products for individuals to use, which is precisely where it is most
unacceptable. Therefore, we have designed this version of the GPL to prohibit the practice for those products. If such problems
arise substantially in other domains, we stand ready to extend this provision to those domains in future versions of the GPL, as
needed to protect the freedom of users.
Finally, every program is threatened constantly by software patents. States should not allow patents to restrict development and
use of software on general-purpose computers, but in those that do, we wish to avoid the special danger that patents applied to
a free program could make it effectively proprietary. To prevent this, the GPL assures that patents cannot be used to render the
program non-free.
The precise terms and conditions for copying, distribution and modification follow.
TERMS AND CONDITIONS
0.
Definitions.
"This License" refers to version 3 of the GNU General Public License.
"Copyright" also means copyright-like laws that apply to other kinds of works, such as semiconductor masks.
"The Program" refers to any copyrightable work licensed under this License. Each licensee is addressed as "you". "Licensees"
and "recipients" may be individuals or organizations.
To "modify" a work means to copy from or adapt all or part of the work in a fashion requiring copyright permission, other than
the making of an exact copy. The resulting work is called a "modified version" of the earlier work or a work "based on" the
earlier work.
A "covered work" means either the unmodified Program or a work based on the Program.
To "propagate" a work means to do anything with it that, without permission, would make you directly or secondarily liable
for infringement under applicable copyright law, except executing it on a computer or modifying a private copy. Propagation
includes copying, distribution (with or without modification), making available to the public, and in some countries other
activities as well.
To"convey"
awork
means
anykind
ofpropagation
that
enables
other
parties
tomake
orreceive
copies.
Mere
interaction
with
auser
through
acomputer
network,
with
notransfer
ofacopy,
isnotconveying.
Aninteractive
user
interface
displays
"Appropriate
Legal
Notices"
totheextent
thatitincludes
aconvenient
and
prominently
visible
feature
that(1)displays
anappropriate
copyright
notice,
and
(2)tells
theuser
that
there
isnowarranty
forthework
(except
totheextent
that
warranties
areprovided),
that
licensees
may
convey
thework
under
thisLicense,
and
how
toview
a
copy
ofthisLicense.
Iftheinterface
presents
alistofuser
commands
oroptions,
such
asamenu,
aprominent
item
inthelist
meets
thiscriterion.
1. Source
Code.
The
"source
code"
forawork
means
thepreferred
form
ofthework
formaking
modifications
toit."Object
code"
means
any
non-source
form
ofawork.
A"Standard
Interface"
means
aninterface
thateither
isanofficial
standard
defined
byarecognized
standards
body,
or,inthe
case
ofinterfaces
specified
foraparticular
programming
language,
one
that
iswidely
used
among
developers
working
inthat
language.
The
"System
Libraries"
ofanexecutable
work
include
anything,
other
than
thework
asawhole,
that
(a)isincluded
inthe
normal
form
ofpackaging
aMajor
Component,
butwhich
isnotpart
ofthatMajor
Component,
and
(b)serves
only
toenable
use
ofthework
with
thatMajor
Component,
ortoimplement
aStandard
Interface
forwhich
animplementation
isavailable
to
thepublic
insource
code
form.
A"Major
Component",
inthiscontext,
means
amajor
essential
component
(kernel,
window
system,
and
soon)ofthespecific
operating
system
(ifany)
onwhich
theexecutable
work
runs,
oracompiler
used
toproduce
thework,
oranobject
code
interpreter
used
torunit.
The
"Corresponding
Source"
forawork
inobject
code
form
means
allthesource
code
needed
togenerate,
install,
and(foran
executable
work)
runtheobject
code
and
tomodify
thework,
including
scripts
tocontrol
those
activities.
However,
itdoes
not
include
thework's
System
Libraries,
orgeneral-purpose
tools
orgenerally
available
freeprograms
which
areused
unmodified
inperforming
those
activities
butwhich
arenotpart
ofthework.
Forexample,
Corresponding
Source
includes
interface
definition
files
associated
with
source
files
forthework,
and
thesource
code
forshared
libraries
and
dynamically
linked
subprograms
that
thework
isspecifically
designed
torequire,
such
asbyintimate
data
communication
orcontrol
flow
between
those
subprograms
andother
parts
ofthework.
The
Corresponding
Source
need
notinclude
anything
thatusers
canregenerate
automatically
from
other
parts
ofthe
Corresponding
Source.
The
Corresponding
Source
forawork
insource
code
form
isthat
same
work.
2. Basic
Permissions.
Allrights
granted
under
thisLicense
aregranted
fortheterm
ofcopyright
ontheProgram,
and
areirrevocable
provided
the
stated
conditions
aremet.
This
License
explicitly
affirms
your
unlimited
permission
toruntheunmodified
Program.
Theoutput
from
running
acovered
work
iscovered
bythisLicense
only
iftheoutput,
given
itscontent,
constitutes
acovered
work.
This
License
acknowledges
your
rights
offairuse
orother
equivalent,
asprovided
bycopyright
law.
You
may
make,
runand
propagate
covered
works
that
you
donotconvey,
without
conditions
solong
asyour
license
otherwise
remains
inforce.
You
may
convey
covered
works
toothers
forthesole
purpose
ofhaving
them
make
modifications
exclusively
foryou,
orprovide
you
with
facilities
forrunning
those
works,
provided
that
youcomply
with
theterms
ofthisLicense
inconveying
allmaterial
forwhich
you
donotcontrol
copyright.
Those
thus
making
orrunning
thecovered
works
foryoumust
dosoexclusively
on
your
behalf,
under
your
direction
and
control,
onterms
that
prohibit
them
from
making
anycopies
ofyour
copyrighted
material
outside
their
relationship
with
you.
Conveying
under
anyother
circumstances
ispermitted
solely
under
theconditions
stated
below.
Sublicensing
isnotallowed;
section
10makes
itunnecessary.
3.
Protecting Users' Legal Rights From Anti-Circumvention Law.
No covered work shall be deemed part of an effective technological measure under any applicable law fulfilling obligations
under article 11 of the WlPO copyright treaty adopted on 20 December 1996, or similar laws prohibiting or restricting
circumvention of such measures.
When you convey a covered work, you waive any legal power to forbid circumvention of technological measures to the extent
such circumvention is effected by exercising rights under this License with respect to the covered work, and you disclaim any
intention to limit operation or modification of the work as a means of enforcing, against the work's users, your or third parties'
legal rights to forbid circumvention of technological measures.
4.
Conveying Verbatim Copies.
You may convey verbatim copies of the Program's source code as you receive it, in any medium, provided that you
conspicuously and appropriately publish on each copy an appropriate copyright notice; keep intact all notices stating that this
License and any non-permissive terms added in accord with section 7 apply to the code; keep intact all notices of the absence
of any warranty; and give all recipients a copy of this License along with the Program.
You may charge any price or no price for each copy that you convey, and you may offer support or warranty protection for a
fee.
6.
Conveying Modified Source Versions.
You may convey a work based on the Program, or the modifications to produce it from the Program, in the form of source code
under the terms of section 4, provided that you also meet all of these conditions:
-
a) The work must carry prominent notices stating that you modified it, and giving a relevant date.
b) The work must carry prominent notices stating that it is released under this License and any conditions added under
section 7. This requirement modifies the requirement in section 4 to "keep intact all notices".
- c)You
must
license
theentire
work,
asawhole,
under
thisLicense
toanyone
who
comes
intopossession
ofacopy.
This
License
willtherefore
apply,
along
with
any
applicable
section
7additional
terms,
tothewhole
ofthework,
and
allits
parts,
regardless
ofhow
they
arepackaged.
This
License
gives
nopermission
tolicense
thework
inanyother
way,
butit
does
notinvalidate
such
permission
ifyou
have
separately
received
it.
- d)Ifthework
hasinteractive
user
interfaces,
each
must
display
Appropriate
Legal
Notices;
however,
iftheProgram
has
interactive
interfaces
that
donotdisplay
Appropriate
Legal
Notices,
your
work
need
notmake
them
doso.
Acompilation
ofacovered
work
with
other
separate
and
independent
works,
which
arenotbytheir
nature
extensions
of
thecovered
work,
and
which
arenotcombined
with
itsuch
astoform
alarger
program,
inoronavolume
ofastorage
or
distribution
medium,
iscalled
an"aggregate"
ifthecompilation
anditsresulting
copyright
arenotused
tolimit
theaccess
or
legal
rights
ofthecompilation's
users
beyond
what
theindividual
works
permit.
Inclusion
ofacovered
work
inanaggregate
does
notcause
thisLicense
toapply
totheother
parts
oftheaggregate.
6. Conveying
Non-Source
Forms.
You
may
convey
acovered
work
inobject
code
form
under
theterms
ofsections
4and
5,provided
that
youalso
convey
the
machine-readable
Corresponding
Source
under
theterms
ofthisLicense,
inone
ofthese
ways:
- a)Convey
theobject
code
in,orembodied
in,aphysical
product
(including
aphysical
distribution
medium),
accompanied
bytheCorresponding
Source
fixed
onadurable
physical
medium
customarily
used
forsoftware
interchange.
- b)Convey
theobject
code
in,orembodied
in,aphysical
product
(including
aphysical
distribution
medium),
accompanied
byawritten
offer,
valid
foratleast
three
years
and
valid
foraslong
asyouoffer
spare
parts
orcustomer
support
forthat
product
model,
togive
anyone
who
possesses
theobject
code
either
(1)acopy
oftheCorresponding
Source
forallthe
software
intheproduct
that
iscovered
bythisLicense,
onadurable
physical
medium
customarily
used
forsoftware
interchange,
foraprice
nomore
than
your
reasonable
cost
ofphysically
performing
thisconveying
ofsource,
or(2)
access
tocopy
theCorresponding
Source
from
anetwork
server
atnocharge.
- c)Convey
individual
copies
oftheobject
code
with
acopy
ofthewritten
offer
toprovide
theCorresponding
Source.
This
alternative
isallowed
only
occasionally
and
noncommercially,
and
only
ifyou
received
theobject
code
with
such
anoffer,
inaccord
with
subsection
6b.
- d)Convey
theobject
code
byoffering
access
from
adesignated
place
(gratis
orforacharge),
and
offer
equivalent
access
totheCorresponding
Source
inthesame
way
through
thesame
place
atnofurther
charge.
You
need
notrequire
recipients
tocopy
theCorresponding
Source
along
with
theobject
code.
Iftheplace
tocopy
theobject
code
isanetwork
server,
theCorresponding
Source
may
beonadifferent
server
(operated
byyou
orathird
party)
that
supports
equivalent
copying
facilities,
provided
youmaintain
clear
directions
next
totheobject
code
saying
where
tofindtheCorresponding
Source.
Regardless
ofwhat
server
hosts
theCorresponding
Source,
you
remain
obligated
toensure
thatitisavailable
for
aslong
asneeded
tosatisfy
these
requirements.
- e)Convey
theobject
code
using
peer-to-peer
transmission,
provided
youinform
other
peers
where
theobject
code
and
Corresponding
Source
ofthework
arebeing
offered
tothegeneral
public
atnocharge
under
subsection
6d.Aseparable
portion
oftheobject
code,
whose
source
code
isexcluded
from
theCorresponding
Source
asaSystem
Library,
need
not
beincluded
inconveying
theobject
code
work.
A"User
Product"
iseither
(1)a"consumer
product",
which
means
any
tangible
personal
property
which
isnormally
used
for
personal,
family,
orhousehold
purposes,
or(2)anything
designed
orsold
forincorporation
into
adwelling.
Indetermining
whether
aproduct
isaconsumer
product,
doubtful
cases
shall
beresolved
infavor
ofcoverage.
Foraparticular
product
received
byaparticular
user,
"normally
used"
refers
toatypical
orcommon
use
ofthat
class
ofproduct,
regardless
ofthe
status
oftheparticular
user
oroftheway
inwhich
theparticular
user
actually
uses,
orexpects
orisexpected
touse,
the
product.
Aproduct
isaconsumer
product
regardless
ofwhether
theproduct
hassubstantial
commercial,
industrial
ornonconsumer
uses,
unless
such
uses
represent
theonly
significant
mode
ofuse
oftheproduct.
"Installation
Information"
foraUser
Product
means
anymethods,
procedures,
authorization
keys,
orother
information
required
toinstall
and
execute
modified
versions
ofacovered
work
inthat
User
Product
from
amodified
version
ofitsCorresponding
Source.
Theinformation
must
suffice
toensure
that
thecontinued
functioning
ofthemodified
object
code
isinnocase
prevented
orinterfered
withsolely
because
modification
has
been
made.
Ifyou
convey
anobject
code
work
under
thissection
in,orwith,
orspecifically
forusein,aUser
Product,
and
theconveying
occurs
aspart
ofatransaction
inwhich
theright
ofpossession
and
useoftheUser
Product
istransferred
totherecipient
in
perpetuity
orforafixed
term
(regardless
ofhow
thetransaction
ischaracterized),
theCorresponding
Source
conveyed
under
thissection
must
beaccompanied
bytheInstallation
Information.
But
thisrequirement
does
notapply
ifneither
younorany
third
party
retains
theability
toinstall
modified
object
code
ontheUser
Product
(forexample,
thework
has
been
installed
in
ROM).
The
requirement
toprovide
Installation
Information
does
notinclude
arequirement
tocontinue
toprovide
support
service,
warranty,
orupdates
forawork
thathas
been
modified
orinstalled
bytherecipient,
orfortheUser
Product
inwhich
ithas
been
modified
orinstalled.
Access
toanetwork
may
bedenied
when
themodification
itself
materially
andadversely
affects
the
operation
ofthenetwork
orviolates
therules
and
protocols
forcommunication
across
thenetwork.
Corresponding
Source
conveyed,
and
Installation
Information
provided,
inaccord
with
thissection
must
beinaformat
thatis
publicly
documented
(and
with
animplementation
available
tothepublic
insource
code
form),
and
must
require
nospecial
password
orkeyforunpacking,
reading
orcopying.
7. Additional
Terms.
"Additional
permissions"
areterms
that
supplement
theterms
ofthisLicense
bymaking
exceptions
from
one
ormore
ofits
conditions.
Additional
permissions
that
areapplicable
totheentire
Program
shall
betreated
asthough
they
were
included
in
thisLicense,
totheextent
that
they
arevalid
under
applicable
law.
Ifadditional
permissions
apply
only
topartoftheProgram,
that
part
may
beused
separately
under
those
permissions,
buttheentire
Program
remains
governed
bythisLicense
without
regard
totheadditional
permissions.
When
youconvey
acopy
ofacovered
work,
youmay
atyour
option
remove
anyadditional
permissions
from
that
copy,
or
from
anypart
ofit.(Additional
permissions
may
bewritten
torequire
their
own
removal
incertain
cases
when
you
modify
the
work.)
You
may
place
additional
permissions
onmaterial,
added
byyou
toacovered
work,
forwhich
youhave
orcan
give
appropriate
copyright
permission.
Notwithstanding
anyother
provision
ofthisLicense,
formaterial
you
add
toacovered
work,
youmay
(ifauthorized
bythe
copyright
holders
ofthat
material)
supplement
theterms
ofthisLicense
with
terms:
- a)Disclaiming
warranty
orlimiting
liability
differently
from
theterms
ofsections
15and16ofthisLicense;
or
- b)Requiring
preservation
ofspecified
reasonable
legal
notices
orauthor
attributions
inthatmaterial
orintheAppropriate
Legal
Notices
displayed
byworks
containing
it;or
- c)Prohibiting
misrepresentation
oftheorigin
ofthat
material,
orrequiring
that
modified
versions
ofsuch
material
be
marked
inreasonable
ways
asdifferent
from
theoriginal
version;
or
- d)Limiting
theuseforpublicity
purposes
ofnames
oflicensors
orauthors
ofthematerial;
or
- e)Declining
togrant
rights
under
trademark
lawforuseofsome
trade
names,
trademarks,
orservice
marks;
or
- f)Requiring
indemnification
oflicensors
and
authors
ofthat
material
byanyone
who
conveys
thematerial
(ormodified
versions
ofit)with
contractual
assumptions
ofliability
totherecipient,
forany
liability
that
these
contractual
assumptions
directly
impose
onthose
licensors
and
authors.
Allother
non-permissive
additional
terms
areconsidered
"further
restrictions"
within
themeaning
ofsection
I0.IftheProgram
asyoureceived
it,oranypart
ofit,contains
anotice
stating
that
itisgoverned
bythisLicense
along
with
aterm
thatisa
further
restriction,
youmay
remove
that
term.
Ifalicense
document
contains
afurther
restriction
butpermits
relicensing
or
conveying
under
thisLicense,
you
may
add
toacovered
work
material
governed
bytheterms
ofthat
license
document,
provided
that
thefurther
restriction
does
notsurvive
such
relicensing
orconveying.
Ifyou
add
terms
toacovered
work
inaccord
with
thissection,
youmust
place,
intherelevant
source
files,
astatement
ofthe
additional
terms
that
apply
tothose
files,
oranotice
indicating
where
tofind
theapplicable
terms.
Additional
terms,
permissive
ornon-permissive,
may
bestated
intheform
ofaseparately
written
license,
orstated
as
exceptions;
theabove
requirements
apply
either
way.
8. Termination.
You
may
notpropagate
ormodify
acovered
work
except
asexpressly
provided
under
thisLicense.
Anyattempt
otherwise
to
propagate
ormodify
itisvoid,
and
willautomatically
terminate
your
rights
under
thisLicense
(including
anypatent
licenses
granted
under
thethird
paragraph
ofsection
11
).
However,
ifyoucease
allviolation
ofthisLicense,
then
your
license
from
aparticular
copyright
holder
isreinstated
(a)
provisionally,
unless
and
until
thecopyright
holder
explicitly
and
finally
terminates
your
license,
and
(b)permanently,
ifthe
copyright
holder
fails
tonotify
youoftheviolation
bysome
reasonable
means
prior
to60days
after
thecessation.
Moreover,
your
license
from
aparticular
copyright
holder
isreinstated
permanently
ifthecopyright
holder
notifies
you
ofthe
violation
bysome
reasonable
means,
thisisthefirsttime
youhave
received
notice
ofviolation
ofthisLicense
(foranywork)
from
that
copyright
holder,
and
youcure
theviolation
prior
to30days
after
your
receipt
ofthenotice.
Termination
ofyour
rights
under
thissection
does
notterminate
thelicenses
ofparties
who
have
received
copies
orrights
from
you
under
thisLicense.
Ifyour
rights
have
been
terminated
and
notpermanently
reinstated,
youdonotqualify
toreceive
new
licenses
forthesame
material
under
section
10.
9. Acceptance
NotRequired
forHaving
Copies.
You
arenotrequired
toaccept
thisLicense
inorder
toreceive
orrunacopy
oftheProgram.
Ancillary
propagation
ofacovered
work
occurring
solely
asaconsequence
ofusing
peer-to-peer
transmission
toreceive
acopy
likewise
does
notrequire
acceptance.
However,
nothing
other
than
thisLicense
grants
youpermission
topropagate
ormodify
anycovered
work.
These
actions
infringe
copyright
ifyoudonotaccept
thisLicense.
Therefore,
bymodifying
orpropagating
acovered
work,
you
indicate
your
acceptance
ofthisLicense
todoso.
10.Automatic
Licensing
ofDownstream
Recipients.
Each
time
youconvey
acovered
work,
therecipient
automatically
receives
alicense
from
theoriginal
licensors,
torun,
modify
and
propagate
that
work,
subject
tothisLicense.
You
arenotresponsible
forenforcing
compliance
bythird
parties
with
this
License.
An"entity
transaction"
isatransaction
transferring
control
ofanorganization,
orsubstantially
allassets
ofone,
orsubdividing
anorganization,
ormerging
organizations.
Ifpropagation
ofacovered
work
results
from
anentity
transaction,
each
party
tothat
transaction
who
receives
acopy
ofthework
also
receives
whatever
licenses
tothework
theparty's
predecessor
in
interest
had
orcould
give
under
theprevious
paragraph,
plus
aright
topossession
oftheCorresponding
Source
ofthework
from
thepredecessor
ininterest,
ifthepredecessor
hasitorcan
getitwith
reasonable
efforts.
You
may
notimpose
any
further
restrictions
ontheexercise
oftherights
granted
oraffirmed
under
thisLicense.
Forexample,
you
may
notimpose
alicense
fee,
royalty,
orother
charge
forexercise
ofrights
granted
under
thisLicense,
and
youmay
not
initiate
litigation
(including
across-claim
orcounterclaim
inalawsuit)
alleging
that
anypatent
claim
isinfringed
bymaking,
using,
selling,
offering
forsale,
orimporting
theProgram
oranyportion
ofit.
11.Patents.
A"contributor"
isacopyright
holder
who
authorizes
useunder
thisLicense
oftheProgram
orawork
onwhich
theProgram
is
based.
The
work
thus
licensed
iscalled
thecontributor's
"contributor
version".
Acontributor's
"essential
patent
claims"
areallpatent
claims
owned
orcontrolled
bythecontributor,
whether
already
acquired
orhereafter
acquired,
that
would
beinfringed
bysome
manner,
permitted
bythisLicense,
ofmaking,
using,
orselling
its
contributor
version,
butdonotinclude
claims
that
would
beinfringed
only
asaconsequence
offurther
modification
ofthe
contributor
version.
Forpurposes
ofthisdefinition,
"control"
includes
theright
togrant
patent
sublicenses
inamanner
consistent
with
therequirements
ofthisLicense.
Each
contributor
grants
youanon-exclusive,
worldwide,
royalty-free
patent
license
under
thecontributor's
essential
patent
claims,
tomake,
use,
sell,
offer
forsale,
import
and
otherwise
run,
modify
and
propagate
thecontents
ofitscontributor
version.
Inthefollowing
three
paragraphs,
a"patent
license"
isanyexpress
agreement
orcommitment,
however
denominated,
not
toenforce
apatent
(such
asanexpress
permission
topractice
apatent
orcovenant
nottosue
forpatent
infringement).
To
"grant"
such
apatent
license
toaparty
means
tomake
such
anagreement
orcommitment
nottoenforce
apatent
against
the
party.
Ifyou
convey
acovered
work,
knowingly
relying
onapatent
license,
and
theCorresponding
Source
ofthework
isnot
available
foranyone
tocopy,
free
ofcharge
andunder
theterms
ofthisLicense,
through
apublicly
available
network
server
or
other
readily
accessible
means,
then
youmust
either
(I)cause
theCorresponding
Source
tobesoavailable,
or(2)arrange
todeprive
yourself
ofthebenefit
ofthepatent
license
forthisparticular
work,
or(3)arrange,
inamanner
consistent
with
the
requirements
ofthisLicense,
toextend
thepatent
license
todownstream
recipients.
"Knowingly
relying"
means
youhave
actual
knowledge
that,
butforthepatent
license,
your
conveying
thecovered
work
inacountry,
oryour
recipient's
useofthe
covered
work
inacountry,
would
infringe
one
ormore
identifiable
patents
inthat
country
that
youhave
reason
tobelieve
are
valid.
If,pursuant
toorinconnection
withasingle
transaction
orarrangement,
you
convey,
orpropagate
byprocuring
conveyance
of,acovered
work,
and
grant
apatent
license
tosome
oftheparties
receiving
thecovered
work
authorizing
them
touse,
propagate,
modify
orconvey
aspecific
copy
ofthecovered
work,
then
thepatent
license
yougrant
isautomatically
extended
toallrecipients
ofthecovered
work
and
works
based
onit.
Apatent
license
is"discriminatory"
ifitdoes
notinclude
within
thescope
ofitscoverage,
prohibits
theexercise
of,oris
conditioned
onthenon-exercise
ofone
ormore
oftherights
that
arespecifically
granted
under
thisLicense.
You
may
not
convey
acovered
work
ifyouareaparty
toanarrangement
with
athird
party
that
isinthebusiness
ofdistributing
software,
under
which
you
make
payment
tothethird
party
based
ontheextent
ofyour
activity
ofconveying
thework,
andunder
which
thethird
party
grants,
toany
oftheparties
who
would
receive
thecovered
work
from
you,
adiscriminatory
patent
license
(a)
inconnection
with
copies
ofthecovered
work
conveyed
byyou(orcopies
made
from
those
copies),
or(b)primarily
forand
in
connection
with
specific
products
orcompilations
thatcontain
thecovered
work,
unless
youentered
into
that
arrangement,
or
that
patent
license
was
granted,
prior
to28March
2007.
Nothing
inthisLicense
shall
beconstrued
asexcluding
orlimiting
any
implied
license
orother
defenses
toinfringement
that
may
otherwise
beavailable
toyou
under
applicable
patent
law.
12.NoSurrender
ofOthers'
Freedom.
Ifconditions
areimposed
onyou(whether
bycourt
order,
agreement
orotherwise)
that
contradict
theconditions
ofthis
License,
they
donotexcuse
you
from
theconditions
ofthisLicense.
Ifyoucannot
convey
acovered
work
soastosatisfy
simultaneously
your
obligations
under
thisLicense
and
anyother
pertinent
obligations,
then
asaconsequence
youmay
not
convey
itatall.Forexample,
ifyouagree
toterms
that
obligate
youtocollect
aroyalty
forfurther
conveying
from
those
to
whom
youconvey
theProgram,
theonly
way
youcould
satisfy
both
those
terms
and
thisLicense
would
betorefrain
entirely
from
conveying
theProgram.
13.Use
with
theGNU
Affero
General
Public
License.
Notwithstanding
anyother
provision
ofthisLicense,
youhave
permission
tolinkorcombine
anycovered
work
with
awork
licensed
under
version
3oftheGNU
Affero
General
Public
License
into
asingle
combined
work,
and
toconvey
theresulting
work.
The
terms
ofthisLicense
willcontinue
toapply
tothepart
which
isthecovered
work,
butthespecial
requirements
of
theGNU
Affero
General
Public
License,
section
13,concerning
interaction
through
anetwork
willapply
tothecombination
as
such.
14.Revised
Versions
ofthisLicense.
The
Free
Software
Foundation
may
publish
revised
and/or
new
versions
oftheGNU
General
Public
License
from
time
totime.
Such
new
versions
willbesimilar
inspirit
tothepresent
version,
butmay
differ
indetail
toaddress
new
problems
orconcerns.
Each
version
isgiven
adistinguishing
version
number.
IftheProgram
specifies
that
acertain
numbered
version
oftheGNU
General
Public
License
"orany
later
version"
applies
toit,youhave
theoption
offollowing
theterms
and
conditions
either
of
that
numbered
version
orofanylater
version
published
bytheFree
Software
Foundation.
IftheProgram
does
notspecify
aversion
number
oftheGNU
General
Public
License,
youmay
choose
any
version
ever
published
bytheFree
Software
Foundation.
IftheProgram
specifies
that
aproxy
candecide
which
future
versions
oftheGNU
General
Public
License
can
beused,
that
proxy's
public
statement
ofacceptance
ofaversion
permanently
authorizes
you
tochoose
that
version
fortheProgram.
Later
license
versions
may
give
youadditional
ordifferent
permissions.
However,
noadditional
obligations
areimposed
onany
author
orcopyright
holder
asaresult
ofyour
choosing
tofollow
alater
version.
16.Disclaimer
ofWarranty.
THERE
ISNOWARRANTY
FOR
THE
PROGRAM,
TOTHE
EXTENT
PERMITTED
BYAPPLICABLE
LAW.
EXCEPT
WHEN
OTHERWISE
STATED
INWRITING
THE
COPYRIGHT
HOLDERS
AND/OR
OTHER
PARTIES
PROVIDE
THE
PROGRAM
"AS
IS"WITHOUT
WARRANTY
OFANY
KIND,
EITHER
EXPRESSED
ORIMPLIED,
INCLUDING,
BUT
NOT
LIMITED
TO,
THE
IMPLIED
WARRANTIES
OFMERCHANTABILITYAND
FITNESS
FORA
PARTICULAR
PURPOSE.
THE
ENTIRE
RISK
ASTOTHE
QUALITY
AND
PERFORMANCE
OFTHE
PROGRAM
ISWITH
YOU.
SHOULD
THE
PROGRAM
PROVE
DEFECTIVE,
YOU
ASSUME
THE
COST
OFALL
NECESSARY
SERVICING,
REPAIR
ORCORRECTION.
16.Limitation
ofLiability.
INNOEVENT
UNLESS
REQUIRED
BY
APPLICABLE
LAW
ORAGREED
TOINWRITING
WILL
ANY
COPYRIGHT
HOLDER,
ORANY
OTHER
PARTY
WHO
MODIFIES
AND/OR
CONVEYS
THE
PROGRAM
ASPERMITTED
ABOVE,
BE
LIABLE
TOYOU
FOR
DAMAGES,
INCLUDING
ANY
GENERAL,
SPECIAL,
INCIDENTAL
ORCONSEQUENTIAL
DAMAGES
ARISING
OUT
OFTHE
USE
ORINABILITY
TOUSE
THE
PROGRAM
(INCLUDING
BUT
NOT
LIMITED
TOLOSS
OFDATA
ORDATA
BEING
RENDERED
INACCURATE
ORLOSSES
SUSTAINED
BYYOU
ORTHIRD
PARTIES
ORAFAILURE
OF
THE
PROGRAM
TOOPERATE
WITH
ANY
OTHER
PROGRAMS),
EVEN
IFSUCH
HOLDER
OROTHER
PARTY
HAS
BEEN
ADVISED
OFTHE
POSSIBILITY
OFSUCH
DAMAGES.
17.Interpretation
ofSections
15and
16.
Ifthedisclaimer
ofwarranty
and
limitation
ofliability
provided
above
cannot
begiven
local
legal
effect
according
totheir
terms,
reviewing
courts
shall
apply
local
lawthatmost
closely
approximates
anabsolute
waiver
ofallcivilliability
inconnection
with
theProgram,
unless
awarranty
orassumption
ofliability
accompanies
acopy
oftheProgram
inreturn
forafee.
END OF TERMS AND CONDiTiONS
How to Apply These Terms to Your New Programs
If you develop a new program, and you want it to be of the greatest possible use to the public, the best way to achieve this is to
make it free software which everyone can redistribute and change under these terms.
To do so, attach the following notices to the program. It is safest to attach them to the start of each source file to most effectively
state the exclusion of warranty; and each file should have at least the "copyright" line and a pointer to where the full notice is found.
<one line to give the program's name and a brief idea of what it does.> Copyright (C) <year> <name of author>
This program is free software: you can redistribute it and/or modify it under the terms of the GNU General Public License as
published by the Free Software Foundation, either version 3 of the License, or (at your option) any later version.
This program is distributed in the hope that it will be useful, but WITHOUT ANY WARRANTY; without even the implied
warranty of MERCHANTABILITY or FITNESS FOR A PARTICULAR PURPOSE. See the GNU General Public License for
more details.
You should have received a copy of the GNU General Public License along with this program. If not, see <http://www.gnu.
org/licenses/>.
Also add information on how to contact you by electronic and paper mail.
If the program does terminal interaction, make it output a short notice like this when it starts in an interactive mode:
<program> Copyright (C) <year> <name of author> This program comes with ABSOLUTELY NO WARRANTY; for details type
'show w'. This is free software, and you are welcome to redistribute it under certain conditions; type 'show c' for details.
The hypothetical commands "show w' and "show c' should show the appropriate parts of the General Public License. Of course,
your program's commands might be different; for a GUI interface, you would use an "about box".
You should also get your employer (if you work as a programmer) or school, if any, to sign a "copyright disclaimer" for the program,
if necessary.
For more information on this, and how to apply and follow the GNU GPL, see <http://www.gnu.org/licenses/>.
The GNU General Public License does not permit incorporating your program into proprietary programs. If your program is a
subroutine library, you may consider it more useful to permit linking proprietary applications with the library. If this is what you want
to do, use the GNU Lesser General Public License instead of this License. But first, please read <http://www.gnu.org/philosophy/
why-not-lgpl.html>.
GNU Lesser General Public License (LGPL)
Version 3, 29 June 2007
Copyright (C) 2007 Free Software Foundation, Inc. <http://fsf.org/>
Everyone is permitted to copy and distribute verbatim copies of this license document, but changing it is not allowed.
Preamble
The GNU General Public License is a free, copyleft license for software and other kinds of works.
The licenses for most software and other practical works are designed to take away your freedom to share and change the
works. By contrast, the GNU General Public License is intended to guarantee your freedom to share and change all versions
of a program--to make sure it remains free software for all its users. We, the Free Software Foundation, use the GNU General
Public License for most of our software; it applies also to any other work released this way by its authors. You can apply it to your
programs, too.
When we speak of free software, we are referring to freedom, not price. Our General Public Licenses are designed to make sure
that you have the freedom to distribute copies of free software (and charge for them if you wish), that you receive source code or
can get it if you want it, that you can change the software or use pieces of it in new free programs, and that you know you can do
these things.
To protect your rights, we need to prevent others from denying you these rights or asking you to surrender the rights. Therefore,
you have certain responsibilities if you distribute copies of the software, or if you modify it: responsibilities to respect the freedom of
others.
For example, if you distribute copies of such a program, whether gratis or for a fee, you must pass on to the recipients the same
freedoms that you received. You must make sure that they, too, receive or can get the source code. And you must show them
these terms so they know their rights.
Developers that use the GNU GPL protect your rights with two steps: (1) assert copyright on the software, and (2) offer you this
License giving you legal permission to copy, distribute and/or modify it.
For the developers' and authors' protection, the GPL clearly explains that there is no warranty for this free software. For both users'
and authors' sake, the GPL requires that modified versions be marked as changed, so that their problems will not be attributed
erroneously to authors of previous versions.
Some devices are designed to deny users access to install or run modified versions of the software inside them, although the
manufacturer can do so. This is fundamentally incompatible with the aim of protecting users' freedom to change the software.
The systematic pattern of such abuse occurs in the area of products for individuals to use, which is precisely where it is most
unacceptable. Therefore, we have designed this version of the GPL to prohibit the practice for those products. If such problems
arise substantially in other domains, we stand ready to extend this provision to those domains in future versions of the GPL, as
needed to protect the freedom of users.
Finally, every program is threatened constantly by software patents. States should not allow patents to restrict development and
use of software on general-purpose computers, but in those that do, we wish to avoid the special danger that patents applied to
a free program could make it effectively proprietary. To prevent this, the GPL assures that patents cannot be used to render the
program non-free.
The precise terms and conditions for copying, distribution and modification follow.
TERMS AND CONDITIONS
0.
Definitions.
"This License" refers to version 3 of the GNU General Public License.
"Copyright" also means copyright-like laws that apply to other kinds of works, such as semiconductor masks.
"The Program" refers to any copyrightable work licensed under this License. Each licensee is addressed as "you". "Licensees"
and "recipients" may be individuals or organizations.
To "modify" a work means to copy from or adapt all or part of the work in a fashion requiring copyright permission, other than
the making of an exact copy. The resulting work is called a "modified version" of the earlier work or a work "based on" the
earlier work.
A "covered work" means either the unmodified Program or a work based on the Program.
To "propagate" a work means to do anything with it that, without permission, would make you directly or secondarily liable
for infringement under applicable copyright law, except executing it on a computer or modifying a private copy. Propagation
includes copying, distribution (with or without modification), making available to the public, and in some countries other
activities as well.
To "convey" a work means any kind of propagation that enables other parties to make or receive copies. Mere interaction with
a user through a computer network, with no transfer of a copy, is not conveying.
An interactive user interface displays "Appropriate Legal Notices" to the extent that it includes a convenient and prominently
visible feature that (1) displays an appropriate copyright notice, and (2) tells the user that there is no warranty for the work
(except to the extent that warranties are provided), that licensees may convey the work under this License, and how to view a
copy of this License. If the interface presents a list of user commands or options, such as a menu, a prominent item in the list
meets this criterion.
1. Source
Code.
The
"source
code"
forawork
means
thepreferred
form
ofthework
formaking
modifications
toit."Object
code"
means
any
non-source
form
ofawork.
A"Standard
Interface"
means
aninterface
thateither
isanofficial
standard
defined
byarecognized
standards
body,
or,inthe
case
ofinterfaces
specified
foraparticular
programming
language,
one
that
iswidely
used
among
developers
working
inthat
language.
The
"System
Libraries"
ofanexecutable
work
include
anything,
other
than
thework
asawhole,
that
(a)isincluded
inthe
normal
form
ofpackaging
aMajor
Component,
butwhich
isnotpart
ofthatMajor
Component,
and
(b)serves
only
toenable
use
ofthework
with
thatMajor
Component,
ortoimplement
aStandard
Interface
forwhich
animplementation
isavailable
to
thepublic
insource
code
form.
A"Major
Component",
inthiscontext,
means
amajor
essential
component
(kernel,
window
system,
and
soon)ofthespecific
operating
system
(ifany)
onwhich
theexecutable
work
runs,
oracompiler
used
toproduce
thework,
oranobject
code
interpreter
used
torunit.
The
"Corresponding
Source"
forawork
inobject
code
form
means
allthesource
code
needed
togenerate,
install,
and(foran
executable
work)
runtheobject
code
and
tomodify
thework,
including
scripts
tocontrol
those
activities.
However,
itdoes
not
include
thework's
System
Libraries,
orgeneral-purpose
tools
orgenerally
available
freeprograms
which
areused
unmodified
inperforming
those
activities
butwhich
arenotpart
ofthework.
Forexample,
Corresponding
Source
includes
interface
definition
files
associated
with
source
files
forthework,
and
thesource
code
forshared
libraries
and
dynamically
linked
subprograms
that
thework
isspecifically
designed
torequire,
such
asbyintimate
data
communication
orcontrol
flow
between
those
subprograms
andother
parts
ofthework.
The
Corresponding
Source
need
notinclude
anything
thatusers
canregenerate
automatically
from
other
parts
ofthe
Corresponding
Source.
The
Corresponding
Source
forawork
insource
code
form
isthat
same
work.
2. Basic
Permissions.
Allrights
granted
under
thisLicense
aregranted
fortheterm
ofcopyright
ontheProgram,
and
areirrevocable
provided
the
stated
conditions
aremet.
This
License
explicitly
affirms
your
unlimited
permission
toruntheunmodified
Program.
Theoutput
from
running
acovered
work
iscovered
bythisLicense
only
iftheoutput,
given
itscontent,
constitutes
acovered
work.
This
License
acknowledges
your
rights
offairuse
orother
equivalent,
asprovided
bycopyright
law.
You
may
make,
runand
propagate
covered
works
that
you
donotconvey,
without
conditions
solong
asyour
license
otherwise
remains
inforce.
You
may
convey
covered
works
toothers
forthesole
purpose
ofhaving
them
make
modifications
exclusively
foryou,
orprovide
you
with
facilities
forrunning
those
works,
provided
that
youcomply
with
theterms
ofthisLicense
inconveying
allmaterial
forwhich
you
donotcontrol
copyright.
Those
thus
making
orrunning
thecovered
works
foryoumust
dosoexclusively
on
your
behalf,
under
your
direction
and
control,
onterms
that
prohibit
them
from
making
anycopies
ofyour
copyrighted
material
outside
their
relationship
with
you.
Conveying
under
anyother
circumstances
ispermitted
solely
under
theconditions
stated
below.
Sublicensing
isnotallowed;
section
10makes
itunnecessary.
3.
Protecting Users' Legal Rights From Anti-Circumvention Law.
No covered work shall be deemed part of an effective technological measure under any applicable law fulfilling obligations
under article 11 of the WlPO copyright treaty adopted on 20 December 1996, or similar laws prohibiting or restricting
circumvention of such measures.
When you convey a covered work, you waive any legal power to forbid circumvention of technological measures to the extent
such circumvention is effected by exercising rights under this License with respect to the covered work, and you disclaim any
intention to limit operation or modification of the work as a means of enforcing, against the work's users, your or third parties'
legal rights to forbid circumvention of technological measures.
4.
Conveying Verbatim Copies.
You may convey verbatim copies of the Program's source code as you receive it, in any medium, provided that you
conspicuously and appropriately publish on each copy an appropriate copyright notice; keep intact all notices stating that this
License and any non-permissive terms added in accord with section 7 apply to the code; keep intact all notices of the absence
of any warranty; and give all recipients a copy of this License along with the Program.
You may charge any price or no price for each copy that you convey, and you may offer support or warranty protection for a
fee.
6.
Conveying Modified Source Versions.
You may convey a work based on the Program, or the modifications to produce it from the Program, in the form of source code
under the terms of section 4, provided that you also meet all of these conditions:
a) The work must carry prominent notices stating that you modified it, and giving a relevant date.
-
-
b) The work must carry prominent notices stating that it is released under this License and any conditions added under
section 7. This requirement modifies the requirement in section 4 to "keep intact all notices".
c) You must license the entire work, as a whole, under this License to anyone who comes into possession of a copy. This
License will therefore apply, along with any applicable section 7 additional terms, to the whole of the work, and all its
parts, regardless of how they are packaged. This License gives no permission to license the work in any other way, but it
does not invalidate such permission if you have separately received it.
d) If the work has interactive user interfaces, each must display Appropriate Legal Notices; however, if the Program has
interactive interfaces that do not display Appropriate Legal Notices, your work need not make them do so.
Acompilation
ofacovered
work
with
other
separate
and
independent
works,
which
arenotbytheir
nature
extensions
of
thecovered
work,
and
which
arenotcombined
with
itsuch
astoform
alarger
program,
inoronavolume
ofastorage
or
distribution
medium,
iscalled
an"aggregate"
ifthecompilation
anditsresulting
copyright
arenotused
tolimit
theaccess
or
legal
rights
ofthecompilation's
users
beyond
what
theindividual
works
permit.
Inclusion
ofacovered
work
inanaggregate
does
notcause
thisLicense
toapply
totheother
parts
oftheaggregate.
6. Conveying
Non-Source
Forms.
You
may
convey
acovered
work
inobject
code
form
under
theterms
ofsections
4and
5,provided
that
youalso
convey
the
machine-readable
Corresponding
Source
under
theterms
ofthisLicense,
inone
ofthese
ways:
- a)Convey
theobject
code
in,orembodied
in,aphysical
product
(including
aphysical
distribution
medium),
accompanied
bytheCorresponding
Source
fixed
onadurable
physical
medium
customarily
used
forsoftware
interchange.
- b)Convey
theobject
code
in,orembodied
in,aphysical
product
(including
aphysical
distribution
medium),
accompanied
byawritten
offer,
valid
foratleast
three
years
and
valid
foraslong
asyouoffer
spare
parts
orcustomer
support
forthat
product
model,
togive
anyone
who
possesses
theobject
code
either
(1)acopy
oftheCorresponding
Source
forallthe
software
intheproduct
that
iscovered
bythisLicense,
onadurable
physical
medium
customarily
used
forsoftware
interchange,
foraprice
nomore
than
your
reasonable
cost
ofphysically
performing
thisconveying
ofsource,
or(2)
access
tocopy
theCorresponding
Source
from
anetwork
server
atnocharge.
- c)Convey
individual
copies
oftheobject
code
with
acopy
ofthewritten
offer
toprovide
theCorresponding
Source.
This
alternative
isallowed
only
occasionally
and
noncommercially,
and
only
ifyou
received
theobject
code
with
such
anoffer,
inaccord
with
subsection
6b.
- d)Convey
theobject
code
byoffering
access
from
adesignated
place
(gratis
orforacharge),
and
offer
equivalent
access
totheCorresponding
Source
inthesame
way
through
thesame
place
atnofurther
charge.
You
need
notrequire
recipients
tocopy
theCorresponding
Source
along
with
theobject
code.
Iftheplace
tocopy
theobject
code
isanetwork
server,
theCorresponding
Source
may
beonadifferent
server
(operated
byyou
orathird
party)
that
supports
equivalent
copying
facilities,
provided
youmaintain
clear
directions
next
totheobject
code
saying
where
tofindtheCorresponding
Source.
Regardless
ofwhat
server
hosts
theCorresponding
Source,
you
remain
obligated
toensure
thatitisavailable
for
aslong
asneeded
tosatisfy
these
requirements.
- e)Convey
theobject
code
using
peer-to-peer
transmission,
provided
youinform
other
peers
where
theobject
code
and
Corresponding
Source
ofthework
arebeing
offered
tothegeneral
public
atnocharge
under
subsection
6d.Aseparable
portion
oftheobject
code,
whose
source
code
isexcluded
from
theCorresponding
Source
asaSystem
Library,
need
not
beincluded
inconveying
theobject
code
work.
A"User
Product"
iseither
(1)a"consumer
product",
which
means
any
tangible
personal
property
which
isnormally
used
for
personal,
family,
orhousehold
purposes,
or(2)anything
designed
orsold
forincorporation
into
adwelling.
Indetermining
whether
aproduct
isaconsumer
product,
doubtful
cases
shall
beresolved
infavor
ofcoverage.
Foraparticular
product
received
byaparticular
user,
"normally
used"
refers
toatypical
orcommon
use
ofthat
class
ofproduct,
regardless
ofthe
status
oftheparticular
user
oroftheway
inwhich
theparticular
user
actually
uses,
orexpects
orisexpected
touse,
the
product.
Aproduct
isaconsumer
product
regardless
ofwhether
theproduct
hassubstantial
commercial,
industrial
ornonconsumer
uses,
unless
such
uses
represent
theonly
significant
mode
ofuse
oftheproduct.
"Installation
Information"
foraUser
Product
means
anymethods,
procedures,
authorization
keys,
orother
information
required
toinstall
and
execute
modified
versions
ofacovered
work
inthat
User
Product
from
amodified
version
ofitsCorresponding
Source.
Theinformation
must
suffice
toensure
that
thecontinued
functioning
ofthemodified
object
code
isinnocase
prevented
orinterfered
withsolely
because
modification
has
been
made.
Ifyou
convey
anobject
code
work
under
thissection
in,orwith,
orspecifically
forusein,aUser
Product,
and
theconveying
occurs
aspart
ofatransaction
inwhich
theright
ofpossession
and
useoftheUser
Product
istransferred
totherecipient
in
perpetuity
orforafixed
term
(regardless
ofhow
thetransaction
ischaracterized),
theCorresponding
Source
conveyed
under
thissection
must
beaccompanied
bytheInstallation
Information.
But
thisrequirement
does
notapply
ifneither
younorany
third
party
retains
theability
toinstall
modified
object
code
ontheUser
Product
(forexample,
thework
has
been
installed
in
ROM).
The
requirement
toprovide
Installation
Information
does
notinclude
arequirement
tocontinue
toprovide
support
service,
warranty,
orupdates
forawork
thathas
been
modified
orinstalled
bytherecipient,
orfortheUser
Product
inwhich
ithas
been
modified
orinstalled.
Access
toanetwork
may
bedenied
when
themodification
itself
materially
andadversely
affects
the
operation
ofthenetwork
orviolates
therules
and
protocols
forcommunication
across
thenetwork.
Corresponding
Source
conveyed,
and
Installation
Information
provided,
inaccord
with
thissection
must
beinaformat
thatis
publicly
documented
(and
with
animplementation
available
tothepublic
insource
code
form),
and
must
require
nospecial
password
orkeyforunpacking,
reading
orcopying.
7. Additional
Terms.
"Additional
permissions"
areterms
that
supplement
theterms
ofthisLicense
bymaking
exceptions
from
one
ormore
ofits
conditions.
Additional
permissions
that
areapplicable
totheentire
Program
shall
betreated
asthough
they
were
included
in
thisLicense,
totheextent
that
they
arevalid
under
applicable
law.
Ifadditional
permissions
apply
only
topartoftheProgram,
that
part
may
beused
separately
under
those
permissions,
buttheentire
Program
remains
governed
bythisLicense
without
regard
totheadditional
permissions.
When
youconvey
acopy
ofacovered
work,
youmay
atyour
option
remove
anyadditional
permissions
from
that
copy,
or
from
anypart
ofit.(Additional
permissions
may
bewritten
torequire
their
own
removal
incertain
cases
when
you
modify
the
work.)
You
may
place
additional
permissions
onmaterial,
added
byyou
toacovered
work,
forwhich
youhave
orcan
give
appropriate
copyright
permission.
Notwithstanding
anyother
provision
ofthisLicense,
formaterial
you
add
toacovered
work,
youmay
(ifauthorized
bythe
copyright
holders
ofthat
material)
supplement
theterms
ofthisLicense
with
terms:
- a)Disclaiming
warranty
orlimiting
liability
differently
from
theterms
ofsections
15and16ofthisLicense;
or
- b)Requiring
preservation
ofspecified
reasonable
legal
notices
orauthor
attributions
inthatmaterial
orintheAppropriate
Legal
Notices
displayed
byworks
containing
it;or
- c)Prohibiting
misrepresentation
oftheorigin
ofthat
material,
orrequiring
that
modified
versions
ofsuch
material
be
marked
inreasonable
ways
asdifferent
from
theoriginal
version;
or
- d)Limiting
theuseforpublicity
purposes
ofnames
oflicensors
orauthors
ofthematerial;
or
- e)Declining
togrant
rights
under
trademark
lawforuseofsome
trade
names,
trademarks,
orservice
marks;
or
- f)Requiring
indemnification
oflicensors
and
authors
ofthat
material
byanyone
who
conveys
thematerial
(ormodified
versions
ofit)with
contractual
assumptions
ofliability
totherecipient,
forany
liability
that
these
contractual
assumptions
directly
impose
onthose
licensors
and
authors.
Allother
non-permissive
additional
terms
areconsidered
"further
restrictions"
within
themeaning
ofsection
I0.IftheProgram
asyoureceived
it,oranypart
ofit,contains
anotice
stating
that
itisgoverned
bythisLicense
along
with
aterm
thatisa
further
restriction,
youmay
remove
that
term.
Ifalicense
document
contains
afurther
restriction
butpermits
relicensing
or
conveying
under
thisLicense,
you
may
add
toacovered
work
material
governed
bytheterms
ofthat
license
document,
provided
that
thefurther
restriction
does
notsurvive
such
relicensing
orconveying.
Ifyou
add
terms
toacovered
work
inaccord
with
thissection,
youmust
place,
intherelevant
source
files,
astatement
ofthe
additional
terms
that
apply
tothose
files,
oranotice
indicating
where
tofind
theapplicable
terms.
Additional
terms,
permissive
ornon-permissive,
may
bestated
intheform
ofaseparately
written
license,
orstated
as
exceptions;
theabove
requirements
apply
either
way.
8. Termination.
You
may
notpropagate
ormodify
acovered
work
except
asexpressly
provided
under
thisLicense.
Anyattempt
otherwise
to
propagate
ormodify
itisvoid,
and
willautomatically
terminate
your
rights
under
thisLicense
(including
anypatent
licenses
granted
under
thethird
paragraph
ofsection
11
).
However,
ifyoucease
allviolation
ofthisLicense,
then
your
license
from
aparticular
copyright
holder
isreinstated
(a)
provisionally,
unless
and
until
thecopyright
holder
explicitly
and
finally
terminates
your
license,
and
(b)permanently,
ifthe
copyright
holder
fails
tonotify
youoftheviolation
bysome
reasonable
means
prior
to60days
after
thecessation.
Moreover,
your
license
from
aparticular
copyright
holder
isreinstated
permanently
ifthecopyright
holder
notifies
you
ofthe
violation
bysome
reasonable
means,
thisisthefirsttime
youhave
received
notice
ofviolation
ofthisLicense
(foranywork)
from
that
copyright
holder,
and
youcure
theviolation
prior
to30days
after
your
receipt
ofthenotice.
Termination
ofyour
rights
under
thissection
does
notterminate
thelicenses
ofparties
who
have
received
copies
orrights
from
you
under
thisLicense.
Ifyour
rights
have
been
terminated
and
notpermanently
reinstated,
youdonotqualify
toreceive
new
licenses
forthesame
material
under
section
10.
9.
Acceptance Not Required for Having Copies.
You are not required to accept this License in order to receive or run a copy of the Program. Ancillary propagation of a covered
work occurring solely as a consequence of using peer-to-peer transmission to receive a copy likewise does not require
acceptance. However, nothing other than this License grants you permission to propagate or modify any covered work. These
actions infringe copyright if you do not accept this License. Therefore, by modifying or propagating a covered work, you
indicate your acceptance of this License to do so.
10. Automatic Licensing of Downstream Recipients.
Each time you convey a covered work, the recipient automatically receives a license from the original licensors, to run, modify
and propagate that work, subject to this License. You are not responsible for enforcing compliance by third parties with this
License.
An "entity transaction" is a transaction transferring control of an organization, or substantially all assets of one, or subdividing
an organization, or merging organizations. If propagation of a covered work results from an entity transaction, each party
to that transaction who receives a copy of the work also receives whatever licenses to the work the party's predecessor in
interest had or could give under the previous paragraph, plus a right to possession of the Corresponding Source of the work
from the predecessor in interest, if the predecessor has it or can get it with reasonable efforts.
You may not impose any further restrictions on the exercise of the rights granted or affirmed under this License. For example,
you may not impose a license fee, royalty, or other charge for exercise of rights granted under this License, and you may not
initiate litigation (including a cross-claim or counterclaim in a lawsuit) alleging that any patent claim is infringed by making,
using, selling, offering for sale, or importing the Program or any portion of it.
11. Patents.
A "contributor" is a copyright holder who authorizes use under this License of the Program or a work on which the Program is
based. The work thus licensed is called the contributor's "contributor version".
A contributor's "essential patent claims" are all patent claims owned or controlled by the contributor, whether already acquired
or hereafter acquired, that would be infringed by some manner, permitted by this License, of making, using, or selling its
contributor version, but do not include claims that would be infringed only as a consequence of further modification of the
contributor version. For purposes of this definition, "control" includes the right to grant patent sublicenses in a manner
consistent with the requirements of this License.
Each contributor grants you a non-exclusive, worldwide, royalty-free patent license under the contributor's essential patent
claims, to make, use, sell, offer for sale, import and otherwise run, modify and propagate the contents of its contributor version.
In the following three paragraphs, a "patent license" is any express agreement or commitment, however denominated, not
to enforce a patent (such as an express permission to practice a patent or covenant not to sue for patent infringement). To
"grant" such a patent license to a party means to make such an agreement or commitment not to enforce a patent against the
party.
Ifyou
convey
acovered
work,
knowingly
relying
onapatent
license,
and
theCorresponding
Source
ofthework
isnot
available
foranyone
tocopy,
free
ofcharge
andunder
theterms
ofthisLicense,
through
apublicly
available
network
server
or
other
readily
accessible
means,
then
youmust
either
(I)cause
theCorresponding
Source
tobesoavailable,
or(2)arrange
todeprive
yourself
ofthebenefit
ofthepatent
license
forthisparticular
work,
or(3)arrange,
inamanner
consistent
with
the
requirements
ofthisLicense,
toextend
thepatent
license
todownstream
recipients.
"Knowingly
relying"
means
youhave
actual
knowledge
that,
butforthepatent
license,
your
conveying
thecovered
work
inacountry,
oryour
recipient's
useofthe
covered
work
inacountry,
would
infringe
one
ormore
identifiable
patents
inthat
country
that
youhave
reason
tobelieve
are
valid.
If,pursuant
toorinconnection
withasingle
transaction
orarrangement,
you
convey,
orpropagate
byprocuring
conveyance
of,acovered
work,
and
grant
apatent
license
tosome
oftheparties
receiving
thecovered
work
authorizing
them
touse,
propagate,
modify
orconvey
aspecific
copy
ofthecovered
work,
then
thepatent
license
yougrant
isautomatically
extended
toallrecipients
ofthecovered
work
and
works
based
onit.
Apatent
license
is"discriminatory"
ifitdoes
notinclude
within
thescope
ofitscoverage,
prohibits
theexercise
of,oris
conditioned
onthenon-exercise
ofone
ormore
oftherights
that
arespecifically
granted
under
thisLicense.
You
may
not
convey
acovered
work
ifyouareaparty
toanarrangement
with
athird
party
that
isinthebusiness
ofdistributing
software,
under
which
you
make
payment
tothethird
party
based
ontheextent
ofyour
activity
ofconveying
thework,
andunder
which
thethird
party
grants,
toany
oftheparties
who
would
receive
thecovered
work
from
you,
adiscriminatory
patent
license
(a)
inconnection
with
copies
ofthecovered
work
conveyed
byyou(orcopies
made
from
those
copies),
or(b)primarily
forand
in
connection
with
specific
products
orcompilations
thatcontain
thecovered
work,
unless
youentered
into
that
arrangement,
or
that
patent
license
was
granted,
prior
to28March
2007.
Nothing
inthisLicense
shall
beconstrued
asexcluding
orlimiting
any
implied
license
orother
defenses
toinfringement
that
may
otherwise
beavailable
toyou
under
applicable
patent
law.
12.NoSurrender
ofOthers'
Freedom.
Ifconditions
areimposed
onyou(whether
bycourt
order,
agreement
orotherwise)
that
contradict
theconditions
ofthis
License,
they
donotexcuse
you
from
theconditions
ofthisLicense.
Ifyoucannot
convey
acovered
work
soastosatisfy
simultaneously
your
obligations
under
thisLicense
and
anyother
pertinent
obligations,
then
asaconsequence
youmay
not
convey
itatall.Forexample,
ifyouagree
toterms
that
obligate
youtocollect
aroyalty
forfurther
conveying
from
those
to
whom
youconvey
theProgram,
theonly
way
youcould
satisfy
both
those
terms
and
thisLicense
would
betorefrain
entirely
from
conveying
theProgram.
13.Use
with
theGNU
Affero
General
Public
License.
Notwithstanding
anyother
provision
ofthisLicense,
youhave
permission
tolinkorcombine
anycovered
work
with
awork
licensed
under
version
3oftheGNU
Affero
General
Public
License
into
asingle
combined
work,
and
toconvey
theresulting
work.
The
terms
ofthisLicense
willcontinue
toapply
tothepart
which
isthecovered
work,
butthespecial
requirements
of
theGNU
Affero
General
Public
License,
section
13,concerning
interaction
through
anetwork
willapply
tothecombination
as
such.
14.Revised
Versions
ofthisLicense.
The
Free
Software
Foundation
may
publish
revised
and/or
new
versions
oftheGNU
General
Public
License
from
time
totime.
Such
new
versions
willbesimilar
inspirit
tothepresent
version,
butmay
differ
indetail
toaddress
new
problems
orconcerns.
Each
version
isgiven
adistinguishing
version
number.
IftheProgram
specifies
that
acertain
numbered
version
oftheGNU
General
Public
License
"orany
later
version"
applies
toit,youhave
theoption
offollowing
theterms
and
conditions
either
of
that
numbered
version
orofanylater
version
published
bytheFree
Software
Foundation.
IftheProgram
does
notspecify
aversion
number
oftheGNU
General
Public
License,
youmay
choose
any
version
ever
published
bytheFree
Software
Foundation.
IftheProgram
specifies
that
aproxy
candecide
which
future
versions
oftheGNU
General
Public
License
can
beused,
that
proxy's
public
statement
ofacceptance
ofaversion
permanently
authorizes
you
tochoose
that
version
fortheProgram.
Later
license
versions
may
give
youadditional
ordifferent
permissions.
However,
noadditional
obligations
areimposed
onany
author
orcopyright
holder
asaresult
ofyour
choosing
tofollow
alater
version.
16.Disclaimer
ofWarranty.
THERE
ISNOWARRANTY
FOR
THE
PROGRAM,
TOTHE
EXTENT
PERMITTED
BYAPPLICABLE
LAW.
EXCEPT
WHEN
OTHERWISE
STATED
INWRITING
THE
COPYRIGHT
HOLDERS
AND/OR
OTHER
PARTIES
PROVIDE
THE
PROGRAM
"AS
IS"WITHOUT
WARRANTY
OFANY
KIND,
EITHER
EXPRESSED
ORIMPLIED,
INCLUDING,
BUT
NOT
LIMITED
TO,
THE
IMPLIED
WARRANTIES
OFMERCHANTABILITYAND
FITNESS
FORA
PARTICULAR
PURPOSE.
THE
ENTIRE
RISK
ASTOTHE
QUALITY
AND
PERFORMANCE
OFTHE
PROGRAM
ISWITH
YOU.
SHOULD
THE
PROGRAM
PROVE
DEFECTIVE,
YOU
ASSUME
THE
COST
OFALL
NECESSARY
SERVICING,
REPAIR
ORCORRECTION.
16.Limitation
ofLiability.
INNOEVENT
UNLESS
REQUIRED
BY
APPLICABLE
LAW
ORAGREED
TOINWRITING
WILL
ANY
COPYRIGHT
HOLDER,
ORANY
OTHER
PARTY
WHO
MODIFIES
AND/OR
CONVEYS
THE
PROGRAM
ASPERMITTED
ABOVE,
BE
LIABLE
TOYOU
FOR
DAMAGES,
INCLUDING
ANY
GENERAL,
SPECIAL,
INCIDENTAL
ORCONSEQUENTIAL
DAMAGES
ARISING
OUT
OFTHE
USE
ORINABILITY
TOUSE
THE
PROGRAM
(INCLUDING
BUT
NOT
LIMITED
TOLOSS
OFDATA
ORDATA
BEING
RENDERED
INACCURATE
ORLOSSES
SUSTAINED
BYYOU
ORTHIRD
PARTIES
ORAFAILURE
OF
THE
PROGRAM
TOOPERATE
WITH
ANY
OTHER
PROGRAMS),
EVEN
IFSUCH
HOLDER
OROTHER
PARTY
HAS
BEEN
ADVISED
OFTHE
POSSIBILITY
OFSUCH
DAMAGES.
17.Interpretation
ofSections
15and
16.
Ifthedisclaimer
ofwarranty
and
limitation
ofliability
provided
above
cannot
begiven
local
legal
effect
according
totheir
terms,
reviewing
courts
shall
apply
local
lawthatmost
closely
approximates
anabsolute
waiver
ofallcivilliability
inconnection
with
theProgram,
unless
awarranty
orassumption
ofliability
accompanies
acopy
oftheProgram
inreturn
forafee.
END OF TERMS AND CONDiTiONS
How to Apply These Terms to Your New Programs
If you develop a new program, and you want it to be of the greatest possible use to the public, the best way to achieve this is to
make it free software which everyone can redistribute and change under these terms.
To do so, attach the following notices to the program. It is safest to attach them to the start of each source file to most effectively
state the exclusion of warranty; and each file should have at least the "copyright" line and a pointer to where the full notice is found.
<one line to give the program's name and a brief idea of what it does.> Copyright (C) <year> <name of author>
This program is free software: you can redistribute it and/or modify it under the terms of the GNU General Public License as
published by the Free Software Foundation, either version 3 of the License, or (at your option) any later version.
This program is distributed in the hope that it will be useful, but WITHOUT ANY WARRANTY; without even the implied
warranty of MERCHANTABILITY or FITNESS FOR A PARTICULAR PURPOSE. See the GNU General Public License for
more details.
You should have received a copy of the GNU General Public License along with this program. If not, see <http://www.gnu.
org/licenses/>.
Also add information on how to contact you by electronic and paper mail.
If the program does terminal interaction, make it output a short notice like this when it starts in an interactive mode:
<program> Copyright (C) <year> <name of author> This program comes with ABSOLUTELY NO WARRANTY; for details type
'show w'. This is free software, and you are welcome to redistribute it under certain conditions; type 'show c' for details.
The hypothetical commands "show w' and "show c' should show the appropriate parts of the General Public License. Of course,
your program's commands might be different; for a GUI interface, you would use an "about box".
You should also get your employer (if you work as a programmer) or school, if any, to sign a "copyright disclaimer" for the program,
if necessary.
For more information on this, and how to apply and follow the GNU GPL, see <http://www.gnu.org/licenses/>.
The GNU General Public License does not permit incorporating your program into proprietary programs. If your program is a
subroutine library, you may consider it more useful to permit linking proprietary applications with the library. If this is what you want
to do, use the GNU Lesser General Public License instead of this License. But first, please read <http://www.gnu.org/philosophy/
why-not-lgpl.html>.
LICENSEISSUES
The OpenSSL toolkit stays under a dual license, i.e. both the conditions of the OpenSSL License and the original SSLeay license
apply to the toolkit. See below for the actual license texts. Actually both licenses are BSD-style Open Source licenses. In case of
any license issues related to OpenSSL please contact [email protected].
OpenSSL License
Copyright (c) 1998-2007 The OpenSSL Project. All rights reserved.
Redistribution and use in source and binary forms, with or without modification, are permitted provided that the following conditions
are met:
1.
Redistributions of source code must retain the above copyright notice, this list of conditions and the following disclaimer.
2.
Redistributions in binary form must reproduce the above copyright notice, this list of conditions and the following disclaimer in
the documentation and/or other materials provided with the distribution.
3.
All advertising materials mentioning features or use of this software must display the following acknowledgment: "This product
includes software developed by the OpenSSL Project for use in the OpenSSL Toolkit. (http://www.openssl.org/)"
4.
The names "OpenSSL Toolkit" and "OpenSSL Project" must not be used to endorse or promote products derived from this
software without prior written permission. For written permission, please contact [email protected].
6.
Products derived from this software may not be called "OpenSSL nor may "OpenSSL" appear in their names without prior
written permission of the OpenSSL Project.
6.
Redistributions of any form whatsoever must retain the following acknowledgment: "This product includes software developed
by the OpenSSL Project for use in the OpenSSL Toolkit (http://www.openssl.org/)"
THIS SOFTWARE IS PROVIDED BY THE OpenSSL PROJECT "AS IS" AND ANY EXPRESSED OR IMPLIED WARRANTIES,
INCLUDING, BUT NOT LIMITED TO, THE IMPLIED WARRANTIES OF MERCHANTABILITY AND FITNESS FORA PARTICULAR
PURPOSE ARE DISCLAIMED. IN NO EVENT SHALL THE OpenSSL PROJECT OR ITS CONTRIBUTORS BE LIABLE FOR
ANY DIRECT, INDIRECT, INCIDENTAL, SPECIAL, EXEMPLARY, OR CONSEQUENTIAL DAMAGES (INCLUDING, BUT NOT
LIMITED TO, PROCUREMENT OF SUBSTITUTE GOODS OR SERVICES; LOSS OF USE, DATA, OR PROFITS; OR BUSINESS
INTERRUPTION) HOWEVER CAUSED AND ON ANY THEORY OF LIABILITY, WHETHER IN CONTRACT, STRICT LIABILITY,
OR TORT (INCLUDING NEGLIGENCE OR OTHERWISE) ARISING IN ANY WAY OUT OF THE USE OF THIS SOFTWARE,
EVEN IF ADVISED OF THE POSSIBILITY OF SUCH DAMAGE.
This product includes cryptographic software written by Eric Young ([email protected]). This product includes software written by
Tim Hudson ([email protected]).
Origina! SSLeay License
Copyright (C) 1995-1998 Eric Young ([email protected])All rights reserved.
This package is an SSL implementation written by Eric Young ([email protected]). The implementation was written so as to
conform with Netscapes SSL.
This library is free for commercial and non-commercial use as long as the following conditions are aheared to. The following
conditions apply to all code found in this distribution, be it the RC4, RSA, Ihash, DES, etc., code; not just the SSL code. The SSL
documentation included with this distribution is covered by the same copyright terms except that the holder is Tim Hudson (tjh@
cryptsoft.com).
Copyright remains Eric Young's, and as such any Copyright notices in the code are not to be removed. If this package is used in
a product, Eric Young should be given attribution as the author of the parts of the library used. This can be in the form of a textual
message at program startup or in documentation (online or textual) provided with the package.
Redistribution and use in source and binary forms, with or without modification, are permitted provided that the following conditions
are met:
1.
Redistributions of source code must retain the copyright notice, this list of conditions and the following disclaimer.
2.
Redistributions in binary form must reproduce the above copyright notice, this list of conditions and the following disclaimer in
the documentation and/or other materials provided with the distribution.
3.
All advertising materials mentioning features or use of this software must display the following acknowledgement: "This
product includes cryptographic software written by Eric Young ([email protected])" The word 'cryptographic' can be left out if
the rouines from the library being used are not cryptographic related :-).
4.
If you include any Windows specific code (or a derivative thereof) from the apps directory (application code) you must include
an acknowledgement: "This product includes software written by Tim Hudson ([email protected])"
THIS SOFTWARE IS PROVIDED BY ERIC YOUNG "AS IS" AND ANY EXPRESS OR IMPLIED WARRANTIES, INCLUDING,
BUT NOT LIMITED TO, THE IMPLIED WARRANTIES OF MERCHANTABILITY AND FITNESS FOR A PARTICULAR
PURPOSE ARE DISCLAIMED. IN NO EVENT SHALL THE AUTHOR OR CONTRIBUTORS BE LIABLE FOR ANY DIRECT,
INDIRECT, INCIDENTAL, SPECIAL, EXEMPLARY, OR CONSEQUENTIAL DAMAGES (INCLUDING, BUT NOT LIMITED
TO, PROCUREMENT OF SUBSTITUTE GOODS OR SERVICES; LOSS OF USE, DATA, OR PROFITS; OR BUSINESS
INTERRUPTION) HOWEVER CAUSED AND ON ANY THEORY OF LIABILITY, WHETHER IN CONTRACT, STRICT LIABILITY,
OR TORT (INCLUDING NEGLIGENCE OR OTHERWISE) ARISING IN ANY WAY OUT OF THE USE OF THIS SOFTWARE,
EVEN IF ADVISED OF THE POSSIBILITY OF SUCH DAMAGE.
The licence and distribution terms for any publically available version or derivative of this code cannot be changed, i.e. this code
cannot simply be copied and put under another distribution licence [including the GNU Public Licence.]