1
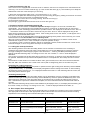
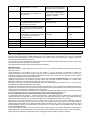
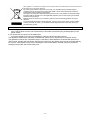
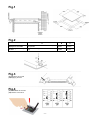
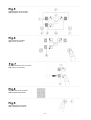
INCA 3 TOUCH 4551 G
MANUAL DE USO Y MANTENIMIENTO
ENCIMERAS ENCASTRABLES
OPERATING AND MAINTENANCE INSTRUCTION FOR
HOBS
LIB30355
ELECTRIC HOBS
-1-
DATOS TÉCNICOS
MODELOS
Tensión
Corriente
Placa Hi-light 1200 W
Placa Hi-light 1700/700 W
Potencia máxima (W)
Cable de alimentación
INCA 3 TOUCH 4551 G
230V
18A
2
1
4100
3x2,5 mm2
1. Montaje (Fig1)
La instalación es a cargo del comprador. El Fabricante no tiene la obligación de efectuar dicho servicio. Los
servicios requeridos al Fabricante, si derivaran de una instalación incorrecta, no están incluidos en la garantía.
Las placas empotrables están preparadas para ser instaladas en encimeras de cualquier material, siempre y
cuando resistan a una temperatura de 100°C, y tengan un grosor entre 25 y 40 mm. La distancia mínima entre
una eventual pared vertical de un mueble columna adosado y el borde de la placa debe ser de 150 mm como
mínimo; mientras que la distancia entre la pared trasera y el borde de la placa debe ser de 55 mm como mínimo.
Si debajo de la placa hay un espacio utilizable, debe aislarse mediante una pared divisoria de material apropiado
(madera o similar). Dicha pared debe estar a 25 mm, como mínimo, del fondo de la placa.
IMPORTANTE: para asegurar que la electrónica tenga un comportamiento estable en el tiempo y no sufra
posibles deterioros, es necesario asegurar una correcta ventilación (ver fig 1).
Fijación al mueble (Fig 2)
La fijación al mueble se realiza con soportes de fijación que se entregan como accesorios. En la parte inferior de
la placa hay agujeros en donde se introducen las espigas (A) y se enroscan los tornillos (C) que bloquean las
grapas de fijación (B).
Aplicación de la junta (Fig 3)
Importante - La figura de abajo indica el modo de aplicar el sellador en todo el perímetro.
Este aparato ha sido fabricado para uso doméstico (no profesional).
2. Conexión eléctrica (Fig 4)
Compruebe los datos indicados en la placa situada en el fondo de la encimera y verifique que la tensión nominal
de línea y potencia disponibles sean adecuadas para su funcionamiento.
Antes de efectuar la conexión, controle la eficiencia de la instalación de toma a tierra obligatoria por Ley. El
Fabricante no se asume ninguna responsabilidad por posibles lesiones a personas o daños a cosas causados por
la inobservancia de dicha norma.
Para los modelos sin enchufe, instale en el cable un enchufe normalizado que soporte la carga indicada en la
placa de características. El conductor de tierra del cable es de color amarillo-verde. En todos los casos el enchufe
debe ser accesible.
Si se desea realizar una conexión fija a la línea, habrá que colocar entre el aparato y la línea, un dispositivo
omnipolar de corte con una distancia entre los contactos de 3 mm como mínimo.
Para conectar el cable a la encimera hay que aflojar y quitar la tapa de la regleta para llegar a los contactos. Una
vez efectuada la conexión, bloquee el cable con el sistema de fijación y cierre la tapa de la regleta.
Si hubiera que sustituir el cable de alimentación, el conductor de tierra (amarillo-verde) debe ser,
obligatoriamente, 10 mm más largo que los conductores de línea.
Use sólo un cable de goma tipo H05RR-F.
DECLARACIÓN DE CONFORMIDAD. Las partes destinadas a tener contacto con substancias alimenticias de
este aparato son conformes a la Directiva 89/109 CEE y al Dec. Legislativo N° 108 del 25/1/92.
CE Aparato conforme a las directivas europeas 89/336/CEE, 93/68/CEE, 73/23/CEE y modificaciones siguientes.
Este aparado cumple la Directiva Europea 2002/96/CE sobre Residuos de equipos eléctricos y electrónicos
(RAEE). Esta directriz enmarca la validez en toda Europa de la devolución y reciclado de los Residuos de equipos
eléctricos y electrónicos.
-2-
INSTRUCCIONES PARA EL USO
Importante: limpiar la encimera antes de cocinar por primera vez. Después, hay que encender todas las placas
una a una en vacío, sin ninguna olla apoyada, durante 5 minutos a temperatura máxima. De esta manera se
eliminará el olor a nuevo y se evaporará la humedad acumulada en las placas. Esto también es necesario para
que los dispositivos electrónicos funcionen perfectamente.
ENCIMERA DE VITROCERÁMICA CON MANDOS TÁCTILES (TOUCH CONTROL)
1. Descripción de los mandos (Fig 5)
1. Botón de encendido (ON/OFF)
2. Botón zona cocción (ON/OFF)
3. Display valor configurado (calor residual)
4. Botón “menos”
5. Botón “más”
6. Botón doble circuito (ON/OFF)
7. Indicador luminoso zona doble circuito
8. Punto decimal del display de configuración
Encendido: la zona de cocción se puede regular
Apagado: la zona de cocción está bloqueada
Botones táctiles
Todas las operaciones se realizan con botones táctiles (sensores capacitivos) situados en la parte frontal de la
encimera; a cada botón corresponde un display.
Cada función es confirmada por un tono de aviso (solo en TP-614).
2. Encendido y apagado (Fig 6)
Toque el botón de encendido (1)
Se activa el control: los indicadores de nivel de regulación (3) muestran “0” y los puntos decimales (8)
parpadean.
La próxima operación se debe realizar antes de 20 segundos, en caso contrario, el dispositivo se apaga
automáticamente.
Encender / apagar una zona de cocción. (Fig 7)
Con el Touch encendido seleccione la zona de cocción deseada accionando la tecla de selección correspondiente
(tecla “+” (5-2) de la respectiva zona). Un punto encendido en el visor (8) de la zona, indica la selección. Si la
zona “quema” se visualizará una “H” alternándose con el “0”. En los demás visores (3) el punto de selección que
parpadea se apaga. Accionando de nuevo la tecla “+”, se puede seleccionar un nivel de potencia y la zona
empezará a calentar. Después de la selección, es necesario no accionar la tecla “+” durante 3 segundos antes de
poderla utilizar de nuevo para escoger la potencia.
Después de seleccionar la zona de cocción, es posible seleccionar el nivel de potencia pulsando la tecla MÁS,
empezando por el nivel 1 se aumenta una unidad cada 0,4 segundos. Cuando se alcanza el nivel 9 no es posible
efectuar ulteriores aumentos.
Si la zona de cocción se selecciona mediante la tecla central “-” (4), el nivel inicial es el “9” (nivel máximo).
Manteniendo pulsada la tecla el nivel activo disminuye una unidad cada 0,4 segundos. Cuando se alcanza el nivel
0 no es posible efectuar ulteriores disminuciones. Sólo es posible modificar la selección accionando de nuevo la
tecla “-” (o “+”).
Apagar una zona de cocción.
Seleccione la zona que quiere apagar con la tecla de selección (“+”). La selección se indica con el punto en el
visor de la zona correspondiente. Accionando la tecla “+” y “-” al mismo tiempo, el nivel de potencia de la zona se
sitúa en el 0. Como alternativa, la tecla “-” se puede utilizar para disminuir el nivel de potencia hasta 0.
Si todas las zonas de cocción se encuentran en el nivel de potencia “0”, los puntos decimales en los visores
parpadean. Si una zona de cocción “quema”, aparecerá una “H” en lugar del “0”.
Indicador de calor residual (Fig 8)
Cuando la zona de cocción está todavía caliente, a tal punto que podría quemar, el display que corresponde a
dicha zona muestra el símbolo “H” (calor residual). La indicación desaparece sólo cuando la temperatura ya no es
peligrosa (60°C).
El display (3) muestra “0” mientras la temperatura permanece por debajo de 60°C y muestra “H” cuando la
temperatura supera 60°C.
Para ahorrar energía, apague la zona de cocción anticipadamente y aproveche el calor residual.
La señal de calor residual “H” se pierde después de un corte de tensión superior a 3 segundos.
Apagado de la encimera (Fig 9)
La encimera se puede apagar en cualquier momento con el botón de encendido (1).
-3-
3. Zonas de cocción de doble circuito (Fig 10)
Alguna zona de cocción puede estar dotadas de un segundo circuito: por ejemplo, la zona está compuesta de un
disco central y una corona exterior. Es posible encender la zona central sola (fig. A) o ambas zonas (fig. B), lo
cual permite adaptar la zona de cocción a la olla utilizada.
Cuando se selecciona la zona dotada del segundo circuito, el indicado luminoso (7), que corresponde a la zona
seleccionada, se enciende; el segundo circuito se enciende junto con el otro circuito.
Es posible apagar el segundo con el el botón de doble circuito (6).
Pulse el botón de doble circuito (6).
El indicador luminoso (7) se apaga y también se apaga el circuito auxiliar de la zona de cocción.
4. Protección en caso de encendido involuntario.
Si el control electrónico detecta que una tecla permanece activa de forma continua durante aproximadamente 10
segundos se apaga de forma automática. El control emite una señal acústica de error durante 10 segundos que
advierte al usuario de la presencia de un objeto en los sensores. Los visores muestran el código de error “E R 0 3“
hasta que el control electrónico advierta el error. Si la zona de cocción “quema”, aparecerá una “H“ en el visor
que se alternará con el señal de error.
Si no se activa ninguna zona de cocción en los siguientes 20 segundos a partir del momento de encendido del
Touch, el control vuelve a la modalidad stand-by (reposo).
Cuando el control está encendido, la tecla ON/OFF tiene prioridad sobre todas las demás teclas y, como
consecuencia, el control se puede apagar en cualquier momento incluso en caso de activación múltiple o continua
de teclas.
En la modalidad stand-by, una activación continua de teclas no tendrá ningún efecto. De todos modos, antes de
que el control electrónico se pueda encender de nuevo, tiene que reconocer que no existe ninguna tecla activada.
5. Bloqueo de las funciones de la encimera
El seguro para niños se puede activar después de haber encendido el Touch pulsando de forma simultánea la
tecla de selección de la zona inferior derecha (2-5) y la tecla “-“ (4) y luego pulsando de nuevo la tecla de
selección de la zona inferior derecha (2-5). Aparecerá una “L” que significa LOCKED (seguro para niños contra el
encendido involuntario). Si la zona de cocción “quema” la “L” y la “H” se visualizarán de forma alternativa.
Esta operación tiene que efectuarse en los siguientes 10 segundos, no se debe accionar ninguna otra tecla aparte
de las que se acaban de mencionar. En caso contrario la secuencia se interrumpe y la placa no se bloqueará.
El control electrónico permanece bloqueado hasta que el usuario no lo desbloquea, aunque mientras tanto se
haya apagado y vuelto a encender. Cuando se produce un reset del touch (después de una caída de tensión) el
bloqueo de las teclas permanece activo.
Desbloqueo de las teclas para cocinar
Para desbloquear el touch es necesario accionar al mismo tiempo la tecla de selección de la zona de cocción
inferior derecha y la tecla “-“. La “L“ (LOCKED/bloqueado) que se encuentra en el visor desaparece y todas las
zonas de cocción muestran el “0“ con un punto que parpadea. Si una zona de cocción “quemase”, se visualizaría
la “H” en lugar del “0”. Después de haber apagado el touch, el seguro para los niños se activa de nuevo.
Eliminación del bloqueo de teclas
Después de encender el touch el seguro para los niños se puede desactivar. Es necesario accionar al mismo
tiempo la tecla de selección de la zona de cocción inferior derecho y la tecla “-“ y luego accionar la tecla “-“ sola.
Si se efectúan todos los pasos en el orden correcto en los siguientes 10 segundos, el bloqueo de las teclas
desaparecerá y el touch se apagará. En caso contrario la secuencia se considerará incompleta, el touch
permanecerá bloqueado y se apagará cuando hayan pasado 20 segundos.
Encendiendo de nuevo el touch con la tecla ON/OFF todos los visores mostrarán el “0”, los puntos decimales
parpadearán y el touch estará preparado para la cocción. Si una zona de cocción “quema”, se mostrará la “H” en
lugar del “0”.
-4-
LIMPIEZA Y MANTENIMIENTO
Algunos consejos para cocinar
Use sólo sartenes y ollas con fondo robusto y, a ser posible, grueso, principalmente para las preparaciones con
altas temperaturas de cocción, tales como los fritos. Los fondos que cóncavos prolongan el tiempo de preparación
y malgastan energía. La mejor transmisión del calor se obtiene cuando la olla y la zona de cocción tienen las
mismas dimensiones.
En las zonas de cocción también se puede emplear vidrio Pyrex y porcelana, siempre y cuando el fondo sea liso.
Observe las instrucciones suministradas por el fabricante del recipiente.
Las salpicaduras se deberán eliminar de inmediato.
Notas importantes
Atención: las superficies de las zonas de cocción se vuelven incandescentes durante el uso. Por dicho motivo, se
aconseja mantener los niños lejos de su alcance.
No haga caer objetos duros sobre las superficies de cocción. En algunas condiciones, el material es sensible a las
cargas mecánicas. La caída de objetos con punta podría romper la superficie de cocción. Si la superficie de
cerámica se rompiera, agrietara o rayara inadvertidamente, deje de usar de inmediato la encimera y contacte al
servicio de asistencia cliente.
La superficie de vitrocerámica no debe ser usada como superficie de apoyo. No utilizar holla en aluminio No
preparar comidas envueltas en hojas de aluminio o en materiales plásticos. No accione jamás las placas sin ollas.
No coloque objetos inflamables, explosivos o deformables en proximidad de la zona de cocción.
Las grasas o aceites recalentados pueden inflamarse; por dicho motivo, las comidas que prevean el uso de
grasas o aceites, tales como patatas fritas, deben controlarse durante la cocción.
Además, es necesario asegurarse de que los cables y los enchufes de otros electrodomésticos nunca tengan
contacto con las superficies de cocción calientes.
El cable, en ningún punto tendrá que llegar a una temperatura superior de 50°C a la temperatura ambiente.
Si el cable de alimentación está dañado, debe ser substituido por un cable o conjunto especial a suministrar por el
fabricante o servicio postventa.
Si la superficie se rompe, desconectar inmediatamente el aparato de la red para evitar la posibilidad de sufrir un
choque eléctrico
No limpie jamás su encimera con equipos de limpieza a vapor o similares.
Después de cada uso hay que limpiar la encimera, tras dejarla enfriar. Hasta los residuos más pequeños se
carbonizarán cuando se utilice nuevamente la encimera. Use sólo detergentes específicos. La esponja de acero,
las esponjas abrasivas y los polvos pueden rayar el producto. No utilice productos de limpieza para horno porque
son corrosivos.
La suciedad ligera se puede eliminar con un paño húmedo o con sosa caliente. Los residuos de detergente se
deben eliminar con agua fría y luego secar perfectamente. Las manchas resistentes al agua hirviendo se pueden
eliminar con vinagre y limón, o con líquidos antical. Si uno de dichos detergentes tuviera contacto con el marco,
límpielo de inmediato con un paño mojado para que no se deteriore.
Las incrustaciones se pueden eliminar fácilmente con una rasqueta para vidrio. El mango de la rasqueta no debe
ser de plástico porque se podría pegar a las superficies calientes. Tenga mucho cuidado durante su uso: peligro
de heridas.
El azúcar y los alimentos con azúcar acaramelada se deben eliminar de inmediato de las zonas de cocción
encendidas.
Este electrodomestico está marcado conforme a la directiva Europea 2002/96/CE sobre los residuos de
aparatos eléctricos y electrónicos (WEEE).
Asegurándose que este producto ha sido eliminado correctamente, ayudará a evitar posibles
consecuencias negativas en el ambiente y la salud de las personas, que pudiera verificarse por causa de
un anómalo tratamiento de este producto
El simbolo sobre el producto indica que este aparato no puede ser tratado como un residuo doméstico
normal, en su ligar deberá ser entregado al centro de recogidas para reciclaje de aparatos eléctricos y
electrónicos.
La eliminación
debe ser efectuada de acuerdo con las reglas medioambientales vigentes para el
tratamiento de los residuos.
Para informacion más detallada sobre el tratamiento, recuperación y reciclaje de este producto, por favor
contacte con la oficina compentente (del departamento de ecología y mediomabiente), o su servicio de
recogida a domicilio si lo hubiera o el punto de venta donde compró el producto.
SERVICIO DE ASISTENCIA TÉCNICA
Antes de llamar al Servicio de Asistencia Técnica:
Si la encimera no funcionara, le aconsejamos controlar que el enchufe esté bien conectado.
Si no se logra detectar el problema:
apague el aparato, no trate de repararlo y llame al Servicio de Asistencia Técnica.
El aparato está amparado por garantía que le permite aprovechar el Servicio de Asistencia Técnica.
Conserve la factura o recibo de compra para testificar la fecha de la misma. En caso de necesidad, tendrá que
mostrar al Servicio de Asistencia Técnica este documento fiscal emitido por el revendedor en el momento de la
compra (documento de entrega, factura, recibo fiscal, etc.) en el que están indicados el nombre del revendedor, la
fecha de entrega, los datos del producto y el precio de venta.
-5-
TECHNICAL DATA
MODELS
Voltage
Current
Hi-light plate 1200W
Hi-light plate 1700/700W
Max power (W)
Electrical cable
INCA 3 TOUCH 4551 G
230V
18A
2
1
4100
3x2,5 mm2
1.Installation (Fig 1)
Installation is the buyer’s responsibility. The manufacturer accepts no liability for this service. Any action that the
manufacturer has to take due to an erroneous installation will not be covered by the guarantee.
The flush-mounted cook tops are designed for installation in work tops made of all kinds of material, providing they
can withstand a temperature of 100°C, and are between 25 and 40 mm thick. If the cook top is installed in a
position so that the side of a kitchen unit comes up against its left-hand or right-hand side, the distance between
the vertical panel and the edge of the cook top must always be at least 150 mm. The distance between the back
wall and the edge of the cook top must be at least 55 mm. A partition made of insulating material (wood or the
like) must be inserted between the cook top and the space below. This partition must be at least 25 mm from the
underside of the cook top tray.
IMPORTANT: to ensure that the electronic behavior is stable over time and not suffer any damage, it is necessary
to ensure correct ventilation (see Fig 1).
Fixing the cook top to the unit (Fig 2)
The cook top is fixed to the unit by means of the brackets and accessories provided. Holes are provided in the
bottom of the tray where the tabs (A) are inserted so that you can attach the screws (C) that hold the brackets (B)
in place.
Applying the seal (Fig 3)
Important - The figure shows how the seal must be attached all around the perimeter.
This cook top has been designed for non-professional, domestic use.
2.Electric connections (Fig 4)
Check the details given on the nameplate situated on the underside of the cook top, then make sure that the rated
mains voltage and power available are suitable for its operation.
Before making the electric connections, check the efficiency of the earthing system. Earthing of the cook top is
compulsory by law. The manufacturer will accept no liability for any personal injury or damage to property deriving
from failure to comply with this requirement.
For models without a plug, fit a standard plug capable of withstanding the specified load on the power cord. The
cord’s earthing conductor is colored yellow and green. The plug must be accessible.
If you prefer to make a fixed connection to the mains, insert an all-pole circuit breaker with a breaking gap of at
least 3 mm between the cook top and the mains.
To connect the cook top power cord, loosen and remove the cover on the terminal block in order to access the
contacts inside. Make the connection, blocking the cord in place with the cable clamp provided and then close the
terminal block cover again immediately.
If you have to change the cord, the earthing (yellow / green) conductor must always be 10 mm longer than the line
conductors.
Use only rubber cable type H05RR-F.
DECLARATION OF CONFORMITY. In the parts destined to come into contact with foodstuffs, this appliance is in
accordance with the requirements of the EC directive 89/109 transposed in the Italian Legislative Decree N° 108 of
25/01/92.
CE Appliance conforming to the European directives 89/336/EEC, 93/68/EEC, 73/23/EEC and subsequent
revisions.
This appliance is marked according to the European directive 20002/96/EC on waste Electrical and electronic
Equipment (WEEE). This guideline is the frame of a europeanwide validity of return and recycling on Waste
electrical and electronic Equipment
-6-
INSTRUCTIONS FOR USE
Important: Before cooking with the appliance for the first time, it is important to clean the cook top. Then turn on
all the heating elements, one as a time, with no pan on top, for 5 minutes on the maximum temperature setting.
This will eliminate to the "new smell" and make any humidity that had accumulated on the heating elements
evaporate. This is also essential to ensure that the electronic devices function properly.
CERAMIC GLASS COOK TOP WITH TOUCH CONTROLS
1. Description of the controls (Fig.5)
1.
2.
3.
4.
5.
6.
7.
8.
On/off key (ON/OFF)
Burner element key (ON/OFF)
Setting display (residual heat)
“Less” key
“More” key
Dual-circuit key (ON/OFF)
Dual-circuit pilot light
Decimal point on setting display
On: the burner setting can be adjusted
Off: the burner is disabled.
Touch controls
All operations are performed by means of touch controls (capacitive sensors) situated on the front of the cook top;
there is a display relating to each key.
Every action is confirmed by an acoustic signal (only on TP-614)
2. Turning on and off (fig.6)
Touch the on/off button.(1). The control is enabled: the setting level indicators (3) read “0” and the decimal points
(8) flash on and off. The next step must be carried out within 20 seconds, otherwise the appliance goes off
automatically.
Turning on the burner (fig.7)
If the control is ON the respective cooking zone can be selected by operating a cooking-zone-select-key (= PLUSkey(5-2) of the respective cooking zone). There is a static dot indication (8)in the respective display. If the cooking
zone is hot “0” is displayed instead of “H” . On all other cooking zone displays(3) the blinking dot extinguishes.
Then a setting will be chosen by a renewed operation of the cooking- zone-select-key or the MINUS-key and the
cooking zone begins to heat up. In order to use the cooking-zone-select-key as a PLUS-key the control has to
recognize that after the selection the cooking zone has been released for 0,3 seconds.
After selection of a cooking zone the setting can be increased by continously pressing the PLUS-key, starting at
step “1” it is increased by 1 step every 0,4 seconds. When setting “9” is reached the setting will not be changed
further (end stop).
If the selected cooking zone will be switched ON by means of the MINUS key(4), the cooking zone starts at the
maximum setting “9“ (“reverse switching-ON”). When the key is continuously operated, it decreases by 1 step
every 0,4 seconds. When setting “0” is reached, there will be no further setting changed (end stop). Only a
renewed operation of the MINUS (or PLUS) key changes the setting.
Turning off the burner /Turning off the burner instantly:
To switch off an individual cooking zone, the respective cooking zone has to be selected with the cooking-zoneselect-key (= PLUS). The selection is indicated with the static dot in the respective cooking zone display. If the
control recognizes that the PLUS- (cooking-zone-select-key is the PLUS-key) and the MINUS-key have been
activated simultaneously the setting of the selected cooking zone will be put back to “0“. Alternatively, the MINUSkey can be used to count down the setting to “0“. .
If all cooking zones are at “0”, all decimal points in the cooking zone displays are blinking. If a cooking zone is
“hot”, “H” will be displayed instead of “0”.
Residual heat indicator (fig.8)
As long as the temperature of the burner remains high enough to cause injury, the display corresponding to the
burner shows the “H” symbol (residual heat). This indication only disappears when there is no longer any danger
(at 60°C).
The display (3) shows a “0” as long as the temperature remains below 60°C, whereas it shows an “H” whenever the
temperature exceeds 60°C.
To save energy, turn off the burner in advance, in order to exploit the residual heat.
The residual heat indicator “H” is lost in the event of a mains power cut lasting more than 3 seconds.
Turning off the cook top (fig.9)
The cook top can be turned off at any time by means of the on/off key (1).
-7-
3. Dual-circuit burners (fig.10)
Two burners can be equipped with a second circuit: for instance, the burner is composed of a central disk and an
outer ring. You can turn on both elements (fig. 5) or the central disk alone (fig. 4). This enables you to adapt the
heated area to the size of the saucepan you are using.
1.Select the required power setting (from 1 to 9) with the keys “+” e “-“ (5/4).
When turn on the plate with double cooking zone, the dual circuit key pilot light (7) relating to the burner concerned
comes on; the second circuit comes on together with the first.
It is possible to turn off the second circuit by pressing the dual-circuit key (6).
Touch the dual-circuit key (6).
The pilot light (7) goes off and the second circuit on burner also goes off.
4. Protection against unintended switching-ON
If the electronic control realizes a continuous operation of keys for approx. 10 seconds, it switches OFF
automatically. The control sends out an audible failure signal for 10 seconds, so that the user can remove the
object which has been mistakingly placed onto the operation surface. The displays show the failure code “ E R 0 3
“ . If the failure carries on for more than 10 seconds, only the code “ E R 0 3 “ will be displayed as long as the
failure will be recognized by the electronic control. If the cooking zone is in the “hot” status, “H“ will appear on the
display in alteration with the failure notice.
If no cooking zone will be activated within 20 seconds after switching-ON by means of the Power-key, the control
switches back from the ON-condition into the stand-by-mode.
When the control is switched-ON the ON/OFF-key has priority over all other keys, so that the control can be
switched-OFF anytime, even in case of multiple or continous operation of keys.
In the stand-by mode a continous operation will not be signalized. However, before the electronic control can be
switched-ON again, it has to recognize that all keys are not operated.
5. Locking the cook top functions
After switching-ON the control the child safety feature can be activated. To achieve this it is necessary to
simultaneously operate the front right cooking-zone-select-key (2-5) and the MINUS-key(4) and then press the
front right cooking-zone-select-key (2-5) again. There will be an “L” , meaning LOCKED (child safety feature
against unintended switching-ON). If a cooking zone is in the “hot” condition, “L” and “H” will be displayed in
alternation.
This course of operation has to take place within a period of 10 seconds, no other key than described above may
be operated. Otherwise the input will be interrupted because of incompleteness, the cooktop will not be locked
then.
The electronic control remains in a locked condition until it gets unlocked, even if the control has been switchedOFF and -ON in the meantime. Also a reset of the control (after a voltage drop) does not cancel the key lock.
Unlocking for cooking purposes:
To unlock and operate the control it is required to operate the front right cooking-zone-select-key and the MINUSkey (4) simultaneously. “L“ (LOCKED) in the display extinguishes and all cooking zones show “0“ with a blinking
dot. Should a cooking zone be “hot”, “H” is displayed instead of the static “0”. After switching-OFF the control, the
child safety feature is active again.
Cancelling the key lock:
After switching-ON the control the child safety feature can be deactivated. Here it is necessary to simultaneously
operate the front right cooking-zone-select-key and the MINUS-key and then operate the MINUS-key alone. If all
steps have been carried out in the right order within 10 seconds the key lock gets cancelled and the control is
OFF. Otherwise the input will be considered incomplete, the control remains locked and switches-OFF after 20
seconds.
After a renewed switching-ON by means of the ON/OFF key all displays show „0“, the display dots are blinking and
the control is ready for cooking. If a cooking zone is “hot“ , “H“ will be displayed instead of the static „0“.
12. Error output, Error management
The Error output takes place on the announcements RL with „E“ and RR error numbers on the announcements FL
with appropriate number made of with appropriate number made of table.If an anouncement should be missing
expenditure on the remaining announcement takes place in the change.
Error code
ER03 &
permanent tone
ER20
ER21
Description
Permanent use of keys; control unit
cuts off after 10 sec
Flash-failure
Control unit cuts off after controlling
due to overheating to avoid damage
to electronics
Possible error cause
Water or cooking utensils on the
glass above the control unit
µ C-faulty
Standard algorithm reaches limit
when overheated. Ambient
temperature of electronics still to
high.
-8-
Error clearing
Cleaning of the
operational surface
Exchange control
Allow cavity to cool
down. Check heat
sealing-off of control
unit..
ER22
Key evaluation defective; control unit
cuts off after 3.5 – 7.5 sec
Short-circuit or discontinuation in
the range of the key evaluation
Er47
None or faulty communication!
Ensure that connection cable is
plugged on correctly.
Communication error between TC
and induction
Er31
Configuration data incorrect
ER36
NTC value is not within its
specification (value < 200mV or >
4.9V; control unit cuts off
Secondary operational voltage is
min.5 s too low according to identified
Unterspannung (1,8V< UPowerfail<
2,9V)
ER40
Exchange control unit
Configuration of necessary
induction
Short-circuit or cut-off at NTC
Exchange control
unit
Primary PTC too hot
Disconnect control unit
from the power system
Control unit connected.
is wrongly
Connect to correct mains
voltage
U400
Secondary voltage of the power unit
to high (primary > 300V). Control unit
cuts off after 1 sec releasing a
permanent tone.
E2
Overheating of the induction coils
E5
Error on filter board
Exchange filter board
E6
E9
Error on power unit
Exchange power unit
Coil temperature sensor defective
Exchange temperature sensor
Cooling down necessary
CLEANING AND MAINTENANCE
A few cooking tips
Use only saucepans and frying pans with a sturdy, preferably thick bottom. This is particularly important when
preparing food requiring high cooking temperatures, such as fried foods. If the bottom of the pan is not perfectly
flat, the food takes longer to cook and uses up more energy. The best heat transfer is obtained when the
saucepan and burner are the same size.
You can also use Pyrex and porcelain pans on the burners, providing the bottom of the pan is smooth. Refer to the
instructions of the pan manufacturer on this point.
Any spillages from the pans should be wiped away immediately.
Important notes
Warning: the burner surface becomes red hot when in use, so it is always advisable to keep children well away
from the cook top.
Avoid dropping any hard object on the cook top surface. In some conditions, the material is sensitive to
mechanical loading. The shock of a sharp or pointed object can damage the cooking surface. In the event of any
breakage, cracking or other damage being accidentally caused to the ceramic top, it is essential to stop using the
cook top immediately and contact customer care.
Ceramic glass cook tops must never be used as a work surface. Do not us aluminum pan. Do not prepare food
wrapped in aluminium foil or packaged in plastic. Never use the burner without a saucepan on it. Never place
flammable, explosive or deformable objects in the vicinity of the cook top.
Fats and oils can catch fire if they are overheated: that is why foods requiring the use of fat or oil, e.g. French fries,
must always be supervised while they are cooking.
Moreover, it is essential to make sure that the power cords and plugs of any other domestic appliances attached to
sockets near the cook top can never come into contact with the hot cook top surfaces. No part of the power supply
cable must reach an ambient temperature which is over 50°c.
If damaged, the cable must be replaced with one supplied by the technical assistance service. If the glass surface
breaks, unplug the device from the mains supply in order to avoid getting an electric shock.
The cook top must never be cleaned with steam or other such cleaning devices.
It is essential to clean the cook top - once it has cooled down - every time it has been used. Even the smallest food
scraps would burn the next time it is used. Use only the recommended detergents. Wire wool, abrasive pads and
powders will cause scratching. Oven-cleaning products are unsuitable because they are corrosive.
Mild soiling can be removed with the aid of a damp cloth or with hot soda. Any traces of detergent must be
removed with cold water and the surfaces must then be accurately dried. Any signs of water that cannot be
removed with boiling water can be eliminated with vinegar and lemon juice, or with a scale-remover fluid. If any of
these detergents comes into contact with the cook top frame, it must be cleaned off immediately with a wet cloth,
to avoid damaging the seal.
Any tenacious dirt can easily be removed with the aid of a glass scraper. The scraper handle must not be made of
plastic because it could become stuck to the hot surfaces. Pay attention while using to scraper: it can cause injury.
Sugar and foods containing caramelized sugar must be removed immediately from the hot burner.
-9-
This appliance is marked according to the European directive 2002/96/EC on Waste Electrical
and Electronic Equipment (WEEE).
By ensuring this product is disposed of correctly, you will help prevent potential negative
consequences for the environment and human health, which could otherwise be caused by
inappropriate waste handling of this product.
The symbol on the product indicates that this product may not be treated as household waste.
Instead it shall be handed over to the applicable collection point for the recycling of electrical
and electronic equipment
Disposal must be carried out in accordance with local environmental regulations for waste
disposal.
For more detailed information about treatment, recovery and recycling of this product, please
contact your local city office, your household waste disposal service or the shop where you
purchased the product.
TECHNICAL SUPPORT
Before calling in the technician:
- if the cook top does not work, we recommend you first make sure that the plug is fitted properly in the
power socket.
If you cannot find any reason for the malfunction:
- turn off the appliance and do not manhandle it. Call in the technical support service.
The appliance comes with a guarantee certificate that entitles you to use the technical support service.
The guarantee must be duly completed, kept in a safe place, and exhibited to the authorized technician in
case of need, together with the fiscally valid document issued by the retailer at the time of purchase (delivery
bill, invoice, cash register receipt, etc.) indicating the name of the retailer, the date of delivery, details for
identifying the product and the purchase price.
- 10 -
Fig.1
………………………………………………………………………………………………………………………………
Fig.2
A
(ES)Fijación al mueble
(GB) Fixing the cook top to
the unit
B
placas a introducir en el fondo de la placa
empotrable
plates for inserting on the bottom of the cook
top
estribo de
fijación
fixing
bracket
C
tornillo
screw
………………………………………………………………………………………………………………………………
Fig.3
(ES)Aplicación de la junta
(GB)Applying the seal
………………………………………………………………………………………………………………………………
Fig.4
(ES) Posibilidad de conexión
(GB) Electric connections
- 11 -
………………………………………………………………………………………………………………………………
Fig.5
(ES) Descripción de los mandos
(GB) Description of the controls
………………………………………………………………………………………………………………………………
Fig.6
(ES) Encendido y apagado
(GB) Turning on and off
………………………………………………………………………………………………………………………………
Fig.7
(ES) Encendido de la zona de cocción
(GB) Turning on the burner
……………………………………………………………………………………………………………………………
Fig.8
(ES) Indicador de calor residual
(GB) Residual heat indicator
………………………………………………………………………………………………………………………………
Fig.9
(ES) Apagado de la encimera
(GB) Turning off the cook top
- 12 -
………………………………………………………………………………………………………………………………
Fig.10
(ES) Zonas de cocción de doble circuito
(GB) Dual-circuit burners
………………………………………………………………………………………………………………………………
Fig.11
(ES) Encendido de una zona de doble circuito
(GB) Turning on a dual-circuit burner
- 13 -
Franke España S.A.U
Poligono Can Magarola
C/ Molí de Can Bassa, 2-10
08100 MOLLET del VALLES
Barcelona – España
Tel: 902 499 498
www.mepamsa.es
- 14 -