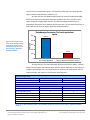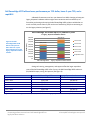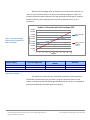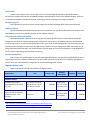
1
COMPARING PERFORMANCE AND COST: DELL POWEREDGE VRTX VS. A LEGACY HARDWARE ENVIRONMENT As your business grows, your server hardware must meet the increasing needs of users. Running a typical remote or branch office workload consisting of email, database, and file and print workloads on existing hardware may seem like the cheapest solution, but may end up costing more through downtime and lost productivity. Additionally, the aging hardware may simply not be able to keep up. Choosing the Dell PowerEdge VRTX for your business gives you the performance, scalability, and high availability your business needs to keep running and meeting increased demand. In the Principled Technologies Labs, we simultaneously ran email, database, and simulated file and print workloads in a VMware® vSphere® ESXi virtual environment on the VRTX. We found that it performed better in all three workloads, while requiring less space and power, and provided a lower 5-year TCO when compared with a legacy, disparate hardware solution. Combining servers, networking, and shared storage into an all-in-one solution, the Dell PowerEdge VRTX can deliver big performance and savings. JUNE 2013 A PRINCIPLED TECHNOLOGIES TEST REPORT Commissioned by Dell Inc. GET BETTER PERFORMANCE WHILE USING LESS POWER We compared performance, power consumption, space, and cost of running typical office applications (email, database, and file/print server) on these two solutions: A Dell PowerEdge VRTX with two Dell PowerEdge M620 server nodes, running VMware vSphere 5 in a high availability (HA) cluster configuration with three Microsoft® Windows Server® 2012 virtual machines (VMs) – one running SQL Server® 2012, one running Exchange Server 2010, and one acting as a file/print server. A legacy, disparate hardware solution consisting of three older HP tower servers, a NETGEAR® switch, and an HP storage appliance. The legacy tower servers ran bare metal instances of Windows Server 2012 with one running SQL Server 2012, one running Exchange Server 2010, and one running as a dedicated file/print server. We ran three benchmarks simultaneously to stress the email, database, and file and print applications at once. We also measured the power consumption of the Dell PowerEdge VRTX and the legacy solution while idle and during the simultaneous workloads. For detailed configuration information about the solutions we tested, see Appendix A. For testing details, see Appendix B. For detailed test results, see Appendix C. Dell PowerEdge VRTX optimized application performance while reducing power consumption and providing headroom for future growth As Figure 1 shows, the Dell PowerEdge VRTX optimized performance compared to the legacy, disparate hardware solution, achieving as much as 64.3 percent better performance while running the three workloads simultaneously on VMs. Percentage win for the Dell PowerEdge VRTX vs. legacy, disparate hardware solution 70% 64.3% Figure 1: The Dell PowerEdge VRTX outperformed the legacy, disparate hardware solution in simultaneous email, database, and file and print workloads. Percentage win 60% 50% 40% 30% 20% 10% 9.5% 10.4% Database Simultaneous workloads File and print 0% Email Comparing performance and cost: Dell PowerEdge VRTX vs. legacy hardware solution A Principled Technologies test report 2 The compact Dell PowerEdge VRTX not only outperformed the legacy tower solution, but it also used significantly less power while delivering that improved performance. The VRTX solution used 19.8 percent less power while running our workloads than the legacy, disparate hardware solution did (see Figure 2). This level of power reduction could significantly lower ongoing operating costs for your business. Power consumption (lower is better) 800 700 544.5 600 Watts Figure 2: The Dell PowerEdge VRTX used less power while running simultaneous workloads than the legacy, disparate hardware solution did. 678.7 500 400 300 200 100 0 Dell PowerEdge VRTX Legacy, disparate hardware solution In our tests, we used a Dell PowerEdge VRTX with only two servers compared to the three physical servers in the legacy hardware solution. Adding server nodes and more or faster drives to the shared storage may achieve greater performance gains. Additionally, adding new application VMs to your VMware vSphere environment may give the Dell PowerEdge VRTX scalability and room to grow as the demands of your business continue to increase. With a legacy, disparate hardware solution, achieving similar results may require purchasing additional servers that take up more space and consume more power. Dell PowerEdge VRTX meets needs in less space while reducing physical complexity In addition to the extra space that legacy, disparate hardware solutions encompass, they often have a great deal of complexity when it comes to hardware pieces and cabling. If your business’ location has premium square footage value, accommodating your legacy solution can mean sacrificing precious space. The Dell PowerEdge VRTX is a compact all-in-one-solution that fits easily under a desk and uses minimal cabling because the solution resides in one chassis. Though neither solution is likely to be in a server rack in a small or remote office, we looked at the rack-equivalent space each solution would occupy to make a universal size comparison. We found that the Dell PowerEdge VRTX solution would fit Comparing performance and cost: Dell PowerEdge VRTX vs. legacy hardware solution A Principled Technologies test report 3 into just 5U of rack-equivalent space – a 70.6 percent reduction in the space that the legacy solution would take up (a massive 17U). As Figure 3 shows, the database performance increase of the Dell PowerEdge VRTX seems even more impressive when you consider that it fits in a fraction of the space needed for a legacy tower solution. The Dell PowerEdge VRTX delivered a whopping 272.0 percent more database performance per U of rack-equivalent space, in orders per minute, than the legacy, disparate hardware solution. 500 449.4 400 OPM per U Figure 3: The compact form factor of the Dell PowerEdge VRTX means it packs more performance into less space than the legacy, disparate hardware solution. Database performance/U of rack-equivalent space 300 200 120.8 100 0 Dell PowerEdge VRTX Legacy, disparate hardware solution As Figure 4 shows, the Dell PowerEdge VRTX also used only six cables, 13 fewer cables than the legacy, disparate hardware solution. Fewer cables are not only easier to configure and manage, but it also helps keep your infrastructure looking neat, which is important when your setup is in an office that customers visit. Dell PowerEdge VRTX Total by type Total cables Legacy, disparate hardware solution HP ProLiant ML310 G5 HP ProLiant ML370 G5 HP ProLiant ML110 G6 NETGEAR ProSAFE Smart Switch Storage Total by type Total cables Ethernet cables 2 Power cables 4 6 Ethernet cables 2 2 2 1 6 13 Power cables 1 1 1 1 2 6 19 Figure 4: The Dell PowerEdge VRTX reduced cabling complexity compared to the legacy, disparate hardware solution. Comparing performance and cost: Dell PowerEdge VRTX vs. legacy hardware solution A Principled Technologies test report 4 Dell PowerEdge VRTX offered more performance per TCO dollar, lower 5-year TCO, and a rapid ROI A bloated infrastructure can hurt your bottom line. While choosing to keep your legacy, disparate hardware solution might seem convenient and cost-effective, we found that purchasing and running the Dell PowerEdge VRTX solution could deliver as much as a 26.0 percent lower 5-year total cost of ownership (TCO) than continuing to use the legacy solution (see Figure 5). Dell PowerEdge VRTX saves up to $21,348 over 5 years vs. legacy, disparate hardware solution $90,000 $82,100.75 $80,000 $70,000 Dollars (US) Figure 5: The Dell PowerEdge VRTX could deliver a 26.0 percent lower TCO over 5 years than continuing to use the legacy, disparate hardware solution. Year 5 costs $60,751.90 Year 4 costs $60,000 $50,000 Year 3 costs $40,000 Year 2 costs $30,000 Year 1 costs $20,000 Acquisition costs $10,000 $0 Dell PowerEdge VRTX Legacy, disparate hardware solution Savings in licensing, management, and support offset the larger acquisition costs of the Dell PowerEdge VRTX. After 5 years, the Dell PowerEdge VRTX solution is $21,348.85 cheaper, saving 26.0 percent (see Figure 6). Acquisition cost Year 1 costs Year 2 costs Year 3 costs Year 4 costs Year 5 costs Total Dell PowerEdge VRTX $30,862.00 $5,977.98 $5,977.98 $5,977.98 $5,977.98 $5,977.98 $60,751.90 Legacy, disparate hardware solution $5,055.00 $15,409.15 $15,409.15 $15,409.15 $15,409.15 $15,409.15 $82,100.75 Figure 6: The Dell PowerEdge VRTX costs up to $21,348.85 less than the legacy, disparate solution after 5 years. Comparing performance and cost: Dell PowerEdge VRTX vs. legacy hardware solution A Principled Technologies test report 5 With the Dell PowerEdge VRTX, we found that you could achieve payback, or a return on your investment (ROI), in as little as 33 months (see Figures 7 and 8). This assumes you do not need to add servers for new workloads with the legacy, disparate hardware solution, which could give you an even more dramatic return on your investment. Payback in 33 months with Dell PowerEdge VRTX $90,000 $80,000 Figure 7: The Dell PowerEdge VRTX can deliver payback in as little as 33 months. Dollars (US) $70,000 Dell PowerEdge VRTX $60,000 $50,000 $40,000 Legacy, disparate hardware solution $30,000 $20,000 $10,000 $0 0 Payback category One-time initial investment Monthly cost Payback period 6 12 18 24 30 36 Months 42 48 54 60 Legacy, disparate hardware Difference solution $30,862.00 $5,055.00 $25,807.00 $498.17 $1,284.10 $785.93 $25,807.00/$785.93=32.84 months Dell PowerEdge VRTX Figure 8: The Dell PowerEdge VRTX can pay back your investment in 32.84 months, so by the 33rd month the return of investment is complete. The solution you choose for your small office or network of remote branches should offer top performance for your dollar. Using the calculations from our TCO analysis, we found that the Dell PowerEdge VRTX delivered 47.9 percent more database performance (OPM) per TCO dollar spent (see Figure 9). Comparing performance and cost: Dell PowerEdge VRTX vs. legacy hardware solution A Principled Technologies test report 6 Database performance/TCO dollar Figure 9: The Dell PowerEdge VRTX delivered 47.9 percent more OPM per TCO dollar. Higher numbers are better. OPM per TCO dollar 0.04 0.037 0.03 0.025 0.02 0.01 0.00 Dell PowerEdge VRTX Legacy, disparate hardware solution For complete details and assumptions of our TCO analysis, see Appendix D. ALL-IN-ONE SHARED INFRASTRUCTURE The Dell PowerEdge VRTX solution with M-series server nodes is an all-in-one solution designed to handle the performance needs of your small-to medium-business or remote office. Here, we provide information about each of the components we used as part of this solution. About the Dell PowerEdge VRTX The Dell PowerEdge VRTX is a compact, all-in-one solution in a 5U rack-able tower chassis. Designed to be quiet under normal operating conditions, the Dell PowerEdge VRTX can be stowed under a desk in a small office without disrupting conversations. Its four bays house M520 or M620 compute nodes, providing a spacesaving alternative to four separate tower or rack servers. In addition to space savings, the Dell PowerEdge VRTX provides administrators with a unified interface, the Chassis Management Controller, for performing routine systems management tasks. The Dell PowerEdge VRTX chassis supports up to 48 TB of shared internal storage that is presentable as virtual drives to single or multiple compute nodes, and provides optional Dell PowerEdge VRTX with 12 3.5-inch drives Dell PowerEdge VRTX with 25 2.5-inch drives pass-through and eight PCIe slots for additional device connectivity. The chassis integrated storage can be configured with 25 bays for 2.5-inch drives or with 12 bays for 3.5-inch drives. The Dell PowerEdge VRTX integrated switch contains multiple external network ports for easy expansion or integration into any computing environment. For more information about the Dell PowerEdge VRTX, visit www.dell.com/poweredge. Comparing performance and cost: Dell PowerEdge VRTX vs. legacy hardware solution A Principled Technologies test report 7 About the Dell PowerEdge M620 server nodes The Dell PowerEdge M620 server node has features optimized for performance, density, and energy efficiency. Processors. The Dell PowerEdge M620 is powered by two Intel® Xeon® E52600-series processors, which incorporate the very latest in processor technology from Intel. The powerful processors provide the performance you need for your essential mainstream tasks. The Intel Xeon E5-2600-series processor gives you up to eight cores per processor, or up to 16 cores per server. Memory. The Dell PowerEdge M620 holds up to 768GB DDR3 RAM (up to 1600 MHz) across 24 DIMM slots per compute node. Management. The Dell PowerEdge M620, like all late-model Dell servers, comes with the Dell Lifecycle Controller. This tool simplifies server management by providing a single interface for management functions and by storing critical system information in the system itself. There are no CDs or USB keys to keep track of for drivers or firmware. About VMware vSphere 5 vSphere 5 is the latest virtualization operating system from VMware. vSphere 5 virtualizes server, storage, and networking resources, achieving a consolidation ratio greater than 15:1. Features such as automated management and dynamic resource allocation improve efficiency. The services that vSphere 5 provides fall into two categories: infrastructure services and application services. The former handle the virtualization of resources and their allocation to application when most needed, while the latter provide service-level controls to applications running on vSphere 5. To learn more about VMware vSphere 5, visit www.vmware.com/products/vsphere/overview.html. WHAT WE TESTED Database testing To create our real-world ecommerce workload, we used the DVD Store Version 2.1 benchmarking tool. DS2 models an online DVD store, where customers log in, search for movies, and make purchases. DS2 reports these actions in orders per minute that the system could handle, to show what kind of performance you could expect for your customers. The DS2 workload also performs other actions, such as adding new customers, to exercise the wide range of database functions you would need to run your ecommerce environment. For more details about the DS2 tool, see www.delltechcenter.com/page/DVD+Store. Comparing performance and cost: Dell PowerEdge VRTX vs. legacy hardware solution A Principled Technologies test report 8 Mail testing To test the solutions’ mail server performance, we used the Microsoft® Load Generator 2010 (LoadGen) benchmark, performing tasks to simulate a heavy user generating mail activity. For our workloads, we used the following settings: Number of users: 500 Mailbox Profile: 250MB mailboxes Action Profile: Outlook_200 For more details about LoadGen, see www.microsoft.com/downloads/details.aspx?FamilyId=DDEC1642-F6E3-4D66-A82F8D3062C6FA98&displaylang=en. File and print testing To test the file and print capabilities of the solutions, we simulated workloads using the Iometer benchmark. Iometer measures IOPS on single and clustered systems. Iometer performs I/O operations to stress a system, and then records the performance of these I/O operations and the system stress they create. We used Iometer version 2006.07.27 on each solution to simulate the same file and print workloads on the solutions. For more details about Iometer, see www.iometer.org. IN CONCLUSION Keeping a legacy, disparate hardware solution instead of choosing the new Dell PowerEdge VRTX may cost you more than you realize. We found that the Dell PowerEdge VRTX increased application performance over a legacy, disparate hardware solution across email, database, and file/print server simultaneous workloads while reducing power consumption by 19.8 percent. The VRTX did so in 70.6 percent less rackequivalent space than the legacy, disparate hardware solution and with one-third as many cables, to reduce complexity and reduce the burden of space in small offices. Finally, despite a larger initial investment, the Dell PowerEdge VRTX could actually lower your total cost of ownership over years as much as 26.0 percent, delivering a solid return on your investment in less than three years. As our test results show, investing in the Dell PowerEdge VRTX solution could provide you with a compact solution to optimize application performance, reduce complexity, and even lower the total cost of your solution over its lifetime. Comparing performance and cost: Dell PowerEdge VRTX vs. legacy hardware solution A Principled Technologies test report 9 APPENDIX A – SYSTEM CONFIGURATION INFORMATION Figures 10 through 12 provide detailed configuration information for the test systems. System Enclosure Compute node enclosure General dimensions of compute node enclosure Height (inches) Width (inches) Depth (inches) U size in server rack equivalent (U) Power supplies Total number Vendor and model number Wattage of each (W) Cooling fans Total number Vendor and model number Dimensions (h x w) of each Volts Chassis RAID controller Vendor and model number Firmware version Cache size (GB) Chassis shared hard drives Hard drive #1 Vendor and model number Number of drives Size (GB) RPM Hard drive #2 Vendor and model number Number of drives Size (GB) RPM Chassis USB ports Number Type Platform Vendor and model number Motherboard model number Motherboard chipset BIOS name and version BIOS settings Dell PowerEdge VRTX solution Dell PowerEdge VRTX 8 19 29.5 5 4 Dell 80 Plus Platinum E1100E-S0 (P/N 0YT39Y) 1,100 6 Delta Electronics, Inc. 60 mm x 60 mm 12 Dell SPERC8 23.8.1-0009 1 Seagate® ST300MM0006 5 300 10,000 Western Digital WD3000BKHG 10 300 10,000 2 2.0 Dell PowerEdge M620 0VHRN7A05 Intel C600 Dell BIOS 1.7.0 Default Comparing performance and cost: Dell PowerEdge VRTX vs. legacy hardware solution A Principled Technologies test report 10 System General Number of processor packages Number of cores per processor Number of hardware threads per core System power management policy CPU Vendor Name Stepping Socket type Core frequency (GHz) L1 cache L2 cache L3 cache Memory modules (per node) Total RAM in system (GB) Vendor and model number Type Speed (MHz) Speed in the system currently running @ (MHz) Timing/latency (tCL-tRCD-iRP-tRASmin) Size (GB) Number of RAM modules Chip organization RAID controller Vendor and model number Firmware version Cache size (GB) Hard drive Dell PowerEdge VRTX solution 2 6 2 Performance Intel Xeon E5-2620 C2 Socket 2011 LGA 2.00 32 KB (per core) 256 KB (per core) 15 MB (shared) 32 Hynix Semiconductor HMT31GR7CFR4C-PB DDR3-12800 1,600 1,333 11-11-11-35 8 4 Double-sided Dell PERC H310 mini 20.12.0-0004 0 MB Vendor and model number Dell Seagate Constellation.2™ ST9250610NS Number of drives Size (GB) RPM Type Network adapter Vendor and model number Type Number of ports USB ports (per node) Number Type 2 250 7.2K SATA Broadcom® NetXtreme® II 10 Gb Ethernet BCM57810 Embedded 2 3 2.0 Figure 10: Detailed configuration information for the Dell PowerEdge VRTX solution. Comparing performance and cost: Dell PowerEdge VRTX vs. legacy hardware solution A Principled Technologies test report 11 Server General dimensions of server Height (inches) Width (inches) Depth (inches) U size in server rackequivalent (U) Power supplies Total number HP ProLiant ML310 G5 HP ProLiant ML110 G6 HP ProLiant ML370 G5 14.4 6.9 16.8 17.0 7.9 24.0 17.5 8.6 28.5 4 5 5 1 1 HP Switching Power Supply DPS-800GB A 850 Vendor and model number Delta Electronics DPS300AB Wattage of each (W) Cooling fans Total number Vendor and model number Dimensions (h x w) of each Volts General Motherboard model number Motherboard chipset 300 1 Delta Electronics DPS410DB 410 1 HP 576930-001 92 mm x 25 mm 12 1 HP 459188-001 120 mm x 25 mm 12 3 Nidec Beta V35633-94 130 mm x 125 mm 12 576924-001 A61TR1 434719-001 Intel 3400 Chipset HP System BIOS 0270126_TAN Performance Intel 3210 Chipset Intel C600 ProLiant System BIOS - W05 ProLiant System BIOS P57 Performance Performance 1 1 2 4 4 4 2 1 1 Static High Performance Static High Performance Static High Performance Intel Xeon X3460 B1 LGA 1156 2.80 32 KB (per core) 256 KB (per core) 8 Intel Xeon X3370 E0 LGA 775 3.00 32 KB (per core) 12 MB (shared) N/A Intel Xeon E5450 E0 LGA 771 3.00 32 KB (per core) 12 MB (shared) N/A 4 Samsung M391B5673EH1CH9 4 Micron MT18HTF25672AY800E1 8 BIOS name and version BIOS settings Number of processor packages Number of cores per processor Number of hardware threads per core System power management policy CPU Vendor Name Stepping Socket type Core frequency (GHz) L1 cache L2 cache L3 cache (MB) Memory modules Total RAM in system (GB) Vendor and model number Comparing performance and cost: Dell PowerEdge VRTX vs. legacy hardware solution Samsung M395T5160QZ4 A Principled Technologies test report 12 Server Type Speed (MHz) Speed in the system currently running @ (MHz) Timing/latency (tCL-tRCDiRP-tRASmin) Size (GB) Number of RAM modules Chip organization RAID controller Vendor and model number Cache size (MB) Hard drive #1 Vendor and model number Number of drives Size (GB) RPM Type Hard drive #2 Vendor and model number Number of drives Size (GB) RPM Type Network adapter Vendor and model number Type Number of ports Network adapter 2 HP ProLiant ML110 G6 PC3-10600E DDR3 1,333 HP ProLiant ML310 G5 PC2-6400E DDR2 800 HP ProLiant ML370 G5 DDR2-5300F 666 1,333 800 666 9-9-9-24 6-6-6-18 5-5-5-15 2 4 Double-Sided 2 2 Double-sided 4 8 Double-sided HP Smart Array B110i N/A HP Smart Array E200 128 HP Smart Array P400 256 Hitachi HDS721032CLA362 1 320 7.2K SATA HP DF0792A9844 2 72 15K SAS HP EG0146FAWHU 2 146 10K SAS N/A N/A N/A N/A N/A ST500NM001 2 500 7.2 SAS N/A N/A N/A N/A N/A Intel Pro/1000 PT Dual Port Server Adapter PCIe 2 Intel Pro/1000 PT Server Adapter PCIe 1 Intel Pro/1000 PT Dual Port Server Adapter PCIe 2 N/A 4 2.0 Vendor and model number HP NC 107i PCIe Gigabit Type Number of ports USB ports (per node) Number Type Integrated 1 Intel Pro/1000 PT Server Adapter PCIe 1 6 2.0 2 2.0 N/A N/A Figure 11: Detailed configuration information for the towers in the legacy hardware solution. Comparing performance and cost: Dell PowerEdge VRTX vs. legacy hardware solution A Principled Technologies test report 13 Storage array Number of arrays Size in server rack-equivalent (U) Number of active storage controllers Number of active storage ports Switch number/type/model Power supplies Power supply vendor and model Number of drives Drive vendor and model number Drive size (GB) Drive buffer size (MB) Drive RPM Drive type Drive firmware Switch Size in server rack-equivalent (U) Ports Port speed Model number HP P2000 G3 Modular Smart Array System 1 2 2 4 P2000 G3 2 3Y Power Technologies YM-3159A AR Rev A 15 HP EG0146FAWHU 146 16 15,000 6G SAS HPDE NETGEAR® ProSAFE® Smart Switch 1 16 10Mbps / 100Mbps / 1000Mbps GS716T Figure 12: Detailed configuration information for the storage array and network switch. Comparing performance and cost: Dell PowerEdge VRTX vs. legacy hardware solution A Principled Technologies test report 14 APPENDIX B - HOW WE TESTED Installing and configuring the infrastructure server We configured a Dell PowerEdge R710 server with VMware vSphere (ESXi) 5.1 Update 1 to host the Active Directory VMs, one for each solution, and the VMware vCenter VM. Installing VMware vSphere 5.1 (ESXi) on the Dell PowerEdge R710 1. 2. 3. 4. 5. 6. 7. 8. Insert the ESXi 5.1 disk, and select Boot from disk. On the Welcome screen, press Enter. On the End User License Agreement (EULA) screen, press F11. On the Select a Disk to install or Upgrade Screen, select the relevant volume to install ESXi on, and press Enter. On the Please Select a Keyboard Layout screen, press Enter. On the Enter a Root Password Screen, assign a root password, and confirm the password by entering it again. Press Enter to continue. On the Confirm Install Screen, press F11 to install. On the Installation complete screen, press Enter to reboot. Configuring ESXi after installation 1. 2. 3. 4. 5. 6. 7. 8. 9. 10. 11. 12. 13. 14. 15. On the ESXi 5.1 screen, press F2, enter the root password, and press Enter. On the System Customization screen, select Troubleshooting Options, and press Enter. On the Troubleshooting Mode Options screen, select enable ESXi Shell, and press Enter. Select Enable SSH, press Enter, and press Esc. On the System Customization screen, select Configure Management Network. On the Configure Management Network screen, select IP Configuration. On the IP Configuration screen, select Set static IP; enter an IP address, subnet mask, and default gateway; and press Enter. On the Configure Management Network screen, press Esc. When the installer asks if you want to apply the changes, press Y. Log in as root with the vSphere client. Select the Configuration tab, and click Networking. Click Add Networking… Create a virtual machine network called PRIV-NET, and select the appropriate adapters. Click OK. Select the Configuration tab, and click DNS and routing. Type a name, and select test.local for domain. Setting up two VMs to host the Microsoft Windows Active Directory® servers 1. In your Web browser, connect to the vSphere server, and browse to the ESXi host hosting the management VMs (in our case, the PowerEdge R710). 2. Right-click the ESXi host, and choose New Virtual Machine. 3. Choose Create a new virtual machine, and click Next. 4. Assign a name to the virtual machine, and click Next. Comparing performance and cost: Dell PowerEdge VRTX vs. legacy hardware solution A Principled Technologies test report 15 5. 6. 7. 8. 9. 10. 11. 12. 13. 14. 15. 16. 17. Select the LUN for the storage, and click Next. Select ESX 5.1 and later compatibility, and click Next. Choose Windows, select Microsoft Windows Server 2012, and click Next. Choose the VM’s virtual hardware options, and click Next (see each VM’s section below for additional VM configuration data). o Select one virtual processor socket, and one core per virtual socket o Select 4GB RAM o Select VMXNET3 for the NIC interface, connect to the PRIV-NET network Choose to create a new virtual disk, and click Next. Make the OS virtual disk size 100 GB, choose thin-provisioned, specify external storage, and click Next. Keep the default virtual device node (0:0), and click Next. Click Finish. Right-click the VM, and select Edit Settings. Click the Resources tab, and click Memory. Select Reserve all guest memory, and click OK. Connect the VM virtual CD-ROM to the Microsoft Windows Server 2012 installation disk. Start the VM. Installing the Microsoft Windows Server 2012 operating system on the domain controller VM 1. 2. 3. 4. 5. 6. 7. 8. 9. 10. 11. 12. 13. Choose the language, time and currency, and keyboard input. Click Next. Click Install Now. Select Windows Server 2012 Enterprise (Full Installation), and click Next. Accept the license terms, and click Next. Click Custom. Click the Disk, and click Drive options (advanced). Click NewApplyFormat, and click Next. After the installation completes, click OK to set the Administrator password. Enter the administrator password twice, and click OK. Connect the VM to the Internet, and install all available Windows updates. Restart as necessary. Enable remote desktop access. Change the hostname, and reboot when the installer prompts you. Set up networking for the data network: a. Click StartControl Panel, right-click Network Connections, and select Open. b. Right-click the VM traffic NIC, and select Properties. c. Select TCP/IP (v4), and select Properties. d. Assign the VM a static IP address. 14. Install VMware Tools. For more information, see http://kb.vmware.com/selfservice/microsites/search.do?language=en_US&cmd=displayKC&externalId=340. 15. Shut down the VM. 16. Clone the VM, storing it in the same datastore as the original. Ensure that the cloned VM is on a separate network. Comparing performance and cost: Dell PowerEdge VRTX vs. legacy hardware solution A Principled Technologies test report 16 Installing Active Directory and DNS services 1. 2. 3. 4. 5. 6. 7. 8. 9. 10. 11. 12. 13. 14. 15. 16. 17. 18. Power on the first AD VM. On the VM, open Server Manager. On the Welcome screen, click 2, and click Add roles and features. At the initial Before you begin screen, click Next three times. At the Server Roles screen, select Active Directory Domain Services. On the pop-up window, click Add Features. Click Next three times. Verify the desired role is being installed, and click Install. Once installation has finished, close the Add roles and features wizard. In Server Manager, click the flag at the top, and select the Promote this server to a domain controller link. Select Add a new forest, enter a root domain name of test.local and click Next. On the Domain Controller Options window, enter a password, and click Next. On the DNS Options screen, click Next. On the Additional Options screen, click Next. On the Review Options screen, click Next. On the Prerequisites screen, verify all prerequisites have passed, and click Install. Once Active Directory Domain Services finishes installing, click Finish, and restart the system. Repeat these steps for the second AD server, changing the domain name to test2.local Configuring the VRTX network 1. 2. 3. 4. 5. 6. 7. 8. 9. 10. Open a Web browser, and enter the address listed for the CMC IP on the front LCD display. Log in with the username root and the password. Expand I/O Module Overview. Click Gigabit Ethernet. Click the Properties tab. Click the Launch I/O Module GUI button. Log in with the username root and the password. Click Submit. Expand SwitchingVLAN, and click VLAN Membership. Under the VLAN Membership tab, click Add. a. Enter a VLAN ID number (1000). b. Enter a VLAN Name (Testing). c. Click Apply. 11. Click SwitchingVLANPort Settings. 12. Under the Port Settings tab, click Edit. a. Select the Internal Port radio button. b. After the screen populates, use the drop-down menu to select gi1/2. c. In VLAN list, click 1, and click Remove. d. In the VLAN list box, enter 1000 and click Add. e. Click Apply. f. Use the drop-down menu to select gi2/2. Comparing performance and cost: Dell PowerEdge VRTX vs. legacy hardware solution A Principled Technologies test report 17 g. h. i. j. k. In the VLAN list box, click 1, and click Remove. In the VLAN list box, enter 1000 and click Add. Click Apply. Select the External Port radio button. After the screen populates, use the drop-down menu to select the port used to connect to the external testing switch. l. In VLAN list, click 1, and click Remove. m. In the VLAN list box, enter 1000 and click Add. n. Click Apply. 13. Click the floppy drive icon in upper-right portion of the configuration pane to save all new settings to the start-up configuration. 14. Click Log out. 15. Click OK. Configuring the VRTX shared storage 1. 2. 3. 4. 5. Open a Web browser, and enter the address listed for the CMC IP on the front LCD display. Log in with the appropriate credentials. Expand Storage. Click Storage. Click the Setup tab. a. Under Assignment Mode, select the Multiple Assignment radio button, and click Apply. b. To confirm the Operation Successful message box, click OK. 6. Configure virtual disks: a. Click StorageVirtual Disks. b. On the Virtual Disks tab, click Create. i. For Choose a virtual disk type, select RAID 10. ii. Select all available disks (14 drives for the RAID 10). iii. For the first volume (to be used for Microsoft Exchange), enter 1.1TB and click Create Virtual Disk. iv. To confirm the message box indicating Operation Successful, click OK. v. Repeat steps i through iv for the next external volume (to be used for Microsoft SQL Server), choosing 120GB. vi. Repeat steps i through iv for the next external volume (to be used for Iometer), choosing 100GB. c. On the Virtual Disks tab, click Manage. i. Select the Virtual Disks Action drop-down menu for Virtual Disk 0, and initialize the drives. ii. Click Apply. iii. To confirm the message box indicating Operation Successful, click OK. iv. Repeat steps i through iii for the remaining virtual disks. d. Configure the remaining physical disk as a global hot spare. e. Allow shared LUN access to both compute nodes. On the Virtual Disks tab, click Assign. i. Use the drop-down menu for all virtual disks and SLOT-01, and select Full Access. Comparing performance and cost: Dell PowerEdge VRTX vs. legacy hardware solution A Principled Technologies test report 18 ii. Use the drop-down menu for all virtual disks and SLOT-02, and select Full Access. iii. Click Apply. iv. To confirm the Operation Successful message box, click OK. Configuring the VMware vSphere environment for the VRTX server nodes Installing and configuring vCenter Server 1. Install the vCenter appliance to the PowerEdge R710 infrastructure server: a. In the vSphere client, select FileDeploy OVF Template. b. Browse to the location of the vCenter Server Appliance .ovf file, and click Open. c. In the OVF Template Details page, click Next. d. In Name and Location, enter vCenter Server for the name, and click Next. e. Select the appropriate datastore, and click Next. f. Select a disk format, and click Next. g. Check the Power on after deployment checkbox, and click Finish. 2. Configure the vCenter appliance: a. Right-click the new vCenter, and select Open Console. b. Note the instructions and the address to use for configuration. c. Open a Web browser to the address listed in the console. d. Log in with root and the password vmware e. Check the box to accept the license agreement, and click Next. f. Select the Configure with default settings radio button, and click Next. g. Click Start. Setup will complete and a new database will be configured automatically. h. Click the Admin Tab. i. In the current administrator password section, enter vmware ii. Enter a new password into both password fields. iii. Click Change Password. Configuring boot properties of the Dell PowerEdge M620 servers 1. 2. 3. 4. Open a Web browser, and enter the address listed for the CMC IP on the front LCD display. Log in with the appropriate credentials. Expand Server Overview, and select Slot-01. Click the Setup Tab. Perform the following steps in the iDRAC settings: a. Check the Enable LAN checkbox. b. Check the Enable IPv4 checkbox. c. Check the DHCP checkbox. d. Check the IPMI Over LAN checkbox. e. Click Apply iDRAC Network Settings. f. To confirm changes to the iDRAC network settings, click OK. 5. Power on the server. a. Click the Power Tab. b. Select Power On Server. c. Click Apply. d. To confirm server control action, click OK. Comparing performance and cost: Dell PowerEdge VRTX vs. legacy hardware solution A Principled Technologies test report 19 6. 7. 8. 9. 10. e. To confirm operation was successful, click OK. Click the Properties tab. Click Launch Remote Console. On new browser page, click Continue to website (not recommended) if prompted. a. If a message appears indicating a pop-up was blocked, select Always allow pop-ups from this site. b. Close the browser tab for the iDRAC. c. Click Launch Remote Console. d. If a message appears indicating the Web page wants to run an add-on called “Virtual Console from Dell Inc.,” select Allow for all websites. A new window appears showing the console for the server to configure. Select PowerReset System. Change the boot disk order in System Setup. a. When prompted during POST, press F2 to enter System Setup. b. Click BIOS. c. Click Boot Settings. d. Click BIOS Boot Settings. e. Scroll down, and click Hard Disk Drive Sequence. i. Highlight the SD card or USB drive entry, and move it to the top using the + key. ii. Click OK. f. Click Back twice. g. Click Finish. h. Click Yes. i. Click Finish. j. Click OK. The system will restart. Installing VMware vSphere 5.1 (ESXi) on the Dell PowerEdge M620 servers 1. 2. 3. 4. 5. 6. 7. 8. 9. Mount the ESXi 5.1 ISO via the iDRAC, and boot the M620 to that ISO. On the Welcome screen, press Enter. On the End User License Agreement (EULA) screen, press F11. On the Select a Disk to install or Upgrade Screen, select the relevant volume to install ESXi on, and press Enter. On the Please Select a Keyboard Layout screen, press Enter. On the Enter a Root Password Screen, assign a root password, and confirm the password by entering it again. Press Enter to continue. On the Confirm Install Screen, press F11 to install. On the Installation complete screen, press Enter to reboot. Repeat for the additional PowerEdge M620. Configuring VMware vSphere (ESXi) embedded on server nodes 1. Complete configuration of ESXi host: a. Press F2. b. Enter the root account password, and press Enter. c. Select Configure Management Network, and press Enter. d. Select Network Adapters, and press Enter. Comparing performance and cost: Dell PowerEdge VRTX vs. legacy hardware solution A Principled Technologies test report 20 i. Clear the vmnic0 checkbox. ii. Check the vmnic1 checkbox. iii. Press Enter. e. Press Esc. f. To restart networking, press Y. g. Select Troubleshooting Options. i. Select Enable ESXi shell, and press Enter. ii. Select Enable SSH, and press Enter. iii. Press Esc. h. To log out, press Esc. 2. Repeat step 1 for each additional server you wish to configure. Adding both server nodes to the vCenter Server 1. Open a new vSphere client session, and connect to the IP address assigned to the vCenter Server Appliance during installation. 2. Log into the root account 3. Right-click the item at the top of the left-hand pane in the client, and select New Datacenter. 4. Select an appropriate name for the Datacenter. For our testing, we selected VRTX-01. 5. Right-click VRTX-01, and select Add Host. 6. Enter the IP address of the ESXi host in Slot 1. 7. Log into the root account. 8. Click Next. 9. Click Yes to verify the authenticity and complete the import. 10. Click Next. 11. Select a license to assign, and click Next. 12. Do not check Enable Lockdown Mode, and click Next. 13. Click Next. 14. Click Finish. 15. Repeat steps 5 through 14 for the ESXi host in Slot 2. Configuring VM networking 1. In the vCenter Server console, select the first host, select the Configuration tab, and select Networking. 2. Add the necessary vSwitch for the network that application traffic will use: a. Click Add Networking. b. Choose Virtual Machine, and click Next. c. Choose create a vSphere standard switch. d. Choose the NIC associated with VM traffic. e. Assign the network label, and assign IP settings. f. Click Finish. 3. Repeat steps 1 and 2 for the second host. Configuring the external volumes 1. In the vSphere client, select the first host. 2. Click the Configuration tab. Comparing performance and cost: Dell PowerEdge VRTX vs. legacy hardware solution A Principled Technologies test report 21 3. 4. 5. 6. 7. 8. 9. 10. 11. 12. Click Storage, and click Add Storage… Choose Disk/LUN. Select the disk, and click Next. Accept the default of VMFS-5 for the file system. Review the disk layout, and click Next. Enter the datastore name, and click Next. Accept the default of using maximum capacity, and click Next. Click Finish. Repeat for the additional volumes. Add shared storage on the second host: a. On the second host, click the Configuration tab. b. Click the Storage menu. c. The new storage should appear automatically. If no storage is listed, click Rescan All… d. Click OK to rescan all adapters. The shared storage will appear automatically with the name VRTXshared-01 already configured. Setting up a high availability cluster 1. 2. 3. 4. 5. 6. 7. 8. 9. 10. 11. Right-click the VRTX-01 Datacenter. Select New Cluster. Name the cluster. For our testing, we used VRTX-01-C1. Check the Turn On vSphere HA checkbox, and click Next. Accept all vSphere HA defaults, and click Next. Accept Virtual Machine Options defaults, and click Next. Accept VM Monitoring defaults, and click Next. Accept VMware EVC defaults, and click Next. Accept VM Swapfile Location defaults, and click Next. To create the cluster, click Finish. Click and drag each ESXi host into the cluster to populate it. Creating the first VM 1. 2. 3. 4. 5. 6. 7. 8. 9. 10. 11. 12. 13. Connect to the vCenter Server. Right-click the cluster, and choose New Virtual Machine. Choose Custom, and click Next. Assign a name to the virtual machine, and click Next. Select the Microsoft Exchange (1.1TB) Datastore on the external storage, and click Next. Choose Virtual Machine Version 8, and click Next. Choose Windows, select Microsoft Windows Server 2012 (64-bit), and click Next. Choose 1 virtual socket, and 4 virtual processors per core, and click Next. Choose 8GB RAM, and click Next. Click 1 for the number of NICs, select vmxnet3, and click Next. Leave the default virtual storage controller, and click Next. Choose to create a new virtual disk, and click Next. Make the OS virtual disk size 40 GB, and choose thick-provisioned lazy zeroed. Comparing performance and cost: Dell PowerEdge VRTX vs. legacy hardware solution A Principled Technologies test report 22 14. 15. 16. 17. 18. Keep the default virtual device node (0:0), and click Next. Click Finish. Right click the VM, select Upgrade Virtual Hardware, and click Yes. Start the VM. Attach the Windows Server 2012 ISO image to the VM, and install Windows Server 2012 on your VM. Installing the operating system on the VMs See the above sections regarding the initial creation of the virtual machines. We provide steps below for installing the operating system. Installing the VM operating system on the first VM 1. Connect to the ISO image of the installation DVD for Windows Server 2012 Enterprise from the VM console. If the ISO image is not stored on the host, start the VM first and then connect to the ISO image. 2. Start the VM. 3. At the Language Selection Screen, click Next. 4. Click Install Now. 5. Select Windows Server 2012 Enterprise (Full Installation), and click Next. 6. Click the I accept the license terms checkbox, and click Next. 7. Click Custom. 8. Click Next. 9. At the User’s password must be changed before logging on warning screen, click OK. 10. Enter the desired password for the administrator in both fields, and click the arrow to continue. 11. At the Your password has been changed screen, click OK. 12. Install the latest VMware Tools package on the VM. Restart as necessary. 13. Connect the machine to the Internet, and install all available Windows updates. Restart as necessary. We configured each VM on the Dell PowerEdge VRTX with all available Windows Updates as of June 21, 2013. 14. Enable remote desktop access. 15. Change the hostname and reboot when prompted. 16. Create a shared folder to store test script files. Set permissions as needed. 17. Set up networking: a. Click StartControl Panel, right-click Network Connections, and choose Open. b. Right-click the VM traffic NIC, and choose Properties. c. Select TCP/IP (v4), and choose Properties. d. Set the IP address, subnet, gateway, and DNS server for the virtual NIC, which will handle outgoing server traffic. Click OK, and click Close. Setting up the legacy systems We configured an HP ProLiant ML370 G5, ML310 G5, and ML110 G6 servers with Windows Server 2012 and all available Windows Updates as of June 21, 2013. We detail our legacy setup configuration steps below. Configuring the internal disks on the legacy systems 1. Power on the HP ProLiant ML370 G5. 2. Enter the setup for the onboard RAID controller. 3. Create a RAID1 using both installed hard drives. Comparing performance and cost: Dell PowerEdge VRTX vs. legacy hardware solution A Principled Technologies test report 23 4. Begin initialization on the newly created virtual disk, and reboot the server. 5. Repeat this steps 1 through 4 for the HP ProLiant ML310 G5, using all four installed hard drives. Installing the operating systems on the legacy systems 1. 2. 3. 4. 5. 6. 7. 8. 9. 10. 11. 12. 13. 14. 15. 16. 17. 18. 19. 20. 21. 22. 23. Insert installation DVD for Windows Server 2012 Enterprise into the HP ProLiant ML370 G5. Power on the system. At the Language Selection Screen, click Next. Click Install Now. Select Windows Server 2012 Enterprise (Full Installation), and click Next. Click the I accept the license terms checkbox, and click Next. Click Custom. Click Next. At the User’s password must be changed before logging on warning screen, click OK. Enter the desired password for the administrator in both fields, and click the arrow to continue. At the Your password has been changed screen, click OK. Connect the machine to the Internet, and install all available Windows updates. Restart as necessary. Enable remote desktop access. Change the hostname and reboot when prompted. Create a shared folder to store test script files. Set permissions as needed. Click StartControl Panel, right-click Network Connections, and choose Open. Right-click the testing network NIC, and choose Properties. Select TCP/IP (v4), and choose Properties. Set the IP address, subnet, gateway, and DNS server for the NIC, which will handle outgoing testing traffic. Click OK, and click Close. Right-click the iSCSI network NIC, and choose Properties. Select TCP/IP (v4), and choose Properties. Set the IP address, subnet, gateway, and DNS server for the NIC, which will handle iSCSI traffic. Click OK, and click Close. Repeat steps 1 through 22 for the ML310 G5 and the ML110 G6. Setting up the HP P2000 G3 storage array 1. Connect network cable from Service port on rear of storage array to an unused port on a NETGEAR ProSAFE GS716T to be used for test traffic. 2. Connect the power cables to the storage array. 3. Open a Web browser, and enter the IP address for the array management module. 4. Log in with appropriate credentials. 5. In the left pane, select HP P2000 G3. 6. In the right pane select ConfigurationConfiguration Wizard 7. Click Next. 8. Assign manage and monitor passwords. Click Next. 9. Modify the network configuration: a. In the drop-down menu for IP address source, select Manual. b. Set a static IP address to an address on the iSCSI network. Comparing performance and cost: Dell PowerEdge VRTX vs. legacy hardware solution A Principled Technologies test report 24 10. 11. 12. 13. 14. 15. 16. 17. 18. 19. 20. 21. 22. 23. 24. 25. 26. 27. 28. 29. 30. 31. 32. 33. 34. 35. 36. 37. 38. 39. 40. 41. 42. 43. 44. 45. 46. 47. 48. 49. Click Next. Leave the defaults for Enable system-management services checked, and click Next. Provide system information, or accept the defaults, and click Next. Accept the defaults for event notification, and click Next. Provide IP addresses for the iSCSI ports. Scroll down to Common Settings for iSCSI and select Enabled in the Jumbo Frames drop-down menu. Click Next. Click Finish to complete configuration of the storage array. Open a Web browser, and enter the address previously assigned to RAID controller A. Log in with appropriate credentials. In the left pane, select HP P2000 G3. In the right pane, select ProvisioningProvisioning Wizard. Click Next. Change setting to RAID 10. From the sub-disks drop-down menu, select 14, and click Next. Choose all disks except the last, and click Next. Adjust the Volume size slider to the far right, and click Next. Click the Map checkbox, and clear the FC port checkboxes. Click Next. Click Finish. Click OK to confirm success. To view disk initialization status, in the left pane, click HP p2000 G3LogicalVdisksvd01. In the right pane, highlight the entry for Vdisk, and scroll down to Current Job. While initialization completes, connect the storage array iSCSI controller ports to a second NETGEAR ProSAFE GS716T used for iSCSI traffic Once initialization is complete, in the left pane, expand HP P2000 G3LogicalVdisksvd01. In the right pane, select ProvisioningCreate Volume. Change the name of the volume to Exchange_Volume Change the size to 750GB. Click the Map checkbox, and clear the FC port checkboxes. Click Apply. In the left pane, expand HP P2000 G3LogicalVdisksvd01. In the right pane, select ProvisioningCreate Volume. Change the name of the volume to SQL_Volume Change the size to 100GB. Click the Map checkbox, and clear the FC port checkboxes. Click Apply. In the left pane, expand HP P2000 G3LogicalVdisksvd01. In the right pane, select ProvisioningCreate Volume. Change the name of the volume to Iometer_Volume Change the size to 50GB. Click the Map checkbox, and clear the FC port checkboxes. Click Apply. Comparing performance and cost: Dell PowerEdge VRTX vs. legacy hardware solution A Principled Technologies test report 25 Installing and configuring Microsoft Exchange Server We installed Microsoft Exchange 2010 SP3 on a VM residing on the first Dell PowerEdge M620 and on the HP ProLiant ML370 G5. Configuring the Exchange 2010 VM (VRTX only) After cloning, modify the Exchange 2010 VM to contain the following settings: Memory: 16GB Virtual Processors: 8 Additional virtual disks: o 1 x 750 GB virtual disk for mailbox storage and logs (Thick-provisioned, eager-zeroed) Configuring the legacy machine (legacy only) 1. 2. 3. 4. 5. 6. 7. 8. 9. 10. 11. 12. 13. 14. 15. 16. 17. 18. Log into Windows using the appropriate credentials. Select StartControl PanelNetwork ConnectionsEthernet 2. Click Properties. Highlight Internet Protocol (TCP/IP), and click Properties. Select the Use the following IP address radio button, and enter the desired IP for your iSCSI network. Click OK. Open the start menu, type iSCSI Initiator and select the displayed tile. If the installation asks you to start the service, click OK. In the Quick Connect Target field, enter the IP assigned to the HP RAID Controller, and click Quick Connect… Select the desired target, and click Connect. Select the Volumes and Devices tab. Click the Auto Configure button. Click OK. Open the start menu, type Hard Disk Partitions, from the right side, select Settings, and click the displayed tile. Right-click the disk sized 698.49 GB, and select Online. Right-click the disk, select Initialize Disk, and click OK. Right-click the volume space, and select Create Simple Volume. Click Next four times to accept all defaults, and click Finish. Joining the domain (both legacy and VRTX) 1. 2. 3. 4. 5. 6. Power on the machine. Select StartControl PanelNetwork ConnectionsEthernet. Click Properties. Highlight Internet Protocol (TCP/IP), and click Properties. Select the Use the following IP address radio button, and enter the desired IP for your testing network. Select the Use the following DNS server addresses radio button, and enter the IP of the AD server in the Preferred DNS server field. Click OK. 7. Right-click My Computer, and select Properties. 8. Under the Computer Name tab, click Change. Comparing performance and cost: Dell PowerEdge VRTX vs. legacy hardware solution A Principled Technologies test report 26 9. In the Computer Name Changes screen, under Computer name, type exchange 10. In the Computer Name Changes screen, under the Member of section, select the Domain radio button, and type test.local 11. To start joining the domain, select OK. 12. When the screen appears asking for a person qualified on the domain, type administrator as the username and Password1 as the password. 13. At the Welcome pop-up and the window warning that you must restart the computer for the changes to take effect, click OK. 14. At the System Properties screen, click OK. 15. When a pop-up appears asking if you want to restart now, click Yes to restart your machine. Installing .NET Framework 3.5.1 Features and Internet Information Services (both legacy and VRTX) 1. 2. 3. 4. 5. 6. 7. 8. Select StartAdministrative ToolsServer Manager. Click Features. Click Add Features. Select .NET Framework 3.5.1 Features Click Add Required Role Services. Click Next. Click Next. At the Select Role Services screen, select the IIS 6 Metabase Compatibility, IIS 6 Management Console, Basic Authentication, Windows Authentication, Digest Authentication, Static content compression, and Dynamic content Compression checkboxes, and click Next. 9. At the Confirm Installation Selections screen, click Install. 10. At the Installation Results screen, click Close. Installing Microsoft Filter Pack 2.0 (both legacy and VRTX) 1. Download the Microsoft Filter Pack 2.0. (http://www.microsoft.com/downloads/en/details.aspx?FamilyID=5cd4dcd7-d3e6-4970-875eaba93459fbee) 2. Run FilterPackx64.EXE. 3. Click Next. 4. Click I accept the terms in the License Agreement, and click Next. 5. When the installation is complete, click OK. Installing Exchange Server 2010 (both legacy and VRTX) 1. 2. 3. 4. 5. 6. 7. 8. Click Start, type services.msc and press Enter. Right-click the Net.Tcp Port Sharing service, and click Properties. Change the Net.Tcp Port Sharing startup type to Automatic, and click OK. Open command prompt and type ServerManagerCmd –i RSAT-ADDS, and press Enter. Reboot the VM. Mount the installation ISO to the VM and click Setup.EXE when prompted. The installer should consider steps 1 and 2 complete, and gray them out. Click the link for Step 3: Choose Exchange Language Option. Comparing performance and cost: Dell PowerEdge VRTX vs. legacy hardware solution A Principled Technologies test report 27 9. 10. 11. 12. 13. 14. 15. 16. 17. 18. 19. 20. 21. 22. 23. 24. 25. Click Install only languages from the DVD. Click the link for Step 4: Install Microsoft Exchange Server 2010 SP1. To go past the introduction screen, click Next. Accept the license agreement, and click Next. Select No for error reporting, and click Next. Select Typical Exchange Server Installation, and click Next. Leave the organization name at default (First Organization), and click Next. At the question about client computers running Outlook 2003 and earlier, select Yes, and click Next. Click Next to accept defaults for Configure Client Access server external domain. At the Customer Experience Improvement Program screen, select I don’t want to join the program at this time, and click Next. If a warning about a lack of SMTP appears after the check finishes, ignore it. To start the installation process, click Install. Once installation is complete, click Finish. Click OK when prompted to reboot. Click Close. To confirm exit, click Yes. Reboot the VM. Installing SP3 for Microsoft Exchange 2010 (both legacy and VRTX) 1. Download Service Pack 3 for Microsoft Exchange 2010 (Exchange2010-SP3-x64.exe) from http://www.microsoft.com/en-us/download/details.aspx?id=36768 to c:\SP3 on the VM. 2. To extract the installation files, double-click the downloaded file. 3. To accept the destination directory for the extracted files, click OK. 4. To launch the installer, double-click setup.exe. 5. Click Install Microsoft Exchange Server upgrade. 6. At the Introduction screen, click Next. 7. Accept the terms in the license agreement, and click Next. The Readiness Checks should begin. 8. Install any roles in Server Manager that the Readiness Checks prompt you to install. 9. When the checks successfully complete, click Upgrade. 10. Click Finish, and reboot the VM. Configuring Exchange Server 2010 connector (both legacy and VRTX) 1. 2. 3. 4. 5. 6. 7. In the VM, Select StartAll ProgramsMicrosoft Exchange Server 2010Exchange Management Console. In the left pane, click Microsoft Exchange On-Premises. In the left pane, expand Organization Configuration, and select Hub Transport. In the action pane on the far right, select New Send Connector. Name the send connector SMTP, select the intended use as Internet, and click Next. In the Address space screen, click Add. In the SMTP Address Space screen, type * as the address, ensure that the installer has checked Include all subdomains, and click OK. 8. Click Next. 9. To accept defaults for the next two pages, click Next. Comparing performance and cost: Dell PowerEdge VRTX vs. legacy hardware solution A Principled Technologies test report 28 10. At the New Connector page, click New to create the connector. 11. To close the New SMTP Send Connector wizard, click Finish. Configuring the Exchange Server 2010 Mailbox role (both legacy and VRTX) 1. 2. 3. 4. 5. 6. 7. 8. 9. 10. 11. 12. 13. 14. 15. 16. 17. 18. 19. 20. 21. 22. 23. 24. 25. Select StartAll ProgramsMicrosoft Exchange Server 2010Exchange Management Console. In the left pane, expand Organization Configuration, and click Mailbox. Click the Database Management tab. Right-click Mailbox Database, and select Properties. Select the Maintenance tab. Check the Enable circular logging box. Check the box beside This database can be overwritten by a restore. Next to Maintenance interval, click Customize. Remove all blue from the boxes so the system will not perform maintenance, and click OK. Click OK. Click OK to any warnings about circular logging being applied after the database is remounted. On the far right pane, click Move Databases. Change the Database file and Log folder path locations to point to the two additional attached virtual disks, and click Move. If the application prompts you to dismount, click Yes. Click Finish. Right-click Public Folder Database, and select Properties. Check the Enable circular logging checkbox, and uncheck the ESE scanning checkbox. Next to Maintenance interval, click Customize. Remove all blue from the boxes so the system will not perform maintenance, and click OK. Click OK. On any warnings about circular logging being applied after the database is remounted, click OK. On the far right pane, click Move Database. Change the Database file and Log folder path locations to point to the two additional attached virtual disks respectively, and click Move. If the application prompts you to dismount, click Yes. Click Finish. Installing and configuring the Exchange 2010 mail test client (LoadGen) For our testing, we used a virtual client for the LoadGen workload. To create this client, we installed Windows Server 2012 and several other software components. We followed this process for the configuration: Joining the domain 1. 2. 3. 4. 5. Select StartControl PanelNetwork ConnectionsLocal Area Connection. Click Properties. Highlight Internet Protocol (TCP/IP), and click Properties. Select the Use the following IP address radio button, and enter the desired IP for your VM. Select the Use the following DNS server addresses radio button, and enter the IP of the AD server in the Preferred DNS server field. Click OK. Comparing performance and cost: Dell PowerEdge VRTX vs. legacy hardware solution A Principled Technologies test report 29 6. 7. 8. 9. 10. 11. 12. 13. 14. Right-click My Computer, and select Properties. Under the Computer Name tab, click Change. In the Computer Name Changes screen, under Computer name, type loadgen as your computer name. In the Computer Name Changes screen, under the Member of section, select the Domain radio button, and type test.local To start joining the domain, select OK. When the screen appears asking for a person qualified on the domain, type administrator as the username and Password1 as the password. At the Welcome pop-up and the window warning that you must reset the computer for the changes to take effect, click OK. At the System Properties screen, click OK. When a pop-up appears asking if you want to restart now, click Yes to restart your computer. Installing Internet Information Services 1. 2. 3. 4. 5. 6. 7. 8. 9. 10. 11. 12. Click StartAdministrative ToolsServer Manager. On the left pane, click Roles. Click Add Roles. Click the Application Server checkbox. When the Add features required for Application Server? screen appears, click Add Required Features. Click Next. Click Next. At the Select Role Services page for Application Server, click the Web Server (IIS) Support checkbox. Click Add Required Support Role Services. Click Next. Click Next. At the Select Role Services page for Web Server (IIS), click IIS 6 Management Compatibility, ASP, and CGI checkboxes; and click Next. 13. Click Install. 14. Click Close. Installing Load Generator 2010 1. Download and install Load Generator 2010 using all defaults. Preparing Load Generator 1. 2. 3. 4. 5. 6. Log into the mail client using the tester account. Select StartAll ProgramsMicrosoft ExchangeExchange Load Generator 2010. When the Load Generator screen appears, select Start a new test. Select Create a new test configuration, and click Continue. Change the total length of simulation to 45 minutes. In the Specify test settings screen, type Password1 as the Directory Access Password and Mailbox Account Master Password, and click Continue with recipient management. 7. Make 500 users in the Mailbox Database, and click Continue. Comparing performance and cost: Dell PowerEdge VRTX vs. legacy hardware solution A Principled Technologies test report 30 8. To accept defaults for Advanced recipient settings, click Continue. 9. In the Specify test user groups screen, select the plus sign to add a user group. 10. Change the Client Type to Outlook 2007 Cached, the Action Profile to Exchange_200, and the Mailbox size to 250 MB. 11. In Remote configurations, click Continue. 12. Click Save the configuration file as, and name it testcfg.xml 13. After saving the configuration file, click Start the initialization phase (recommended before running the test). Installing and configuring Microsoft SQL Server 2012 We installed Microsoft SQL Server 2012 on a VM residing on the second Dell PowerEdge M620 and on the HP ProLiant ML310 G5. Configuring the SQL Server VM (VRTX only) 1. After cloning, modify the SQL VM to contain the following settings: o Memory: 16GB o Virtual Processors: 8 o Additional virtual disks: 1 x 100GB virtual disks for SQL database and log data (Thick provisioned, eager-zeroed) 2. In the VM, configure the VM storage: a. In the taskbar, click the Server Manager icon. b. In the left pane, expand Storage, and click Disk Management. c. Right-click the first volume, and choose Initialize Disk. d. In the right pane, right-click the volume, and choose New Simple VoIume… e. At the welcome window, click Next. f. At the Specify Volume Size window, leave the default selection, and click Next. g. At the Assign Drive Letter or Path window, choose a drive letter, and click Next. h. At the Format Partition window, choose NTFS, and click Next. i. At the Completing the New Simple Volume Wizard window, click Finish. Configuring the legacy machine (legacy only) 1. 2. 3. 4. 5. 6. 7. 8. 9. 10. 11. 12. 13. Log into Windows using the appropriate credentials. Select StartControl PanelNetwork ConnectionsEthernet 2. Click Properties. Highlight Internet Protocol (TCP/IP), and click Properties. Select the Use the following IP address radio button, and enter the desired IP for your iSCSI network. Click OK. Open the start menu, type iSCSI Initiator and select the displayed tile. If it asks you to start the service, click OK. In the Quick Connect Target field, enter the IP assigned to the HP RAID Controller, and click Quick Connect… Select the desired target, and click Connect. Select the Volumes and Devices tab. Click the Auto Configure button. Click OK. Comparing performance and cost: Dell PowerEdge VRTX vs. legacy hardware solution A Principled Technologies test report 31 14. Open the start menu, type Hard Disk Partitions, on the right, select Settings, and click the displayed tile. 15. Right-click the disk sized 93.13 GB, and select Online. 16. Right-click the disk, select Initialize Disk, and click Ok. 17. Right-click the volume space, and select Create Simple Volume. 18. At the Specify Volume Size window, leave the default selection, and click Next. 19. At the Assign Drive Letter or Path window, choose a drive letter, and click Next. 20. At the Format Partition window, choose NTFS, and click Next. 21. At the Completing the New Simple Volume Wizard window, click Finish. Installing SQL Server 2012 (both legacy and VRTX) 1. Open the console for the VM or connect to the VM with RDP. 2. Mount the installation ISO to the VM. 3. Click Run SETUP.EXE. If Autoplay does not begin the installation, navigate to the SQL Server 2012 DVD, and double-click. 4. If the installer prompts you with a .NET installation prompt, click Yes to enable the .NET Framework Core role. 5. In the left pane, click Installation. 6. Click New SQL Server stand-alone installation or add features to an existing installation. 7. At the Setup Support Rules screen, wait for the rule check to complete. If there are no failures or relevant warnings, click OK. 8. Select the Specify a free edition and from the drop-down menu, select Evaluation. Click Next. 9. Click the checkbox to accept the license terms, and click Next. 10. If no failures are displayed after the setup support files are installed, click Next. 11. At the Setup Role screen, choose SQL Server Feature Installation. 12. At the Feature Selection screen, select Database Engine Services, Full-Text and Semantic Extractions for Search, Client Tools Connectivity, Client Tools Backwards Compatibility, Management Tools – Basic, and Management Tools – Complete. Click Next. 13. At the Installation Rules screen, click Next after the check completes. 14. At the Instance configuration screen, leave the default selection of default instance, and click Next. 15. At the Disk Space Requirements screen, click Next. 16. At the Server Configuration screen, check that NT AUTHORITY\SYSTEM is selected for SQL Server Agent and SQL Server Database Engine. Click Next. 17. Assuming there are no failures, click Next. 18. At the Database Engine Configuration screen, select Mixed Mode. 19. Enter and confirm a password for the system administrator account. 20. Click Add Current user. This may take several seconds. 21. Click the Data Directories tab, and enter the appropriate drive and folders for database and logs. 22. Click Next. 23. At the Error and usage reporting screen, click Next. 24. At the Installation Configuration Rules screen, check that there are no failures or relevant warnings, and click Next. Comparing performance and cost: Dell PowerEdge VRTX vs. legacy hardware solution A Principled Technologies test report 32 25. At the Ready to Install screen, click Install. 26. After installation completes, click Close. 27. Create a SQL Server login for the ds2user (see the Configuring the database (Data generation overview) section for the specific script to use). 28. Copy the pre-created DVD Store backup to the specified backup volume. 29. Download and install any available updates for Microsoft SQL Server 2012. We installed SQL Server 2012 SP1 and CU5. Configuring the database workload client For our testing, we used a single client machine for the Microsoft SQL Server client. To create this client, we installed Windows Server 2012, assigned a static IP address, and installed .NET 3.5. Configuring the database Data generation overview We generated the data using the Install.pl script included with DVD Store version 2.1 (DS2), providing the parameters for our 10GB database size and the database platform on which we ran: Microsoft SQL Server. We ran the Install.pl script on a utility system running Linux. The database schema was also generated by the Install.pl script. After processing the data generation, we transferred the data files and schema creation files to a Windowsbased system running SQL Server 2012. We built the 10GB database in SQL Server 2012, and then performed a full backup, storing the backup file on the C: drive for quick access. We used that backup file to restore the server between test runs. The only modification we made to the schema creation scripts were the specified file sizes for our database. We explicitly set the file sizes higher than necessary to ensure that no file-growth activity would affect the outputs of the test. Besides this file size modification, the database schema was created and loaded according to the DVD Store documentation. Specifically, we followed the steps below: 1. We generated the data and created the database and file structure using database creation scripts in the DS2 download. We made size modifications specific to our 10GB database and the appropriate changes to drive letters. 2. We transferred the files from our Linux data generation system to a Windows system running SQL Server. 3. We created database tables, stored procedures, and objects using the provided DVD Store scripts. 4. We set the database recovery model to bulk-logged to prevent excess logging. 5. We loaded the data we generated into the database. For data loading, we used the import wizard in SQL Server Management Studio. Where necessary, we retained options from the original scripts, such as Enable Identity Insert. 6. We created indices, full-text catalogs, primary keys, and foreign keys using the database-creation scripts. 7. We updated statistics on each table according to database-creation scripts, which sample 18 percent of the table data. 8. On the SQL Server instance, we created a ds2user SQL Server login using the following Transact SQL (TSQL) script: Comparing performance and cost: Dell PowerEdge VRTX vs. legacy hardware solution A Principled Technologies test report 33 USE [master] GO CREATE LOGIN [ds2user] WITH PASSWORD=N’’, DEFAULT_DATABASE=[master], DEFAULT_LANGUAGE=[us_english], CHECK_EXPIRATION=OFF, CHECK_POLICY=OFF GO 9. We set the database recovery model back to full. 10. We created the necessary full text index using SQL Server Management Studio. 11. We created a database user and mapped this user to the SQL Server login. 12. We then performed a full backup of the database. This backup allowed us to restore the databases to a pristine state relatively quickly between tests. Figure 13 shows our initial file size modifications. Logical name Database files primary cust1 cust2 ind1 ind2 ds_misc orders1 orders2 Log files ds_log Filegroup Initial size (MB) PRIMARY DS_CUST_FG DS_CUST_FG DS_IND_FG DS_IND_FG DS_MISC_FG DS_ORDERS DS_ORDERS 3.25 5,767 5,767 2,621 2,621 2,621 2,621 2,621 Not Applicable 20,480 Figure 13: Our initial file size modifications. Installing and configuring Iometer We installed Iometer on a VM residing on the second Dell PowerEdge M620 and on the HP ProLiant ML110 G6. Configuring the Iometer VM (VRTX only) After cloning, modify the Iometer VM to contain the following settings: o Memory: 8GB o Virtual Processors: 4 o Additional virtual disks: 1 x 50GB virtual disk for Iometer target (Thick provisioned, eager-zeroed) Configuring the legacy machine (legacy only) 1. Log into Windows using the appropriate credentials. Comparing performance and cost: Dell PowerEdge VRTX vs. legacy hardware solution A Principled Technologies test report 34 2. 3. 4. 5. 6. 7. 8. 9. 10. 11. 12. 13. 14. 15. 16. 17. 18. Select StartControl PanelNetwork ConnectionsEthernet 2. Click Properties. Highlight Internet Protocol (TCP/IP), and click Properties. Select the Use the following IP address radio button, and enter the desired IP for your iSCSI network. Click OK. Open the Start menu, type iSCSI Initiator and select the displayed tile. If it asks you to start the service, click OK. In the Quick Connect Target field, enter the IP assigned to the HP RAID Controller, and click Quick Connect… Select the desired target and click Connect. Select the Volumes and Devices tab. Click the Auto Configure button. Click OK. Open the Start menu, type Hard Disk Partitions, on the right, select Settings, and click the displayed tile. Right-click the disk sized 46.56 GB, and select Online. Right-click the disk, select Initialize Disk, and click OK. Right-click the volume space, and select Create Simple Volume. Accept all defaults by selecting Next four times, and click Finish. Installing and configuring Iometer on the VM (both legacy and VRTX) 1. 2. 3. 4. 5. 6. Download the Iometer 2006.07.27 package for Windows from www.iometer.org/doc/downloads.html. Double-click the installer, and click Run. At the Welcome window, click Next. At the License Agreement window, click I Agree. At the Choose Components window, leave the defaults selected, and click Next. At the Choose Install Location window, change the Destination Folder to C:\Iometer 2006.07.27, and click Install. 7. When the installation completes, click Finish. 8. Copy the relevant access specification file to the VM. Configuring the Iometer workloads (both legacy and VRTX) We set up Iometer to deliver a light file/print server-like I/O load through the duration of the tests. Below we review the specific configuration of our Iometer workload. Iometer workload specifications 50GB dataset, 1 Outstanding I/O per target 512KB transfer request size 100ms transfer delay 1 Burst I/O 80% read, 100% random 45 minute run time 60 second ramp up time Comparing performance and cost: Dell PowerEdge VRTX vs. legacy hardware solution A Principled Technologies test report 35 Cycling – normal Running the test Test start and run times We ran all workloads concurrently in order to start and record all performance counters for this report. The specific testing parameters we used for each benchmark are included in the setup sections, and specifics for launching these tests are described below. About running the LoadGen test To run the test, we installed the LoadGen client and server components and simulated 500 Exchange users targeting the Exchange VM using LoadGen’s Exchange_200 Workload profile. We ran the LoadGen benchmark for 45 minutes, and beginning at the 15-minute mark, we used a 30-minute measurement window for performance monitoring. For more details about LoadGen, see http://www.microsoft.com/download/en/details.aspx?displaylang=en&id=14060. About running the DVD Store tests We created a series of batch files, SQL scripts, and shell scripts to automate the complete test cycle. DVD Store outputs an orders-per-minute metric, which is a running average calculated through the test. In this report, we report the last OPM reported by each client/target pair. Each complete test cycle consisted of the general steps listed below. 1. 2. 3. 4. 5. 6. Clean up prior outputs from the target system and the client driver system. Drop the database from the target. Restore the database on the target. Shut down the target. Reboot the host and client system. Wait for a ping response from the server under test (the hypervisor system), the client system, and the target. 7. Let the test server idle for 20 minutes. 8. Start the DVD Store driver on the client. We used the following DVD Store parameters for testing: ds2sqlserverdriver.exe --target=<target_IP> --ramp_rate=10 --run_time=30 -n_threads=12 --db_size=10GB --think_time=0.3 --detailed_view=Y -warmup_time=15 About running the Iometer tests 1. Log into the Iometer machine. 2. Open the Iometer specification for the machine. 3. Click the start button. 4. After all access specifications finish running, remove the result files from the machine. Comparing performance and cost: Dell PowerEdge VRTX vs. legacy hardware solution A Principled Technologies test report 36 APPENDIX C – DETAILED TEST RESULTS Figure 14 shows the results of our database, mail, and file and print testing as well as power data for the Dell PowerEdge VRTX solution we tested. The median run was determined by OPM. Dell PowerEdge VRTX Power Idle power (W) Active power (W) Database Orders per minute Mail Avg latency (ms) File and print IOPS Run 1 Run 2 Run 3 Median run 533.1 546.6 534.1 545.7 532.3 544.5 532.3 544.5 2241 2257 2247 2247 0.5 0.4 0.5 0.5 8.5 8.5 8.5 8.5 Figure 14: Detailed run results for the Dell PowerEdge VRTX from our testing. Figure 15 shows the results of our database, mail, and file and print testing as well as power data for the legacy, disparate hardware solution we tested. The median run was determined by OPM. Legacy, disparate hardware Power Idle power (W) Active power (W) Database Orders per minute Mail Avg. latency (ms) File and print IOPS Run 1 Run 2 Run 3 Median run 660.2 679.7 671.4 678.7 662.9 678.1 671.4 678.7 2050 2053 2053 2053 1.22 1.4 1.5 1.4 7.8 7.7 7.8 7.7 Figure 15: Detailed run results for the legacy, disparate hardware solution from our testing. Comparing performance and cost: Dell PowerEdge VRTX vs. legacy hardware solution A Principled Technologies test report 37 APPENDIX D – TCO CALCULATIONS In this appendix, we estimate and compare 5-year costs for the two solutions we tested in this report. Each solution supports one SQL Server 2012 Standard Edition instance, one Microsoft Exchange 2013 Standard Edition instance, and one instance for file/print -- in three VMs on the Dell PowerEdge VRTX solution and on individual servers in the legacy solution. Dell PowerEdge VRTX – we include acquisition costs and annual costs to run the Dell PowerEdge VRTX solution we tested in this report. Legacy solution – we compared performance of the Dell PowerEdge VRTX to a set of three 4- to 5-year-old HP servers, a shared HP storage array, and a switch. We estimate costs for this solution. Our cost estimates are conservative. We do not for example include costs to replace the legacy servers, which by the end of this analysis would be reaching 10 years old and increasingly susceptible to breakdown. We do include a downtime cost for this solution to account for its growing age and greater likelihood to fail compared to the newer Dell PowerEdge VRTX solution, which is designed for high availability. Key assumptions For the legacy solution, we assume the SMB would repurpose legacy equipment from other uses, so the SMB would need to purchase software for it. For the legacy solution, we assume the SMB purchases post-warranty hardware support each year from the vendor for the servers and storage array. We use current dollars for all calculations. We use undiscounted costs for hardware and software. We annualize multi-year costs for software support. We assume all tasks are carried out by a system administrator earning in salary and benefits the equivalent of $50 an hour.1 For the Dell PowerEdge VRTX solution, we include staff costs for the Dell PowerEdge VRTX solution to manage the on-premise hardware and VMware VSphere 5 virtualization. For the Dell PowerEdge VRTX solution, we assume an existing VMware vCenter server that is not included in this cost analysis. We consider only the costs that are platform specific. We thus omit staff costs for tasks that would be common to the two solutions and would require same or similar effort and cost on the two solutions – costs of setting up and maintaining the SQL Server and Exchange databases, updating the operating system versions, and updating the SQL server versions as updates become available over the 5-year TCO timeframe. We include only server licensing in this model and omit client access license costs and other client licensing. We include software license costs with acquisition costs and software support costs with annual costs. 1 Based on the national average System Administrator II salary and benefits of $103,649 as reported by Salary.com in June 2013. We divided that value by 2080 hours (52 40-hour weeks) to get a rounded value of $50 per hour staff time. See: swz.salary.com/SalaryWizard/Systems-Administrator-SalaryDetails.aspx?hdcbxbonuse=off&isshowpiechart=true&isshowjobchart=false&isshowsalarydetailcharts=false&isshownextsteps=false &isshowcompanyfct=false&isshowaboutyou=false Comparing performance and cost: Dell PowerEdge VRTX vs. legacy hardware solution A Principled Technologies test report 38 We do not include data center costs such as space or build costs because we assume these solutions would be installed within the SMB or branch office, not in a centralized enterprise data center. We include costs to power and cool the solutions using power utilization measurements we made during testing. We estimate cooling costs as the same as power costs. We estimate negligible downtime for VRTX and nine hours per server per year for the older legacy servers. To calculate the cost of downtime, we estimate that the SMB has 40 users, with an average salary (including benefits) of $30 an hour, and that each user loses 20 percent of their productivity for the hours the server is down. Using these assumptions each hour of downtime costs the SMB $240 in end-user productivity. Dell PowerEdge VRTX solution costs Figure 16 shows the costs we calculated for the Dell PowerEdge VRTX solution. Dell PowerEdge VRTX platform Acquisition costs Hardware Dell PowerEdge VRTX platform Software licenses Unit Platform Cost per unit Quantity description $22,710.00 One VRTX Quantity Total cost 1 $22,710.00 Windows Server 2012 Standard Edition (processor licenses) Each server with up to two processors. Up to two VMs per license. Two servers with one or two $883.00 processors each and one to two VMs per server 2 $1,766.00 Microsoft SQL Server® 2012 Standard (server + CAL licensing) One license per SQL VM $898.00 One SQL Server VM 1 $898.00 Microsoft Exchange Server 2013 Standard Edition (server + CAL licensing) One license per Exchange VM $708.00 One Exchange VM 1 $708.00 One per processor $995.00 Number processors 4 $3,980.00 16 $800.00 $30,862.00 1 $1,300.00 2 $441.50 VMware vSphere 5 Standard for 1 processor Setup Total acquisition costs Annual costs Hardware and software support Cost per hour Hardware support Platform Windows Server 2012 Standard Edition (Software Assurance) Each server with up to two processors $50.00 Number hours $1,300.00 One VRTX $220.75 Comparing performance and cost: Dell PowerEdge VRTX vs. legacy hardware solution Two servers with two processors A Principled Technologies test report 39 Dell PowerEdge VRTX platform Unit Cost per unit Quantity description Quantity Total cost Microsoft SQL Server 2012 Standard (Software Assurance) One license per SQL VM $224.50 One SQL Server VM 1 $224.50 Microsoft Exchange Server 2013 (Software Assurance) One server $177.00 One Exchange VM 1 $177.00 One per processor per year $273.00 Number processors 4 $1,092.00 Platform $942.98 One VRTX 1 $942.98 12 24 $600.00 $1,200.00 $5,977.98 $498.17 VMware vSphere 5 Standard Basic support Energy cost for power and cooling Hardware management VMware management Total annual costs Average cost per month Cost per hour Cost per hour $50.00 Number hours $50.00 Number hours Figure 16: Cost analysis for the Dell PowerEdge VRTX solution. Acquisition costs Acquisition costs include purchase costs for the Dell PowerEdge VRTX hardware that we tested, license costs for the Microsoft Windows Server 2012, Microsoft SQL Server 2012, and VMware vSphere 5 software versions that we tested with, and IT staff costs to setup the system. Hardware costs See Appendix A for system information for the Dell PowerEdge VRTX hardware we tested. Dell supplied the hardware price. Software costs We include license costs for the following software: Windows Server 2012 Standard Edition licenses for the four processors on the two servers Microsoft SQL Server 2012 Standard license for one VM Microsoft Exchange Server 2013 Standard Edition license for one VM VMware vSphere 5 Standard licenses for the four processors on the two servers We used the Microsoft License Advisor2 and selected Corporate Open No Level pricing for Microsoft software. We used prices on the VMware site for VMware vSphere Standard licensed per processor.3 Setup costs We estimated 16 hours of staff time to unbox and setup the Dell PowerEdge VRTX hardware and to install the software on it. We do not include time to update the software to the latest edition or to migrate files and databases to it. We omit those non-platform-specific tasks from this analysis. 2 3 mla.microsoft.com/default.aspx www.vmware.com/products/datacenter-virtualization/vsphere/pricing.html Comparing performance and cost: Dell PowerEdge VRTX vs. legacy hardware solution A Principled Technologies test report 40 Annual costs Annual costs include mission critical support for the Dell PowerEdge VRTX platform, Microsoft Software Assurance for the Microsoft software and VMware Support and Subscription costs for the VMware software, staff time to maintain the hardware and support the VMs, and energy costs for powering and cooling the platforms. Hardware support Dell supplied annual cost for mission critical support for the Dell PowerEdge VRTX solution that we tested. Software support We estimated Microsoft Software Assurance costs at 25 percent per year for the Microsoft server software. We used VMware prices for one-year Basic support for the VMware software.4 Energy costs for power and cooling We measured power utilization while running the Dell PowerEdge VRTX solution under load and at idle. We average the two values to estimate average power utilization for the solution in an SMB environment. We estimated annual energy costs for a solution running around the clock, year round, at that average power. For the energy cost, we used the national average commercial cost of 9.999 cents per KwH for the year ending March 2013 reported by the US Energy Information Administration.5 We estimated equal costs to power and to cool the equipment, so we doubled the cost for power to get energy costs for power and cooling. Systems management With mission-critical Dell support for the Dell PowerEdge VRTX solution, our hypothetical SMB should be able to keep in-house costs for hardware maintenance low. We include costs for one hour per month hardware management and two hours per month VMware management for the Dell PowerEdge VRTX solution. Legacy solution costs Figure 17 shows the costs we calculated for the legacy solution. Legacy costs Unit Cost per unit Quantity description Quantity Total cost Acquisition costs Software licenses Windows Server 2012 Standard Edition (processor licenses) Each server with up to two processors. Up to two VMs per license. Three servers $883.00 with one or two processors each 3 $2,649.00 Microsoft SQL Server 2012 Standard (server + CAL licenses) One server $898.00 One server with SQL installed 1 $898.00 4 5 www.vmware.com/products/datacenter-virtualization/vsphere/pricing.html www.eia.gov/electricity/monthly/epm_table_grapher.cfm?t=epmt_5_06_a Comparing performance and cost: Dell PowerEdge VRTX vs. legacy hardware solution A Principled Technologies test report 41 Legacy costs Microsoft Exchange Server 2013 (server licenses) Unit Cost per unit One server $708.00 Quantity description One server with Exchange Quantity Total cost 1 $708.00 $50.00 Number hours 16 $800.00 $5,055.00 Each server with up to two processors Three servers $220.75 with one or two processors each 3 $662.25 One server $224.50 One server with SQL installed 1 $224.50 One server $177.00 One server with Exchange 1 $177.00 $2,483.00 One year 1 $2,483.00 $1,182 One year 1 $1,182.40 Estimate at 2 hours a month per server + 1 $50 hour a month for storage array per year 84 $4,200.00 Each server $240 down for 9 hours a year 27 $6,480.00 Setup Cost per hour Total acquisition costs Annual costs Support Windows Server 2012 Standard Edition (Software Assurance) Microsoft SQL Server 2012 Standard (Software Assurance) Microsoft Exchange 2013 (Software Assurance) Hardware support HP extended support agreements for three servers and storage array with one-year terms Energy cost for power and cooling Legacy configuration Hardware management Per solution Downtime cost Per hour for 40 workers Legacy monthly costs Average cost per month $15,409.15 $1,284.10 Figure 17: Cost analysis for the legacy solution. Comparing performance and cost: Dell PowerEdge VRTX vs. legacy hardware solution A Principled Technologies test report 42 Acquisition costs Acquisition costs for the legacy solution include software license and setup costs. This solution does not have a hardware purchase cost. Software costs We include license costs for the following software: Windows Server 2012 Standard Edition licenses processor licenses for the three servers; each server requires a single two-license pack, which licenses a one- or two-processor server. Microsoft SQL Server 2012 Standard license for one server Microsoft Exchange Server 2013 Standard Edition license for one server This solution does not use virtualization, so cost does not include the VMware vSphere 5 Standard licenses used with the Dell PowerEdge VRTX solution. We used the Microsoft License Advisor6 and selected Corporate Open No Level pricing for Microsoft software. Setup costs We estimated 16 hours of staff time to move the legacy hardware and to install the software on it. We omit those non platform-specific tasks from this analysis so we do not include time to update the software to the latest edition or to migrate files and databases to it. Annual costs Annual costs include hardware support, Microsoft Software Assurance, energy costs for power and cooling, staff time to maintain the hardware, and end-user staff costs related to the downtime for aging servers and storage. Hardware support We assume the SMB purchases the following year-to-year post-warranty support for the servers and storage array: Item HP ProLiant ML310 G5 - HP 1-year Post Warranty 4-hour 24x7 ProLiant ML310 G5 Hardware Support HP ProLiant ML370 G5 - HP 1-year Post Warranty 4-hour 24x7 ProLiant ML370 G5 Hardware Support HP ProLiant ML110 G6 - HP 1-year Post Warranty 4-hour 24x7 ProLiant ML110 G6 Hardware Support HP P2000 G3 Modular Smart Array System - HP 1-year Post Warranty 4-hour 24x7 HP P2000 G3 MSA SAN Kit Hardware Support Total per year for three servers and storage array Price $271.00 $833.00 $146.00 $1,233.00 $2,483.00 Figure 18: Hardware support costs for the legacy solution. We used the HP accessories page in the HP SMB online store for pricing, h30094.www3.hp.com. Software support We estimated Microsoft Software Assurance costs at 25 percent per year for the Microsoft server software. 6 mla.microsoft.com/default.aspx Comparing performance and cost: Dell PowerEdge VRTX vs. legacy hardware solution A Principled Technologies test report 43 Energy costs for power and cooling We measured power utilization of the legacy servers, storage, and switch under load and at idle. We used the same formulas and assumptions to calculate energy costs for the legacy solution that we used for the Dell PowerEdge VRTX solution. Systems management We expect the HP solution, even with vendor support, to require more hands-on in-house support than the newer Dell PowerEdge VRTX solution. We include costs for two hours per month hardware management for each server and one hour per month for the storage array, a total of seven hours a month. Downtime for users We estimate negligible downtime for VRTX and nine hours per server per year for the older legacy servers. To calculate the cost of downtime, we estimate that the SMB has 40 users, with an average salary (including benefits) of $30 an hour, and that each user loses 20 percent of their productivity for the hours the server is down. With these assumptions, we calculate a downtime cost of $240 an hour or $6,480.00 for the 27 hours that we estimate one of the three servers is down each year. Comparing performance and cost: Dell PowerEdge VRTX vs. legacy hardware solution A Principled Technologies test report 44 ABOUT PRINCIPLED TECHNOLOGIES Principled Technologies, Inc. 1007 Slater Road, Suite 300 Durham, NC, 27703 www.principledtechnologies.com We provide industry-leading technology assessment and fact-based marketing services. We bring to every assignment extensive experience with and expertise in all aspects of technology testing and analysis, from researching new technologies, to developing new methodologies, to testing with existing and new tools. When the assessment is complete, we know how to present the results to a broad range of target audiences. We provide our clients with the materials they need, from market-focused data to use in their own collateral to custom sales aids, such as test reports, performance assessments, and white papers. Every document reflects the results of our trusted independent analysis. We provide customized services that focus on our clients’ individual requirements. Whether the technology involves hardware, software, Web sites, or services, we offer the experience, expertise, and tools to help our clients assess how it will fare against its competition, its performance, its market readiness, and its quality and reliability. Our founders, Mark L. Van Name and Bill Catchings, have worked together in technology assessment for over 20 years. As journalists, they published over a thousand articles on a wide array of technology subjects. They created and led the Ziff-Davis Benchmark Operation, which developed such industry-standard benchmarks as Ziff Davis Media’s Winstone and WebBench. They founded and led eTesting Labs, and after the acquisition of that company by Lionbridge Technologies were the head and CTO of VeriTest. Principled Technologies is a registered trademark of Principled Technologies, Inc. All other product names are the trademarks of their respective owners. Disclaimer of Warranties; Limitation of Liability: PRINCIPLED TECHNOLOGIES, INC. HAS MADE REASONABLE EFFORTS TO ENSURE THE ACCURACY AND VALIDITY OF ITS TESTING, HOWEVER, PRINCIPLED TECHNOLOGIES, INC. SPECIFICALLY DISCLAIMS ANY WARRANTY, EXPRESSED OR IMPLIED, RELATING TO THE TEST RESULTS AND ANALYSIS, THEIR ACCURACY, COMPLETENESS OR QUALITY, INCLUDING ANY IMPLIED WARRANTY OF FITNESS FOR ANY PARTICULAR PURPOSE. ALL PERSONS OR ENTITIES RELYING ON THE RESULTS OF ANY TESTING DO SO AT THEIR OWN RISK, AND AGREE THAT PRINCIPLED TECHNOLOGIES, INC., ITS EMPLOYEES AND ITS SUBCONTRACTORS SHALL HAVE NO LIABILITY WHATSOEVER FROM ANY CLAIM OF LOSS OR DAMAGE ON ACCOUNT OF ANY ALLEGED ERROR OR DEFECT IN ANY TESTING PROCEDURE OR RESULT. IN NO EVENT SHALL PRINCIPLED TECHNOLOGIES, INC. BE LIABLE FOR INDIRECT, SPECIAL, INCIDENTAL, OR CONSEQUENTIAL DAMAGES IN CONNECTION WITH ITS TESTING, EVEN IF ADVISED OF THE POSSIBILITY OF SUCH DAMAGES. IN NO EVENT SHALL PRINCIPLED TECHNOLOGIES, INC.’S LIABILITY, INCLUDING FOR DIRECT DAMAGES, EXCEED THE AMOUNTS PAID IN CONNECTION WITH PRINCIPLED TECHNOLOGIES, INC.’S TESTING. CUSTOMER’S SOLE AND EXCLUSIVE REMEDIES ARE AS SET FORTH HEREIN. Comparing performance and cost: Dell PowerEdge VRTX vs. legacy hardware solution A Principled Technologies test report 45