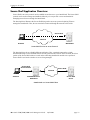
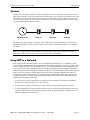
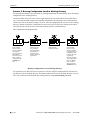
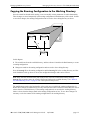
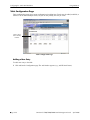
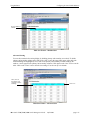
1
Part No. 060159-10, Rev. J
April 2006
OmniSwitch 7700/7800
OmniSwitch 8800
Switch Management Guide
www.alcatel.com
This user guide documents release 5.4 of the OmniSwitch 7700, 7800, and 8800.
The functionality described in this guide is subject to change without notice.
Copyright © 2006 by Alcatel Internetworking, Inc. All rights reserved. This document may not be reproduced in whole or in part without the express written permission of Alcatel Internetworking, Inc.
Alcatel® and the Alcatel logo are registered trademarks of Alcatel. Xylan®, OmniSwitch®, OmniStack®,
and Alcatel OmniVista® are registered trademarks of Alcatel Internetworking, Inc.
OmniAccess™, Omni Switch/Router™, PolicyView™, RouterView™, SwitchManager™, VoiceView™,
WebView™, X-Cell™, X-Vision™, and the Xylan logo are trademarks of Alcatel Internetworking, Inc.
This OmniSwitch product contains components which may be covered by one or more of the following
U.S. Patents:
• U.S. Patent No. 6,339,830
• U.S. Patent No. 6,070,243
• U.S. Patent No. 6,061,368
• U.S. Patent No. 5,394,402
• U.S. Patent No. 6,047,024
• U.S. Patent No. 6,314,106
• U.S. Patent No. 6,542,507
• U.S. Patent No. 6,874,090
26801 West Agoura Road
Calabasas, CA 91301
(818) 880-3500 FAX (818) 880-3505
[email protected]
US Customer Support—(800) 995-2696
International Customer Support—(818) 878-4507
Internet—http://eservice.ind.alcatel.com
ii
OmniSwitch 7700/7800/8800 Switch Management Guide
April 2006
Contents
About This Guide .......................................................................................................... xi
Supported Platforms .......................................................................................................... xi
Who Should Read this Manual? ......................................................................................xiii
When Should I Read this Manual? ..................................................................................xiii
What is in this Manual? ...................................................................................................xiii
What is Not in this Manual? ............................................................................................xiii
How is the Information Organized? ................................................................................ xiv
Documentation Roadmap ................................................................................................ xiv
Related Documentation ................................................................................................... xvi
User Manuals Web Site .................................................................................................. xvii
Technical Support .......................................................................................................... xvii
Chapter 1
Logging Into the Switch ............................................................................................ 1-1
In This Chapter ................................................................................................................1-1
Login Specifications ........................................................................................................1-2
Login Defaults .................................................................................................................1-2
Quick Steps for Logging Into the Switch ........................................................................1-3
Overview of Switch Login Components .........................................................................1-4
Management Interfaces ............................................................................................1-4
Logging Into the CLI .........................................................................................1-4
Using the WebView Management Tool ............................................................1-5
Using SNMP to Manage the Switch ..................................................................1-5
User Accounts ..........................................................................................................1-5
Using Telnet ....................................................................................................................1-6
Logging Into the Switch Via Telnet .........................................................................1-6
Starting a Telnet Session from the Switch ...............................................................1-6
Using FTP .......................................................................................................................1-7
Using FTP to Log Into the Switch ...........................................................................1-7
Using Secure Shell ..........................................................................................................1-8
Secure Shell Components .........................................................................................1-8
Secure Shell Interface ........................................................................................1-8
Secure Shell File Transfer Protocol ...................................................................1-8
Secure Shell Application Overview .........................................................................1-9
Secure Shell Authentication ...................................................................................1-10
Protocol Identification .....................................................................................1-10
Algorithm and Key Exchange .........................................................................1-10
OmniSwitch 7700/7800/8800 Switch Management Guide
April 2006
iii
Contents
Authentication Phase .......................................................................................1-10
Connection Phase ............................................................................................1-11
Starting a Secure Shell Session ..............................................................................1-11
Closing a Secure Shell Session ..............................................................................1-13
Log Into the Switch with Secure Shell FTP ...........................................................1-13
Closing a Secure Shell FTP Session ......................................................................1-14
Modifying the Login Banner .........................................................................................1-15
Modifying the Text Display Before Login .............................................................1-16
Configuring Login Parameters ......................................................................................1-17
Configuring the Inactivity Timer ..................................................................................1-17
Enabling the DNS Resolver ..........................................................................................1-18
Verifying Login Settings ...............................................................................................1-18
Chapter 2
Managing System Files ............................................................................................. 2-1
In This Chapter ................................................................................................................2-1
File Management Specifications .....................................................................................2-2
File Management Overview ............................................................................................2-3
File Transfer .............................................................................................................2-3
Switch Directories ....................................................................................................2-4
File and Directory Management ......................................................................................2-5
Using Wildcards .......................................................................................................2-7
Multiple Characters ...........................................................................................2-7
Single Characters ...............................................................................................2-7
Directory Commands ...............................................................................................2-8
Determining Your Location in the File Structure ..............................................2-8
Changing Directories .........................................................................................2-9
Displaying Directory Contents ........................................................................2-10
Making a New Directory .................................................................................2-11
Displaying Directory Contents Including Subdirectories ................................2-12
Copying an Existing Directory ........................................................................2-12
Removing a Directory and its Contents ...........................................................2-13
File Commands ......................................................................................................2-14
Creating or Modifying Files ............................................................................2-14
Copying an Existing File .................................................................................2-14
Moving a File or Directory ..............................................................................2-15
Changing File Attribute and Permissions ........................................................2-16
Deleting a File .................................................................................................2-16
Utility Commands ..................................................................................................2-16
Displaying Free Memory Space ......................................................................2-16
Performing a File System Check .....................................................................2-16
Deleting the Entire File System .......................................................................2-17
Loading Software onto the Switch ................................................................................2-18
Using the Switch as an FTP Server ........................................................................2-18
Using the Switch as an FTP Client .........................................................................2-20
Using Secure Shell FTP .........................................................................................2-22
Closing a Secure Shell FTP Session ......................................................................2-22
Using Zmodem .......................................................................................................2-23
iv
OmniSwitch 7700/7800/8800 Switch Management Guide
April 2006
Contents
Registering Software Image Files .................................................................................2-24
Directories on the Switch .......................................................................................2-24
Using the Install Command ....................................................................................2-25
Available Image Files .............................................................................................2-26
Application Examples for File Management ................................................................2-27
Creating a File Directory on the Switch .................................................................2-27
Transferring a File to the Switch Using FTP .........................................................2-28
FTP Client Application Example ....................................................................2-29
Creating a File Directory Using Secure Shell FTP ................................................2-31
Transfer a File Using Secure Shell FTP .................................................................2-32
Closing a Secure Shell FTP Session ......................................................................2-32
Verifying Directory Contents ........................................................................................2-32
Setting the System Clock ..............................................................................................2-33
Setting Date and Time ............................................................................................2-33
Date ..................................................................................................................2-33
Time Zone .......................................................................................................2-33
Time .................................................................................................................2-34
Daylight Savings Time Configuration ...................................................................2-35
Enabling DST ..................................................................................................2-36
Chapter 3
Configuring Network Time Protocol (NTP) .......................................................... 3-1
In This Chapter ................................................................................................................3-1
NTP Specifications ..........................................................................................................3-2
NTP Defaults Table .........................................................................................................3-2
NTP Quick Steps .............................................................................................................3-3
NTP Overview ................................................................................................................3-4
Stratum .....................................................................................................................3-5
Using NTP in a Network ..........................................................................................3-5
Authentication ..........................................................................................................3-7
Configuring NTP .............................................................................................................3-8
Configuring the OmniSwitch as a Client .................................................................3-8
NTP Servers .............................................................................................................3-9
Using Authentication ..............................................................................................3-10
Verifying NTP Configuration .......................................................................................3-11
Chapter 4
Managing CMM Directory Content ....................................................................... 4-1
In This Chapter ................................................................................................................4-1
CMM Specifications .......................................................................................................4-2
CMM Files ......................................................................................................................4-3
CMM Directory Structure ........................................................................................4-3
Where is the Switch Running From? .................................................................4-4
Software Rollback Feature .......................................................................................4-4
Software Rollback Configuration Scenarios .....................................................4-5
CMM Redundancy ...................................................................................................4-8
OmniSwitch 7700/7800/8800 Switch Management Guide
April 2006
v
Contents
Managing the Directory Structure of the CMM (Non-Redundant) ................................4-9
Rebooting the Switch ...............................................................................................4-9
Copying the Running Configuration to the Working Directory ............................4-11
Rebooting from the Working Directory .................................................................4-13
Copying the Working Directory to the Certified Directory ...................................4-15
Copying the Certified Directory to the Working Directory ...................................4-16
Show Currently Used Configuration ......................................................................4-17
Show Switch Files ..................................................................................................4-18
Managing Redundant CMMs ........................................................................................4-19
Rebooting the Switch .............................................................................................4-19
Copying the Working Directory to the Certified Directory ...................................4-20
Synchronizing the Primary and Secondary CMMs ................................................4-21
Swapping the Primary CMM for the Secondary CMM .........................................4-23
Show Currently Used Configuration ......................................................................4-24
NI Module Behavior During Takeover ...........................................................4-24
Emergency Restore of the boot.cfg File ........................................................................4-25
Can I Restore the boot.file While Running from Certified? ..................................4-25
Displaying CMM Conditions ........................................................................................4-26
Chapter 5
Using the CLI ............................................................................................................... 5-1
In This Chapter ................................................................................................................5-1
CLI Specifications ...........................................................................................................5-2
CLI Overview ..................................................................................................................5-2
Online Configuration ................................................................................................5-2
Offline Configuration Using Configuration Files ....................................................5-3
Command Entry Rules and Syntax .................................................................................5-3
Text Conventions .....................................................................................................5-3
Using “Show” Commands .......................................................................................5-4
Using the “No” Form ...............................................................................................5-4
Using “Alias” Commands ........................................................................................5-4
Partial Keyword Completion ....................................................................................5-5
Command Help ...............................................................................................................5-5
Tutorial for Building a Command Using Help .........................................................5-7
CLI Services ....................................................................................................................5-9
Command Line Editing ............................................................................................5-9
Deleting Characters ...........................................................................................5-9
Recalling the Previous Command Line ...........................................................5-10
Inserting Characters .........................................................................................5-10
Syntax Checking ....................................................................................................5-11
Prefix Recognition ..................................................................................................5-11
Example for Using Prefix Recognition ...........................................................5-12
Prefix Prompt ...................................................................................................5-13
Command History ..................................................................................................5-13
vi
OmniSwitch 7700/7800/8800 Switch Management Guide
April 2006
Contents
Logging CLI Commands and Entry Results .................................................................5-15
Enabling Command Logging ..........................................................................5-15
Disabling Command Logging .........................................................................5-15
Viewing the Current Command Logging Status .............................................5-16
Viewing Logged CLI Commands and Command Entry Results ....................5-16
Customizing the Screen Display ...................................................................................5-17
Changing the Screen Size .......................................................................................5-17
Changing the CLI Prompt ......................................................................................5-17
Displaying Table Information ................................................................................5-18
Filtering Table Information ....................................................................................5-19
Multiple User Sessions ..................................................................................................5-20
Listing Other User Sessions ...................................................................................5-20
Listing Your Current Login Session ......................................................................5-21
Application Example .....................................................................................................5-22
Using a Wildcard to Filter Table Information ........................................................5-22
Chapter 6
Working With Configuration Files ......................................................................... 6-1
In This Chapter ................................................................................................................6-1
Configuration File Specifications ...................................................................................6-2
Tutorial for Creating a Configuration File ......................................................................6-2
Quick Steps for Applying Configuration Files ...............................................................6-4
Setting a File for Immediate Application .................................................................6-4
Setting an Application Session for a Date and Time ...............................................6-4
Setting an Application Session for a Specified Time Period ...................................6-5
Configuration Files Overview .........................................................................................6-6
Applying Configuration Files to the Switch ............................................................6-6
Verifying a Timed Session ................................................................................6-7
Cancelling a Timed Session ..............................................................................6-7
Configuration File Error Reporting ...................................................................6-7
Setting the Error File Limit ...............................................................................6-8
Verbose Mode ...................................................................................................6-8
Displaying a Text File ..............................................................................................6-9
Text Editing on the Switch .......................................................................................6-9
Invoke the “Vi” Editor .......................................................................................6-9
Creating Snapshot Configuration Files .........................................................................6-10
Snapshot Feature List .............................................................................................6-10
User-Defined Naming Options ........................................................................6-11
Editing Snapshot Files .....................................................................................6-11
Verifying File Configuration .........................................................................................6-13
Chapter 7
Managing Switch User Accounts ............................................................................ 7-1
In This Chapter ................................................................................................................7-1
User Database Specifications ..........................................................................................7-2
User Account Defaults ....................................................................................................7-2
OmniSwitch 7700/7800/8800 Switch Management Guide
April 2006
vii
Contents
Overview of User Accounts ............................................................................................7-3
Startup Defaults ........................................................................................................7-4
Quick Steps for Creating Network Administrator User Accounts ...........................7-5
Quick Steps for Creating Customer Login User Accounts ......................................7-6
Default User Settings ...............................................................................................7-7
How User Settings Are Saved ..................................................................................7-7
Creating a User ................................................................................................................7-8
Removing a User ......................................................................................................7-8
User-Configured Password ......................................................................................7-8
Setting a Minimum Password Size ...........................................................................7-9
Configuring Password Expiration ............................................................................7-9
Default Password Expiration .............................................................................7-9
Specific User Password Expiration .................................................................7-10
Configuring Privileges for a User .................................................................................7-11
Setting Up SNMP Access for a User Account ..............................................................7-13
SNMP Access Without Authentication/Encryption ...............................................7-13
SNMP Access With Authentication/Encryption ....................................................7-14
Removing SNMP Access From a User ..................................................................7-14
Setting Up End-User Profiles ........................................................................................7-15
Creating End-User Profiles ....................................................................................7-16
Setting Up Port Ranges in a Profile .......................................................................7-16
Setting Up VLAN Ranges in a Profile ...................................................................7-16
Associating a Profile With a User ..........................................................................7-17
Removing a Profile From the Configuration ..........................................................7-17
Verifying the User Configuration .................................................................................7-17
Chapter 8
Managing Switch Security ........................................................................................ 8-1
In This Chapter ................................................................................................................8-1
Switch Security Specifications ........................................................................................8-2
Switch Security Defaults .................................................................................................8-2
Switch Security Overview ...............................................................................................8-3
Authenticated Switch Access ..........................................................................................8-4
AAA Servers—RADIUS or LDAP ..........................................................................8-4
Authentication-only—ACE/Server ..........................................................................8-4
Interaction With the User Database .........................................................................8-5
ASA and Authenticated VLANs ..............................................................................8-5
Configuring Authenticated Switch Access .....................................................................8-6
Quick Steps for Setting Up ASA ....................................................................................8-7
Setting Up Management Interfaces .................................................................................8-9
Enabling Switch Access .........................................................................................8-10
Configuring the Default Setting .............................................................................8-10
Using Secure Shell .................................................................................................8-11
Configuring Accounting for ASA .................................................................................8-12
Verifying Switch Security Configuration .....................................................................8-13
viii
OmniSwitch 7700/7800/8800 Switch Management Guide
April 2006
Contents
Chapter 9
Using WebView ........................................................................................................... 9-1
In This Chapter ................................................................................................................9-1
WebView CLI Defaults ...................................................................................................9-2
Browser Setup .................................................................................................................9-2
WebView CLI Commands ..............................................................................................9-3
Enabling/Disabling WebView ..................................................................................9-3
Enabling/Disabling SSL ...........................................................................................9-3
Quick Steps for Setting Up WebView ............................................................................9-4
WebView Overview ........................................................................................................9-4
WebView Page Layout .............................................................................................9-4
Banner ................................................................................................................9-5
Toolbar ..............................................................................................................9-5
Feature Options .................................................................................................9-6
View/Configuration Area ..................................................................................9-6
Configuring the Switch With WebView .........................................................................9-7
Accessing WebView ................................................................................................9-7
Home Page ...............................................................................................................9-8
Configuration Page ...................................................................................................9-9
Global Configuration Page ................................................................................9-9
Table Configuration Page ................................................................................9-10
Table Features .................................................................................................9-13
Adjacencies ............................................................................................................9-17
WebView Help ..............................................................................................................9-18
General WebView Help .........................................................................................9-18
Specific-page Help .................................................................................................9-18
Chapter 10
Using SNMP ............................................................................................................... 10-1
In This Chapter ..............................................................................................................10-1
SNMP Specifications ....................................................................................................10-2
SNMP Defaults .............................................................................................................10-2
Quick Steps for Setting Up An SNMP Management Station .......................................10-3
Quick Steps for Setting Up Trap Filters ........................................................................10-4
Filtering by Trap Families ......................................................................................10-4
Filtering by Individual Traps ..................................................................................10-5
SNMP Overview ...........................................................................................................10-6
SNMP Operations ..................................................................................................10-6
Using SNMP for Switch Management ...................................................................10-7
Setting Up an SNMP Management Station .....................................................10-7
SNMP Versions ......................................................................................................10-7
SNMPv1 ..........................................................................................................10-7
SNMPv2 ..........................................................................................................10-8
SNMPv3 ..........................................................................................................10-8
SNMP Traps Table .................................................................................................10-9
OmniSwitch 7700/7800/8800 Switch Management Guide
April 2006
ix
Contents
Using SNMP For Switch Security ..............................................................................10-26
Community Strings (SNMPv1 and SNMPv2) .....................................................10-26
Configuring Community Strings ...................................................................10-26
Encryption and Authentication (SNMPv3) ..........................................................10-27
Configuring Encryption and Authentication .................................................10-27
Setting SNMP Security .................................................................................10-28
Working with SNMP Traps ........................................................................................10-29
Trap Filtering ........................................................................................................10-29
Filtering by Trap Families .............................................................................10-29
Filtering By Individual Trap ..........................................................................10-29
Authentication Trap ..............................................................................................10-30
Trap Management ................................................................................................10-30
Replaying Traps .............................................................................................10-30
Absorbing Traps ............................................................................................10-30
Sending Traps to WebView ...........................................................................10-30
SNMP MIB Information .............................................................................................10-31
MIB Tables ...........................................................................................................10-31
MIB Table Description ..................................................................................10-31
Industry Standard MIBs .......................................................................................10-32
Enterprise (Proprietary) MIBs ..............................................................................10-37
Verifying the SNMP Configuration ............................................................................10-41
Appendix A
Software License and Copyright Statements A-1
Alcatel License Agreement ............................................................................................ A-1
ALCATEL INTERNETWORKING, INC. (“AII”)
SOFTWARE LICENSE AGREEMENT ................................................................ A-1
Third Party Licenses and Notices .................................................................................. A-4
A. Booting and Debugging Non-Proprietary Software .......................................... A-4
B. The OpenLDAP Public License: Version 2.4, 8 December 2000 ..................... A-4
C. Linux .................................................................................................................. A-5
D. GNU GENERAL PUBLIC LICENSE: Version 2, June 1991 .......................... A-5
E. University of California ................................................................................... A-10
F. Carnegie-Mellon University ............................................................................ A-10
G. Random.c ......................................................................................................... A-10
H. Apptitude, Inc. ................................................................................................. A-11
I. Agranat ............................................................................................................. A-11
J. RSA Security Inc. ............................................................................................ A-11
K. Sun Microsystems, Inc. .................................................................................... A-11
L. Wind River Systems, Inc. ................................................................................ A-12
M. Network Time Protocol Version 4 ................................................................... A-12
Index ...................................................................................................................... Index-1
x
OmniSwitch 7700/7800/8800 Switch Management Guide
April 2006
About This Guide
This OmniSwitch 7700/7800/8800 Switch Management Guide describes basic attributes of your switch and
basic switch administration tasks. The software features described in this manual are shipped standard with
your OmniSwitch 7700, 7800, or 8800. These features are used when readying a switch for integration into
a live network environment.
Supported Platforms
The information in this guide applies to the following products:
• OmniSwitch 7700
• OmniSwitch 7800
• OmniSwitch 8800
The OmniSwitch 7700 includes 10 slots for high performance 10/100 Ethernet and Gigabit Ethernet
Network Interface (NI) modules. The OmniSwitch 7800 includes 18 slots for high performance 10/100
Ethernet and Gigabit Ethernet NI modules. The OmniSwitch 8800 includes 18 slots for high performance
10/100 Ethernet and Gigabit Ethernet NI modules.
Unsupported Platforms
The information in this guide does not apply to the following products:
• OmniSwitch (original version with no numeric model name)
• OmniSwitch 6624
• OmniSwitch 6648
• OmniSwitch 6600-U24
• OmniSwitch 6600-P24
• OmniSwitch 6602-24
• OmniSwitch 6602-48
• OmniSwitch 6800-24
• OmniSwitch 6800-48
• OmniSwitch 6800-U24
• OmniSwitch 6800-24L
• OmniSwitch 6800-48L
OmniSwitch 7700/7800/8800 Switch Management Guide
April 2006
page xi
Supported Platforms
About This Guide
• OmniSwitch 6850
• OmniSwitch 9700
• Omni Switch/Router
• OmniStack
• OmniAccess
page xii
OmniSwitch 7700/7800/8800 Switch Management Guide
April 2006
About This Guide
Who Should Read this Manual?
Who Should Read this Manual?
The audience for this user guide is network administrators and IT support personnel who need to configure, maintain, and monitor switches and routers in a live network. However, anyone wishing to gain
knowledge on how fundamental software features are implemented in the OmniSwitch 7700, 7800, or
8800 will benefit from the material in this configuration guide.
When Should I Read this Manual?
Read this guide as soon as your switch is up and running and you are ready to familiarize yourself with
basic software functions. You should have already stepped through the first login procedures and read the
brief software overviews in your OmniSwitch Getting Started Guide.
You should have already set up a switch password and be familiar with the very basics of the switch software. This manual will help you understand the switch’s directory structure, the Command Line Interface
(CLI), configuration files, basic security features, and basic administrative functions. The features and
procedures in this guide will help form a foundation that will allow you to configure more advanced
switching and routing features later.
What is in this Manual?
This configuration guide includes information about the following features:
• Basic switch administrative features, such as file editing utilities, procedures for loading new software,
and setting up system information (name of switch, date, time).
• Configurations files, including snapshots, off-line configuration, time-activated file download.
• The CLI, including on-line configuration, command-building help, syntax error checking, and line edit-
ing.
• Basic security features, such as switch access control and customized user accounts.
• SNMP
• Web-based management (WebView)
What is Not in this Manual?
The configuration procedures in this manual primarily use Command Line Interface (CLI) commands in
examples. CLI commands are text-based commands used to manage the switch through serial (console
port) connections or via Telnet sessions. This guide does include introductory chapters for alternative
methods of managing the switch, such as web-based (WebView) and SNMP management. However the
primary focus of this guide is managing the switch through the CLI.
Further information on WebView can be found in the context-sensitive on-line help available with that
application.
This guide does not include documentation for the OmniVista network management system. However,
OmniVista includes a complete context-sensitive on-line help system.
OmniSwitch 7700/7800/8800 Switch Management Guide
April 2006
page xiii
How is the Information Organized?
About This Guide
This guide provides overview material on software features, how-to procedures, and tutorials that will
enable you to begin configuring your OmniSwitch. However, it is not intended as a comprehensive reference to all CLI commands available in the OmniSwitch. For such a reference to all OmniSwitch 7700/
7800/8800 CLI commands, consult the OmniSwitch CLI Reference Guide.
How is the Information Organized?
Chapters in this guide are broken down by software feature. The titles of each chapter include protocol or
features names (e.g., 802.1Q, RIP, server load balancing) with which most network professionals will be
familiar.
Each software feature chapter includes sections that will satisfy the information requirements of casual
readers, rushed readers, serious detail-oriented readers, advanced users, and beginning users.
Quick Information. Most chapters include a specifications table that lists RFCs and IEEE specifications
supported by the software feature. In addition, this table includes other pertinent information such as minimum and maximum values and sub-feature support. Most chapters also include a defaults table that lists
the default values for important parameters along with the CLI command used to configure the parameter.
Many chapters include a Quick Steps section, which is a procedure covering the basic steps required to get
a software feature up and running.
In-Depth Information. All chapters include overview sections on the software feature as well as on
selected topics of that software feature. Topical sections may often lead into procedure sections that
describe how to configure the feature just described. Serious readers and advanced users will also find the
many application examples, located near the end of chapters, helpful. Application examples include
diagrams of real networks and then provide solutions using the CLI to configure a particular feature, or
more than one feature, within the illustrated network.
Documentation Roadmap
The OmniSwitch user documentation suite was designed to supply you with information at several critical
junctures of the configuration process. The following section outlines a roadmap of the manuals that will
help you at each stage of the configuration process. Under each stage, we point you to the manual or
manuals that will be most helpful to you.
Stage 1: Using the Switch for the First Time
Pertinent Documentation: OmniSwitch 7700/7800 Getting Started Guide
OmniSwitch 8800 Getting Started Guide
Release Notes
A hard-copy OmniSwitch 7700/7800 Getting Started Guide is included with OmniSwitch 7700/7800
switches and a hard-copy OmniSwitch 8800 Getting Started Guide is included with OmniSwitch 8800
switches; these guides provide all the information you need to get your switch up and running the first
time. These guides provide information on unpacking the switch, rack mounting the switch, installing NI
modules, unlocking access control, setting the switch’s IP address, and setting up a password. They also
include succinct overview information on fundamental aspects of the switch, such as hardware LEDs, the
software directory structure, CLI conventions, and web-based management.
At this time you should also familiarize yourself with the Release Notes that accompanied your switch.
This document includes important information on feature limitations that are not included in other user
guides.
page xiv
OmniSwitch 7700/7800/8800 Switch Management Guide
April 2006
About This Guide
Documentation Roadmap
Stage 2: Gaining Familiarity with Basic Switch Functions
Pertinent Documentation: OmniSwitch 7700/7800 Hardware Users Guide
OmniSwitch 8800 Hardware Users Guide
OmniSwitch 7700/7800/8800 Switch Management Guide
Once you have your switch up and running, you will want to begin investigating basic aspects of its hard
ware and software. Information about OmniSwitch 7700/7800 hardware is provided in the OmniSwitch
7700/7800 Hardware Users Guide. Information about OmniSwitch 8800 hardware is provided in the
OmniSwitch 8800 Hardware Users Guide. These guides provide specifications, illustrations, and descriptions of all hardware components—chassis, power supplies, Chassis Management Modules (CMMs),
Network Interface (NI) modules, and cooling fans. They also include steps for common procedures, such
as removing and installing switch components.
The OmniSwitch 7700/7800/8800 Switch Management Guide is the primary user guide for the basic software features on a single switch. This guide contains information on the switch directory structure, basic
file and directory utilities, switch access security, SNMP, and web-based management. It is recommended
that you read this guide before connecting your switch to the network.
Stage 3: Integrating the Switch Into a Network
Pertinent Documentation: OmniSwitch 7700/7800/8800 Network Configuration Guide
OmniSwitch 7700/7800/8800 Advanced Routing Configuration Guide
When you are ready to connect your switch to the network, you will need to learn how the OmniSwitch
implements fundamental software features, such as 802.1Q, VLANs, Spanning Tree, and network routing
protocols. The OmniSwitch 7700/7800/8800 Network Configuration Guide contains overview information, procedures, and examples on how standard networking technologies are configured in the
OmniSwitch 7700, 7800, and 8800.
The OmniSwitch 7700/7800/8800 Advanced Routing Configuration Guide includes configuration information for networks using advanced routing technologies, such as OSPF, BGP, and multicast routing protocols (DVMRP and PIM-SM).
Anytime
The OmniSwitch CLI Reference Guide contains comprehensive information on all CLI commands
supported by the switch. This guide includes syntax, default, usage, example, related CLI command, and
CLI-to-MIB variable mapping information for all CLI commands supported by the switch. This guide can
be consulted anytime during the configuration process to find detailed and specific information on each
CLI command.
OmniSwitch 7700/7800/8800 Switch Management Guide
April 2006
page xv
Related Documentation
About This Guide
Related Documentation
The following are the titles and descriptions of all the OmniSwitch 7700/7800/8800 user manuals:
• OmniSwitch 7700/7800 Getting Started Guide
Describes the hardware and software procedures for getting an OmniSwitch 7700/7800 up and running.
Also provides information on fundamental aspects of OmniSwitch software architecture.
• OmniSwitch 8800 Getting Started Guide
Describes the hardware and software procedures for getting an OmniSwitch 8800 up and running. Also
provides information on fundamental aspects of OmniSwitch software architecture.
• OmniSwitch 7700/7800 Hardware Users Guide
Complete technical specifications and procedures for all OmniSwitch 7700/7800 chassis, power
supplies, Chassis Management Modules (CMMs), fans, and Network Interface (NI) modules.
• OmniSwitch 8800 Hardware Users Guide
Complete technical specifications and procedures for all OmniSwitch 8800 chassis, power supplies,
Chassis Management Modules (CMMs), Switch Fabric Modules (SFMs), fans, and Network Interface
(NI) modules.
• OmniSwitch CLI Reference Guide
Complete reference to all CLI commands supported on the OmniSwitch 6624, 6648, 7700, 7800, and
8800. Includes syntax definitions, default values, examples, usage guidelines, and CLI-to-MIB variable mappings.
• OmniSwitch 7700/7800/8800 Switch Management Guide
Includes procedures for readying an individual switch for integration into a network. Topics include the
software directory architecture, image rollback protections, authenticated switch access, managing
switch files, system configuration, using SNMP, and using web management software (WebView).
• OmniSwitch 7700/7800/8800 Network Configuration Guide
Includes network configuration procedures and descriptive information on all the major software
features and protocols included in the base software package. Chapters cover Layer 2 information
(Ethernet and VLAN configuration), Layer 3 information (routing protocols, such as RIP and IPX),
security options (authenticated VLANs), Quality of Service (QoS), link aggregation, and server load
balancing.
• OmniSwitch 7700/7800/8800 Advanced Routing Configuration Guide
Includes network configuration procedures and descriptive information on all the software features and
protocols included in the advanced routing software package. Chapters cover multicast routing
(DVMRP and PIM-SM), OSPF, and BGP.
• Technical Tips, Field Notices
Includes information published by Alcatel’s Customer Support group.
• Release Notes
Includes critical Open Problem Reports, feature exceptions, and other important information on the
features supported in the current release and any limitations to their support.
page xvi
OmniSwitch 7700/7800/8800 Switch Management Guide
April 2006
About This Guide
User Manuals Web Site
User Manuals Web Site
All related user guides for the OmniSwitch 7700, 7800, and 8800 can be found on our web site at
http://www.alcatel.com/enterprise/en/resource_library/user_manuals.html
All documentation on the User Manual web site is in PDF format and requires the Adobe Acrobat Reader
program for viewing. Acrobat Reader freeware is available at www.adobe.com.
Note. When printing pages from the documentation PDFs, de-select Fit to Page if it is selected in your
print dialog. Otherwise pages may print with slightly smaller margins.
Technical Support
An Alcatel service agreement brings your company the assurance of 7x24 no-excuses technical support.
You’ll also receive regular software updates to maintain and maximize your Alcatel product’s features and
functionality and on-site hardware replacement through our global network of highly qualified service
delivery partners. Additionally, with 24-hour-a-day access to Alcatel’s Service and Support web page,
you’ll be able to view and update any case (open or closed) that you have reported to Alcatel’s technical
support, open a new case or access helpful release notes, technical bulletins, and manuals. For more information on Alcatel’s Service Programs, see our web page at eservice.ind.alcatel.com, call us at 1-800-9952696, or email us at [email protected].
OmniSwitch 7700/7800/8800 Switch Management Guide
April 2006
page xvii
Technical Support
page xviii
About This Guide
OmniSwitch 7700/7800/8800 Switch Management Guide
April 2006
Logging Into the Switch
1
In This Chapter
Logging Into the Switch
Logging into the switch may be done locally or remotely. Management tools include: the Command Line
Interface (CLI), which may be accessed locally via the console port, or remotely via Telnet; WebView,
which requires an HTTP client (browser) on a remote workstation; and SNMP, which requires an SNMP
manager (such as Alcatel’s OmniVista or HP OpenView) on the remote workstation. Secure sessions are
available using the Secure Shell interface. File transfers can be done via FTP or Secure Shell FTP.
In This Chapter
This chapter describes the basics of logging into the switch to manage the switch through the CLI. It
includes information about using Telnet, FTP, and Secure Shell for logging into the switch as well as
information about using the switch to start a Telnet or Secure Shell session on another device. It also
includes information about managing sessions and specifying a DNS resolver. For more details about the
syntax of referenced commands, see the OmniSwitch CLI Reference Guide.
Configuration procedures described in this chapter include:
• “Quick Steps for Logging Into the Switch” on page 1-3
• “Using Telnet” on page 1-6
• “Using FTP” on page 1-7
• “Using Secure Shell” on page 1-8
• “Modifying the Login Banner” on page 1-15
• “Configuring Login Parameters” on page 1-17
• “Enabling the DNS Resolver” on page 1-18
Management access is disabled (except through the console port) unless specifically enabled by a network
administrator. For more information about management access and methods, use the table here as a guide:
For more information about...
See...
Enabling or “unlocking” management interfaces
on the switch
Getting Started Guide or
Chapter 8, “Managing Switch Security”
Authenticating users to manage the switch
Chapter 8, “Managing Switch Security”
Creating user accounts directly on the switch
Chapter 7, “Managing Switch User Accounts”
Using the CLI
Chapter 5, “Using the CLI”
Using WebView to manage the switch
Chapter 9, “Using WebView”
Using SNMP to manage the switch
Chapter 10, “Using SNMP”
OmniSwitch 7700/7800/8800 Switch Management Guide
April 2006
page 1-1
Login Specifications
Logging Into the Switch
Login Specifications
Telnet clients supported
Any standard Telnet client.
FTP clients supported
Any standard FTP client.
HTTP (WebView) clients supported
– Internet Explorer for Windows NT, Windows
XP, and Windows 2000, version 5.5
– Netscape for Windows NT, Windows XP, and
Windows 2000, version 4.7
– Netscape for Sun OS 2.8, version 4.7
– Netscape for HP-UX 11.0, version 4.7.
Secure Shell clients supported
Any standard Secure Shell client (Secure Shell
Version 2).
SNMP clients supported
Any standard SNMP manager (such as HP OpenView).
Login Defaults
Access to managing the switch is always available for the admin user through the console port, even if
management access to the console port is disabled
Parameter Description
Command
Default
Session login attempts allowed
before the TCP connection is
closed.
session login-attempt
3 attempts
Timeout period allowed for
session login before the TCP
connection is closed.
session login-timeout
55 seconds
Inactivity timeout period. The
length of time the switch can
remain idle during a login
session before the switch will
close the session.
session timeout
4 minutes
page 1-2
OmniSwitch 7700/7800/8800 Switch Management Guide
April 2006
Logging Into the Switch
Quick Steps for Logging Into the Switch
Quick Steps for Logging Into the Switch
The following procedure assumes that you have set up the switch as described in your OmniSwitch Getting
Started Guide and Hardware Users Guide. Setup includes:
• Connecting to the switch via the console port.
• Setting up the Ethernet Management Port (EMP) through the switch’s boot prompt.
• Enabling (or “unlocking”) management interfaces types (Telnet, FTP, HTTP, SNMP, and Secure
Shell) through the aaa authentication command for the interface you are using. Note that Telnet, FTP,
and Secure Shell are used to log into the switch’s Command Line Interface (CLI). For detailed information about enabling session types, see Chapter 8, “Managing Switch Security.”
1 If you are connected to the switch via the console port, your terminal will automatically display the
switch login prompt. If you are connected remotely, you must enter the switch IP address in your Telnet,
FTP, or Secure Shell client (typically the IP address of the EMP). The login prompt then displays.
2 At the login prompt, enter the admin username. At the password prompt, enter the switch password.
(Alternately, you may enter any valid username and password.) The switch’s default welcome banner will
display, followed by the CLI prompt.
Welcome to the Alcatel OmniSwitch 7000
Software Version 5.4.1.231.R01 Development April 13, 2006
Copyright(c), 1994-2005 Alcatel Internetworking, Inc. All Rights reserved.
OmniSwitch(TM) is a trademark of Alcatel Internetworking, Inc. registered in the
United States Patent and Trademark Office.
You are now logged into the CLI. For information about changing the welcome banner, see “Modifying
the Login Banner” on page 1-15.
For information about changing the login prompt, see Chapter 5, “Using the CLI.”
For information about setting up additional user accounts locally on the switch, see Chapter 7, “Managing
Switch User Accounts.”
OmniSwitch 7700/7800/8800 Switch Management Guide
April 2006
page 1-3
Overview of Switch Login Components
Logging Into the Switch
Overview of Switch Login Components
Switch access components include access methods (or interfaces) and user accounts stored on the local
user database in the switch and/or on external authentication servers. Each access method, except the
console port, must be enabled or “unlocked” on the switch before users can access the switch through that
interface.
OmniSwitch
Authentication
Server
OmniSwitch 7800
remote user
Login via Secure Shell, Telnet,
FTP, HTTP, or SNMP.
local user
database
local user
Login via the console port.
Switch Login Components
Management Interfaces
Logging into the switch may be done locally or remotely. Remote connections may be secure or insecure,
depending on the method. Management interfaces are enabled using the aaa authentication command.
This command also requires specifying the external servers and/or local user database that will be used to
authenticate users. The process of authenticating users to manage the switch is called Authenticated
Switch Access (ASA). Authenticated Switch Access is described in detail in Chapter 8, “Managing Switch
Security.”
An overview of management methods is listed here:
Logging Into the CLI
• Console port—A direct connection to the switch through the console port. The console port is always
enabled for the default user account. For more information about connecting to the console port, see
your switch’s Hardware Users Guide.
• Telnet—Any standard Telnet client may be used for remote login to the switch. This method is not
secure. For more information about using Telnet to access the switch, see “Using Telnet” on page 1-6.
• FTP—Any standard FTP client may be used for remote login to the switch. This method is not secure.
See “Using FTP” on page 1-7.
• Secure Shell—Any standard Secure Shell client may be used for remote login to the switch. See
“Using Secure Shell” on page 1-8.
page 1-4
OmniSwitch 7700/7800/8800 Switch Management Guide
April 2006
Logging Into the Switch
Overview of Switch Login Components
Using the WebView Management Tool
• HTTP—The switch has a Web browser management interface for users logging in via HTTP. This
management tool is called WebView. For more information about using WebView, see Chapter 9,
“Using WebView.”
Using SNMP to Manage the Switch
• SNMP—Any standard SNMP browser may be used for logging into the switch. See Chapter 10,
“Using SNMP.”
User Accounts
User accounts may be configured and stored directly on the switch, and user accounts may also be configured and stored on an external authentication server or servers.
The accounts include a username and password. In addition, they also specify the user’s privileges or enduser profile, depending on the type of user account. In either case, the user is given read-only or read-write
access to particular commands.
• Local User Database
The user command creates accounts directly on the switch. See the Chapter 7, “Managing Switch User
Accounts,” for information about creating accounts on the switch.
• External Authentication Servers
The switch may be set up to communicate with external authentication servers that contain user information. The user information includes usernames and passwords; it may also include privilege information or
reference an end-user profile name.
For information about setting up the switch to communicate with external authentication servers, see the
OmniSwitch 7700/7800/8800 Network Configuration Guide.
OmniSwitch 7700/7800/8800 Switch Management Guide
April 2006
page 1-5
Using Telnet
Logging Into the Switch
Using Telnet
Telnet may be used to log into the switch from a remote station. All of the standard Telnet commands are
supported by software in the switch. When Telnet is used to log in, the switch is acting as a Telnet server.
A Telnet session may also be initiated from the switch itself during a login session. In this case, the switch
is acting as a Telnet client.
Logging Into the Switch Via Telnet
Before you can log into the OmniSwitch using a Telnet interface, the telnet option of the aaa
authentication command must be enabled. Once enabled, any standard Telnet client may be used to log
into the switch. To log into the switch, open your Telnet application and enter the switch’s IP address (the
IP address will typically be the same as the one configured for the EMP). The switch’s welcome banner
and login prompt display.
Note. A Telnet connection is not secure. Secure Shell is recommended instead of Telnet or FTP as a
secure method of accessing the switch.
Starting a Telnet Session from the Switch
At any time during a login session on the switch, you can initiate a Telnet session to another switch (or
some other device) by using the telnet CLI command and the relevant IP address. The following shows an
example of telnetting to another OmniSwitch with an IP address of 10.255.10.123.
-> telnet 10.255.10.123
Trying 10.255.10.123...
Connected to 10.255.10.123.
Escape character is '^]'.
login :
Here, you must enter a valid username and password. Once login is completed, the OmniSwitch welcome
banner will display as follows:
login : admin
password :
Welcome to the Alcatel OmniSwitch 7000
Software Version 5.4.1.231.R01 Development, April 13, 2006.
Copyright(c), 1994-2005 Alcatel Internetworking, Inc. All Rights reserved.
OmniSwitch(TM) is a trademark of Alcatel Internetworking, Inc. registered
in the United States Patent and Trademark Office.
page 1-6
OmniSwitch 7700/7800/8800 Switch Management Guide
April 2006
Logging Into the Switch
Using FTP
Using FTP
The OmniSwitch can function as an FTP server. Any standard FTP client may be used.
Note. An FTP connection is not secure. Secure Shell is recommended instead of FTP or Telnet as a secure
method of accessing the switch.
Using FTP to Log Into the Switch
You can access the OmniSwitch with a standard FTP application. To login to the switch, start your FTP
client. Where the FTP client asks for “Name”, enter the IP address of your switch. Where the FTP client
asks for “User ID”, enter the username of your login account on the switch. Where the FTP client asks for
“Password”, enter your switch password.
Note. If you are using Authenticated Switch Access (ASA), the port interface must be authenticated for
FTP use and the username profile must have permission to use FTP. Otherwise the switch will not accept
an FTP login. For information about ASA, refer to Chapter 8, “Managing Switch Security.”
Note. You must use the binary mode (bin) to transfer image files via FTP.
OmniSwitch 7700/7800/8800 Switch Management Guide
April 2006
page 1-7
Using Secure Shell
Logging Into the Switch
Using Secure Shell
The OmniSwitch Secure Shell feature provides a secure mechanism that allows you to log in to a remote
switch, to execute commands on a remote device, and to move files from one device to another. Secure
Shell provides secure, encrypted communications even when your transmission is between two untrusted
hosts or over an unsecure network. Secure Shell protects against a variety of security risks including the
following:
• IP spoofing
• IP source routing
• DNS spoofing
• Interception of clear-text passwords and other data by intermediate hosts
• Manipulation of data by users on intermediate hosts
Note. The OmniSwitch supports Secure Shell Version 2 only.
Secure Shell Components
The OmniSwitch includes both client and server components of the Secure Shell interface and the Secure
Shell FTP file transfer protocol. SFTP is a subsystem of the Secure Shell protocol. All Secure Shell FTP
data are encrypted through a Secure Shell channel.
Since Secure Shell provides a secure session, the Secure Shell interface and SFTP are recommended
instead of the Telnet program or the FTP protocol for communications over TCP/IP for sending file
transfers. Both Telnet and FTP are available on the OmniSwitch but they do not support encrypted
passwords.
Note. Secure Shell may only be used to log into the switch to manage the switch. It cannot be used for
Layer 2 authentication through the switch.
Secure Shell Interface
The Secure Shell interface is invoked when you enter the ssh command. After the authentication process
between the client and the server is complete, the remote Secure Shell interface runs in the same way as
Telnet. Refer to “Starting a Secure Shell Session” on page 1-11 to for detailed information.
Secure Shell File Transfer Protocol
Secure Shell FTP is the standard file transfer protocol used with Secure Shell version 2. Secure Shell FTP
is an interactive file transfer program (similar to the industry standard FTP) which performs all file
transfer operations over a Secure Shell connection.
You invoke the Secure Shell FTP protocol by using the sftp command. Once the authentication phase is
completed, the Secure Shell FTP subsystem runs. Secure Shell FTP connects and logs into the specified
host, then enters an interactive command mode. Refer to “Starting a Secure Shell Session” on page 1-11
for detailed information.
page 1-8
OmniSwitch 7700/7800/8800 Switch Management Guide
April 2006
Logging Into the Switch
Using Secure Shell
Secure Shell Application Overview
Secure Shell is an access protocol used to establish secured access to your OmniSwitch. The Secure Shell
protocol can be used to manage an OmniSwitch directly or it can provide a secure mechanism for
managing network servers through the OmniSwitch.
The drawing below illustrates the Secure Shell being used as an access protocol replacing Telnet to
manage the OmniSwitch. Here, the user terminal is connected through the network to the switch.
Secure Shell
Network
OmniSwitch
Terminal
Secure Shell Used as an Access Protocol
The drawing below shows a slightly different application. Here, a terminal connected to a single
OmniSwitch acting as a Secure Shell client as an entry point into the network. In this scenario, the client
portion of the Secure Shell software is used on the connecting OmniSwitch and the server portion of
Secure Shell is used on the switches or servers being managed.
Secure Shell
Access Protocol
Secure Shell
Network
Terminal
OmniSwitch Secure
Shell Client
Secure Shell
Server
OmniSwitch as a Secure Shell Client
OmniSwitch 7700/7800/8800 Switch Management Guide
April 2006
page 1-9
Using Secure Shell
Logging Into the Switch
Secure Shell Authentication
Secure Shell authentication is accomplished in several phases using industry standard algorithms and
exchange mechanisms. The authentication phase is identical for Secure Shell and Secure Shell SFTP. The
following sections describe the process in detail.
Protocol Identification
When the Secure Shell client in the OmniSwitch connects to a Secure Shell server, the server accepts the
connection and responds by sending back an identification string. The client will parse the server’s identification string and send an identification string of its own. The purpose of the identification strings is to
validate that the attempted connection was made to the correct port number. The strings also declare the
protocol and software version numbers. This information is needed on both the client and server sides for
debugging purposes.
At this point, the protocol identification strings are in human-readable form. Later in the authentication
process, the client and the server switch to a packet-based binary protocol, which is machine readable
only.
Algorithm and Key Exchange
The OmniSwitch Secure Shell server is identified by one or several host-specific DSA keys. Both the
client and server process the key exchange to choose a common algorithm for encryption, signature, and
compression. This key exchange is included in the Secure Shell transport layer protocol. It uses a key
agreement to produce a shared secret that cannot be determined by either the client or the server alone. The
key exchange is combined with a signature and the host key to provide host authentication. Once the
exchange is completed, the client and the server turn encryption on using the selected algorithm and key.
The following elements are supported:
Host Key Type
DSA
Cipher Algorithms
AES, Blowfish, Cast, 3DES, Arcfour, Rijndael
Signature Algorithms
MD5, SHA1
Compression Algorithms
None Supported
Key Exchange Algorithms
diffie-hellman-group-exchange-sha1
diffie-hellman-group1-sha1
Note. The OmniSwitch generates a 512 bit DSA host key at initial startup. The DSA key on the switch is
made up of two files contained in the /flash/network directory; the public key is called
ssh_host_dsa_key.pub, and the private key is called ssh_host_dsa_key. To generate a different DSA key,
use the Secure Shell tools available on your Unix or Windows system and copy the files to the /flash/
network directory on your switch. The new DSA key will take effect after the OmniSwitch is rebooted.
Authentication Phase
When the client tries to authenticate, the server determines the process used by telling the client which
authentication methods can be used. The client has the freedom to attempt several methods listed by the
server. The server will disconnect itself from the client if a certain number of failed authentications are
attempted or if a timeout period expires. Authentication is performed independent of whether the Secure
Shell interface or the SFTP file transfer protocol will be implemented.
page 1-10
OmniSwitch 7700/7800/8800 Switch Management Guide
April 2006
Logging Into the Switch
Using Secure Shell
Connection Phase
After successful authentication, both the client and the server process the Secure Shell connection
protocol. The OmniSwitch supports one channel for each Secure Shell connection. This channel can be
used for a Secure Shell session or a Secure Shell FTP session.
Starting a Secure Shell Session
To start a Secure Shell session from an OmniSwitch, issue the ssh command and identify the IP address
for the device you are connecting to.
Note. You can only use a host name instead of an IP address if the DNS resolver has been configured and
enabled. If not, you must specify an IP address. See “Enabling the DNS Resolver” on page 1-18 for
details.
Note. Use of the cmdtool OpenWindows support facility is not recommended over Secure Shell connections with an external server.
The following command establishes a Secure Shell interface from the local OmniSwitch to IP address
11.333.30.135.
-> ssh 11.333.30.135
login as:
You must have a login and password that is recognized by the IP address you specify. When you enter
your login, the device you are logging into will request your password as shown here.
-> ssh 11.333.10.135
login as: rrlogin1
rrlogin1's password for keyboard-interactive method:
Once the Secure Shell session is established, you can use the remote device specified by the IP address on
a secure connection from your OmniSwitch.
Note. The login parameters for Secure Shell session login parameters can be affected by the session loginattempt and session login-timeout CLI commands.
OmniSwitch 7700/7800/8800 Switch Management Guide
April 2006
page 1-11
Using Secure Shell
Logging Into the Switch
The following drawing shows an OmniSwitch, using IP address 11.233.10.145, establishing a Secure Shell
session across a network to another OmniSwitch, using IP address 11.333.30.135. To establish this session
from the console in the figure below, you would use the CLI commands shown in the examples above.
Once you issue the correct password, you are logged into the OmniSwitch at IP address 11.333.30.135.
Console
OmniSwitch
11.233.10.145
OmniSwitch
11.333.30.135
Secure Shell Session between Two Switches
page 1-12
OmniSwitch 7700/7800/8800 Switch Management Guide
April 2006
Logging Into the Switch
Using Secure Shell
To view the parameters of the Secure Shell session, issue the who command. The following will display.
-> who
Session number = 0
User name
= (at login),
Access type = console,
Access port = Local,
IP address = 0.0.0.0,
Read-only domains
= None,
Read-only families = ,
Read-Write domains = None,
Read-Write families = ,
End-User profile
=
Session number = 1
User name
= rrlogin1,
Access type = ssh,
Access port = NI,
IP address = 11.233.10.145,
Read-only domains
= None,
Read-only families = ,
Read-Write domains = All ,
Read-Write families = ,
End-User profile
=
This display shows two sessions currently running on the remote OmniSwitch at IP address
11.333.30.135. Session number 0 is identified as the console session. Session number 1 indicates the
User name is rrlogin1, the IP address is 11.233.10.145, and the Access type is “ssh” which indicates a
Secure Shell session.
Closing a Secure Shell Session
To terminate the Secure Shell session, issue the exit command. The following will display:
-> exit
Connection to 11.333.30.135 closed.
Using the example shown above, this display indicates the Secure Shell session between the two switches
is closed. At this point, the user is logged into the local OmniSwitch at IP address 11.233.10.145.
Log Into the Switch with Secure Shell FTP
To open a Secure Shell FTP session from a local OmniSwitch to a remote device, proceed as follows:
1 Log on to the OmniSwitch and issue the sftp CLI command. The command syntax requires you to
identify the IP address for the device to which you are connecting. The following command establishes a
Secure Shell FTP interface from the local OmniSwitch to IP address 10.222.30.125.
-> sftp 10.222.30.125
login as:
2 You must have a login and password that is recognized by the IP address you specify. When you enter
your login, the device you are logging in to will request your password as shown here.
-> sftp 10.222.30.125
login as: rrlogin2
rrlogin2's password for keyboard-interactive method:
OmniSwitch 7700/7800/8800 Switch Management Guide
April 2006
page 1-13
Using Secure Shell
Logging Into the Switch
3 After logging in, you will receive the sftp> prompt. You may enter a question mark (?) to view
available Secure Shell FTP commands and their definitions as shown here.
sftp>?
Available commands:
cd path
lcd path
chmod mode path
help
get remote-path [local-path]
lls [path]]
ln oldpath newpath
lmkdir path
lpwd
ls [path]
mkdir path
put local-path [remote-path]
pwd
exit
quit
rename oldpath newpath
rmdir path
rm path
symlink oldpath newpath
version
?
Change remote directory to 'path'
Change local directory to 'path'
Change permissions of file 'path' to 'mode'
Display this help text
Download file
Display local directory listing
Symlink remote file
Create local directory
Print local working directory
Display remote directory listing
Create remote directory
Upload file
Display remote working directory
Quit sftp
Quit sftp
Rename remote file
Remove remote directory
Delete remote file
Symlink remote file
Show SFTP version
Synonym for help
Note. Although Secure Shell FTP has commands similar to the industry standard FTP, the underlying
protocol is different. See Chapter 2, “Managing System Files” for a Secure Shell FTP application example.
Closing a Secure Shell FTP Session
To terminate the Secure Shell FTP session, issue the exit command. The following will display:
-> exit
Connection to 11.333.30.135 closed.
This display indicates the Secure Shell FTP session with IP address 11.333.20.135 is closed. The user is
now logged into the OmniSwitch as a local device with no active remote connection.
page 1-14
OmniSwitch 7700/7800/8800 Switch Management Guide
April 2006
Logging Into the Switch
Modifying the Login Banner
Modifying the Login Banner
The Login Banner feature allows you to change the banner that displays whenever someone logs into the
switch. This feature can be used to display messages about user authorization and security. You can
display the same banner for all login sessions or you can implement different banners for different login
sessions. You can display a different banner for logins initiated by FTP sessions than for logins initiated
by a direct console or a Telnet connection. The default login message looks similar to the following:
login : user123
password :
Welcome to the Alcatel OmniSwitch 7000
Software Version 5.4.1.231.R01 Development, April 13, 2006.
Copyright(c), 1994-2005 Alcatel Internetworking, Inc. All Rights reserved.
OmniSwitch(TM) is a trademark of Alcatel Internetworking, Inc. registered
in the United States Patent and Trademark Office.
Here is an example of a banner that has been changed:
login : user123
password :
Welcome to the Alcatel OmniSwitch 7000
Software Version 5.4.1.231.R01 Development, April 13, 2006.
Copyright(c), 1994-2005 Alcatel Internetworking, Inc. All Rights reserved.
OmniSwitch(TM) is a trademark of Alcatel Internetworking, Inc. registered
in the United States Patent and Trademark Office.
********** LOGIN ALERT ************************
This switch is a secure device. Unauthorized
use of this switch will go on your permanent record.
Two steps are required to change the login banner. These steps are listed here:
• Create a text file that contains the banner you want to display in the switch’s /flash/switch directory.
• Enable the text file by entering the session banner CLI command followed by the filename.
To create the text file containing the banner text, you may use the vi text editor in the switch (See
Chapter 2, “Managing System Files,” for information about creating files directly on the switch.) This
method allows you to create the file in the /flash directory without leaving the CLI console session. You
can also create the text file using a text editing software package (such as MS Wordpad) and transfer the
file to the switch’s /flash directory. For more information about file transfers, see Chapter 2, “Managing
System Files.”
If you want the login banner in the text file to apply to FTP switch sessions, execute the following CLI
command where the text filename is firstbanner.txt.
-> session banner ftp /flash/firstbanner.txt
If you want the login banner in the text file to apply to CLI switch sessions, execute the following CLI
command where the text filename is secondbanner.txt.
-> session banner cli /flash/secondbanner.txt
The banner files must contain only ASCII characters and should bear the .txt extension. The switch will
not reproduce graphics or formatting contained in the file.
OmniSwitch 7700/7800/8800 Switch Management Guide
April 2006
page 1-15
Modifying the Login Banner
Logging Into the Switch
Modifying the Text Display Before Login
By default, the switch does not display any text before the login prompt for any CLI session.
At initial bootup, the switch creates a pre_banner.txt file in the /flash directory. The file is empty and
may be edited to include text that you want to display before the login prompt.
For example:
Please supply your user name and password at the prompts.
login : user123
password :
In this example, the pre_banner.txt file has been modified with a text editor to include the Please supply
your user name and password at the prompts message.
The pre-banner text cannot be configured for FTP sessions.
To remove a text display before the login prompt, delete the pre_banner.txt file (it will be recreated at the
next bootup and will be empty), or modify the pre_banner.txt file.
page 1-16
OmniSwitch 7700/7800/8800 Switch Management Guide
April 2006
Logging Into the Switch
Configuring Login Parameters
Configuring Login Parameters
You can set the number of times a user may attempt unsuccessfully to log in to the switch’s CLI by using
the session login-attempt command as follows:
-> session login-attempt 5
In this example, the user may attempt to log in to the CLI five (5) times unsuccessfully. If the user
attempts to log in the sixth time, the switch will break the TCP connection.
You may also set the length of time allowed for a successful login by using the session login-timeout
command as follows:
-> session login-timeout 20
In this example, the user must complete the login process within 20 seconds. This means that the time
between a user entering a login name and the switch processing a valid password must not exceed 20
seconds. If the timeout period is exceeded, the switch will break the TCP connection.
Configuring the Inactivity Timer
You can set the amount of time that a user must be inactive before the session times out. By default, the
timeout for each session type is 4 minutes. To change the setting, enter the session timeout command with
the type of session (cli, http, or ftp) and the desired number of minutes. In the following example, the CLI
timeout is changed from the default to 8 minutes.
-> session timeout cli 8
This command changes the inactivity timer for new CLI sessions to 8 minutes. Current CLI sessions are
not affected. In this example, current CLI sessions will be timed out after 4 minutes. (CLI sessions are
initiated through Telnet, Secure Shell, or through the switch console port.)
For information about connecting to the CLI through Telnet or Secure Shell, see “Using Telnet” on
page 1-6 and “Using Secure Shell” on page 1-8. For information about connecting to the CLI through the
console port, see your Getting Started Guide. For information about using the CLI in general, see
Chapter 5, “Using the CLI.”
The ftp option sets the timeout for FTP sessions. For example, to change the FTP timeout to 5 minutes,
enter the following command:
-> session timeout ftp 5
This command changes the timeout for new FTP sessions to 5 minutes. Current FTP sessions are not
affected. For more information about FTP sessions, see “Using FTP” on page 1-7.
The http option sets the timeout for WebView sessions. For example, to change the WebView inactivity
timer to 10 minutes, enter the following command:
-> session timeout http 10
In this example, any new WebView session will have a timeout of 10 minutes. Current WebView sessions
are not affected. For more information about WebView sessions, see Chapter 9, “Using WebView.”
OmniSwitch 7700/7800/8800 Switch Management Guide
April 2006
page 1-17
Enabling the DNS Resolver
Logging Into the Switch
Enabling the DNS Resolver
A Domain Name System (DNS) resolver is an optional internet service that translates host names into IP
addresses. Every time you enter a host name when logging into the switch, a DNS service must look up the
name on a server and resolve the name to an IP address. You can configure up to three domain name servers that will be queried in turn to resolve the host name. If all servers are queried and none can resolve the
host name to an IP address, the DNS fails. If the DNS fails, you must either enter an IP address in place of
the host name or specify the necessary lookup tables on one of the specified servers.
Note. You do not need to enable the DNS resolver service unless you want to communicate with the
switch by using a host name. If you use an IP address rather than a host name, the DNS resolver service is
not needed.
You must perform three steps on the switch to enable the DNS resolver service.
1 Set the default domain name for DNS lookups with the ip domain-name CLI command.
-> ip domain-name mycompany1.com
2 Specify the IP addresses of up to three servers with the ip name-server CLI command. These servers
will be queried when a host lookup is requested.
-> ip name-server 189.202.191.14 189.202.191.15 189.255.19.1
3 Use the ip domain-lookup CLI command to enable the DNS resolver service.
-> ip domain-lookup
You can disable the DNS resolver by using the no ip domain-lookup command. For more information,
refer to the OmniSwitch CLI Reference Guide.
Verifying Login Settings
To display information about login sessions, use the following CLI commands.
who
Displays all active login sessions (e.g., console, Telnet, FTP, HTTP,
Secure Shell, Secure Shell FTP).
whoami
Displays the current user session.
show session config
Displays session configuration information (e.g., default prompt, banner file name, inactivity timer, login timer, login attempts).
show dns
Displays the current DNS resolver configuration and status
For more information about these commands, refer to the OmniSwitch CLI Reference Guide.
page 1-18
OmniSwitch 7700/7800/8800 Switch Management Guide
April 2006
2
Managing System Files
This chapter describes the several methods of transferring software files onto the OmniSwitch and how to
register those files for use by the switch. This chapter also describes several basic switch management
procedures and discusses the Command Line Interface (CLI) commands used.
• File Management (copy, edit, rename, remove, change, and display file attributes)
• Directory Management (create, copy, move, remove, rename, and display directory information)
• System Date and Time (set system clock)
CLI commands are used in the configuration examples; for more details about the syntax of commands,
see the OmniSwitch CLI Reference Guide.
In This Chapter
Configuration procedures described in this chapter include:
• “Loading Software onto the Switch” on page 2-18
• “Creating a File Directory on the Switch” on page 2-27
• “Registering Software Image Files” on page 2-24
• “Setting the System Clock” on page 2-33
For related information about connecting a terminal to the switch, see your Getting Started Guide. For
information about switch command privileges, see the Chapter 8, “Managing Switch Security.”
OmniSwitch 7700/7800/8800 Switch Management Guide
April 2006
page 2-1
File Management Specifications
Managing System Files
File Management Specifications
The following table lists specifications for the OmniSwitch flash directory and file system as well as the
system clock.
File Transfer Methods
FTP, Zmodem
Configuration Recovery
The /flash/certified directory holds configurations that are certified as
the default start-up files for the switch. They will be used in the event of
a non-specified reload.
Switch /flash Directory
• 32 MB flash memory available for switch files and directories
• Contains the /certified and /working directories
File/Directory Name Metrics
• 32 characters maximum for directory and file names
• 255 character maximum for a fully qualified path
File/Directory Name Characters
Character types are limited to a-z, A-Z, 0-9, dashes (-), dots (.), and
underlines (_)
Maximum Number of
Files/Directories
Maximum of 244 files and/or directories allowed in the root (flash)
directory.
Sub-Directories
Up to seven sub-directories allowed including /flash.
Text Editing
Vi (standard UNIX editor). The Ed standard UNIX editor is available in
the debug mode only.
System Clock
Set local date, time and time zone, Universal Time Coordinate (UTC),
Daylight Savings (DST or summertime).
System Date Default Value
THU JAN 01 1970 (Thursday, January 1, 1970)
page 2-2
OmniSwitch 7700/7800/8800 Switch Management Guide
April 2006
Managing System Files
File Management Overview
File Management Overview
The OmniSwitch has a variety of software features designed for different networking environments and
applications. Over the life of the switch, it is very likely that your configuration and feature set will change
because the needs of your network are likely to expand. Also, software updates become available from
Alcatel. If you change your configuration to upgrade your network, you must understand how to install
switch files and to manage switch directories.
The OmniSwitch switch has 32 MB of usable flash memory. You can use this memory to store files,
including executable files (used to operate switch features and applications), configuration files, and log
files.
You need to understand the various methods of loading files onto the switch for software upgrades and
new features. Once the files are on the switch, the CLI has commands that allow you to load, copy, and
delete these files. The CLI also has commands for displaying, creating, and editing ASCII files directly on
the switch. You may also want to establish a file directory structure to help organize your files on the
switch.
All of the files and directories on the switch bear a time stamp. This is useful for switch administration
because the time stamp allows you to tell at a glance which files are the most recent. You can set the
system clock that controls these time stamps as well as other time based switch functions.
File Transfer
The switch can receive and send files using industry standard local and remote transfer methods. Each of
these methods are defined and explained. Because file transfers can involve logging onto the switch from
a remote host, security factors, such as DNS resolver and Authenticated Switch Access requirements
should be considered.
OmniSwitch
User’s Host
File Transfer from User’s
Host to the OmniSwitch
File Transfer to OmniSwitch
It is not enough to simply transfer a file onto the switch. Once files are on the switch, they must be registered in order to become functional. The OmniSwitch has a directory structure that allows you to install
new software while maintaining a backup copy of your old configuration. This directory structure is
explained in the “Switch Directories” section on page 2-4 and instructions are given on how to execute the
install command in the “Registering Software Image Files” section on page 2-24.
OmniSwitch 7700/7800/8800 Switch Management Guide
April 2006
page 2-3
File Management Overview
Managing System Files
Switch Directories
You can create your own directories in the switch flash directory. This allows you to organize your configuration and text files on the switch. You can also use the vi command to create files. This chapter tells you
how to make, copy, move, and delete both files and directories.
Listing Directory: /flash
Directory: /flash/certified
Directory: /flash/network
(Files)
(Files)
Directory: /flash/working
(Files)
config.txt
swlog2.log
swlog1.log
boot.params
(Files)
Switch Flash Directory
page 2-4
OmniSwitch 7700/7800/8800 Switch Management Guide
April 2006
Managing System Files
File and Directory Management
File and Directory Management
A number of CLI commands allow you to manage files on your switch by grouping them into subdirectories within the switch’s flash directory. These commands perform the same functions as file
management software applications (such as Microsoft’s Explorer) perform on a workstation. For
documentation purposes, we have categorized the commands into three groups.
• Directory commands allow you to create, copy, move, remove, rename, and display directories.
• File commands allow you copy, edit, rename, remove, change, and display file attributes.
• Utility commands display memory and system diagnostic information.
The following illustration represents a sample flash directory that contains four directories and five files at
the top level. The working directory and the certified directory both hold five files. The network directory
holds one file and the switch directory is empty. This sample flash directory is used in the explanations of
the directory, file and utility CLI commands in the following section.
Sample Flash Directory
Network Directory
config.txt
Flash Files
swlog2.log
policy.cfg
swlog1.log
boot.params
boot.params
Working Directory
Certified Directory
Fsecu.img
Fweb.img
Fos.img
Fsecu.img
F12eth.img
F12eth.img
Fbase.img
Frelease.img
boot.cfg
boot.params
Fos.img
boot.params
Sample Flash File Directory
OmniSwitch 7700/7800/8800 Switch Management Guide
April 2006
page 2-5
File and Directory Management
Managing System Files
To list all files and directories in your current directory, use the ls command. Here is a sample display of
the flash directory.
-> ls
Listing Directory /flash:
-rw
drw
drw
-rw
-rw
-rw
drw
drw
drw
290
2048
2048
64000
64000
4885718
2048
2048
2048
Apr
Apr
Apr
Apr
Apr
Apr
Apr
Apr
Mar
22
19
22
22
22
22
2
22
11
05:23
06:12
08:01
05:22
07:58
05:23
03:13
08:00
00:30
boot.params
certified/
working/
swlog2.log
swlog1.log
cs_system.pmd
network/
testdir/
switch/
2351104 bytes free
The following information describes the screen displayed by the ls command.
• The first column consists of three text characters. The first character indicates whether the row entry is
a file (-) or a directory (d). The second and third characters indicate the user’s read/write permissions.
-rw
drw
290 Apr 22 05:23 boot.params
2048 Apr 19 06:12 certified/
Here, the first entry shows a file (-) for which the user has read and write (rw) permissions. The second
entry shows a directory (d) for which the user has read and write (rw) permissions.
• The second column indicates the number of bytes of flash memory the row entry occupies.
-rw
drw
290 Apr 22 05:23 boot.params
2048 Apr 19 06:12 certified/
Here, the first entry shows that the file uses 290 bytes of flash memory. The second entry shows that
the directory occupies 2048 bytes of flash memory.
• The third, fourth, and fifth columns show the date and time the row entry was created or copied into the
flash directory.
-rw
drw
290 Apr 22 05:23 boot.params
2048 Apr 19 06:12 certified/
Here, the first entry indicates the file was created or copied on April 22 at 05:23 hours. The second
entry indicates that the directory was created or copied on April 19 at 06:12 hours.
• The column on the right lists the file or directory name. Note that directory names end with a slash (/)
character.
-rw
drw
290 Apr 22 05:23 boot.params
2048 Apr 19 06:12 certified/
Here, the first entry shows a file named boot.params, the second shows a directory named certified.
The value shown at the bottom of the display indicates the amount of flash memory remaining for use in
this directory (2.35 megabytes in the above example).
page 2-6
OmniSwitch 7700/7800/8800 Switch Management Guide
April 2006
Managing System Files
File and Directory Management
Using Wildcards
Wildcards allow you to substitute symbols (* or ?) for text patterns while using file and directory
commands. The asterisk (*) takes the place of multiple characters and the question mark character (?)
takes the place of single characters. More than one wildcard can be used within a single text string.
Multiple Characters
An asterisk (*) is used as a wildcard for multiple characters in a text pattern. The following command will
list all entries in the current directory that end with the .log extension.
-> ls *.log
Listing Directory /flash:
-rw
-rw
64000 Mar 21 19:49 swlog1.log
64000 Apr 12 19:06 swlog2.log
The following command lists all entries in the current directory that contain the i character.
-> ls *i*
Listing Directory /flash:
drw
drw
-rw
drw
2048
2048
31
2048
Apr 2 17:49
Apr 12 18:51
Dec 29 2001
Feb 28 12:17
certified/
working/
policy.cfg
switch/
Single Characters
The question mark (?) is used as a wildcard for a single character in a text pattern. The following
command will locate all entries containing swlog followed by any single character, followed by the .log
extension.
-> ls swlog?.log
Listing Directory /flash:
-rw
-rw
64000 Mar 21 19:49 swlog1.log
64000 Apr 12 19:06 swlog2.log
The single and multiple character wildcards can be used in combination. The following command lists all
entries containing the letter i followed by any two single characters.
-> ls *i??
Listing Directory /flash:
drw
2048 Apr 12 18:51 working/
OmniSwitch 7700/7800/8800 Switch Management Guide
April 2006
page 2-7
File and Directory Management
Managing System Files
Directory Commands
The directory commands are applied to the switch file system and to files contained within the file system.
When you first enter the flash directory, your login is located at the top of the directory tree. You may
navigate within this directory by using the pwd and cd commands (discussed below). The location of your
login within the directory structure is called your current directory. You need to observe your login
location because when you issue a command, that command applies only to directories and files in your
current directory unless another path is specified.
The following drawing is a logical representation of the file directory shown in the illustration on
page 2-5.
Flash Directory
Certified Directory
(Files)
Fsecu.img
Fos.img
F12eth.img
release.img
boot.cfg
Working Directory
Network Directory
(Files)
(File)
policy.cfg
config.txt
swlog2.log
swlog1.log
boot.params
(Files)
Fweb.imb
Fsecu.img
F12eth.img
Fbase.img
Fos.img
Sample Switch Directory Tree
Determining Your Location in the File Structure
Use the pwd command to display the path to your current directory. When you first log into the switch,
your current directory is the flash directory. If you enter the pwd command, the following will display.
-> pwd
/flash
->
The display shows the name of the current directory and its path. If your current directory is the certified
directory and you enter the pwd command, the following will display.
-> pwd
/flash/certified
->
The display shows the path to your current directory.
page 2-8
OmniSwitch 7700/7800/8800 Switch Management Guide
April 2006
Managing System Files
File and Directory Management
Changing Directories
Use the cd command to navigate within the file directory structure. The cd command allows you to move
“up” or “down” the directory tree. To go down, you must specify a directory located in your current directory. The following command example presumes your current directory is the /flash file directory as
shown in the directory on page 2-8 and that you want to move down the directory tree to the certified
directory.
->pwd
/flash
->cd certified
->
To verify that your current directory has changed to /flash/certified, use the pwd command and the
following will display.
->pwd
/flash/certified
To move “up” the directory tree, use the cd command. Enter cd.. (cd dot dot) without specifying a directory name and your current directory will move up one directory level. If you enter cd without the dots,
your current directory will move to the top of the tree. The following example shows the cd command
used where the current directory is /flash/certified.
->pwd
/flash/certified
-> cd
->
To verify that your current directory has moved up the directory tree, use the pwd command to display
your location. The display shows you have moved up one level from the /flash/certified directory and that
your current directory is /flash.
-> pwd
/flash
If you use the cd command while you are at the top of the directory tree, the cd command will have no
effect on the location of your login. In other words, if you use cd while your current directory is /flash,
your current directory will remain /flash after you execute the cd command.
OmniSwitch 7700/7800/8800 Switch Management Guide
April 2006
page 2-9
File and Directory Management
Managing System Files
Displaying Directory Contents
The ls and dir commands have the same function. These two commands display the contents of the current
directory. If you use the ls or dir command while logged into the /flash file directory as shown on
page 2-8, the following will display.
-> dir
Listing Directory /flash:
-rw
drw
drw
drw
-rw
-rw
->
1452
2048
2048
2048
10000
10000
April
April
April
April
April
April
7
12
3
2
12
12
12:50
11:16
12:32
16:22
11:48
11:36
boot.params
certified/
working/
switch/
swlog1.log
swlog2.log
If you specify a path as part of the ls or dir command, your screen will list the contents of the directory at
the specified path.
-> ls /flash/certified
Listing Directory /flash/certified:
drw
drw
-rw
-rw
-rw
-rw
-rw
page 2-10
2048
2048
2636
496901
860086
123574
123574
April
April
April
April
April
April
April
12 11:16 ./
12 15:58 ../
12 11:16 boot.cfg
6 11:07 Fl2eth.img
6 11:07 Fos.img
14 10:54 Fsecu.img
14 10:54 Fsecu.img
OmniSwitch 7700/7800/8800 Switch Management Guide
April 2006
Managing System Files
File and Directory Management
Making a New Directory
To make a new directory use the mkdir command. You may specify a path for the new directory, otherwise, the new directory will be created in your current directory. The syntax for this command requires a
slash (/) and no space between the path and the new directory name. Also, a slash (/) is required at the
beginning of your path specification. The following command makes a new directory in the working
directory.
-> mkdir /flash/working/newdir1
Flash Directory
Working Directory
(Files)
Fweb.imb
Fsecu.img
F12eth.img
Fbase.img
Fos.img
newdir1 Directory
This drawing represents the content of the /flash/working directory after the new directory is added.
Note. Your login account must have write privileges to execute the mkdir command.
OmniSwitch 7700/7800/8800 Switch Management Guide
April 2006
page 2-11
File and Directory Management
Managing System Files
Displaying Directory Contents Including Subdirectories
The ls -r command displays the contents of your current directory and associated subdirectories and files
contained therein. The following example shows the result of the ls -r command where the /flash/working
directory contains a directory named newdir1. Be sure to include a space between ls and -r.
-> ls -r /flash/working
Listing Directory /flash/working:
drw
drw
drw
-rw
-rw
-rw
-rw
2048
2048
2048
2636
123574
123574
123574
April
April
April
April
April
April
April
14
14
14
12
14
14
14
17:14
17:12
17:14
11:16
10:54
10:54
10:54
./
../
newdir1/
boot.cfg
Fsecu.img
Fbase.img
Fos.img
Listing Directory /flash/working/newdir:
drw
drw
2048 April 14 17:14 ./
2048 April 14 17:14 ../
Copying an Existing Directory
The cp -r command recursively copies directories, as well as any associated subdirectories and files.
Before using this command, you should make sure you have enough memory space in your target directory to hold the new material you are copying. In this example, a copy of the working directory and all its
contents will be created in the certified directory. The destination directory must exist before the cp -r
command will work.
->cp -r /flash/working flash/certified/working
Flash Directory
Certified Directory
Working Directory
(Files)
boot.cfg
F12eth.img
Fbase.img
Fsecu.img
Fweb.img
newdir1 Directory
(Files)
boot.cfg
F12eth.img
Fos.img
Frelease.img
Fsecu.img
Working Directory
(Files)
boot.cfg
F12eth.img
Fbase.img
Fsecu.img
Fweb.img
newdir1 Directory
Note. Your login account must have write privileges to execute the cp -r command.
page 2-12
OmniSwitch 7700/7800/8800 Switch Management Guide
April 2006
Managing System Files
File and Directory Management
To verify the creation of the new directory, use the ls -r command to produce a list of the contents of the
certified directory. This list will include the newly created copy of the working directory and all its
contents.
->ls -r /flash/certified
Listing Directory /flash/certified:
drw
drw
drw
2048 Oct 2 16:22 ./
2048 Nov 15 10:16 ../
2048 Jan 31 10:16 ../
Listing Directory /flash/certified/working
drw
drw
drw
-rw
-rw
-rw
-rw
-rw
2048
2048
2048
2636
496901
123574
123574
123574
Nov
Nov
Nov
Nov
Nov
Nov
Nov
Nov
14
14
14
12
6
14
14
14
17:14
17:12
17:14
11:16
11:07
10:54
10:54
10:54
./
../
newdir1/
boot.cfg
Fweb.img
Fsecu.img
Fbase.img
Fos.img
Listing Directory /flash/certified/working/newdir:
drw
drw
2048 Nov 14 17:14 ./
2048 Nov 14 17:14 ../
Removing a Directory and its Contents
The rmdir command removes the specified directory and all its contents. If the following command is
issued from the flash directory, shown in the drawing on page 2-8, the working directory would be
removed from the switch directory.
->rm -r /flash/certified/working
Note. Your login account must have write privileges to execute the rmdir command.
OmniSwitch 7700/7800/8800 Switch Management Guide
April 2006
page 2-13
File and Directory Management
Managing System Files
File Commands
The file commands apply to files located in the /flash file directory and its sub-directories.
Note. Each file in any directory must have a unique name. If you attempt to create or copy a file into a
directory where a file of the same name already exists, you will overwrite or destroy one of the files.
Creating or Modifying Files
The switch has an editor for creating or modifying files. The editor is invoked by entering the vi command
and the name of the new file or existing file that you want to modify. For example:
-> vi /flash/my_file
This command puts the switch in editor mode for my_file. If my_file does not already exist, the switch
will create the file in the flash directory. In editing mode, the switch uses command keystrokes similar to
any vi UNIX text editor. For example, to quit the edit session and save changes to the file, type ZZ to
return to the CLI prompt.
Copying an Existing File
Use the cp command to copy an existing file. You can specify the path and filename for the original file
being copied as well as the path and filename for the new copy being created. If no path is specified, the
command assumes the current directory. The following syntax copies the Fos.img file from the working
directory to the switch directory.
->cp /flash/working/Fos.img /flash/switch
This second example presumes that the user’s current directory is the /flash/working directory. Here, it is
not necessary to specify a path for the original file. A copy of Fos.img will appear in the /flash/switch
directory once the following command is executed.
->cp Fos.img /flash/switch
This third example presumes that the user’s current directory is the /flash/switch directory. To copy a file
into the same directory where the file currently exists, the user must specify a new filename. The following command will result in the Fos.img file being copied into the /flash/working directory under the new
name of newfile.img. Both Fos.img and its copy newfile.img will appear in the /flash/working directory.
->cp /flash/working/Fos.img newfile.img
In these examples, a new file will be written to the specified or assumed path with the new filename. If
you do not specify a new filename, the new file will have the same name as the copied file. If you copy a
file to its own directory, you must specify a new filename. In each case, the file being copied will remain
in its original location.
Note. You must have write privileges in order to execute the cp command.
page 2-14
OmniSwitch 7700/7800/8800 Switch Management Guide
April 2006
Managing System Files
File and Directory Management
Moving a File or Directory
The move and mv commands have the same function and use the same syntax. Use these commands to
move an existing file or directory to another location. You can specify the path and name for the file or
directory being moved. If no path is specified, the command assumes the current path. You can also
specify a path and a new name for the file or directory being moved. If no name is specified, the existing
name will be used.
Note. Your login account must have write privileges to use the move or mv command.
Flash Directory
Certified Directory
Testfiles Directory
(Files)
Working Directory
Network Directory
(Files)
(File)
policy.cfg
(File)
testfile2
In this first example, the user’s current directory is the flash directory. The following command syntax
moves the testfile2 file from the user created testfiles directory into the working directory as shown in the
illustration above. The screen displays a warning that the file is being renamed (or in this case, redirected).
-> move /flash/testfiles/testfile2 /flash/working/testfile2
WARNING:renaming file /flash/testfiles/testfile2 -> /flash/working/testfile2
In the next example, the user’s current directory is the /flash/testfiles directory as shown in the illustration,
so it is not necessary to specify a path for the file being copied. However, the command syntax specifies a
path to the destination directory. The screen displays a warning that the file is being renamed.
-> move testfile2 /flash/working/newtestfile2
WARNING:renaming file /flash/working/newtestfile2 -> /flash/working/newtestfile2
In this third example, the user’s current directory is the flash directory. Here, it is not necessary to specify
a path for the destination file but a path must be specified for the original file. The screen displays a
warning that the file is being renamed.
-> move /flash/testfiles/testfile2 newfile2
WARNING: renaming file /flash/testfiles/testfile2 -> /flash/testfiles/newfile2
In each of the above examples, a new file will be written to the specified or assumed path with the new
filename. In each case, the file being copied will be removed from its original location.
OmniSwitch 7700/7800/8800 Switch Management Guide
April 2006
page 2-15
File and Directory Management
Managing System Files
Changing File Attribute and Permissions
The chmod and attrib commands have the same function and use the same syntax. Use these commands
to change read-write privileges for the specified file. The following syntax sets the privilege for the
config1.txt file to read-write. In this example, the user’s current directory is the /flash file directory.
Note. You must have read-write privileges to a file to change that file’s privileges.
To set the permission for the config1.txt file to read-only, use the following syntax.
-> chmod -w /flash/config1.txt
To set the permission for the config1.txt file to read/write, use the following syntax.
-> chmod +w /flash/config1.txt
Deleting a File
The delete command deletes an existing file. If you use the delete command from the directory containing
the file, you do not need to specify a path. If you are in another directory, you must specify the path and
name for the file being deleted. The user of this command must have write privileges for any file being
deleted.
-> delete /flash/config.txt
Utility Commands
The utility commands include freespace, fsck, and newfs. These commands are used to check memory
and delete groups of files.
Displaying Free Memory Space
The freespace command displays the amount of free memory space available for use in the switch’s file
system. You may issue this command from any location in the switch’s directory tree.
-> freespace
/flash 16480256 bytes free
Performing a File System Check
The fsck command performs a file system check and can automatically repair any error found. It displays
diagnostic information in the event of file corruption. When you enter the command, you must specify the
flash directory as follows.
-> fsck /flash
The screen displays the following prompt:
Do you want fsck to automatically repair any errors found? (<CR> = No)
page 2-16
OmniSwitch 7700/7800/8800 Switch Management Guide
April 2006
Managing System Files
File and Directory Management
Press Enter to skip repairing files, or enter yes to start file repair. If you enter yes, the screen displays similar to the following:
/flash/
- disk check in progress ...
/flash/
- Volume is OK
total # of clusters:
# of free clusters:
# of bad clusters:
total free space:
max contiguous free space:
# of files:
# of folders:
total bytes in files:
# of lost chains:
total bytes in lost chains:
14,773
9,621
0
19,242 Kb
7,454,720 bytes
28
4
10,262 Kb
0
0
Deleting the Entire File System
The newfs command deletes the flash file system and all the files and directories contained in it. This
command is used when you want to reload all files in the file system.
Caution. This command will delete all of the switch’s system files. All configurations programmed into
the switch will be lost. Do not use this command unless you are prepared to reload all files.
OmniSwitch 7700/7800/8800 Switch Management Guide
April 2006
page 2-17
Loading Software onto the Switch
Managing System Files
Loading Software onto the Switch
There are three common methods for loading software to and from your switch. The method you use
depends on your workstation software, your hardware configuration, and the location and condition of
your switch. These methods are listed here.
• FTP Server—You can use the switch as an FTP server. If you have FTP client software on your work-
station, you can transfer a file to the switch via FTP. This is normally done to load or upgrade the
switch’s software or configurations.
• FTP Client—You can use the switch as an FTP client by connecting a terminal to the switch’s console
port and using standard FTP commands. This feature is useful in cases where you do not have access to
a workstation with an FTP client.
• Zmodem—You can load software directly through the serial port with any terminal emulator that
supports the Zmodem protocol. Note that a Zmodem transfer of large files may take several minutes to
complete.
For detailed information on using FTP and Zmodem, refer to Chapter 1, “Logging Into the Switch”.
Using the Switch as an FTP Server
The switch can act as an FTP server for receiving files transferred from your workstation. You can transfer software files to the switch using standard FTP client software located on a host workstation. This is
normally done to load or upgrade the switch software.
Workstation
OmniSwitch
The FTP Client software
on the Workstation sends a
file from the Workstation to
the OmniSwitch
FTP Client
FTP Server
OmniSwitch FTP Server
The following describes how to transfer files where the switch is acting as an FTP server.
1 Log into the switch. Use your workstation’s FTP client software just as you would with any FTP
application. To log in to the switch, start your FTP client. Where the FTP client asks for “Name”, enter the
IP address of your switch. Where the FTP client asks for “User ID”, enter the username of your login
account on the switch. Where the FTP client asks for “Password”, enter your switch password.
Note. If you are using Authenticated Switch Access (ASA), the port interface must be authenticated for
FTP use and the username profile must have permission to use FTP. Otherwise the switch will not accept
an FTP login. For information about ASA, refer to Chapter 8, “Managing Switch Security.”
page 2-18
OmniSwitch 7700/7800/8800 Switch Management Guide
April 2006
Managing System Files
Loading Software onto the Switch
2 Specify the transfer mode. If you are transferring a switch image file, you must specify the binary
transfer mode on your FTP client. If you are transferring a configuration file, you must specify the ASCII
transfer mode.
3 Transfer the file. Use the FTP “put” command or click the client’s download button to send the file to
the switch.
When you use FTP to transfer a file to the switch, the file is automatically placed in the switch’s /flash/
working directory. For details, on using CLI commands to managing files once they are on the switch
refer to “File and Directory Management” on page 2-5.
Note. You must use the binary mode (bin) to transfer image files via FTP.
OmniSwitch 7700/7800/8800 Switch Management Guide
April 2006
page 2-19
Loading Software onto the Switch
Managing System Files
Using the Switch as an FTP Client
Using the switch as an FTP client is useful in cases where you do not have access to a workstation with an
FTP client. You can establish an FTP session locally by connecting a terminal to the switch console port.
You can also establish an FTP session to a remote switch by using a Telnet session. Once you are logged
into the switch as an FTP client, you can use standard FTP commands.
Note. If you are using Authenticated Switch Access (ASA), the port interface must be authenticated for
FTP and Telnet use. The login profile must also have permission to use FTP. Otherwise the switch will not
accept an FTP login. For information about ASA and user privileges, refer to the “Managing Switch Security” chapter of this manual.
Terminal
OmniSwitch
A dumb terminal uses the FTP client on the OmniSwitch to retrieve
a file from a file server
File Server
FTP Server
FTP Client
OmniSwitch FTP Client
Use the switch ftp command to start its FTP client.
1 Establish a connection to the switch as explained in your OmniSwitch Getting Started Guide.
2 Log on to the switch and enter the ftp command to start the FTP client. Next, enter a valid host name or
IP address. (For information about enabling the DNS resolver for host names, see Chapter 1, “Logging
Into the Switch.”) A screen similar to the following displays:
Connecting to [198.23.9.101]...connected
220 cosmo FTP server (UNIX(r) System V Release 4.1) ready
Name :
Note. You can only use a host name instead of an IP address if the DNS resolver has been configured and
enabled. If not, you must specify an IP address.
3 Set the client to binary mode with the bin command. Enter a valid user name and password for the host
you specified with the ftp command. A screen similar to the following displays:
Name : Jsmith
331 Password required for Jsmith
Password: *****
230 User Jsmith logged in.
page 2-20
OmniSwitch 7700/7800/8800 Switch Management Guide
April 2006
Managing System Files
Loading Software onto the Switch
4 After logging in, you will receive the ftp-> prompt. You may enter a question mark (?) to view
available FTP commands as shown here.
ftp->?
Supported commands:
ascii
binary
dir
get
put
pwd
lpwd
mput
lcd
user
bye
help
quit
mget
cd
hash
remotehelp
prompt
delete
ls
user
!ls
These are industry standard FTP commands. Their definitions are given in the following table.
ascii
Set transfer type to ASCII (7-bit).
binary
Set transfer type to binary (8-bit).
bye
Close session gracefully.
cd
Change to a new directory on the remote machine.
delete
Delete a file on the remote machine.
dir
Obtain a long listing on the remote machine.
get
Retrieve a file from the remote machine.
hash
Print the hash symbol (#) for every block of data transferred. (This command toggles hash enabling and disabling.)
help
Displays a list of FTP commands and their definitions.
ls
Display summary listing of the current directory on the remote host.
put
Send a file to the remote machine.
pwd
Display the current working directory on the remote host.
quit
Close session gracefully.
remotehelp
List the commands that the remote FTP server supports.
user
Send new user information.
lpwd
Display the current working directory on the local host.
mput
Allows for the transfer of multiple files out of the local machine.
mget
Allows for the transfer of multiple files into the local machine.
prompt
Toggles the query for use with the mput and mget commands.
!ls
Lists the contents (files and directories) of the local directory.
lcd
Change to a new local directory
user
Sends new user information.
If you lose communications while running FTP, you may receive a message similar to the following:
Waiting for reply (Hit ^C to abort)...........
In this case you can press Crtl-C to abort the session or wait until the communication failure is resolved
and the FTP transfer can continue.
Note. You must use the binary mode (bin) to transfer image files via FTP.
OmniSwitch 7700/7800/8800 Switch Management Guide
April 2006
page 2-21
Loading Software onto the Switch
Managing System Files
Using Secure Shell FTP
1 Log on to the OmniSwitch and issue the sftp CLI command. The command syntax requires you to
identify the IP address for the device you are connecting to. The following command establishes a Secure
Shell FTP interface from the local OmniSwitch to IP address 10.222.30.125.
-> sftp 10.222.30.125
login as:
2 You must have a login and password that is recognized by the IP address you specify. When you enter
your login, the device you are logging into will request your password as shown here.
-> sftp 10.222.30.125
login as: rrlogin2
rrlogin2's password for keyboard-interactive method:
3 After logging in, you will receive the sftp> prompt. You may enter a question mark (?) to view
available Secure Shell FTP commands and their definitions as shown here.
sftp>?
Available commands:
cd path
lcd path
chmod mode path
help
get remote-path [local-path]
lls [path]]
ln oldpath newpath
lmkdir path
lpwd
ls [path]
mkdir path
put local-path [remote-path]
pwd
exit
quit
rename oldpath newpath
rmdir path
rm path
symlink oldpath newpath
version
?
Change remote directory to 'path'
Change local directory to 'path'
Change permissions of file 'path' to 'mode'
Display this help text
Download file
Display local directory listing
Symlink remote file
Create local directory
Print local working directory
Display remote directory listing
Create remote directory
Upload file
Display remote working directory
Quit sftp
Quit sftp
Rename remote file
Remove remote directory
Delete remote file
Symlink remote file
Show SFTP version
Synonym for help
Note. Although Secure Shell FTP has commands similar to the industry standard FTP, the underlying
protocol is different.
Closing a Secure Shell FTP Session
To terminate the Secure Shell FTP session, issue the exit command. The following will display:
-> exit
Connection to 11.333.30.135 closed.
This display indicates the Secure Shell FTP session with IP address 11.333.20.135 is closed. The user is
now logged into the OmniSwitch as a local device with no active remote connection.
page 2-22
OmniSwitch 7700/7800/8800 Switch Management Guide
April 2006
Managing System Files
Loading Software onto the Switch
Using Zmodem
A Zmodem application has been included with your switch software so that new programs and archives
can be uploaded through the switch’s serial console port. You may want to use the switch’s console port to
load software using Zmodem when your system is having problems and the FTP transfer method does not
work or when the switch’s Ethernet Management port is either not functioning or not configured.
To use Zmodem, you must have a terminal emulator that supports the Zmodem protocol. There are many
Zmodem products available that operate differently. Consult the user manual that came with your terminal emulation software for details.
Note. If a file you are transferring already exists in the switch’s flash memory, you must remove the file
before transferring the new file via Zmodem.
Workstation
Zmodem
OmniSwitch
Zmodem is used to transfer
a file from a workstation to
the OmniSwitch
Zmodem File Transfer
To transfer a file via Zmodem, complete the following steps.
1 Connect your terminal emulation device containing the Zmodem protocol to the switch’s console port.
2 Start the Zmodem process on your switch by executing the rz command.
-> rz
A screen similar to the following will appear.
Upload directory: /flash
rz ready to receive file, please start upload (or send 5 CTRL-X’s to abort).
**B000000023be50
3 Transfer the files using your terminal emulation software. The following will display.
ZMODEM file transfer successful,
Hit <RETURN> to exit...
When the transfer is complete, you can use the ls command to verify that the new files were loaded
successfully. To abort a Zmodem session enter Ctrl-X five times in succession.
Note. Files transferred via Zmodem are loaded into the flash directory. Before the new files can be used
by the switch, you must transfer them to the switch’s /flash/working directory and execute the install
command.
OmniSwitch 7700/7800/8800 Switch Management Guide
April 2006
page 2-23
Registering Software Image Files
Managing System Files
Registering Software Image Files
New software transferred to the switch must go through a registration process before it can be used by the
switch. The registration process includes two tasks.
• Transfer the new software file(s) to the switch’s /flash/working directory via remote connection.
• Register the software by executing the install command.
Note. Switch software must be located in the switch’s /flash/working directory before the install command
is executed.
Directories on the Switch
When you log into the switch, your current directory is the flash directory. For a factory default switch, the
flash directory contains three sub-directories and several files. It is important to understand the relationship of these directories before you load software or edit any of the files. The three directories are
described here:
• Certified directory—This directory contains configuration files that are certified as the default start-
up files for the switch. These are the trusted configuration and binary image files. They will be used in
the event of a non-specified reload. Do not attempt to edit these files. The path to this directory is /
flash/certified.
• Working directory—The working directory is a repository for configuration files that you are work-
ing on. If you are working on configuration files to develop a custom switch application, you may want
to test them before certifying them as the switch’s default. To do this, you can boot from the files in the
working directory while preserving the files in the certified directory. When the files in the working
directory are tested and working properly, you may certify them as the switch’s default files. The files
are then copied into the certified directory to replace the old ones. The path to this directory is
/flash/working.
• Network directory—This directory holds files that may be required by servers used for authentica-
tion. Other files can be put into this directory if desired. The path to this directory is /flash/network.
For more information on switch directories see Chapter 4, “Managing CMM Directory Content.”
page 2-24
OmniSwitch 7700/7800/8800 Switch Management Guide
April 2006
Managing System Files
Registering Software Image Files
Using the Install Command
The install command verifies that the version number of the new file is compatible with files already on
the switch. It will also perform installation procedures required by the new file or the switch. Once these
procedures are completed, the install command will update the appropriate switch files so the newly registered file can be used. The new software must be loaded into the working directory of the switch in order
for the install command to work.
To register an image file that has been loaded into the switch’s working directory, enter the following
command along with the name of the file being registered:
-> install Fos.img
In this example, Fos.img is the name of the file being registered.
Note. You can use wildcards with the install command. For example, to install all image files in the
current directory use the following command:
-> install *.img
For more information, refer to “Using Wildcards” on page 2-7.
Executing the install command adds comments to the “Release” archive and package name; in addition,
version numbers are updated in the “Release” archive.
When the install command is executed it will perform a set of default operations to ensure version
compatibility. If the registration cannot succeed without intervention or if there is a compatibility problem, the registration will be aborted and an error message will display.
Note. All registration processes take place within the working directory of the switch. New files are never
directly written to the certified directory. It is possible to perform registration procedures in the working
directory even if the switch is running off the files in the working directory. If the switch is booted using
files in the certified directory, no immediate effect from the registration will be realized until the system is
restarted from the working directory. If the system was booted from the working directory, the new software will be immediately available for use by the system following the successful completion of the registration process.
OmniSwitch 7700/7800/8800 Switch Management Guide
April 2006
page 2-25
Registering Software Image Files
Managing System Files
Available Image Files
The following table lists of image files available for the OmniSwitch 7700/7800. Most of the files listed
here are part of the base switch configuration. Files that support optional switch features are noted in the
table.
Archive File Name
Base or Optional Software
Description
Fadvrout.img
Optional Advanced Routing
CMM Advanced Routing
Fbase.img
Base Software
CMM Base
Fdiag.img
Base Software
CMM Diagnostics
Feni.img
Base Software
NI image for all Ethernet-type NIs
Fl2eth.img
Base Software
CMM Layer 2 and Ethernet drivers
Fos.img
Base Software
CMM Operating System
Fqos.img
Base Software
CMM Quality of Service
Frout.img
Base Software
CMM Routing (IP and IPX)
Fsecu.img
Optional Security
CMM Security (AVLANS)
Fweb.img
Base Software
CMM Webview—Main
Fwebadvrout.img
Optional Advanced Routing
CMM Webview—Advanced Routing
Fwebl2eth.img
Base Software
CMM Webview—Layer 2 and Ethernet drivers
Fwebqos.img
Base Software
CMM Webview—Quality of Service
Fwebrout.img
Base Software
CMM Webview—Routing
Fwebsecu.img
Optional Security
CMM Webview—Security
Frelease.img
Base Software
Release Archive
This table lists of image files for the OmniSwitch 8800. Most of the files listed here are part of the base
switch configuration. Files that support an optional switch feature are noted in the table.
Archive File Name
Base or Optional Software
Description
Eadvrout.img
Advanced Routing
CMM Advanced Routing
Ebase.img
Base Software
CMM Base
Ediag.img
Base Software
CMM Diagnostics
Eeni.img
Base Software
NI image for all Ethernet-type NIs
El2eth.img
Base Software
CMM Layer 2 and Ethernet drivers
Eos.img
Base Software
CMM Operating System
Eqos.img
Base Software
CMM Quality of Service
Erout.img
Base Software
CMM Routing (IP and IPX)
Esecu.img
Optional Security
CMM Security (AVLANS)
Eweb.img
Base Software
CMM Webview—Main
Ewebadvrout.img
Advanced Routing
CMM Webview—Advanced Routing
Ewebl2eth.img
Base Software
CMM Webview—Layer 2 and Ethernet drivers
Ewebqos.img
Base Software
CMM Webview—Quality of Service
Ewebrout.img
Base Software
CMM Webview—Routing
Ewebsecu.img
Optional Security
CMM Webview—Security
Erelease.img
Base Software
Release Archive
page 2-26
OmniSwitch 7700/7800/8800 Switch Management Guide
April 2006
Managing System Files
Application Examples for File Management
Application Examples for File Management
The following sections give detailed examples of managing files and directories on the switch.
Creating a File Directory on the Switch
In this example, the user wants to store several test files on the switch for use at a later date. The user has
loaded the files into the switch’s /flash/working directory using FTP. Rather than leaving the files in the
working directory, the user may want to create a new directory. The following steps describe how to
create a directory on the switch, how to transfer files into the directory, and how to list the files.
1 Log onto the switch and use the mkdir command to create a new directory called “resources”.
-> mkdir resources
2 Verify that the new directory was created by using the ls command. The “resources” directory is listed.
-> ls
Listing Directory /flash:
-rw
drw
drw
-rw
-rw
drw
-rw
drw
-rw
308
2048
2048
64000
64000
2048
30
2048
0
Feb 5 13:33 boot.params
Feb 4 10:45 certified/
Feb 5 16:24 working/
Feb 5 16:19 swlog1.log
Feb 5 14:05 swlog2.log
Jan 24 07:57 switch/
Feb 19 2023 policy.cfg
Feb 5 16:25 resources/
Jan 24 08:00 boot.cfg
3 Use the ls command to list the contents of the /flash/working directory.
-> ls /flash/working
Listing Directory /flash/working:
drw
drw
-rw
-rw
-rw
-rw
2048
2048
880
6
6
6
Feb 5 17:03 ./
Feb 5 16:25 ../
Jan 31 13:05 boot.cfg
Feb 5 17:03 test1.txt
Feb 5 17:03 test2.txt
Feb 5 17:03 test3.txt
4 Use the mv command to move the test files from /flash/working to /flash/resources.
-> mv test1.txt /flash/resources
-> mv test2.txt /flash/resources
-> mv test3.txt /flash/resources
OmniSwitch 7700/7800/8800 Switch Management Guide
April 2006
page 2-27
Application Examples for File Management
Managing System Files
5 Use the ls command to verify that the files are now located in the /flash/resources directory.
-> ls /flash/resources
Listing Directory /flash/resources:
drw
drw
-rw
-rw
-rw
2048
2048
6
6
6
Feb
Feb
Feb
Feb
Feb
5
5
5
5
5
17:20
16:25
17:03
17:03
17:03
./
../
test1.txt
test2.txt
test3.txt
17995776 bytes free
Transferring a File to the Switch Using FTP
In this example, the user is adding advanced routing functionality to the switch. To do this the user must
load the Fadvrout.img image file onto the switch and then register the file using the CLI install
command. The following steps describe how to transfer the file from the user workstation to the switch
using an FTP client on the workstation.
1 Load the Fadvrout.img file onto a workstation that contains an FTP client.
You will normally receive the file from the Internet, via Email, or on CD media. Place the file on your
workstation where it can be easily downloaded.
2 Run the FTP client software on your workstation.
Most workstations have an FTP client installed. Refer to your manufacturer’s instructions for details on
running the FTP application.
3 Log into the switch from your FTP client.
Where the FTP client asks for Name, enter the IP address of your switch. Where the FTP client asks for
User ID, enter “admin”. Where the FTP client asks for Password, enter “switch” or your custom configured password.
4 Transfer the file from the workstation to the switch using the FTP client.
If you have a GUI FTP client, select the Fadvrout.img file on your desktop and click the download
button. If you have a text only FTP client, use the FTP “put” command to move the file from your desktop
to the switch. In either case, you must specify a binary file transfer because the Fadvrout.img file is a
binary file. Once the transfer is complete, the file will appear in the switch’s /flash/working directory.
5 Close the FTP session with the switch.
page 2-28
OmniSwitch 7700/7800/8800 Switch Management Guide
April 2006
Managing System Files
Application Examples for File Management
6 To verify that the Fadvrout.img file is in the /flash/working directory on the switch. Log onto the
switch and list the files in the /flash/working directory.
-> ls /flash/working
Listing Directory /flash/working:
drw
drw
-rw
-rw
-rw
-rw
-rw
-rw
-rw
-rw
-rw
2048
2048
670979
2877570
217119
727663
184312
236713
5519
467850
880
Feb 4
Feb 5
Feb 5
Feb 4
Feb 4
Feb 4
Feb 4
Feb 4
Feb 4
Feb 4
Jan 31
10:45
14:05
14:44
10:33
10:33
10:33
10:33
10:34
10:34
10:34
13:05
./
../
Fadvrout.img
Fbase.img
Fdiag.img
Feni.img
Fenisym
Fqos.img
Frelease.img
Frout.img
boot.cfg
This list verifies that the file is located on the switch in the /flash/working directory.
7 Execute the install command to register the advanced routing file Fadvrout.img. The following will
display:
-> install Fadvrout.img
renaming file temp.img -> /flash/working/Frelease.img
Installation of Fadvrout.img was successful.
The features and services supported by the Fadvrout.img image file are now available on the switch.
FTP Client Application Example
The following example shows how to transfer a file named rrtext.txt from the switch’s /flash/working
directory to another host using the switch as an FTP client.
1 Log into the switch. Use the ls command to verify that your current directory is /flash.
-> ls
Listing Directory /flash:
-rw
drw
drw
drw
-rw
-rw
-rw
-rw
-rw
-rw
drw
-rw
-rw
272
2048
2048
2048
10000
10000
445
7298
2662306
543
2048
1452
1452
Nov
Nov
Nov
Oct
Nov
Nov
Nov
Oct
Nov
Nov
Nov
Nov
Nov
12
12
3
2
12
12
1
24
8
1
12
7
7
15:57
17:52
12:32
16:22
15:58
17:50
11:43
16:51
16:44
12:02
17:50
12:50
12:42
boot.params
certified/
working/
switch/
swlog1.log
swlog2.log
aaasnap
websnap1024
cs_system.pmd
aaapublic
newdir/
nssnap76
iesnap76
16480256 bytes free
OmniSwitch 7700/7800/8800 Switch Management Guide
April 2006
page 2-29
Application Examples for File Management
Managing System Files
2 Use the cd command to change your current directory to /flash/working. Use the ls or pwd command
to verify.
-> cd working
-> ls
Listing Directory /flash/working:
drw
drw
-rw
2048 Nov 3 12:32 ./
2048 Nov 14 10:58 ../
450 Nov 13 10:02 rrtest1.txt
3 Enter the FTP mode by using the ftp command followed by the IP address or the name of the host you
are connecting to.
->ftp 10.255.11.101
220 Connecting to [10.255.11.101]...connected.
Cosmo Windows FTP server ready
Name : Myhost1
Note. If the DNS resolver has been configured and enabled, you must use a host name instead of an IP
address.
4 Enter a valid user name and password for the host you specified with the ftp command. A screen
similar to the following displays:
Name (d) : Jsmith
331 Password required for Jsmith
Password: *****
230 User Jsmith logged in.
5 Use the FTP “put” command to transfer the file from your switch to the host as shown here.
ftp> put rrtest.txt
The following will display.
200 Port set okay
150 Opening BINARY mode data connection
Transferred 20 octets in 1 seconds.
226 Transfer complete
ftp>
6 To exit the switch’s FTP client mode, use the “quit” FTP command. Your current directory on the
switch is /flash/working, which is the location from which you initiated the FTP client session. Use the
pwd CLI command to verify your current directory.
ftp> quit
221 Bye
-> pwd
/flash/working
page 2-30
OmniSwitch 7700/7800/8800 Switch Management Guide
April 2006
Managing System Files
Application Examples for File Management
Creating a File Directory Using Secure Shell FTP
The following example describes the steps necessary to create a directory on a remote OmniSwitch and to
transfer a file into the new directory using Secure Shell FTP.
1 Log on to the switch and issue the sftp CLI command with the IP address for the device you are
connecting to. The following command establishes a Secure Shell FTP interface from the local
OmniSwitch to another OmniSwitch at IP address 10.222.30.125.
-> sftp 10.222.30.125
login as:
2 You must have a login and password that is recognized by the IP address you are logging into. When
you enter your login, the device will request your password. Here, the login “rrlogin2” is used, the system
requests a password.
-> sftp 10.222.30.125
login as: rrlogin2
rrlogin2's password for keyboard-interactive method:
Once the correct password is given and the login is completed, the sftp> prompt displays. This indicates
that you are in the Secure Shell FTP mode and must therefore use the Secure Shell FTP commands as
listed on page 2-22.
3 Use the ls command to display the contents of the target OmniSwitch’s directory.
sftp> ls
287 boot.params
2048 certified
2048 working
64000 swlog1.log
64000 swlog2.log30 policy.cfg
2048 network
206093 cs_system.pmd
2048 LPS
256 random-seed
4 Use the mkdir command to create a new directory entitled “newssdir” in the target OmniSwitch.
Remember you must specify the path for the new directory as follows:
sftp> mkdir /flash/newssdir
5 Use the ls command again to list the contents of the current (flash) directory. Note that the “newssdir”
directory appears toward the bottom of the following list.
sftp> ls
287 boot.params
2048 certified
2048 working
64000 swlog1.log
64000 swlog2.log30 policy.cfg
2048 network
206093 cs_system.pmd
2048 LPS
2048 newssdir
256 random-seed
OmniSwitch 7700/7800/8800 Switch Management Guide
April 2006
page 2-31
Verifying Directory Contents
Managing System Files
Transfer a File Using Secure Shell FTP
To demonstrate how to transfer a file using the Secure Shell FTP, this application example continues from
the previous example, where a new directory named “newssdir” was created on a remote OmniSwitch.
1 Use the Secure Shell FTP put command to transfer the file “testfile1.rr” from the local OmniSwitch to
the “newssdir” directory on the remote OmniSwitch. You must specify the local path (where the file
originates) and the remote path (where the file is going) in the command syntax. The following command
is used:
sftp> put /flash/testfile1.rr /flash/newssdir
The following will display to indicate that the file was successfully transferred to the /flash/newssdir on
the target OmniSwitch.
Uploading /flash/testfile1.rr to /flash/newssdir/testfile1.rr
2 To verify that the file was transferred to the correct destination, use the Secure Shell FTP cd command
to move your login to the newssdir directory. Then, use the ls command to list the contents of the
directory. The copied file is listed in the correct directory as shown here.
sftp> cd
sftp> ls
2048
2048
31
newssdir
.
..
testfile1.rr
Closing a Secure Shell FTP Session
To terminate the Secure Shell FTP session, issue the exit command. The following will display:
-> exit
Connection to 11.333.30.135 closed.
This display indicates the Secure Shell FTP session with IP address 11.333.20.135 is closed. The user is
now logged into the OmniSwitch as a local device with no active remote connection.
Verifying Directory Contents
To display list of files, the following CLI commands may be used.
ls
Displays the contents of a specified directory or the current working
directory.
dir
Displays the contents of a specified directory or the current working
directory.
For more information about these commands, see the OmniSwitch CLI Reference Guide.
page 2-32
OmniSwitch 7700/7800/8800 Switch Management Guide
April 2006
Managing System Files
Setting the System Clock
Setting the System Clock
The switch clock displays time using a 24-hour clock format. It can also be set for use in any time zone.
Daylight Savings Time (DST) is supported for a number of standard time zones. DST parameters can be
programmed to support non-standard time zones and time off-set applications.
All switch files and directories listed in the flash directory bear a time stamp. This feature is useful for file
management purposes.
Setting Date and Time
You can set the local date, time zone, and time for your switch or you can also set the switch to run on
Universal Time Coordinate (UTC or GMT). If applicable, you can also configure Daylight Savings Time
(DST or Summertime) parameters.
Note. If your switch has two CMMs for redundancy, you must set the date and time on both the primary
and the secondary CMM. Otherwise, if you experience a fail-over situation, the backup CMM’s time and
date will not match. You can use the takeover command to switch between CMMs to set time and date.
For more information on redundancy, refer to Chapter 4, “Managing CMM Directory Content.”
Date
To display the current system date for your switch, use the system date command. If you do not specify a
new date in the command line, the switch will display the current system date.
To modify the switch’s current system date, enter the new date with the command syntax. The following
command will set the switch’s system date to June 23, 2002.
-> system date 06/23/2002
When you specify the date you must use the mm/dd/yyyy syntax where mm is the month, dd is the day and
yyyy is the year. Months are specified as numbers from 01 to 12. Days are specified as numbers from 1 to
31. You must use two digits to define the month and the day. You must use four digits to specify the year.
Time Zone
To determine the current time zone or to specify a new time zone for your switch, use the system
timezone command. This specifies the time zone for the switch and sets the system clock to run on UTC
time (or Greenwich Mean Time). The following displays for the Pacific standard time zone.
-> system timezone
PST: (Coordinated Universal Time) UTC-8 hours
To set a new time zone for the system clock, use the system timezone command along with the appropriate time zone abbreviation. Refer to the table in “Enabling DST” on page 2-36 for time zone abbreviations. The following command sets the system clock to run on Pacific standard time.
-> system timezone pst
PST: (Coordinated Universal Time) UTC-8 hours
OmniSwitch 7700/7800/8800 Switch Management Guide
April 2006
page 2-33
Setting the System Clock
Managing System Files
You may set the switch system clock to a time that is offset from standard UTC time. For example, you
can set a time that is offset from UTC by increments of 15, 30 or 45 minutes. You must indicate by a plus
(+) or minus (-) character whether the time should be added to or subtracted from the system time. To set a
time that offsets UTC by adding 5 hours and 45 minutes, use the following command:
-> system timezone +05:45
Note that four digits must be used to specify an offset for minutes and that minutes must be specified in
15, 30 or 45 minute increments. To specify the number of hours offset from UTC (such as ten hours) use
the following command syntax:
-> system timezone +10
Values to specify hours for offset range from -13 through +12.
Time
To display the current local time for your switch, use the system time command. If you do not specify a
new time in the command line, the current system time is displayed as shown:
-> system time
17:08:51 (PST)
To modify the switch’s current system time, enter the system time command. When you specify the time
you must use the hh:mm:ss syntax where hh is the hour based on a 24-hour clock. The mm syntax represents minutes and ss represents seconds. You must use two digits to specify the minutes and two digits to
specify the seconds. The following command will set the switch’s system time to 10:45:00 a.m.
-> system time 10:45:00
->
The following command will set the switch’s system time to 3:14:00 p.m.
-> system time 15:41:00
->
page 2-34
OmniSwitch 7700/7800/8800 Switch Management Guide
April 2006
Managing System Files
Setting the System Clock
Daylight Savings Time Configuration
The switch can be set to automatically change the system clock to adjust for Daylight Savings Time
(DST). There are two situations that apply depending on the time zone selected for your switch.
If the time zone set for your switch shows DST parameters in the table on page 2-36, you need only enable
DST on your switch by using the following command:
-> system daylight savings time enable
If the time zone set for your switch does not show DST parameters in the table on page 2-36, you must
specify the start, end, and change parameters for DST using the system daylight savings time command.
The following information is needed to specify DST:
• The day of the week and month of the year when DST will begin.
• The position of that day in the month (e.g., first, second, third, fourth, or last Sunday of the month).
• The hour and minute of the day at which DST will begin.
• The day of the week and month of the year when DST will end.
• The position of that day in the month (e.g., first, second, third, fourth, or last Sunday of the month).
• The hour and minute of the day at which DST will end.
• The number of hours the switch clock will be offset for DST (one hour in most cases).
To set the switch DST parameters so that the clock will move back one hour on the fourth Sunday of
September at 11:00 p.m. and move forward on the fourth Sunday of March at 11:00 a.m., the following
command should be used:
-> system daylight savings time start fourth sun in Sept at 23:00 end fourth sun
in march at 11:00 by 1
For more details on syntax for this command, please refer to the OmniSwitch CLI Reference Guide. You
can also use the question mark (?) character in the command syntax to invoke the CLI’s help feature as
described in “Using the CLI” chapter of this manual.
Note. By default, Daylight Savings Time is disabled.
OmniSwitch 7700/7800/8800 Switch Management Guide
April 2006
page 2-35
Setting the System Clock
Managing System Files
Enabling DST
When Daylight Savings Time (DST) is enabled, the switch’s clock will automatically set the default DST
parameters for the time zone specified on the switch or for the custom parameters you can specify with the
system daylight savings time start command. In this case, it is not necessary to change the time setting
on the switch when your time zone changes to and from DST. To verify the DST parameters for your
switch, use the system daylight savings time command. A screen similar to the following will display:
-> system daylight savings time
Daylight Savings Time (DST) is DISABLED.
PST: (Coordinated Universal Time) UTC-8 hours
Daylight Savings Time (DST):
DST begins on the first sunday in april (4/7) at 2:00
DST ends on the last sunday in october (10/27) at 2:00
DST will change the time by +/- 1:00 hour(s)
The second line in the above display indicates the Enabled/Disabled status of the DST setting on the
switch. The last three lines describe the date and time parameters for the selected time zone or the custom
parameters set with the CLI. To enable daylight savings time use the following command:
-> system daylight savings time enable
Note. If your time zone shows “No default” in the “Time Zone and DST Information Table” below under
the DST parameters, refer to “Daylight Savings Time Configuration” on page 2-35 for information on
configuring and enabling DST.
The following table shows a list of supported time zone abbreviations and DST parameters.
Time Zone and DST Information Table
Abbreviation
Name
Hours from
UTC
nzst
New Zealand
+12:00
1st Sunday in Oct. at 3rd Sunday in Mar.
2:00 a.m.
at 3:00 a.m.
1:00
zp11
No standard name
+11:00
No default
No default
No default
aest
Australia East
+10:00
Last Sunday in Oct.
at 2:00 a.m.
Last Sunday in Mar.
at 3:00 a.m.
1:00
gst
Guam
+10:00
No default
No default
No default
acst
Australia Central
Time
+09:30
Last Sunday in Oct.
at 2:00 a.m.
Last Sunday in Mar.
at 3:00 a.m.
1:00
jst
Japan
+09:00
No default
No default
No default
kst
Korea
+09:00
No default
No default
No default
awst
Australia West
+08:00
No default
No default
No default
zp8
China;
Manila, Philippines
+08:00
No default
No default
No default
zp7
Bangkok
+07:00
No default
No default
No default
zp6
No standard name
+06:00
No default
No default
No default
zp5
No standard name
+05:00
No default
No default
No default
zp4
No standard name
+04:00
No default
No default
No default
msk
Moscow
+03:00
Last Sunday in Mar.
at 2:00 a.m.
Last Sunday in Oct.
at 3:00 a.m.
1:00
page 2-36
DST Start
DST End
DST Change
OmniSwitch 7700/7800/8800 Switch Management Guide
April 2006
Managing System Files
Setting the System Clock
Time Zone and DST Information Table (continued)
Abbreviation
Name
Hours from
UTC
eet
Eastern Europe
cet
DST Start
DST End
DST Change
+02:00
Last Sunday in Mar.
at 2:00 a.m.
Last Sunday in Oct.
at 3:00 a.m.
1:00
Central Europe
+01:00
Last Sunday in Mar.
at 2:00 a.m.
Last Sunday in Oct.
at 3:00 a.m.
1:00
met
Middle Europe
+01:00
Last Sunday in Mar.
at 2:00 a.m.
Last Sunday in Oct.
at 3:00 a.m.
1:00
bst
British Standard
Time
+00:00
Last Sunday in Mar.
at 1:00 a.m.
Last Sunday in Oct.
at 3:00 a.m.
1:00
wet
Western Europe
+00:00
Last Sunday in Mar.
at 1:00 a.m.
Last Sunday in Oct.
at 3:00 a.m.
1:00
gmt
Greenwich Mean
Time
+00:00
No default
No default
No default
wat
West Africa
-01:00
No default
No default
No default
zm2
No standard name
-02:00
No default
No default
No default
zm3
No standard name
-03:00
No default
No default
No default
nst
Newfoundland
-03:30
1st Sunday in Apr. at Last Sunday in Oct.
2:00 a.m.
at 2:00 a.m.
1:00
ast
Atlantic Standard
Time
-04:00
1st Sunday in Apr. at Last Sunday in Oct.
2:00 a.m.
at 2:00 a.m.
1:00
est
Eastern Standard
Time
-05:00
1st Sunday in Apr. at Last Sunday in Oct.
2:00 a.m.
at 2:00 a.m.
1:00
cst
Central Standard
Time
-06:00
1st Sunday in Apr. at Last Sunday in Oct.
2:00 a.m.
at 2:00 a.m.
1:00
mst
Mountain Standard
Time
-07:00
1st Sunday in Apr. at Last Sunday in Oct.
2:00 a.m.
at 2:00 a.m.
1:00
pst
Pacific Standard
Time
-08:00
1st Sunday in Apr. at Last Sunday in Oct.
2:00 a.m.
at 2:00 a.m.
1:00
akst
Alaska
-09:00
1st Sunday in Apr. at Last Sunday in Oct.
2:00 a.m.
at 2:00 a.m.
1:00
hst
Hawaii
-10:00
No default
No default
No default
zm11
No standard name
-11:00
No default
No default
No default
OmniSwitch 7700/7800/8800 Switch Management Guide
April 2006
page 2-37
Setting the System Clock
page 2-38
Managing System Files
OmniSwitch 7700/7800/8800 Switch Management Guide
April 2006
3
Configuring Network Time
Protocol (NTP)
The Network Time Protocol (NTP) is used to synchronize the time of a computer client or server to
another server or reference time source, such as a radio or satellite receiver. It provides client time accuracies within a millisecond on LANs, and up to a few tens of milliseconds on WANs relative to a primary
server synchronized to Universal Coordinated Time (UTC) (via a Global Positioning Service receiver, for
example).
In This Chapter
This chapter describes the basic components of the OmniSwitch implementation of Network Time Protocol and how to configure it through the Command Line Interface (CLI). CLI commands are used in the
configuration examples; for more details about the syntax of commands, see the OmniSwitch CLI Reference Guide.
Configuration procedures described in this chapter include:
• Enabling the NTP client and selecting the NTP mode. See “Configuring the OmniSwitch as a Client”
on page 3-8.
• Selecting an NTP server for the NTP client and modifying settings for communicating with the server.
See “NTP Servers” on page 3-9.
• Enabling authentication in NTP negotiations. See “Using Authentication” on page 3-10.
OmniSwitch 7700/7800/8800 Switch Management Guide
April 2006
page 3-1
NTP Specifications
Configuring Network Time Protocol (NTP)
NTP Specifications
RFCs supported
1305 - Network Time Protocol
Maximum number of NTP servers per client 3
NTP Defaults Table
The following table shows the default settings of the configurable NTP parameters.
NTP Defaults
Parameter Description
Command
Default Value/Comments
Specifies an NTP server from which ntp server
this switch will receive updates.
version: 4
minpoll: 6
prefer: no
key: 0
Used to activate client
ntp client
disabled
Used to activate NTP client broadcast mode
ntp broadcast
disabled
Used to set the advertised broadcast ntp broadcast-delay
delay, in microseconds.
page 3-2
4000 microseconds
OmniSwitch 7700/7800/8800 Switch Management Guide
April 2006
Configuring Network Time Protocol (NTP)
NTP Quick Steps
NTP Quick Steps
The following steps are designed to show the user the necessary commands to set up NTP on an
OmniSwitch:
1 Designate an NTP server for the switch using the ntp server command. The NTP server provides the
switch with its NTP time information. For example:
-> ntp server 1.2.5.6
2 Activate the client side of NTP on the switch using the ntp client command. For example:
-> ntp client enable
3 You can check the server status using the show ntp server status command, as shown:
-> show ntp server status
IP address = 1.2.5.6
Prefer = yes
Version = 4
Key = 0
Stratum = 2
Minpoll = 6
Maxpoll = 10
Delay = 0.016 seconds
Offset = -0.700 seconds
Dispersion = 0.017 seconds
4 You can check the list of servers associated with this client using the show ntp client server-list
command as shown:
-> show ntp client server-list
IP Address
Ver
Key
St
Delay
Offset
Disp
================+===+=======+====+==========+=================+==========
1.2.5.6
4
0
2
0.06
-0.673
0.017
5 You can check the client configuration using the show ntp client command, as shown:
-> show ntp client
Current time:
Last NTP update:
Client mode:
Broadcast client mode:
Broadcast delay (microseconds):
MON APR 05 2004
MON APR 05 2004
enabled
disabled
4000
OmniSwitch 7700/7800/8800 Switch Management Guide
April 2006
17:44:54 (UTC)
17:30:54
page 3-3
NTP Overview
Configuring Network Time Protocol (NTP)
NTP Overview
The Network Time Protocol (NTP) is used to synchronize the time of a computer client or server to
another server or reference time source, such as a radio or satellite receiver. It provides client time accuracies within a millisecond on LANs, and up to a few tens of milliseconds on WANs relative to a primary
server synchronized to Universal Coordinated Time (UTC) (via a Global Positioning Service receiver, for
example). Typical NTP configurations utilize multiple redundant servers and diverse network paths in
order to achieve high accuracy and reliability. Some configurations include cryptographic authentication to
prevent accidental or malicious protocol attacks.
It is important for networks to maintain accurate time synchronization between network nodes. The standard timescale used by most nations of the world is based on a combination of Universal Coordinated
Time (UTC) (representing the Earth’s rotation about its axis), and the Gregorian Calendar (representing
the Earth’s rotation about the Sun). The UTC timescale is disciplined with respect to International Atomic
Time (TAI) by inserting leap seconds at intervals of about 18 months. UTC time is disseminated by various means, including radio and satellite navigation systems, telephone modems, and portable clocks.
Special purpose receivers are available for many time-dissemination services, including the Global Position System (GPS) and other services operated by various national governments. For reasons of cost and
convenience, it is not possible to equip every computer with one of these receivers. However, it is possible to equip some computers with these clocks, which then act as primary time servers to synchronize a
much larger number of secondary servers and clients connected by a common network. In order to do this,
a distributed network clock synchronization protocol is required which can read a server clock, transmit
the reading to one or more clients, and adjust each client clock as required. Protocols that do this include
the Network Time Protocol (NTP).
Note. The Alcatel OmniSwitch 6000, 7000, and 8000 series switches can only be NTP clients in an NTP
network. They cannot act as NTP servers.
page 3-4
OmniSwitch 7700/7800/8800 Switch Management Guide
April 2006
Configuring Network Time Protocol (NTP)
NTP Overview
Stratum
Stratum is the term used to define the relative proximity of a node in a network to a time source (such as a
radio clock). Stratum 1 is the server connected to the time source itself. (In most cases the time source and
the stratum 1 server are in the same physical location.) An NTP client or server connected to a stratum 1
source would be stratum 2. A client or server connected to a stratum 2 machine would be stratum 3, and so
on, as demonstrated in the diagram below.
UTC Time Source
Stratum 1
Stratum 2
Stratum 3
The farther away from stratum 1 a device is, the more likely there will be discrepancies or errors in the
time adjustments done by NTP. A list of stratum 1 and 2 sources available to the public can be found on
the Internet.
Note. It is not required that NTP be connected to an officially recognized time source (for example, a
radio clock). NTP can use any time source to synchronize time in the network.
Using NTP in a Network
NTP operates on the premise that there is one true standard time (defined by UTC), and that if several
servers claiming synchronization to the standard time are in disagreement, then one or more of them must
be out of synchronization or not functioning correctly. The stratum gradiation is used to qualify the accuracy of a time source along with other factors such as advertised precision and the length of the network
path between connections. NTP operates with a basic distrust of time information sent from other network
entities, and is most effective when multiple NTP time sources are integrated together for checks and
crosschecks. To achieve this end, there are several modes of operation that an NTP entity can use when
synchronizing time in a network. These modes help predict how the entity behaves when requesting or
sending time information, listed below:
• A switch can be a client of an NTP server (usually of a lower stratum), receiving time information
from the server but not passing it on to other switches.
• A switch can be a client of an NTP server, and in turn be a server to another switch or switches.
• A switch (regardless of its status as either a client or server) must be peered with another switch. Peer-
ing allows NTP entities in the network of the same stratum to regard each other as reliable sources of
time and exchange time information.
OmniSwitch 7700/7800/8800 Switch Management Guide
April 2006
page 3-5
NTP Overview
Configuring Network Time Protocol (NTP)
Examples of these are shown in the simple network diagram below:
UTC Time Source
Stratum 1
NTP
Servers
1a
1b
Stratum 2
NTP
Server/Clients
2a
2b
Stratum 3
NTP
Clients
3a
3b
Servers 1a and 1b receive time information from, or synchronize with, a UTC time source such as a radio
clock. (In most cases, these servers would not be connected to the same UTC source, though it is shown
this way for simplicity.) Servers 1a and 1b become stratum 1 NTP servers and are peered with each other,
allowing them to check UTC time information against each other. These machines support machines 2a
and 2b as clients, and these clients are synchronized to the higher stratum servers 1a and 1b.
Clients 2a and 2b are also peered with each other for time checks, and become stratum 2 NTP servers for
more clients (3a and 3b, which are also peered). In this hierarchy, the stratum 1 servers synchronize to the
most accurate time source available, then check the time information with peers at the same stratum. The
stratum 2 machines synchronize to the stratum 1 servers, but do not send time information to the stratum 1
machines. Machines 2a and 2b in turn provide time information to the stratum 3 machines. It is important
to consider the issue of robustness when selecting sources for time synchronization.
It is suggested that at least three sources should be available, and at least one should be “close” to you in
terms of network topology. It is also suggested that each NTP client is peered with at least three other
same stratum clients, so that time information crosschecking will be performed.
Note. Alcatel’s current implementation of NTP only allows the OmniSwitch to act as a passive client, not
as a server. A passive client only receives NTP information and adjusts its time accordingly. In the above
example, an OmniSwitch could be either Server 3a or 3b. An OmniSwitch as Server 3a or 3b would also
not be able to peer with other servers on the same stratum.
page 3-6
OmniSwitch 7700/7800/8800 Switch Management Guide
April 2006
Configuring Network Time Protocol (NTP)
NTP Overview
When planning your network, it is helpful to use the following general rules:
• It is usually not a good idea to synchronize a local time server with a peer (in other words, a server at
the same stratum), unless the latter is receiving time updates from a source that has a lower stratum
then from where the former is receiving time updates. This minimizes common points of failure.
• Peer associations should only be configured between servers at the same stratum level. Higher Strata
should configure lower Strata, not the reverse.
• It is inadvisable to configure time servers in a domain to a single time source. Doing so invites
common points of failure.
Note. NTP does not support year date values greater than 2035 (the reasons are documented in RFC 1305
in the data format section). This should not be a problem (until the year 2035) as setting the date this far in
advance runs counter to the administrative intention of running NTP.
Authentication
NTP is designed to use MD5 encryption authentication to prevent outside influence upon NTP timestamp
information. This is done by using a key file. The key file is loaded into the switch memory, and consists
of a text file that lists key identifiers that correspond to particular NTP entities.
If authentication is enabled on an NTP switch, any NTP message sent to the switch must contain the
correct key ID in the message packet to use in decryption. Likewise, any message sent from the authentication enabled switch will not be readable unless the receiving NTP entity possesses the correct key ID.
The key file is a text (.txt) file that contains a list of keys that are used to authenticate NTP servers. It
should be located in the /networking directory of the switch.
Key files are created by a system administrator independent of the NTP protocol, and then placed in the
switch memory when the switch boots. An example of a key file is show below:
2
14
M
M
RIrop8KPPvQvYotM
sundial
# md5 key as an ASCII random string
# md5 key as an ASCII string
In a key file, the first token is the key number ID, the second is the key format, and the third is the key
itself. (The text following a “#” is not counted as part of the key, and is used merely for description.) The
key format indicates an MD5 key written as a 1 to 31 character ASCII string with each character standing
for a key octet.
The key file (with identical MD5 keys) must be located on both the local NTP client and the client’s
server.
OmniSwitch 7700/7800/8800 Switch Management Guide
April 2006
page 3-7
Configuring NTP
Configuring Network Time Protocol (NTP)
Configuring NTP
The following sections detail the various commands used to configure and view the NTP client software in
an OmniSwitch.
Configuring the OmniSwitch as a Client
The NTP software is disabled on the switch by default. To activate the switch as an NTP client, enter the
ntp client command as shown:
-> ntp client enable
This sets the switch to act as an NTP client in passive mode, meaning the client will receive updates from
a designated NTP server.
To disable the NTP software enter the ntp client command as shown:
-> ntp client disable
Setting the Client to Broadcast Mode
It is possible to configure an NTP client to operate in broadcast mode. Broadcast mode specifies a client
switch listens on all interfaces for server broadcast timestamp information. It uses these messages to
update its time.
To set an OmniSwitch to operate in broadcast mode, enter the ntp broadcast command as shown:
-> ntp broadcast enable
A client in broadcast mode does not need to have a specified server.
Setting the Broadcast Delay
When set to broadcast mode, a client needs to advertise a broadcast delay. Broadcast mode is intended for
operation on networks with numerous workstations and where the highest accuracy is not required. In a
typical scenario one or more time servers on the network broadcast NTP messages which are received by
NTP hosts. Correct time is determined from this NTP message based on a pre-configured latency or broadcast delay in the order of a few milliseconds.
To set the broadcast delay, enter the ntp broadcast-delay command as shown:
-> ntp broadcast delay 1000
page 3-8
OmniSwitch 7700/7800/8800 Switch Management Guide
April 2006
Configuring Network Time Protocol (NTP)
Configuring NTP
NTP Servers
An NTP client needs to receive NTP updates from and NTP server. Each client must have at least one
server with which it synchronizes (unless it is operating in broadcast mode). There are also adjustable
server options.
Designating an NTP Server
To configure a client to synchronize with an NTP server, enter the ntp server command with the server IP
address or domain name, as shown:
-> ntp server 1.1.1.1
or
-> ntp server spartacus
It is possible to remove an NTP server from the list of servers from which a client synchronizes. To do
this, enter the ntp server command with the no prefix, as shown:
-> no ntp server 1.1.1.1
Setting the Minimum Poll Time
The minimum poll time is the number of seconds that the switch waits before requesting a time synchronization from the NTP server. This number is determined by raising 2 to the power of the number entered
using the ntp server command with the server IP address (or domain name) and the minpoll keyword.
For example, to set the minimum poll time to 128 seconds, enter the following:
-> ntp server 1.1.1.1 minpoll 7
This would set the minimum poll time to 27 = 128 seconds.
Setting the Version Number
There are currently four versions of NTP available (numbered one through four). The version that the NTP
server uses must be specified on the client side.
To specify the NTP version on the server from which the switch receives updates, use the ntp server
command with the server IP address (or domain name), version keyword, and version number, as shown:
-> ntp server 1.1.1.1 version 3
The default setting is version 4.
Marking a Server as Preferred
If a client receives timestamp updates from more than one server, it is possible to mark one of the servers
as the preferred server. A preferred server’s timestamp will be used before another unpreferred server
timestamp.
To specify an NTP as preferred, use the ntp server command with the server IP address (or domain name)
and the prefer keyword, as shown:
-> ntp server 1.1.1.1 prefer
OmniSwitch 7700/7800/8800 Switch Management Guide
April 2006
page 3-9
Configuring NTP
Configuring Network Time Protocol (NTP)
Using Authentication
Authentication is used to encrypt the NTP messages sent between the client and server. The NTP server
and the NTP client must both have a text file containing the public and secret keys. (This file should be
obtained from the server administrator. For more information on the authentication file, see “Authentication” on page 3-7.)
Once both the client and server share a common MD5 encryption key, the MD5 key identification for the
NTP server must be specified on and labeled as trusted on the client side.
Setting the Key ID for the NTP Server
Enabling authentication requires the following steps:
1 Make sure the key file is located in the /networking directory of the switch. This file must contain the
key for the server that provides the switch with its timestamp information.
2 Make sure the key file with the NTP server’s MD5 key is loaded into the switch memory by issuing the
ntp key load command, as shown:
-> ntp key load
3 Set the server authentication key identification number using the ntp server command with the key
keyword. This key identification number must be the one the server uses for MD5 encryption. For example, to specify key identification number 2 for an NTP server with an IP address of 1.1.1.1, enter:
-> ntp server 1.1.1.1 key 2
4 Specify the key identification set above as trusted. A key that has been labeled as trusted is ready for
use in the authentication process. To set a key identification to be trusted, enter the ntp key command with
the key identification number and trusted keyword. For example, to set key ID 5 to trusted status, enter
the following:
-> ntp key 5 trusted
Untrusted keys, even if they are in the switch memory and match an NTP server, will not authenticate
NTP messages.
5 A key can be set to untrusted status by using the ntp key command with the untrusted keyword. For
example, to set key ID 5 to untrusted status, enter the following:
-> ntp key 5 untrusted
page 3-10
OmniSwitch 7700/7800/8800 Switch Management Guide
April 2006
Configuring Network Time Protocol (NTP)
Verifying NTP Configuration
Verifying NTP Configuration
To display information about the NTP client, use the show commands listed in the following table:
show ntp client
Displays information about the current client NTP configuration.
show ntp server status
Displays the basic server information for a specific NTP server or a list
of NTP servers.
show ntp client server-list
Displays a list of the servers with which the NTP client synchronizes.
show ntp keys
Displays information about all authentication keys.
For more information about the resulting displays form these commands, see chapter “NTP Commands”
chapter in the OmniSwitch CLI Reference Guide.
Examples of the show ntp client, show ntp server stats, and show ntp server-list command outputs are
given in the section “NTP Quick Steps” on page 3-3.
OmniSwitch 7700/7800/8800 Switch Management Guide
April 2006
page 3-11
Verifying NTP Configuration
page 3-12
Configuring Network Time Protocol (NTP)
OmniSwitch 7700/7800/8800 Switch Management Guide
April 2006
4
Managing CMM
Directory Content
The CMM, Chassis Management Module, is the management unit for the OmniSwitch 7700/7800/8800
system. Each OmniSwitch 7700/7800/8800 chassis can run with two CMMs to provide redundancy; one
CMM is designated as the primary CMM, and one is designated as the secondary CMM. One or the other
runs the switch, but never at the same time.
The directory structure of the CMM is designed to prevent corrupting or losing switch files. It also allows
you to retrieve a previous version of the switch software.
In This Chapter
This chapter describes the basic functions of CMM directory management and how to implement them
using the Command Line Interface (CLI). CLI commands are used in the configuration examples; for
more details about the syntax of commands, see the OmniSwitch CLI Reference Guide.
For specifics on the CMM boards, see the OmniSwitch 7700/7800 Hardware Users Guide and OmniSwitch
8800 Hardware Users Guide.
This chapter contains the following information:
• The interaction between the running configuration, the working directory, and the certified directory is
described in “CMM Files” on page 4-3.
• A description of how to restore older versions of files and prevent switch downtime is described in
“Software Rollback Feature” on page 4-4.
• The CLI commands available for use and the correct way to implement them are listed in “Managing
the Directory Structure of the CMM (Non-Redundant)” on page 4-9.
• The CLI commands and issues involved in managing the directory structure of a chassis with redun-
dant CMMs are described in “Managing Redundant CMMs” on page 4-19.
OmniSwitch 7700/7800/8800 Switch Management Guide
April 2006
page 4-1
CMM Specifications
Managing CMM Directory Content
CMM Specifications
Size of Flash Memory
32 Megabytes
Size of RAM Memory
128 Megabytes
Maximum Length of File Names
32 Characters
Maximum Length of Directory Names
32 Characters
Default Boot Directory
Certified
page 4-2
OmniSwitch 7700/7800/8800 Switch Management Guide
April 2006
Managing CMM Directory Content
CMM Files
CMM Files
The management of the switch is controlled by three types of files:
• Image files, which are proprietary code developed by Alcatel to run the hardware. These files are not
configurable by the user, but may be upgraded from one release to the next. These files are also known
as archive files, as they are really the repository of several smaller files grouped together under a
common heading.
• A configuration file, named boot.cfg, which is an ASCII-based text file that sets and controls the
configurable functions inherent in the image files provided with the switch. This file can be modified
by the user. When the switch boots, it looks for the file called boot.cfg. It uses this file to set various
switch parameters defined by the image files.
• A boot file, named boot.params, which is an ASCII-based text file that sets the Ethernet Management
Port (EMP) IP address, gateway, and mask. It also controls the console port’s baud rate and displays
directory loading information and is located in the flash memory of the switch. The boot.params file
and how to configure it is discussed more thoroughly in the your Getting Started Guide.
Modifications to the switch parameters affect or change the configuration file. The image files are static
for the purposes of running the switch (though they can be updated and revised with future releases or
enhancements). Image and configuration files are stored in the Flash memory (which is equivalent to a
hard drive memory) in specified directories. When the switch is running, it loads the image and configuration files from the Flash into the RAM. When changes are made to the configuration file, the changes are
first stored in RAM. The procedures for saving these changes via the CLI are detailed in the sections to
follow.
CMM Directory Structure
The directory structure that stores the image and configuration files is divided into two parts:
• The certified directory contains files that have been certified by an authorized user as the default files
for the switch. Should the switch reboot, it would reload the files in the certified directory to reactivate
its functionality.
• The working directory contains files that may or may not be altered from the certified directory. The
working directory is a holding place for new files. Files in the working directory must be tested before
committing them to the certified directory. You can save configuration changes to the working directory. You can reboot the switch from the working directory using the reload working command as
described in “Rebooting from the Working Directory” on page 4-13.
The running configuration is the current operating parameters of the switch, obtained from information
from the image and configuration files. The running configuration is in the RAM memory.
OmniSwitch 7700/7800/8800 Switch Management Guide
April 2006
page 4-3
CMM Files
Managing CMM Directory Content
Where is the Switch Running From?
When a switch has booted and is running, the software used will come either from the certified directory
or the working directory. In most instances, the switch boots from the certified directory. (A switch can be
specifically booted from the working directory by using the reload working config command described in
“Rebooting from the Working Directory” on page 4-13.)
Once the switch is booted and functioning, the switch is said to be running from a particular directory,
either the working or certified directory. Where the switch is running from is determined at the time of the
switch’s boot-up.
At the time of a normal boot (by turning the switch power on or using the reload command), a comparison is made between the working directory and the certified directory. If the directories are completely
synchronized (i.e., all files are the same in both directories) the switch will be running from the working
directory. If there is any discrepancy between the two directories (even as small as a different file size or
file date), the switch will be running from the certified directory.
If a switch is running from the certified directory, you will not be able to save any changes made in the
running configuration. If the switch reboots, the changes made to switch parameters will be lost. In order
to save running configuration changes, the switch must be running from the working directory. You can
determine where the switch is running from by using the show running directory command described in
“Show Currently Used Configuration” on page 4-17.
Software Rollback Feature
The directory structure inherent in the CMM allows for a switch to return to a previous, more reliable
version of image or configuration files.
Initially, when normally booting the switch, the software is loaded from the certified directory. This is the
repository for the most reliable software. When the switch is booted, the certified directory is loaded into
the running configuration and used to manage switch functionality.
Changes made to the configuration file in the running configuration will alter switch functionality. These
changes are not saved unless explicitly done so by the user using the copy running-config working
command described in “Copying the Running Configuration to the Working Directory” on page 4-11. If
the switch reboots before the configuration file in the running configuration is saved, then the certified
directory is re-loaded to the running configuration and changes made to the configuration file in the
running configuration prior to the reboot are lost.
Changes to the configuration file must be initially saved to the working directory using the copy runningconfig working or the write-memory commands. Once the configuration file is saved to the working
directory, the switch can be rebooted from the working directory using the reload working command,
described in “Rebooting from the Working Directory” on page 4-13.
Likewise, new image files are always placed in the working directory first. The switch can then be rebooted from the working directory. When this is done, the contents of the working directory are loaded and
used to set up the running configuration, which is used to control switch functionality. New image or
configuration files can now be tested for a time to decide whether they are reliable.
Should the configuration or images files prove to be less reliable than their older counterparts in the certified directory, then the switch can be rebooted from the certified directory, and “rolled back” to an earlier
version.
Once the contents of the working directory are established as good files, then these files can be saved to
the certified directory and used as the most reliable software to which the switch can be rolled back to in
an emergency situation.
page 4-4
OmniSwitch 7700/7800/8800 Switch Management Guide
April 2006
Managing CMM Directory Content
CMM Files
Software Rollback Configuration Scenarios
The examples below illustrate a few likely scenarios and explain how the running configuration, working
directory, and certified directory interoperate to facilitate the software rollback. In the examples below, R
represents the running configuration, W represents the working directory, and C represents the certified
directory.
Note. For the following scenarios, it is important to remember the difference between where the switch
boots from, and where the switch is running from. See “Where is the Switch Running From?” on page 4-4
for more information.
Scenario 1: Running Configuration Lost After Reboot
Switch X is new from the factory. It is plugged in and booted up from the certified directory, the contents
of which are loaded into the running configuration. Since the working and certified directories are exactly
the same, the switch is running from the working directory. Through the course of several days, changes
are made to the configuration file in the running configuration.
Power to the switch is interrupted, the switch reboots from certified directory, all of the changes in the
running configuration are overwritten, and the switch rolls back to the certified directory (which in this
case is the factory setting).
This is illustrated in the diagram below:
R
W
C
1. Switch boots
from certified
directory using
factory configuration settings.
Since the working
and certified
directories are the
same, it will be
running from the
working directory.
R
W
C
2. Changes are
made to the running configuration and stored in
the running configuration.
R
W
C
3. Power is interrupted and the
switch goes down.
R
W
C
4. Switch reboots
from certified
directory using
factory configuration settings; running configuration
changes are lost.
Since the working
and certified directories are the same,
it will be running
from the working
directory.
Running Configuration is Overwritten by the Certified Directory on Boot
OmniSwitch 7700/7800/8800 Switch Management Guide
April 2006
page 4-5
CMM Files
Managing CMM Directory Content
Scenario 2: Running Configuration Saved to Working Directory
The network administrator recreates Switch X’s running configuration and immediately saves the running
configuration to the working directory.
In another mishap, the power to the switch is again interrupted. The switch reboots from certified directory, overwriting all of the changes in the running configuration, and rolls back to the certified directory
(which in this case is the factory settings). However, since the configuration file was saved to the working
directory, that file is still in the working directory and can be retrieved. Since the working and certified
directories are not exactly the same, the switch is running from the certified directory.
This is illustrated in the diagram below:
R
W
C
1. Switch boots
from certified
directory using
factory configuration settings.
Since the working
and certified
directories are the
same, it will be
running from the
working directory.
R
W
C
2. Changes are
made to the running configuration and stored in
the running configuration, then
saved to the working directory.
R
W
C
3. Power is interrupted and the
switch goes down.
R
W
C
4. Switch reboots
from certified
directory using
factory configuration settings; saved
configuration file
is still in the working directory.
Since the working
and certified directories are not the
same, it will be
running from the
certified directory.
Running Configuration Saved to Working Directory
It is important to note that in the above scenario, the switch is using the configuration file from the certified directory, not the working directory. The changes made and saved to the working directory are not in
effect. The switch can be booted from the working directory using reload working command.
page 4-6
OmniSwitch 7700/7800/8800 Switch Management Guide
April 2006
Managing CMM Directory Content
CMM Files
Scenario 3: Saving the Working Directory to the Certified Directory
After running the modified configuration settings, and seeing no problems, the network administrator
decides that the modified configuration settings (stored in the working directory) are completely reliable.
The administrator then decides to save the contents of the working directory to the certified directory.
Once the working directory is saved to the certified directory, the modified configuration file is included
in a normal reboot.
Since the working and certified directories are exactly the same, the switch is running from the working
directory.
R
W
C
R
1. Switch boots
from certified
directory using
factory configuration settings.
Since the working
and certified
directories are the
same, it will be
running from the
working directory.
W
C
2. Changes are
made to the running configuration and stored in
the running configuration, saved
to the working
directory, then
saved to the certified directory.
R
W
R
C
3. Power is interrupted and the
switch goes down.
W
C
4. Switch reboots
from certified
directory using
saved configuration file in the certified directory.
Since the working
and certified directories are the same,
it will be running
from the working
directory.
Running Configuration is Saved to Working, then Certified, Directory
OmniSwitch 7700/7800/8800 Switch Management Guide
April 2006
page 4-7
CMM Files
Managing CMM Directory Content
Scenario 4: Rollback to Previous Version of Switch Software
Later that year, an upgraded image file for the ENI module is released from Alcatel. The network administrator loads the new file via FTP to the working directory of the switch and reboots the switch from the
working directory. Since the switch is specifically booted from the working directory, the switch is
running from the working directory.
After the reboot loads the new image file from the working directory, it is discovered that the image file
was corrupted during the FTP transfer. Rather than having a disabled switch, the network administrator
can reboot the switch from the certified directory (which has the previous, more reliable version of the
ENI image file) and wait for a new version of the ENI image. In the meantime, the administrator’s switch
is still functioning.
This is illustrated below:
R
W
C
1. The new
eni.img file is
installed in the
working directory.
R
W
C
2. The new
eni.img file is
loaded via a
reboot from the
working directory. The switch is
running from the
working directory.
R
W
C
3. The file is corrupted and doesn’t
boot correctly.
R
W
C
4. Switch reboots
from certified
directory using old
eni.img file. Since
the working and
certified directories are not the
same, it will be
running from the
certified directory.
Switch Rolls Back to Previous File Version
CMM Redundancy
CMM redundancy is one of the switch’s most important fail over features. For CMM redundancy, two
fully-operational CMM modules must be installed in the chassis at all times. In addition, the software on
the two CMM modules must be synchronized. (Refer to “Synchronizing the Primary and Secondary
CMMs” on page 4-21 for more information.)
When two CMMs are running in the switch, one CMM has the primary role and one CMM has the secondary role at any given time. The primary CMM manages the current switch operations while the secondary
CMM provides backup (also referred to as “fail over”).
page 4-8
OmniSwitch 7700/7800/8800 Switch Management Guide
April 2006
Managing CMM Directory Content
Managing the Directory Structure of the CMM (Non-Redundant)
Managing the Directory Structure of the CMM
(Non-Redundant)
The following sections define commands that allow the user to manipulate the files in the directory structure of a non-redundant CMM.
Note. All of the commands described in the following sections work on a switch with a redundant CMM.
However, there may be special circumstances that apply when modifying parameters on a switch with a
redundant CMM that do not apply to a switch without a redundant CMM. Redundant CMM CLI
command usage is covered in “Managing Redundant CMMs” on page 4-19. See the OmniSwitch 7700/
7800 Hardware Users Guide and OmniSwitch 8800 Hardware Users Guide for more information on
CMM redundancy.
Rebooting the Switch
When booting the switch, the software in the certified directory is loaded into the RAM memory of the
switch and used as a running configuration, as shown:
Working
Certified
Primary CMM
Running
The certified directory software should be the best, most reliable versions of both the image files and the
boot.cfg file (configuration file). The switch will run from the certified directory after boot if the working
and certified directories are not exactly the same. If they are the same, then the switch will run from the
working directory, allowing changes made to the running configuration to be saved. If the switch is
running from the certified directory, you cannot save any changes to the running configuration, or copy
files between the directories.
OmniSwitch 7700/7800/8800 Switch Management Guide
April 2006
page 4-9
Managing the Directory Structure of the CMM (Non-Redundant)
Managing CMM Directory Content
To reboot the switch from the certified directory, enter the reload command at the prompt:
-> reload
This command loads the image and configuration files in the certified directory into RAM memory. These
files control the operation of the switch.
Note. When the switch reboots using the reload command, it will boot from the certified directory. Any
information in the running configuration that has not been saved to the working directory will be lost.
Scheduling a Reboot
It is possible to cause a reboot of the primary or secondary CMM at a future time by setting time parameters in conjuction with the reload command, using the in or at keywords.
To schedule a reboot of the primary CMM in 3 hours and 3 minutes, you would enter:
-> reload primary in 3:03
To schedule a reboot of the primary CMM for June 30 at 8:00pm, you would enter:
-> reload primary at 20:00 june 30
Note. Scheduled reboot times should be entered in military format (i.e., a twenty-four hour clock).
Canceling a Scheduled Reboot
To cancel a scheduled reboot, use the cancel keyword. A cancel command can be specified for a primary
reboot, a secondary reboot, or all currently scheduled reboots. For example, to cancel the primary reboot
set above, enter the following:
-> reload primary cancel
To cancel all scheduled reboots with a single command, enter the following:
-> reload cancel
Checking the Status of a Scheduled Reboot
You can check the status of a reboot set for a later time by entering the following command:
-> show reload
or
-> show reload status
The reload command is described in detail in the OmniSwitch CLI Reference Guide.
page 4-10
OmniSwitch 7700/7800/8800 Switch Management Guide
April 2006
Managing CMM Directory Content
Managing the Directory Structure of the CMM (Non-Redundant)
Copying the Running Configuration to the Working Directory
Once the switch has booted and is running, a user can modify various parameters of switch functionality.
These changes are stored temporarily in the running configuration in RAM memory of the switch. In order
to save these changes, the running configuration must be saved to the working directory as shown:
Working
Certified
2
1
Primary CMM
Running
In this diagram:
1 The switch boots from the certified directory, and the software is loaded to the RAM memory to create
a running configuration.
2 Changes are made in the running configuration and are saved to the working directory.
Now the boot.cfg file in the running configuration and the boot.cfg file in the working directory are identical. Should the switch go down or reboot, the configuration changes made can be restored.
Note. If the switch is rebooted at this point in the process, since the certified and working directory
boot.cfg files are not the same, the switch will boot and run from the certified directory. (See “Where is
the Switch Running From?” on page 4-4 for a description of this process.)
The modifications made to the functionality of the switch are recorded in the running configuration, in
RAM. These changes in RAM memory are only valid until the switch is rebooted. At that time, the switch
reboots from the certified directory. If the running configuration is not saved to the working directory
before a reboot, then the changes made in the running configuration are lost. To save these changes it is
necessary to save the contents of the running configuration to the working directory.
OmniSwitch 7700/7800/8800 Switch Management Guide
April 2006
page 4-11
Managing the Directory Structure of the CMM (Non-Redundant)
Managing CMM Directory Content
To save the running configuration to the working directory, enter the copy running-config working or
write memory command at the prompt, as shown:
-> copy running-config working
or
-> write memory
The above commands perform the same function. When these commands are issued the running configuration, with all modifications made, is saved to a file called boot.cfg in the working directory.
Note. This command will not function if the switch is running from the certified directory. See “Where is
the Switch Running From?” on page 4-4 for an explanation.
The copy running-config working and write memory commands are described in detail in the
OmniSwitch CLI Reference Guide.
Note. The saved boot.cfg file will be overwritten if the takeover command is executed after the copy
running-config working or write memory commands, in an OmniSwitch set up with redundant CMMs.
page 4-12
OmniSwitch 7700/7800/8800 Switch Management Guide
April 2006
Managing CMM Directory Content
Managing the Directory Structure of the CMM (Non-Redundant)
Rebooting from the Working Directory
Besides a regular boot of the switch (from the certified directory), you can also force the switch to boot
from the working directory. This is useful for checking whether a new configuration or image file will
boot the switch correctly, before committing it to the certified directory. (For information on saving the
working directory to the certified directory, see “Copying the Working Directory to the Certified Directory” on page 4-15.)
The following picture illustrates the case of a switch being rebooted from the working directory:
Primary CMM
Working
2
Certified
1
3
Running
In the above diagram:
1 The certified directory is used to initially boot the switch.
2 Changes are made to the configuration file and are saved to the configuration file in the working direc-
tory using the copy running-config working command, described in the section “Copying the Running
Configuration to the Working Directory” on page 4-11.
3 The switch is rebooted from the working directory using the reload working command.
When a reload working command is entered, the switch prohibits a takeover from the secondary CMM.
Switch functions will be suspended until the boot process is complete.
If you decide against using the new software booted from the working directory, the switch can revert to
the software stored in the certified directory by using the copy certified working command as described
in “Copying the Certified Directory to the Working Directory” on page 4-16, or by using the reload
command as described in “Rebooting the Switch” on page 4-9.
Note. If the switch is rebooted before using the copy certified working command, the switch will be
running from the certified directory as the working and certified directories are not the same. This behavior is described in “Where is the Switch Running From?” on page 4-4.
OmniSwitch 7700/7800/8800 Switch Management Guide
April 2006
page 4-13
Managing the Directory Structure of the CMM (Non-Redundant)
Managing CMM Directory Content
To reboot the switch from the working directory, enter the following command at the prompt, along with a
time out period (in minutes), as shown:
-> reload working rollback-timeout 5
At the end of the timeout period, the switch will reboot again normally, as if a reload command had been
issued.
Rebooting the Switch from the Working Directory with No Rollback Timeout
It is possible to reboot from the working directory without setting a rollback timeout, in the following
manner:
-> reload working no rollback-timeout
Scheduling a Working Directory Reboot
It is possible to cause a working directory reboot of the CMM at a future time by setting time parameters
in conjuction with the reload working command, using the in or at keywords. You will still need to specify a rollback timeout time, or that there is no rollback.
To schedule a working directory reboot of the CMM in 3 hours and 3 minutes with no rollback timeout,
you would enter:
-> reload working no rollback-timeout in 3:03
To schedule a working directory reboot of the CMM at 8:00pm with a rollback timeout of 10 minutes, you
would enter:
-> reload working rollback-timeout 10 at 20:00
Note. Scheduled reboot times should be entered in military format (i.e., a twenty-four hour clock).
Cancelling a Rollback Timeout
To cancel a rollback timeout, enter the reload cancel command as shown:
-> reload primary cancel
or
-> reload cancel
The reload working command is described in detail in the OmniSwitch CLI Reference Guide.
page 4-14
OmniSwitch 7700/7800/8800 Switch Management Guide
April 2006
Managing CMM Directory Content
Managing the Directory Structure of the CMM (Non-Redundant)
Copying the Working Directory to the Certified Directory
When the running configuration is saved to the working directory, the switch’s working and certified
directories are now different. This difference, if the CMM reboots, causes the switch to boot and run from
the certified directory. When the switch is booted and run from the certified directory, changes made to
switch functionality cannot be saved and files cannot be moved between directories. The boot.cfg file
saved on the working directory needs to be saved to the certified directory, as shown:
3
Working
Certified
2
1
Primary CMM
Running
In this diagram:
1 The switch boots from the certified directory and changes are made to the running configuration.
2 The changes are saved to the working directory as the boot.cfg file.
3 The contents of the working directory are saved to the certified directory.
Once the working directory is copied to the certified directory, and the switch reboots, it will reboot from
the certified directory but run from the working directory. When the switch runs in this fashion, changes
made to the running configuration can be saved to the working directory as described in “Copying the
Running Configuration to the Working Directory” on page 4-11.
Note. Only software that has been thoroughly validated as viable and reliant software should be copied to
the certified directory. Once you copy software to the certified directory, you will not be able to recover a
previous version of the image or configuration files.
OmniSwitch 7700/7800/8800 Switch Management Guide
April 2006
page 4-15
Managing the Directory Structure of the CMM (Non-Redundant)
Managing CMM Directory Content
When the software on the working directory of a switch has proven to be effective and reliable, eventually
the contents of the working directory should be copied into the certified directory.
To copy the contents of the working directory to the certified directory, enter the following command at
the prompt:
-> copy working certified
The copy working certified command is only valid if the switch is running from the working directory. If
you attempt to copy the working directory to the certified directory when the switch is running from the
certified directory, nothing will happen, and the files in the certified directory remain unchanged.
Note. In order for this command to work, the amount of free space in flash must equal the size of the files
being copied. If there isn’t enough free space, the copy attempt will fail and an error message is generated. Only image files, the boot.cfg file, and the certs.pem file should be kept in the working directory.
Copying the Certified Directory to the Working Directory
It is possible to copy the contents of the certified directory to the working directory. This is done by using
the following CLI command:
-> copy certified working
If this command is executed, all files in the working directory will be permanently overwritten by the
contents of the certified directory.
The copy certified working command is described in detail in the OmniSwitch CLI Reference Guide.
Note. In order for this command to work, the amount of free space in flash must equal the size of the files
being copied. If there isn’t enough free space, the copy attempt will fail and an error message is generated. Only image files, the boot.cfg file, and the certs.pem file should be kept in the certified directory.
page 4-16
OmniSwitch 7700/7800/8800 Switch Management Guide
April 2006
Managing CMM Directory Content
Managing the Directory Structure of the CMM (Non-Redundant)
Show Currently Used Configuration
When a switch is booted, the certified and working directories are compared. If they are the same, the
switch runs from the working directory. If they are different, the switch runs from the certified directory.
A switch running from the certified directory cannot modify directory contents. (This topic is covered in
“Where is the Switch Running From?” on page 4-4.)
To check the directory from where the switch is currently running, enter the following command:
-> show running-directory
CONFIGURATION STATUS
Running CMM
CMM Mode
Current CMM Slot
Running configuration
Certify/Restore Status
SYNCHRONIZATION STATUS
Flash Between CMMs
Running Configuration
NIs Reload On Takeover
:
:
:
:
:
PRIMARY,
DUAL CMMs,
A,
WORKING,
CERTIFY NEEDED
: NOT SYNCHRONIZED,
: SYNCHRONIZED,
: ALL NIs
The command returns the directory the switch is currently running from (working or certified) and which
CMM is currently controlling the switch (primary or secondary), as well as the synchronization status and
the certify status.
The show running-directory command is described in detail in the OmniSwitch CLI Reference Guide.
OmniSwitch 7700/7800/8800 Switch Management Guide
April 2006
page 4-17
Managing the Directory Structure of the CMM (Non-Redundant)
Managing CMM Directory Content
Show Switch Files
The files currently installed on a switch can be viewed using the show microcode command. This
command displays the files currently in the specified directory.
To display files, enter the command with a directory, as shown:
-> show microcode certified
Package
Release
Size
Description
-----------------+---------------+--------+----------------------------------Fadvrout.img
5.4.1.231.R01
987442 Alcatel Advanced Routing
Fbase.img
5.4.1.231.R01
4361865 Alcatel Base Software
Fdiag.img
5.4.1.231.R01
331499 Alcatel Diagnostics Archive
Feni.img
5.4.1.231.R01
1319483 Alcatel NI Software
Fl2eth.img
5.4.1.231.R01
990701 Alcatel Layer 2, Ethernet
Fos.img
5.4.1.231.R01
1498479 Alcatel Operating System
Fqos.img
5.4.1.231.R01
314177 Alcatel Quality of Service
Frout.img
5.4.1.231.R01
769574 Alcatel Routing
Fsecu.img
5.4.1.231.R01
129799 Alcatel Security
Fweb.img
5.4.1.231.R01
1472785 Alcatel Webview - Main
Fwebadvrout.img
5.4.1.231.R01
251953 Alcatel Webview - Advanced Routing
Fwebl2eth.img
5.4.1.231.R01
330891 Alcatel Webview - Layer 2 and Ethern
Fwebqos.img
5.4.1.231.R01
263724 Alcatel Webview - Quality of Service
Fwebrout.img
5.4.1.231.R01
350642 Alcatel Webview – Routing
Fwebsecu.img
5.4.1.231.R01
212664 Alcatel Webview – Security
If no directory is specified, the files that have been loaded into the running configuration are shown.
To display the date when the archive was last updated, enter the show microcode command with the
history keyword, as shown:
-> show microcode history
Archive Created 1/1/06 6:49:34
page 4-18
OmniSwitch 7700/7800/8800 Switch Management Guide
April 2006
Managing CMM Directory Content
Managing Redundant CMMs
Managing Redundant CMMs
The following section describe circumstances that the user should be aware of when managing the CMM
directory structure on a switch with redundant CMMs. It also includes descriptions of CLI commands
designed to synchronize software between the primary and secondary CMMs.
Rebooting the Switch
You can specify a reboot of the secondary CMM by using the secondary keyword in conjunction with the
reload command. For example, to reboot the secondary CMM, enter the reload command as shown:
-> reload secondary
In this case, the current primary CMM continues to run, while the secondary CMM reboots.
Scheduling a Reboot
It is possible to cause a reboot of the primary or secondary CMM at a future time by setting time parameters in conjuction with the reload command.
For example, to schedule a reboot of the secondary CMM in 8 hours and 15 minutes on the same day,
enter the following at the prompt:
-> reload secondary in 08:15
Note. Scheduled reboot times should be entered in military format (i.e., a twenty-four hour clock).
Canceling a Scheduled Reboot
To cancel a scheduled reboot, use the cancel keyword. A cancel command can be specified for a primary
reboot, a secondary reboot, or all currently scheduled reboots. For example, to cancel the primary reboot
set above, enter the following:
-> reload secondary cancel
Secondary CMM Fail Over
When rebooting the switch during normal operation, and a secondary CMM is installed, the switch will
“fail over” to the secondary CMM. “Fail over” means the secondary CMM takes the place of the primary
CMM. This prevents the switch from ceasing functionality during the boot process. If the versions of the
software on the primary and secondary CMM are not synchronized, the NI modules on the switch will
restart, causing severe packet loss.
Synchronizing the primary and secondary CMMs is done using the copy flash-synchro command
described in “Synchronizing the Primary and Secondary CMMs” on page 4-21.
Note. If a switch fails over to the secondary CMM, it is necessary to have a management interface connection to the secondary CMM (such as an Ethernet port or a console port).
OmniSwitch 7700/7800/8800 Switch Management Guide
April 2006
page 4-19
Managing Redundant CMMs
Managing CMM Directory Content
Copying the Working Directory to the Certified Directory
Synchronizing the Primary and Secondary CMMs
At the same time that you copy the working directory to the certified directory, you can synchronize the
secondary CMM with the primary CMM. In the case of redundant CMMs, this ensures that the two
modules are booting from the same software.
To copy the working directory to the certified directory of the primary CMM, and at the same time
synchronize the software of the primary and secondary CMM, use the following command:
-> copy working certified flash-synchro
Note. This command will not function if the switch is running from the certified directory. See “Where is
the Switch Running From?” on page 4-4 for an explanation.
The copy working certified command is described in detail in the OmniSwitch CLI Reference Guide.
Note. When synchronizing the primary and secondary CMMs, it is important to remember that the
boot.params file and the switch date and time are not automatically synchronized. See the your Getting
Started Guide for information on the boot.params file, and Chapter 2, “Managing System Files,” for
information on setting the switch date and time. The date and time are synchronized using the system
time-and-date synchro command.
page 4-20
OmniSwitch 7700/7800/8800 Switch Management Guide
April 2006
Managing CMM Directory Content
Managing Redundant CMMs
Synchronizing the Primary and Secondary CMMs
If you have a secondary CMM in your switch, it will be necessary to synchronize the software between the
primary and secondary CMM. If the primary CMM goes down (for example, during a reboot), then the
switch fails over to the secondary CMM. If the software in the secondary CMM is not synchronized with
the software in the primary CMM, the switch will not function as configured by the administrator.
The synchronization process is shown in the diagram below:
Working
Certified
1
Working
Certified
3
Primary CMM
2
Secondary CMM
Running
In the above diagram:
1 The primary CMM copies its certified directory to the secondary CMM working directory (remember
that you cannot copy files directly to the certified directory, they must first be copied to the working directory).
2 An automatic reboot is then triggered on the secondary CMM, loading the new contents of the work-
ing directory to the running configuration.
3 If no problems exist, then the working directory is automatically copied to the certified directory of the
secondary CMM.
If the secondary CMM fails to boot properly, then the contents of the secondary CMM’s certified directory overwrite the new software on the working directory of the secondary CMM. This has the effect of
denying the attempted synchronization process.
This process copies the files in the certified directory of the primary CMM to the certified directory of the
secondary CMM. This prevents the secondary CMM from rebooting using incorrect or out-of-date software should the primary CMM go down.
OmniSwitch 7700/7800/8800 Switch Management Guide
April 2006
page 4-21
Managing Redundant CMMs
Managing CMM Directory Content
To synchronize the secondary CMM to the primary CMM, enter the following command at the prompt:
-> copy flash-synchro
The copy flash-synchro command is described in detail in the OmniSwitch CLI Reference Guide.
Note. When synchronizing the primary and secondary CMMs, it is important to remember that the
boot.params file and the switch date and time are not automatically synchronized. See the your Getting
Started Guide for information on the boot.params file, and Chapter 2, “Managing System Files,” for
information on setting the switch date and time. The date and time are synchronized using the system
time-and-date synchro command.
Synchronizing the System Date and Time
To synchronize the system date and time, use the system time-and-date synchro command. This
command synchronizes the secondary CMM date and time to the primary CMM date and time.
Enter the command as shown:
-> system time-and-date synchro
page 4-22
OmniSwitch 7700/7800/8800 Switch Management Guide
April 2006
Managing CMM Directory Content
Managing Redundant CMMs
Swapping the Primary CMM for the Secondary CMM
If the primary CMM is having problems, or if it needs to be shut down, then the secondary CMM can be
instructed to “take over” switch operation as the primary CMM is shut down.
Note. It is important that the software for the secondary CMM has been synchronized with the primary
CMM before you initiate a secondary CMM takeover. If the CMMs are not synchronized, the takeover
could result in the switch running old or out-of-date software. Synchronizing the primary and secondary
CMMs is described in “Synchronizing the Primary and Secondary CMMs” on page 4-21.
To instruct the secondary CMM to takeover switch functions from the primary CMM, enter the following
command at the prompt:
-> takeover
The takeover command is described in detail in the OmniSwitch CLI Reference Guide.
Note. The saved boot.cfg file will be overwritten if the takeover command is executed after the copy
running-config working or write memory commands, in an OmniSwitch set up with redundant CMMs.
OmniSwitch 7700/7800/8800 Switch Management Guide
April 2006
page 4-23
Managing Redundant CMMs
Managing CMM Directory Content
Show Currently Used Configuration
In a chassis with a redundant CMM, the display for the currently running configuration tells the user if the
primary and secondary CMM is synchronized.
To check the directory from where the switch is currently running and if the primary and secondary CMM
are synchronized, enter the following command:
-> show running-directory
CONFIGURATION STATUS
Running CMM
CMM Mode
Current CMM Slot
Running configuration
Certify/Restore Status
SYNCHRONIZATION STATUS
Flash Between CMMs
Running Configuration
NIs Reload On Takeover
:
:
:
:
:
PRIMARY,
DUAL CMMs,
A,
WORKING,
CERTIFY NEEDED
: NOT SYNCHRONIZED,
: SYNCHRONIZED,
: ALL NIs
The command returns the directory the switch is currently running from (working or certified) and which
CMM is currently controlling the switch (primary or secondary). It also displays whether the working and
certified directories are the same, and if a synchronization is needed between the primary and secondary
CMM. In addition, the command output displays how many Network Interface (NI) modules will be
reloaded in the event of a management module takeover. Options include NONE, ALL, or a list of specific
NIs. Refer to the section below for additional information on NI behavior during a redundant CMM takeover.
The show running-directory command is described in detail in the OmniSwitch CLI Reference Guide.
NI Module Behavior During Takeover
If there are no unsaved configuration changes and the flash directories on both the primary and secondary
management modules have been synchronized via the copy flash-synchro command, no NIs will be
reloaded if a management module takeover occurs. As a result, data flow is not interrupted on the NIs
during the takeover.
If a configuration change is made to one or more NI modules (e.g., a VLAN is configured on several
different interfaces), and the changes are not saved via the write memory command, the corresponding
NIs will automatically reload if a management module takeover occurs. Data flow on the affected NIs will
be interrupted until the reload is complete. Note that the NIs will reload whether or not the flash synchronization status shows SYNCHRONIZED. This is because the unsaved changes have occurred in the
running configuration (i.e., RAM), and have not been written to the flash directory’s configuration file. In
this case, a list of only the affected NIs displays in the table output (e.g., 1 6 9 12).
If the flash directories on the primary and secondary management modules are not synchronized (e.g., a
copy flash-synchro command has not been issued recently), all NIs will be reloaded automatically if a
management module takeover occurs. Data flow will be interrupted on all NIs until the reload is complete.
page 4-24
OmniSwitch 7700/7800/8800 Switch Management Guide
April 2006
Managing CMM Directory Content
Emergency Restore of the boot.cfg File
Emergency Restore of the boot.cfg File
If all copies of the boot.cfg file have been deleted and a system boot has occurred, network configuration
information is permanently lost. However, if the files have been deleted and no boot has occurred you can
issue a write memory command to regenerate the boot.cfg file.
Can I Restore the boot.file While Running from Certified?
Yes. While it is not recommended that you routinely save configuration changes while running from the
certified directory, you can perform an emergency restore of your configuration by following the steps:
1 Copy your current configuration to a manually-generated boot.cfg file in the /flash directory by entering the following command:
-> configuration snapshot all boot.cfg
2 Copy the new boot.cfg file from the /flash directory to the /flash/working directory using the cp
command. For example:
-> cp boot.cfg working/boot.cfg
3 Reboot the switch from the /flash/working directory by entering the following command:
-> reload working no rollback-timeout
Once the boot.cfg file is confirmed to be good, it needs to be saved to the certified directory using the
procedure described in “Copying the Working Directory to the Certified Directory” on page 4-15.
OmniSwitch 7700/7800/8800 Switch Management Guide
April 2006
page 4-25
Displaying CMM Conditions
Managing CMM Directory Content
Displaying CMM Conditions
To show various CMM conditions, such as where the switch is running from and which files are installed,
use the following CLI show commands:
show running-directory
Shows the directory from where the switch was booted.
show reload
Shows the status of any time delayed reboot(s) that are pending on the
switch.
show microcode
Displays microcode versions installed on the switch.
show microcode history
Displays the archive history for microcode versions installed on the
switch.
For more information on the resulting displays from these commands, see the OmniSwitch CLI Reference
Guide. An example of the output for the show microcode command is given in “Show Switch Files” on
page 4-18.
page 4-26
OmniSwitch 7700/7800/8800 Switch Management Guide
April 2006
5
Using the CLI
Alcatel’s Command line interface (CLI) is a text-based configuration interface that allows you to
configure switch applications and to view switch statistics. Each CLI command applicable to the switch is
defined in the OmniSwitch CLI Reference Guide. All command descriptions listed in the Reference Guide
include command syntax definitions, defaults, usage guidelines, example screen output and release history.
In This Chapter
This chapter describes various rules and techniques that will help you use the CLI to its best advantage.
CLI commands are used in the configuration examples. For more details about the syntax of commands,
see the OmniSwitch CLI Reference Guide.
This chapter includes:
• “CLI Overview” on page 5-2
• “Command Entry Rules and Syntax” on page 5-3
• “Command Help” on page 5-5
• “CLI Services” on page 5-9
• “Logging CLI Commands and Entry Results” on page 5-15
OmniSwitch 7700/7800/8800 Switch Management Guide
April 2006
page 5-1
CLI Specifications
Using the CLI
CLI Specifications
The following table lists specifications for the Command Line Interface.
Configuration Methods
• Online configuration via real-time sessions using CLI commands.
• Offline configuration using text file holding CLI commands.
Command Capture Feature
Snapshot feature captures switch configurations in a text file.
User Service Features
•
•
•
•
•
•
•
•
•
•
Command Line Editing
Command Prefix Recognition
CLI Prompt Option
Command Help
Keyword Completion
Command History (up to 30 commands)
Command Logging (up to 100 commands; detailed information)
Syntax Error Display
Alias Command Option
More Command
CLI Overview
The CLI uses single-line text commands that are similar to other industry standard switch interfaces.
However, the Alcatel CLI is different from industry standard interfaces in several ways. Unlike other
switch interfaces, the Alcatel CLI has no concept of command modes. Other CLI’s require you to step
your way down a tree-type hierarchy to access commands. Once you enter a command mode, you must
step your way back to the top of the hierarchy before you can enter a command in a different mode. The
Alcatel switch will answer any CLI command at any time because there is no hierarchy.
Online Configuration
To configure parameters and view statistics you must connect the switch to a terminal, such as a PC or
UNIX workstation, using terminal emulation software. This connection can be made directly to the
switch’s serial port, through a modem, or over a network via Telnet. For information about connecting a
terminal to the switch, see the OmniSwitch 7700/7800 Getting Started Guide or OmniSwitch 8800 Getting
Started Guide.
Once you are logged in to the switch, you may configure the switch directly using CLI commands.
Commands executed in this manner normally take effect immediately. The majority of CLI commands are
independent, single-line commands and therefore can be entered in any order. However, some functions
may require you to configure specific network information before other commands can be entered. For
example, before you can assign a port to a VLAN, you must first create the VLAN. For information about
CLI command requirements, refer to the OmniSwitch CLI Reference Guide.
page 5-2
OmniSwitch 7700/7800/8800 Switch Management Guide
April 2006
Using the CLI
Command Entry Rules and Syntax
Offline Configuration Using Configuration Files
CLI configuration commands can be typed into a generic text file. When the text file is placed in the
switch /flash/working directory, its commands are applied to the switch when the configuration apply
command is issued. Files used in this manner are called configuration files.
A configuration file can be viewed or edited offline using a standard text editor. It can then be uploaded
and applied to additional switches in the network. This allows you to easily clone switch configurations.
This ability to store comprehensive network information in a single text file facilitates troubleshooting,
testing, and overall network reliability.
See Chapter 6, “Working With Configuration Files,” for detailed information about configuration files.
Command Entry Rules and Syntax
When you start a session on the switch, you can execute CLI commands as soon as you are logged in. The
following rules apply:
• Enter only one command per line.
• No command may be extended across multiple lines.
• Passwords are case sensitive.
• Commands are not case sensitive. The switch accepts commands entered in upper case, lower case or a
combination of both.
• Press Enter to complete each command line entry.
• To use spaces within a user-defined text string, you must enclose the entry in quotation marks (“ ”).
• If you receive a syntax error (i.e., ERROR: Invalid entry:), double-check your command as written and
re-enter it exactly as described in the OmniSwitch CLI Reference Guide. Be sure to include all syntax
option parameters.
• To exit the CLI, type exit and press Enter.
Text Conventions
The following table contains text conventions and usage guidelines for CLI commands as they are
documented in this manual.
bold text
Indicates basic command and keyword syntax.
Example: show snmp station
“ ” (Quotation Marks)
Used to enclose text strings that contain spaces
Example: vlan 2 name “new test vlan”
OmniSwitch 7700/7800/8800 Switch Management Guide
April 2006
page 5-3
Command Entry Rules and Syntax
Using the CLI
Using “Show” Commands
The CLI contains show commands that allow you to view configuration and switch status on your console
screen. The show syntax is used with other command keywords to display information pertaining to those
keywords.
For example, the show vlan command displays a table of all VLANs currently configured, along with
pertinent information about each VLAN. Different forms of the show vlan command can be used to
display different subsets of VLAN information. For example the show vlan rules command displays all
rules defined for a VLAN.
Using the “No” Form
The OmniSwitch CLI Reference Guide defines all CLI commands and explains their syntax. Whenever a
command has a “no” form, it is described on the same page as the original command. The “no” form of a
command will mean one of the following:
• It can remove the configuration created by a command. For example, you create a VLAN with the vlan
command, and you delete a VLAN with the no vlan command.
• It can reset a configuration value to its default. For example, you configure the time interval that the
switch will use to remove a multicast stream from a port with the ip multicast leave-timeout
command. You set the interval back to its default value with the ip multicast no leave-timeout
command.
Using “Alias” Commands
You may define substitute text for the switch’s CLI commands by using the alias command. There are two
main reasons for defining aliases.
• You can eliminate excess typing by reducing the number of characters required for a command.
To reduce the number of characters required to use the group term in a CLI command, you can change the
syntax to gp as follows:
-> alias gp group
• You can change unfamiliar command words into familiar words or patterns.
If you prefer the term “privilege” to the term “attribute” with reference to a login account’s read-write
capabilities, you can change the CLI word from attrib to privilege by using the following command.
-> alias privilege attrib
After an alias has been defined, both the alias and the original CLI term will be supported as valid CLI
terms. For example if privilege is defined as an alias as shown above, both privilege and attrib will work
as CLI commands and both words are shown when you use the CLI help feature.
You can save command aliases for the current user account by executing the user profile save command.
If the aliases are not saved they will be stored until the user session ends. In this case, once you log off the
switch, substitute terms configured with the alias command are destroyed.
To display aliases, use the show alias command. To set all alias values back to their factory defaults, use
the user profile reset command.
page 5-4
OmniSwitch 7700/7800/8800 Switch Management Guide
April 2006
Using the CLI
Command Help
Partial Keyword Completion
The CLI has a partial keyword recognition feature that allows the switch to recognize partial keywords to
CLI command syntax. Instead of typing the entire keyword, you may type only as many characters as is
necessary to uniquely identify the keyword, then press the Tab key. The CLI will complete the keyword
and place the cursor at the end of the keyword.
When you press Tab to complete a command keyword, one of four things can happen
• You enter enough characters (prior to Tab) to uniquely identify the command keyword.
In this case, pressing Tab will cause the CLI to complete the keyword and place a space followed by the
cursor at the end of the completed keyword.
• You do not enter enough characters (prior to Tab) to uniquely identify the command keyword.
In this case pressing Tab will have no effect.
• You enter characters that do not belong to a keyword that can be used in this instance.
In this case, pressing Tab will remove the characters and place the cursor back to its previous position.
• You enter enough characters (prior to Tab) to uniquely identify a group of keywords such that all
keywords in the group share a common prefix.
In this case, pressing Tab will cause the CLI to complete the common prefix and place the cursor at the
end of the prefix. Note that in this case, no space is placed at the end of the keyword
Note. The keyword completion feature will accept wildcards.
Command Help
The CLI has an internal help feature you can invoke by using the question mark (?) character as a
command. The CLI help feature provides progressive information on how to build your command syntax,
one keyword at a time.
If you do not know the first keyword of the command you need, you can use a question mark character at
the CLI system prompt. The CLI responds by listing command keywords divided into command sets. You
can find the first keyword for the command you need by referring to the list on your screen. The following is a partial display:
-> ?
WHOAMI WHO VIEW VI USER TTY TELNET SYSTEM SWLOG SSH SHOW SFTP SESSION RZ
RMDIR RM RENAME PWD PROMPT NTP NSLOOKUP NO NEWFS MV MOVE MORE MODIFY MKDIR
LS KILL IP INSTALL HISTORY FTP FSCK FREESPACE EXIT DSHELL DIR DELETE DEBUG
CP COMMAND-LOG CHMOD CD ATTRIB ALIAS
(System Service & File Mgmt Command Set)
(Additional output not shown)
Note that the command keywords are shown in all capital letters. The name of the command set is listed
parenthetically below the keywords in initial caps.
OmniSwitch 7700/7800/8800 Switch Management Guide
April 2006
page 5-5
Command Help
Using the CLI
The following table contains the first-level commands and their set names as they are listed on the display
screen when you enter a single question mark and press Enter.
Command Set Name
Commands
System Service &
File Management
WHOAMI, WHO, VIEW, VI, TTY, TELNET, SYSTEM, SWLOG,
SSH, SHOW, SFTP, SESSION, RZ, RMDIR, RM, RENAME,
PWD, PROMPT, NTP, NSLOOKUP, NO, NEWFS, MV, MOVE,
MORE, MODIFY, MKDIR, LS, KILL, IP, INSTALL, HISTORY,
FTP, FSCK, FREESPACE, EXIT, DSHELL, DIR, DELETE,
DEBUG, CP, COMMAND-LOG, CHMOD, CD, ATTRIB, ALIAS
CMM Chassis Supervision COPY, WRITE, POWER, TEMP-THRESHOLD, TAKEOVER,
SYSTEM, SHOW, RELOAD, NO, DEBUG, CONFIGURE
Source Learning
SHOW, PORT-SECURITY, NO, MAC-ADDRESS-TABLE,
DEBUG
Spanning Tree
SHOW, BRIDGE
VLAN
VLAN, SHOW, NO, DEBUG
Link Aggregation
STATIC, SHOW, NO, LINKAGG, LACP
Miscellaneous
HTTP, VRRP, TRACEROUTE, SNMP, SHOW, RMON, PORT,
POLICY, PING, NO, MAC-RANGE, MAC, LANPOWER, IP,
ICMP, HRE, HEALTH, GMAP, DEBUG, CLEAR, ARP, AMAP,
802.1X
AAA & Configuration
Manager
USER, SHOW, PASSWORD, NO, END-USER, DEBUG,
CONFIGURATION, AAA
Interface
TRAP, SHOW, NO, INTERFACES, FLOW, DEBUG
IP Routing & Multicast
SHOW, NO, IP
QoS
SHOW, QOS, POLICY, NO, DEBUG
IPX
SHOW, PING, NO, IPX, DEBUG, CLEAR
Debug
DEBUG
page 5-6
OmniSwitch 7700/7800/8800 Switch Management Guide
April 2006
Using the CLI
Command Help
Tutorial for Building a Command Using Help
The Help feature allows you to figure out syntax for a CLI command by using a series of command line
inquiries together with some educated guesses. If you do not know the correct CLI command you can use
the Help feature to determine the syntax.
This tutorial shows you how to use help to find the CLI syntax to create a VLAN. This VLAN will be
given the ID number 33 and will be named “test vlan 2.”
1 At the command prompt, enter vlan followed by a space and a question mark. The following will
display.
-> vlan ?
^
ROUTER <num>
(Vlan Manager Command Set)
PORT NO <num>
(Group Mobility Command Set)
802.1Q <num>
(Miscellaneous Command Set)
The question mark character invokes the help feature, which displays keywords that can be used with the
vlan prefix. Because you are setting up a new VLAN, you can presume the proper command for this task
will be shown in the VLAN Manager Command Set. This set shows two possible keywords to follow the
vlan syntax: ROUTER and <num>. Because you are assigning an ID number to the VLAN, you can
presume a number should be entered at this time.
Note. The presumptions you make while using the help feature may be educated guesses. Whenever you
make a guess as to the next keyword, it is a good idea to enter the keyword followed by a space and a
question mark.
2 At the command prompt, enter the number 33 followed by a space and a question mark. This step will
either give you more choices or an error message.
-> vlan 33 ?
^
<cr> AUTHENTICATION DISABLE ENABLE NAME NO PORT ROUTER STP
(Vlan Manager Command Set)
BINDING DHCP IP IPX MAC NO PORT PROTOCOL USER
(Group Mobility Command Set)
802.1Q NO
(Miscellaneous Command Set)
In this example, the question mark displays all keywords that can be used with the vlan 33 syntax.
Because you are setting up a new VLAN, and want to give the VLAN a name, you can presume the proper
syntax for this task will be NAME as shown in the VLAN Manager Command Set.
OmniSwitch 7700/7800/8800 Switch Management Guide
April 2006
page 5-7
Command Help
Using the CLI
3 At the command prompt, enter name followed by a space and a question mark. This step will either
give you more choices or an error message.
-> vlan 33 name ?
^
<hex> <"string"> <string>
(Vlan Manager Command Set)
There is a smaller set of keywords available for use with the vlan 33 name syntax. This is because the
command becomes more specialized as more keywords are added. From the choices shown on the screen,
you can enter a hex value, a text string enclosed in quotes (“ ”) or a text string without quotes. In this case,
the name selected for the VLAN includes spaces so you should use the syntax enclosed in quotes.
4 At the command prompt, enter the name of the VLAN enclosed in quotes, followed by a space and a
question mark.
-> vlan 33 name "test vlan 2" ?
^
<cr>
(Vlan Manager Command Set)
When the question mark is issued this time, the only syntax listed is <cr>. This means that the command
syntax is complete. At this point when you press Enter, the command will be issued.
Note. Optional. To verify that the command was accepted, enter the show vlan command. The display is
similar to the one shown here.
-> show vlan
vlan admin
oper
stree
auth
ip
ipx
name
-----+-------+------+-------+------+----+-----+--------------------------------1
on
off
on
off
off off
VLAN 1
33
on
off
on
off
off off
test vlan 2
The second entry verifies that a VLAN was created, the VLAN ID is 33 and the name is test vlan 2.
page 5-8
OmniSwitch 7700/7800/8800 Switch Management Guide
April 2006
Using the CLI
CLI Services
CLI Services
There are several services built into the CLI that help you use the interface. The Command Line Editing
service makes it easy for you to enter and edit repetitive commands. Other CLI services, such as syntax
checking, command help, prefix prompt, and history assist you in selecting and using the correct
command syntax for the task you are performing.
Command Line Editing
CLI commands are entered from your keyboard and are executed when you press Enter. The CLI also has
several editing features that make it easier for you to enter the correct commands, either by allowing you
to correct entry mistakes or by helping you enter the correct command.
Deleting Characters
You can delete CLI command characters by using the Backspace key or the Delete key. The Backspace
key deletes each character in the line, one at a time, from right to left. Note the following command entry:
-> show macrocode
The correct syntax is “show microcode”. To change the spelling in this entry, use the Backspace key to
delete all of the characters after the “m”.
-> show m
Type the correct syntax, then press Enter to execute the command.
To change incorrect syntax with the Delete key, use the Left Arrow key to move the cursor to the left of
the character to be deleted, then use the Delete key to remove characters to the right of the cursor. Note the
following command entry:
-> show macrocode
The correct syntax is “show microcode”. To change the spelling in this entry, use the Left Arrow key to
place the cursor between the “m” and the “a”.
-> show m|acrocode
Use the Delete key to remove the “a” and type “i”.
-> show microcode
Press Enter to execute the command.
OmniSwitch 7700/7800/8800 Switch Management Guide
April 2006
page 5-9
CLI Services
Using the CLI
Recalling the Previous Command Line
To recall the last command executed by the switch, press either the Up Arrow key or the !! (bang, bang)
command at the prompt and the previous command will display on your screen. You can execute the
command again by pressing Enter or you can edit it first by deleting or inserting characters.
In the following example, the ls command is used to list the contents of the switch’s /flash/switch
directory.
->ls
Listing Directory /flash/switch:
drw
drw
-rw
2048 Jan
2048 Jan
308 Jan
1 1980 ./
3 19:23 ../
1 1980 banner_default.txt
9850880 bytes free
To enter this same command again, use the Up Arrow key. The ls command appears at the prompt. To
issue the ls command, press Enter.
-> ls
The Up Arrow key and the !! (bang, bang) command will display the last command line entered even if the
command was rejected by the switch.
For more details on using the !! command, refer to “Command History” on page 5-13.
Inserting Characters
To insert a character between characters already typed, use the Left and Right Arrow keys to place the
cursor into position, then type the new character. Once the command is correct, execute it by pressing
Enter. In the following example, the user enters the wrong syntax to execute the show microcode
command. The result is an error message.
-> show micrcode
ERROR: flash: no such directory
To correct the syntax without retyping the entire command line, use the !! command to recall the previous
syntax. Then, use the Left Arrow key to position the cursor between the “r” and the “c” characters. To
insert the missing character, type “o”.
-> !!
-> show microcode
To execute the corrected command, press Enter.
page 5-10
OmniSwitch 7700/7800/8800 Switch Management Guide
April 2006
Using the CLI
CLI Services
Syntax Checking
If you make a mistake while entering command syntax, the CLI gives you clues about how to correct your
error. Whenever you enter an invalid command, two indicators are displayed.
• The Error message tells you what the error is.
• The caret (^) character tells you where the error is in your syntax.
The following example of the syntax checking feature shows an attempt to set IP routing. If you enter the
command set ip routing the following will display:
-> set ip routing enable
^
ERROR: Invalid entry: "set"
The set ip routing command is not valid so the CLI error message states what the problem is (Invalid
entry) and the carat indicates where the problem is located in the syntax. Here, the problem is with the
“set” keyword so the carat is located under “set.” The error message states the nature of the problem—that
“set” is an invalid entry. In order to enable IP routing, you must find another command keyword because
set is not valid.
Prefix Recognition
Prefix Recognition is a CLI feature that reduces redundant command line entry by storing prefix
information for certain network commands.
When you configure network services, you may have to enter the same command prefix multiple times.
Entering the same prefix again and again can be cumbersome and prone to error. The prefix recognition
feature addresses the problem of redundant command entry by allowing the CLI to store commonly-used
prefix information. This prefix information stored by the switch then becomes part of the next CLI
command entered.
The following command families support the prefix recognition feature.
• AAA
• Interface
• Link Aggregation
• QOS
• Spanning Tree
• VLAN Management
When certain commands are entered from one of these families, the CLI will retain the prefix information
in a memory buffer. Then, if a valid related command is entered next, the CLI will assume the stored
prefix is part of the next command. In this case, you are only required to enter the suffix information for
the next command.
OmniSwitch 7700/7800/8800 Switch Management Guide
April 2006
page 5-11
CLI Services
Using the CLI
Example for Using Prefix Recognition
This example shows how the Prefix Recognition feature is used for entering multiple commands that have
the same prefix. This table lists the tasks to be accomplished in this example and the CLI syntax required
for each task.
Task
CLI Syntax
1. Create a VLAN with an identification number of 501.
vlan 501 enable
2. Enable the spanning tree protocol for VLAN 501.
vlan 501 stp enable
3. Enable authentication for VLAN 501.
vlan 501 authentication enable
To create VLAN 501 and configure its attributes using the CLI commands, you could enter the vlan 501
prefix three times. However, VLAN commands support the prefix recognition capability so redundant
entry of this prefix is not necessary.
For example, when you enter
-> vlan 501 enable
the CLI will automatically store the prefix vlan 501. Now, if you enter a related command for the same
VLAN, you are only required to enter suffix information. In this case you can enter the commands to
accomplish tasks 2, and 3 as follows:
-> stp enable
-> authentication enable
Prefix information will be remembered by the CLI until you enter a command with a new prefix.
Note. If you want to create or configure another VLAN, you must reenter the full command prefix,
including the new VLAN ID.
Show Prefix
You can view the current prefix by issuing the show prefix command. If you issue this command when
the prefix stored by the CLI is vlan 501 the following will display.
-> show prefix
Current prefix: vlan 501
If you issue the show prefix command when there is no prefix stored by the CLI, a “no prefix” message
will display.
page 5-12
OmniSwitch 7700/7800/8800 Switch Management Guide
April 2006
Using the CLI
CLI Services
Prefix Prompt
You may set the CLI so that your screen prompt displays the stored prefix. To display the stored prefix as
part of the screen prompt for the VLAN example above, enter the prompt prefix CLI command as
follows:
-> prompt prefix
The following will display.
-> vlan 501
Your screen prompt will include your stored prefix until a new prompt is specified. To set the prompt back
to the arrow (->) enter the prompt string -> (prompt string arrow) syntax as follows.
-> vlan 501 prompt string ->
->
The arrow displays to indicate that your prompt has changed back to the default.
For more general information about changing the prompt, refer to “Changing the CLI Prompt” on
page 5-17.
Command History
The history command allows you to view commands you have recently issued to the switch. The switch
has a history buffer that stores up to 30 of the most recently executed commands.
Note. The command history feature differs from the command logging feature in that command logging
stores up to 100 of the most recent files to a separate command.log file. Also, the command logging
feature includes additional information, such as full command syntax, login user name, entry date and
time, session IP address, and entry results. For more information on command logging, refer to “Logging
CLI Commands and Entry Results” on page 5-15.
You can display the commands in a numbered list by using the show history command. The following is
a sample list.
-> show history
1 show cmm
2 show fan
3 show sensor
4 show temp
5 ip load dvmrp
6 show arp
7 clear arp
8 show ip config
9 ip helper max hops 5
10 ip bgp pn
11 show ip bgp
12 show history
In the example above, the show history command is listed last because it is the command that was
executed most recently.
OmniSwitch 7700/7800/8800 Switch Management Guide
April 2006
page 5-13
CLI Services
Using the CLI
You can recall commands shown in the history list by using the exclamation point character (!) also called
“bang”. To recall the command shown in the history list at number 4, enter !4 (bang, 4). The CLI will
respond by printing the number four command at the prompt. Using the history list of commands above,
the following would display:
-> !4
-> show temp
You can recall the last command in the history list by issuing the !! (bang bang) syntax. The CLI will
respond by printing the last command in the history list (show history) at the prompt as shown here.
-> !!
-> show history
Note. When you use !n or !! to recall a command in the history list, you must press the Enter key to
execute the command.
You can configure the number of history commands saved by the switch for display by the show history
command. The range for the history size value is 1 to 30. To view the history parameters, use the show
history parameters command.
-> history size 30
-> show history parameters
History size: 30
CurrentSize: 10
Index Range: 1-10
The values in this display are defined here:
• History Size: The number of commands the switch will save for display by the show history
command.
• Current Size: The number of commands currently saved by the switch, ready for display by the show
history command.
• Index Range: This value indicates the index range of the commands for this CLI session currently
stored in the history buffer.
In the above example, the switch is set to display 30 commands. However, when the show history
parameters command was issued, only ten commands had yet been issued. Since only ten commands had
been issued during the current login session, the index range shows 1 to 10. This is because the commands
in the buffer are the first through the tenth commands issued during the current login session.
Note. The Partial Keyword Completion feature described on page 5-5 works within the CLI history buffer.
page 5-14
OmniSwitch 7700/7800/8800 Switch Management Guide
April 2006
Using the CLI
Logging CLI Commands and Entry Results
Logging CLI Commands and Entry Results
OmniSwitch 7700, 7800, and 8800 switches provide command logging via the command-log command.
This feature allows users to record up to 100 of the most recent commands entered via Telnet, Secure
Shell, and console sessions. In addition to a list of commands entered, the results of each command entry
are recorded. Results include information such as whether a command was executed successfully, or
whether a syntax or configuration error occurred.
Note. The command history feature differs from the command logging feature in that command history
buffers up to 30 of the most recent commands. The command information is not written to a separate log
file. Also, the command history feature includes only general keyword syntax (i.e., it does not record full
syntax, date and time, session IP address, and entry results). For more information on command history,
refer to page 5-13.
Refer to the sections below for more information on configuring and using CLI command logging. For
detailed information related to command logging commands, refer to the OmniSwitch CLI Reference
Guide.
Enabling Command Logging
By default, command logging is disabled. To enable command logging on the switch, enter the following
command:
-> command-log enable
When command logging is enabled via the command-log enable syntax, a file called command.log is
automatically created in the switch’s flash directory. Once enabled, configuration commands entered on
the command line will be recorded to this file until command logging is disabled.
The command.log file has a 66402 byte capacity. This capacity allows up to 100 of the most recent
commands to be recorded. Because all CLI command logging information is archived to the
command.log file, command history information will be lost if the file is deleted.
Note. The command.log file cannot be deleted while the command logging feature is enabled. Before
attempting to remove the file, be sure to disable command logging. To disable command logging, refer to
the information below.
Disabling Command Logging
To disable the command logging, simply enter the following command:
-> command-log disable
Disabling command logging does not automatically remove the command.log file from the flash directory. All commands logged before the command-log disable syntax was entered remains available for
viewing. For information on viewing logged commands, along with the command entry results, refer to
“Viewing Logged CLI Commands and Command Entry Results” on page 5-16.
OmniSwitch 7700/7800/8800 Switch Management Guide
April 2006
page 5-15
Logging CLI Commands and Entry Results
Using the CLI
Viewing the Current Command Logging Status
As mentioned above, the command logging feature is disabled by default. To view whether the feature is
currently enabled or disabled on the switch, use the show command-log status command. For example:
-> show command-log status
CLI command logging : Enable
In this case, the feature has been enabled by the user via the command-log command. For more information on enabling and disabling command logging, refer to the sections above.
Viewing Logged CLI Commands and Command Entry Results
To view a list of logged commands, along with the corresponding information (including entry results),
enter the show command-log command. For example:
Command : interfaces 1/23 duplex full
UserName : admin
Date
: WED FEB 09 10:56:52
Ip Addr : 128.251.16.185
Result
: WARNING: No Link, if Link Partner cannot handle this advertizement
of FULL-duplex.
Command : interfaces 1/23 speed 100
UserName : admin
Date
: WED FEB 09 10:56:40
Ip Addr : 128.251.16.185
Result
: SUCCESS
Command : command-log enable
UserName : admin
Date
: WED FEB 09 10:55:44
Ip Addr : 128.251.16.185
Result
: SUCCESS
The show command-log command lists up to 100 CLI commands in descending order. In other words,
the most recent commands are listed first. In the example above, the command-log enable syntax is the
least recent command logged; the interfaces 1/23 duplex full syntax is the most recent.
• Command. Shows the exact syntax of the command, as entered by the user.
• UserName. Shows the name of the user session that entered the command. For more information on
different user session names, refer to Chapter 7, “Managing Switch User Accounts.”
• Date. Shows the date and time, down to the second, when the command was originally entered.
• IP Addr. The IP address of the terminal from which the command was entered.
• Result. The outcome of the command entry. If a command was entered successfully, the syntax
SUCCESS displays in the Result field. If a syntax or configuration error occurred at the time a
command was entered, details of the error display. For example:
Result
page 5-16
: ERROR: Ip Address must not belong to IP VLAN 67 subnet
OmniSwitch 7700/7800/8800 Switch Management Guide
April 2006
Using the CLI
Customizing the Screen Display
Customizing the Screen Display
The CLI has several commands that allow you to customize the way switch information is displayed to
your screen. You can make the screen display smaller or larger. You can also adjust the size of the table
displays and the number of lines shown on the screen.
Note. Screen display examples in this chapter assume the use of a VT-100/ASCII emulator.
Changing the Screen Size
You may specify the size of the display shown on your terminal screen by using the tty command. This
command is useful when you have a small display screen or you want to limit the number of lines scrolled
to the screen at one time. For example, to limit the number of lines to 10 and the number of columns to
150, enter the following:
-> tty 10 150
The first number entered after tty defines the number of lines on the screen. It must be a number between
10 and 150. The second number after tty defines the number of columns on the screen. It must be a
number between 20 and 150. You may view the current setting for your screen by using the show tty
command.
Changing the CLI Prompt
You can change the system prompt that displays on the screen when you are logged into the switch. The
default prompt consists of a dash, greater-than (->) text string. To change the text string that defines the
prompt from -> to ##=> use the session prompt command as follows:
-> session prompt default ##=>
##=>
The switch displays the new prompt string after the command is entered.
Several building blocks are provided that can automatically display system information along with the
prompt string. You can set a switch to display any combination of the current username, system time,
system date, and system prefix along with the prompt string. The following command will define the
prefix to display the system time and date along with the prompt string defined in the above example:
-> prompt time date string ##=>
01:31:01 04/29/02##=>
For an example of using a stored prefix as part of the prompt, refer to “Prefix Prompt” on page 5-13. For
more general information on the session prompt command, refer to the OmniSwitch CLI Reference
Guide.
OmniSwitch 7700/7800/8800 Switch Management Guide
April 2006
page 5-17
Customizing the Screen Display
Using the CLI
Displaying Table Information
The amount of information displayed on your console screen can be extensive, especially for certain show
commands. By default, the CLI will immediately scroll all information to the screen. The more mode can
be used to limit the number of lines displayed to your screen. To use the more mode requires two steps as
follows:
• Specify the number of lines displayed while in the more mode.
• Enter the more mode.
The more size command specifies the number of lines displayed to the screen while in the more mode.
The following syntax will set the switch to display six lines of data to the screen while in the CLI is in
more mode.
-> more size 6
The following command enables the more feature.
-> more
After these commands are executed, the CLI will display no more than 6 lines to the screen at a time
followed by the More? prompt. The following is a sample display.
-> show snmp mib family
MIP ID
MIB TABLE NAME
FAMILY
-------+----------------------------------------+---------------------
6145
esmConfTrap
NO SNMP ACCESS
6146
alcetherStatsTable
interface
6147
esmConfTable
interface
More? [next screen <sp>, next line <cr>, filter pattern </>, quit <q>]
At the More? prompt, you are given a list of options. The output formats are described here:
<sp>
Press <sp> (space bar) to display the next page of information.
<cr>
Press <cr> (character return) to display the next line of information
/
<q>
Press / to enter the filter mode. (See “Filtering Table Information” on page 5-19.)
Press the character “q” to exit More? and return you to the system prompt.
To exit the more mode, use the no more CLI command.
Note. The value set with the more size command applies to the screen display when the CLI is in the more
mode or when you are using the switch’s Vi text editor.
page 5-18
OmniSwitch 7700/7800/8800 Switch Management Guide
April 2006
Using the CLI
Customizing the Screen Display
Filtering Table Information
The CLI allows you to define filters for displaying table information. This is useful in cases where a vast
amount of display data exists but you are interested in only a small subset of that data. Commands showing routing tables are a good example for when you might want to filter information. You can specify a
filter that identifies the data that are relevant to your search. The switch will then display the information
you identified. This saves you the trouble of scanning long lists of data unnecessarily.
The filter mode filters unwanted information from a CLI table by displaying only those lines containing a
specified text pattern (up to 80 characters). Once the filter command has been executed, the filter mode
remains active until you reach the end of the CLI table or until you exit the table by using the q command.
The filter command is case sensitive. When using the slash (/) command, you must type the text exactly as
it would appear in the CLI table.
For additional information about filtering, refer to “Using a Wildcard to Filter Table Information” on
page 5-22.
OmniSwitch 7700/7800/8800 Switch Management Guide
April 2006
page 5-19
Multiple User Sessions
Using the CLI
Multiple User Sessions
Several CLI commands give you information about user sessions that are currently operating on the
OmniSwitch, including your own session. These commands allow you to list the number and types of
sessions that are currently running on the switch. You can also terminate another session, provided you
have administrative privileges.
Listing Other User Sessions
The who command displays all users currently logged into the OmniSwitch. The following example shows
use of the who command and a resulting display:
-> who
Session number = 0
User name
= (at login),
Access type = console,
Access port = Local,
IP address = 0.0.0.0,
Read-only domains
= None,
Read-only families = ,
Read-Write domains = None,
Read-Write families = ,
End-User profile
=
Session number = 1
User name
= admin,
Access type = http,
Access port = NI,
IP address = 123.33.188.100,
Read-only domains
= None,
Read-only families = ,
Read-Write domains = All ,
Read-Write families = ,
End-User profile
=
Session number = 3
User name
= admin,
Access type = telnet,
Access port = NI,
IP address = 123.33.188.101,
Read-only domains
= None,
Read-only families = ,
Read-Write domains = All ,
Read-Write families = ,
End-User profile
=
The above display indicates three sessions are currently active on the OmniSwitch. Session number 0
always shows the console port whenever that port is active and logged in. The other sessions are identified
by session number, user name, the type of access, port type, IP address, and user privileges. The output
definitions are defined in the table on page 5-21.
page 5-20
OmniSwitch 7700/7800/8800 Switch Management Guide
April 2006
Using the CLI
Multiple User Sessions
Listing Your Current Login Session
In order to list information about your current login session, you may either use the who command and
identify your login by your IP address or you may enter the whoami command. The following will
display.
-> whoami
Session number = 17
User name
= admin,
Access type = telnet,
Access port = NI,
IP address = 123.33.101.13,
Read-only domains
= None,
Read-only families = ,
Read-Write domains = All ,
Read-Write families = ,
End-User profile
=
This display indicates that the user is currently logged in as session number 4, under the username
“admin,” using a Telnet interface, from the IP address of 123.33.101.13.
Session Number
The session number assigned to the user.
User name
User name.
Access type
Type of access protocol used to connect to the switch.
Access port
Switch port used for access during this session.
Ip Address
User IP address.
Read-only rights
The hexadecimal value of privileges configured for the user.
Read-Write rights
The hexadecimal value of privileges configured for the user.
Read-only domains
The command domains available with the user’s read-only access. See
the table beginning on page 5-6 for a listing of valid domains.
Read-only families
The command families available with the user’s read-only access. See
the table beginning on page 5-6 for a listing of valid families.
Read-Write domains
The command domains available with the user’s read-write access. See
the table beginning on page 5-6 for a listing of valid domains.
Read-Write families
The command families available with the user’s read-write access. See
the table beginning on page 5-6 for a listing of valid families.
OmniSwitch 7700/7800/8800 Switch Management Guide
April 2006
page 5-21
Application Example
Using the CLI
Application Example
Using a Wildcard to Filter Table Information
The wildcard character allows you to substitute the asterisk (*) character for text patterns while using the
filter mode.
Note. You must type the wildcard character in front of and after the filter text pattern unless the text
pattern appears alone on a table row.
In this example, the show snmp mib family command is used because it displays a long table of MIB
information. This example uses the filter option to display only those lines containing the “vlan” character
pattern.
1 Use the more command to set the number of displayed lines to 10 and to enable the more mode.
-> more size 10
-> more
To verify your settings, enter the following:
-> show more
The more feature is enabled and the number of line is set to 10
2 Enter the show snmp mib family command. Note that 10 lines of information are displayed. The
switch is now in the More? mode as indicated at the bottom of the screen.
-> show snmp mib family
MIP ID
MIB TABLE NAME
FAMILY
-------+----------------------------------------+--------------------6145
esmConfTrap
NO SNMP ACCESS
6146
alcetherStatsTable
interface
6147
esmConfTable
interface
6148
ifJackTable
interface
7169
dot1qPortVlanTable
802.1Q
7170
qAggregateVlanTable
802.1Q
7171
qPortVlanTable
802.1Q
More? [next screen <sp>, next line <cr>, filter pattern </>, quit <q>]
3 Type the filter pattern “/” command and the following message will automatically appear.
Enter filter pattern:
Enter the desired text pattern, in this case “*vlan*”, at the prompt. Remember to type the text exactly as it
would appear in the CLI table and to type the asterisk (*) character before and after the text. The More?
mode prompt will automatically re-appear.
Enter filter pattern: *vlan*
More? [next screen <sp>*, next line <cr>*, filter pattern </>*, quit <q>]
page 5-22
OmniSwitch 7700/7800/8800 Switch Management Guide
April 2006
Using the CLI
Application Example
4 Press the spacebar <sp> key to execute the filter option. The following will display.
Enter filter pattern: *vlan*
8193
dot1qBase
8194
dot1qVlan
8195
dot1qVlanCurrentTable
8196
dot1qVlanStaticTable
8197
vlanMgrVlanSet
8198
vlanTable
8199
vpaTable
9217
vCustomRuleTable
9218
vDhcpGenericRuleTable
9219
vDhcpMacRuleTable
More? [next screen <sp>*, next line <cr>*, filter
vlan
vlan
vlan
vlan
vlan
vlan
vlan
vlan
vlan
vlan
pattern </>*, quit <q>]
The screen displays 10 table rows, each of which contain the text pattern “vlan”. (The screen rows shown
above and below the table are not counted as part of the 10 rows.) If you want to display the rows one line
at a time, press Enter instead of the space bar key. To exit the table, type the “q” character and the CLI
will exit the more mode and return you to the system prompt.
OmniSwitch 7700/7800/8800 Switch Management Guide
April 2006
page 5-23
Application Example
page 5-24
Using the CLI
OmniSwitch 7700/7800/8800 Switch Management Guide
April 2006
6 Working With
Configuration Files
Commands and settings needed for the OmniSwitch can be contained in an ASCII-based configuration
text file. Configuration files can be created in several ways and are useful in network environments where
multiple switches must be managed and monitored.
This chapter describes how configuration files are created, how they are applied to the switch, and how
they can be used to enhance OmniSwitch usability.
In This Chapter
Configuration procedures described in this chapter include:
• “Tutorial for Creating a Configuration File” on page 6-2
• “Applying Configuration Files to the Switch” on page 6-6
• “Configuration File Error Reporting” on page 6-7
• “Text Editing on the Switch” on page 6-9
• “Creating Snapshot Configuration Files” on page 6-10
OmniSwitch 7700/7800/8800 Switch Management Guide
April 2006
page 6-1
Configuration File Specifications
Working With Configuration Files
Configuration File Specifications
The following table lists specifications applicable to Configuration Files.
Creation Methods for
Configuration Files
• Create a text file on a word processor and upload it to the switch.
• Invoke the switch’s snapshot feature to create a text file.
• Create a text file using one of the switch’s text editors.
Timer Functions
Files can be applied immediately or by setting a timer on the switch.
Command Capture Feature
Snapshot feature captures switch configurations in a text file.
Error Reporting
Snapshot feature includes error reporting in the text file.
Text Editing on the Switch
Vi standard UNIX editor. The Ed standard UNIX editor is available in
the debug mode.
Tutorial for Creating a Configuration File
This example creates a configuration file that includes CLI commands to configure the DHCP Relay application on the switch. For this example, the forward delay value is set to 15 seconds, the maximum number
of hops is set to 3 and the IP address of the DHCP server is 128.251.16.52.
This tutorial shows you how to accomplish the following tasks:
1 Create a configuration text file containing CLI commands needed to configure DHCP Relay application.
This example used MS Notepad to create a text file on a PC workstation. The text file named
dhcp_relay.txt contains three CLI commands needed to configure the forward delay value to 15 seconds
and the maximum number of hops to 3. The IP address of the DHCP server is 128.251.16.52.
ip helper address 128.251.16.52
ip helper forward delay 15
ip helper maximum hops 3
2 Transfer the configuration file to the switch’s file system.
To transfer the configuration file to the switch, use an FTP transfer method. For more information about
transferring files onto the switch refer to Chapter 2, “Managing System Files.”
3 Apply the configuration file to the switch by using the configuration apply command as shown here:
-> configuration apply dhcp_relay.txt
File configuration <dhcp_relay.txt>: completed with no errors
page 6-2
OmniSwitch 7700/7800/8800 Switch Management Guide
April 2006
Working With Configuration Files
Tutorial for Creating a Configuration File
4 Use the show configuration status command to verify that the dhcp_relay.txt configuration file was
applied to the switch. The display is similar to the one shown here:
-> show configuration status
File configuration <dhcp_relay.txt>: completed with no errors
File configuration: none scheduled
Running configuration and saved configuration are different
Note. If the configuration file applied with the configuration apply command results in no changes to the
saved configuration, the message will state that the running configuration and saved configuration are
identical. To synchronize the running configuration and the saved configuration, use the write memory
command.
For more information about this display, see “Configuration File Manager Commands” in the OmniSwitch
CLI Reference Guide.
5 Use a the show ip helper command to verify that the DHCP Relay parameters defined in the configu-
ration files were actually implemented on the switch. The display is similar to the one shown here:
-> show ip helper
Forward Delay (seconds) = 15
Max number of hops
= 3
Forwarding option
= standard
Forwarding Address:
128.251.16.52
These results confirm that the commands specified in the file dhcp_relay.txt configuration file were
successfully applied to the switch.
OmniSwitch 7700/7800/8800 Switch Management Guide
April 2006
page 6-3
Quick Steps for Applying Configuration Files
Working With Configuration Files
Quick Steps for Applying Configuration Files
Setting a File for Immediate Application
In this example, the configuration file configfile_1 exists on the switch in the /flash directory. When these
steps are followed, the file will be immediately applied to the switch.
1 Check to verify that there are no timer sessions pending on the switch.
-> show configuration status
File configuration: none scheduled
2 Apply the file by executing the configuration apply command followed by the path and filename. If
the configuration file is accepted with no errors, the CLI responds with a system prompt.
-> configuration apply /flash/configfile_1.txt
->
Note. Optional. To verify that the file was applied, enter the show configuration status command. The
display is similar to the one shown here.
-> show configuration status
File configuration </flash/configfile_1.txt>: completed with 0 errors
For more information about this display, see “Configuration File Manager Commands” in the OmniSwitch
CLI Reference Guide.
Setting an Application Session for a Date and Time
You can set a timed session to apply a configuration file at a specific date and time in the future. The
following example applies the bncom_cfg.txt file at 9:00 a.m. on July 4 of the current year.
1 Check to verify that there are no current timer sessions pending on the switch.
-> show configuration status
File configuration: none scheduled
2 Apply the file by executing the configuration apply using the at keyword with the relevant date and
time.
-> configuration apply bncom_cfg.txt at 09:00 04 july
Note. Optional. To verify that the switch received this configuration apply request, enter the show
configuration status command. The display is similar to the one shown here.
-> show configuration status
File configuration </flash/working/bncom_cfg.txt>: scheduled at 07/04/02 09:00
For more information about this display see “Configuration File Manager Commands” in the OmniSwitch
CLI Reference Guide.
page 6-4
OmniSwitch 7700/7800/8800 Switch Management Guide
April 2006
Working With Configuration Files
Quick Steps for Applying Configuration Files
Setting an Application Session for a Specified Time Period
You can set a future timed session to apply a configuration file after a specified period of time has elapsed.
In the following example, the amzncom_cfg.txt will be applied after 6 hours and 15 minutes have
elapsed.
1 Check to verify that there are no current timer sessions pending on the switch.
-> show configuration status
File configuration: none scheduled
2 Apply the file by executing the configuration apply using the in keyword with the relevant time frame
specified.
-> configuration apply amzncom_cfg.txt in 6:15
Note. Optional. To verify that the switch received this configuration apply request, enter the show
configuration status command. The display is similar to the one shown here.
-> show configuration status
File configuration </flash/working/amzncom_cfg.txt>: scheduled at 03/07/02 05:02
The “scheduled at” date and time show when the file will be applied. This value is 6 hours and 15 minutes
from the date and time the command was issued.
For more information about this display see “Configuration File Manager Commands” in the OmniSwitch
CLI Reference Guide.
OmniSwitch 7700/7800/8800 Switch Management Guide
April 2006
page 6-5
Configuration Files Overview
Working With Configuration Files
Configuration Files Overview
Instead of using CLI commands entered at a workstation, you can configure the switch using an ASCIIbased text file. You may type CLI commands directly into a text document to create a configuration file
that will reside in your switch’s /flash directory. Configuration files are created in the following ways:
• You may create, edit and view a file using a standard text editor (such as MS WordPad or Notepad) on
a workstation. The file can then be uploaded to the switch’s /flash file directory.
• You can invoke the switch’s CLI configuration snapshot command to capture the switch’s current
configuration into a text file. This causes a configuration file to be created in the switch’s /flash directory.
• You can use the switch’s text editor to create or edit a configuration file located in the switch’s /flash
file directory.
Applying Configuration Files to the Switch
Once you have a configuration file located in the switch’s file system you must load the file into running
memory to make it run on the switch. You do this by using configuration apply commands.
You may apply configuration files to the switch immediately, or you can specify a timer session. In a timer
session, you schedule a file to be applied in the future at a specific date and time or after a specific period
of time has passed (like a countdown). Timer sessions are very useful for certain management tasks, especially synchronized batch updates.
• To apply a file immediately, refer to the quick steps section on “Setting a File for Immediate Applica-
tion” on page 6-4.
• To apply a file at a future date and time, refer to the quick steps section on “Setting an Application
Session for a Date and Time” on page 6-4.
• To apply a file after a period of time has elapsed, refer to the quick steps section on “Setting an Appli-
cation Session for a Specified Time Period” on page 6-5.
page 6-6
OmniSwitch 7700/7800/8800 Switch Management Guide
April 2006
Working With Configuration Files
Configuration Files Overview
Verifying a Timed Session
To verify that a timed session is running, use the show configuration status command. The following
displays where the timed session was set using the configuration apply qos_pol at 11:30 october 31
syntax.
-> show configuration status
File configuration <qos_pol>: scheduled at 01/10/31 11:30
Note. Only one session at a time can be scheduled on the switch. If two sessions are set, the last one will
overwrite the first. Before you schedule a timed session you should use the show configuration status
command to see if another session is already running.
The following displays where the timed session was set on March 10, 2002 at 01:00 using the
configuration apply group_config in 6:10 syntax.
-> show configuration status
File configuration <group_config>: scheduled at 03/10/02 07:10
Cancelling a Timed Session
You may cancel a pending timed session by using the configuration cancel command. To confirm that
your timer session has been canceled, use the show configuration status command. The following will
display.
-> configuration cancel
-> show configuration status
File configuration: none scheduled
For more details about the CLI commands used to apply configuration files or to use timer sessions, refer
to “Configuration File Manager Commands” in the OmniSwitch CLI Reference Guide.
Configuration File Error Reporting
If you apply a configuration file to the switch that contains significant errors, the application may not
work. In this case, the switch will indicate the number of errors detected and print the errors into a text file
that will appear in the /flash directory. The following display will result where the cfg_txt file contains
three errors.
-> configuration apply cfg_file
Errors: 3
Log file name: cfg_txt.1.err
In this case, the error message indicates that the application attempt was unsuccessful. It also indicates that
the switch wrote some log messages into a file named cfg_txt.1.err which now appears in your /flash
directory. You can read the messages in the log file to troubleshoot your configuration file.
Note. When you use the debug set or debug show CLI commands, the switch will write its output to a file
ending with the .err extension. This does not mean that an error has occurred. This is merely a convenient
way for the switch to display the output.
OmniSwitch 7700/7800/8800 Switch Management Guide
April 2006
page 6-7
Configuration Files Overview
Working With Configuration Files
Setting the Error File Limit
The number of files ending with the .err extension present in the switch’s /flash directory is set with the
configuration error-file limit command. You can set the switch to allow up to 25 error files in the /flash
directory. Once the error file limit has been reached, the next error file generated will cause the error file
with the oldest time stamp to be deleted. The following command sets the error file limit to 5 files.
-> configuration error-file limit 5
->
If you need to save files with the .err extension, you can either rename them so they no longer end with the
.err extension or you may move them to another directory.
Note. The default error file limit is one file. Unless you set the error file limit to a higher number, any
subsequent error file will cause any existing error file to be deleted.
Verbose Mode
You may want to see if a configuration file contains syntax errors. To do this, use the configuration
syntax check verbose command. This command allows you to verify whether or not your file contains
syntax errors before applying the file to the switch. If the configuration file contains errors, the syntax
check information will be scrolled onto your console screen. The errors will also be captured in a text file
created in your /flash directory.
For example, the following shows the command used to run a syntax check on the file testfile_chk.
-> configuration syntax check testfile_chk verbose
This particular file contains three errors so the following information will display along with the name of
the log file created in the /flash directory.
Errors: 3
Log file name: testfile_chk.1.err
The switch may display syntax check information to your console and a log file may be created even if no
error is detected.
The verbose mode can also be specified with the configuration apply command. This causes the switch to
give you a visual indication on the console of the file’s progress. The commands in the file are scrolled to
the display screen as they are applied to the switch. This allows you to view the commands as they are
executed and to observe any error messages that may occur. To apply a file named cfgtextfile.txt in the
verbose mode use the following syntax:
-> configuration apply cfgtextfile.txt verbose
page 6-8
OmniSwitch 7700/7800/8800 Switch Management Guide
April 2006
Working With Configuration Files
Configuration Files Overview
Displaying a Text File
The more command allows you to view a text file one screen at a time. Use this command with the
desired filename. Specifying a path is optional. The following command will display the textfile.rtf text
file located in the /flash/working directory.
-> more /flash/working/textfile.rtf
The switch will display the file text on your terminal screen until the entire screen is full. After that, when
you press Enter, the switch will scroll the file text until it fills up another screen or until the end of the file.
The more mode assumes a screen that is 80 columns wide and 24 lines long.
Text Editing on the Switch
The switch software includes a standard UNIX-type line editor called “Vi”. The Vi editor is available on
most UNIX systems. No attempt is being made to document Vi in this manual because information on it is
freely available on the Internet.
Invoke the “Vi” Editor
You can invoke the Vi editor from the command line. Use the following syntax to view the switchlog.txt
file located in the /flash/working directory:
-> vi /flash/working switchlog.txt
You can invoke the Vi editor in read-only mode by using the following syntax.
-> view
To exit the Vi editor, use the Cap ZZ key sequence.
OmniSwitch 7700/7800/8800 Switch Management Guide
April 2006
page 6-9
Creating Snapshot Configuration Files
Working With Configuration Files
Creating Snapshot Configuration Files
You can generate a list of configurations currently running on the switch by using the configuration
snapshot command. A snapshot is a text file that lists commands issued to the switch during the current
login session.
Note. A user must have read and write permission for the configuration family of commands to generate a
snapshot file for those commands. See Chapter 8, “Managing Switch Security” for further information
about permissions for specific command families.
Snapshot Feature List
You can specify the snapshot file so it will capture the CLI commands for one or more switch features or
for all network features. To generate a snapshot file for all network features, use the following syntax.
-> configuration snapshot all
To generate a snapshot file for specific features, select the appropriate syntax from the following list.
Snapshot Keywords
802.1q
ip-routing
rdp
aaa
ipmr
rip
aip
ipms
ripng
all
ipx
session
bgp
ipv6
slb
bridge
linkagg
snmp
chassis
module
stp
health
ospf
system
interface
pmm
vlan
ip
policy
vrrp
ip-helper
qos
webmgt
You may enter more than one network feature in the command line. Separate each feature with a space
(and no comma). The following command will generate a snapshot file listing current configurations for
the vlan, qos, and snmp command families.
-> configuration snapshot vlan qos snmp
You can verify that a new snapshot file is created by using the ls command to list all files in the /flash
directory.
page 6-10
OmniSwitch 7700/7800/8800 Switch Management Guide
April 2006
Working With Configuration Files
Creating Snapshot Configuration Files
User-Defined Naming Options
When the snapshot syntax does not include a file name, the snapshot file is created using the default file
name asc.n.snap. Here, the n character holds the place of a number indicating the order in which the
snapshot file name is generated. For example, the following syntax may generate a file named asc.1.snap.
-> configuration snapshot all
Subsequent snapshot files without a name specified in the command syntax will become asc.2.snap,
asc.3.snap, etc.
The following command produces a snapshot file with the name testfile.snap.
-> configuration snapshot testfile.snap
Editing Snapshot Files
Snapshot files can be viewed, edited and reused as a configuration file. You also have the option of editing
the snapshot file directly using the switch’s Vi text editor or you may upload the snapshot file to a text
editing software application on your workstation.
The snapshot file contains both command lines and comment lines. You can identify the comment lines
because they each begin with the exclamation point (!) character. Comment lines are ignored by the switch
when a snapshot file is being applied. Comment lines are located at the beginning of the snapshot file to
form a sort of header. They also appear intermittently throughout the file to identify switch features or
applications that apply to the commands that follow them.
Example Snapshot File Text
The following is the text of a sample snapshot file created with the configuration snapshot all command.
!========================================!
! File: asc.1.snap
!
!========================================!
! Chassis :
system name FalconCmm
mac alloc 91 0 1 00:d0:95:6b:09:41
! Configuration:
! VLAN :
! VLAN SL:
! IP :
ip service all
ip interface "vlan-1" address 10.255.11.243 mask 255.255.255.0 vlan 1 mtu 1500 i
findex 1
! IPX :
! IPMS :
! AAA :
aaa authentication default "local"
aaa authentication console "local"
aaa authentication snmp "local"
! PARTM :
! AVLAN :
! 802.1x :
! QOS :
! Policy manager :
! Session manager :
session timeout cli 99999
session timeout ftp 99999
OmniSwitch 7700/7800/8800 Switch Management Guide
April 2006
page 6-11
Creating Snapshot Configuration Files
Working With Configuration Files
(Example Snapshot File - Continued)
session timeout http 99999
command-log enable
! SNMP :
snmp security no security
snmp community map mode off
! IP route manager :
ip static-route 0.0.0.0 mask 0.0.0.0 gateway 10.255.11.254 metric 1
! RIP :
! OSPF :
! BGP :
! IP multicast :
! IPv6 :
! RIPng :
! Health monitor :
! Interface :
interfaces 1/23 speed 100
interfaces 1/23 alias "ip_phone"
! Link Aggregate :
! VLAN AGG:
! 802.1Q :
! Spanning tree :
bridge mode 1x1
! Bridging :
! Bridging :
! Port mirroring :
! UDP Relay :
ip udp relay BOOTP
! Server load balance :
! System service :
! VRRP :
! Web :
! AMAP :
! GMAP :
! Module :
! Lan Power :
! NTP :
!RDP :
This file shows configuration settings for the VLAN, AAA, Session Manager, SNMP, IP Route Manager,
OSPF, Server Load Balance, and Switch Logging services. Each of these services have configuration
commands listed under their heading. All other switch services and applications are either not being using
or are using default settings.
page 6-12
OmniSwitch 7700/7800/8800 Switch Management Guide
April 2006
Working With Configuration Files
Verifying File Configuration
Verifying File Configuration
You can verify the content and the status of the switch’s configuration files with commands listed in the
following table.
show configuration status
Displays whether there is a pending timer session scheduled for a configuration file and indicates whether the running configuration and the
saved configuration files are identical or different. This command also
displays the number of error files that will be held in the flash directory.
show configuration snapshot
Generates a snapshot file of the switch’s non-default current running
configuration. A snapshot can be generated for all current network features or for one or more specific network features. A snapshot is a single text file that can be viewed, edited, and reused as a configuration
file.
write terminal
Displays the switch’s current running configuration for all features.
OmniSwitch 7700/7800/8800 Switch Management Guide
April 2006
page 6-13
Verifying File Configuration
page 6-14
Working With Configuration Files
OmniSwitch 7700/7800/8800 Switch Management Guide
April 2006
7
Managing Switch User
Accounts
Switch user accounts may be set up locally on the switch for users to log into and manage the switch. The
accounts specify login information (combinations of usernames and passwords) and privilege or profile
information, depending on the type of user.
The switch has several interfaces (console, Telnet, HTTP, FTP, Secure Shell, and SNMP) through which
users may access the switch. The switch may be set up to allow or deny access through any of these interfaces. See Chapter 8, “Managing Switch Security,” for information about setting up management interfaces.
In This Chapter
This chapter describes how to set up user accounts locally on the switch through the Command Line Interface (CLI). CLI commands are used in the configuration examples; for more details about the syntax of
commands, see the OmniSwitch CLI Reference Guide.
This chapter provides an overview of user accounts. In addition, configuration procedures described in this
chapter include:
• “Creating a User” on page 7-8
• “Configuring Privileges for a User” on page 7-11
• “Setting Up SNMP Access for a User Account” on page 7-13
• “Setting Up End-User Profiles” on page 7-15
For information about enabling management interfaces on the switch, see Chapter 8, “Managing Switch
Security.”
For information about connecting a management station to the switch, see Chapter 1, “Logging Into the
Switch,” and the OmniSwitch 7700/7800 Getting Started Guide or OmniSwitch 8800 Getting Started
Guide.
User information may also be configured on external servers in addition to, or instead of, user accounts
configured locally on the switch (except end-user profiles, which may only be configured on the switch).
For information about setting up external servers that are configured with user information, see the
“Managing Authentication Servers” chapter in the OmniSwitch 7700/7800/8800 Network Configuration
Guide.
OmniSwitch 7700/7800/8800 Switch Management Guide
April 2006
page 7-1
User Database Specifications
Managing Switch User Accounts
User Database Specifications
Maximum number of alphanumeric characters in a
username
47
Maximum number of alphanumeric characters in a
user password
47
Maximum number of alphanumeric characters in an
end-user profile name
32
Maximum number of user accounts
64
Maximum number of end-user profiles
128
User Account Defaults
• Two user accounts are available on the switch by default: admin and default. For more information
about these accounts, see “Startup Defaults” on page 7-4 and “Default User Settings” on page 7-7.
• New users inherit the privileges of the default user if specific privileges or end-user profiles are not
configured; the default user is modifiable.
• Password defaults are as follows:
Parameter Description
Command
Default
Minimum password length
user password-size min
8 characters
Default password expiration for user password-expiration
any user
disabled
Password expiration for particu- expiration keyword in the user
lar user
command
none
page 7-2
OmniSwitch 7700/7800/8800 Switch Management Guide
April 2006
Managing Switch User Accounts
Overview of User Accounts
Overview of User Accounts
A user account includes a login name and password. The account also includes privilege or profile information, depending on the type of user account. There are two types of accounts: network administrator
accounts, and end-user or customer login accounts.
Network administrator accounts are configured with user (sometimes called functional) privileges. These
privileges determine whether the user has read or write access to the switch and which command domains
and command families the user is authorized to execute on the switch.
Customer login accounts are configured with end-user profiles rather than functional privileges. Profiles
are configured separately and then attached to the user account. A profile specifies command areas to
which a user has access as well as VLAN and/or port ranges to which the user has access.
The designation of particular command families/domains or command families for user access is sometimes referred to as partitioned management. The privileges and profiles are sometimes referred to as
authorization.
Note. End-user command areas are different from the command domains/families used for network
administrator accounts. In general, command areas are much more restricted groups of commands (see
page 7-15).
Functional privileges (network administration) and end-user profiles (customer login) are mutually exclusive. Both types of users may exist on the switch, but any given user account can only be one type,
network administrator or customer login. The CLI in the switch prevents you from configuring both privileges and a profile for the same user.
End-user profiles also cannot be configured on an authentication server; however, users configured on an
external authentication server may have profile attributes, which the switch will attempt to match to
profiles configured locally.
Note that if user information is configured on an external server (rather than locally on the switch through
the CLI) with both functional privilege attributes and profile attributes, the user is seen by the switch as an
end-user and will attempt to match the profile name to a profile name configured on the switch. If there is
no match, the user will not be able to log into the switch.
Note. For information about setting up user information on an authentication (AAA) server, see the
“Managing Authentication Servers” chapter of the OmniSwitch 7700/7800/8800 Network Configuration
Guide.
Users typically log into the switch through one of the following methods:
• Console port—A direct connection to the switch through the console port.
• Telnet—Any standard Telnet client may be used for logging into the switch.
• FTP—Any standard FTP client may be used for logging into the switch.
• HTTP—The switch has a Web browser management interface for users logging in via HTTP. This
management tool is called WebView.
OmniSwitch 7700/7800/8800 Switch Management Guide
April 2006
page 7-3
Overview of User Accounts
Managing Switch User Accounts
• Secure Shell—Any standard Secure Shell client may be used for logging into the switch.
• SNMP—Any standard SNMP browser may be used for logging into the switch.
For more information about connecting to the switch through one of these methods, see Chapter 1,
“Logging Into the Switch,” and the OmniSwitch 7700/7800 Getting Started Guide or OmniSwitch 8800
Getting Started Guide.
For information about setting up the switch to allow user access through these interfaces, see Chapter 8,
“Managing Switch Security.”
Startup Defaults
By default, a single user management account is available at the first bootup of the switch. This account
has the following user name and password:
• user name—admin
• password—switch
Initially, the admin user can only be authorized on the switch through the console port. Management
access through any other interface is disabled. The Authenticated Switch Access commands may be used
to enable access through other interfaces/services (Telnet, HTTP, etc.); however, SNMP access is not
allowed for the admin user. Also, the admin user cannot be modified, except for the password.
Password expiration for the admin user is disabled by default. See “Configuring Password Expiration” on
page 7-9.
In addition to the admin account, another account, default, is available on the switch for default settings
only; this account cannot be used to log into the switch. It is used to store and modify default settings for
new users.
Note. Up to 64 users may be configured in the local switch database.
To set up a user account, use the user command, which specifies the following:
• Password—The password is required for new users or when modifying a user’s SNMP access. The
password will not appear in an ASCII configuration file created via the snapshot command.
• Privileges—The user’s read and write access to command domains and families; used for network
administrator accounts. See “Configuring Privileges for a User” on page 7-11 for more details.
• SNMP access—Whether or not the user is permitted to manage the switch via SNMP. See “Setting Up
SNMP Access for a User Account” on page 7-13 for more details.
• End-User Profile—The user’s read and write access to command areas, port ranges, and VLAN ranges;
used for customer login accounts. See “Setting Up End-User Profiles” on page 7-15.
Typically, options for the user (privileges or end-user profile; SNMP access) are configured at the same
time the user is created. An example of creating a network administrator account and setting access privileges for the account is given here:
-> user thomas techpubs read-write domain-policy md5+des
For more details about command syntax, see the OmniSwitch CLI Reference Guide.
page 7-4
OmniSwitch 7700/7800/8800 Switch Management Guide
April 2006
Managing Switch User Accounts
Overview of User Accounts
Quick Steps for Creating Network Administrator User Accounts
1 Configure the user with the relevant username and password. For example, to create a user called
thomas with a password of pubs, enter the following:
-> user thomas password pubs
For information about creating a user and setting up a password, see “Creating a User” on page 7-8.
2 Configure the user privileges (and SNMP access) if the user should have privileges that are different
than those set up for the default user account. For example:
-> user thomas read-write domain-network ip-helper telnet
For information about the default user settings, see the next section. For information about setting up privileges, see “Configuring Privileges for a User” on page 7-11.
Note. Optional. To verify the user account, enter the show user command. The display is similar to the
following:
User name = admin
Read Only for domains
Read/Write for domains
Snmp not allowed
= None,
= All ,
User name = public
Read Only for domains
Read/Write for domains
Snmp authentication
= None,
= All ,
= NONE, Snmp encryption = NONE
User name = thomas
Read Only for domains
Read/Write for domains
= None,
= Network ,
Read/Write for families
Snmp not allowed
User name = default
Read Only for domains
Read/Write for domains
Snmp not allowed
= telnet ip-helper ,
= None,
= None,
For more information about the show user command, see the OmniSwitch CLI Reference Guide.
OmniSwitch 7700/7800/8800 Switch Management Guide
April 2006
page 7-5
Overview of User Accounts
Managing Switch User Accounts
Quick Steps for Creating Customer Login User Accounts
1 Set up a user profile through the end-user profile command. For example, configure a profile called
Profile1 that specifies read-write access to the physical and basic-ip-routing command areas:
-> end-user profile Profile1 read-write physical basic-ip-routing
2 Specify ports to which the profile will allow access. In this example, Profile1 will be configured with
access to ports on slot 1 and slot 2.
-> end-user profile Profile1 port-list 1/1-2 1/4-5 2/1-8
3 Specify VLANs or VLAN ranges to which the profile will allow access. In this example, Profile1 will
be configured with access to VLANs 3 through 8.
-> end-user profile Profile1 vlan-range 3-8
Note. Optional. To verify the end-user profile, enter the show end-user profile command. The display is
similar to the following:
End user profile : Profile1
Area accessible with read and write rights :
physical,
basic ip routing,
Slot : 1, ports allowed : 1-2, 4-5
Slot : 2, ports allowed : 1-8
Vlan Id :
3-8
For more information about the show end-user profile command, see the OmniSwitch CLI Reference
Guide.
4 Associate the profile with a user account. Enter the user command with the relevant username and
password and specify Profile1. In this example, the user name is Customer1 and the password is
my_passwd:
-> user Customer1 password my_passwd end-user profile Profile1
For more information about creating a user and setting up a password, see “Creating a User” on page 7-8.
For information about creating end-user profiles, see “Setting Up End-User Profiles” on page 7-15.
Note. Optional. To verify the user account, enter the show user command. The display is similar to the
following:
User name = Customer1
END user profile
SNMP authentication
User name = default
END user profile
Snmp not allowed
= Profile1
= NONE, Snmp encryption = NONE
Profile5
For more information about the show user command, see the OmniSwitch CLI Reference Guide.
page 7-6
OmniSwitch 7700/7800/8800 Switch Management Guide
April 2006
Managing Switch User Accounts
Overview of User Accounts
Default User Settings
The default user account on the switch is used for storing new user defaults for privileges or profile information. This account does not include a password and cannot be used to log into the switch.
At the first switch startup, the default user account is configured for:
• No read or write access.
• No SNMP access.
• No end-user profile.
Any new users created on the switch will inherit the privileges or the end-user profile of the default user
unless the user is configured with specific privileges or a profile.
The default user settings may be modified. Enter the user command with default as the user name. Note
that the default user may only store default functional privileges or a default end-user profile. The default
user cannot be configured with both privileges and a profile.
The following example modifies the default user account with read access and write access to all CLI
commands.
-> user default read-write all
In this example, any new user that is created will have read and write access to all CLI commands (unless
a specific privilege, SNMP access, or end-user profile is configured for the new user). For more information about configuring privileges, see “Configuring Privileges for a User” on page 7-11.
The privilege default is particularly important for users who are authenticated via an ACE/Server, which
only supplies username and password information; or for users who are authenticated via a RADIUS or
LDAP server on which privileges are not configured. For more information about these servers, see the
“Managing Authentication Servers” chapter of the OmniSwitch 7700/7800/8800 Network Configuration
Guide.
How User Settings Are Saved
Unlike other settings on the switch, user settings configured through the user and password commands
are saved to the switch configuration automatically. These settings are saved in real time in the local user
database.
At bootup, the switch reads the database file for user information (rather than the boot.cfg file). The write
memory, copy running-config working, or configuration snapshot command is not required to save
user or password settings over a reboot.
For information about using the write memory, copy running-config working, and configuration
snapshot commands, see the Chapter 4, “Managing CMM Directory Content,” Chapter 6, “Working With
Configuration Files,” and the OmniSwitch CLI Reference Guide.
OmniSwitch 7700/7800/8800 Switch Management Guide
April 2006
page 7-7
Creating a User
Managing Switch User Accounts
Creating a User
To create a new user, enter the user command with the desired username and password. Use the password
keyword. For example:
-> user thomas password techpubs
In this example, a user account with a user name of thomas and a password of techpubs is stored in the
local user database.
Note. Typically the password should be a string of non-repeating characters. The CLI uses the first occurrence of the character series to uniquely identify the password. For example, the password tpubtpub is the
same as tpub. A better password might be tpub3457.
If privileges are not specified or an end-user profile is not specified for the user, the user will inherit all of
the privileges or the end-user profile of the default user account. See “Default User Settings” on page 7-7.
Note that the password will not display in clear text in an ASCII configuration file produced by the
snapshot command. Instead, it will display in encrypted form. See Chapter 6, “Working With Configuration Files,” for information about using the snapshot command.
Removing a User
To remove a user from the local database, use the no form of the command:
-> no user thomas
The user account for thomas is removed from the local user database.
User-Configured Password
Users may change their own passwords by using the password command. In this example, the current user
wants to change her password to my_passwd. Follow the steps here to change the password:
1 Enter the password command. The system displays a prompt for the new password:
-> password
enter old password:
2 Enter the old password. (The password is concealed with asterisks.) A prompt displays for the new
password.
-> password
enter old password:********
enter new password:
3 Enter the desired password. The system then displays a prompt to verify the password.
-> password
enter old password:********
enter new password: *********
reenter new password:
page 7-8
OmniSwitch 7700/7800/8800 Switch Management Guide
April 2006
Managing Switch User Accounts
Creating a User
4 Enter the password again.
-> password
enter old password:********
enter new password: *********
reenter new password: *********
->
The password is now reset for the current user. At the next switch login, the user must enter the new password.
Note. A new password cannot be identical to the current password; it cannot be identical to any of the
three passwords that preceded the current password.
Setting a Minimum Password Size
The default minimum password length (or size) is 8 characters. To configure a minimum password size,
enter the user password-size min command. For example:
-> user password-size min 10
The minimum length for any passwords configured for users is now 10 characters.
Note that the maximum password length is 47 characters.
Configuring Password Expiration
By default, password expiration is disabled on the switch. A global default password expiration may be
specified for all users or password expiration may be set for an individual user.
Note. When the current user’s password has less than one week before expiration, the switch will display
an expiration warning after login.
If a user’s password expires, the user will be unable to log into the switch through any interface; the
admin user must reset the user’s password. If the admin user’s password expires, the admin user will
have access to the switch through the console port with the currently configured password.
Default Password Expiration
To set password expiration globally, use the user password-expiration command with the desired
number of days; the allowable range is 1 to 150 days. For example:
-> user password-expiration 3
The default password expiration is now set to three days. All user passwords on the switch will be set or
reset with the three-day expiration. If an individual user was configured with a different expiration through
the user command, the expiration will be reset to the global value.
The expiration is based on the switch system date/time and date/time the user password-expiration
command is entered. For example, if a user is configured with a password expiration of 10 days, but the
global setting is 20 days, that user’s password will expire in 10 days.
OmniSwitch 7700/7800/8800 Switch Management Guide
April 2006
page 7-9
Creating a User
Managing Switch User Accounts
To disable the default password expiration, use the user password-expiration command with the disable
option:
-> user password-expiration disable
Default password expiration is disabled on the switch.
Specific User Password Expiration
To set password expiration for an individual user’s current password, use the user command with the
expiration keyword and the desired number of days or an expiration date. For example:
-> user bert password techpubs expiration 5
This command sets user bert with a password expiration of five days.
To set a specific date for password expiration, include the date in mm/dd/yyyy hh:mm format. For example:
-> user bert password techpubs expiration 02/19/2003 13:30
This command sets the password expiration to February 19, 2003, at 1:30pm; the switch will calculate the
expiration based on the system date/time. The system date/time may be displayed through the system date
and system time commands. For more information about the system date/time, see the OmniSwitch 7700/
7800/8800 Switch Management Guide.
Note. The expiration will be reset to the global default setting (based on the user password-expiration
command) if the user password is changed or the user password-expiration command is entered again.
page 7-10
OmniSwitch 7700/7800/8800 Switch Management Guide
April 2006
Managing Switch User Accounts
Configuring Privileges for a User
Configuring Privileges for a User
To configure privileges for a network administrator account, enter the user command with the read-only
or read-write option and the desired CLI command domain names or command family names. The readonly option provides access to show commands; the read-write option provides access to configuration
commands and show commands. Command families are subsets of command domains.
If you create a user without specifying any privileges, the user’s account will be configured with the privileges specified for the default user account.
Note. Privileges cannot be configured for users with end-user profiles; privileges and profiles are mutually exclusive.
Command domains and families are listed here:
Domain
Corresponding Families
domain-admin
file telnet dshell debug
domain-system
system aip snmp rmon webmgt config
domain-physical
chassis module interface pmm health
domain-network
ip rip ospf bgp vrrp ip-routing ipx ipmr ipms
domain-layer2
vlan bridge stp 802.1q linkagg ip-helper
domain-service
dns
domain-policy
qos policy slb
domain-security
session avlan aaa
OmniSwitch 7700/7800/8800 Switch Management Guide
April 2006
page 7-11
Configuring Privileges for a User
Managing Switch User Accounts
In addition to command families, the keywords all or none may be used to set privileges for all command
families or no command families respectively.
An example of setting up user privileges:
-> user thomas read-write domain-network ip-helper telnet
User thomas will have write access to all the configuration commands and show commands in the
network domain, as well as Telnet and IP helper (DHCP relay) commands. The user will not be able to
execute any other commands on the switch.
Use the keyword all to specify access to all commands. In the following example, the user is given read
access to all commands:
-> user lindy read-only all
Note. When modifying an existing user, the user password is not required. If you are configuring a new
user with privileges, the password is required.
The default user privileges may also be modified. See “Default User Settings” on page 7-7.
Note. If you set up a user’s privileges to include domain-physical or the pmm command family, the user
will be able to set up port mirroring, which may allow the user access to sensitive data.
page 7-12
OmniSwitch 7700/7800/8800 Switch Management Guide
April 2006
Managing Switch User Accounts
Setting Up SNMP Access for a User Account
Setting Up SNMP Access for a User Account
By default, users can access the switch based on the SNMP setting specified for the default user account.
The user command, however, may be used to configure SNMP access for a particular user. SNMP access
may be configured without authentication and encryption required (supported by SNMPv1, SNMPv2, or
SNMPv3). Or it may be configured with authentication or authentication/encryption required (SNMPv3
only).
SNMP authentication specifies the algorithm that should be used for computing the SNMP authentication
key. It may also specify DES encryption. The following options may be configured for a user’s SNMP
access with authentication or authentication/encryption:
• SHA—The SHA authentication algorithm is used for authenticating SNMP PDU for the user.
• MD5—The MD5 authentication algorithm is used for authenticating SNMP PDU for the user.
• SHA and DES—The SHA authentication algorithm and DES encryption standard is used for authenti-
cating and encrypting SNMP PDU for the user.
• MD5 and DES—The MD5 authentication algorithm and the DES encryption standard is used for
authenticating and encrypting SNMP PDU for the user.
The user’s level of SNMP authentication is superseded by the SNMP version allowed globally on the
switch. By default, the switch allows all SNMP requests. Use the snmp security command to change the
SNMP security level on the switch.
Note. At least one user with SHA/MD5 authentication and/or DES encryption must be configured on the
switch for SNMPv3 communication with OmniVista.
The community string carried in the SNMP PDU identifies the request as an SNMPv1 or SNMPv2
request. The way the community string is handled on the switch is determined by the setting of the snmp
community map mode command. If the community map mode is enabled, the community string is
checked against the community strings database (populated by the snmp community map command). If
the community map mode is disabled, then the community string value is checked against the user database. In either case, if the check fails, the request is dropped.
For more information about configuring SNMP globally on the switch, see Chapter 10, “Using SNMP.”
The next sections describe how to configure SNMP access for users. Note the following:
• SNMP access cannot be specified for the admin user.
• When modifying a user’s SNMP access, the user password must be re-entered (or a new one config-
ured). This is required because the hash algorithm used to save the password in the switch depends on
the SNMP authentication level.
SNMP Access Without Authentication/Encryption
To give a user SNMP access without SNMP authentication required, enter the user command with the no
auth option. For example, to give existing user thomas SNMP access without SNMP authentication, enter
the following:
-> user thomas password techpubs no auth
OmniSwitch 7700/7800/8800 Switch Management Guide
April 2006
page 7-13
Setting Up SNMP Access for a User Account
Managing Switch User Accounts
For this user, if the SNMP community map mode is enabled (the default), the SNMP community map
must include a mapping for this user to a community string. In this example, the community string is
our_group:
-> snmp community map our_group user thomas
In addition, the global SNMP security level on the switch must allow non-authenticated SNMP frames
through the switch. By default, the SNMP security level is privacy all; this is the highest level of SNMP
security, which allows only SNMPv3 frames through the switch. Use the snmp security command to
change the SNMP security level. For more information about configuring SNMP globally on the switch,
see Chapter 10, “Using SNMP.”
SNMP Access With Authentication/Encryption
To configure a user with SNMP access and authentication, enter the user command with the desired
authentication type (sha, md5, sha+des, md5+des).
-> user thomas password techpubs sha+des
When SNMP authentication is specified, an SNMP authentication key is computed from the user password based on the authentication/encryption setting. In this example, the switch would use the SHA
authentication algorithm and DES encryption on the techpubs password to determine the SNMP authentication key for this user. The key is in hexadecimal form and is used for encryption/de-encryption of the
SNMP PDU.
The authentication key is only displayed in an ASCII configuration file if the snapshot command is
entered. The key is indicated in the file by the syntax authkey key. See Chapter 6, “Working With Configuration Files,” for information about using the snapshot command. The key is not displayed in the CLI.
Removing SNMP Access From a User
To deny SNMP access, enter the user command with the no snmp option:
-> user thomas no snmp
This command results in thomas no longer having SNMP access to manage the switch.
page 7-14
OmniSwitch 7700/7800/8800 Switch Management Guide
April 2006
Managing Switch User Accounts
Setting Up End-User Profiles
Setting Up End-User Profiles
End-user profiles are designed for user accounts in the carrier market. With end-user profiles, a network
administrator can configure customer login accounts that restrict users to particular command areas over
particular ports and/or VLANs.
End-user profiles are only managed and stored on the switch; profiles are not stored on external servers.
Note. End-user profiles cannot be used in conjunction with user partitioned management; the features are
mutually exclusive.
The following table shows the end-user command areas and the commands associated with each area:
Area Keyword
Available Commands
physical
trap port link
flow
flow wait
interfaces admin
interfaces alias
interfaces
interfaces no L2 statistics
show interfaces
vlan-table
vlan
vlan stp
vlan authentication
vlan router ipx
vlan port default
show vlan
show vlan port
show vlan router mac status
vlan dhcp mac
vlan dhcp mac range
vlan dhcp port
vlan dhcp generic
vlan binding mac-ip-port
vlan binding mac-port-protocol
vlan binding mac-port
vlan binding mac-ip
vlan binding ip-port
vlan binding port-protocol
vlan mac
vlan mac range
vlan ip
vlan ipx
vlan protocol
vlan user
vlan port
vlan port mobile
vlan port default vlan restore
vlan port authenticate
show vlan rules
show vlan port mobile
vlan 802.1q
vlan 802.1q frame type
vlan 802.1q force tag internal
show 802.1q
mac-filtering-table
mac-address-table
mac-address-table aging-time
show mac-address-table
show mac-address-table count
show mac-address aging-time
spantree
show spantree
show spantree ports
basic-ip-routing
show arp
ip-routes-table
show ip route
OmniSwitch 7700/7800/8800 Switch Management Guide
April 2006
page 7-15
Setting Up End-User Profiles
Managing Switch User Accounts
Creating End-User Profiles
To set up an end-user profile, use the end-user profile command and enter a name for the profile. Specify
read-only or read-write access to particular command areas. The profile can also specify port ranges and/or
VLAN ranges. The port ranges and VLAN ranges must be configured on separate command lines and are
discussed in the next sections.
In this example, a profile is created with access to physical commands on the switch:
-> end-user profile Profile3 read-write physical
A profile named Profile3 is now available on the switch and may be associated with a user through the
user command.
Note that if port ranges or VLAN ranges are not configured, a user with this profile will not be able to use
any commands that require port or VLAN values or view any show outputs that contain port or VLAN
values.
Setting Up Port Ranges in a Profile
To set up port ranges for a profile, enter the end-user profile port-list command with the relevant profile
name and the desired slots/ports. For example:
-> end-user profile Profile3 port-list 2 3/1-4
In this example, the port list includes all ports in slot 2, and ports 1 through 4 on slot 3. A user with this
profile will be able to manage these ports (depending on the command areas specified in the profile).
To remove a port list, use the no form of the command with the relevant slot number(s). All ports in the
port list on a given slot will be removed. For example:
-> end-user profile Profile3 no port-list 3
In this example, all ports on slot 3 are removed from the profile.
Setting Up VLAN Ranges in a Profile
To set up VLAN ranges for a profile, enter the end-user profile vlan-range command with the relevant
profile name and the desired VLAN range. For example:
->end-user profile Profile3 vlan-range 2-4 7-8
In this example, the VLAN range includes VLANs 2, 3, 4, 7, and 8. A user with this profile will be able to
manage these VLANs (depending on the command areas specified in the profile).
To remove a VLAN range from a profile, use the no form of the command and the VLAN ID of the start
of the range to be removed. For example:
-> end-user profile Profile3 no vlan-range 7
This command removes VLANs 7 and 8 from Profile3.
page 7-16
OmniSwitch 7700/7800/8800 Switch Management Guide
April 2006
Managing Switch User Accounts
Verifying the User Configuration
Associating a Profile With a User
To associate a profile with a user, enter the user command with the end-user profile keywords and the
relevant profile name. For example:
-> user Customer2 end-user profile Profile3
Profile3 is now associated with Customer2. When Customer2 logs into the switch, Customer2 will have
access to command areas, port ranges, and VLAN ranges specified by Profile3.
Note that user information stored on an external server may include a profile name. When the user
attempts to log into the switch, the switch will attempt to match the profile name to a profile stored on the
switch.
Removing a Profile From the Configuration
To delete a profile from the configuration, enter the no form of the end-user profile command with the
name of the profile you want to delete. For example:
-> no end-user profile Profile3
Profile3 is deleted from the configuration.
Note. If the profile name is associated with a user, and the profile is deleted from the configuration, the
user will not have access to the switch.
Verifying the User Configuration
To display information about user accounts configured locally in the user database, use the show
commands listed here:
show user
Displays information about all users or a particular user configured in
the local user database on the switch.
show end-user profile
Displays information about end-user profiles.
show aaa priv hexa
Displays hexadecimal values for command domains/families.
show user password-size
Displays the minimum number of characters that are required for a user
password.
For more information about the resulting displays from these commands, see the OmniSwitch CLI Reference Guide. An example of the output for the show user command is also given in “Quick Steps for
Creating Network Administrator User Accounts” on page 7-5.
OmniSwitch 7700/7800/8800 Switch Management Guide
April 2006
page 7-17
Verifying the User Configuration
page 7-18
Managing Switch User Accounts
OmniSwitch 7700/7800/8800 Switch Management Guide
April 2006
8
Managing Switch Security
Switch security is provided on the switch for all available management interfaces (console, Telnet, HTTP,
FTP, Secure Shell, and SNMP). The switch may be set up to allow or deny access through any of these
interfaces. (Note that users attempting to access the switch must have a valid username and password.)
In This Chapter
This chapter describes how to set up switch management interfaces through the Command Line Interface
(CLI). CLI commands are used in the configuration examples; for more details about the syntax of
commands, see the OmniSwitch CLI Reference Guide.
An overview of switch security is given in this chapter. In addition, configuration procedures described in
this chapter include:
• “Configuring Authenticated Switch Access” on page 8-6
• “Setting Up Management Interfaces” on page 8-9
• “Configuring Accounting for ASA” on page 8-12
A user login procedure requires that users are authenticated for switch access via an external authentication server or the local user database. For information about setting up user accounts locally on the switch,
see Chapter 7, “Managing Switch User Accounts.” For information about setting up external servers that
are configured with user information, see the “Managing Authentication Servers” chapter in the
OmniSwitch 7700/7800/8800 Network Configuration Guide.
This chapter describes how to enable/disable access for management interfaces. For information about
basic login on the switch, see Chapter 1, “Logging Into the Switch.”
OmniSwitch 7700/7800/8800 Switch Management Guide
April 2006
page 8-1
Switch Security Specifications
Managing Switch Security
Switch Security Specifications
Telnet sessions allowed
4 concurrent sessions
FTP sessions allowed
4 concurrent sessions
HTTP (Web browser) sessions allowed
4 concurrent sessions
Secure Shell sessions (including SFTP) allowed
8 concurrent sessions
Total sessions (Secure Shell, Telnet, FTP, HTTP, and
console)
21 concurrent sessions
SNMP sessions allowed
50 concurrent sessions
Switch Security Defaults
Access to managing the switch is always available for the admin user through the console port, even if
management access to the console port is disabled.
page 8-2
OmniSwitch 7700/7800/8800 Switch Management Guide
April 2006
Managing Switch Security
Switch Security Overview
Switch Security Overview
Switch security features increase the security of the basic switch login process by allowing management
only through particular interfaces for users with particular privileges. Login information and privileges
may be stored on the switch and/or an external server, depending on the type of external server you are
using and how you configure switch access.
The illustration here shows the components of switch security:
End User
login request
management interface
RADIUS, LDAP, or ACE
Server
Servers supply login information about the user. Userprivilege information is also
available on RADIUS and
LDAP servers.
local user
database
OmniSwitch
Authenticated Switch Access Setup
An external RADIUS or LDAP server can supply both user login and authorization information. ACE/
Server can provide login information; user authorization information is available through the switch’s
local user database. External servers may also be used for accounting, which includes logging statistics
about user sessions. For information about configuring the switch to communicate with external servers,
see the “Managing Authentication Servers” chapter in the OmniSwitch 7700/7800/8800 Network Configuration Guide.
If an external server is not available or is not configured, user login information and user authorization
may be provided through the local user database on the switch. Local user accounts are described in
Chapter 7, “Managing Switch User Accounts.”
Logging may also be accomplished directly on the switch. For information about configuring local
logging for switch access, see “Configuring Accounting for ASA” on page 8-12. For complete details
about local logging, see the “Using Switch Logging” chapter in the OmniSwitch 7700/7800/8800 Network
Configuration Guide.
OmniSwitch 7700/7800/8800 Switch Management Guide
April 2006
page 8-3
Authenticated Switch Access
Managing Switch Security
Authenticated Switch Access
Authenticated Switch Access (ASA) is a way of authenticating users who want to manage the switch. With
authenticated access, all switch login attempts using the console or modem port, Telnet, FTP, SNMP,
Secure Shell, or HTTP require authentication via the local user database or via a third-party server.
This section describes how to configure management interfaces for authenticated access as well as how to
specify external servers that the switch can poll for login information. The type of server may be an
authentication-only mechanism or an authentication, authorization, and accounting (AAA) mechanism.
AAA Servers—RADIUS or LDAP
AAA servers are able to provide authorization for switch management users as well as authentication (they
also may be used for accounting). The AAA servers supported on the switch are Remote Authentication
Dial-In User Service (RADIUS) or Lightweight Directory Access Protocol (LDAP) servers. User login
information and user privileges may be stored on the servers.
Privileges are used for network administrator accounts. Instead of user privileges an end-user profile may
be associated with a user for customer login accounts. User information configured on an external server
may include a profile name attribute. The switch will attempt to match the profile name to a profile stored
locally on the switch.
The following illustration shows the two different user types attempting to authenticate with a AAA
server:
Network Administrator
Customer
login request
login request
LDAP or RADIUS
Server
LDAP or RADIUS
Server
The switch polls the server
and receives login and privilege information about the
user.
OmniSwitch
The switch polls the server
for login information, which
may reference a profile
name; end-user profiles are
stored on the switch.
end-user
profile
OmniSwitch
AAA Server (LDAP or RADIUS)
For more information about types of users, see Chapter 7, “Managing Switch User Accounts.”
Authentication-only—ACE/Server
Authentication-only servers are able to authenticate users for switch management access, but authorization (or what privileges the user has after authenticating) are determined by the switch. Authenticationonly servers cannot return user privileges or end-user profiles to the switch. The authentication-only server
supported by the switch is ACE/Server, which is a part of RSA Security’s SecurID product suite. RSA
Security’s ACE/Agent is embedded in the switch.
The following illustration shows the two different user types attempting to authenticate with an ACE/
Server:
page 8-4
OmniSwitch 7700/7800/8800 Switch Management Guide
April 2006
Managing Switch Security
Authenticated Switch Access
Network Administrator
Customer
login request
ACE/Server
login request
ACE/Server
The switch polls the server
for login information; privileges are stored on the
switch.
user
privileges
The switch polls the server
for login information; enduser profiles are stored on
the switch.
OmniSwitch
end-user
profiles
OmniSwitch
Authentication-Only Server (ACE/Server)
Note. A RADIUS server supporting the challenge and response mechanism as defined in RADIUS RFC
2865 may access an ACE/Server for authentication purposes. The ACE/Server is then used for user
authentication, and the RADIUS server is used for user authorization.
Interaction With the User Database
By default, switch management users may be authenticated through the console port via the local user
database. If external servers are configured for other management interfaces (such as Telnet, or HTTP) but
the servers become unavailable, the switch will poll the local user database for login information.
Access to the console port provides secure failover in case of misconfiguration or if external authentication servers become unavailable. The admin user is always authorized through the console port via the
local database (provided the correct password is supplied), even if access to the console port is disabled.
The database includes information about whether or not a user is able to log into the switch and which
kinds of privileges or rights the user has for managing the switch. The database may be set up by the
admin user or any user with write privileges to the AAA commands.
See Chapter 7, “Managing Switch User Accounts,” for more information about setting up the user database.
ASA and Authenticated VLANs
Layer 2 Authentication uses Authenticated VLANs to authenticate users through the switch out to a
subnet. Authenticated Switch Access authenticates users into the switch to manage it. The features are
independent of each other; however, user databases for each feature may be located on the same authentication server.
For more information about Authenticated VLANs, see “Configuring Authenticated VLANs” in the
OmniSwitch 7700/7800/8800 Network Configuration Guide. For more information about authentication
servers, see “Configuring Authentication Servers” in the OmniSwitch 7700/7800/8800 Network Configuration Guide.
OmniSwitch 7700/7800/8800 Switch Management Guide
April 2006
page 8-5
Configuring Authenticated Switch Access
Managing Switch Security
Configuring Authenticated Switch Access
Setting up Authenticated Switch Access involves the following general steps:
1 Set Up the Authentication Servers. This procedure is described briefly in this chapter. See the
“Managing Authentication Servers” chapter of the OmniSwitch 7700/7800/8800 Network Configuration
Guide for complete details.
2 Set Up the Local User Database. Set up user information on the switch if user login or privilege infor-
mation will be pulled from the switch. See Chapter 7, “Managing Switch User Accounts.”
3 Set Up the Management Interfaces. This procedure is described in “Setting Up Management Interfaces” on page 8-9.
4 Set Up Accounting. This step is optional and is described in “Configuring Accounting for ASA” on
page 8-12.
Additional configuration is required in order to set up the switch to communicate with external authentication servers. This configuration is briefly mentioned in this chapter and described in detail in the “Managing Authentication Servers” chapter of the OmniSwitch 7700/7800/8800 Network Configuration Guide.
If you are using the local switch database to authenticate users, user accounts must be set up on the switch.
Procedures for creating user accounts are described in this chapter. See Chapter 7, “Managing Switch User
Accounts.”
Note that by default:
• Authenticated switch access is available only through the console port.
• Users are authenticated through the console port via the local user database on the switch.
These defaults provide “out-of-the-box” security at initial startup. Other management interfaces (Telnet,
HTTP, etc.) must be specifically enabled before they can access the switch.
A summary of the commands used for configuring ASA is given in the following table:
Commands
Used for ...
user
Configuring the local user database on the switch.
aaa radius-server
aaa ldap-server
Setting up the switch to communicate with external RADIUS or LDAP
authentication servers.
aaa authentication
Configuring the management interface and specifying the servers and/or
local user database to be used for the interface.
aaa accounting session
Optional. Specifies servers to be used for accounting.
page 8-6
OmniSwitch 7700/7800/8800 Switch Management Guide
April 2006
Managing Switch Security
Quick Steps for Setting Up ASA
Quick Steps for Setting Up ASA
1 If the local user database will be used for user login information, set up user accounts through the user
command. User accounts may include user privileges or an end-user profile. In this example user privileges are configured:
-> user thomas password pubs read-write domain-network ip-helper telnet
If SNMP access is configured for the user, the global SNMP setting for the switch may have to be configured through the snmp security command. See Chapter 7, “Managing Switch User Accounts,” for more
information about setting up user accounts.
2 If an external RADIUS or LDAP server will be used for user login information, use the aaa radiusserver or aaa ldap-server commands to configure the switch to communicate with these servers. For
example:
-> aaa radius-server rad1 host 10.10.1.2 timeout 3
For more information, see the “Managing Authentication Servers” chapter in the OmniSwitch 7700/7800/
8800 Network Configuration Guide.
3 Use the aaa authentication command to specify the management interface through which switch
access is permitted (such as console, telnet, ftp, http, or ssh). Specify the server and backup servers to be
used for checking user login and privilege information. Multiple servers of different types may be specified. For example:
-> aaa authentication ssh rad1 ldap2 local
The order of the server names is important. The switch uses the first available server in the list. In this
example, the switch would use rad1 to authenticate Secure Shell users. If rad1 becomes unavailable, the
switch will use ldap2. If ldap2 then becomes unavailable, the switch will use the local user database to
authenticate users.
4 Repeat step 3 for each management interface to which you want to configure access; or use the default
keyword to specify access for all interfaces for which access is not specifically denied. For example, if
you want to configure access for all management interfaces except FTP, you would enter:
-> no aaa authentication ftp
-> aaa authentication default rad1 local
Note the following:
• SNMP access may only use LDAP servers or the local user database. If you configure the default
management access with only RADIUS and/or ACE, SNMP will not be enabled.
• It is recommended that Telnet and FTP be disabled if Secure Shell (ssh) is enabled.
• If you want to use WebView to manage the switch, make sure HTTP is enabled.
5 Specify an accounting server if a RADIUS or LDAP server will be used for accounting. Specify local
if accounting may be done on the switch through the Switch Logging feature. Multiple servers may be
specified as backups.
-> aaa accounting session ldap2 local
The order of the server names is important here as well. In this example, the switch will use ldap2 for
logging switch access sessions. If ldap2 becomes unavailable, the switch will use the local Switch
OmniSwitch 7700/7800/8800 Switch Management Guide
April 2006
page 8-7
Quick Steps for Setting Up ASA
Managing Switch Security
Logging facility. For more information about Switch Logging, see the OmniSwitch 7700/7800/8800
Network Configuration Guide.
Note. To verify the switch access setup, enter the show aaa authentication command. The display is
similar to the one shown here:
Service type = Default
1rst authentication server = rad1
2nd authentication server
= local
Service type = Console
Authentication = Use Default ,
1rst authentication server = rad1
2nd authentication server
= local
Service type = Telnet
Authentication = Use Default,
1rst authentication server = rad1
2nd authentication server
= local
Service type = Ftp
Authentication = Use Default,
1rst authentication server = rad1
2nd authentication server
= local
Service type = Http
Authentication = denied
Service type = Snmp
Authentication = Use Default,
1rst authentication server = rad1
2nd authentication server
= local
Service type = Ssh
Authentication = Use Default,
1rst authentication server = rad1
2nd authentication server
= local
For more information about this command, see the OmniSwitch CLI Reference Guide.
page 8-8
OmniSwitch 7700/7800/8800 Switch Management Guide
April 2006
Managing Switch Security
Setting Up Management Interfaces
Setting Up Management Interfaces
By default, authenticated access is available through the console port. Access through other management
interfaces is disabled. Other management interfaces include Telnet, FTP, HTTP, Secure Shell, and SNMP.
This chapter describes how to set up access for management interfaces. For more details about particular
management interfaces and how they are used, see Chapter 1, “Logging Into the Switch.”
To give switch access to management interfaces, use the aaa authentication command to allow or deny
access to each interface type; the default keyword may be used to configure access for all interface types.
Specify the server(s) to be used for authentication through the indicated management interface.
Keywords used for specifying management interfaces are listed here:
keywords
console
telnet
ftp
http
ssh
snmp
default
Note that ssh is the keyword used to specify Secure Shell.
To specify an external authentication server or servers, use the RADIUS or LDAP server name or the
keyword ace for an ACE/Server. To specify that the local user database should be used for authentication,
use the local keyword. Up to four servers total may be specified.
RADIUS and LDAP servers are set up to communicate with the switch via the aaa radius-server and aaa
ldap-server commands. ACE/Servers do not require any configuration, but you must FTP the sdconf.rec
file from the server to the switch’s network directory. For more information about configuring the switch
to communicate with these servers, see the “Managing Authentication Servers” chapter of the OmniSwitch
7700/7800/8800 Network Configuration Guide.
Note. RADIUS or LDAP servers used for authenticated switch access may also be used with authenticated VLANs. Authenticated VLANs are described in the “Configuring Authenticated VLANs” chapter of
the OmniSwitch 7700/7800/8800 Network Configuration Guide.
The order of the specified servers is important. The switch uses only one server for authentication—the
first available server in the list. All authentication attempts will be tried on that server. Other servers are
not tried, even if they are available. If local is specified, it must be last in the list since the local user database is always available when the switch is up.
Servers may also be used for accounting, or logging, of authenticated sessions. See “Configuring Accounting for ASA” on page 8-12.
The following table describes the management access interfaces or methods and the types of authentication servers that may be used with them:
Server Type
Management Access Method
RADIUS
Telnet, FTP, HTTP, Secure Shell
LDAP
Telnet, FTP, HTTP, Secure Shell, SNMP
ACE/Server
Telnet, FTP, HTTP, Secure Shell
local
console, FTP, HTTP, Secure Shell, SNMP
OmniSwitch 7700/7800/8800 Switch Management Guide
April 2006
page 8-9
Setting Up Management Interfaces
Managing Switch Security
Enabling Switch Access
Enter the aaa authentication command with the relevant keyword that indicates the management interface and specify the servers to be used for authentication. In this example, Telnet access for switch
management is enabled. Telnet users will be authenticated through a chain of servers that includes a
RADIUS server and an LDAP server that have already been configured through the aaa radius-server
and aaa ldap-server commands respectively. For example:
-> aaa authentication telnet rad1 ldap2 local
After this command is entered, Telnet users will be authenticated to manage the switch through the rad1
RADIUS server. If that server is unavailable, the LDAP server, ldap2, will be polled for user information.
If that server is unavailable, the local user database will be polled for user information. Note that if the
local user database is specified, it must be last in the list of servers.
To disable authenticated access for a management interface use the no form of the command with the
keyword for the interface. For example:
-> no aaa authentication ftp
FTP access is now denied on the switch.
Note. The admin user always has switch access through the console port even if access is denied through
the console port.
To remove a server from the authenticated switch access configuration, enter the aaa authentication
command with the relevant server names(s) and leave out the names of any servers you want to remove.
For example:
-> aaa authentication telnet rad1 local
The server ldap2 is removed for Telnet access and will not be polled for user information when users
attempt to log into the switch through Telnet.
Note. SNMP can only use LDAP servers or the local user database for authentication.
Configuring the Default Setting
The default keyword may be used to specify the default setting for all management interfaces except those
that have been explicitly denied. For example:
-> no aaa authentication ftp
-> aaa authentication default ldap2 local
In this example, all management interfaces except FTP are given switch access through ldap2 and the
local user database.
Since SNMP can only use LDAP servers or the local database for authentication, RADIUS or ACE/Server
are not valid servers for SNMP management access. If the default interface setting includes only RADIUS
and/or ACE server, the default setting will not be used for SNMP. For example:
-> no aaa authentication ftp
-> aaa authentication default rad1 rad2
page 8-10
OmniSwitch 7700/7800/8800 Switch Management Guide
April 2006
Managing Switch Security
Setting Up Management Interfaces
In this scenario, SNMP access is not enabled because only RADIUS servers have been included in the
default setting. If servers of different types are configured and include LDAP or local, SNMP will be
enabled through those servers. For example:
-> aaa authentication default rad1 ldap2 local
In this case, SNMP access is enabled, and users will be authenticated through ldap2 and the local database.
The default keyword may also be used to reset a specified interface to the default interface setting. For
example:
-> aaa authentication telnet default
In this example, Telnet users will now be authenticated through the servers that are specified for the
default interface.
Using Secure Shell
Secure Shell is recommended instead of Telnet and FTP as a method accessing the switch. (Telnet and
FTP are not secure.) Secure Shell contains a secure FTP application that may be used after a Secure Shell
session is initiated. If Secure Shell is enabled, it is recommended that Telnet and FTP be disabled. For
example:
-> no aaa authentication telnet
-> no aaa authentication ftp
-> aaa authentication ssh rad1 ldap2 local
In addition to enabling Secure Shell on the switch, you may want to replace the DSA key on the switch.
The DSA key is generated at initial switch startup and copied to the secondary CMM; it includes a private
key that generates a digital signature against a public key. The Secure Shell client will verify this signature when the client attempts to log into the switch.
The DSA key on the switch is made up of two files contained in the /flash/network directory; the public
key is called ssh_host_dsa_key.pub, and the private key is called ssh_host_dsa_key. To generate a
different DSA key, use the Secure Shell tools available on your Unix or Windows system and copy the
files to the /flash/network directory.
For more information about Secure Shell, see Chapter 1, “Logging Into the Switch.”
Note. Secure Shell cannot be used for Authenticated VLANs.
OmniSwitch 7700/7800/8800 Switch Management Guide
April 2006
page 8-11
Configuring Accounting for ASA
Managing Switch Security
Configuring Accounting for ASA
Accounting servers track network resources such as time, packets, bytes, etc., and user activity (when a
user logs in and out, how many login attempts were made, session length, etc.). The accounting servers
may be located anywhere in the network.
Note the following:
• Up to 4 servers may be configured.
• The servers may be different types.
• ACE cannot be used as an accounting server.
• The keyword local must be specified if you want accounting to be performed via the Switch Logging
feature in the switch. If local is specified, it must be the last server in the list.
Note that external accounting servers are configured through the aaa radius-server and aaa ldap-server
commands. These commands are described in “Managing Authentication Servers” in the OmniSwitch
7700/7800/8800 Network Configuration Guide.
To enable accounting (logging a user session) for Authenticated Switch Access, use the aaa accounting
session command with the relevant server name(s). In this example, the RADIUS and LDAP servers have
already been configured through the aaa radius-server and aaa ldap-server commands.
-> aaa accounting session rad1 ldap2 local
After this command is entered, accounting will be performed through the rad1 RADIUS server. If that
server is unavailable, the LDAP server, ldap2, will be used for accounting. If that server is unavailable,
logging will be done locally on the switch through the Switch Logging feature. (For more information
about Switch Logging, see the OmniSwitch 7700/7800/8800 Network Configuration Guide.)
To remove an individual server from the list of servers, enter the aaa accounting session command with
the relevant server name(s), removing the desired server from the list. For example:
-> aaa accounting session rad1 local
The server ldap2 is removed as an accounting server.
To disable accounting for Authenticated Switch Access, use the no form of the aaa accounting session
command:
-> no aaa accounting session
Accounting will not be performed for Authenticated Switch Access sessions.
page 8-12
OmniSwitch 7700/7800/8800 Switch Management Guide
April 2006
Managing Switch Security
Verifying Switch Security Configuration
Verifying Switch Security Configuration
To display information about management interfaces used for Authenticated Switch Access, use the show
commands listed here:
show aaa authentication
Displays information about the current authenticated switch session.
show aaa accounting
Displays information about accounting servers configured for Authenticated Switch Access or Authenticated VLANs.
show aaa server
Displays information about a particular AAA server or AAA servers.
For more information about the resulting displays from these commands, see the OmniSwitch CLI Reference Guide. An example of the output for the show aaa authentication command is also given in “Quick
Steps for Setting Up ASA” on page 8-7.
OmniSwitch 7700/7800/8800 Switch Management Guide
April 2006
page 8-13
Verifying Switch Security Configuration
page 8-14
Managing Switch Security
OmniSwitch 7700/7800/8800 Switch Management Guide
April 2006
9
Using WebView
The switch can be monitored and configured using WebView, Alcatel’s web-based device management
tool. The WebView application is embedded in the switch and is accessible via the following web browsers:
• Internet Explorer 6.0 and later for Windows NT, 2000, XP, 2003
• Netscape 7.1 for Windows NT, 2000, XP
• Netscape 7.0 for Solaris SunOS 5.8
Note. For information about setting up browser preferences and options, see “Browser Setup” on page 9-2
In This Chapter
This chapter provides an overview of WebView and WebView functionality, and includes information
about the following procedures:
• Configuring the Switch with WebView
– WebView Login (see page 9-7)
– Home Page (see page 9-8)
– Configuration Page (see page 9-9)
• Using WebView Help
– Global Configuration Page (see page 9-9)
– Table Configuration Page (see page 9-10)
Note. For detailed configuration information on each feature, see other chapters in this guide or the
OmniSwitch 7700/7800/8800 Network Configuration Guide or Advanced Routing Configuration Guide.
OmniSwitch 7700/7800/8800 Switch Management Guide
April 2006
page 9-1
WebView CLI Defaults
Using WebView
WebView CLI Defaults
Web Management Command Line Interface (CLI) commands allow you to enable/disable WebView,
enable/disable Secure Socket Layer (SSL), and view basic WebView parameters. These configuration
options are also available in WebView. The following table lists the defaults for WebView configuration
through the http command.
Description
Command
Default
WebView Status
http server
enabled
Force SSL
http ssl
disabled
Browser Setup
Your browser preferences (or options) should be set up as follows:
• Cookies should be enabled. Typically this is the default.
• JavaScript must be enabled/supported.
• Java must be enabled.
• Style sheets must be enabled; that is, the colors, fonts, backgrounds, etc. of web pages should always
be used (rather than any user-configured settings).
• Checking for new versions of pages should be set to “Every time” your browser opens.
• If you are using a proxy server, the proxy settings should be configured to bypass the switch on which
you are running WebView (the local switch).
Typically many of these settings are configured as the default. Different browsers (and different versions
of the same browser) may have different dialogs for these settings. Check your browser help pages if you
need help.
page 9-2
OmniSwitch 7700/7800/8800 Switch Management Guide
April 2006
Using WebView
WebView CLI Commands
WebView CLI Commands
The following WebView configuration options are typically managed through the CLI. However, enabling
WebView and enabling SSL may also be set up through WebView itself.
Enabling/Disabling WebView
WebView is enabled on the switch by default. If necessary, use the http server command to enable
WebView. For example:
-> http server
Use the no http server command to disable WebView on the switch. If web management is disabled, you
will not be able to access the switch using WebView. Use the show http command to view WebView
status.
Enabling/Disabling SSL
Force SSL is disabled by default. Use the http ssl command to enable Force SSL on the switch. For example:
-> http ssl
Use the no form of the http ssl command to disable Force SSL on the switch. Use the show http
command to view WebView status.
OmniSwitch 7700/7800/8800 Switch Management Guide
April 2006
page 9-3
Quick Steps for Setting Up WebView
Using WebView
Quick Steps for Setting Up WebView
1 Make sure you have an Ethernet connection to the switch (through the Ethernet Management Port or a
network interface).
2 Configure switch management for HTTP using the aaa authentication command. Enter the command,
the port type that you are authenticating (http), and the name of the LDAP, RADIUS, ACE, or local server
that is being used for authentication. For example, to configure switch management for HTTP using the
“local” authentication server you would enter:
-> aaa authentication http local
3 Open a web browser.
4 Enter the IP address of the switch you want to access in the Address field of the browser and press
Enter. The WebView login screen appears.
5 Enter the appropriate user ID and password (the initial user name is admin and the initial password is
switch). After successful login, the Chassis Management Home Page appears.
WebView Overview
The following sections provide an overview of WebView page layouts. For information on configuring the
switch with WebView, see page 9-7.
WebView Page Layout
As shown below, each WebView page is divided into four areas:
• Banner—Used to access global options (e.g., global help, telnet, log out). An icon is also displayed in
this area to indicate the current directory (Certified or Working).
Certified
Working
• Toolbar—Used to access WebView features.
• Feature Options—Used to access specific configuration options for each feature (displayed in drop-
down menus at the top of the page).
• View/Configuration Area—Used to view/configure a feature.
page 9-4
OmniSwitch 7700/7800/8800 Switch Management Guide
April 2006
Using WebView
WebView Overview
View/Configuration Area
Banner
Configuration
Group
Feature
Options
Toolbar
Configuration
Feature
WebView Chassis Home Page
Banner
The following features are available in the WebView Banner:
• Options—Brings up the User Options Page, which is used to change the user login password.
• Save Config—Brings up the Save Configuration Screen. Click Apply to save the switch’s running
configuration for the next startup.
• Help—Brings up general WebView Help. Specific help pages are also available on each configuration
page.
• About—Provides basic WebView product information.
• Telnet—Brings up a Telnet session window, through which you can access the switch for CLI config-
uration.
• Log Out—Logs the user out of the switch and ends the user session. After logout, the login screen
appears. The user can log back into the switch or just close the login screen.
Toolbar
Switch configuration is divided into configuration groups in the toolbar (for example, Physical, Layer 2,
etc.). Under each configuration group are switch features, identified by a name and an icon.
For detailed configuration information on each feature, see other chapters in this guide or the OmniSwitch
7700/7800/8800 Network Configuration Guide or Advanced Routing Configuration Guide. Help pages are
also available in WebView.
OmniSwitch 7700/7800/8800 Switch Management Guide
April 2006
page 9-5
WebView Overview
Using WebView
Feature Options
Feature configuration options are displayed as drop-down menus at the top of each feature page. For more
information on using the drop-down menus, see “Configuration Page” on page 9-9.
View/Configuration Area
The View/Configuration area is where switch configuration information is displayed and where configuration pages appear. After logging into WebView, a real-time graphical representation of the switch displays
all of the switch’s current components. The feature configuration options on this page are used to configure the switch.
page 9-6
OmniSwitch 7700/7800/8800 Switch Management Guide
April 2006
Using WebView
Configuring the Switch With WebView
Configuring the Switch With WebView
The following sections provide an overview of WebView functionality. For detailed configuration procedures, see other chapters in this guide, the OmniSwitch 7700/7800/8800 Network Configuration Guide, or
the OmniSwitch 7700/7800/8800 Advanced Routing Configuration Guide.
Accessing WebView
WebView is accessed using any of the browsers listed on page 9-1. All of the necessary WebView files
are stored on the switch. To access WebView and login to a switch:
1 Open a web browser.
2 Enter the IP address of the switch you want to configure in the browser Address field and press Enter.
The login screen appears.
WebView Login Page
3 Enter the appropriate user ID and password at the login prompt (the initial user name is admin and the
initial password is switch) and click Login. After successful login, the Chassis Management Home Page
appears.
Note. You can access WebView through any interface on the switch. However, if you want to access the
switch through the EMP port, you must be on the same subnet as the switch.
To configure a feature in WebView, click on the feature icon in the toolbar on the left side of the screen.
The first page displayed is the Home Page. Each configuration feature in WebView has a Home Page and
a number of configuration pages. The Home Page provides an overview of the feature and current configuration. The configuration pages are used to configure the feature.
OmniSwitch 7700/7800/8800 Switch Management Guide
April 2006
page 9-7
Configuring the Switch With WebView
Using WebView
Home Page
The first page displayed for each feature is the Home Page (e.g., IP Home). The Home Page describes the
feature and provides an overview of that feature’s current configuration. If applicable, home pages display
the feature’s current configuration and can also be used to configure global parameters. Each Home Page
also provides a Site Map (shown below), which displays all of the configuration options available for that
feature. These are the same configuration options available in the drop-down menus at the top of the page.
Displays the Site
Map
Displays feature
Home Page.
Feature Overview
Example Home Page
Click on a configuration option to
display the configuration page.
Click on the browser
Back button to return
to the Home Page.
Example Site Map
page 9-8
OmniSwitch 7700/7800/8800 Switch Management Guide
April 2006
Using WebView
Configuring the Switch With WebView
Configuration Page
Feature configuration options are displayed in the drop-down menus at the top of each page. The same
menus are displayed on every configuration page within a feature. To configure a feature on the switch,
select a configuration option from the drop down menu. There are two types of configuration pages in
WebView—Global configuration pages and Table configuration pages.
Global Configuration Page
Global configuration pages display drop-down menus and fields that you complete to configure global
parameters. The fields display the current configuration. To change the configuration:
1 Select a new value from one of the drop-down lists or enter a new value in a field.
2 Click Apply to apply the changes to the switch. The new configuration takes effect immediately.
3 Repeat the procedure to make additional configuration changes.
Note. If you update a field and want to return it to the previous configuration, click Restore. However, you
must click Restore before applying the new configuration. If you apply the new configuration and want to
return to the previous configuration, you must re-enter the old configuration in the applicable fields.
Select from
drop-down
menu.
Configures
global
parameter.
Applies new
configuration.
Click Help to display
help for the current page.
Restores field values
to their original state.
Global Configuration Page
OmniSwitch 7700/7800/8800 Switch Management Guide
April 2006
page 9-9
Configuring the Switch With WebView
Using WebView
Table Configuration Page
Table configuration pages show current configurations in tabular form. Entries may be added, modified, or
deleted. You can delete multiple entries, but you can only modify one entry at a time.
Click to select
item to modify
or delete.
Table Configuration Page
Adding a New Entry
To add a new entry to the table:
1 Click Add on the Configuration page. The Add window appears (e.g., Add IP Static Route).
page 9-10
OmniSwitch 7700/7800/8800 Switch Management Guide
April 2006
Using WebView
Configuring the Switch With WebView
2 Complete the fields, then click Apply. The new configuration takes effect immediately and the new
entry appears in the table.
3 Repeat steps 1 and 2 to add additional entries.
Add Window
Modifying an Existing Entry
To modify an existing entry:
1 Click on the checkbox to the left of the entry on the Configuration page and click Modify. The Modify
window appears (e.g., Modify IP Static Route). The current configuration is displayed in each field.
OmniSwitch 7700/7800/8800 Switch Management Guide
April 2006
page 9-11
Configuring the Switch With WebView
Using WebView
2 Modify the applicable field(s), then click Apply. If successful, the Modify window disappears. The
new configuration takes effect immediately and the modified entry appears in the table. If there is an error,
the window will remain and an error message is displayed.
3 Repeat the procedure to modify additional entries.
Modify Window
Deleting an Existing Entry
To delete an existing entry:
1 Click on the checkbox to the left of the entry on the Configuration page.
2 Click Delete. The entry is immediately deleted from the table.
Note. You can delete multiple entries by selecting the checkbox next to each entry. Click on the top box to
select all entries in the table.
page 9-12
OmniSwitch 7700/7800/8800 Switch Management Guide
April 2006
Using WebView
Configuring the Switch With WebView
Table Features
Table Views
Some table configuration pages can be expanded to view additional configuration information. If this
option is available, a toggle switch appears at the bottom left corner of the table. To change views, click
on the toggle switch (e.g., Expanded View). For example, if the table is in summary view, click on
“Expanded View” to change to the expanded view. From the expanded view, click on “Summary View” to
return to the summary view. For example:
Click to expand
the table.
Table View Feature—Summary View
Click to return to
summary view.
Table View Feature—Expanded View
OmniSwitch 7700/7800/8800 Switch Management Guide
April 2006
page 9-13
Configuring the Switch With WebView
Using WebView
Table Sorting
Basic Sort
Table entries can be sorted by column in ascending or descending order. Initially, tables are sorted on the
first column in ascending order (the number 1 appears in the first column). To sort in descending order,
click on the column heading. Click again to return to ascending order.
To sort on a different column, click on the column heading (the number 1 appears at the top of the
column). Click on the column heading to sort the table on that column. Click again to sort the data in
descending order.
Note. You can also click on the “Flip” icon in the upper right corner of the table to toggle between ascending and descending order.
Click to toggle
between
ascending and
descending
order.
“Flip” icon
Table Sort Feature—Initial Sort
page 9-14
OmniSwitch 7700/7800/8800 Switch Management Guide
April 2006
Using WebView
Configuring the Switch With WebView
Sort on a different
column.
Table Sort Feature—Modified Sort
Advanced Sorting
You can also customize the sorting display by defining primary and secondary sort criteria. To define
primary and secondary column sorts, click on the “Sort” icon in the upper right corner of the table (the
column headings are highlighted). Next, click on the primary and secondary column headings (the
numbers 1 and 2 appear in the primary and secondary columns). Click again on the “Sort” icon to sort the
table. Click on the "Clear" icon to clear the sort settings. You can sort up to 4 columns.
Then, click on
the primary and
secondary column
headings.
“Sort” icon
Table Sort Feature—Advanced Sort
OmniSwitch 7700/7800/8800 Switch Management Guide
April 2006
page 9-15
Configuring the Switch With WebView
Using WebView
Table Paging
Some large tables (e.g., VLANs) have a paging feature that loads the table data in increments of 50 or 100
entries. If the table reaches this threshold, the first group of entries is displayed and a “Next” button
appears at the bottom of the page. Click Next to view the next group of entries. Click Previous to view the
previous group of entries.
Click Previous to
view the previous
group of entries.
Click Next to view
the next group of
entries.
Table Paging Feature
page 9-16
OmniSwitch 7700/7800/8800 Switch Management Guide
April 2006
Using WebView
Configuring the Switch With WebView
Adjacencies
WebView provides a graphical representation of all AMAP-supported Alcatel switches and IP phones
adjacent to the switch. The following information for each device is also listed:
• IP address
• MAC address
• Remote slot/port
By clicking on a device, the Web-based device manager (if available) is displayed for that device. If a
Web-based device manager is not available, a Telnet session may be launched. (A route to the adjacent
switch must exist in the IP routing table in order for a Web-based device manager or Telnet session to be
launched.)
To display the adjacencies, click on the Adjacencies button under the Physical group. The page displays
similar to the following:
Displays
Adjacencies
Page
Mouse-over to
display information about the
adjacent switch
Adjacencies View
OmniSwitch 7700/7800/8800 Switch Management Guide
April 2006
page 9-17
WebView Help
Using WebView
WebView Help
A general help page for using WebView is available from the banner at the top of the page. In addition,
on-line help is available on every WebView page. Each help page provides a description of the page and
specific instructions for each configurable field.
General WebView Help
To display general help for WebView, click the Help option in the WebView banner. (For information
about the banner, see “WebView Page Layout” on page 9-4.)
The information in the help page is similar to the information given in this chapter.
Specific-page Help
Each help page provides a description of the page and a description for each field. To access help from any
global configuration page, table page, or Add or Modify window:
1 Click the Help button at the bottom of the page. A help window displays similar to the following:
Prints or closes the
Help window
Click to jump to
field definition
Help Page Layout
1 Click on the field name hyperlink on the help page to go to help for that field; or use the scroll bar on
the right side of the help page to scroll through help for all fields. (You can also click Print to print a hard
copy of the help page.)
Click Close or the Close Window icon in the top right corner to close the help page and return to the
configuration or table page.
page 9-18
OmniSwitch 7700/7800/8800 Switch Management Guide
April 2006
Using SNMP
In This Chapter
10
Using SNMP
The Simple Network Management Protocol (SNMP) is an application-layer protocol that allows
communication between SNMP managers and SNMP agents on an IP network. Network administrators
use SNMP to monitor network performance and to manage network resources.
In This Chapter
This chapter describes SNMP and how to use it through the Command Line Interface (CLI). CLI
commands are used in the configuration examples; for more details about the syntax of commands, see the
OmniSwitch CLI Reference Guide.
Configuration procedures described in this chapter include:
• ‘‘Setting Up An SNMP Management Station’’ on page 10-3
• ‘‘Setting Up Trap Filters’’ on page 10-4
• “Using SNMP For Switch Security” on page 10-26
• “Working with SNMP Traps” on page 10-29
This chapter also includes lists of Industry Standard and Enterprise (Proprietary) MIBs used to manage the
OmniSwitch.
OmniSwitch 7700/7800/8800 Switch Management Guide
April 2006
page 10-1
SNMP Specifications
Using SNMP
SNMP Specifications
The following table lists specifications for the SNMP protocol.
RFCs Supported for SNMPv2
1902 through 1907 - SNMPv2c Management Framework
1908 - Coexistence and transitions relating to SNMPv1 and SNMPv2c
RFCs Supported for SNMPv3
2570 – Version 3 of the Internet Standard Network Management
Framework
2571 – Architecture for Describing SNMP Management Frameworks
2572 – Message Processing and Dispatching for SNMP
2573 – SNMPv3 Applications
2574 – User-based Security Model (USM) for version 3 SNMP
2575 – View-based Access Control Model (VACM) for SNMP
2576 – Coexistence between SNMP versions
SNMPv1, SNMPv2, SNMPv3
The SNMPv3 protocol is ascending compatible with SNMPv1 and v2
and supports all the SNMPv1 and SNMPv2 PDUs
SNMPv1 and SNMPv2
Authentication
Community Strings
SNMPv1, SNMPv2 Encryption
None
SNMPv1 and SNMPv2 Security Sets and Gets
requests accepted by the switch
SNMPv3 Authentication
SHA, MD5
SNMPv3 Encryption
DES
SNMPv3 Security requests
accepted by the switch.
Non-authenticated Sets, Non-authenticated Gets and Get-Nexts,
Authenticated Sets, Authenticated Gets and Get-Nexts, Encrypted Sets,
Encrypted Gets and Get-Nexts
SNMP traps
Refer to the table on page 10-9 for a complete list of traps and their
definitions.
SNMP Defaults
The following table describes the default values of the SNMP protocol parameters.
Parameter Description
Command
Default Value/Comments
SNMP Management Station
snmp station
UDP port 162, SNMPv3, Enabled
Community Strings
snmp community map
Enabled
SNMP Security setting
snmp security
Privacy all (highest) security
Trap filtering
snmp trap filter
Disabled
Trap Absorption
snmp trap absorption
Enabled
Enables the forwarding of traps to
WebView.
snmp trap to webview
Enabled
Enables or disables SNMP
snmp authentication trap
authentication failure trap forwarding.
page 10-2
Disabled
OmniSwitch 7700/7800/8800 Switch Management Guide
April 2006
Using SNMP
Quick Steps for Setting Up An SNMP Management Station
Quick Steps for Setting Up An SNMP
Management Station
An SNMP Network Management Station (NMS) is a workstation configured to receive SNMP traps from
the switch. To set up an SNMP NMS using the switch’s CLI, proceed as follows:
1 Specify the user account name and the authentication type for that user. For example:
-> user NMSuserV3MD5DES md5+des password ********
2 Specify the UDP destination port number (in this case 8010), the IP address of the management station
(199.199.100.200), a user account name (NMSuserV3MD5DES), and the SNMP version number (v3). For
example:
-> snmp station 199.199.100.200 8010 NMSuserV3MD5DES v3 enable
Note. Optional. To verify the SNMP Management Station, enter the show snmp station command. The
display is similar to the one shown here:
-> show snmp station
ipAddress/udpPort
status
protocol user
---------------------------+---------+--------+------------------------------199.199.100.200/8010
enable
v3
NMSuserV3MD5DES
199.199.101.201/111
disable
v2
NMSuserV3MD5
199.199.102.202/8002
enable
v1
NMSuserV3SHADES
For more information about this display, see the “SNMP Commands” chapter in the OmniSwitch CLI
Reference Guide.
OmniSwitch 7700/7800/8800 Switch Management Guide
April 2006
page 10-3
Quick Steps for Setting Up Trap Filters
Using SNMP
Quick Steps for Setting Up Trap Filters
You can filter traps by limiting user access to trap command families. You can also filter according to
individual traps.
Filtering by Trap Families
The following example will create a new user account. This account will be granted read-only privileges to
three CLI command families (snmp, chassis, and interface). Read-only privileges will be withheld from all
other command families.
1 Set up a user account named “usermark2” by executing the user CLI command.
-> user usermark2 password ******
2 Remove all read-only privileges from the user account.
-> user usermark2 read-only none
3 Add read-only privileges for the snmp, chassis and interface command families.
-> user usermark2 read-only snmp chassis interface
Note. Optional. To verify the user account, enter the show user command. A partial display is shown here:
-> show user
User name = usermark2
Read right
=
Write right
=
Read for domains
=
Read for families
=
Write for domains
=
Snmp authentication =
0x0000a200 0x00000000,
0x00000000 0x00000000,
,
snmp chassis interface ,
None ,
NONE, Snmp encryption = NONE
The usermark2 account has read-only privileges for the snmp, chassis, and interface command families.
4 Set up an SNMP station with the user account “usermark2” defined above.
-> snmp station 210.1.2.1 usermark2 v3 enable
Note. Optional.To verify the SNMP Management Station, enter the show snmp station command. The
display is similar to the one shown here:
-> show snmp station
ipAddress/udpPort
status
protocol user
---------------------------+---------+--------+------------------------------210.1.2.1/162
enable
v3
usermark2
The usermark2 account is established on the SNMP station at IP address 210.1.2.1.
page 10-4
OmniSwitch 7700/7800/8800 Switch Management Guide
April 2006
Using SNMP
Quick Steps for Setting Up Trap Filters
Filtering by Individual Traps
The following example enables trap filtering for the coldstart, warmstart, linkup, and linkdown traps. The
identification numbers for these traps are 0, 1, 2, and 3. When trap filtering is enabled, these traps will be
filtered. This means that the switch will not pass them through to the SNMP management station. All
other traps will be passed through.
1 Specify the IP address for the SNMP management station and the trap identification numbers.
-> show snmp trap filter 210.1.2.1 0 1 2 3
Note. Optional. You can verify which traps will not pass through the filter by entering the snmp trap
filter command. The display is similar to the one shown here:
-> show snmp trap filter
ipAddress
trapId list
-----------------+---------------------------------------210.1.2.1
0
1
2
3
The SNMP management station with the IP address of 210.1.2.1 will not receive trap numbers 0, 1, 2, and
3.
For trap numbers refer to the “SNMP Traps Table” on page 10-9. For more information on the CLI
commands and the displays in these examples, refer to the OmniSwitch CLI Reference Guide.
OmniSwitch 7700/7800/8800 Switch Management Guide
April 2006
page 10-5
SNMP Overview
Using SNMP
SNMP Overview
SNMP provides an industry standard communications model used by network administrators to manage
and monitor their network devices. The SNMP model defines two components: the SNMP Manager and
the SNMP Agent.
Network Management Station
OmniSwitch
SNMP Agent
SNMP Manager
SNMP Network Model
• The SNMP Manager resides on a workstation hosting the management application. It can query agents
using SNMP operations. An SNMP manager is commonly called a Network Management System
(NMS). NMS refers to a system made up of a network device (such as a workstation) and the NMS
software. It provides an interface that allows users to request data or see alarms resulting from traps or
informs. It can also store data that can be used for network analysis.
• The SNMP Agent is the software entity that resides within the switch on the network. It maintains the
management data about a particular network device and reports these data, as needed, to the managing
systems. The agent also responds to requests for data from the SNMP Manager.
Along with the SNMP agent, the switch also contains Management Information Bases (MIBs). MIBs are
databases of managed objects, written in the SNMP module language, that can be monitored by the NMS.
The SNMP agent contains MIB variables, which have values the NMS can request or change using Get,
GetNext, GetBulk, or Set operations. The agent can also send unsolicited messages (traps or informs) to
the NMS to notify the manager of network conditions.
SNMP Operations
Devices on the network are managed through transactions between the NMS and the SNMP agent residing
on the network device (i.e., switch). SNMP provides two kinds of management transactions: managerrequest/agent-response and unsolicited notifications (traps or informs) from the agent to the manager.
In a manager-request/agent-response transaction, the SNMP manager sends a request packet, referred to as
a Protocol Data Unit (PDU), to the SNMP agent in the switch. The SNMP agent complies with the request
and sends a response PDU to the manager. The types of management requests are Get, GetBulk and
GetNext requests. These transactions are used to request information from the switch (Get, GetNext or
GetBulk) or to change the value of an object instance on the switch (Set).
In an unsolicited notification, the SNMP agent in the switch sends a trap PDU to the SNMP manager to
inform it that an event has occurred. The SNMP manager normally does not send confirmation to the agent
acknowledging receipt of a trap.
page 10-6
OmniSwitch 7700/7800/8800 Switch Management Guide
April 2006
Using SNMP
SNMP Overview
Using SNMP for Switch Management
The Alcatel switch can be configured using the Command Line Interface (CLI), SNMP or the WebView
device management tool. When configuring the switch using SNMP, an NMS application (such as HP
OpenView) is used.
Although MIB browsers vary depending on which software package is used, they all have a few things in
common. The browser must compile the Alcatel switch MIBs before it can be used to manage the switch
by issuing requests and reading statistics. Each MIB must be checked for dependencies and the MIBs must
be compiled in the proper order. Once the browser is properly installed and the MIBs are compiled, the
browser software can be used to manage the switch. The MIB browser you use depends on the design and
management requirements of your network.
Detailed information on working with MIB browsers is beyond the scope of this manual. However, you
must know the configuration requirements of your MIB browser or other NMS installation before you can
define the system to the switch as an SNMP station.
Setting Up an SNMP Management Station
An SNMP management station is a workstation configured to receive SNMP traps from the switch. You
must identify this station to the switch by using the snmp station CLI command.
The following information is needed to define an SNMP management station.
• The IP address of the SNMP management station device.
• The UDP destination port number on the management station. This identifies the port to which the
switch will send traps.
• The SNMP version used by the switch to send traps.
• A user account name that the management station will recognize.
Procedures for configuring a management station can be found in “Quick Steps for Setting Up An SNMP
Management Station” on page 10-3.
SNMP Versions
The SNMP agent in the switch can communicate with multiple managers. You can configure the switch to
communicate with different management stations using different versions of SNMP. The switch supports
three versions of SNMP—v1, v2 and v3.
SNMPv1
SNMPv1 is the original implementation of the SNMP protocol and network management model. It is
characterized by the Get, Set, GetNext and Trap protocol operations.
SNMPv1 uses a rudimentary security system where each PDU contains information called a community
string. The community string acts like a combination username and password. When you configure a
device for SNMP management you normally specify one community string that provides read-write access
to objects within the device and another community string that limits access to read-only. If the
community string in a data unit matches one of these strings, the request is granted. If not, the request is
denied.
OmniSwitch 7700/7800/8800 Switch Management Guide
April 2006
page 10-7
SNMP Overview
Using SNMP
The community string security standard offers minimal security and is generally insufficient for networks
where need for security is high. Although SNMPv1 lacks bulk message retrieval capabilities and security
features, it is widely used and is a de facto standard in the Internet environment.
SNMPv2
SNMPv2 is a later version of the SNMP protocol. It uses the same Get, Set, GetNext and Trap operations
as SNMPv1 and supports the same community-based security standard. SNMPv1 is incompatible with
SNMPv2 in certain applications due to the following enhancements.
• Management Information Structure
SNMPv2 includes new macros for defining object groups, traps compliance characteristics and capability characteristics.
• Protocol Operations
SNMPv2 has two new PDUs not supported by SNMPv1. The GetBulkRequest PDU enables the
manager to retrieve large blocks of data efficiently. In particular, it is well suited to retrieving multiple
rows in a table. The InformRequest PDU enables one manager to send trap information to another
manager.
SNMPv3
SNMPv3 supports the View-Based Access Control Model (VACM) and User-Based Security Model
(USM) security models along with these added security features:
• Message integrity—Ensuring that a packet has not been tampered with in transit.
• Time Frame Protection—Limiting requests to specified time frames. The user can specify a time frame
so that any PDU bearing an out of date timestamp will be ignored.
• Encryption—Scrambling the contents of a packet to prevent it from being learned by an unauthorized
source.
• Authentication—Determining that the message is from a valid source holding the correct privileges.
page 10-8
OmniSwitch 7700/7800/8800 Switch Management Guide
April 2006
Using SNMP
SNMP Overview
SNMP Traps Table
The following table provides information on all SNMP traps supported by the switch. Each row includes
the trap name, its ID number, any objects (if applicable), its command family, and a description of the
condition the SNMP agent in the switch is reporting to the SNMP management station. You can generate a
list of SNMP traps that are supported on your switch by using the show snmp trap config command.
No. Trap Name
Objects
Family
Description
0
coldStart
none
chassis
The SNMP agent in the switch is
reinitiating and its configuration
may have been altered.
1
warmStart
none
chassis
The SNMP agent in the switch is
reinitiating itself and its configuration is unaltered.
2
linkDown
IfIndex
ifAdminStatus
ifOperStatus
interface
The SNMP agent in the switch
recognizes a failure in one of the
communications links configured
for the switch.
IfIndex—A unique value, greater than zero, for each interface. It is recommended that values are assigned contiguously starting from 1. The value for each interface sub-layer must remain constant at least from one re-initialization of the entity’s network management system to the next re-initialization.
ifAdminStatus—The desired state of the interface. The testing(3) state indicates that no operational packets
can be passed. When a managed system initializes, all interfaces start with ifAdminStatus in the down(2) state.
As a result of either explicit management action or per configuration information retained by the managed system, ifAdminStatus is then changed to either the up(1) or testing(3) states (or remains in the down(2) state).
ifOperStatus—The current operational state of the interface. The testing(3) state indicates that no operational
packets can be passed. If ifAdminStatus is down(2) then ifOperStatus should be down(2). If ifAdminStatus is
changed to up(1) then ifOperStatus should change to up(1) if the interface is ready to transmit and receive network traffic; it should change to dormant(5) if the interface is waiting for external actions (such as a serial line
waiting for an incoming connection); it should remain in the down(2) state if and only if there is a fault that prevents it from going to the up(1) state; it should remain in the notPresent(6) state if the interface has missing
(typically, hardware) components.
3
linkUp
ifIndex
ifAdminStatus
ifOperStatus
interface
The SNMP agent in the switch
recognizes that one of the communications links configured for
the switch has come up.
IfIndex—A unique value, greater than zero, for each interface. It is recommended that values are assigned contiguously starting from 1. The value for each interface sub-layer must remain constant at least from one re-initialization of the entity's network management system to the next re-initialization.
ifAdminStatus—The desired state of the interface. The testing(3) state indicates that no operational packets
can be passed. When a managed system initializes, all interfaces start with ifAdminStatus in the down(2) state.
As a result of either explicit management action or per configuration information retained by the managed system, ifAdminStatus is then changed to either the up(1) or testing(3) states (or remains in the down(2) state).
ifOperStatus—The current operational state of the interface. The testing(3) state indicates that no operational
packets can be passed. If ifAdminStatus is down(2) then ifOperStatus should be down(2). If ifAdminStatus is
changed to up(1) then ifOperStatus should change to up(1) if the interface is ready to transmit and receive network traffic; it should change to dormant(5) if the interface is waiting for external actions (such as a serial line
waiting for an incoming connection); it should remain in the down(2) state if and only if there is a fault that prevents it from going to the up(1) state; it should remain in the notPresent(6) state if the interface has missing
(typically, hardware) components.
4
authenticationFailure
none
OmniSwitch 7700/7800/8800 Switch Management Guide
snmp
April 2006
The SNMP agent in the switch
has received a protocol message
that is not properly authenticated.
page 10-9
SNMP Overview
Using SNMP
No. Trap Name
Objects
Family
Description
5
entConfigChange
none
module
An entConfigChange notification
is generated when a conceptual
row is created, modified, or
deleted in one of the entity
tables.
6
aipAMAPStatusTrap
aipAMAPLastTrapReason
aipAMAPLastTrapPort
aip
The status of the Alcatel Mapping Adjacency Protocol
(AMAP) port changed.
aipAMAPLastTrapReason—Reason for last change of port status. Valid reasons are: 1 (port added), 2
(change of information on existing port), 3 (port deleted), and 4 (no trap has been sent).
aipAMAPLastTrapPort—The ifindex number of the port that most recently changed.
7
aipGMAPConflictTrap
aipGMAPLastTrapReason
aipGMAPLastTrapPort
aipGMAPLastTrapMac
aipGMAPLastTrapProtocol
aipGMAPLastTrapVlan
aip
Indicates a Group Mobility
Advertisement Protocol (GMAP)
port update conflict.
aipGMAPLastTrapReason—Reason for last GMAP update to not be applied. Valid reasons are: 1 (Target
VLAN is an authenticated VLAN), 2 (update would conflict with a binding rule), 3 (update would create two
different VLAN entries for the same protocol), 4 (update would create two different protocol entries for the
same VLAN), 5 (target VLAN is not mobile), and 6 (no trap has been sent).
aipGMAPLastTrapPort—The ifindex number of the last port on which the GMAP was not applied because of
a conflict.
aipGMAPLastTrapMac—The last MAC address for which a GMAP change was not
applied because of a conflict.
aipGMAPLastTrapProtocol—The protocol identifier of the last GMAP change that was not applied because
of a conflict.
aipGMAPLastTrapVlan—The VLAN identifier of the last GMAP change that was not applied because of a
conflict.
8
policyEventNotification
policyTrapEventDetailString
policyTrapEventCode
policy
The switch notifies the NMS
when a significant event happens
that involves the policy manager.
policyTrapEventDetailString—Details about the event that took place.
policyTrapEventCode—The code of the event.
page 10-10
OmniSwitch 7700/7800/8800 Switch Management Guide
April 2006
Using SNMP
SNMP Overview
No. Trap Name
Objects
9
chassisTrapsStr- chassis
Level
chassisTrapsStrAppID
chassisTrapsStrSnapID
chassisTrapsStrfileName
chassisTrapsStrfileLineNb
chassisTrapsStrErrorNb
chassisTrapsStrcomments
chassisTrapsStrdataInfo
chassisTrapsStr
Family
Description
A software trouble report (STR)
was sent by an application
encountering a problem during
its execution.
chassisTrapsStrLevel—An enumerated value that provides the urgency level of the STR.
chassisTrapsStrAppID—The application identification number.
chassisTrapsStrSnapID—The subapplication identification number. You can have multiple snapIDs per Subapplication (task) but only one is to be used to send STRs.
chassisTrapsStrfileName—Name of the source file where the fault was detected. This is given by the C ANSI
macro __FILE__. The path shouldn’t appear.
chassisTrapsStrfileLineNb—Line number in the source file where the fault was detected. This is given by the
C ANSI macro __LINE__.
chassisTrapsStrErrorNb—The fault identificator. The error number identifies the kind the detected fault and
allows a mapping of the data contained in chassisTrapsdataInfo.
chassisTrapsStrcomments—Comment text explaining the fault.
chassisTrapsStrdataInfo—Additional data provided to help to find out the origin of the fault. The contained
and the significant portion are varying in accordance with chassisTrapsStrErrorNb. The length of this field is
expressed in bytes.
10
chassisTrapsAlert
chassis
physicalIndex
chassisTrapsObjectType
chassisTrapsObjectNumber
chassisTrapsAlertNumber
chassisTrapsAlertDescr
A notification that some change
has occurred in the chassis.
physicalIndex—The physical index of the involved object.
chassisTrapsObjectType—An enumerated value that provides the object type involved in the alert trap.
chassisTrapsObjectNumber—A number defining the order of the object in the set (e.g., the number of the
considered fan or power supply). This is intended to clarify as much as possible the location of the failure or
alert. An instance of the appearance of the trap could be “failure on a module. Power supply 3”.
chassisTrapsAlertNumber—This number that identifies the alert among all the possible chassis alert causes.
chassisTrapsAlertDescr— The description of the alert matching ChassisTrapsAlertNumber.
OmniSwitch 7700/7800/8800 Switch Management Guide
April 2006
page 10-11
SNMP Overview
Using SNMP
No. Trap Name
Objects
11
chassis
physicalIndex
chassisTrapsObjectType
chassisTrapsObjectNumber
chasEntPhysOperStatus
chassisTrapsStateChange
Family
Description
An NI status change was
detected.
physicalIndex—The physical index of the involved object.
chassisTrapsObjectType—An enumerated value that provides the object type involved in the alert trap.
chassisTrapsObjectNumber—A number defining the order of the object in the set (e.g., the number of the
considered fan or power supply). This intend to clarify as much as possible the location of the failure or alert.
An instance of the appearance of the trap could be “failure on a module. Power supply 3”.
chasEntPhysOperStatus—An enumerated value that indicates the operational status of installed modules
(includes empty slots).
12
chassisTrapsMacOverlap
physicalIndex
chasTrapMacRangeIndex
module
A MAC range overlap was found
in the backplane eeprom.
physicalIndex—The physical index of the involved object.
chasTrapMacRangeIndex—The MAC range index of the involved object.
13
vrrpTrapNewMaster
vrrpOperMasterIpAddr
vrrp
The SNMP agent has transferred
from the backup state to the master state.
vrrpOperMasterIpAddr—The master router’s real (primary) IP address. This is the IP address listed as the
source in VRRP advertisement last received by this virtual router.
14
vrrpTrapAuthFailure
vrrpTrapPacketSrc
vrrpTrapAuthErrorType
vrrp
A packet was received from the
network whose authentication
key conflicts with the switch’s
authentication key or type.
vrrpTrapPacketSrc—The IP address of an inbound VRRP packet.
vrrpTrapAuthErrorType—Potential types of configuration conflicts.
page 10-12
OmniSwitch 7700/7800/8800 Switch Management Guide
April 2006
Using SNMP
SNMP Overview
No. Trap Name
Objects
15
healthMonRx- health
Status
healthMonRxTxStatus
healthMonMemoryStatus
healthMonCpuStatus
healthMonCmmTempStatus
healthMonCmmCpuTempStatus
healthMonDeviceTrap
Family
Description
Indicates a device-level threshold
was crossed.
healthMonRxStatus—Rx threshold status indicating if threshold was crossed or no change.
healthMonRxTxStatus— RxTx threshold status indicating if threshold was crossed or no change.
healthMonMemoryStatus—Memory threshold status indicating if threshold was crossed or no change.
healthMonCpuStatus—CPU threshold status indicating if threshold was crossed or no change.
healthMonCmmTempStatus—CMM temperature threshold status indicating if threshold was crossed or no
change.
healthMonCmmCpuTempStatus—CMM CPU temperature threshold status indicating if threshold was
crossed or no change.
16
healthMonModuleTrap
healthModuleSlot
healthMonRxStatus
healthMonRxTxStatus
healthMonMemoryStatus
healthMonCpuStatus
health
Indicates a module-level threshold was crossed.
healthModuleSlot—The (one-based) front slot number within the chassis.
healthMonRxStatus—Rx threshold status indicating if threshold was crossed or no change.
healthMonRxTxStatus—RxTx threshold status indicating if threshold was crossed or no change.
healthMonMemoryStatus—Memory threshold status indicating if threshold was crossed or no change.
healthMonCpuStatus—CPU threshold status indicating if threshold was crossed or no change.
17
healthMonPortTrap
healthPortSlot
healthPortIF
healthMonRxStatus
healthMonRxTxStatus
health
Indicates a port-level threshold
was crossed.
healthPortSlot—The physical slot number for this port.
healthPortIF—The on-board interface number.
healthMonRxStatus—Rx threshold status indicating if threshold was crossed or no change.
healthMonRxTxStatus—RxTx threshold status indicating if threshold was crossed or no change.
OmniSwitch 7700/7800/8800 Switch Management Guide
April 2006
page 10-13
SNMP Overview
Using SNMP
No. Trap Name
Objects
18
bgpPeerLastEr- bgp
ror
bgpPeerState
bgpEstablished
Family
Description
The BGP routing protocol has
entered the established state.
bgpPeerLastError—The last error code and subcode seen by this peer on this connection. If no error has
occurred, this field is zero. Otherwise, the first byte of this two byte OCTET STRING contains the error code,
and the second byte contains the subcode.
bgpPeerState—The BGP peer connection state.
19
bgpBackwardTransition
bgpPeerLastEr- bgp
ror
bgpPeerState
This trap is generated when the
BGP router port has moved from
a more active to a less active
state.
bgpPeerLastError—The last error code and subcode seen by this peer on this connection. If no error has
occurred, this field is zero. Otherwise, the first byte of this two byte OCTET STRING contains the error code,
and the second byte contains the subcode.
bgpPeerState—The BGP peer connection state.
20
esmDrvTrapDropsLink
esmPortSlot
esmPortIF
ifInErrors
ifOutErrors
esmDrvTrapDrops
interface
This trap is sent when the Ethernet code drops the link because
of excessive errors.
esmPortSlot—The physical slot number for this Ethernet Port. The slot number has been added to be used by
the private trap.
esmPortIF—The on-board interface number for this Ethernet port. The port number has been added to be used
by the private trap.
ifInErrors—For packet-oriented interfaces, the number of inbound packets that contained errors preventing
them from being deliverable to a higher-layer protocol. For character-oriented or fixed-length interfaces, the
number of inbound transmission units that contained errors preventing them from being deliverable to a higherlayer protocol. Discontinuities in the value of this counter can occur at re-initialization of the management system, and at other times as indicated by the value of ifCounterDiscontinuityTime.
ifOutErrors—For packet-oriented interfaces, the number of outbound packets that could not be transmitted
because of errors. For character-oriented or fixed-length interfaces, the number of outbound transmission units
that could not be transmitted because of errors. Discontinuities in the value of this counter can occur at re-initialization of the management system, and at other times as indicated by the value of ifCounterDiscontinuityTime.
esmDrvTrapDrops— Partitioned port (separated due to errors).
21
pimNeighborLoss
pimNeighborIfIndex
ipmr
Signifies the loss of adjacency
with a neighbor device. This trap
is generated when the neighbor
time expires and the switch has
no other neighbors on the same
interface with a lower IP address
than itself.
pimNeighborIfIndex—The value of ifIndex for the interface used to reach this PIM neighbor.
page 10-14
OmniSwitch 7700/7800/8800 Switch Management Guide
April 2006
Using SNMP
SNMP Overview
No. Trap Name
Objects
22
dvmrpInterface- ipmr
LocalAddress
dvmrpNeighborState
dvmrpNeighborLoss
Family
Description
A 2-way adjacency relationship
with a neighbor has been lost.
This trap is generated when the
neighbor state changes from
“active” to “one-way,” “ignoring” or “down.” The trap is sent
only when the switch has no
other neighbors on the same
interface with a lower IP address
than itself.
dvmrpInterfaceLocalAddress—The IP address this system will use as a source address on this interface. On
unnumbered interfaces, it must be the same value as dvmrpInterfaceLocalAddress for some interfaces on the
system.
dvmrpNeighborState—State of the neighbor adjacency.
23
dvmrpNeighborNotPruning
dvmrpInterface- ipmr
LocalAddress
dvmrpNeighborCapabilities
A non-pruning neighbor has been
detected in an implementationdependent manner. This trap is
generated at most once per generation ID of the neighbor. For
example, it should be generated
at the time a neighbor is first
heard from if the prune bit is not
set. It should also be generated if
the local system has the ability to
tell that a neighbor which sets the
prune bit is not pruning any
branches over an extended period
of time. The trap should be generated if the router has no other
neighbors on the same interface
with a lower IP address than
itself.
dvmrpInterfaceLocalAddress—The IP address this system will use as a source address on this interface. On
unnumbered interfaces, it must be the same value as dvmrpInterfaceLocalAddress for some interfaces on the
system.
dvmrpNeighborCapabilities—This object describes the neighboring router’s capabilities. The leaf bit indicates that the neighbor has only one interface with neighbors. The prune bit indicates that the neighbor supports
pruning. The generationID bit indicates that the neighbor sends its generationID in Probe messages. The mtrace
bit indicates that the neighbor can handle mtrace requests.
OmniSwitch 7700/7800/8800 Switch Management Guide
April 2006
page 10-15
SNMP Overview
Using SNMP
No. Trap Name
Objects
24
rmon
alarmIndex
alarmVariable
alarmSampleType
alarmValue
alarmRisingThreshold
risingAlarm
Family
Description
An Ethernet statistical variable
has exceeded its rising threshold. The variable’s rising threshold and whether it will issue an
SNMP trap for this condition are
configured by an NMS station
running RMON.
alarmIndex—An index that uniquely identifies an entry in the alarm table. Each such entry defines a diagnostic sample at a particular interval for an object on the device.
alarmVariable—The object identifier of the particular variable to be sampled. Only variables that resolve to an
ASN.1 primitive type of INTEGER (INTEGER, Integer32, Counter32, Counter64, Gauge, or TimeTicks) may
be sampled.
alarmSampleType—The method of sampling the selected variable and calculating the value to be compared
against the thresholds. If the value of this object is absoluteValue(1), the value of the selected variable will be
compared directly with the thresholds at the end of the sampling interval. If the value of this object is
deltaValue(2), the value of the selected variable at the last sample will be subtracted from the current value, and
the difference compared with the thresholds.
alarmValue—The value of the statistic during the last sampling period. For example, if the sample type is
deltaValue, this value will be the difference between the samples at the beginning and end of the period. If the
sample type is absoluteValue, this value will be the sampled value at the end of the period.
alarmRisingThreshold—A threshold for the sampled statistic. When the current sampled value is greater than
or equal to this threshold, and the value at the last sampling interval was less than this threshold, a single event
will be generated. A single event will also be generated if the first sample after this entry becomes valid is
greater than or equal to this threshold and the associated alarmStartupAlarm is equal to risingAlarm(1) or risingOrFallingAlarm(3).
25
fallingAlarm
rmon
alarmIndex
alarmVariable
alarmSampleType
alarmValue
alarmFallingThreshold
An Ethernet statistical variable
has dipped below its falling
threshold. The variable’s falling
threshold and whether it will
issue an SNMP trap for this condition are configured by an NMS
station running RMON.
alarmIndex—An index that uniquely identifies an entry in the alarm table. Each such entry defines a diagnostic sample at a particular interval for an object on the device.
alarmVariable—The object identifier of the particular variable to be sampled. Only variables that resolve to an
ASN.1 primitive type of INTEGER (INTEGER, Integer32, Counter32, Counter64, Gauge, or TimeTicks) may
be sampled.
alarmSampleType—The method of sampling the selected variable and calculating the value to be compared
against the thresholds. If the value of this object is absoluteValue(1), the value of the selected variable will be
compared directly with the thresholds at the end of the sampling interval. If the value of this object is
deltaValue(2), the value of the selected variable at the last sample will be subtracted from the current value, and
the difference compared with the thresholds.
alarmValue—The value of the statistic during the last sampling period. For example, if the sample type is
deltaValue, this value will be the difference between the samples at the beginning and end of the period. If the
sample type is absoluteValue, this value will be the sampled value at the end of the period.
alarmFallingThreshold—A threshold for the sampled statistic. When the current sampled value is less than or
equal to this threshold, and the value at the last sampling interval was greater than this threshold, a single event
will be generated. A single event will also be generated if the first sample after this entry becomes valid is less
than or equal to this threshold and the associated alarmStartupAlarm is equal to fallingAlarm(2) or risingOrFallingAlarm(3).
26
stpNewRoot
vStpNumber
stp
Sent by a bridge that became the
new root of the spanning tree.
vStpNumber—The Spanning Tree number identifying this instance.
page 10-16
OmniSwitch 7700/7800/8800 Switch Management Guide
April 2006
Using SNMP
SNMP Overview
No. Trap Name
Objects
Family
Description
27
vStpNumber
vStpRootPortNumber
stp
A root port has changed for a
spanning tree bridge. The root
port is the port that offers the
lowest cost path from this bridge
to the root bridge.
stpRootPortChange
vStpNumber—The Spanning Tree number identifying this instance.
vStpRootPortNumber—The port ifindex of the port which offers the lowest cost path from this bridge to the
root bridge for this spanning tree instance.
28
mirrorConfigError
mirmonPrima- pmm
rySlot
mirmonPrimaryPort
mirroringSlot
mirroringPort
mirMonErrorNi
mirMonError
The mirroring configuration
failed on an NI. This trap is sent
when any NI fails to configure
mirroring. Due to this error, port
mirroring session will be terminated.
mirmonPrimarySlot—Slot of mirrored or monitored interface.
mirmonPrimaryPort—Port of mirrored or monitored interface.
mirroringSlot—Slot of mirroring interface.
mirroringPort—Port of mirroring interface.
mirMonErrorNi—The NI slot number.
mirMonError—The Error returned by the NI which failed to configure Mirroring/Monitoring.
29
mirrorUnlikeNi
mirmonPrima- pmm
rySlot
mirmonPrimaryPort
mirroringSlot
mirroringPort
mirMonErrorNi
The mirroring configuration is
deleted due to the swapping of
different NI board type. The Port
Mirroring session which was
active on a slot cannot continue
with the insertion of different NI
type in the same slot.
mirmonPrimarySlot—Slot of mirrored or monitored interface.
mirmonPrimaryPort—Port of mirrored or monitored interface.
mirroringSlot—Slot of mirroring interface.
mirroringPort—Port of mirroring interface.
mirMonErrorNi—The NI slot number.
mirMonError—The Error returned by the NI which failed to configure Mirroring/Monitoring.
30
slPesudoCAMStatusTrap
slPCAMSlotNumber
slPCAMSliceNumber
slPCAMStatus
bridge
The trap status of the Layer 2
pesudoCAM for this NI.
slPCAMSlotNumber—The slot number of this Coronado switching/routing ASIC.
slPCAMSliceNumber—The slice number of this Coronado switching/routing ASIC.
slPCAMStatus—The Layer 2 pesudoCAM status of this Coronado switching/routing ASIC.
31
alarmActiveState
N/A
none
An alarm from a hardware alarm
panel has been raised.
none
An alarm from a hardware alarm
panel has been cleared.
Note: This trap is not supported in the current release.
32
alarmClearState
N/A
Note: This trap is not supported in the current release.
OmniSwitch 7700/7800/8800 Switch Management Guide
April 2006
page 10-17
SNMP Overview
Using SNMP
No. Trap Name
Objects
33
slbTrapInfoEn- load
balancing
tityGroup
slbTrapInfoOperStatus
slbTrapInfoClusterName
slbTrapInfoServerIpAddr
slbTrapOperStatus
Family
Description
A change occurred in the operational status of the server load
balancing entity.
slbTrapInfoEntityGroup—The entity group inside SLB management.
slbTrapInfoOperStatus—The operational status of an SLB cluster or server.
slbTrapInfoClusterName—A change occurred in the operational status of an SLB entity.
slbTrapInfoServerIpAddr—The IP address of a server.
34
ifMauJabber
ifMauJabberState
interface
This trap is sent whenever a managed interface MAU enters the
jabber state.
ifMauJabberState—The value other(1) is returned if the jabber state is not 2, 3, or 4. The agent MUST always
return other(1) for MAU type dot3MauTypeAUI. The value unknown(2) is returned when the MAU’s true state
is unknown; for example, when it is being initialized. If the MAU is not jabbering the agent returns noJabber(3).
This is the “normal” state. If the MAU is in jabber state the agent returns the jabbering(4) value.
35
sessionAuthenticationTrap
sessionAccessType
sessionUserName
sessionUserIpAddress
sessionAuthFailure
session
An authentication failure trap is
sent each time a user authentication is refused.
sessionAccessType—The access type of the session.
sessionUserName—The user name of the user logged-in.
sessionUserIpAddress—The IP address of the user logged-in.
36
trapAbsorptionTrap
trapAbsorStamp snmp
trapAbsorTrapId
trapAbsorCounter
trapAbsorTime
The absorption trap is sent when
a trap has been absorbed at least
once.
trapAbsorStamp—The time stamp of the absorbed trap.
trapAbsorTrapId—The trap identifier of the absorbed trap.
trapAbsorCounter—The number of the iterations of the absorbed trap.
trapAbsorTime—The time stamp of the last iteration.
37
alaStackMgrDuplicateSlotTrap
alaStackMgrSlotNINumber
stack
manager
Two or more slots claim to have
the same slot number.
alaStackMgrSlotNINumber—The numbers allocated for the stack NIs are from 1 to 8.
Note: This trap is not supported on OmniSwitch 7700/7800/8800 switches.
page 10-18
OmniSwitch 7700/7800/8800 Switch Management Guide
April 2006
Using SNMP
SNMP Overview
No. Trap Name
Objects
38
stack
alaStackMgrStackSta- manager
tus
alaStackMgrSlotNINumber
alaStackMgrTrapLinkNumber
alaStackMgrNeighborChangeTrap
Family
Description
Indicates whether or not the stack
is in loop.
alaStackMgrStackStatus—Indicates whether the stack is or is not in a loop.
alaStackMgrSlotNINumber—The numbers allocated for the stack NIs are from 1to 8.
alaStackMgrTrapLinkNumber—Holds the link number when the stack is not in a loop.
Note: This trap is not supported on OmniSwitch 7700/7800/8800 switches.
39
alaStackMgrRoleChangeTrap
alaStackMgrPri- stack
manager
mary
alaStackMgrSecondary
Indicates that a new primary or
secondary stack is elected.
alaStackMgrPrimary—Holds the number of the stack, which is in Primary role.
alaStackMgrSecondary—Holds the number of the stack, which is in Secondary role.
Note: This trap is not supported on OmniSwitch 7700/7800/8800 switches.
40
lpsViolationTrap
lpsTrapSwitch- bridge
Name
lpsTrapSwitchIpAddr
lpsTrapSwitchSlice
lpsTrapSwitchPort
lpsTrapViolatingMac
lpsTrapViolationType
systemServicesDate
systemServicesTime
A Learned Port Security (LPS)
violation has occurred.
lpsTrapSwitchName—The name of the switch.
lpsTrapSwitchIpAddr—The IP address of switch.
lpsTrapSwitchSlice— The physical slice number for the LPS port on which the violation occurred.
lpsTrapSwitchPort—The physical port number on which the violation occurred.
lpsTrapViolatingMac—The violating MAC address.
lpsTrapViolationType—The type of violation that occurred on the LPS port.
systemServicesDate—This object contains the current System Date in the following format: MM/DD/YYYY.
systemServicesTime—This object contains the current System Time in the following format: HH:MM:SS.
41
alaDoSTrap
alaDoSType
ip
alaDoSDetected
Indicates that the sending agent
has received a Denial of Service
(DoS) attack.
alaDoSType—Index field for the alaDoSTable. Integer indicating the DoS Type: 0=portscan, 1=tcpsyn,
2=pingofdeath, 3=smurf, 3=pepsi, 5=land and 6=teardropBonkBoink.
alaDoSDetected—Number of attacks detected
OmniSwitch 7700/7800/8800 Switch Management Guide
April 2006
page 10-19
SNMP Overview
Using SNMP
No. Trap Name
Objects
Family
Description
42
gmBindRuleType
gmBindRuleVlanId
gmBindRuleIPAddress
gmBindRuleMacAddress
gmBindRulePortIfIndex
gmBindRuleProtoClass
gmBindRuleEthertype
gmBindRuleDsapSsap
vlan
Occurs whenever a binding rule
which has been configured gets
violated.
gmBindRuleViolation
gmBindRuleType—Type of binding rule for which trap sent.
gmBindRuleVlanId—Binding Rule VLAN Id.
gmBindRuleIPAddress—Binding Rule IP address.
gmBindRuleMacAddress—Binding Rule Mac Address.
gmBindRulePortIfIndex—The ifIndex corresponding to the mobile port on which the binding rule violation
occurred.
gmBindRuleProtoClass—The encoded protocol number used for binding VLAN classification.
gmBindRuleEthertype—Ethertype value for generic Ethertype or snap rule. This value has no meaning for
vProtoRuleProtoClass set to values other than 9 or 11.
gmBindRuleDsapSsap— DSAP and SSAP values for generic DSAP/SSAP and SNAP rules. This value has no
meaning for vProtoRuleProtoClass set to values other than 10.
43
acctConnFailure
N/A
none
The switch is unable to open a
connection to an accounting
server.
none
The switch has successfully
opened a connection to an
accounting server.
none
A high water mark threshold
reached on the spooling queue
for accounting has been reached.
none
Indicates that accounting records
have been lost.
Note: This trap is not supported in the current release.
44
acctConnSuccess
N/A
Note: This trap is not supported in the current release.
45
acctQueueHighThresholdReached
N/A
Note: This trap is not supported in the current release.
46
acctRecordsLost
N/A
Note: This trap is not supported in the current release.
page 10-20
OmniSwitch 7700/7800/8800 Switch Management Guide
April 2006
Using SNMP
SNMP Overview
No. Trap Name
Objects
47
pethPsePortDe- module
tectionStatus
pethPsePortOnOffNotification
Family
Description
Indicates if power inline port is
or is not delivering power to the a
power inline device.
pethPsePortDetectionStatus—Describes the operational status of the port PD detection. A value of disabled(1)- indicates that the PSE State diagram is in the state IDLE. A value of searching(2)- indicates that the
PSE State diagram is in the state DETECTION, CLASSIFICATION, SIGNATURE_INVALID or BACKOFF.
A value of deliveringPower(4) - indicates that the PSE State diagram is in the state POWER_UP, POWER_ON
or POWER_OFF. A value of fault(5) - indicates that the PSE State diagram is in the state TEST_ERROR or the
state IDLE due to the variable error condition. Faults detected are vendor specific. A value of test(7) - indicates
that the PSE State diagram is in the state TEST_MODE. A value of denyLowPriority(8) indicates that the port
was disabled by the power management system, in order to keep active higher priority ports.
48
pethPsePortPowerMaintenanceStatus- pethPsePortmodule
Notification
PowerMaintenanceStatus
Indicates the status of the power
maintenance signature for inline
power.
pethPsePortPowerMaintenanceStatus—The value ok(1) indicates the Power Maintenance Signature is
present and the overcurrent condition has not been detected. The value overCurrent (2) indicates an overcurrent
condition has been detected. The value mPSAbsent(3) indicates that the Power Maintenance Signature is
absent.
49
pethMainPowerUsageOnNotification
pethMainPseC- module
onsumptionPower
Indicates that the power inline
usage is above the threshold.
pethMainPseConsumptionPower—Measured usage power expressed in Watts.
50
pethMainPowerUsageOffNotification
pethMainPseC- module
onsumptionPower
Indicates that the power inline
usage is below the threshold.
pethMainPseConsumptionPower—Measured usage power expressed in Watts.
51
ospfNbrStateChange
ospfRouterId
ospfNbrIpAddr
ospfNbrAddressLessIndex
ospfNbrRtrId
ospfNbrState
ospf
Indicates a state change of the
neighbor relationship.
ospfRouterId—A 32-bit integer uniquely identifying the router in the Autonomous System. By convention, to
ensure uniqueness, this should default to the value of one of the router’s IP interface addresses.
ospfNbrIpAddr—The IP address this neighbor is using in its IP Source Address. Note that, on address-less
links, this will not be 0.0.0.0, but the address of another of the neighbor’s interfaces.
ospfNbrAddressLessIndex—On an interface having an IP Address, zero. On address-less interfaces, the corresponding value of ifIndex in the Internet Standard MIB. On row creation, this can be derived from the
instance.
ospfNbrRtrId—A 32-bit integer (represented as a type IpAddress) uniquely identifying the neighboring router
in the Autonomous System.
ospfNbrState—The State of the relationship with this Neighbor.
OmniSwitch 7700/7800/8800 Switch Management Guide
April 2006
page 10-21
SNMP Overview
Using SNMP
No. Trap Name
Objects
Family
Description
52
ospfRouterId
ospfVirtNbrArea
ospfVirtNbrRtrId
ospfVirtNbrState
ospf
Indicates a state change of the
virtual neighbor relationship.
ospfVirtNbrStateChange
ospfRouterId—A 32-bit integer uniquely identifying the router in the Autonomous System. By convention, to
ensure uniqueness, this should default to the value of one of the router’s IP interface addresses.
ospfVirtNbrArea—The Transit Area Identifier.
ospfVirtNbrRtrId—A 32-bit integer uniquely identifying the neighboring router in the Autonomous System.
ospfVirtNbrState—The state of the Virtual Neighbor Relationship.
53
httpServerDoSAttackTrap
httpConnection- webmgt
Stats
httpsConnectionStats
This trap is sent to management
station(s) when the HTTP server
is under Denial of Service attack.
The HTTP and HTTPS connections are sampled at a 15 second
interval. This trap is sent every 1
minute while the HTTP server
detects it is under attack.
httpConnectionStats—The number of HTTP connection attempts over the past 15 seconds.
httpsConnectionStats—The number of HTTPS connection attempts over the past 15 seconds.
54
alaStackMgrDuplicateRoleTrap
alaStackMgrSlotNINumber
alaStackMgrChasRole
chassis
The element identified by
alaStackMgrSlotNINumber
detected the presence of two elements with the same primary or
secondary role as specified by
alaStackMgrChasRole on the
stack.
alaStackMgrSlotNINumber—Numbers allocated for the stack NIs as follows:
- 0: invalid slot number
- 1..8: valid and assigned slot numbers corresponding to values from the entPhysicalTable
- 1001..1008: switches operating in pass through mode
- 255: unassigned slot number.
alaStackMgrChasRole—The current role of the chassis as follows:
- unassigned(0),
- primary(1),
- secondary(2),
- idle(3),
- standalone(4),
- passthrough(5).
Note: This trap is not supported on OmniSwitch 7700/7800/8800 switches.
page 10-22
OmniSwitch 7700/7800/8800 Switch Management Guide
April 2006
Using SNMP
SNMP Overview
No. Trap Name
Objects
Family
Description
55
alaStackMgrSlotNINumber
chassis
The element identified by
alaStackMgrSlotNINumber will
enter the pass through mode
because its operational slot was
cleared with immediate effect.
alaStackMgrClearedSlotTrap
alaStackMgrSlotNINumber—Numbers allocated for the stack NIs as follows:
- 0: invalid slot number
- 1..8: valid and assigned slot numbers corresponding to values from the entPhysicalTable
- 1001..1008: switches operating in pass through mode
- 255: unassigned slot number.
Note: This trap is not supported on OmniSwitch 7700/7800/8800 switches.
56
alaStackMgrOutOfSlotsTrap
N/A
chassis
One element of the stack will
enter the pass through mode
because there are no slot numbers available to be assigned to
this element.
Note: This trap is not supported on OmniSwitch 7700/7800/8800 switches.
57
alaStackMgrOutOfTokensTrap
alaStackMgrSlotNINumber
chassis
The element identified by
alaStackMgrSlotNINumber will
enter the pass through mode
because there are no tokens
available to be assigned to this
element.
alaStackMgrSlotNINumber—Numbers allocated for the stack NIs as follows:
- 0: invalid slot number
- 1..8: valid and assigned slot numbers corresponding to values from the entPhysicalTable
- 1001..1008: switches operating in pass through mode
- 255: unassigned slot number.
Note: This trap is not supported on OmniSwitch 7700/7800/8800 switches.
58
alaStackMgrOutOfPassThroughSlotsTrap
N/A
chassis
There are no pass through slots
available to be assigned to an element that is supposed to enter the
pass through mode.
Note: This trap is not supported on OmniSwitch 7700/7800/8800 switches.
OmniSwitch 7700/7800/8800 Switch Management Guide
April 2006
page 10-23
SNMP Overview
Using SNMP
No. Trap Name
Objects
59
gmOverloadRu- vlan
leTable
gmOverloadRuleType
gmOverloadRuleVlanId
gmOverloadRuleMacAddress
gmOverloadRuleIpAddress
gmOverloadRuleProtocol
gmOverloadRuleIpxNetwork
gmHwVlanRuleTableOverloadAlert
Family
Description
An overload trap occurs whenever a new entry to the hardware
VLAN rule table gets dropped
due to the overload of the table.
gmOverloadRuleTable—Overloaded hardware VLAN rule table.
gmOverloadRuleType—VLAN rule types that are not configured due to the overload of the hardware VLAN
rule table.
gmOverloadRuleVlanId—The overloaded VLAN ID.
gmOverloadRuleMacAddress—The overloaded MAC address.
gmOverloadRuleIpAddress—The overloaded IP address.
gmOverloadRuleProtocol—The overloaded protocol type.
gmOverloadRuleIpxNetwork—The overloaded IPX network address.
60
lnkaggAggUp
traplnkaggId
traplnkaggPortIfIndex
linkaggregation
Indicates the link aggregate is
active. This trap is sent when any
one port of the link aggregate
group goes into the attached
state.
linkaggregation
Indicates the link aggregate is not
active. This trap is sent when all
ports of the link aggregate group
are no longer in the attached
state.
linkaggregation
This trap is sent when any given
port of the link aggregate group
goes to the attached state.
linkaggregation
This trap is sent when any given
port detaches from the link
aggregate group.
traplnkaggId—Index value of the Link Aggregate group.
traplnkaggIfIndex—Port of the Link Aggregate group.
61
lnkaggAggDown
traplnkaggId
traplnkaggPortIfIndex
traplnkaggId—Index value of the Link Aggregate group.
traplnkaggIfIndex—Port of the Link Aggregate group.
62
lnkaggPortJoin
traplnkaggId
traplnkaggPortIfIndex
traplnkaggId—Index value of the Link Aggregate group.
traplnkaggIfIndex—Port of the Link Aggregate group.
63
lnkaggPortLeave
traplnkaggId
traplnkaggPortIfIndex
traplnkaggId—Index value of the Link Aggregate group.
traplnkaggIfIndex—Port of the Link Aggregate group.
page 10-24
OmniSwitch 7700/7800/8800 Switch Management Guide
April 2006
Using SNMP
SNMP Overview
No. Trap Name
Objects
Family
Description
64
traplnkaggId
traplnkaggPortIfIndex
linkaggregation
This trap is sent when any given
port of the link aggregate group
is removed due to an invalid configuration.
lnkaggPortRemove
traplnkaggId—Index value of the Link Aggregate group.
traplnkaggIfIndex—Port of the Link Aggregate group.
65
pktDrop
IP
pktDropType
pktDropIfIndex
pktDropCount
pktDropFrag
The pktDrop trap indicates that
the sending agent has dropped
certain packets (to blocked IP
ports, from spoofed addresses,
etc.).
pktDropType—Reason index for why the packet was dropped.
pktDropIfIndex—Interface index (if_index) of the ingress port of the dropped pkt.
pktDropCount—The number of packet drops (within a configured time interval) of the pktDropType that triggered this particular trap instance.
pktDropFrag—Less than or equal to 512 bytes of the dropped packet (dsmac[12], tag[4], etype[2], payload[..512] (0 if DropCount only).
66
monitorFileWritten
mirmonPrima- pmm
rySlot
mirmonPrimaryPort
monitorFileName
monitorFileSize
A File Written Trap is sent when
the amount of data requested by
the user has been written by the
port monitoring instance.
mirmonPrimarySlot—Slot of mirrored or monitored interface.
mirmonPrimaryPort—Port of mirrored or monitored interface.
monitorFileName—The name of the file in which the traffic will be stored (the default is
“PMONITOR.ENC”).
monitorFileSize—The number of bytes in 16K (16384) increments allowed for the file (default 16384 bytes).
The file contains only the last monitorFileName bytes of the current port monitoring instance.
Note: This trap is not supported on OmniSwitch 7700/7800/8800 switches.
OmniSwitch 7700/7800/8800 Switch Management Guide
April 2006
page 10-25
Using SNMP For Switch Security
Using SNMP
Using SNMP For Switch Security
Community Strings (SNMPv1 and SNMPv2)
The switch supports the SNMPv1 and SNMPv2c community strings security standard. When a community string is carried over an incoming SNMP request, that community string must match up with a user
account name as listed in the community string database on the switch. Otherwise, the SNMP request will
not be processed by the SNMP agent in the switch.
Configuring Community Strings
To use SNMPv1 and v2 community strings, each user account name must be mapped to an SNMP
community string. Follow these steps:
1 Create a user account on the switch and define its password. Enter the following CLI syntax to create
the account “community_user1”.
-> user community_user1 password ******* no auth
Note. A community string inherits the security privileges of the user account that creates it.
A user account can be created locally on the switch using CLI commands. For detailed information on
setting up user accounts, refer to Chapter 8, “Managing Switch Security”.
2 Map the user account to a community string.
A community string works like a password so it is defined by the user. It can be any text string up to 32
characters in length. If spaces are part of the text, the string must be enclosed in quotation marks (“ ”). The
following CLI command maps the username “community_user1” to the community string “comstring2”.
-> snmp community map comstring2 user community_user1 enable
3 Verify that the community string mapping mode is enabled.
By default, the community strings database is enabled. (If community string mapping is not enabled, the
community string configuration will not be checked by the switch.) If the community string mapping
mode is disabled, use the following command to enable it.
-> snmp community map mode enable
Note. Optional. To verify that the community string is properly mapped to the username, enter the show
snmp community map command. The display is similar to the one shown here:
->show snmp community map
Community mode : enabled
status
community string
user name
--------+--------------------------------+-------------------------------enabled comstring2
community_user1
This display also verifies that the community map mode is enabled.
page 10-26
OmniSwitch 7700/7800/8800 Switch Management Guide
April 2006
Using SNMP
Using SNMP For Switch Security
Encryption and Authentication (SNMPv3)
Two important processes are used to verify that the message contents have not been altered and that the
source of the message is authentic. These processes are encryption and authentication.
A typical data encryption process requires an encryption algorithm on both ends of the transmission and a
secret key (like a code or a password). The sending device encrypts or “scrambles” the message by
running it through an encryption algorithm along with the key. The message is then transmitted over the
network in its encrypted state. The receiving device then takes the transmitted message and “un-scrambles” it by running it through a decryption algorithm. The receiving device cannot un-scramble the coded
message without the key.
The switch uses the Data Encryption Standard (DES) encryption scheme in its SNMPv3 implementation.
For DES, the data are encrypted in 64-bit blocks using a 56-bit key. The algorithm transforms 64-bit input
into a 64-bit output. The same steps with the same key are used to reverse the encryption.
The authentication process ensures that the switch receives accurate messages from authorized sources.
Authentication is accomplished between the switch and the SNMP management station through the use of
a username and password identified via the snmp station CLI syntax. The username and password are
used by the SNMP management station along with an authentication algorithm (SHA or MD5) to compute
a hash that is transmitted in the PDU. The switch receives the PDU and computes the hash to verify that
the management station knows the password. The switch will also verify the checksum contained in the
PDU.
Authentication and encryption are combined when the PDU is first authenticated by either the SHA or
MD5 method. Then the message is encrypted using the DES encryption scheme. The encryption key is
derived from the authentication key, which is used to decrypt the PDU on the switch’s side.
Configuring Encryption and Authentication
Setting Authentication for a User Account
User account names and passwords must be a minimum of 8 characters in length when authentication and
encryption are used. The following syntax sets authentication type MD5 with DES encryption for user
account “user_auth1”.
-> user user_auth1 password ******** md5+des
SNMP authentication types SHA and MD5 are available with and without type DES encryption. The sha,
md5, sha+des, md5+des keywords may be used in the command syntax.
Note. Optional. To verify the authentication and encryption type for the user, enter the show user
command. The following is a partial display.
-> show user
User name = user_auth1
Read right
= 0x0000a200 0x00000000,
Write right
= 0x00000000 0x00000000,
Read for domains
= ,
Read for families
= snmp chassis interface ,
Write for domains
= None ,
Snmp authentication = MD5, Snmp encryption = DES
The user’s SNMP authentication is shown as MD5, SNMP encryption is shown as DES.
OmniSwitch 7700/7800/8800 Switch Management Guide
April 2006
page 10-27
Using SNMP For Switch Security
Using SNMP
Setting SNMP Security
By default, the switch is set to “privacy all” which means the switch accepts only authenticated and
encrypted v3 Sets, Gets, and Get-Nexts. You can configure different levels of SNMP security by entering
snmp security followed by the command parameter for the desired security level. For example, the
following syntax sets the SNMP security level as “authentication all” as defined in the table below:
-> snmp security authentication all
The command parameters shown in the following table define security from the lowest level (no security)
to the highest level (traps only) as shown.
Security Level
SNMP requests accepted by the switch
no security
All SNMP requests are accepted.
authentication set
SNMPv1, SNMPv2 Gets
Non-authenticated v3 Gets and Get-Nexts
Authenticated v3 Sets, Gets, and Get-Nexts
Encrypted v3 Sets, Gets, and Get-Nexts
authentication all
Authenticated v3 Sets, Gets, and Get-Nexts
Encrypted v3 Sets, Gets, and Get-Nexts
privacy set
Authenticated v3 Gets and Get-Nexts
Encrypted v3 Sets, Gets, and Get-Nexts
privacy all
Encrypted v3 Sets, Gets, and Get-Nexts
traps only
All SNMP requests are rejected.
page 10-28
OmniSwitch 7700/7800/8800 Switch Management Guide
April 2006
Using SNMP
Working with SNMP Traps
Working with SNMP Traps
The SNMP agent in the switch has the ability to send traps to the management station. It is not required
that the management station requests them. Traps are messages alerting the SNMP manager to a condition
on the network. A trap message is sent via a PDU issued from the switch’s network management agent. It
is sent to alert the management station to some event or condition on the switch.
Traps can indicate improper user authentication, restarts, the loss of a connection, or other significant
events. You can configure the switch so that traps are forwarded to or suppressed from transmission to the
management station under different circumstances.
Trap Filtering
You can filter SNMP traps in at least two ways. You can filter traps by limiting user access to trap
families or you can filter according to individual traps.
Filtering by Trap Families
Access to SNMP traps can be restricted by withholding access privileges for user accounts to certain
command families or domains. (Designation of particular command families for user access is sometimes
referred to as partitioned management.)
SNMP traps are divided into functional families as shown in the “SNMP Traps Table” on page 10-9.
These families correspond to switch CLI command families. When read-only privileges for a user account
are restricted for a command family, that user account is also restricted from reading traps associated with
that family.
Procedures for filtering traps according to command families can be found in the Quick Steps for “Filtering by Trap Families” on page 10-4. For a list of trap names, command families, and their descriptions
refer to the “SNMP Traps Table” on page 10-9.
Filtering By Individual Trap
You can configure the switch to filter out individual traps by using the snmp trap filter command. This
command allows you to suppress specified traps from the management station. The following information
is needed to suppress specific traps:
• The IP address of the SNMP management station that will receive the traps.
• The ID number of the individual traps to be suppressed.
Procedures for filtering individual traps can be found in the Quick Steps for “Filtering by Individual
Traps” on page 10-5. For a list of trap names, ID numbers, and their descriptions refer to the table “SNMP
Traps Table” on page 10-9.
OmniSwitch 7700/7800/8800 Switch Management Guide
April 2006
page 10-29
Working with SNMP Traps
Using SNMP
Authentication Trap
The authentication trap is sent when an SNMP authentication failure is detected. This trap is a signal to the
management station that the switch received a message from an unauthorized protocol entity. This
normally means that a network entity attempted an operation on the switch for which it had insufficient
authorization. When the SNMP authentication trap is enabled, the switch will forward a trap to the
management station. The following command will enable the authentication trap:
-> snmp authentication trap enable
The trap will be suppressed if the SNMP authentication trap is disabled.
Trap Management
Several CLI commands allow you to control trap forwarding from the agent in the switch to the SNMP
management station.
Replaying Traps
The switch normally stores all traps that have been sent out to the SNMP management stations. You can
list the last stored traps by using the show snmp trap replay command. This command lists the traps
along with their sequence number. The sequence number is a record of the order in which the traps were
previously sent out.
You may want to replay traps that have been stored on the switch for testing or troubleshooting purposes.
This is useful in the event that any traps are lost in the network. To replay stored traps, use the snmp trap
replay command followed by the IP address for an SNMP management station. This command replays (or
re-sends) all stored traps from the switch to the specified management station on demand.
If you do not want to replay all of the stored traps, you can specify the sequence number from which the
trap replay will start. The switch will start the replay with a trap sequence number greater than or equal to
the sequence number given in the CLI command. The number of traps replayed depends on the number of
traps stored for this station.
Absorbing Traps
The switch may send the same traps to the management station many, many times. You can suppress the
transmission of identical repetitive traps by issuing the snmp trap absorption command. When trap
absorption is enabled, traps that are identical to traps previously sent will be suppressed and therefore not
forwarded to the SNMP management station. The following command will enable SNMP trap absorption.
-> snmp trap absorption enable
To view or verify the status of the Trap Absorption service, use the show snmp trap config command.
Sending Traps to WebView
When WebView forwarding is enabled, all traps sent by switch applications are also forwarded to
WebView. The following command allows a WebView session to retrieve the trap history log.
-> snmp trap to webview enable
page 10-30
OmniSwitch 7700/7800/8800 Switch Management Guide
April 2006
Using SNMP
SNMP MIB Information
SNMP MIB Information
MIB Tables
You can display MIB tables and their corresponding command families by using the show snmp mib
family command. The MIB table identifies the MIP identification number, the MIB table name and the
command family. If a command family is not valid for the entire MIB table, the command family will be
displayed on a per-object basis.
For a list and description of system MIBs, refer to “Industry Standard MIBs” on page 10-32 and “Enterprise (Proprietary) MIBs” on page 10-37. For a list and description of traps, refer to the “SNMP Traps
Table” on page 10-9.
The following is a partial display.
-> show snmp mib family
MIP ID
MIB TABLE NAME
FAMILY
-------+----------------------------------------+--------------------6145
esmConfTrap
NO SNMP ACCESS
6146
alcetherStatsTable
interface
6147
dot3ControlTable
interface
6148
dot3PauseTable
interface
6149
dot3StatsTable
interface
6150
esmConfTable
interface
...
...
77828
healthModuleTable
rmon
77829
healthPortTable
rmon
77830
healthThreshInfo
rmon
78849
vrrpAssoIpAddrTable
vrrp
78850
vrrpOperTable
vrrp
78851
vrrpOperations
vrrp
78852
vrrpRouterStatsTable
vrrp
...
...
87042
vacmContextTable
snmp
87043
vacmSecurityToGroupTable
snmp
87044
vacmAccessTable
snmp
87045
vacmViewTreeFamilyTable
snmp
MIB Table Description
If the user account has no restrictions the display shown by the show snmp mib family command can be
very long. For documentation purposes, a partial list is shown above and three entry examples are defined.
• The first entry in the MIB Table shows a MIP identification number of 6145. The MIB table name is
esmConfTrap.This table is found in the AlcatelIND1Port MIB which defines managed objects for the
ESM Driver subsystem.
• For MIP Id number 77828, the MIB table name is healthModuleTable. This table is found in the
AlcatelIND1Health MIB which defines managed objects for the health monitoring subsystem.
• For MIB Id number 87042, the MIB table name is vacmContextTable. This table is found in the
SNMP-VIEW-BASED-ACM MIB which serves as the view-based access control model (VACM) for
the SNMP.
OmniSwitch 7700/7800/8800 Switch Management Guide
April 2006
page 10-31
SNMP MIB Information
Using SNMP
Industry Standard MIBs
The following table lists industry standard MIBs supported by the OmniSwitch 7700/7800/8800.
MIB Name
Description
Dependencies
BGP4-MIB, RFC 1657
Definitions of Managed Objects for the Fourth Version SNMPv2-SMI
of the Border Gateway Protocol (BGP-4) using
SMIv2.
BRIDGE-MIB,
RFC 1493:
The Bridge MIB for managing MAC bridges based on SNMPv2-SMI,
the IEEE 802.1D standard between Local Area NetRFC1215-MIB
work (LAN) segments.
DVMRP-STD-MIB,
Draft 11
The MIB module for management of Distance-Vector SNMPv2-SMI,
Multicast Routing Protocol (DVMRP) routers.
SNMPv2-TC,
SNMPv2-CONF,
SNMPFRAMEWORKMIB,
IF-MIB,
ALCATEL-IND1BASE
EE8023-LAG-MIB,
IEEE 802.3ad
Link Aggregation module for managing IEEE
Standard 802.3ad.
SNMPv2-SMI,
SNMPv2-TC,
SNMPv2-CONF,
IF-MIB,
Q-BRIDGE-MIB
ENTITY-MIB, RFC 2737 Entity MIB (Version 2). Standardized set of managed
objects representing logical and physical entities and
relationships between them.
SNMPv2-SMI,
SNMPv2-TC,
SNMPv2-CONF,
SNMPFRAMEWORKMIB
EtherLike-MIB,
RFC 2665
SNMPv2-SMI,
SNMPv2-CONF,
IF-MIB
Definitions of Managed Objects for the Ethernet-like
Interface Types.
HCNUM-TC, RFC 2856: A MIB module containing textual conventions for high SNMPv2-SMI,
capacity data types. This module addresses an
SNMPv2-TC
immediate need for data types not directly supported in
the SMIv2. This short-term solution is meant to be
deprecated as a long-term solution is deployed.
IANAifType-MIB
This MIB module defines the IANAifType Textual
Convention, and thus the enumerated values of the
ifType object defined in the MIB-II Table.
SNMPv2-SMI,
SNMPv2-TC
IANA-RTPROTO-MIB
This MIB module defines the IANAipRouteProtocol
and IANAipMRouteProtocol textual conventions for
use in MIBs which need to identify unicast or multicast routing mechanisms.
SNMPv2-SMI,
SNMPv2-TC
page 10-32
OmniSwitch 7700/7800/8800 Switch Management Guide
April 2006
Using SNMP
SNMP MIB Information
MIB Name
Description
IEEE8021-PAE-MIB
This MIB modules defines 802.1X ports used for port- SNMPv2-SMI,
based access control.
SNMPv2-TC,
SNMPv2-CONF,
SNMPFRAMEWORKMIB
IF-MIB
IF-MIB, RFC 2863
The Interfaces Group MIB. Contains generic
SNMPv2-SMI,
information about the physical interfaces of the entity. SNMPv2-TC,
SNMPv2-CONF,
SNMPv2-MIB,
IANAifType-MIB
IGMP-STD-MIB,
RFC 2933
Internet Group Management Protocol MIB.
SNMPv2-SMI,
SNMPv2-TC,
SNMPv2-CONF,
IF-MIB
INET-ADDRESS-MIB,
RFC 2851
Textual Conventions for Internet Network Addresses.
SNMPv2-SMI,
SNMPv2-TC
IP-BRIDGE-MIB,
RFC 2674
The Bridge MIB Extension module for managing
Priority and Multicast Filtering, defined by IEEE
802.1D.
SNMPv2-SMI,
SNMPv2-TC,
SNMPv2-CONF,
BRIDGE-MIB
IP-FORWARD-MIB,
RFC 2096
IP Forwarding Table MIB
SNMPv2-SMI,
SNMPv2-TC,
SNMPv2-CONF
IP-MIB, RFC 2011
SNMPv2 Management Information Base for the
SNMPv2-SMI,
Internet Protocol using SMIv2. Includes Internetwork SNMPv2-TC,
Control Message Protocol (ICMP).
SNMPv2-CONF
IPMROUTE-STD-MIB,
RFC 932
IPv4 Multicast Routing MIB
SNMPv2-SMI,
SNMPv2-TC,
SNMPv2-CONF,
SNMPFRAMEWORKMIB,
IF-MIB
IANA-RTPROTOMIB
MAU-MIB,
RFC 2668
Management Information for IEEE 802.3 Medium
Attachment Units.
SNMPv2-SMI,
SNMPv2-TC,
SNMPv2-CONF
Novell IPX MIB
This MIB is designed to provide a basic framework for SNMPv2-SMI,
the management of systems implementing the Novell SNMPv2-TC,
Internetwork Packet Exchange (IPX) protocol.
RFC1215-MIB
OmniSwitch 7700/7800/8800 Switch Management Guide
Dependencies
April 2006
page 10-33
SNMP MIB Information
Using SNMP
MIB Name
Description
Novell RIPSAP MIB
This MIB defines the management information for the SNMPv2-SMI
Routing Information Protocol (RIP) and Service
Advertising Protocol (SAP) protocols running in a
Novell Internetwork Packet Exchange (IPX) protocol
environment. It provides information in addition to
that contained in the IPX MIB itself. All tables in this
MIB are linked to an instance of IPX via the system
instance identifier as defined in the IPX MIB.
OSPF-MIB,
RFC 1850
Open Path Shortest First (OSPF) Version 2
Management Information Base.
SNMPv2-SMI,
SNMPv2-TC,
SNMPv2-CONF
PIM-MIB,
RFC 2934
Protocol Independent Multicast MIB for IPv4.
SNMPv2-SMI,
SNMPv2-TC,
SNMPv2-CONF,
IF-MIB,
IPMROUTE-STDMIB
POWER-ETHERNETMIB
The MIB module for managing Powered Devices (PD)
or Power Source Equipment (PSE) working according
to the IEEE 802.af Powered Ethernet (DTE Power via
MDI) standard.
SNMPv2-SMI,
SNMPv2-TC,
IF-MIB,
SNMPv2-CONF
Q-BRIDGE-MIB,
RFC 2674
The Bridge MIB Extension module for managing Pri- SNMPv2-SMI,
ority and Multicast Filtering, defined by IEEE 802.1D. SNMPv2-TC,
SNMPv2-CONF,
SNMPFRAMEWORKMIB,
BRIDGE-MIB,
P-BRIDGE-MIB
RIPv2-MIB,
RFC 1724
Routing Information Protocol (RIP) Version 2 MIB
Extension.
SNMPv2-SMI,
SNMPv2-TC,
SNMPv2-CONF
RMON-MIB, RFC 2819
Remote Network Monitoring (RMON) Management
Information Base.
SNMPv2-SMI,
SNMPv2-TC,
SNMPv2-CONF
RS-232-MIB, RFC 1659
Definitions of Managed Objects for RS-232-like
Hardware Devices using SMIv2.
SNMPv2-SMI,
SNMPv2-CONF,
IF-MIB
SNMP-COMMUNITYMIB, RFC 2576
Definitions of objects to help support coexistence
between SNMPv1, SNMPv2c, and SNMPv3.
SNMPv2-SMI,
SNMPv2-TC,
SNMPFRAMEWORKMIB,
SNMP-TARGETMIB,
SNMPv2-CONF
page 10-34
Dependencies
OmniSwitch 7700/7800/8800 Switch Management Guide
April 2006
Using SNMP
SNMP MIB Information
MIB Name
Description
Dependencies
SNMP-FRAMEWORK
MIB, RFC 2571
An Architecture for Describing SNMP Management
Frameworks.
SNMPv2-SMI,
SNMPv2-TC,
SNMPv2-CONF
SNMP-MPD-MIB,
RFC 2572
Message Processing And Dispatching For The Simple SNMPv2-SMI,
Network Management Protocol (SNMP).
SNMPv2-CONF
SNMP-NOTIFICATION
MIB, RFC 2573
SNMP Applications, Notifications SNMP Entity
Remote Configuration.
SNMPv2-SMI,
SNMPv2-TC,
SNMPv2-CONF,
SNMPFRAMEWORKMIB,
SNMP-TARGETMIB
SNMP-PROXY-MIB,
RFC 2573
SNMP Applications, Proxy SNMP Entity Remote
Configuration.
SNMPv2-SMI,
SNMPv2-TC,
SNMPv2-CONF,
SNMPFRAMEWORKMIB,
SNMP-TARGET
MIB
SNMP-TARGET-MIB,
RFC 2573
SNMP Applications, Proxy SNMP Entity Remote
Configuration.
SNMPv2-SMI,
SNMPv2-TC,
SNMPv2-CONF,
SNMPFRAMEWORKMIB
SNMP-USER-BASEDSM-MIB, RFC 2574
User-based Security Model (USM) for version 3 of the SNMPv2-SMI,
Simple Network Management Protocol (SNMPv3).
SNMPv2-TC,
SNMPv2-CONF,
SNMPFRAMEWORKMIB
SNMPv2-MIB,
RFC 1907
Management Information Base for Version 2 of the
Simple Network Management Protocol (SNMPv2).
SNMPv2-SMI,
SNMPv2-TC,
SNMPv2-CONF
SNMP-VIEW-BASEDACM-MIB, RFC 2575
View-based Access Control Model (VACM) for the
Simple Network Management Protocol (SNMP).
SNMPv2-SMI,
SNMPv2-TC,
SNMPv2-CONF,
SNMPFRAMEWORKMIB
TCP-MIB, RFC 2012
SNMPv2 Management Information Base for the
Transmission Control Protocol using SMIv2.
SNMPv2-SMI,
SNMPv2-CONF
OmniSwitch 7700/7800/8800 Switch Management Guide
April 2006
page 10-35
SNMP MIB Information
Using SNMP
MIB Name
Description
Dependencies
TUNNEL-MIB,
RFC 2667
IP Tunnel MIB
SNMPv2-SMI,
SNMPv2-TC,
SNMPv2-CONF,
IF-MIB
UDP-MIB, RFC 2013
SNMPv2 Management Information Base for the User
Datagram Protocol using SMIv2.
SNMPv2-SMI,
SNMPv2-CONF
VRRP-MIB, RFC 2787
Definitions of Managed Objects for the Virtual Router SNMPv2-SMI,
Redundancy Protocol (VRRP).
SNMPv2-TC,
SNMPv2-CONF,
IF-MIB
page 10-36
OmniSwitch 7700/7800/8800 Switch Management Guide
April 2006
Using SNMP
SNMP MIB Information
Enterprise (Proprietary) MIBs
The following table lists the enterprise proprietary MIBs supported by the OmniSwitch 7700/7800/8800.
Note. The ALCATEL-IND1-BASE* MIB is required for all MIBs listed in this table.
MIB Name
Description
ALCATEL-IND1AAA-MIB
Definitions of managed objects for the Authentication, SNMPv2-SMI,
Authorization, and Accounting (AAA) subsystem.
SNMPv2-TC,
SNMP-v2-CONF
ALCATEL-IND1-BASE
This module provides base definitions for modules
developed to manage Alcatel Internetworking networking infrastructure products.
SNMPv2-SMI
ALCATEL-IND1BGP-MIB
Definitions of managed objects for the Border Gateway Protocol (BGP) subsystem.
SNMPv2-SMI,
SNMPv2-CONF
ALCATEL-IND1CHASSIS-MIB
Definitions of managed objects for the Chassis Management subsystem.
SNMPv2-SMI,
SNMPv2-TC,
SNMPv2-CONF,
SNMPFRAMEWORKMIB,
ENTITY-MIB
ALCATEL-IND1CONFG-MGR-MIB
Definitions of managed objects for the Configuration
Manager subsystem.
SNMPv2-SMI,
SNMPv2-TC,
SNMPv2-CONF
ALCATEL-IND1DEVICES
Definitions of chassis and modules.
SNMP-SMI
ALCATEL-IND1DOT1Q-MIB
Definitions of managed objects for the IEEE 802.1Q
subsystem.
SNMPv2-SMI,
SNMPv2-TC,
SNMPv2-CONF
ALCATEL-IND1DRCTM-MIB
Definitions of managed objects for the Dynamic Rout- SNMPv2-SMI,
ing and Control (DRC) subsystems.
SNMPv2-CONF
ALCATEL-IND1DVMRP-MIB
Definitions of managed objects for the Distance Vector SNMPv2-SMI,
Multicast Routing Protocol (DVMRP) subsystem.
SNMPv2-CONF
ALCATEL-IND1GROUP-MOBILITYMIB
Definitions of managed objects for Group Mobility.
SNMPv2-SMI,
SNMPv2-TC,
SNMPv2-CONF
ALCATEL-IND1HEALTH-MIB
Definitions of managed objects for the Health Monitoring subsystem.
SNMPv2-SMI,
SNMPv2-TC,
SNMPv2-CONF
ALCATEL-IND1INLINE-POWER-MIB
Definitions of proprietary inline power extensions.
SNMPv2-SMI,
POWER-ETHERNET-MIB,
SNMPv2-CONF
OmniSwitch 7700/7800/8800 Switch Management Guide
Dependencies*
April 2006
page 10-37
SNMP MIB Information
Using SNMP
MIB Name
Description
Dependencies*
ALCATEL-IND1INTERSWITCHPROTOCOL-MIB
Definitions of managed objects for the Interswitch
Protocol (i.e., GMAP, XMAP) subsystem.
SNMPv2-SMI,
SNMPv2-TC,
SNMPv2-CONF
ALCATEL-IND1IP-MIB
Definitions of managed objects for the IP Stack subsystem.
SNMPv2-SMI,
SNMPv2-TC,
SNMPv2-CONF,
IP-MIB
ALCATEL-IND1IPMRM-MIB
Definitions of managed objects for the IP Multicast
Routing Manager (IPMRM) subsystem.
SNMPv2-SMI,
SNMPv2-CONF
ALCATEL-IND1IPMS-MIB
Definitions of managed objects for the IP Multicast
Switching (IPMS) subsystem.
SNMPv2-SMI,
SNMPv2-TC,
SNMPv2-CONF
ALCATEL-IND1IPRM-MIB
Definitions of managed objects for the IP Routing
Manager (IPRM) subsystem.
SNMPv2-SMI,
SNMPv2-TC,
SNMPv2-CONF,
IANA-RTPROTOMIB
ALCATEL-IND1IPX-MIB
Definitions of managed objects for the Novell Internet- SNMPv2-SMI,
work Packet Exchange (IPX) Protocol subsystem.
SNMPv2-TC,
SNMPv2-CONF
ALCATEL-IND1LAG-MIB
Definitions of managed objects for the IEEE 802.3ad
Link Aggregation (LAG) subsystem.
ALCATEL-IND1LPS-MIB
Definitions of the MIB module for the address learning SNMPv2-SMI,
MIB addresses entity.
SNMPv2-TC,
IF-MIB,
Q-BRIDGE-MIB,
ALCATEL-IND1SYSTEM-MIB,
SNMPv2-CONF
ALCATEL-IND1MAC-ADDRESS-MIB
Definitions of managed objects for the Source Learning MAC Address subsystem.
ALCATEL-IND1MAC-SERVER-MIB
Definitions of managed objects for the Chassis Super- SNMPv2-SMI,
vision MAC Server subsystem.
SNMPv2-TC,
SNMPv2-CONF,
ENTITY-MIB,
ALCATEL-IND1CHASSIS-MIB
ALCATEL-IND1NTP-MIB
Definitions of the Network Time Protocol (NTP) sub- SNMPv2-SMI,
system.
SNMPv2-TC
page 10-38
SNMPv2-SMI,
SNMPv2-TC,
SNMPv2-CONF,
IEEE8023-LAGMIB,
IF-MIB
Q-BRIDGE-MIB
SNMPv2-SMI,
SNMPv2-TC,
SNMPv2-CONF,
IF-MIB,
Q-Bridge-MIB
OmniSwitch 7700/7800/8800 Switch Management Guide
April 2006
Using SNMP
SNMP MIB Information
MIB Name
Description
Dependencies*
ALCATEL-IND1OSPF-MIB
Definitions of managed objects for the Open Shortest
Path First (OSPF) subsystem.
SNMPv2-SMI,
SNMPv2-TC,
SNMPv2-CONF
ALCATEL-IND1PARTITIONED-MGRMIB
Definitions of the user Partitioned Manager subsystem.
SNMPv2-SMI,
SNMPv2-TC,
SNMPv2-CONF,
Q-BRIDGE-MIB,
SNMPFRAMEWORKMIB,
SNMPv2-TC
ALCATEL-IND1PCAM-MIB
Definitions of managed objects for the Coronado
L3HRE Manager subsystem.
SNMPv2-SMI,
SNMPv2-TC,
SNMPv2-CONF
ALCATEL-IND1PIMSM-MIB
Definitions of managed objects for the Protocol Inde- SNMPv2-SMI,
pendent Multicast Sparse Mode (PIM-SM) subsystem. SNMPv2-CONF
ALCATEL-IND1POLICY-MIB
Definitions of managed objects for the Policy Manager SNMPv2-SMI,
subsystem.
SNMPv2-TC,
SNMPv2-CONF
ALCATEL-IND1PORT-MIB
Definitions of managed objects for the Port Manager
subsystem.
ALCATEL-IND1PORT-MIRRORINGMONITORING-MIB
Definitions of managed objects for the Port Mirroring SNMPv2-SMI,
and Monitoring subsystem.
SNMPv2-TC,
SNMPv2-CONF
ALCATEL-IND1QOS-MIB
Definitions of managed objects for the Quality of Ser- SNMPv2-SMI,
vice (QoS) subsystem.
SNMPv2-TC,
SNMPv2-CONF
ALCATEL-IND1RIP-MIB
Definitions of managed objects for the Routing Information Protocol (RIP) subsystem.
SNMPv2-SMI,
SNMPv2-TC,
SNMPv2-CONF
ALCATEL-IND1SESSION-MGR-MIB
Definitions of managed objects for the User Session
Manager subsystem.
SNMPv2-SMI,
SNMPv2-TC,
SNMPv2-CONF
ALCATEL-IND1SLB-MIB
Definitions of managed objects for the Server Load
Balancing (SLB) subsystem.
SNMPv2-SMI,
SNMPv2-TC,
SNMPv2-CONF
ALCATEL-IND1SNMP-AGENT-MIB
Definitions of managed objects for the Simple Network Management Protocol (SNMP) Agent subsystem.
SNMPv2-SMI
ALCATEL-IND1SYSTEM-MIB
Definitions of managed objects for the System Services subsystem.
SNMPv2-SMI,
SNMPv2-TC,
SNMPv2-CONF
OmniSwitch 7700/7800/8800 Switch Management Guide
April 2006
SNMPv2-SMI,
SNMPv2-CONF,
IF-MIB
page 10-39
SNMP MIB Information
Using SNMP
MIB Name
Description
Dependencies*
ALCATEL-IND1TRAP-MGR-MIB
Definitions of managed objects for the SNMP Notification (i.e., Trap) Manager subsystem.
SNMPv2-SMI,
SNMP-v2-TC,
SNMPv2-CONF
ALCATEL-IND1UDP-RELAY-MIB
Definitions of managed objects for the User Datagram SNMPv2-SMI,
Protocol (UDP) Relay subsystem.
SNMPv2-TC,
SNMPv2-CONF
ALCATEL-IND1VLAN-MGR-MIB
Definitions of managed objects for the VLAN Manager subsystem.
SNMPv2-SMI,
SNMPv2-TC,
SNMPv2-CONF
ALCATEL-IND1VLAN-STP-MIB
Definitions of managed objects for the VLAN Spanning Tree Protocol (STP) subsystem.
SNMPvw-SMI,
SNMPv2-CONF,
BRIDGE-MIB
ALCATEL-IND1-WEBMGT-MIB
Definitions of managed objects for the Web Based
Management subsystem.
SNMPv2-SMI,
SNMPv2-TC,
SNMPv2-CONF,
INET-ADDRESSMIB
page 10-40
OmniSwitch 7700/7800/8800 Switch Management Guide
April 2006
Using SNMP
Verifying the SNMP Configuration
Verifying the SNMP Configuration
To display information about SNMP management stations, trap management, community strings, and
security, use the show commands listed in the following table.
show snmp station
Displays current SNMP station information including IP address, UDP
Port number, Enabled/Disabled status, SNMP version and user account
names.
show snmp community map
Shows the local community strings database including status, community string text and user account name.
show snmp security
Displays current SNMP security status.
show snmp statistics
Displays SNMP statistics. Each MIB object is listed along with its
status.
show snmp mib family
Displays SNMP MIB information. Information includes MIP ID number, MIB table name, and command family.
show snmp trap replay
Displays SNMP trap replay information. This includes the IP address of
the SNMP station manager that replayed each trap and the number of
the oldest replayed trap.
show snmp trap filter
Displays the current SNMP trap filter status. This includes the IP
address of the SNMP station that recorded the traps and the identification list for the traps being filtered.
show snmp authentication trap Displays the current authentication failure trap forwarding status (i.e.,
enable or disable).
show snmp trap config
Displays SNMP trap information including trap ID numbers, trap
names, command families and absorption rate. This command also displays the Enabled/Disabled status of SNMP absorption and the Traps to
WebView service.
For more information about the resulting displays from these commands, see the OmniSwitch CLI Reference Guide.
OmniSwitch 7700/7800/8800 Switch Management Guide
April 2006
page 10-41
Verifying the SNMP Configuration
page 10-42
Using SNMP
OmniSwitch 7700/7800/8800 Switch Management Guide
April 2006
A
Software License and
Copyright Statements
This appendix contains Alcatel and third-party software vendor license and copyright statements.
Alcatel License Agreement
ALCATEL INTERNETWORKING, INC. (“AII”)
SOFTWARE LICENSE AGREEMENT
IMPORTANT. Please read the terms and conditions of this license agreement carefully before opening
this package.
By opening this package, you accept and agree to the terms of this license agreement. If you are not
willing to be bound by the terms of this license agreement, do not open this package. Please
promptly return the product and any materials in unopened form to the place where you obtained it
for a full refund.
1. License Grant. This is a license, not a sales agreement, between you (the “Licensee”) and AII. AII
hereby grants to Licensee, and Licensee accepts, a non-exclusive license to use program media and
computer software contained therein (the “Licensed Files”) and the accompanying user documentation
(collectively the “Licensed Materials”), only as authorized in this License Agreement. Licensee, subject to
the terms of this License Agreement, may use one copy of the Licensed Files on the Licensee’s system.
Licensee agrees not to assign, sublicense, transfer, pledge, lease, rent, or share their rights under this
License Agreement. Licensee may retain the program media for backup purposes with retention of the
copyright and other proprietary notices. Except as authorized under this paragraph, no copies of the
Licensed Materials or any portions thereof may be made by Licensee and Licensee shall not modify,
decompile, disassemble, reverse engineer, or otherwise attempt to derive the Source Code. Licensee is also
advised that AII products contain embedded software known as firmware which resides in silicon.
Licensee may not copy the firmware or transfer the firmware to another medium.
2. AII’s Rights. Licensee acknowledges and agrees that the Licensed Materials are the sole property of
AII and its licensors (herein “its licensors”), protected by U.S. copyright law, trademark law, and are
licensed on a right to use basis. Licensee further acknowledges and agrees that all rights, title, and interest
in and to the Licensed Materials are and shall remain with AII and its licensors and that no such right,
license, or interest shall be asserted with respect to such copyrights and trademarks. This License Agreement does not convey to Licensee an interest in or to the Licensed Materials, but only a limited right to use
revocable in accordance with the terms of this License Agreement.
OmniSwitch 7700/7800/8800 Switch Management Guide
April 2006
page A-1
Alcatel License Agreement
Software License and Copyright Statements
3. Confidentiality. AII considers the Licensed Files to contain valuable trade secrets of AII, the unauthorized disclosure of which could cause irreparable harm to AII. Except as expressly set forth herein,
Licensee agrees to use reasonable efforts not to disclose the Licensed Files to any third party and not to
use the Licensed Files other than for the purpose authorized by this License Agreement. This confidentiality obligation shall continue after any termination of this License Agreement.
4. Indemnity. Licensee agrees to indemnify, defend and hold AII harmless from any claim, lawsuit, legal
proceeding, settlement or judgment (including without limitation AII’s reasonable United States and local
attorneys’ and expert witnesses’ fees and costs) arising out of or in connection with the unauthorized copying, marketing, performance or distribution of the Licensed Files.
5. Limited Warranty. AII warrants, for Licensee’s benefit alone, that the program media shall, for a
period of ninety (90) days from the date of commencement of this License Agreement (referred to as the
Warranty Period), be free from defects in material and workmanship. AII further warrants, for Licensee
benefit alone, that during the Warranty Period the Licensed Files shall operate substantially in accordance
with the functional specifications in the User Guide. If during the Warranty Period, a defect in the
Licensed Files appears, Licensee may return the Licensed Files to AII for either replacement or, if so
elected by AII, refund of amounts paid by Licensee under this License Agreement. EXCEPT FOR THE
WARRANTIES SET FORTH ABOVE, THE LICENSED MATERIALS ARE LICENSED “AS IS” AND
AII AND ITS LICENSORS DISCLAIM ANY AND ALL OTHER WARRANTIES, WHETHER
EXPRESS OR IMPLIED, INCLUDING (WITHOUT LIMITATION) ANY IMPLIED WARRANTIES
OF MERCHANTABILITY OR FITNESS FOR A PARTICULAR PURPOSE. SOME STATES DO NOT
ALLOW THE EXCLUSION OF IMPLIED WARRANTIES SO THE ABOVE EXCLUSIONS MAY
NOT APPLY TO LICENSEE. THIS WARRANTY GIVES THE LICENSEE SPECIFIC LEGAL
RIGHTS. LICENSEE MAY ALSO HAVE OTHER RIGHTS WHICH VARY FROM STATE TO
STATE.
6. Limitation of Liability. AII’s cumulative liability to Licensee or any other party for any loss or
damages resulting from any claims, demands, or actions arising out of or relating to this License Agreement shall not exceed the license fee paid to AII for the Licensed Materials. IN NO EVENT SHALL AII
BE LIABLE FOR ANY INDIRECT, INCIDENTAL, CONSEQUENTIAL, SPECIAL, OR EXEMPLARY DAMAGES OR LOST PROFITS, EVEN IF AII HAS BEEN ADVISED OF THE POSSIBILITY OF SUCH DAMAGES. SOME STATES DO NOT ALLOW THE LIMITATION OR EXCLUSION
OF LIABILITY FOR INCIDENTAL OR CONSEQUENTIAL DAMAGES, SO THE ABOVE LIMITATION OR EXCLUSION TO INCIDENTAL OR CONSEQUENTIAL DAMAGES MAY NOT APPLY
TO LICENSEE.
7. Export Control. This product is subject to the jurisdiction of the United States. Licensee may not
export or reexport the Licensed Files, without complying with all United States export laws and regulations, including but not limited to (i) obtaining prior authorization from the U.S. Department of Commerce
if a validated export license is required, and (ii) obtaining “written assurances” from licensees, if required.
8. Support and Maintenance. Except as may be provided in a separate agreement between AII and
Licensee, if any, AII is under no obligation to maintain or support the copies of the Licensed Files made
and distributed hereunder and AII has no obligation to furnish Licensee with any further assistance, documentation or information of any nature or kind.
9. Term. This License Agreement is effective upon Licensee opening this package and shall continue until
terminated. Licensee may terminate this License Agreement at any time by returning the Licensed Materials and all copies thereof and extracts therefrom to AII and certifying to AII in writing that all Licensed
Materials and all copies thereof and extracts therefrom have been returned or erased by the memory of
Licensee’s computer or made non-readable. AII may terminate this License Agreement upon the breach by
Licensee of any term hereof. Upon such termination by AII, Licensee agrees to return to AII or destroy the
Licensed Materials and all copies and portions thereof.
page A-2
OmniSwitch 7700/7800/8800 Switch Management Guide
April 2006
Software License and Copyright Statements
Alcatel License Agreement
10. Governing Law. This License Agreement shall be construed and governed in accordance with the
laws of the State of California.
11. Severability. Should any term of this License Agreement be declared void or unenforceable by any
court of competent jurisdiction, such declaration shall have no effect on the remaining terms herein.
12. No Waiver. The failure of either party to enforce any rights granted hereunder or to take action against
the other party in the event of any breach hereunder shall not be deemed a waiver by that party as to
subsequent enforcement of rights or subsequent actions in the event of future breaches.
13. Notes to United States Government Users. Software and documentation are provided with restricted
rights. Use, duplication or disclosure by the government is subject to (i) restrictions set forth in GSA ADP
Schedule Contract with AII’s reseller(s), or (ii) restrictions set forth in subparagraph (c) (1) and (2) of 48
CFR 52.227-19, as applicable.
14.Third Party Materials. Licensee is notified that the Licensed Files contain third party software and
materials licensed to AII by certain third party licensors. Some third party licensors (e.g., Wind River and
their licensors with respect to the Run-Time Module) are third part beneficiaries to this License Agreement with full rights of enforcement. Please refer to the section entitled “Third Party Licenses and
Notices” on page A-4 for the third party license and notice terms.
OmniSwitch 7700/7800/8800 Switch Management Guide
April 2006
page A-3
Third Party Licenses and Notices
Software License and Copyright Statements
Third Party Licenses and Notices
The licenses and notices related only to such third party software are set forth below:
A. Booting and Debugging Non-Proprietary Software
A small, separate software portion aggregated with the core software in this product and primarily used for
initial booting and debugging constitutes non-proprietary software, some of which may be obtained in
source code format from AII for a limited period of time. AII will provide a machine-readable copy of the
applicable non-proprietary software to any requester for a cost of copying, shipping and handling. This
offer will expire 3 years from the date of the first shipment of this product.
B. The OpenLDAP Public License: Version 2.4, 8 December 2000
Redistribution and use of this software and associated documentation (“Software”), with or without modification, are permitted provided that the following conditions are met:
1 Redistributions of source code must retain copyright statements and notices.
2 Redistributions in binary form must reproduce applicable copyright statements and notices, this list of
conditions, and the following disclaimer in the documentation and/or other materials provided with the
distribution.
3 Redistributions must contain a verbatim copy of this document.
4 The names and trademarks of the authors and copyright holders must not be used in advertising or
otherwise to promote the sale, use or other dealing in this Software without specific, written prior permission.
5 Due credit should be given to the OpenLDAP Project.
6 The OpenLDAP Foundation may revise this license from time to time. Each revision is distinguished
by a version number. You may use the Software under terms of this license revision or under the terms of
any subsequent revision of the license.
THIS SOFTWARE IS PROVIDED BY THE OPENLDAP FOUNDATION AND CONTRIBUTORS “AS
IS” AND ANY EXPRESSED OR IMPLIED WARRANTIES, INCLUDING, BUT NOT LIMITED TO,
THE IMPLIED WARRANTIES OF MERCHANTABILITY AND FITNESS FOR A PARTICULAR
PURPOSE ARE DISCLAIMED. IN NO EVENT SHALL THE OPENLDAP FOUNDATION OR ITS
CONTRIBUTORS BE LIABLE FOR ANY DIRECT, INDIRECT, INCIDENTAL, SPECIAL, EXEMPLARY, OR CONSEQUENTIAL DAMAGES (INCLUDING, BUT NOT LIMITED TO, PROCUREMENT OF SUBSTITUTE GOODS OR SERVICES; LOSS OF USE, DATA, OR PROFITS; OR
BUSINESS INTERRUPTION) HOWEVER CAUSED AND ON ANY THEORY OF LIABILITY,
WHETHER IN CONTRACT, STRICT LIABILITY, OR TORT (INCLUDING NEGLIGENCE OR
OTHERWISE) ARISING IN ANY WAY OUT OF THE USE OF THIS SOFTWARE, EVEN IF
ADVISED OF THE POSSIBILITY OF SUCH DAMAGE.
OpenLDAP is a trademark of the OpenLDAP Foundation.
Copyright 1999-2000 The OpenLDAP Foundation, Redwood City,
California, USA. All Rights Reserved. Permission to copy and
distributed verbatim copies of this document is granted.
page A-4
OmniSwitch 7700/7800/8800 Switch Management Guide
April 2006
Software License and Copyright Statements
Third Party Licenses and Notices
C. Linux
Linux is written and distributed under the GNU General Public License which means that its source code
is freely-distributed and available to the general public.
D. GNU GENERAL PUBLIC LICENSE: Version 2, June 1991
Copyright (C) 1989, 1991 Free Software Foundation, Inc. 675 Mass Ave, Cambridge, MA 02139, USA
Everyone is permitted to copy and distribute verbatim copies of this license document, but changing it is
not allowed.
Preamble
The licenses for most software are designed to take away your freedom to share and change it. By
contrast, the GNU General Public License is intended to guarantee your freedom to share and change free
software--to make sure the software is free for all its users. This General Public License applies to most of
the Free Software Foundation’s software and to any other program whose authors commit to using it.
(Some other Free Software Foundation software is covered by the GNU Library General Public License
instead.) You can apply it to your programs, too.
When we speak of free software, we are referring to freedom, not price. Our General Public Licenses are
designed to make sure that you have the freedom to distribute copies of free software (and charge for this
service if you wish), that you receive source code or can get it if you want it, that you can change the software or use pieces of it in new free programs; and that you know you can do these things.
To protect your rights, we need to make restrictions that forbid anyone to deny you these rights or to ask
you to surrender the rights. These restrictions translate to certain responsibilities for you if you distribute
copies of the software, or if you modify it.
For example, if you distribute copies of such a program, whether gratis or for a fee, you must give the
recipients all the rights that you have. You must make sure that they, too, receive or can get the source
code. And you must show them these terms so they know their rights.
We protect your rights with two steps: (1) copyright the software, and (2) offer you this license which
gives you legal permission to copy, distribute and/or modify the software.
Also, for each author’s protection and ours, we want to make certain that everyone understands that there
is no warranty for this free software. If the software is modified by someone else and passed on, we want
its recipients to know that what they have is not the original, so that any problems introduced by others
will not reflect on the original authors’ reputations.
Finally, any free program is threatened constantly by software patents. We wish to avoid the danger that
redistributors of a free program will individually obtain patent licenses, in effect making the program
proprietary. To prevent this, we have made it clear that any patent must be licensed for everyone’s free use
or not licensed at all.
The precise terms and conditions for copying, distribution and modification follow.
GNU GENERAL PUBLIC LICENSE TERMS AND CONDITIONS FOR COPYING,
DISTRIBUTION AND MODIFICATION
0 This License applies to any program or other work which contains a notice placed by the copyright
holder saying it may be distributed under the terms of this General Public License. The “Program”, below,
refers to any such program or work, and a “work based on the Program” means either the Program or any
derivative work under copyright law: that is to say, a work containing the Program or a portion of it, either
OmniSwitch 7700/7800/8800 Switch Management Guide
April 2006
page A-5
Third Party Licenses and Notices
Software License and Copyright Statements
verbatim or with modifications and/or translated into another language. (Hereinafter, translation is
included without limitation in the term “modification”.) Each licensee is addressed as “you”.
Activities other than copying, distribution and modification are not covered by this License; they are
outside its scope. The act of running the Program is not restricted, and the output from the Program is
covered only if its contents constitute a work based on the Program (independent of having been made by
running the Program). Whether that is true depends on what the Program does.
1 You may copy and distribute verbatim copies of the Program’s source code as you receive it, in any
medium, provided that you conspicuously and appropriately publish on each copy an appropriate copyright notice and disclaimer of warranty; keep intact all the notices that refer to this License and to the
absence of any warranty; and give any other recipients of the Program a copy of this License along with
the Program.
You may charge a fee for the physical act of transferring a copy, and you may at your option offer
warranty protection in exchange for a fee.
2 You may modify your copy or copies of the Program or any portion of it, thus forming a work based on
the Program, and copy and distribute such modifications or work under the terms of Section 1 above,
provided that you also meet all of these conditions:
a You must cause the modified files to carry prominent notices stating that you changed the files and
the date of any change.
b You must cause any work that you distribute or publish, that in whole or in part contains or is
derived from the Program or any part thereof, to be licensed as a whole at no charge to all third parties
under the terms of this License.
c If the modified program normally reads commands interactively when run, you must cause it, when
started running for such interactive use in the most ordinary way, to print or display an announcement
including an appropriate copyright notice and a notice that there is no warranty (or else, saying that you
provide a warranty) and that users may redistribute the program under these conditions, and telling the
user how to view a copy of this License. (Exception: if the Program itself is interactive but does not
normally print such an announcement, your work based on the Program is not required to print an
announcement.)
These requirements apply to the modified work as a whole. If identifiable sections of that work are not
derived from the Program, and can be reasonably considered independent and separate works in themselves, then this License, and its terms, do not apply to those sections when you distribute them as separate works. But when you distribute the same sections as part of a whole which is a work based on the
Program, the distribution of the whole must be on the terms of this License, whose permissions for other
licensees extend to the entire whole, and thus to each and every part regardless of who wrote it. Thus, it is
not the intent of this section to claim rights or contest your rights to work written entirely by you; rather,
the intent is to exercise the right to control the distribution of derivative or collective works based on the
Program.
In addition, mere aggregation of another work not based on the Program with the Program (or with a work
based on the Program) on a volume of a storage or distribution medium does not bring the other work
under the scope of this License.
3 You may copy and distribute the Program (or a work based on it, under Section 2) in object code or
executable form under the terms of Sections 1 and 2 above provided that you also do one of the following:
a Accompany it with the complete corresponding machine-readable source code, which must be
distributed under the terms of Sections 1 and 2 above on a medium customarily used for software interchange; or,
page A-6
OmniSwitch 7700/7800/8800 Switch Management Guide
April 2006
Software License and Copyright Statements
Third Party Licenses and Notices
b Accompany it with a written offer, valid for at least three years, to give any third party, for a charge
no more than your cost of physically performing source distribution, a complete machine-readable
copy of the corresponding source code, to be distributed under the terms of Sections 1 and 2 above on a
medium customarily used for software interchange; or,
c Accompany it with the information you received as to the offer to distribute corresponding source
code. (This alternative is allowed only for noncommercial distribution and only if you received the
program in object code or executable form with such an offer, in accord with Subsection b above.)
The source code for a work means the preferred form of the work for making modifications to it. For an
executable work, complete source code means all the source code for all modules it contains, plus any
associated interface definition files, plus the scripts used to control compilation and installation of the
executable. However, as a special exception, the source code distributed need not include anything that is
normally distributed (in either source or binary form) with the major components (compiler, kernel, and so
on) of the operating system on which the executable runs, unless that component itself accompanies the
executable.
If distribution of executable or object code is made by offering access to copy from a designated place,
then offering equivalent access to copy the source code from the same place counts as distribution of the
source code, even though third parties are not compelled to copy the source along with the object code.
4 You may not copy, modify, sublicense, or distribute the Program except as expressly provided under
this License. Any attempt otherwise to copy, modify, sublicense or distribute the Program is void, and will
automatically terminate your rights under this License. However, parties who have received copies, or
rights, from you under this License will not have their licenses terminated so long as such parties remain
in full compliance.
5 You are not required to accept this License, since you have not signed it. However, nothing else grants
you permission to modify or distribute the Program or its derivative works. These actions are prohibited
by law if you do not accept this License. Therefore, by modifying or distributing the Program (or any
work based on the Program), you indicate your acceptance of this License to do so, and all its terms and
conditions for copying, distributing or modifying the Program or works based on it.
6 Each time you redistribute the Program (or any work based on the Program), the recipient automati-
cally receives a license from the original licensor to copy, distribute or modify the Program subject to
these terms and conditions. You may not impose any further restrictions on the recipients’ exercise of the
rights granted herein. You are not responsible for enforcing compliance by third parties to this License.
7 If, as a consequence of a court judgment or allegation of patent infringement or for any other reason
(not limited to patent issues), conditions are imposed on you (whether by court order, agreement or otherwise) that contradict the conditions of this License, they do not excuse you from the conditions of this
License. If you cannot distribute so as to satisfy simultaneously your obligations under this License and
any other pertinent obligations, then as a consequence you may not distribute the Program at all. For
example, if a patent license would not permit royalty-free redistribution of the Program by all those who
receive copies directly or indirectly through you, then the only way you could satisfy both it and this
License would be to refrain entirely from distribution of the Program.
If any portion of this section is held invalid or unenforceable under any particular circumstance, the
balance of the section is intended to apply and the section as a whole is intended to apply in other circumstances.
It is not the purpose of this section to induce you to infringe any patents or other property right claims or
to contest validity of any such claims; this section has the sole purpose of protecting the integrity of the
free software distribution system, which is implemented by public license practices. Many people have
made generous contributions to the wide range of software distributed through that system in reliance on
OmniSwitch 7700/7800/8800 Switch Management Guide
April 2006
page A-7
Third Party Licenses and Notices
Software License and Copyright Statements
consistent application of that system; it is up to the author/donor to decide if he or she is willing to distribute software through any other system and a licensee cannot impose that choice.
This section is intended to make thoroughly clear what is believed to be a consequence of the rest of this
License.
8 If the distribution and/or use of the Program is restricted in certain countries either by patents or by
copyrighted interfaces, the original copyright holder who places the Program under this License may add
an explicit geographical distribution limitation excluding those countries, so that distribution is permitted
only in or among countries not thus excluded. In such case, this License incorporates the limitation as if
written in the body of this License.
9 The Free Software Foundation may publish revised and/or new versions of the General Public License
from time to time. Such new versions will be similar in spirit to the present version, but may differ in
detail to address new problems or concerns.
Each version is given a distinguishing version number. If the Program specifies a version number of this
License which applies to it and “any later version”, you have the option of following the terms and conditions either of that version or of any later version published by the Free Software Foundation. If the
Program does not specify a version number of this License, you may choose any version ever published by
the Free Software Foundation.
10 If you wish to incorporate parts of the Program into other free programs whose distribution conditions
are different, write to the author to ask for permission. For software which is copyrighted by the Free Software Foundation, write to the Free Software Foundation; we sometimes make exceptions for this. Our
decision will be guided by the two goals of preserving the free status of all derivatives of our free software and of promoting the sharing and reuse of software generally.
NO WARRANTY
11 BECAUSE THE PROGRAM IS LICENSED FREE OF CHARGE, THERE IS NO WARRANTY FOR
THE PROGRAM, TO THE EXTENT PERMITTED BY APPLICABLE LAW. EXCEPT WHEN
OTHERWISE STATED IN WRITING THE COPYRIGHT HOLDERS AND/OR OTHER PARTIES
PROVIDE THE PROGRAM “AS IS” WITHOUT WARRANTY OF ANY KIND, EITHER EXPRESSED
OR IMPLIED, INCLUDING, BUT NOT LIMITED TO, THE IMPLIED WARRANTIES OF
MERCHANTABILITY AND FITNESS FOR A PARTICULAR PURPOSE. THE ENTIRE RISK AS TO
THE QUALITY AND PERFORMANCE OF THE PROGRAM IS WITH YOU. SHOULD THE
PROGRAM PROVE DEFECTIVE, YOU ASSUME THE COST OF ALL NECESSARY SERVICING,
REPAIR OR CORRECTION.
12 IN NO EVENT UNLESS REQUIRED BY APPLICABLE LAW OR AGREED TO IN WRITING
WILL ANY COPYRIGHT HOLDER, OR ANY OTHER PARTY WHO MAY MODIFY AND/OR
REDISTRIBUTE THE PROGRAM AS PERMITTED ABOVE, BE LIABLE TO YOU FOR DAMAGES,
INCLUDING ANY GENERAL, SPECIAL, INCIDENTAL OR CONSEQUENTIAL DAMAGES ARISING OUT OF THE USE OR INABILITY TO USE THE PROGRAM (INCLUDING BUT NOT
LIMITED TO LOSS OF DATA OR DATA BEING RENDERED INACCURATE OR LOSSES
SUSTAINED BY YOU OR THIRD PARTIES OR A FAILURE OF THE PROGRAM TO OPERATE
WITH ANY OTHER PROGRAMS), EVEN IF SUCH HOLDER OR OTHER PARTY HAS BEEN
ADVISED OF THE POSSIBILITY OF SUCH DAMAGES.
END OF TERMS AND CONDITIONS
page A-8
OmniSwitch 7700/7800/8800 Switch Management Guide
April 2006
Software License and Copyright Statements
Third Party Licenses and Notices
Appendix: How to Apply These Terms to Your New Programs
If you develop a new program, and you want it to be of the greatest possible use to the public, the best way
to achieve this is to make it free software which everyone can redistribute and change under these terms.
To do so, attach the following notices to the program. It is safest to attach them to the start of each source
file to most effectively convey the exclusion of warranty; and each file should have at least the “copyright” line and a pointer to where the full notice is found.
<one line to give the program’s name and a brief idea of what it does.> Copyright (C)
19yy <name of author>
This program is free software; you can redistribute it and/or modify it under the terms of
the GNU General Public License as published by the Free Software Foundation; either
version 2 of the License, or (at your option) any later version.
This program is distributed in the hope that it will be useful, but WITHOUT ANY
WARRANTY; without even the implied warranty of MERCHANTABILITY or
FITNESS FOR A PARTICULAR PURPOSE. See the GNU General Public License
for more details.
You should have received a copy of the GNU General Public License along with this
program; if not, write to the Free Software Foundation, Inc., 675 Mass Ave, Cambridge,
MA 02139, USA.
Also add information on how to contact you by electronic and paper mail.
If the program is interactive, make it output a short notice like this when it starts in an interactive mode:
Gnomovision version 69, Copyright (C) 19yy name of author Gnomovision comes with
ABSOLUTELY NO WARRANTY; for details type ‘show w’. This is free software,
and you are welcome to redistribute it under certain conditions; type ‘show c’ for details.
The hypothetical commands ‘show w’ and ‘show c’ should show the appropriate parts of the General
Public License. Of course, the commands you use may be called something other than ‘show w’ and
‘show c’; they could even be mouse-clicks or menu items--whatever suits your program.
You should also get your employer (if you work as a programmer) or your school, if any, to sign a “copyright disclaimer” for the program, if necessary. Here is a sample; alter the names:
Yoyodyne, Inc., hereby disclaims all copyright interest in the program ‘Gnomovision’
(which makes passes at compilers) written by James Hacker.
<signature of Ty Coon>, 1 April 1989
Ty Coon, President of Vice
This General Public License does not permit incorporating your program into proprietary programs. If
your program is a subroutine library, you may consider it more useful to permit linking proprietary applications with the library. If this is what you want to do, use the GNU Library General Public License
instead of this License.
URLWatch:
For notice when this page changes, fill in your email address.
Maintained by: Webmaster, Linux Online Inc.
Last modified: 09-Aug-2000 02:03AM.
Views since 16-Aug-2000: 177203.
OmniSwitch 7700/7800/8800 Switch Management Guide
April 2006
page A-9
Third Party Licenses and Notices
Software License and Copyright Statements
Material copyright Linux Online Inc.
Design and compilation copyright (c)1994-2002 Linux Online Inc.
Linux is a registered trademark of Linus Torvalds
Tux the Penguin, featured in our logo, was created by Larry Ewing
Consult our privacy statement
URLWatch provided by URLWatch Services.
All rights reserved.
E. University of California
Provided with this product is certain TCP input and Telnet client software developed by the University of
California, Berkeley.
F. Carnegie-Mellon University
Provided with this product is certain BOOTP Relay software developed by Carnegie-Mellon University.
G. Random.c
PR 30872 B Kesner created May 5 2000
PR 30872 B Kesner June 16 2000 moved batch_entropy_process to own task iWhirlpool to make code
more efficient
random.c -- A strong random number generator
Version 1.89, last modified 19-Sep-99
Copyright Theodore Ts’o, 1994, 1995, 1996, 1997, 1998, 1999. All rights reserved.
Redistribution and use in source and binary forms, with or without modification, are permitted provided
that the following conditions are met:
1. Redistributions of source code must retain the above copyright notice, and the entire permission notice
in its entirety, including the disclaimer of warranties.
2. Redistributions in binary form must reproduce the above copyright notice, this list of conditions and the
following disclaimer in the documentation and/or other materials provided with the distribution.
3. The name of the author may not be used to endorse or promote products derived from this software
without specific prior written permission. ALTERNATIVELY, this product may be distributed under the
terms of the GNU Public License, in which case the provisions of the GPL are required INSTEAD OF the
above restrictions. (This clause is necessary due to a potential bad interaction between the GPL and the
restrictions contained in a BSD-style copyright.)
THIS SOFTWARE IS PROVIDED “AS IS” AND ANY EXPRESS OR IMPLIED WARRANTIES,
INCLUDING, BUT NOT LIMITED TO, THE IMPLIED WARRANTIES OF MERCHANTABILITY
AND FITNESS FOR A PARTICULAR PURPOSE, ALL OF WHICH ARE HEREBY DISCLAIMED. IN
NO EVENT SHALL THE AUTHOR BE LIABLE FOR ANY DIRECT, INDIRECT, INCIDENTAL,
SPECIAL, EXEMPLARY, OR CONSEQUENTIAL DAMAGES (INCLUDING, BUT NOT LIMITED
TO, PROCUREMENT OF SUBSTITUTE GOODS OR SERVICES; LOSS OF USE, DATA, OR PROFITS; OR BUSINESS INTERRUPTION) HOWEVER CAUSED AND ON ANY THEORY OF LIABILITY, WHETHER IN CONTRACT, STRICT LIABILITY, OR TORT (INCLUDING NEGLIGENCE OR
OTHERWISE) ARISING IN ANY WAY OUT OF THE USE OF THIS SOFTWARE, EVEN IF NOT
ADVISED OF THE POSSIBILITY OF SUCH DAMAGE.
page A-10
OmniSwitch 7700/7800/8800 Switch Management Guide
April 2006
Software License and Copyright Statements
Third Party Licenses and Notices
H. Apptitude, Inc.
Provided with this product is certain network monitoring software (“MeterWorks/RMON”) licensed from
Apptitude, Inc., whose copyright notice is as follows: Copyright (C) 1997-1999 by Apptitude, Inc. All
Rights Reserved. Licensee is notified that Apptitude, Inc. (formerly, Technically Elite, Inc.), a California
corporation with principal offices at 6330 San Ignacio Avenue, San Jose, California, is a third party beneficiary to the Software License Agreement. The provisions of the Software License Agreement as applied
to MeterWorks/RMON are made expressly for the benefit of Apptitude, Inc., and are enforceable by
Apptitude, Inc. in addition to AII. IN NO EVENT SHALL APPTITUDE, INC. OR ITS SUPPLIERS BE
LIABLE FOR ANY DAMAGES, INCLUDING COSTS OF PROCUREMENT OF SUBSTITUTE
PRODUCTS OR SERVICES, LOST PROFITS, OR ANY SPECIAL, INDIRECT, CONSEQUENTIAL
OR INCIDENTAL DAMAGES, HOWEVER CAUSED AND ON ANY THEORY OF LIABILITY,
ARISING IN ANY WAY OUT OF THIS AGREEMENT.
I. Agranat
Provided with this product is certain web server software (“EMWEB PRODUCT”) licensed from Agranat
Systems, Inc. (“Agranat”). Agranat has granted to AII certain warranties of performance, which warranties [or portion thereof] AII now extends to Licensee. IN NO EVENT, HOWEVER, SHALL AGRANAT
BE LIABLE TO LICENSEE FOR ANY INDIRECT, SPECIAL, OR CONSEQUENTIAL DAMAGES
OF LICENSEE OR A THIRD PARTY AGAINST LICENSEE ARISING OUT OF, OR IN CONNECTION WITH, THIS DISTRIBUTION OF EMWEB PRODUCT TO LICENSEE. In case of any termination of the Software License Agreement between AII and Licensee, Licensee shall immediately return the
EMWEB Product and any back-up copy to AII, and will certify to AII in writing that all EMWEB Product components and any copies of the software have been returned or erased by the memory of Licensee’s
computer or made non-readable.
J. RSA Security Inc.
Provided with this product is certain security software (“RSA Software”) licensed from RSA Security Inc.
RSA SECURITY INC. PROVIDES RSA SOFTWARE “AS IS” WITHOUT ANY WARRANTY WHATSOEVER. RSA SECURITY INC. DISCLAIMS ALL WARRANTIES, EXPRESS, IMPLIED OR STATUTORY, AS TO ANY MATTER WHATSOEVER INCLUDING ALL IMPLIED WARRANTIES OF
MERCHANTABILITY, FITNESS FOR A PARTICULAR PURPOSE AND NON-INFRINGEMENT OF
THIRD PARTY RIGHTS.
K. Sun Microsystems, Inc.
This product contains Coronado ASIC, which includes a component derived from designs licensed from
Sun Microsystems, Inc.
OmniSwitch 7700/7800/8800 Switch Management Guide
April 2006
page A-11
Third Party Licenses and Notices
Software License and Copyright Statements
L. Wind River Systems, Inc.
Provided with this product is certain software (“Run-Time Module”) licensed from Wind River Systems,
Inc. Licensee is prohibited from: (i) copying the Run-Time Module, except for archive purposes consistent with Licensee’s archive procedures; (ii) transferring the Run-Time Module to a third party apart from
the product; (iii) modifying, decompiling, disassembling, reverse engineering or otherwise attempting to
derive the source code of the Run-Time Module; (iv) exporting the Run-Time Module or underlying technology in contravention of applicable U.S. and foreign export laws and regulations; and (v) using the RunTime Module other than in connection with operation of the product. In addition, please be advised that:
(i) the Run-Time Module is licensed, not sold and that AII and its licensors retain ownership of all copies
of the Run-Time Module; (ii) WIND RIVER DISCLAIMS ALL IMPLIED WARRANTIES, INCLUDING WITHOUT LIMITATION THE IMPLIED WARRANTIES OF MERCHANTABILITY, FITNESS
FOR A PARTICULAR PURPOSE, (iii) The SOFTWARE LICENSE AGREEMENT EXCLUDES
LIABILITY FOR ANY SPECIAL, INDIRECT, PUNITIVE, INCIDENTAL AND CONSEQUENTIAL
DAMAGES; and (iv) any further distribution of the Run-Time Module shall be subject to the same restrictions set forth herein. With respect to the Run-Time Module, Wind River and its licensors are third party
beneficiaries of the License Agreement and the provisions related to the Run-Time Module are made
expressly for the benefit of, and are enforceable by, Wind River and its licensors.
M.Network Time Protocol Version 4
The following copyright notice applies to all files collectively called the Network Time Protocol Version 4
Distribution. Unless specifically declared otherwise in an individual file, this notice applies as if the text
was explicitly included in the file.
***********************************************************************
*
*
* Copyright (c) David L. Mills 1992-2003
*
*
*
* Permission to use, copy, modify, and distribute this software and
*
* its documentation for any purpose and without fee is hereby
*
* granted, provided that the above copyright notice appears in all
*
* copies and that both the copyright notice and this permission
*
* notice appear in supporting documentation, and that the name
*
* University of Delaware not be used in advertising or publicity
*
* pertaining to distribution of the software without specific,
*
* written prior permission. The University of Delaware makes no
*
* representations about the suitability this software for any
*
* purpose. It is provided "as is" without express or implied
*
* warranty.
*
*
*
*************************************************************************
page A-12
OmniSwitch 7700/7800/8800 Switch Management Guide
April 2006
Index
B
banner
login 1-15
pre-login text 1-16
boot.cfg file 4-3, 4-11
C
Symbols
! command
5-10
A
aaa accounting session command 8-6
aaa authentication command 1-3, 8-6
default setting for management interfaces 8-10
for HTTP access 9-4
used for enabling switch access 8-10
aaa ldap-server command 8-6
aaa radius-server command 8-6
accounting
for Authenticated Switch Access 8-12
ACE/Servers 8-4
alias command 5-4
application examples
applying configuration files 6-4
Authenticated Switch Access 8-7
CLI 5-7, 5-22
CMM 4-5
configuration file 6-2
creating a file directory 2-27
customer login user accounts 7-6
logging into the switch 1-3
network administrator user accounts 7-5
NTP 3-3
SNMP 10-3, 10-4
transferring a file via FTP 2-28
transferring a file via Secure Shell FTP 2-32
Trap Filters 10-4
WebView 9-4
applying configuration files
application examples 6-4
ASA
see Authenticated Switch Access
attrib command 2-16
Authenticated Switch Access 8-4
accounting 8-12
application example 8-7
defaults 8-2
management interfaces 8-9
authentication
MD5 10-27
SHA 10-27
traps 10-30
OmniSwitch 7700/7800/8800 Switch Management Guide
cd command 2-9
certified directory 4-3
copying to working directory 4-16, 4-21
Chassis Management Module
see CMM
chmod command 2-16
CLI 5-1
application example 5-22
domains and families 7-11
logging commands 5-15–5-16
specifications 5-2
CMM 4-1
application examples 4-5
boot.cfg file 4-3
cancelling a reboot 4-10, 4-14, 4-19
certified directory 4-3
checking reboot status 4-10
configuration files 4-3
copying certified directory to working directory 4-16, 4-21
copying running configuration to working directory 4-11
copying working directory to certified directory 4-15, 4-20
directory structure 4-3
displaying current configuration 4-17, 4-24
displaying switch files 4-18
fail over 4-19
image files 4-3
managing 4-9
rebooting 4-9, 4-19
rebooting from the working directory 4-13, 4-20
running configuration 4-3
scheduling a reboot 4-10, 4-19
specifications 4-2
swapping primary for secondary 4-23
synchronizing primary and secondary 4-20, 4-21
working directory 4-3
CMM Conditions
verify information about 4-26
CMM scenarios 4-5
lost running configuration 4-5
rollback to previous software 4-8
running configuration saved to working directory 4-6
working directory saved to certified directory 4-7
Command Line Interface
see CLI
command-log command 5-15
community strings 10-26
configuration apply command 5-3, 6-2
configuration cancel command 6-7
configuration error-file command 6-3
configuration error-file limit command 6-8
configuration file
April 2006
Index-1
Index
application examples 6-2
errors 6-7
specifications 6-2
configuration files 4-3, 5-3
configuration snapshot command 6-6, 6-11
configuration syntax check command 6-8
console port 1-4
copy certified working command 4-16
copy flash-synchro command 4-22
copy running-config working command 4-12
copy working certified command 4-16
copy working certified flash-synchro command
cp command 2-12, 2-14, 4-25
customer login user accounts
application examples 7-6
D
date 2-33, 6-4
Daylight Savings Time
see DST
defaults
Authenticated Switch Access
login 1-2
NTP 3-2
SNMP 10-2
startup 7-4
switch security 8-2
user accounts 7-2
WebView 9-2
delete command 2-16
DES encryption 10-27
dir command 2-10
directories
certified 2-24, 4-3
flash 2-8
managing 4-9
network 2-24
working 2-24, 4-3
DNS resolver 1-18
Domain Name Server
see DNS resolver
DSA key
Secure Shell 8-11
DST 2-35
8-2
F
4-20
fail over 4-19
file configuration
verify information about
file management
specifications 2-2
files
attributes 2-16
boot.cfg 4-3
configuration 4-3
image 2-26, 4-3
names 6-11
permissions 2-16
snapshots 6-10
text 6-9
filters 5-19
traps 10-4
freespace command 2-16
fsck command 2-16
FTP 1-7
client 2-20
server 2-18
ftp command 2-20
6-13
H
help 5-5
history command 5-13
HTTP
web browser 1-5
http server command 9-3
http ssl command 9-3
I
image files 4-3
install command 2-24
ip domain-lookup command 1-18
ip domain-name command 1-18
ip name-server command 1-18
is command 6-10
K
keywords
5-5
E
editor
vi 6-9
encryption
DES 10-27
end-user profile command 7-6
end-user profile port-list command 7-16
end-user profile vlan-range command 7-16
errors 6-7
exit command 1-13, 1-14, 2-22
Index-2
OmniSwitch 7700/7800/8800 Switch Management Guide
April 2006
Index
L
LDAP accounting servers
Authenticated Switch Access 8-12
LDAP servers
for switch security 8-4
logging into the switch
application examples 1-3
login
banner 1-15
defaults 1-2
specifications 1-2
login settings
verify information about 1-18
ls command 2-6, 5-10
ls -r command 2-12
M
Management Information Bases
see MIBs
MD5
authentication 10-27
memory 2-16
MIBs
enterprise 10-37
industry standard 10-32
mkdir command 2-11
more command 5-18, 6-9
move command 2-15
mv command 2-15
N
network administrator user accounts
application examples 7-5
Network Management Station
see NMS
Network Time Protocol
see NTP
newfs command 2-16
NI modules
behavior during takeover 4-24
NMS 10-7
no command 5-4
NTP 3-1
application examples 3-3
configuring 3-8
configuring a client 3-8
configuring server 3-9
defaults 3-2
overview 3-4
specifications 3-2
stratum 3-5
using in a network 3-5
ntp broadcast command 3-8
ntp broadcast-delay command 3-8
NTP client
broadcast delay 3-8
broadcast mode 3-8
OmniSwitch 7700/7800/8800 Switch Management Guide
ntp client command. 3-3
NTP configuration
verify information about 3-11
ntp key command 3-10
ntp key load command 3-10
NTP server
configuring 3-9
designating 3-9
minimum poll time 3-9
preferred 3-9
version number 3-9
ntp server command 3-3
P
partition management 10-29
password command 7-8
passwords
expiration 7-9
minimum length 7-9
user-configured 7-8
pre_banner.txt file 1-16
prefixes 5-11
primary CMM
swapping with the secondary 4-23
synchronizing with secondary 4-21
prompt 5-13, 5-17
prompt prefix command 5-13
pwd command 2-8
R
RADIUS accounting servers
Authenticated Switch Access 8-12
RADIUS servers
for switch security 8-4
RAM 4-3
reboot
cancelling 4-10, 4-14, 4-19
checking status 4-10
primary 4-9, 4-19
scheduling 4-10, 4-19
secondary 4-19
working directory 4-13, 4-20
reload cancel command 4-10
reload command 4-10, 4-14, 4-19
reload secondary command 4-19
reload working command 4-13
rmdir command 2-13
running configuration 4-3
copying to working directory 4-11
rz command 2-23
April 2006
Index-3
Index
S
screen
display 5-17
prompt 5-13, 5-17
secondary CMM
swapping with the primary 4-23
synchronizing with primary 4-21
Secure Shell 1-4, 1-8, 8-9
algorithms 1-10
DSA key 8-11
key exchange 1-10
managing the switch 8-11
Secure Socket Layer
see SSL
WebView 9-3
security
SNMP 10-26
session banner command 1-15
session login-attempt command 1-17
session login-timeout command 1-17
session prompt command 5-17
session timeout command 1-17
sftp command 1-8, 1-13, 2-22, 2-31
SHA authentication 10-27
show alias command 5-4
show command 5-4
show command-log command 5-16
show command-log status command 5-16
show configuration status command 6-4
show end-user profile command 7-6
show history command 5-13
show http command 9-3
show ip helper command 6-3
show microcode command 4-18, 5-10
show microcode history command 4-18
show ntp client command 3-3
show ntp client server-list command 3-3
show ntp server status command 3-3
show prefix command 5-12
show reload command 4-10
show running-directory command 4-17, 4-24
show snmp community map command 10-26
show snmp mib family command 5-22, 10-31
show snmp station command 10-3
show snmp trap config command 10-9
show snmp trap replay command 10-30
show tty command 5-17
show user command 7-5, 10-4, 10-27
snapshots 6-10, 6-13
SNMP
access for user accounts 7-14
agent 10-6
application examples 10-3, 10-4
browser 1-5
defaults 10-2
management station 10-7
manager 10-6
security 10-26, 10-28
Index-4
specifications 10-2
traps 10-29
versions 10-7
snmp community map mode command 7-13
SNMP configuration
verify information about 10-41
snmp security command 7-13, 10-28
snmp station command 10-7
snmp trap config command 10-30
snmp trap filter command 10-5, 10-29
software rollback
configuration scenarios 4-5
specifications
CLI 5-2
CMM 4-2
configuration file 6-2
file management 2-2
login 1-2
NTP 3-2
SNMP 10-2
switch security 8-2
user database 7-2
ssh command 1-8, 1-11
SSL
see Secure Socket Layer
WebView 9-3
startup
defaults 7-4
switch
rebooting 4-9, 4-19
switch security
defaults 8-2
specifications 8-2
switch security configuration
verify information about 8-13
syntax 5-3, 5-11
system date command 2-33
system daylight savings time command 2-35
system time command 2-34
system time-and-date synchro command 4-22
system timezone command 2-33
OmniSwitch 7700/7800/8800 Switch Management Guide
April 2006
Index
T
W
tables
displays 5-18
filters 5-22
takeover command 2-33, 4-23
Telnet 1-4, 1-6
telnet command 1-6
time 2-34, 6-4
time zone 2-33
timed sessions 6-7
Trap Filters
application examples 10-4
traps
authentication 10-30
families 10-29
filters 10-4, 10-29
management 10-30
tty command 5-17
WebView 9-1
accessing WebView 9-7
adjacencies 9-17
application example 9-4
browser setup 9-2
CLI commands 9-3
configuring the switch with 9-7
defaults 9-2
disabling 9-3
enabling 9-3
on-line help 9-18
SSL 9-3
who command 1-13, 5-21
whoami command 5-21
wildcards 5-22
working directory 4-3
copying to certified directory 4-15, 4-20
write memory command 4-12
U
user accounts
defaults 7-2
for switch access 7-3
saving settings 7-7
SNMP access 7-14
user command 1-5, 8-6
creating a user 7-8
user configuration
verify information about 7-17
user database
specifications 7-2
switch management 8-5
user password-expiration command 7-9
user password-size min command 7-9
user profile command 5-4
user snmp station command 10-27
users
see user accounts
using the CLI
application examples 5-7
UTC 3-1
Z
Zmodem
2-23
V
verbose mode 6-8
vi command 2-14
OmniSwitch 7700/7800/8800 Switch Management Guide
April 2006
Index-5
Index
Index-6
OmniSwitch 7700/7800/8800 Switch Management Guide
April 2006