1
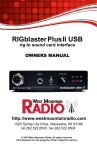
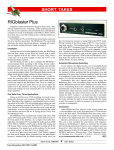
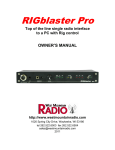
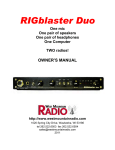
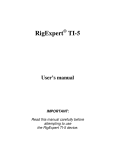
Personal computers are quickly becoming as essential in our
ham shacks as radios and antennas. But hooking up the computer
to communicate with and control the radio has often been a
stumbling block. Not anymore…
CQ Reviews:
West Mountain Radio RIGblaster
and RIGblaster Plus
BY RICH MOSESON,* W2VU
“O
h, cool! It’s just like instant messaging!”
exclaimed my daughter as she sat at the computer keyboard, having a PSK31 QSO (mostly
about horses) with a ham in Florida and his granddaughter.
One of the drawing points for getting more kids into ham radio
today is HF digital communications—instant messaging, if
you will—with people all over the world (and without tying up
the phone line for hours at a time). Computer sound cards
have put amateur digital communications within the range of
just about any ham with a radio and a computer. But connecting the radio to the computer can be a challenge, especially for those hams whose skills lie more in the analog world
than the digital. Well, the folks at West Mountain Radio heard
your cries of frustration and have solved the problem for you.
West Mountain’s “RIGblaster” and now, “RIGblaster Plus,”
have taken the world of amateur digital communications by
storm. It’s a rare station whose “brag list” of equipment
doesn’t include one of these interface boxes. Why? Because
the RIGblaster is reasonably priced, simple to install and use,
and most importantly, it works. But what exactly does it do?
The RIGblaster brings together in one small box all the
cabling and switching that the average ham needs to switch
back and forth between using a microphone and using a keyboard to communicate. It also provides routing for incoming
audio cables that need to feed both a speaker for voice contacts and the computer for digital QSOs. Better yet, it detects
whether you’re switching on the transmitter from your microphone or your computer and automatically opens that channel for communication with the radio. No switching is required
in most cases.
The “Plus” model, introduced at the 2001 Dayton
Hamvention®, adds a front panel headphone jack and a
separate PTT in/out jack on the back. This jack may be
used in one of two ways. First, you may connect a foot
switch to key your transmitter on and off. Second, you may
connect a cable from this jack to an external device, such
as a linear amplifier or sequencer that needs to be keyed
on whenever the transmitter is keyed on. The Plus model
also has a “key out” jack on the rear panel. This is for software that switches your transmitter on and off directly from
*Editor, CQ
e-mail: <[email protected]>
30
•
CQ
•
January 2002
The RIGblaster (bottom) and RIGblaster Plus (top)
from West Mountain Radio. See text for differences in
features between the two models.
the computer’s serial jack via the key input or FSK port on
your radio (other programs using the mic input actually put
out audio tones, giving you MCW, modulated CW, or AFSK,
audio frequency shift keying).
That new headphone jack on the front panel replaces a
“left/right/both” switch on the original (now called Standard)
model which let you send different audio tones to different
channels for full duplex operation. Few hams do this, which
is why the switch was dropped.
By the way, there are three variations on the Standard
model. One comes with an RJ-style modular mic plug on both
input and output, another comes with an 8-pin round connector, and another comes with a 4-pin round connector. Pick
the one that matches the mic jack on your rig. The RIGblaster
Plus comes with the modular plug as standard output and
your choice of cables to match your rig’s mic connector. The
only mic input jack on the Plus is an 8-pin, which is the most
common (if your mic has a different jack, you’ll need to go
with the Standard instead of the Plus).
There’s also a “NoMic” version, without a mic connector,
for people who plan to operate digital modes exclusively and
don’t need to connect a microphone.
The Plus communicates with your computer via a DB-9 serial port rather than the DB-25 serial port found on the Standard
model. This was changed in order to make room for the additional jacks on the back panel. The correct cable comes with
each model, so there’s no problem. However, be careful that
Visit Our Web Site
Rear view of the RIGblaster (bottom) and RIGblaster
Plus (top) show additional jacks added on the Plus
version. See text for details.
you hook up to the same “Com” port on your computer that
you have configured to communicate with the RIGblaster.
The computer in my shack has two serial ports, one of
which is used by the mouse. Somehow, I managed to swap
the cables. I was having problems with the mouse freezing
up whenever there was a signal from the radio coming into
the computer, and I couldn’t get the computer to switch my
transmitter on and off. When I put the RIGblaster in “Auto”
mode, it locked the rig on transmit. The audio came through
fine, so I never suspected a cable problem (which is really
dumb in hindsight, since the audio travels on its own cables
to the sound card). I had to switch the transmitter on and off
by hand, and it was driving me crazy (along with the folks at
West Mountain, who couldn’t figure out what was going
wrong). Finally, out of desperation, I swapped the mouse
cable and the RIGblaster cable. Lo and behold, both the
RIGblaster and my mouse worked perfectly! Lesson: Make
sure you hook up your cable to the correct computer port.
When VOX Isn’t Really VOX
The one front panel switch common to both the Standard and
Plus versions of the RIGblaster is marked “Auto” and “VOX.”
This doesn’t mean what it seems to at first glance and it’s
Interior view of the RIGblaster, with three of the
jumpers you’ll need to install on the left side.
Arrangement of the jumpers varies with the type of
radio you’re using.
32
•
CQ
•
January 2002
important to understand what each setting does. For most
uses, you’ll be leaving the switch in the “Auto” position. The
unit will sense whether keying commands are coming from
the mic or the computer and will shut off the inactive channel. Pressing the PTT (Push-To-Talk) switch on your mic will
always key your transmitter and turn on your microphone.
West Mountain calls this its PTT Override feature. Your rig’s
VOX (Voice-Operated Switching) circuit for voice contacts
should also work just fine with the RIGblaster in the “Auto”
position, but not in the VOX position.
Switching the RIGblaster into “VOX” will actually disable
your ability to use VOX on your microphone. This position is
used when, for whatever reason, your computer’s normal
switching commands are not being understood by your radio.
In this case, switching on the VOX on your radio and flipping
the RIGblaster switch to VOX will allow the audio coming
from the computer to switch on your transmitter via the VOX
circuit. But to protect against accidental voice keyups, the
mic is disconnected from the circuit when the RIGblaster is
in the VOX position. Again, though, the PTT override feature
takes precedence, so you may make voice contacts by manually keying your mic, even when the RIGblaster is in the
VOX setting.
Starting With Receive
The manual strongly urges you to install your digital communications software and make sure that received signals
are being properly received and decoded before you set up
the RIGblaster itself. The unit comes with a CD containing
software for various digital modes, including Baudot RTTY
(radioteletype), PSK31, Hellschreiber, VHF packet, SSTV
and a host of others. West Mountain has just released
Version 5 of its CD, with updated programs, including the hot
new meteor scatter mode, WSJT (If you already have a
RIGblaster with a previous version of the CD, you may go
to the West Mountain website, click on Links, and go to get
the latest versions and new offerings). Most of the programs
on the CD are either freeware or shareware, so once you find
a program you like, you may have to pay the authors a registration fee. If you find you’re really enjoying yourself, you’ll
want to do this anyway, because many of these programs
are constantly updated and the latest versions are available
only to registered users. The West Mountain CD also includes
a variety of other handy software, including two digital voice
programs for contesting (and a CW contest program), electronic logbook programs, a repeater controller/voice message program, and much more. Plus, it’s set up to let you
install the programs of your choice with a single mouse click—
no unzipping, etc. The CD may be as valuable as the
RIGblaster itself!
But back to the RIGblaster. Pick some software based on
the type of digital communications that interests you and the
type of operating system on your computer. Install it. Connect
a cable from your rig’s audio out jack to your sound card’s line
in jack (if you must use speaker-level audio rather than linelevel, you may need to plug into the sound card’s mic jack).
This line does not go through the RIGblaster. Turn on your
radio and tune around for some digital signals (on 20 meters,
the neighborhood within 30 kHz either side of 14.100 MHz is
generally good hunting ground), and see if words start to appear on your computer screen. A good starting point for PSK31
is 14.07015 (if your VFO is that precise). Then lock your tuning dial and just use your mouse to select signals on your computer screen. On a typical evening or weekend day, there
should be plenty to choose from. And of course, there’s much
more out there than PSK31. If you’re a VHFer, you’ve got to
Visit Our Web Site
check out WSJT and a whole new dimension of working meteor scatter (see
N6CL’s “VHF Plus” column in the
October, 2001 issue of CQ for an introduction to WSJT).
A couple of notes here: First of all,
even if gibberish appears on your
screen in a sequence matching a signal, then the connections and software
are probably working OK. If you’ve
never tried to tune in digital signals, it
can be quite a challenge, first of all identifying what type of signal you’re hearing (you’ll soon learn to differentiate
between Baudot RTTY, PSK31, Packet, etc.) and then tuning it in precisely.
If your rig is capable of fine tuning in the
10 Hz range, it will help. Much of today’s
software also helps, either with tuning
guides that show you on-screen when
the signal is properly tuned in, or with
so-called waterfall displays that let you
click your mouse on a visual depiction
of the signal and fine-tune the radio for
you. Click on the center of the signal.
Expect a lot of trial and error, though, as
you get started. And if possible, start out
operating with a friend who’s already
familiar with HF digital and who can tell
you which signals match the mode your
software decodes.
(A couple of tips: On a “waterfall” display, a PSK31 signal will be a single vertical line with fuzzy edges, while a Baudot
RTTY signal will consist of two parallel
lines. A single line with sharp edges is
usually a dead carrier. Also, while it used
to be common practice for digital modes
to use LSB on all HF bands, it now seems
that USB has become the standard, at
least on those bands where USB is the
voice standard.)
Another cool thing to try: slow-scan
TV. There’s software on the CD. Even
if you don’t have anything to send, you
can still tune to 14.233 MHz (the main
HF SSTV frequency) and monitor what
people are sending to each other.
Watching images from all over the world
slowly appear on your computer screen
is unlike anything else you’ve tried in
ham radio. Guaranteed.
Setup and Installation
Once you’re receiving OK, getting your
RIGblaster up and running is relatively
easy and straightforward. You will need
to install some computer-type jumpers
on a strip inside the unit. For this reason, the RIGblaster ships without the
cover being screwed on! You must
remove the cover and put in the jumpers
in order for it to work. Basically, the
jumpers make sure the PTT, Audio, and
Ground lines from your microphone
continue to match up with the correct
www.cq-amateur-radio.com
pins on your rig’s mic jack, and bring in
the computer audio and switching lines
to the same pins. The process is explained well in the manual and there are
diagrams for hooking up many popular
radios. You should check the wiring
against your rig’s manual to be sure all
the pin number assignments match
those in the RIGblaster manual. If your
rig isn’t listed, several more are on West
Mountain’s website support page
(<http://www.westmountainradio.com/
support.htm>), which also includes
additional helpful information.
Once you’ve got the jumpers set,
close up the cover, plug in your mic, the
RIGblaster-to-mic jack cable, the audio
output of your computer sound card and,
if desired, your computer speakers. (You
should already have run a cable from
your rig’s audio out jack to the sound card
line input. Again, this does not run
through the RIGblaster.) Then plug in the
“wall wart” power supply and you should
be on your way. An interesting note here:
There is no power on/off switch on the
RIGblaster. According to the manufacturer, the unit uses so little power in
standby mode that it would take 60 years
at average electric rates for your added
electricity costs to equal the cost of an
additional switch!
The only adjustment on the RIGblaster is audio level output control. It’s preset at the maximum setting, so you may
need to turn it down. The typical setting
is 1/4 of maximum. Before touching the
output level control, though, you should
optimize the mic gain and speech
processor settings on your rig for normal SSB operation. The RIGblaster
manual explains how to set up the audio
level control on the interface, along with
the levels on your computer, for the best
audio and about 50% RF power out
(since many HF digital modes are “keydown,” it’s generally advisable to reduce your power output to avoid damaging your final amplifier).
If you do have problems, both the
manual and the website have excellent
troubleshooting guides. Please consult
these resources before contacting the
manufacturer for help. And if you do
end up calling, please keep in mind that
in the vast majority of cases, the problem is in the way you’ve hooked up
something or set up some parameter,
not in the RIGblaster unit itself. There
simply isn’t that much stuff in there to
not work.
Using the RIGblaster
Using the RIGblaster is basically the
same whether you’re using the original
(Standard) model or the Plus version.
Once everything is hooked up and
you’ve confirmed that the software is
working properly, it’s time to make some
contacts. If you’re brand new to this
stuff, again it’s best to make a sked with
another ham who’s already experienced (and if you’re trying meteor scatter with WSJT or the high-speed CW
software, a sked is almost a necessity).
If you don’t know someone who’s already active in these modes, then start
by tuning around looking for a station
calling CQ or finishing up a QSO. Then
call that station. I suggest this instead
of calling CQ yourself because it will
give you a better chance to make sure
all your settings are correct. If you call
CQ and get no answer, it could just be
that no one is listening. If you call a station you know is there and get no answer
(and he doesn’t call someone else who
may have beaten you to the punch), that
would suggest you need to re-examine
your settings. Plus, since it seems that
every other ham you contact on any HF
digital mode is also using a RIGblaster,
you may be able to get immediate help
with any questions you still have, plus a
detailed signal report.
Note that I didn’t tell you what to do
with the RIGblaster in order to use it.
That’s because, if everything is hooked
up properly, you won’t have to do anything. All switching should be taken care
of automatically. It will be more important to learn how to tell the software to
switch your transmitter on and off (each
program has its own way, but most are
pretty simple to learn).
My recommendation? Well, I’ve only
dabbled in HF digital before this, and
I’ve never gone beyond receiving on
SSTV and meteor scatter, so perhaps
it’s best to listen to more experienced
operators. And I’ve been amazed to find
that, no matter whom I talk to, no matter where in the world they are, there’s
an excellent chance that they’re using
a RIGblaster between their radios and
their computers. That alone should
speak volumes.
List price for the RIGblaster Plus is
$139.95, including power supply, all
cables—no less than four—and software
CD. RIGblaster Standard is $109.95 complete (as above), and the NoMic version is
$59.95 (as above, minus the power supply
as none is needed). You may order from
your favorite dealer or directly from West
Mountain Radio, 18 Sheehan Avenue,
Norwalk, CT 06854 (telephone: 203-8538080; fax: 203-299-0232; e-mail: <sales@
westmountainradio.com>; and on the web:
<http://www.westmountainradio.com>.
January 2002
•
CQ
•
33