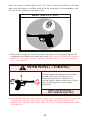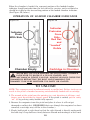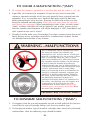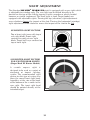
1
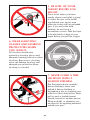
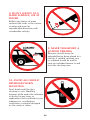
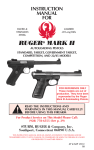
S
INSTRUCTION
MANUAL
FOR
BLUED &
STAINLESS
STEEL
CALIBER
.22 Long Rifle
RUGER® MARK IIITM
AUTOLOADING PISTOLS
STANDARD, TARGET, GOVERNMENT TARGET,
COMPETITION, HUNTER AND 22/45 MODELS
READ THE INSTRUCTIONS AND
WARNINGS IN THIS MANUAL CAREFULLY
BEFORE USING THIS FIREARM
For Product Service on This Model Please Call:
(928) 778-6555 (See p. 27)
THIS INSTRUCTION MANUAL SHOULD ALWAYS ACCOMPANY THIS FIREARM AND BE
TRANSFERRED WITH IT UPON CHANGE OF OWNERSHIP, OR WHEN THE FIREARM IS LOANED
OR PRESENTED TO ANOTHER PERSON
AP & KAP 4/07 C
R4
State-By-State Warnings
Certain states require by law that their own specified warning
notices in larger-than-normal type be conspicuously included by
the manufacturer, distributor, or retail dealer with firearms sold
in that state. Sturm, Ruger sells its products in compliance with
applicable laws and regulations. Because our products may be
sold in these states, we include the following:
California:
WARNING
ADVERTENCIA
“A los niños los atraen las armas
de fuego y las pueden hacer
funcionar. Ellos pueden causarses
lesions graves y la muerte. Evite
que los niños tengan accesso a las
armas de fuego guardándolas
siempre con llave y descargadas
cuando no las esté utilizando. Si
usted tiene un arma de fuego
cargada en un lugar en que un
niño tiene acceso a ella y la usa
indebidamente, le pueden dar una
multa o enviarlo a la carcel.”
“Children are attracted to and
can operate firearms that can
cause severe injuries or death.
Prevent child access by always
keeping guns locked away and
unloaded when not in use. If you
keep a loaded firearm where a
child obtains and improperly uses
it, you may be fined or sent to
prison.”
Connecticut:
“UNLAWFUL STORAGE OF A LOADED FIREARM MAY
RESULT IN IMPRISONMENT OR FINE.”
Florida:
“IT IS UNLAWFUL, AND PUNISHABLE BY
IMPRISONMENT AND FINE, FOR ANY ADULT TO
STORE OR LEAVE A FIREARM IN ANY PLACE WITHIN
THE REACH OR EASY ACCESS OF A MINOR UNDER 18
YEARS OF AGE OR TO KNOWINGLY SELL OR
OTHERWISE TRANSFER OWNERSHIP OR POSSESSION
OF A FIREARM TO A MINOR OR A PERSON OF
UNSOUND MIND.”
3
Maine:
“ENDANGERING THE WELFARE OF A CHILD IS A
CRIME. IF YOU LEAVE A FIREARM AND AMMUNITION
WITHIN EASY ACCESS OF A CHILD, YOU MAY BE
SUBJECT TO FINE, IMPRISONMENT OR BOTH. KEEP
FIREARMS AND AMMUNITION SEPARATE. KEEP
FIREARMS AND AMMUNITION LOCKED UP. USE
TRIGGER LOCKS.”
Maryland:
“WARNING: Children can operate firearms which may cause
death or serious injury. It is a crime to store or leave a loaded
firearm in any location where an individual knew or should
have known that an unsupervised minor would gain access to
the firearm. Store your firearm responsibly!”
Massachusetts:
“WARNING FROM THE MASSACHUSETTS ATTORNEY
GENERAL: This handgun is not equipped with a device that
fully blocks use by unauthorized users. More than 200,000
firearms like this one are stolen from their owners every year
in the United States. In addition, there are more than a
thousand suicides each year by younger children and
teenagers who get access to firearms. Hundreds more die from
accidental discharge. It is likely that many more children
sustain serious wounds, or inflict such wounds accidentally on
others. In order to limit the chance of such misuse, it is
imperative that you keep this weapon locked in a secure place
and take other steps necessary to limit the possibility of theft
or accident. Failure to take reasonable preventive steps may
result in innocent lives being lost, and in some circumstances
may result in your liability for these deaths.”
“IT IS UNLAWFUL TO STORE OR KEEP A FIREARM,
RIFLE, SHOTGUN OR MACHINE GUN IN ANY PLACE
UNLESS THAT WEAPON IS EQUIPPED WITH A
TAMPER-RESISTANT SAFETY DEVICE OR IS STORED
OR KEPT IN A SECURELY LOCKED CONTAINER.”
4
New Jersey:
“IT IS A CRIMINAL OFFENSE TO LEAVE A LOADED
FIREARM WITHIN EASY ACCESS OF A MINOR.”
New York City:
“THE USE OF A LOCKING DEVICE OR SAFETY LOCK IS
ONLY ONE ASPECT OF RESPONSIBLE FIREARMS
STORAGE. FOR INCREASED SAFETY, FIREARMS
SHOULD BE STORED UNLOADED AND LOCKED IN A
LOCATION THAT IS BOTH SEPARATE FROM THEIR
AMMUNITION AND INACCESSIBLE TO CHILDREN AND
OTHER UNAUTHORIZED PERSONS.”
North Carolina:
“IT IS UNLAWFUL TO STORE OR LEAVE A FIREARM
THAT CAN BE DISCHARGED IN A MANNER THAT A
REASONABLE PERSON SHOULD KNOW IS ACCESSIBLE
TO A MINOR.”
Texas:
“IT IS UNLAWFUL TO STORE, TRANSPORT, OR
ABANDON AN UNSECURED FIREARM IN A PLACE
WHERE CHILDREN ARE LIKELY TO BE AND CAN
OBTAIN ACCESS TO THE FIREARM.”
Wisconsin:
“IF YOU LEAVE A LOADED FIREARM WITHIN THE
REACH OR EASY ACCESS OF A CHILD YOU MAY BE
FINED OR IMPRISONED OR BOTH IF THE CHILD
IMPROPERLY DISCHARGES, POSSESSES, OR EXHIBITS
THE FIREARM.”
* * * * * * * * * * * * * * * * * * * * * *
Please check with your licensed retailer or state police for
additional warnings which may be required by local law or
regulation. Such regulations change constantly, and local
authorities are in the best position to advise you on such legal
matters.
5
WHY ARE WE INCLUDING A FIRED CARTRIDGE CASE
WITH EVERY RUGER PISTOL AND REVOLVER?
Certain states and jurisdictions now require that all newly manufactured pistols
and revolvers must be accompanied by a cartridge case, which has been test fired
from that gun at the factory. The case must be placed in a sealed container
bearing certain information concerning this test cartridge.
At the time of retail sale in those jurisdictions, firearms dealers must forward
such test cartridge to a designated destination such as their State Police
Laboratory. As independent Ruger Distributors have nationwide markets without
territorial restrictions, we have decided to include a fired cartridge case with all
new Ruger pistols and revolvers, to minimize the possibility of inadvertent noncompliance with these laws.
Retail customers located in other states, where laws or regulations do not require
the dealer to so act, may be assured that the fired cartridge case they receive with
the firearm at the time of retail purchase is proof that your new Ruger firearm
has undergone our normal test firing procedures during manufacture.
LOCKING DEVICE
INSTALLATION INSTRUCTIONS
WARNING – USE OF LOCKING DEVICES
• Always keep your firearm pointed in a safe direction,
including when you are installing or removing your
locking device.
• Always verify that your firearm is completely unloaded
before installing your locking device.
• Do not install locking devices in the trigger guard;
always keep your fingers and locking device outside the
trigger guard during device installation and removal.
• Store firearms, ammunition and keys separately and
securely, away from children and careless adults; do not
store your firearm with the keys in the locking device.
• Do not attempt to work the action of your firearm with
the locking device in place; this may damage your
firearm.
• While locking devices are an important aid to security
measures, they are not a substitute for safe firearm
handling and proper storage. Remember that any
mechanical device can be bypassed with enough time,
knowledge, determination and equipment.
LOCKING DEVICES MUST BE USED
SAFELY AND RESPONSIBLY
6
Use the Correct Lock: While the basic locking device is substantially
similar for all Ruger® firearms, due to the different shapes of the many
Ruger® firearms, some firearms utilize different locking devices. The lock
with a 1 1/2” shackle is for use with RUGER® MARK IIITM &
22/45 MARK III Model Pistols. It is very important to use the correct
locking device!
To Install the Factory-Supplied Locking Device:
1. Keep the muzzle pointed in a safe direction and your fingers outside the
trigger guard at all times!
2. Be sure the firearm and its magazine are completely unloaded and
contain no cartridges or cartridge cases! Remove the magazine from your
pistol.
3. Open the action completely. Use the bolt stop to keep the action open
during installation of the locking device.
4. Apply the lock by placing the shackle of the lock into the slot in the bolt
as shown below.
5. Close the lock by pressing the shackle into the body of the lock (the part
that receives the key) as tightly together as possible. The lock has
bumpers that will not harm the metal finish of your firearm; be careful
not to dent the frame or grip panels of the pistol.
6. Once the lock is securely closed, remove the key. Pull firmly on the lock
to test the connection and be sure it is locked. Do not leave or store your
firearm with the key in the lock! Store your locked unloaded firearm and
the key in secure, separate locations, away from ammunition, children, or
unauthorized adults.
Correct Installation of Lock For
Ruger® Mark III & 22/45 Mark III Pistols Only
7
FIREARMS SAFETY-YOUR RESPONSIBILITY
SAFETY MUST BE THE FIRST AND CONSTANT
CONSIDERATION OF EVERY PERSON WHO HANDLES
FIREARMS AND AMMUNITION.
This Instruction Manual is designed to assist you in learning how to use and care
for your RUGER® MARK IIITM pistol properly. Please contact us if you have
any questions about it.
Only when you are certain you fully understand the Manual and can properly carry
out its instructions should you practice loading, unloading, etc. with live
ammunition. If you have any doubts about your ability to handle or use a
particular type of gun safely, you should seek supervised instruction. Such
personalized instruction is often available from gun dealers, gun clubs or police
departments. If none of these sources can help you, write to the National Rifle
Association, 11250 Waples Mill Road, Fairfax, VA 22030-7400. They will assist you.
The person possessing a gun has a full-time job. You cannot guess; you cannot
forget. You must know how to use your firearm safely. Do not use any firearm
without having a complete understanding of its particular characteristics and safe
use. Remember: There is no such thing as a foolproof gun.
TABLE OF CONTENTS
Page
State-By-State Warnings . . . . . . . . . . . . . . . . . . . . . . . . . . . . . . . . . . . . . . . . . . .3
Locking Device Installation Instructions . . . . . . . . . . . . . . . . . . . . . . . . . . . . . .6
General Information and Mechanical Characteristics . . . . . . . . . . . . . . . . . . . . 9
Operation of Manual Safety (Illustrations) . . . . . . . . . . . . . . . . . . . . . . . . . . . 12
Operation of Internal Lock . . . . . . . . . . . . . . . . . . . . . . . . . . . . . . . . . . . . . . . . .13
Ammunition . . . . . . . . . . . . . . . . . . . . . . . . . . . . . . . . . . . . . . . . . . . . . . . . . . . .14
To Load and Fire . . . . . . . . . . . . . . . . . . . . . . . . . . . . . . . . . . . . . . . . . . . . . . . . 15
Operation of Magazine Disconnect . . . . . . . . . . . . . . . . . . . . . . . . . . . . . . . . . .17
Operation of Loaded Chamber Indicator . . . . . . . . . . . . . . . . . . . . . . . . . . . . . .17
To Unload . . . . . . . . . . . . . . . . . . . . . . . . . . . . . . . . . . . . . . . . . . . . . . . . . . . . . . 18
To Extract and Eject a Chambered Cartridge . . . . . . . . . . . . . . . . . . . . . . . . . .20
To Clear a Malfunction (“Jam”) . . . . . . . . . . . . . . . . . . . . . . . . . . . . . . . . . . . . .21
To Minimize Malfunctions (“Jams”) . . . . . . . . . . . . . . . . . . . . . . . . . . . . . . . . .21
Basic Disassembly and Reassembly . . . . . . . . . . . . . . . . . . . . . . . . . . . . . .22 - 26
Magazine Disassembly . . . . . . . . . . . . . . . . . . . . . . . . . . . . . . . . . . . . . . . . . . . . 27
Care and Cleaning . . . . . . . . . . . . . . . . . . . . . . . . . . . . . . . . . . . . . . . . . . . . . . . 28
Storage . . . . . . . . . . . . . . . . . . . . . . . . . . . . . . . . . . . . . . . . . . . . . . . . . . . . .29 - 30
Sight Adjustment . . . . . . . . . . . . . . . . . . . . . . . . . . . . . . . . . . . . . . . . . . . . . . .31
Changing LitePipe on HiViz Sight (Hunter Models Only) . . . . . . . . . . . . . . . .32
Service and Parts Policy . . . . . . . . . . . . . . . . . . . . . . . . . . . . . . . . . . . . . . . . . . 33
Shipping Firearms For Repair . . . . . . . . . . . . . . . . . . . . . . . . . . . . . . . . . . . . . .33
Ordering Parts . . . . . . . . . . . . . . . . . . . . . . . . . . . . . . . . . . . . . . . . . . . . . . . . . .34
Parts List . . . . . . . . . . . . . . . . . . . . . . . . . . . . . . . . . . . . . . . . . . . . . . . . . . .35 - 39
Parts Drawings & Photos . . . . . . . . . . . . . . . . . . . . . . . . . . . . . . . . . . . . . 40 - 42
The Basic Rules of Safe Firearms Handling . . . . . . . . . . . . . . . . . . . . . . . 43 - 46
Warranty Information . . . . . . . . . . . . . . . . . . . . . . . . . . . . . . . . . . . . . . . . . . . . 48
“RUGER“ is a registered U.S. trademark.
“22/45” and “Mark III” are Sturm, Ruger Trademarks.
8
WARNINGS OF GREAT IMPORTANCE ARE
FOUND ON THE FOLLOWING PAGES:
Locking Devices
Alterations
Manual Safety
Ammunition
Lead Exposure
Firing
Handling
7
9
12
14
14
16
17
Loaded Chamber Indicator
Malfunctions
Disassembly
Lubrication
Storage
Shipping
Parts Purchasers
18
21
23
29
30
33
34
OTHER CAUTIONS AND WARNINGS APPEAR
THROUGHOUT THE MANUAL.
FIREARMS ARE DANGEROUS WEAPONS–
READ THE INSTRUCTIONS AND WARNINGS IN THIS
MANUAL THOROUGHLY AND CAREFULLY BEFORE USING.
WARNING–ALTERATIONS
This product was designed to
function properly in its original
condition. Alterations can make it
unsafe. Do not alter any part or add
or substitute parts or accessories
not made by Sturm, Ruger & Co. Inc.
DO NOT ALTER ANY GUN
GENERAL INFORMATION
AND MECHANICAL CHARACTERISTICS
RUGER® MARK III pistols are differentiated from Ruger Mark I and Mark
II pistols by certain external differences in markings and exterior components
(magazine latch, bolt, ejection port, sights, and grip configuration) and by the
presence of certain new features for which patents are pending such as internal
locks, loaded chamber indicators, and magazine disconnects.
The RUGER® MARK III Standard model is a .22 caliber rimfire, 10-shot,
magazine fed, autoloading (‘blowback’) operated pistol.
The RUGER® GOVERNMENT TARGET MODEL MARK III has a
longer, heavyweight barrel and is laser targeted at the factory, just like pistols
delivered to the U.S. Government for target shooting and training.
9
NOMENCLATURE
(All Mark III’s other than 22/45 Mark III Models)
Barrel-Receiver
Assembly
Rear Sight
Bolt
Bolt Stop Pin
Front Sight
Barrel
Receiver
Muzzle
Extractor
Bolt Ears
Grip Frame
Bolt Stop
Safety
Loaded Chamber
Indicator
Mainspring
Housing
(shown”ON”)
Mainspring
Housing
Latch
Internal
Lock
Keyway
Trigger
Guard
Trigger
Magazine
Release
Button
‘Grooved Foot’
of Magazine
(22/45 Mark III’s (P4GC shown below))
Barrel-Receiver
Assembly
Rear Sight
Bolt Stop Pin
Bolt
Receiver
Front Sight
Barrel
Muzzle
Extractor
Grip Frame
Bolt Ears
Loaded Chamber
Indicator
Mainspring
Housing
Bolt Stop
Safety
(shown”ON”)
Mainspring
Housing
Latch
Trigger
Guard
Internal
Lock
Keyway
Trigger
Magazine
Release
Button
Magazine
Bottom
10
The RUGER® COMPETITION MODEL MARK III has a slab-sided,
heavyweight barrel with target grips.
The RUGER® 22/45 MARK III has a grip frame assembly made of molded
synthetic polymer, with a grip shape and angle generally similar to “1911”-style .45
caliber pistols.
RUGER® MARK III HUNTER models feature a 6 7/8” target-crowned,
fluted bull barrel, a micro-adjustable V-notch rear sight, and a HiViz® lightgathering front sight.
All RUGER® MARK III pistols have the same basic operating mechanism and
include the following features with which the gun user should be thoroughly
familiar:
Bolt Stop: When the last shot has been fired and the magazine is empty, the bolt
stop automatically holds the bolt open. When there is an empty magazine in the
pistol and the bolt is retracted manually, the bolt stop will automatically hold the
bolt open. If a loaded magazine is inserted in the pistol when the bolt is closed and
the bolt is then retracted fully, the bolt stop will not automatically hold open the
bolt. The user can actuate the bolt stop mechanism to hold the bolt open at any
time by retracting the bolt and pushing up the bolt stop.
The bolt stop can be released when an empty magazine is in the pistol by drawing
back slightly on the bolt and depressing the bolt stop thumbpiece. When the bolt is
released, it will move forward under pressure from the recoil spring.
The bolt stop is spring-loaded or detented in position. Therefore, when there is a
loaded magazine in place and the pistol is jarred, the bolt may fly forward and
chamber a cartridge. For this reason and as an essential safety practice, the safety
of the pistol should always be in the “on” (S) position except when the user is
firing the gun at a selected target.
Magazines: The 10-shot magazine (Part M10MKIII) for the RUGER® MARK
III pistol is different from all other Ruger rimfire pistols. In addition to the
familiar removable plastic bottom decorated with a silver “eagle,” the M10MKIII
magazine has a trigger interlock window and protrusion. (See “Magazine
Nomenclature,” p. 27.) The M10MKIII is the only magazine that should be used in
RUGER® MARK III pistols because it is designed to correctly function the
bolt stop and magazine disconnect.
The RUGER® 22/45 MARK III pistol uses a different 10-shot magazine (Part
AP10MKIII) which is identified by its removable elongated plastic bottom. The
AP10MKIII magazine is distinguishable from earlier 22/45 magazines by the
presence of the trigger interlock window and protrusion. (See “Magazine
Nomenclature,” p. 27.) Note that the AP10MKIII is not interchangeable with the
M10MKIII magazine described above. (See “Magazine Nomenclature,” p. 27.) The
AP10MKIII is the only magazine that should be used in the RUGER® 22/45
MARK III pistols because it is designed to correctly function the bolt stop and
magazine disconnect.
11
Safety: The safety locks the sear when the safety is “on.” Because the safety
cannot be moved to its “on” (S) position unless the hammer is cocked, the safety
therefore serves as a cocking indicator. The bolt can be manually retracted and
released when the safety is “on” (S). This feature allows the pistol to be loaded or
unloaded when the safety is “on” (S). As shown below and elsewhere in this
Manual, the safety should be “on” (the “S” fully showing) at all times except
when the gun user is deliberately positioned to fire at a selected target.
OPERATION OF MANUAL SAFETY
Figure 1. Safety in the “off” or “fire” (F)
position. Safety is all the way down.
Figure 2. Safety in the “on” or “safe” (S)
position. Safety is all the way up.
The Safety is not “on” unless it “clicks” fully up into the “S” position.
WARNING – MANUAL SAFETY
Putting the safety between “S” and “F” can
result in the pistol firing when the trigger
is pulled. Always move the safety fully to its
intended position and check it. The safety
is not “on” unless it is completely “on.”
Never depend on a safety mechanism or
any other mechanical device to justify
careless handling or permitting the pistol
to point in an unsafe direction. The only
“safe” pistol is one in which the bolt is
open, the chamber is empty and there is no
magazine in the gun.
NEVER PUT SAFETY 1/2 ON
12
OPERATION OF INTERNAL LOCK
Never rely upon any safety mechanism or mechanical device to justify unsafe or
careless handling of a firearm. When securing your pistol or to prevent
unauthorized access, you should completely unload the pistol and store it in a
gun safe or use the key-operated external locking device supplied with your
pistol. (See Page 6.) However, for added security, and to comply with certain
state and local laws, your RUGER® MARK III pistol is also equipped with
an internal lock. When actuated, this internal lock will secure the pistol’s
manual safety in the "on" or "safe" position.
Before activating the internal lock on your pistol, first visually inspect the
chamber and magazine to verify that they are empty and do not contain any
cartridges.
To activate the internal lock, place the manual safety in the "on" or "safe"
position. (Note that the pistol must be cocked to engage the safety.) Next, place
the internal lock key (supplied with your pistol) into the internal lock keyway.
(See “Nomenclature,” p. 10.) Rotate the key fully clockwise (about 1 3/4 of a
rotation from the fully unlocked position) until it stops. (See Figure 3.) Remove
the key and verify that the internal lock engaged by attempting to move the
safety to the "off" or "fire" position. If the internal lock is engaged, you will not
be able to move the safety to the "off" or "fire" position.
To deactivate the internal lock, place the internal lock key into the internal lock
keyway (see “Nomenclature,” p. 10) and rotate the key counter-clockwise (about
1 3/4 turns from the fully locked position) until it stops. (See Figure 3.)
Be sure to store the internal lock key in a secure location, away from children
and careless adults. Do not store your firearm with the key in the internal lock
keyway. Never lock a loaded gun – always unload the gun before locking.
OPERATION OF INTERNAL LOCK
Place Manual
Safety “On”
Before Locking
Figure 3
13
AMMUNITION
The RUGER® MARK III pistol is chambered only for the .22 caliber Long
Rifle cartridge, standard velocity or high velocity, manufactured to U.S. Industry
Standards. Do not attempt to load .22 Long, .22 Short, or any other type .22
caliber cartridge into the magazine or in the chamber of the pistol. Use of .22
shot shells is not recommended. See “Warning - Malfunctions,” p. 21.
WARNING – AMMUNITION
Death, serious injury, and damage can result
from the use of wrong ammunition, bore
obstructions, powder overloads, or incorrect
cartridge components.
.22 cases are very thin and sometimes split
when fired. Always wear shooting glasses and
hearing protection.
IMPROPER AMMUNITION
DESTROYS GUNS
AMMUNITION (CARTRIDGES) NOTICE
WE SPECIFICALLY DISCLAIM RESPONSIBILITY FOR ANY DAMAGE
OR INJURY WHATSOEVER OCCURRING IN CONNECTION WITH, OR
AS THE RESULT OF, THE USE IN RUGER PISTOLS OF FAULTY, OR
NONSTANDARD, OR “REMANUFACTURED” OR HANDLOADED
(RELOADED) AMMUNITION, OR OF CARTRIDGES OTHER THAN
THOSE FOR WHICH THE FIREARM WAS ORIGINALLY CHAMBERED.
WARNING – LEAD EXPOSURE
Discharging firearms in poorly ventilated
areas, cleaning firearms, or handling
ammunition may result in exposure to
lead and other substances known to the
state of California to cause birth defects,
reproductive harm, and other serious
physical injury. Have adequate ventilation
at all times. Wash hands thoroughly after
exposure.
SHOOTING OR CLEANING GUNS
MAY EXPOSE YOU TO LEAD
14
TO LOAD AND FIRE
Practice this important aspect of gun handing (with an unloaded pistol) until you
can perform each of the steps — described below — with skill and confidence.
But before you do anything with the pistol, first read completely through this
manual.
1. Keep the muzzle pointed in a safe direction. (See Rule 2, p. 42.)
2. Push the magazine release button and pull the magazine down out of the grip
frame by its foot.
3. Grasp the grooved ears of the bolt and pull the bolt to the rear as far as it will
go. (See Figure 4, below.) This cocks the hammer and must be done before the
safety can be put on.
Figure 4
4. Engage the safety by moving it fully upward so the “S” shows completely. (See
Figure 2, p. 12.)
5. Put ten (10) or fewer .22 caliber Long Rifle cartridges into the magazine. In
loading the magazine make sure that all of the cartridges lie parallel and
evenly in the magazine. The follower button on the left side of the magazine is
used to lower the follower so the cartridges can be readily inserted.
CAUTION: When using the follower button, have it under control.
When loading or handling the magazine, do not pull the button down
and then release it suddenly. The rim of the cartridge hitting the
magazine lips may set off a sensitive primer and cause the cartridge
case to discharge, burst violently, and result in injury.
6. Insert magazine into pistol, taking care that the magazine is fully inserted and
locked in place. Slamming the magazine into the grip frame is not necessary.
7. Don’t touch the trigger. Pull the bolt to the rear as far as it will go. (See Figure
4, above.) Release the bolt so that it will fly forward. (On 22/45 models, the
bolt stop must also be depressed to permit the bolt to fly forward.) This will
place a cartridge into the firing chamber. If the pistol is not to be fired
immediately, the safety button should remain “on” — with the “S” showing.
(See Figure 2, p. 12.)
15
Once the safety is pushed down so the “F” shows, the pistol will fire a cartridge
each time the trigger is pulled, until all of the cartridges in the magazine, and
the one in the chamber, have been fired.
KEEP SAFETY ON
8. The pistol is ready for instant use once the safety is disengaged. Firing will
automatically reload and recock the pistol. Note that every time the trigger is
pulled, if a cartridge is in the chamber and the safety is “off,” the pistol will
fire — be careful!
WARNING – FIRING
The bolt automatically opens and shuts
quickly while firing. Keep face and
hands away from rear. Hot brass is
ejected quickly and can burn you. Always
wear shooting glasses and hearing
protectors.
BOLT OPENS FAST HOT BRASS EJECTED
9. Immediately following the firing of a shot, and if a subsequent shot is not to be
fired at once, put the safety in its “safe” position while the pistol is still
pointing in a safe direction down range. Never put a loaded pistol down with
the safety off!
16
WARNING – HANDLING
If dropped or struck with the safety
“off,” the pistol may fire. Keep
chamber empty unless actually
firing! Keep safety “on” unless
actually firing!
ANY GUN MAY FIRE IF DROPPED
10. When the last cartridge loaded into the pistol has been fired, the magazine
follower presses the slide stop upward to engage the slide automatically
holding the action open. If the slide is shut, the shooter should always
assume that there is a cartridge in the chamber!
Don’t rely on your memory to know if a gun or magazine is loaded. Visually
inspect the magazine and the chamber.
OPERATION OF MAGAZINE DISCONNECT
Your RUGER® MARK III pistol is equipped with a magazine disconnect. This
device prevents the trigger from being pulled if the magazine is removed from the
pistol. You will not be able to use your pistol as a single loader or to fire the pistol
with the magazine removed.
Remember that a round may still be in the chamber and that the pistol may still be
loaded even if the magazine is removed. As always, you should not rely upon the
magazine disconnect or any other mechanical device or safety to justify careless or
unsafe handling of any firearm.
Don’t rely on your memory to know if a gun or magazine is loaded. Visually inspect
the magazine and the chamber.
OPERATION OF
LOADED CHAMBER INDICATOR
You should always treat every gun as though it is loaded and always keep the
muzzle pointed in a safe direction. Never rely upon any safety or mechanical device
to justify unsafe or careless gun handling. In order to assist you in determining
the presence of a cartridge in the chamber of your RUGER® MARK III pistol,
it is equipped with a loaded chamber indicator, the first such device on a .22 caliber
pistol. The indicator appears on the left side of the receiver. (See “Nomenclature,”
p. 10.)
When the chamber is empty, the loaded chamber indicator should be flush with the
left side of the receiver. (See Figure 5A, p. 18.)
17
When the chamber is loaded, the rearmost portion of the loaded chamber
indicator should protrude from the left side of the receiver, and a red dot also
should be visible on the forward top portion of the loaded chamber indicator.
(See Figure 5B, below.)
OPERATION OF LOADED CHAMBER INDICATOR
Figure 5A
Figure 5B
Indicator
Protrudes
From
Side Red Dot
and
“Loaded”
Visible
Indicator
Flush
With Side
Cartridge in Chamber
Chamber Empty
NEVER RELY ON YOUR MEMORY OR ANY LOADED CHAMBER
INDICATOR TO KNOW IF A GUN IS LOADED. ANY
MECHANICAL DEVICE CAN FAIL. ALWAYS VISUALLY CHECK THE
CHAMBER BY RETRACTING THE BOLT AND EXAMINING THE
CHAMBER TO BE SURE WHETHER IT IS EMPTY OR LOADED.
TO UNLOAD
NOTE: This sequence must be followed exactly as spelled out. Failure to do so can
result in the pistol’s chamber becoming unintentionally loaded with a cartridge.
1. The muzzle of the pistol must be pointing in a safe direction at all times, and
fingers must be outside the trigger guard. If the pistol is cocked, put the safety
“on” (S) by pushing safety button fully upward.
2. Remove the magazine from the pistol and place it where it will not get
damaged or collect dirt. (REMEMBER that even though the magazine has been
removed, a cartridge may still be in the chamber.)
3. Firmly hold pistol in right hand so that the right thumb is directly underneath
the bolt stop. Grasp bolt ears firmly between thumb and forefinger of left hand
18
and briskly retract the bolt to its rearmost position. As the bolt nears the end
of its retraction, the chambered cartridge should be extracted and ejected.
When the bolt is fully retracted, push upward on bolt stop with thumb, then
allow bolt to move forward slowly until it comes to rest against the bolt stop.
Always visually double check the chamber and the interior area of the receiver
and the magazine-well to be certain there are no cartridges present. Gently
shake the pistol to dislodge any cartridge which may have been ejected into
the magazine-well when the bolt was retracted.
CORRECT UNLOADING SEQUENCE
1
Safety “ON”
43
3
2
2
1
19
4. If desired, the bolt can be left in the open position, being held there by the bolt
stop. If it is desired to close the bolt, again look to be certain the chamber is
empty. Assuming that the magazine is not in the pistol and that the safety is
“on” (S), retract the bolt to its rearmost position, release it, and the bolt will
snap forward (on Mark III models). On 22/45 models the bolt stop button must
be depressed. Keep your fingers out of the receiver!
5. With the muzzle pointed in a safe direction, push the safety to the “off” (F)
position and pull the trigger to decock the pistol. The pistol can be dry fired as
long as the firing pin stop is in place (see NOTE in step 5 on page 25).
6. If the magazine contains cartridges, they can be removed by pressing down
slightly on the magazine button (to ease the spring tension) with the thumb,
and then sliding the cartridges forward and out of the magazine, one at a time
until emptied.
7. Push empty (unloaded) magazine into grip frame until the latch locks it in
place.
TO EXTRACT AND
EJECT A CHAMBERED CARTRIDGE
When the pistol is fired, the same gas pressure that drives the bullet forward also
acts through the cartridge case to push the bolt to the rear. That action causes
extraction and ejection of the fired cartridge case. But, when the bolt is operated
by hand, there can be a failure to extract the cartridge from the chamber, or a
failure to eject the cartridge clear of the pistol. These failures usually are the
result of the bolt not being pulled rearward vigorously, coupled with an
accumulation of bullet lubricant in the chamber. From the foregoing it is clear
that the gun user must:
1. Always visually check the chamber after opening the bolt to eject a chambered
cartridge. If the bolt is not vigorously retracted when being operated by hand,
the extracted cartridge can be ‘ejected’ into the grip frame of the magazinewell.
2. Thoroughly clean the chamber and extractor as often as necessary to prevent
the accumulation of grease and dirt.
3. If an empty magazine is in the pistol when the bolt is being hand retracted to
extract a cartridge, the cartridge may drop on top of the magazine. Then when
the bolt goes forward, the cartridge will be chambered again! Always remove
the magazine before clearing the chamber, and visually ensure that no
cartridges remain in the gun.
20
TO CLEAR A MALFUNCTION (“JAM”)
1. Be certain the muzzle is pointed in a safe direction and the safety is “on” (S).
2. If possible, first remove the magazine. It may be necessary to manually
remove a jammed cartridge which has only partially been stripped from the
magazine. If so, use extreme care. Lock the bolt open with the bolt stop
before attempting to clear the jam. Drawing the bolt fully to the rear may
bring the jammed cartridge along. Keep your face away from the ejection
port during this operation. When attempting to clear a jam, use only wood
“tools” so that a cartridge will not be ignited if you strike a primer and so
that the chamber and magazine will not be damaged. A 3/16" wood dowel rod
with a point on one end is useful.
3. Visually check to make sure all cartridges have been removed from the pistol.
Safely dispose of any cartridges involved in a malfunction incident. Do not
use damaged ammunition in any firearm.
WARNING – MALFUNCTIONS
The .22 Long Rifle rimfire cartridge fires when
the firing pin impacts the relatively soft
cartridge case rim, and also can be “discharged”
before it is chambered if its rim receives a sharp
blow. If a cartridge hangs up, jams, or binds
when being chambered or when being fed from
the magazine into the chamber, do not attempt
to force it into the chamber by pushing or
striking the bolt. Any jam or feeding problem is
a signal to immediately stop using the gun until
it can be determined what is wrong. Most
failures of a cartridge to feed or to chamber are
caused by a damaged magazine, improper gun
handling, or defective ammunition. Whatever
the cause, rimfire cartridge jams can result in
the potentially dangerous situation of a
cartridge discharging before it is chambered. If
this occurs, the cartridge case will rupture and
its fragments will fly out of the gun with
sufficient force to cause injury. Always wear
shooting glasses and hearing protectors! Keep
face away from chamber!
CRUSHING RIM CAN BURST AMMO
TO MINIMIZE MALFUNCTIONS (“JAMS”)
1. If it appears that the gun and magazine are not at fault and that the jam was
caused by the type of cartridge being used, then try another type.
2. If changing to another type or brand of cartridges does not at once eliminate
malfunctions, then the following steps should be taken:
21
a. Make certain the gun and the magazine are unloaded and that the
safety is “on” (S). Remember, the magazine should be removed first,
then check the chamber and be certain it and the magazine-well are
clear of cartridges.
b. Thoroughly clean the magazine and bolt mechanism, paying
particular attention to removing accumulated grease. Use a bristle brush
and solvent to remove grease and fouling from the bolt face, the
extractor, the chamber, and the feed ramp. (See the “Care and Cleaning”
section of this manual for detailed cleaning instructions.)
c. Check to see that the magazine spring tension is adequate.
d. Check the magazine lips to be certain they are free of nicks and burrs
and are not deformed.
e. Remove excess oil and solvent from all cleaned components, load the
magazine, and try the firearm again. As always, proceed slowly. Be
certain bystanders are not close and that you are wearing eye and
hearing protection and that your face is a safe distance from the pistol so
that any discharge resulting from a jammed cartridge will not injure
anyone.
If the above procedures do not result in a smooth and reliably functioning firearm,
don’t use the gun. The pistol can be returned directly to our Prescott Product
Service Department for repair. See the Service and Parts Policy section of this
manual for packing and shipping information.
Another precaution: when using any firearm chambered for rimfire cartridges,
form the habit of examining fired cartridge cases. If they have bulged heads or
frequently show splits on any part of the case, the rifle or pistol should be
returned to the factory for inspection.
DISASSEMBLY
Although RUGER® MARK III pistols are designed to be disassembled and
reassembled without the use of tools, some “tools” may be useful in the process,
particularly when the pistols are new. Tools that may be useful include: (1) a soft
rubber/plastic mallet; (2) a paper clip; and (3) a wooden dowel (1/8” - 1/4”
diameter).
1.
Before beginning disassembly, be certain that the muzzle is pointed in a safe
direction and that the safety is "on" (S) if the pistol is cocked. Remove the
magazine and carefully check it to verify that it is completely empty. Draw
the bolt fully rearward and visually inspect the chamber to be certain that
there is no cartridge in it and then release the bolt. Insert the empty
magazine into the magazine well until it "clicks" and is fully in place.
Disengage the internal lock, if necessary. (See p. 13.) Place the safety in the
"off" (F) position. Point the pistol in a safe direction and pull the trigger to
be sure the hammer has fallen. The hammer must be uncocked before the
pistol can be disassembled. Remove the empty magazine.
22
WARNING – DISASSEMBLY
2
Always unload a firearm
before cleaning, lubrication,
disassembly or assembly.
3
1
UNLOAD BEFORE
CLEANING
2.
Insert a blunt, ‘pointed’ instrument in the oval recess of the mainspring
housing (at the back of the grip) and swing the housing latch open like the
blade of a pocket knife. (Some users find that a paper clip, looped over the
latch, is an ideal ‘instrument’ for this phase of disassembly.)
3.
Swing the entire housing outward on its pivot and pull downward, removing
the mainspring housing and bolt stop pin. With new pistols it may be
necessary to lightly tap (with a plastic hammer and wooden dowel) on the
top portion of the bolt stop pin—which protrudes above the receiver—while
pulling downward on the mainspring housing. Be careful not to damage the
rear sight.
4.
Fully insert the empty magazine into the frame. Point the muzzle upward in
a safe direction and pull the trigger rearward. The bolt will drop out of the
receiver or it can readily be removed. Remove the magazine.
5.
With the mainspring housing, bolt stop pin, (as an assembly), bolt and
magazine removed, a forward blow (with a plastic hammer) on the rear of
the receiver will disengage the barrel-receiver assembly from the grip frame.
No attempt should be made to remove rivets or staked pins. Further
disassembly should be undertaken only by the factory.
REASSEMBLY
(The procedure is the same for all RUGER® MARK III pistols.)
1. Be certain the pistol is free of
cartridges! The safety must be
in the "off" (F) position for
reassembly.
2. Keep your finger off the
trigger. Place the hammer in
the horizontal (cocked) position.
(The hammer is visible by
looking down on the grip frame
and is the rectangular object
inside the grip frame and near
the rear. See Figure 6.)
Hammer
F
Figure 6
23
If you cannot place the hammer in the horizontal
position, it is most likely because the hammer strut is
trapped behind the crosspin (see Figure 7 – not
applicable to 22/45 models). If this occurs, lift the
hammer to free the hammer strut from behind the
crosspin and then move the hammer into the
horizontal position.
HAMMER STRUT
CROSSPIN
If the hammer has been rotated too far forward, it also
may be difficult to rotate backwards. Inserting the
empty magazine fully into the magazine well will allow
the hammer to rotate backwards into a horizontal
position. Once the hammer is horizontal, remove the
empty magazine.
Before placing the barrel receiver onto the frame,
make sure that the loaded chamber indicator pin (Part
No. A02611 / Key No. 7 in the exploded view drawing
on p. 39) has not fallen out of the receiver.
Figure 7
3. Place the barrel receiver on top of the
frame so that the square lug engages the
square front recess on the underside of
the receiver (see Figure 8A). Push the
barrel rearward until it stops, with the
rear end of the receiver slightly overhanging the rear end of the grip frame
(see Figure 8B). If alignment cannot be
achieved by hand pressure, place the
pistol (muzzle down) on a padded bench
and strike the rear of the grip frame
immediately below the receiver with a
plastic or wooden mallet. Be careful not
to damage the grip frame.
Figure 8A
Figure 9
Figure 8B
4. Fully insert the empty magazine back into
the magazine well. Point the muzzle up in a
safe direction and pull the trigger. Gravity
should cause the hammer to return to the
cocked position if it became dislodged in step
3 (see Figure 9). If not, reach into the rear of
the receiver and push the hammer back down
flat (into the horizontal position). When the
hammer is in this position, remove the empty
magazine.
24
5. NOTE: Before sliding the
Figure 10
FIRING
bolt into the receiver, BE
PIN STOP
CERTAIN that the firing pin
stop (part number A03500, a
small pin) is in the bolt. (See
Figure 10.) Without this pin,
the first time the trigger is
pulled on an assembled
pistol, the firing pin will fly
forward so far as to
irreparably dent the rear end
of the chamber of the barrel, making the pistol useless. Now, slide the bolt (with
the recoil spring upward) fully forward into the receiver. (See Figure 10.)
6. Insert the empty magazine into the
magazine well, point the muzzle toward the
ground in a safe direction and pull the trigger.
The hammer should fall to its full forward
position. If it does not, retract the bolt
partially and manipulate the hammer through
the slot in the rear of the frame until the
hammer is in its full forward position.
PUSH UP UNTIL
BOLT STOP PIN
PROTRUDES HERE
Point the muzzle toward the ground. With the
pistol in this position, hold the mainspring
housing bolt stop pin assembly and press the
bolt stop pin through the holes in the receiver
and bolt until the tip of the pin protrudes
beyond the top of the receiver. (See Figure
11.) You may need to tap the mainspring
housing into position with a rubber or wooden
mallet. The pin must be fully in place to close
the latch in Step 8. Do not yet move the
mainspring housing into the frame.
7. (For 22/45 models, skip to 7A.)
Now invert the pistol so that the
muzzle is pointed upward. Make
sure you can see the hammer strut
when you lift the housing up. The
hammer strut should go into the
oval-shaped cut inside the
mainspring housing. (See Figure
12.) Hold the trigger to the rear.
Figure 11
TIP OF
HAMMER
STRUT
OVAL CUT
INSIDE
MAINSPRING
HOUSING
Figure 12
25
While holding the pistol in this position
and depressing the trigger, move the
mainspring housing into its proper place
in the frame. (See Figure 13.)
Figure 13
7A. For 22/45 models ONLY: Now invert
the pistol so that the muzzle is pointed
upward. Make sure you can see the
hammer strut when you lift the housing
up. The hammer strut should go into the
oval-shaped cutout inside the mainspring
housing (see Figure 12). While holding the
pistol in this position and depressing the
trigger, close the mainspring housing as
far as it will go without excessive pressure. Holding the mainspring housing in
this position, release the trigger and remove the magazine. Once the magazine is
removed, the mainspring housing will close the rest of the way.
8. The housing latch can now be snapped shut,
completing assembly. (See Figure 14.) Spring
pressure should be felt just before the housing is
fully shut if the internal parts are correctly
aligned.
Figure 14
9. To determine if reassembly was performed
correctly, pull the bolt backward and verify that
it opens fully. If not, open the latch and repeat
steps 6 - 8, above.
10. Replace empty magazine, point pistol in a
safe direction and pull the trigger to uncock the gun. Guns should not be stored
loaded or cocked. Note that in order for the internal lock to be engaged, the pistol
must remain cocked, and the manual safety must be put “on” safe. (See p. 12.)
IF YOU HAVE DIFFICULTY REASSEMBLING THE PISTOL,
HERE ARE SOME HELPFUL TIPS!
If the mainspring housing pulls out of the gun when swung in, the barrel/
receiver assembly is not fully rearward on the frame. Repeat step 3, above.
Remember that it is essential that the hammer must be in its vertical, uncocked
position as the mainspring housing is swung shut. If the housing is excessively
difficult to close, the hammer is probably cocked. Repeat steps 6-9, above.
The foregoing may give the impression that reassembly is difficult, but it is
quickly and easily done once properly learned.
26
MAGAZINE NOMENCLATURE
FOR 22/45
ONLY
FOR ALL OTHER RUGER
MARK III PISTOLS
MAGAZINE DISASSEMBLY
TO DISASSEMBLE MAGAZINE: Withdraw magazine from pistol and remove all
cartridges (check chamber to be certain no cartridge remains in it). Hold
magazine upside down in left hand so that the hole in the Magazine Block is
accessible.
1. With right hand, insert drift punch in hole and depress Magazine Block
Retaining Plunger approximately 1/4".
2. Slide Magazine Block forward slowly BEING VERY CAREFUL TO KEEP
PLUNGER AND SPRING UNDER CONTROL. If not contained, these parts will fly
out with considerable force. Therefore keep bottom end of magazine pointed
away from persons and objects.
3. With the Magazine Block fully removed, the Plunger and Spring should be
slowly withdrawn.
4. Now, holding magazine flat in left hand, align the Magazine Follower Button
with circular opening near the lower end of magazine body and lift out the
Magazine Follower Button.
5. The Magazine Follower can then be removed.
Reassemble in reverse order, being careful to contain the Spring and Plunger as
the Magazine Bottom is slid and locked into place. After reassembly has been
completed, test Magazine Follower to ensure it has free movement.
Always ‘ride’ the Magazine Follower Button up and down with your thumb.
Do not lower Follower Button and then permit it to snap up.
27
MAGAZINE DISASSEMBLY
5
Remove Follower
2
Slide Block
Forward
4
1
Remove
Button
Push Up
3
Remove Spring
& Plunger
DAMAGED, NON-STANDARD, OR IMPROPERLY
ASSEMBLED MAGAZINES SHOULD NOT BE USED.
THEY CAN CAUSE THE PISTOL TO MALFUNCTION.
CARE AND CLEANING
Make Sure Gun is Unloaded!
Before cleaning, be certain the pistol and its magazine contain no cartridges.
(See “To Unload,” p. 18.)
At regular intervals, or whenever the pistol has been exposed to sand, dust,
extreme humidity, condensation, immersion in water, or other adverse
conditions, disassemble, clean, and oil it. Proper periodic maintenance is
essential to the reliable functioning of any firearm.
To clean the pistol, proceed as follows;
1. Disassemble (field-strip) the pistol to the extent described on pages 22 - 23.
2. Using a cleaning rod, run a solvent-wetted patch through the bore several
times. Then attach a solvent-wetted bristle brush to the rod and run it back
and forth the full length of the bore as many times as necessary to remove
grease and dirt from the bore and chamber. Clean bore with dry patches and
examine. Bore fouling can contribute to reduced accuracy, and grease
accumulation in the chamber can interfere with proper feeding of cartridges
from the magazine.
28
3. Using powder solvent on a clean patch or bristle brush, remove powder
residue from all components of the mechanism. After cleaning, run a dry
patch through the bore, then follow with a patch that is very lightly oiled.
Wipe all surfaces clean with a cloth, then wipe all surfaces with a patch or
cloth that has been very lightly oiled.
4. NOTE: Only a light application of oil is needed to provide adequate
lubrication of moving parts and to prevent rust. Excess accumulations of oil
tend to attract particles of dust and dirt and may congeal in cold weather
which can interfere with the safe and reliable function of the pistol.
5. If magazine becomes dirty, it should be disassembled and thoroughly cleaned
(see “Magazine Disassembly” section, p. 27).
6. Before firing remove all oil and grease from the bore.
WARNING – LUBRICATION
Firing a pistol with oil, grease, or any other
material even partially obstructing the bore
may result in damage to the pistol and
serious injury to the shooter and those
nearby.
Do not spray or apply lubricants directly on
ammunition. If the powder of a cartridge is
affected by the lubricant, it may not be
ignited, but the primer firing may push the
bullet into the bore where it may become
lodged. Firing a subsequent bullet into the
obstructed bore may damage the pistol and
cause serious injury or death to the shooter
and those nearby. Use lubricants properly.
You are responsible for the proper care and
maintenance of your firearms.
IMPROPER LUBRICATION
DESTROYS GUNS
STORAGE
GUNS SHOULD NOT BE STORED LOADED!
USE THE LOCKING DEVICE SUPPLIED WITH THE PISTOL FOR STORAGE.
(SEE PAGE 6)
Sturm, Ruger also offers gun safes for sale as a means to secure more than one
firearm. Please call 1-800-515-7233 for details and ordering information.
Do not keep the pistol stored in a leather holster or case. Leather attracts moisture,
even though the holster or case may appear to be perfectly dry.
TO RENDER THE PISTOL INOPERATIVE FOR SAFE STORAGE
Be certain that the muzzle is pointed in a safe direction and that the safety is “on”
(S) if the pistol is cocked. Remove the magazine and carefully check it to verify that
it is completely empty. Draw the bolt fully rearward and visually inspect the
chamber to be certain that there is no cartridge in it and then release the bolt.
Insert the empty magazine into the magazine well until it “clicks” and is fully in
29
place. Place the safety in the “off” (F) position. Point the pistol in a safe direction and
pull the trigger to uncock the pistol.
Using a paper clip or similar non-marring tool, pull down on the main spring housing
latch located at the lower rear of the pistol grip. Swing the main spring housing
upward. With the pistol pointed upward, pull the trigger. Now invert the pistol so that
it is pointing downward. Keeping the pistol pointing downward swing the main spring
housing back in to the pistol grip and push the latch back into the main spring
housing until it is flush with the pistol grip.
When assembled in this manner, it should be impossible to fully retract the bolt to
chamber a cartridge. With the muzzle pointed in a safe direction, test the pistol by
attempting to retract the bolt. If the bolt cannot be retracted more than a fraction of
an inch, the pistol has been assembled in an inoperative condition. It is uncocked and
cannot be fired without correct reassembly.
To reassemble the pistol for firing, again using a paper clip or similar non-marring
tool, pull down on the main spring housing latch and point the muzzle upward. Pull
the trigger and keep the muzzle pointed in an upward direction. Swing the main
spring housing back into position and shut the main spring housing latch. Test the
pistol to be sure it is correctly reassembled by attempting to retract the bolt fully. If
the bolt can be fully retracted, the pistol is correctly reassembled and can be loaded
and fired normally.
While the pistol is less likely to be used by unauthorized persons when assembled in
the above inoperative manner, it is always safest to store the pistol with the supplied
external locking device correctly installed on the pistol, or to store the pistol in a
gun safe or other secure location away from children and unauthorized adults. Guns
should always be stored securely, unloaded and separate from their ammunition.
To operate internal lock, see instructions and warnings on page 13.
WARNING – STORAGE
Never place or store any firearm in
such a manner that it may be
dislodged. Firearms should always be
stored securely and unloaded, away
from children and careless adults. Use
the locking device originally supplied
with this firearm for storage.
The use of a locking device or safety
lock is only one aspect of responsible
firearms storage. For increased safety,
firearms should be stored unloaded
and locked in a location that is both
separate from their ammunition and
inaccessible to children and any other
unauthorized person.
STORE SECURELY &
UNLOADED
30
SIGHT ADJUSTMENT
The Standard RUGER® MARK III pistol is equipped with a rear sight which
is adjustable for windage only. The rear sight can be drifted laterally in its
dovetail on the top of the slide by tapping it with a wooden or plastic headed
hammer or similar implement. The front sight is fixed. Target models are
equipped with adjustable sights. Turning the top (elevation) sight adjustment
screw clockwise lowers the impact of the shot. Turning the horizontal (windage)
sight adjustment screw clockwise moves the impact of the shot to the left.
SUGGESTED SIGHT PICTURE
Top of front sight even with top of
rear sight blade. Front sight
centered in notch of rear sight
blade. Target bull’s-eye centered on
top of front sight.
SUGGESTED SIGHT PICTURE
FOR V-NOTCH REAR SIGHTS
(Ruger Mark III Hunter Models)
A v-notch express sight is
designed to be used as a point of
aim/point of impact sighting
system. The recommended sight
picture for this type of system is to
place the round front sight bead,
regardless of the size of the bead,
at the bottom of the v-notch in the
rear sight. The front sight bead
should be pointed directly at the
intended target.
31
INSTRUCTIONS FOR ATTACHING
THE SCOPE BASE
(Target Model Only)
1. Remove the filler screws from the top of the receiver.
2. Degrease the screw holes in the receiver.
3. Degrease the scope base screws.
4. After the degreased areas are dry, place a drop of red LOCTITE
adhesive/sealant or equivalent to the scope base screws.
5. Set the scope base on the receiver with the side notch aligned with the
ejection port of the receiver.
6. Install the scope base screws and tighten.
7. Set the assembled pistol aside overnight to allow the adhesive to set up.
CHANGING THE LITEPIPE
ON YOUR HiViz® SIGHT
(Ruger Mark III Hunter Models Only)
1. Point the muzzle in a safe direction.
2. Make sure that the magazine and the pistol are completely unloaded.
3. Place the thin tab on the HiViz® key between the LitePipe and the sight base.
This will compress the locking spring, allowing you to carefully pull the
LitePipe out of the supporting rings. Remove the key.
4. Slide the new LitePipe into the sight base. You will have to lightly press down
on the rounded end as it enters the far supported ring to compress the
locking spring.
32
SERVICE AND PARTS POLICY
If you have any questions with regard to the performance of your RUGER®
MARK III pistol, please call (928-778-6555) or write our Prescott, Arizona
Product Service Department, fully describing all circumstances and conditions
involved. If you should return your pistol to the factory for repair, or order parts
for it, please comply with the following suggestions for prompt service:
WARNING: BEFORE SHIPPING ANY FIREARM,
BE ABSOLUTELY CERTAIN THAT IT AND ITS MAGAZINES ARE
UNLOADED. DO NOT SHIP CARTRIDGES WITH A FIREARM.
SHIPPING FIREARMS FOR REPAIR
RUGER® MARK III pistols returned to the factory for services or repair
should be sent to: Ruger, Product Service Department, 200 Ruger Road, Prescott,
AZ 86301-6181. Telephone: (928) 778-6555.
Guns should be sent prepaid. We will not accept collect shipments.
The Federal Gun Control Act, as well as the laws of most States and localities, do
not prohibit an individual (who is not otherwise barred from purchasing or
possessing a firearm) from shipping a firearm directly to the manufacturer for
repair. However, before you ship your firearm to us, be certain that your State or
locality does not have a law or regulation which will prohibit you from receiving
it from us after it has been repaired. If such receiving is prohibited, then please
have a Federally Licensed firearms dealer ship the gun to us. If it is sent to us by
a dealer, it will be returned to him after being repaired. If a handgun (pistol or
revolver) is shipped by an individual who does not hold a Federal Firearms
License, it must be shipped for overnight delivery via U.P.S., Federal Express, or
other similar private overnight service. NOTE: Firearms may not be shipped via
U.S. Mail. Persons who do not hold a Federal Firearms License are prohibited by
Federal law from shipping a handgun by Mail. Handguns mailed in violation of
the law are impounded by the Post Office.
Please do not include holster, custom grip panels, or custom accessories with a
firearm being shipped to the factory for service. DO NOT SEND GUN BOXES
OR LITERATURE THAT YOU CONSIDER TO BE COLLECTOR’S ITEMS THESE ARE INVARIABLY DAMAGED OR DESTROYED IN SHIPMENT.
Always insure your shipment.
Enclose a letter which includes your name, address, telephone number, serial
number and model of the firearm. Describe in detail the trouble you have
experienced with your firearm, or the work you wish to have done. Merely stating
that the firearm “needs repair” is inadequate information. State precisely what is
wrong. Please enclose copies of any previous correspondence.
Work performed will bear a net minimum labor charge of $20.00 plus a $30.00
shipping and handling charge. The charge for metal refinishing the RUGER®
MARK III pistol is $50.00 plus a $30.00 shipping and handling charge.
Custom gunsmithing service or nonstandard alterations are NOT AVAILABLE
from Ruger Product Service Departments.
33
WARNING –PARTS PURCHASERS
It is the purchaser’s responsibility to be absolutely
certain that any parts ordered from the factory are
correctly fitted and installed. Firearms are
complicated mechanisms and IMPROPER FITTING
OF PARTS MAY RESULT IN A DANGEROUS
MALFUNCTION, DAMAGE TO THE FIREARM, AND
SERIOUS INJURY TO THE SHOOTER AND OTHER
PERSONS. The purchaser and installer of parts
must accept full responsibility for the correct
adjustment and functioning of the pistol after such
installation.
PARTS MUST FIT CORRECTLY
ORDERING PARTS
Please contact the Arizona Product Service Department for parts availability and
current prices. All parts ordered for the RUGER® MARK III should be sent
to: Ruger, Parts Department, 200 Ruger Road, Prescott, AZ 86301-6181,
telephone: (928) 778-6555.
We cannot comply with open account or C.O.D. requests. Payment in the form of
a money order, Visa or MasterCard must accompany your order. Credit Card
orders must include the account number, expiration date and whether it is a Visa
or MasterCard account. Minimum parts order is $1.00 plus a $3.50 shipping and
handling charge. Order parts by Part Name and Part Number and include the
entire serial number of the firearm for which the parts are being ordered. There
is a minimum net labor charge of $20.00 plus $30.00 shipping and handling
charge if parts are factory fitted. All factory fitted parts are fit on an exchange
basis only. We will not return the replaced parts.
*Parts designated by an asterisk must be factory fitted. These parts are fitted on
an exchange basis only. We will not return the replaced parts. We will not return
any part that is broken, malfunctioning, badly worn or has been modified. See
“Warning – Parts Purchasers” above.
Because it is a serial-numbered component, the RUGER® MARK III pistol
barrel/receiver assembly is defined as a “firearm” by Federal Law and is not
offered for sale separately.
CAUTION: A gun containing modified, broken, malfunctioning,
or badly worn parts should not be fired.
34
RUGER® MARK III
PARTS LIST
Design, prices and specifications subject to change without notice.
SPECIFY MODEL WHEN ORDERING
(See Exploded Views on pages 39 - 41)
Key No.
* 1
2
3
4
35
5
6
7
8
9
10
11
12
13
14
15
16
Part Name
Part No.
Model
Barrel/Receiver Assembly
MKIII & 22/45 MKIII models
(For information about the barrel/receiver assembly, please provide
model and serial number when contacting the Product Service Dept. – 928-778-6555)
Front Sight
A03612
MKIII & 22/45 MKIII models
Front Sight Screw
XR07600
MKIII & 22/45 MKIII models
Barrel/Receiver Filler Screws, 3 Req’d
B-83
MKIII & 22/45 MKIII models
(except Standard Models)
Loaded Chamber Indicator
A11002B
MKIII & 22/45 MKIII - blued models
A11002G
MKIII & 22/45 MKIII - stainless models
Loaded Chamber Indicator Spring
KAP04600
MKIII & 22/45 MKIII models
Loaded Chamber Indicator Pin
A02611
MKIII & 22/45 MKIII models
Rear Sight Assembly, Complete A15901-100
MKIII & 22/45 MKIII Target models
Includes Key Nos. 8 - 16
(Will Not Work on Standard Models)
Rear Sight Body
A05900
MKIII & 22/45 MKIII models
Rear Sight Pivot Pin
MR05600
MKIII & 22/45 MKIII models
Rear Sight Elevation Spring
MR05906
MKIII & 22/45 MKIII models
Rear Sight Base
A06100
MKIII & 22/45 MKIII models
Rear Sight Base Set Screw
A06200
MKIII & 22/45 MKIII models
Rear Sight Blade
MR05901
MKIII & 22/45 MKIII models
Rear Sight Windage Spring
MR05907
MKIII & 22/45 MKIII models
Rear Sight Windage Adjustment Screw
E05903
MKIII & 22/45 MKIII models
Rear Sight Elevation Screw
MR05902
MKIII & 22/45 MKIII models
* PARTS SO MARKED MUST BE FACTORY FITTED
Key No.
Part Name
Bolt Assembly, Complete - Includes Key Nos. 17 - 25
17
Bolt, Only
18
Firing Pin Stop
19
Rebound Spring
20
Rebound Spring Support
36
21
22
23
24
25
* 26
Firing Pin
Recoil Spring Assembly
Extractor Spring
Extractor Plunger
Extractor
Grip Frame with Trigger Guard
* 27
Grip Frame, One Piece, Plastic
Trigger
*
28
Trigger Spring
29
Trigger Spring Plunger
30
Trigger Pivot Retainer
31
Bolt Stop Assembly (See Notes A & B on Pages 39 & 40)
32
Bolt Stop Plunger (See Notes A & B on Pages 39 & 40)
PARTS SO MARKED MUST BE FACTORY FITTED
Part No.
A02111-100
KA02111-100
A02111
KA02111
A03500
KA03500
A20000
KA20000
A03900
KA03900
KA01300
KA-57
B-15
A02510
KA02200
AN54002
KA54002
AP10200
A01202
A01203
A20400
KA20400
A02508
KA02508
KA04200
AP04200
AN-37
KA-37
AP03703
A04300
KA04300
AP02511
Model
MKIII & 22/45 MKIII - blued models
MKIII & 22/45 MKIII - stainless models
MKIII & 22/45 MKIII - blued models
MKIII & 22/45 MKIII - stainless models
MKIII & 22/45 MKIII - blued models
MKIII & 22/45 MKIII - stainless models
MKIII & 22/45 MKIII - blued models
MKIII & 22/45 MKIII - stainless models
MKIII & 22/45 MKIII - blued models
MKIII & 22/45 MKIII - stainless models
MKIII & 22/45 MKIII models
MKIII & 22/45 MKIII models
MKIII & 22/45 MKIII models
MKIII & 22/45 MKIII models
MKIII & 22/45 MKIII models
MKIII - blued models
MKIII - stainless models
22/45 MKIII models
MKIII & 22/45 MKIII Fixed Sight Models
MKIII & 22/45 MKIII Target Models
MKIII & 22/45 MKIII - blued models
MKIII & 22/45 MKIII - stainless models
MKIII & 22/45 MKIII - blued models
MKIII & 22/45 MKIII - stainless models
MKIII Models
22/45 MKIII models
MKIII - blued model
MKIII - stainless models
22/45 MKIII models
MKIII - blued models
MKIII - stainless models
22/45 MKIII models
Key No.
33
34
* 35
* 36
37
37
38
* 39
40
41
42
43
44
*
Part Name
Part No.
Bolt Stop Plunger Spg. (See Notes A & B on Pages 39 & 40) KA04600
AP04600
Trigger Pivot Pin
A03400
KA04300
AP03401
Safety Assembly, Complete
AN-56
KA-56
AP00056
Hammer Assembly, Complete
A01803-100
A01803-101
A01802-100
A01802-101
Magazine Disconnector Spring
A20250
Magazine Disconnector
KA01110
Disconnector Assembly
KA011
Hammer Bushing
KA02513
Sear Spring
A03100
KA03100
AP03100
Sear
A01901
KA01901
Bolt Stop Thumbpiece
A04700
KA04700
Hammer Pivot Pin (See WARNING, below)
A02605
KA02605
AP02613
Model
MKIII models
22/45 MKIII models
MKIII - blued models
MKIII - stainless models
22/45 MKIII models
MKIII - blued models
MKIII - stainless models
22/45 MKIII models
MKIII & 22/45 MKIII - blued Target models
MKIII & 22/45 MKIII - stainless Target models
MKIII & 22/45 MKIII - blued Standard models
MKIII & 22/45 MKIII - stainless Standard models
MKIII & 22/45 MKIII models
MKIII & 22/45 MKIII models
MKIII & 22/45 MKIII models
MKIII & 22/45 MKIII models
MKIII - blued models
MKIII - stainless models
22/45 MKIII models
MKIII & 22/45 - blued models
MKIII & 22/45 - stainless models
MKIII - blued models
MKIII - stainless models
MKIII - blued models
MKIII - stainless models
22/45 MKIII models
PARTS SO MARKED MUST BE FACTORY FITTED
WARNING regarding non-Ruger Grip Panels. Note: The Hammer Pin (A02605) is prevented from drifting out of the left side of the Grip Frame by contact with the inner surface
of the left Grip Panel. Therefore, be certain that the clearance cut in the left Grip Panel is the correct depth to maintain the Hammer Pivot fully seated in the Grip Frame.
Key No.
45
Part Name
Magazine Latch
Magazine Latch Spring
Magazine Latch Spring Plunger
Magazine Latch Screw
Sear Pivot Pin
50
Sear Spring Stop Pin
51
52
Magazine Latch Pin, 2 Req’d
Mainspring Housing Assembly
53
54
55
56
57
58
59
60
Lock Pin
Spring Back-up Pin
LockDetent Plunger
Lock Detent Plunger Spring
Hammer Spring Plunger
Hammer Spring
Mainspring Housing Detent Ball
Mainspring Housing Latch
61
Mainspring Housing Latch Pin
62
63
Grip Frame Filler
Grip Panels Sold In Pairs, Only
38
46
47
48
49
Part No.
A00503
KA00503
AP00504
KAP03000
KE-61
A08003
A02601
KA02601
AP02612
A02603
KA02603
A02601
A00910-100
KA00910-100
AP00903-100
KA02614
KA02616
KV04612
KV06476
KA02509
A20100
A04100
A00700
KA00700
AP00700
A02602
KA02602
A00401
A00810-250
Model
MKIII - blued models
MKIII - stainless models
22/45 MKIII models
MKIII & 22/45 MKIII models
MKIII models
MKIII - blued models
MKIII - stainless models
22/45 MKIII models
MKIII - blued models
MKIII - stainless models
MKIII models
MKIII - blued models
MKIII - stainless models
22/45 MKIII models
MKIII & 22/45 MKIII models
MKIII & 22/45 MKIII models
MKIII & 22/45 MKIII models
MKIII & 22/45 MKIII models
MKIII & 22/45 MKIII models
MKIII & 22/45 MKIII models
MKIII & 22/45 MKIII models
MKIII - blued models
MKIII - stainless models
22/45 MKIII models
MKIII & 22/45 - blued models
MKIII & 22/45 - stainless models
MKIII models
MKIII models
Key No.
64
65
66
67
68
39
Part Name
Grip Panel Screw, 2 Req’d
Magazine, Complete (10-round)
Part No.
A02503
90231 (M10MKIII)
90229 (AP10MKIII)
KV15009
90224 (A07050G)
Model
MKIII models
MKIII models
22/45 MKIII
MKIII & 22/45 MKIII models
MKIII & 22/45 MKIII - Target models
Internal Lock Key
Scope Mount Base, Weaver-Style, with Screws,
Matte Gray Color (See NOTE C, page 41)
Scope Mount Base, Weaver-Style, with Screws,
90228 (A07050B)
MKIII & 22/45 MKIII - Target models
Matte Black Color (See NOTE C, page 41)
Scope Base Screws, 3 Req’d (also sold w/ Scope Base)
B-89
MKIII & 22/45 MKIII - Target models
(See NOTE C, page 41)
Also Available, but Not Illustrated
Scope Mount Base (3.421”), with Screws
90011 ((A07000)
MKIII & 22/45 MKIII models
Scope Mount Base (4.125”), Extended, with Screws
90101 (A07001)
MKIII & 22/45 MKIII models
Scope Rings, Low, Blued
90003 (S100RL)
MKIII & 22/45 MKIII models
Scope Rings, Low, Stainless
90073 (KS100RL)
MKIII & 22/45 MKIII models
Scope Rings (blued and stainless, 1” and 30mm) are also available in medium and high ring heights.
Front Sight
A03604
MKIII - Competition models
Case with Gun Lock
90084 (PGC-RF)
MKIII & 22/45 MKIII models
For Ruger Scope Rings Only.
RUGER® MARK III
EXPLODED VIEW
Note A — The Bolt Stop components in this group are for holding open the bolt and are
not functionally related to the Bolt Stop Pin and Bolt Stop Pin Pivot. These two later
components are attached to the Mainspring Housing Assembly (Key No. 52; Part No.
A00910-100). See parts drawing below for relationship of parts.
Front and rear sights
for the Target Models
are not adaptable to
Standard Models.
40
RUGER® 22/45 MARK III
EXPLODED VIEW
Note B — The Bolt Stop components in this group are for holding open the bolt and are
not functionally related to the Bolt Stop Pin and Bolt Stop Pin Pivot. These two later
components are attached to the Mainspring Housing Assembly (Key No. 52; Part No.
AP00903-100). See parts drawing below for relationship of parts.
Front and rear sights
for the Target Models
are not adaptable to
Standard Models.
41
RUGER® WEAVER-STYLE
SCOPE MOUNT BASE
67
68
67
68
NOTE C — Scope mount bases and rings listed will fit all MARK III and
22/45 MARK III pistols. Only the MARK III Target models are drilled
and tapped at teh factory. The MARK III Standard models must be drilled and
tapped by your local gunsmith. (Drilling and tapping instructions available upon
request.)
42
THE BASIC RULES OF SAFE FIREARMS HANDLING
We believe that Americans have a right to purchase and use firearms for lawful
purposes. The private ownership of firearms in America is traditional, but that
ownership imposes the responsibility on the gun owner to use his firearms in a
way which will ensure his own safety and that of others. When firearms are used in
a safe and responsible manner, they are a great source of pleasure and satisfaction,
and represent a fundamental part of our personal liberty.
Firearms do not cause accidents! Firearms accidents are almost always found to
have been the result of carelessness or ignorance on the part of the shooter of the
basic rules of safe gun handling.
The following rules must be observed by gun users at all times. Safe gun handling
is not just desirable, it is absolutely essential to your safety, the safety of others, and
the continuation of gun ownership and sport shooting as we know it today.
1. LEARN THE MECHANICAL AND HANDLING
CHARACTERISTICS OF THE FIREARM YOU ARE USING.
®
R
RUGE NUAL
N MA
S
UCTIO
CTION
INSTR
E INSTRUIN THIS
GS
READ TH
IN
RN
BEFORE
A
AND W L CAREFULLY .
MANUATHIS FIREARM
USING
Not all firearms are the same. The
method of carrying and handling
firearms varies in accordance with the
mechanical provisions for avoiding
accidental discharge and the various
proper procedures for loading and
unloading. No person should handle
any firearm without first having
thoroughly familiarized himself with
the particular type of firearm he is
using, and with safe gun handling in
general.
2. ALWAYS KEEP THE
MUZZLE POINTED IN A
SAFE DIRECTION.
Be sure of the bullet stop behind your
target, even when dry-firing. Never let
the muzzle of a firearm point at any
part of your body or at another person.
This is particularly important when
loading or unloading a firearm. In the
event of an accidental discharge, no
injury can occur as long as the muzzle
is pointing in a safe direction. A safe
direction means a direction which will
not permit a discharged bullet to strike
a person, or to strike an object from
which the bullet may ricochet.
43
A safe direction must take into account the fact that a bullet may
penetrate a wall, ceiling, floor, window, etc., and strike a person or
damage property. Make it a habit to know exactly where the muzzle of
your gun is pointing whenever you handle it, and be sure that you are
always in control of the direction in which the muzzle is pointing, even
if you fall or stumble. Keep your finger off the trigger until you are ready
to shoot.
3. FIREARMS SHOULD BE UNLOADED WHEN NOT IN
USE.
2
Firearms should be loaded only
when you are in the field or on
the target range or shooting area,
ready to shoot. Firearms and
ammunition should be securely
locked in safes, racks or cabinets,
or by using the locking device
supplied with the firearm, when
not in use. Ammunition should
be safely stored separate from
firearms. Store your firearms out
of sight of visitors and children. It
is the gun owner’s responsibility
to be certain that children and
persons unfamiliar with firearms
cannot gain access to firearms,
ammunition, or components.
3
1
4. BE SURE THE BARREL IS CLEAR OF OBSTRUCTIONS
BEFORE SHOOTING.
Even a bit of mud, snow or excess
lubricating oil or grease in the
bore may cause the barrel to
bulge, or even burst on firing, and
can cause serious injury to the
shooter and bystanders. Be sure
that you are using ammunition of
the proper caliber and loading for
the gun you are using. If the
report or recoil on firing seems
weak, or doesn’t seem quite right,
CEASE FIRING IMMEDIATELY,
unload your firearm, and check to be sure
that no obstruction has become lodged in the barrel.
44
5. BE SURE OF YOUR
TARGET BEFORE YOU
SHOOT.
Don’t shoot unless you know
exactly where your bullet is going
to strike. Be sure of the bullet
stop behind your target, even
when dry-firing with an unloaded
gun. If you are in the field
hunting, do not fire at a
movement or noise. Take the time
to be absolutely certain of your
target before you pull the trigger.
6. WEAR SHOOTING
GLASSES AND HEARING
PROTECTORS WHEN
YOU SHOOT.
All shooters should wear
protective shooting glasses and
adequate hearing protectors when
shooting. Exposure to shooting
noise can damage hearing, and
adequate eye protection when
shooting is essential.
7. NEVER CLIMB A TREE
OR FENCE WITH A
LOADED FIREARM.
Put the firearm down carefully
before climbing a fence, and
unload it before climbing or
descending a tree or jumping over
a ditch or other obstruction. Never
pull or push a loaded firearm
toward yourself or another person.
When in doubt, or whenever you
are about to do anything awkward,
unload your gun!
45
8. DON’T SHOOT AT A
HARD SURFACE, OR AT
WATER.
Bullets can glance off many
surfaces like rocks or the surface
of water and travel in
unpredictable directions with
considerable velocity.
9. NEVER TRANSPORT A
LOADED FIREARM.
Firearms should always be
unloaded before being placed in a
vehicle. A suitable carrying case
or scabbard should by used to
carry an unloaded firearm to and
from the shooting area.
10. AVOID ALCOHOLIC
BEVERAGES WHEN
SHOOTING.
Don’t drink until the day’s
shooting is over. Handling
firearms while under the influence
of alcohol in any form, or
medications that could affect your
judgment or coordination,
constitutes a criminal disregard
for the safety of others.
46
A BRIEF ACCOUNT OF AN EXTRAORDINARY
ACHIEVEMENT: RUGER FIREARMS
Sturm, Ruger & Company, Inc., had its beginning in a small machine
shop occupying a rented frame building in Southport, Connecticut. In
January, 1949, with an initial investment of only $50,000 and an idea,
William B. Ruger and Alexander M. Sturm started production of a .22
caliber autoloading pistol–a design which was so successful that it
became the cornerstone upon which one of the most comprehensive
lines of sporting firearms ever made in America was established. After
Alex Sturm’s death in 1951, William B. Ruger continued to direct the
Company until his death in 2002. William B. Ruger, Jr. continued to
provide guidance, which helped make this Company a sound and
successful enterprise, until his retirement in 2006. The Company has
continued to prosper, under new management and guidance from our
Board, with new products and fresh perspectives.
Ruger, in this relatively short time, has established itself as a leading
small arms design organization, developing a unique and broad line of
fine quality sporting, military and police firearms to become one of the
world’s most famous producers of revolvers, pistols, rifles and shotguns.
Since 1949 Ruger craftsmen have built many millions of firearms.
During its five decades of growth and progress under the leadership of
William B. Ruger, the Company developed a business philosophy and
implemented policies which represent a constructive influence in the
life of modern America. From the beginning, Ruger played a positive
role in conservation efforts and has supported the interests of shooters
through such groups as the National Rifle Association, National
Shooting Sports Foundation, and many regional sportsmen’s
organizations.
The Company has always endeavored to market its firearms for
constructive and recreational purposes, to emphasize the traditional
aspects of shooting, to render meaningful public services and to
encourage shooters in constructive, responsible, and safe participation
in the shooting sports. Its motto, “Arms Makers For Responsible
Citizens,” exemplifies this Company philosophy.
Today, Ruger is particularly mindful of those elements which have
contributed to the creation of its success, and extends heartfelt thanks to
its many loyal employees and customers.
A current catalog of Ruger firearms is available free upon request to
Ruger, Southport, CT 06890
47
WHY NO WARRANTY CARD HAS BEEN
PACKED WITH THIS NEW RUGER FIREARM
The Magnuson-Moss Act (Public Law 93-637) does not require any
seller or manufacturer of a consumer product to give a written
warranty. It does provide that if a written warranty is given, it must be
designated as “limited” or as “full” and sets minimum standards for a
“full” warranty. Sturm, Ruger & Company, Inc. has elected not to
provide any written warranty, either “limited” or “full”, rather than to
attempt to comply with the provisions of the Magnuson-Moss Act and
the regulations issued thereunder. There are certain implied
warranties under state law with respect to sales of consumer goods. As
the extent and interpretation of these implied warranties varies from
state to state, you should refer to your state statutes. Sturm, Ruger &
Company wishes to assure its customers of its continued interest in
providing service to owners of Ruger firearms.
STURM, RUGER & Company, Inc.
Southport, Connecticut 06890 U.S.A.
www.ruger.com
Arms Makers For Responsible Citizens®
A COPY OF THE INSTRUCTION MANUAL FOR ANY RUGER
FIREARM IS AVAILABLE FROM THE FACTORY FREE ON REQUEST, OR IT MAY
BE DOWNLOADED FROM OUR WEBSITE AT WWW.RUGER.COM.
THESE INSTRUCTION MANUALS CONTAIN IMPORTANT
WARNINGS WHICH MUST BE UNDERSTOOD
BEFORE USING THESE FIREARMS.
“Ruger 10/17,” “22/45,” “Model 96,” “P90,” “P91,” “P93,” “P94,” “P95,” “P97,” “Ruger P345,” “P345D,”
“Mark III,” “P345PR,” and “Super Redhawk Alaskan” are RUGER TRADEMARKS. “RUGER,” THE
STURM, RUGER LOGO, “AC-556,” “Arms Makers For Responsible Citizens,” “10/22,” “All-Weather,”
“Bearcat,” “Bisley,” “Blackhawk,” “Gold Label,” “GP100,” “Hawkeye,” “M77,” “Mini Thirty,” “Mini-14,”
“Old Army,” “P85,” “Redhawk,” “Ruger Titanium,” “Ruger 77/17,” “Ruger 77/22,” “Ruger 77/44,”
“Ruger 77/50,” “Ruger SP101,” “Ruger Vaquero,” “Security-Six,” “Service-Six,” “Single Six,” “Speed-Six,”
the “SR” Design and “Target Grey” are REGISTERED U.S. TRADEMARKS. “DEERFIELD” is a registered
trademark of Blount, Inc. “The Frontier” is a registered trademark of new Colt Holding Corp.