1
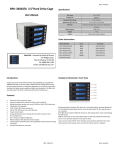
World-Wide Web Site:
Compuserve Forum:
http://www.seagate.com
type GO SEAGATE
SeaTDD: Use a telecommunications device for the deaf
(TDD) to exchange messages with a technical support
specialist.
408-944-9121
USA
Australia
1-800-SEAGATE or 408-456-4496
61-2-9756-5170 England 44-1628-894084
SeaFAX: Use a touch-tone telephone to access Seagate’s
automated FAX system to receive technical information by
return FAX. This service is available 24 hours daily.
USA
Germany
Singapore
Australia
408-434-1080
49-89-140-9331
65-292-6973
61-2-9756-2359
France
England
Thailand
Taiwan
33 1-48 25 35 95
44-1628-478011
662-531-8111
886-2-719-6075
SeaBOARD: Use a modem to contact the Seagate computer
bulletin board, which supports communications up to 9,600
baud (8-N-1). SeaBOARD is available 24 hours daily.
Please read this installation guide before you install your
new drive. If you are not familiar with the procedures
outlined here, have a qualified computer technician perform
the drive installation. If you need assistance installing this
drive, first consult your dealer, who can help you with
system conflicts and other technical issues. If you need
additional assistance, use one of the services listed below,
or call the Seagate support line at 1-800-SEAGATE.
Hardd Drives
ATA/IDE Har
Medalist 1276 (ST31276A)
Medalist 1082 (ST31082A)
Medalist 636 (ST3636A)
NSTALLA
ALLATION
ALLA
TION GUIDE
Q UICK INST
Technical support services
IMPORTANT PRECAUTIONS
• Do not format your new drive before reading the
instructions in this manual. Formatting the drive
removes the Disk Manager software that is supplied
with the drive.
• Always handle the disc drive carefully, holding its edges
or frame. Do not touch the connectors or any part of the
printed circuit board.
• Keep the drive in its antistatic bag until you are ready to
install it.
• Set the drive down only on a flat, padded, non-static
surface.
• This drive is susceptible to damage from electrostatic
discharge. Before handling the drive, ground yourself by
touching the grounded chassis of your computer. For
optimum protection, wear a grounded antistatic wrist
strap.
• Make sure your computer is turned off before opening the
case. Do not unplug your computer if you will be using it
for antistatic grounding.
• Do not remove the drive cover. The drive contains no
user-serviceable components.
• Save your Seagate packing materials for future use.
Using any other container or packing material voids your
drive warranty and may damage your drive.
LIMITED WARRANTY STATEMENT
Seagate warrants that your Seagate disc drive will be free from defects in material and
workmanship and will perform to Seagate’s applicable specifications for Seagate’s threeyear warranty period. The warranty period will be calculated from the date of original
purchase.
Seagate will replace, at no charge, any drive that does not meet our warranty. The drive
must be returned in the packaging provided by Seagate with transportation charges
prepaid to the authorized Seagate destination.
This warranty is void if defect has resulted from accident, abuse, unauthorized repair or
misapplication.
WITH REGARD TO THE DISK MANAGER SOFTWARE, THERE ARE NO WARRANTIES OF
MERCHANTABILITY OR FITNESS FOR A PARTICULAR PURPOSE AND ALL SUCH
WARRANTIES ARE EXPRESSLY AND SPECIFICALLY DISCLAIMED.
DISCLAIMER: EXCEPT FOR THE ABOVE EXPRESS LIMITED WARRANTIES OR
CONDITIONS, SEAGATE MAKES NO WARRANTIES ON THE PRODUCTS, EXPRESS,
IMPLIED, OR STATUTORY, AND SEAGATE SPECIFICALLY DISCLAIMS ANY IMPLIED
WARRANTY OR CONDITION OF MERCHANT ABILITY OR FITNESS FOR A PARTICULAR
PURPOSE. This limited warranty gives you specific legal rights. You may have others,
which vary from state to state.
IN NO EVENT WILL SEAGATE’S LIABILITY OF ANY KIND INCLUDE ANY LOST PROFITS,
LOSS OF USE, LOSS OF DATA, OR ANY SPECIAL, INCIDENTAL, OR CONSEQUENTIAL
DAMAGES, EVEN IF SEAGATE HAS KNOWLEDGE OF THE POSSIBILITY OF THE POTENTIAL
LOSS OR DAMAGE. Some states do not allow for the exclusion or limitation of liability for
consequential or incidental damages, as such, the above limitations may not apply to you.
Documentation: Seagate Technology makes no warranty of any kind with regard to this
material, including, but not limited to, the implied warranties of merchantability and fitness
for a particular purpose. Seagate Technology shall not be liable for errors contained herein
or for incidental consequential damages in connection with the furnishing, performance,
or use of this material. Seagate reserves the right to change, without notice, product
offerings or specifications.
Seagate®, Seagate Technology® and the Seagate logo are registered trademarks of
Seagate Technology, Inc. SeaFONE TM , SeaTDD TM , SeaBOARD TM and SeaFAX TM are
trademarks of Seagate Technology, Inc. Other product names are registered trademarks or
trademarks of their owners.
© 1996 Seagate Technology, Inc. All rights reserved.
No part of this publication may be reproduced in any form without written permission from
Seagate Technology, Inc.
P/N 21200047-001,Rev. B, August, 1996
INSTALLATION PROCEDURE:
Configuring the drive
1. Turn off your computer and remove the cover.
2. Configure the disk drive jumpers as necessary. Refer to the
illustration below for details.
40-pin ATA
interface
connector
pin 1
4-pin power
connector
2 4 6
Master/slave
jumper settings
1 3 5
5. Save the drive-type settings and exit the system setup program. You
will have to reboot your computer for the changes to take effect.
6. After you reboot your computer, you should be able to access the
software on your new hard disc. If your new hard drive is drive C,
type C:\SEAMOVE. Press [ENTER] to transfer the disc support
software. Use a different drive letter if necessary.
The SEAMOVE program transfers the Disk Manager files from your
new hard disc to the bootable diskette in drive A. After all the files
have been transferred, SEAMOVE deletes all the files from the hard
drive, along with the temporary partition that held them.
Running Disk Manager from your bootable software diskette
1. Simultaneously press [CTRL], [ALT], and [DEL] to reboot your
computer from the bootable diskette that now contains the Disk
Manager software. During the start-up process, enter your
computer’s system setup program, as described previously.
Drive is slave
Drive is master in singleor dual-drive system
Drive is master with
non-ATA-compatible slave1
1 Use this jumper setting only if the drive does
Enable Cable Select2
2 Consult your computer manual to determine
not work with a single jumper on pins 5 and 6.
if your system supports cable select.
Connecting cables and mounting the drive
1. Connect the interface cable to the drive. Make sure that pin 1 on the
interface cable (colored stripe) is attached to pin 1 on the drive (see
above) and pin 1 on the host adapter.
2. Partially insert the drive into the drive bay. Select an unused power
connector from the power supply and connect it to the drive. If
there are no unused power connections on the power supply, you
can purchase a “Y” cable adapter from your dealer. This connector
will allow you to add another power connection for your new drive.
3. Secure the drive with four 6-32 x 0.25 screws. CAUTION: If you use
screws longer than 0.25 inch when mounting the drive, you may
damage the drive’s circuit board. The maximum insertion depth for
the bottom mounting holes is 0.25 inch; the maximum insertion
depth for the side holes is 0.125 inch.
About Disk Manager Software
This Seagate drive is shipped with free Disk Manager software
installed on a temporary partition on the drive. This software
partitions and formats the drive and allows older computers to
access the drive’s full capacity.
Before you can use the Disk Manager software, you must transfer it from
the temporary partition on the drive to a bootable diskette with at least
one Mbyte available. To create a bootable diskette, see your DOS manual.
Transferring the software to a bootable diskette
1. Insert a bootable diskette into drive A.
2. Simultaneously press [CTRL], [ALT], and [DEL] to reboot your
computer from the bootable diskette.
3. During the start-up process, enter your computer’s system setup
program (sometimes called BIOS or CMOS setup). This is usually
done by pressing a special key, such as [DELETE], [ESC], or [F1]
during start-ups. See your computer or motherboard manual for
system-specific instructions.
4. Within the system setup program, configure your new hard drive as
Drive Type 2, or enter the following values for a user-definable drive
type: 615 cylinders, 4 heads, and 17 sectors per track. These
temporary settings allow you to access the Disk Manager software
on your new hard disc.
2. Within the system setup program, make sure that a drive type is
listed for each ATA hard drive in your computer. Some newer
computers can automatically determine drive-type characteristics,
using the Auto drive-type setting. If your computer does not
provide this option, you must manually enter the number of
cylinders, heads, and sectors per track for your new drive, as
shown in the table below.
Model
Heads
Cylinders Sectors
Capacity*
ST31276A 16
2482
63
1275 Mbytes
ST31082A 16
2097
63
1080 Mbytes
ST3636A 16
1241
63
635 Mbytes
*1 Mbyte = 1,000,000 bytes
3. Save the drive-type settings and exit the system setup program.
You will have to reboot your computer for the changes to take
effect.
4. At the DOS prompt, type A:\DM. Press [ENTER] to run Disk
Manager
5. Follow the instructions on your computer screen. From the main
menu, select (E)asy Disk Installation. Then press [ENTER].
6. At this point, Disk Manager lists all the hard drives that it can
recognize. You should see your new Seagate drive and your old
hard drive (if any). If Disk Manager recognizes all your drives,
select the new drive you wish to install and press [ENTER]. Disk
Manager will format and partition your new drive.
If a hard drive is not recognized, exit Disk Manager and turn off
your computer. Check all cables, jumpers and BIOS settings. Then
run Disk Manager again.
7. Follow the instructions on the Disk Manager post-installation
screens. You're done!
NOTES:
1) If your computer does not require software support for large hard
drives, Disk Manager will optimize your system BIOS settings, then
partition and format your new hard disc.
2) If Disk Manager has installed software to help your computer
access a large hard drive, you should see a blue Disk Manager
banner each time you boot your computer. In this case, if you need
to boot from a diskette instead of from your hard drive, see the Disk
Manager online manual for instructions.
3) To view the Disk Manager online manual, insert the Disk Manager
diskette and type A:\DM /H. Then press [ENTER]. You can also view
the online manual from within Disk Manager by selecting (V)iew/Print
Online Manual in the main menu.