1
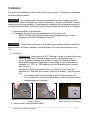
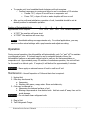
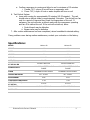
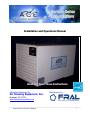
Horizon Series Dehumidifiers Installation and Operations Manual Read and Save These Instructions Distributed Exclusively By: Air Cleaning Equipment, Inc. Manufactured by: Broadway, NC 27332 www.horizondehumidifiers.com __________________________________________________________________________________ Horizon Series Owner’s Manual 1 Safety Notes: • • • • • • • • • The Horizon Series Dehumidifier must always be connected using the grounded electrical connection as required from all electrical appliances. The warranty is voided and all responsibility for the operation is born by the owner if non-grounded wiring is utilized. The Horizon Dehumidifiers must only be maintained and serviced by a qualified technician. The Horizon Dehumidifiers are intended only for operation when oriented with the unit sitting on its feet and level. Any other orientation could cause water to come in contact with the electrical components. Remove plug before moving dehumidifier. If any water may have spread throughout unit, the unit should be opened and allowed to dry thoroughly before reconnected to electric and restarting. For proper operation, neither the inlet nor discharge should be positioned against a wall. The inlet requires a minimum of 12” clearance and the discharge needs a minimum of 24” clearance. For proper diffusion of air throughout the room, the dehumidifier should be positioned with the sides against a wall and the inlet and discharge perpendicular to the wall. Do not insert any objects into the inlet or discharge. If service is required, call a qualified technician. All work on unit should be done with the unit “off” and unplugged. Do not use water to clean unit exterior. Only use a damp cloth with unit unplugged. Do not use unit as shelf or device to hang clothes. This could cause damage to unit. The inlet filter generally needs cleaned no more than once per month. Check unit on a weekly basis to insure that more frequent cleaning is not required. __________________________________________________________________________________ Horizon Series Owner’s Manual 2 Identification: For future reference, write down the model, serial number, date of purchase and use this information whenever corresponding concerning your dehumidifier. Model Number Serial Number Date of Purchase Horizon ______________________ _____________________________ _____________________________ Customer Service: For additional questions concerning the operation of your dehumidifier, please: Contact your installing contractor Please call ACE at 919-258-3330 Email: [email protected] Warning 120 Volts AC may cause serious injury from electric shock. 1. 2. 3. 4. Disconnect electrical power before servicing Plug unit only into grounded electrical outlet Do not use extension cord Do not use plug adapter Power Supply: Outlet Requirement: Circuit Protector: 115V, 60 Hz AC Only 1 Phase 3-Prong, GFI 15 Amp Time Delay Fuse or Circuit Breaker Principle of Operation The Horizon Series Dehumidifier utilizes its integral humidistat or optional remote mount humidistat to monitor the conditioned space. When the relative humidity goes above the selected set point, the dehumidifier will energize. Air is drawn across an evaporator coil. The evaporator coil is cooler than the dew point of the air so moisture will condense out of the air (below 80°F you will actually see ice forming on the evaporator coil). Air is then reheated through the condenser coil and distributed back into the room. __________________________________________________________________________________ Horizon Series Owner’s Manual 3 Installation The area to be controlled should be sealed with a vapor barrier. If installed in a crawlspace, all vents should be sealed. WARNING: It is recommended to remove dehumidifier from area if applying a liquid vapor barrier. Some coatings dry via “solvent evaporation,” which can be harmful to certain components in your dehumidifier. Allow coating to completely dry and exhaust vapors prior to positioning dehumidifier. Read and follow coating manufacturer’s instructions completely. Place dehumidifier on level surface If necessary, the legs have some adjustment to help level the unit. o NOTE: On units with optional integral pump, an additional pair of legs is provided to give further adjustment (up to 3”) WARNING – If after unit is positioned, it is moved in such a manner that the compressor didn’t remain in a vertical orientation, wait a minimum of 2 hours before turning the unit “on.” Drain Line o Standard Unit - Route drain line (3/4” ID tubing) to drain or outside of the area. Drain line must have a downward slope to drain or condensate pump. A section of garden hose using the female connection for attaching hose to dehumidifier works well. Depending on hose fitting, it may be necessary to purchase a ¾” FPT x ¾” MGH adapter at a local hardware store to create a leak-free joint. o Optional Unit with Integral Drain Pump – Unit has 50’ of 1/8” drain line attached to it. Run drain line to drain or exterior of building. Trim any excess line. Do not place outlet of drain line higher than 4.5’ above top of unit. If it is necessary to move unit, drain button on exterior of cabinet allows complete draining of reservoir. Unit drain line can be extended to 20’ with extra line and coupling adapter provided in packaging Manual Drain Button on exterior of cabinet allows for purging drain sump Plug unit into 15 amp grounded outlet. __________________________________________________________________________________ Horizon Series Owner’s Manual 4 To operate unit, turn humidistat knob clockwise until unit energizes. o Confirm compressor is running and allow to run for minimum of 15 minutes If under 70°F, a layer of ice will form on evaporator coil If over 70°F, a layer of frost or water droplets will form on coil After you’ve confirmed satisfactory operation of unit, humidistat should be set at desired position for automatic operation. Position of Dehumidistat Knob Approximate Room Setpoint • • 1 2 3 4 5___________________ 70% 60% 48% 35% 25% Relative Humidity In “OFF” the machine will never start In “CONT” the machine will never stop NOTE: Humidistat settings are approximate only. For critical applications, you may want to confirm actual settings with a psychrometer and adjust according. Operation During normal operation, the dehumidifier will automatically cycle “on” and “off” to maintain your desired set point. If it should need to run for extended periods of time, the dehumidifier features an automatic defrost cycle to melt any ice that accumulates on evaporator coil. Approximately every 35 minutes of continuous operation, the unit will test for the need for a defrost cycle. If required, it will defrost for approximately 3 minutes. Warning: Never apply an external source of heat to melt ice off coil. Maintenance – Annual Inspection of Coils and drain line is required. 1. Unplug Unit 2. Filter may be cleaned by a. Vacuuming b. Washing with warm, soapy water. Rinse and shake dry. 3. Coils may be cleaned by a. Vacuuming the external surfaces of coil b. Blowing compressed air from behind coils. Hold air nozzle 6” away from coil to avoid damage. Warning: Do not steam clean refrigerant coils. 4. Plug in Unit 5. Test Refrigerant Charge __________________________________________________________________________________ Horizon Series Owner’s Manual 5 a. Confirm compressor is running and allow to run for minimum of 15 minutes i. If under 70°F, a layer of ice will form on evaporator coils ii. If over 70°F, a layer of frost or water droplets will form on coil 6. Test Defrost System a. Leave unit running for approximately 35 minutes (45-55 minutes). The unit should enter a defrost mode for approximately 3 minutes. The unit will run fan only for a period of time and then check the temperature of the coil. If necessary, the unit will enter a defrost mode with the compressor operating and fan off to defrost the coil If the unit will not defrost, either i. Control board may be defective ii. Bypass valve may be defective 7. After routine maintenance has been completed, return humidistat to desired setting. If any problems occur during routine maintenance, contact your contractor or the factory. Specifications: MODEL Horizon 30 Horizon 50 HEIGHT 16” 16” WIDTH 13.8” 13.8” LENGTH 23” 23” WEIGHT 60.00 LBS 62.00 LBS AIRFLOW 200 CFM 350 CFM 35 PINTS PER DAY 50 PINTS PER DAY 115 VOLT/60 HERTZ SINGLE PHASE 115 VOLT/60 HERTZ SINGLE PHASE POWDER-COATED EPOXY POWDER-COATED EPOXY 33 F TO 90 F 33 F TO 90 F REFRIGERANT R-22 R-22 CONDENSATE DRAIN SIZE ¾” M ¾” M 3.5 FLA 4.2 FLA 20’ GROUNDED PLUG 20’ GROUDED PLUG 11x11” 11x11” MOISTURE REMOVAL AT 80F/60% RH POWER SUPPLY FINISH OPERATING RANGE AMPS (FULL LOAD) AT 80F/60% POWER CORD FILTER SIZE __________________________________________________________________________________ Horizon Series Owner’s Manual 6 Parts List 1 7 1 2 3 11 2 12 4 5 6 13 10 9 8 Horizon Series Parts List Item 1 2 3 4 5 6 7 8 9 10 11 12 13 Not Shown Part Number Horizon 30 Part Number Horizon 50 DH-30-101 DH-101 DH-30-102 DH-30-103 DH-102 DH-30-104 DH-103 DH-104 DH-105 DH-106 DH-107 DH-30-105 DH-30-106 DH-108 DH-50-101 DH-101 DH-50-102 DH-50-103 DH-102 DH-50-104 DH-103 DH-104 DH-105 DH-106 DH-107 DH-50-105 DH-50-106 DH-108 Description Compressor Humidistat Fan Motor Fan Blade Thermostat Capacitor Relay Solenoid Coil Solenoid Valve Power Cord Control Board Condenser Coil Evaporator Coil Integral Condensate Pump __________________________________________________________________________________ Horizon Series Owner’s Manual 7 Notes for Accessories, Optional Equipment 1. Condensate Pump – Water must flow via gravity directly into condensate pump. A small section of garden works well for most pumps. Discharge condensate hose should empty into sump pump or existing drain. If freezing temperatures will not be an issue, it is also possible to drain unit outside. See instructions with pump. 2. Remote Humidistat – Existing humidistat circuit is 120 VAC. It does turns unit on/off via relay so the humidistat doesn’t handle unit’s full amp draw. If you utilize an external plug-in stat, you will need to insure that it can handle the full load current of the compressor (7 amps at Saturation Conditions). Warranty Seller warrants the equipment to be free from defects in workmanship and material for a period of 12 months after shipment (36 months on compressor). This warranty is limited, however, to the repair or replacement of defective equipment, which is returned, freight prepaid, to the Seller’s factory. This limited warranty does not apply to any part or component that is damaged in transit or when handling, has been subject to misuse, has not been installed, operated or serviced according to the Seller’s instructions, or has been operated beyond the factory-rated capacity or has been altered in any way. Routine maintenance is not covered by this warranty. Seller’s liability is limited to replacement of defective parts or components and does not include any cost of labor (including, but not limited to, labor to remove and/or reinstall any defective part). ACE shall not be responsible for loss of use of any product, loss of time, inconvenience, or damage to other equipment, or any other indirect or consequential damage with respect to property whether as a result of breach of warranty, neglect, or otherwise. THE WARRANTIES AND LIABILITIES SET FORTH ARE IN LIEU OF ALL OTHER WARRANTIES EXPRESSED OR IMPLIED, IN LAW OR IN FACT, INCLUDING IMPLIED WARRANTIES OF MERCHANTABILITY AND FITNESS FOR PARTICULAR PURPOSE. The foregoing shall constitute the total liability of seller in the case of defective performance of all or any of the equipment or services provided to Buyer. Buyer agrees to accept and hereby accepts the foregoing as the sole and exclusive remedy for any breach or alleged breach of warranty by Seller. __________________________________________________________________________________ Horizon Series Owner’s Manual 8