1
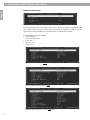
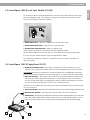
BOSE ControlSpace AMS-8 Audio Management System
®
™
User Guide
The manufacturer reserves specification privileges. Information in this manual is subject to change without prior notice or obligation.
Der Hersteller behält sich das Recht vor, Änderungen im Sinne des technischen Fortschritts durchzuführen, die u.U. noch nicht in dieser
Bedienungsanleitung berücksichtigt wurden.
Table of contents
1. Introduction
Features and functions
4
2. ControlSpace AMS-8 system rack control
™
Main menu
5
Room settings menu
5
Event scheduler menu
6
System standby menu
8
Room combining menu
8
Date and time menu
8
FM input cards menu
8
Installation menu
9
3. System control
3.1 ControlSpace Wall Controller
™
10
3.2 ControlSpace Remote Control
10
3.3 ControlSpace Local Input Module
11
3.4 ControlSpace Paging Panel
11
™
™
™
4. Privileged User Software
PC requirements
12
4.1 Room Control
12
4.2 Paging Panel
13
4.3 Room combining
14
4.4 Scheduler events
14
5. Troubleshooting
15
European sales offices
16
1. Introduction
English
Introduction
The Bose ControlSpace AMS-8 Audio Management System is a flexible, expandable and high quality
audio signal processor for audio distribution applications such as restaurants, shops, bars, offices, hotels,
conference facilities and sport venues. The main unit includes eight line inputs and eight line outputs. Four
available audio slots allow the addition of up to 8 more audio inputs (2 inputs per card).
™
For more zones, up to 10 AMS-8 system racks can be used per system. Each added system rack adds
8 zones to the system. Multiple choices of user interfaces are available to provide end-users a simple,
easy-to-use operation of their ControlSpace AMS-8 system.
The Bose ControlSpace AMS-8 Live Installer software is used to design systems and configure the
AMS-8 and user interfaces. The software runs on a PC and communicates with the AMS-8 system using
serial communication (RS232), or optional via ethernet (requires PC Kit)
™
Features and functions
• Expandable and flexible cardframe architecture
• 8 (up to 16) analogue line level input channels
• Eight analogue line level output channels
•GPIO: 8 general purpose control inputs (to activate messages, roomcombining presets or room standby)
and 1 general purpose control output
• Design, configuration and system control via PC-based software programs
•Digital signal processing including: Bose speaker EQs, Dynamic EQ, delay,
gain control and source selection
• LCD screen and navigation buttons
• Wall Controller (optional)
• IR remote to control wall controller (optional)
• Local Input Module (optional)
• Paging functionality (optional Paging panel is required)
• Messaging functionality (optional Message Storage Card is required)
• Tuner functionality (optional Twin Tuner Card is required)
• Automatic detection of input card type
• Room Combining functionality
• Event Scheduling functionality
2. ControlSpace AMS-8 System rack control
™
2. ControlSpace AMS-8 System rack control
™
English
1
2
1. LCD SCREEN
The LCD screen shows the menu items with the settings per menu item. The language of all displayed
items can be changed between English, Dutch, Danish, Swedish, Polish, Italian, Spanish, German and
French. Language selection is only available in the installation menu.
2 . NAVIGATION BUTTONS
With the up- and down buttons one can scroll through the menu items and with the left- and right buttons one
can change the values of the selected menu item. The OK button functions as the enter button on a keyboard.
By pressing OK when e.g. the ‘Room Settings’ menu item is highlighted, one enters the Room Settings menu.
MAIN MENU
In the MAIN MENU one can select the item which needs to be changed, adjusted or activated.
ROOM SETTINGS MENU
In the ROOM SETTINGS menu one can select the specific room which needs to be changed.
In this submenu of the ROOM SETTINGS menu one can turn the room on or off by changing
the status and one can change the volume level and the source selection of the selected
room. This submenu also shows the status of the room and the status of the communication/
connection to the optional wall controller. ‘Status On’ means that a source is selected.
The connection status is shown by ‘WC-‘ or ‘WC+’. WC- means that there is no communication
with a Wall Controller in that room, e.g. no Wall Controller is connected. WC+ means the
system recognized a connected Wall Controller in that room.
2. ControlSpace AMS-8 System rack control
™
English
EVENT SCHEDULER MENU
In the event scheduler menu a pre-configured event can be selected. The settings of the first 10 (of 40)
(pre-configured) events can also be changed in this part of the menu. Examples of events are: Turn the
system rack on at Monday 08:00, Page a certain message every Wednesday at 15:00.
The following Event types are available:
• System Standby
• Room Combining Preset
• Audio event
• Message event
• Switch event
Event to (de-)activate System Standby
Event to activate a Room Combining preset
Event to temporary change to another Audio input
2. ControlSpace AMS-8 System rack control
™
English
Event to activate pre-recorded messages
Event to Switch between different sources or to turn a room on or off
For those event types wherein one can select a room or a day, the following sub menus are shown:
Select the required days for the event.
Select the required rooms for the event.
2. ControlSpace AMS-8 System rack control
™
English
SYSTEM STANDBY MENU
In the SYSTEM STANDBY menu one can put the system in standby.
ROOM COMBINING MENU
In the ROOM COMBINING menu one can turn on one or more pre-configured room combining presets.
The settings of the first 10 (of 40) (pre-configured) presets can also be changed in this part of the menu,
see below submenu.
DATE AND TIME MENU
In the DATE AND TIME menu one can change date and time and presentation formats of the date and time.
FM INPUT CARDS MENU
In this menu one can select another Tuner preset (only if Tuner Card is installed)
2. ControlSpace AMS-8 System rack control
™
English
Select yes to proceed and select another FM-preset
In this submenu one can select another FM-preset
INSTALLATION MENU
Via the ‘INSTALLATION’ item of the main menu the INSTALLATION MENU can be entered.
To get access to the installation menu of the system rack a 4 digit pin code needs to be entered.
This menu is only available for authorized people (e.g. Installer or Bose Professional Systems engineer)
3. System control
3.1 ControlSpace AMS-8 Wall Controller (CS-WC)
English
™
1
2
3
1. LCD SCREEN
- Screen to control Wall Controller.
The LCD screen shows the selected channel and volume.
2. VOLUME ButtonS
- Buttons to change the volume level
3. CHANNEL ButtonS - Buttons to switch between channels/sources
The ControlSpace AMS-8 Wall Controller has a built-in infrared receiver so a remote control may be used
(see chapter 3.2)
™
3.2 ControlSpace AMS-8 Remote control (CS-RC)
™
This infrared remote control allows users to operate the ControlSpace AMS-8 Wall Controller from a distance.
3
2
1
4
1. ON / OFF button
– Button to switch the wall controller on or off.
2. VOLUME buttonS – Buttons to change the volume level for the room
where in the wall controller is installed.
3. CHANNEL buttonS – Buttons to change between channels/ sources
for the room in which the wall controller is installed.
4. SOURCE buttonS – Buttons to directly select a source/ channel
for the room in which the wall controller is installed.
10
3. System control
3.3 ControlSpace AMS-8 Local Input Module (CS-LIM)
™
English
The ControlSpace AMS-8 Local Input Module allows to use the central sound system for sound sources
that can be plugged in locally, e.g. a CD player, a microphone or a laptop for a presentation or movie.
The level of the microphone gain can be adjusted.
1
2
3
1. AUDIO INPUT (RCA) – Input Left and Right for a local audio source input
2. MICROPHONE INPUT (XLR) – Input socket for a local microphone
3. MICROPHONE GAIN ADJUSTER – Adjuster to adjust the gain
Turn the adjuster anti clockwise to decrease the gain with a minimum of 32dB.
Turn the adjuster clockwise to increase the gain to a max of 66dB. The factory gain setting is 38dB.
If one uses the audio and the microphone input, both signals will be audible.
The CS-LIM can be configured so the inputs are available in all rooms or only in the specific room
where it is installed.
3.4 ControlSpace AMS-8 Paging Panel (CS-PP)
™
1. ROOM SELECTION buttonS – By pressing a room button one selects a specific room or zone
(group of zones) for paging. The indicator (led) next to the button lights up green when it is selected.
Room blocking: By pressing a room button for 2 seconds, the indicator next to it will light up red. This means
this room is now blocked for paging. Press the same button again for 2 seconds to release the ‘block’ situation.
2. MESSAGE buttonS – One can page a pre-recorded message by first selecting the required room(s)
followed by pressing the appropriate message button. To stop a playing message, one should press
the same message button again. The paging function still has a higher priority: during a pre-recorded
message anouncement the microphone can be used to override this message.
This function is only available if the optional message storage card is installed and pre-recorded messages
are stored on this card.
3. SELECT ALL BUTTON – By pressing the ‘select all’ button all rooms are selected (except the blocked rooms).
4. DESELECT ALL BUTTON – By pressing the ‘deselect all’ button all rooms are deselected.
1
5. TALK BUTTON – After pressing the talk button the indicator just above this button lights up red, at the same
time a chime signal is activated and routed the selected rooms. As soon as this indicator turns green one can
page a live spoken message, as long as the button is pressed. Releasing this button will stop the paging.
2
4
1
5
2
3
11
English
4. PRIVILEGED USER SOFTWARE
4. Privileged user software
PC requirements
Minimum requirements for
ControlSpace AMS-8 Privileged User Software:
™
- Hardware:
Minimum 1Ghz Pentium based PC
256MB free RAM
CD ROM player
50MB free internal Hard disk space
- Operating system(s)
Windows 2000, Windows XP and higher
- Display
Minimum 1024x768 resolution, 16 bit color (32 bit
recommended)
- Com Port requirements
Com Port 1 to 4 only
4.1 Room Control
Room Control can be used to change the source and volume settings of a room.
This module contains 3 displays, showing:
1. the selected room (left display)
2. the selected source (right display)
3.a listing of available sources and rooms, depending on the button pressed.
When no button is pressed, the third display shows the actual status of the room.
Press this button to turn a room on/off
Settings button (Pin-code protected)
Button to open all modules (Paging panel & Presets/Events, only available in Multi User Mode)
Room select: Press this button at the left to select another room to control
(only available in Multi User Mode)
Select: Press this button at the right to select another source to listen to
Minimize/Close button
Volume fader: Move this fader to adjust the level in the room, shown on the display
12
Mute: Press this button to mute the source (only available in Single User Mode)
4. PRIVILEGED USER SOFTWARE
English
4.2 Paging Panel
The paging panel can be used to page into one or more rooms/zones by using a separate microphone.
This panel can also be used to send a pre-recorded message (or commercial or music track) into one or
more selected rooms/zones (only in combination with ControlSpace AMS-8 Message Storage Card).
™
Press this button to turn a room on/off
Settings button (Pin-code protected)
Zone button: Press to select a room/zone (button turns into green).
Press and hold until the button changes to red, to block a room/zone for paging/ messaging
Message select: Push this button to select a message listed in the Status Display
Push to talk: Press this button to make a page into the selected room(s)/ zone(s)
(a chime signal will be played before the microphone will be released for paging)
Push to talk: Up to 3 extra ‘push to talk’ buttons can be assigned to allow paging
at different paging levels.
Press this button to select all zones at once
Press this button to deselect all zones at once
Paging/Message Status display: Shows the status of paging and messaging of the whole
system, also if a page or message is activated from another user interface, e.g. a hardware
paging panel or via the ControlSpace AMS-8 Event Scheduler.
™
13
English
4. PRIVILEGED USER SOFTWARE
4.3 Room Combining
This module can be used to activate up to 40 Room Combining presets. All programmed presets will be
listed in the status display (the lowest display in the picture below). To activate: Click on one of the listed
presets. A highlighted preset indicates that these are active at the moment. When a red indicator is shown
in front of a preset, one can not (de-)activate this preset (User disabled or blocked due to room overlap).
One is able to configure 10 of the 40 Room Combining presets and the user ability to control these on the
AMS-8 system rack. All other Room Combining presets can only be configured by your system installer.
Settings button (Pin-code protected)
Button to open all modules (Paging panel & Presets/Events, only available in Multi User Mode)
Preset select: Press this button (at the left) to (de-)activate another preset
4.4 Event Scheduler
This module can be used to activate up to 40 events from the Event Scheduler. All programmed events
will be listed in the status display (the lowest display in the picture below). To activate: Click on one of
the listed events. A highlighted event indicates that these are active at the moment. When a red indicator
is shown in front of an event, one can not (de-)activate this event (User disabled or blocked due to room
overlap). The user is able to configure 10 of the 40 events and the user ability to control these on the
AMS-8 system rack. All other events can only be configured by your system installer.
Settings button (Pin-code protected)
Button to open all modules (Paging panel & Presets/Events, only available in Multi User Mode)
14
Preset select: Press this button (at the left) to (de-)activate another preset
5. Troubleshooting
No paging/dingdong from
user software
Check cabling between PC-soundcard, microphone and system rack.
Check the volume settings of the PC-soundcard
No control/
communication from
CS-WC/CS-PP:
- CS-WC displays:
‘Check connections’ >
- CS-PP: Talk-LED blinks
between red and green >
Check the cabling between CS-WC/CS-PP and the system rack.
In the room settings menu of the system rack, the status of the wall
controller is shown. If it shows ‘WC-‘, then there is no communication
to the specific wall controller. ‘Check-connections’ indicates a failure
in the communication (cable) to the Wall Controllers. A red to green
blinking Talk-LED indicates a failure in the communication (cable)
to the paging panel
No communication/control
between PC and AMS-8
system rack when using
the Privileged User
Software
Check the RS232 cable between Computer and AMS-8 system rack.
Reduce the length of the cable (10m max.). If a PC-Kit is used:
Restart the software. Check the LAN connection between computer
and the AMS-8 system rack. If the connection is ok and after restart
messages like “No System Rack Found” are still being displayed,
please contact your Bose Professional Systems dealer
English
5. Troubleshooting
15
European sales offices
English
How to reach the sales offices in Europe
Austria
Professional Systems Division, Austria
Bose Ges.m.b.H., Business Park Vienna
Wienerbergstrasse 7, 10 O.G.
1100 Wien, Österreich
Telephone: 01-60404340
Fax: 01-604043423
Belgium
Professional Systems Division, Belgium
Bose N.V., Limesweg 2
3700 Tongeren, België
Telephone: 012-390800
Fax: 012-390840
Denmark
Professional Systems Division, Denmark
Bose Danmark A/S, Industrivej 7
PO Box 14, 2605 Brøndby, Danmark
Telephone: 43437777
Fax: 43437818
France
Professional Systems Division, France
Bose S.A., 12 rue de Témara
78100 Saint Germain en Laye
Telephone: 01-30616363
Fax: 01-30616388
Germany
Professional Systems Division, Germany
Bose GmbH, Max-Planck-Straße 36,
61381 Friedrichsdorf, Deutschland
Telephone: 06172-7104-0
Fax: 06172-7104-19
Ireland
Professional Systems Division, Ireland
Bose GP, Castleblayney Road
Carrickmacross, County Monaghan
Republic Of Ireland
Telephone: 042-9661988,
Fax: 042-9661998
Italy
Professional Systems Division, Italy
Bose SpA, Via della Magliana 876
00148 Roma, Italia
Telephone: 066-5670802, Fax: 066-5680177
16
The Netherlands
Professional Systems Division, The Netherlands
Bose B.V., Nijverheidstraat 8
1135 GE Edam, Nederland
Telephone: 0299-390139
Fax: 0299-390109
Norway
Professional Systems Division, Norway
Bose Filial till Bose A/S Danmark, Lerkev 58
2209 Kongsvinger, Norge
Telephone: 062-821560
Fax: 062-821569
Poland
Bose sp. z o.o., ul.
Wołoska 12, 02-675 Warszawa
Tel.: (48) 22-852-2928
Faks: (48) 22-852-2927
Switzerland
Professional Systems Division, Switzerland
Bose AG, Hauptstrasse 134
4450 Sissach, Sweiz
Telephone: 061-9757733
Fax: 061-9757744
Spain
Gaplasa S.A.
Avda. Ingeniero Conde de Torroja 25
28022 Madrid, España
Telephone: 91 748 29 60
Fax: 91 329 16 75
Sweden
Professional Systems Division, Sweden
Bose, filial till Bose A/S Danmark
Johannefredsgatan 4, 43153 Mölndal, Sverige
Telephone: 031-878850
Fax: 031-274891
United Kingdom
Professional Systems Division, United Kingdom
Bose Ltd., 1 Ambley Green
Gillingham Business Park
Gillingham, Kent ME8 0NJ, England
Telephone: 0870-741-4500
Fax 0870-741-4545