1
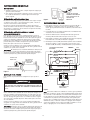
MOUNTING INSTRUCTIONS
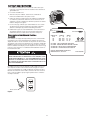
CIRCULAR
HOLE
General
1. In workshops, locate heater away from sources of wood dust.
2. When heater is mounted on the wall or ceiling, provisions
must be made to bundle or otherwise prevent excess power
cord from draping loose.
USE CIRCULAR
HOLES FOR CEILING
MOUNTING.
DO NOT USE KEYHOLES.
Floor Application
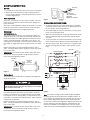
Figure 2
The heater, as received, is set up for floor mounting. Place the
heater on floor or other flat surface and insert the plug into the
proper wall outlet.
OPERATING INSTRUCTIONS:
1. To operate the heater, first select either high or low position
on the heat selector switch, then turn the thermostat knob as
far as it will go in the clockwise direction.
The heater can be adjusted to redirect the airstream. To do this,
simply loosen the knob on either side of the heater, then pivot
heater to desired position and re-tighten both knobs.
2. The indicator light will come on and remain on as long as the
heater is in the operating mode.
Wall Mount
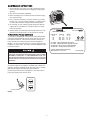
SEE WARNING NO. 12.
3. When the room temperature reaches the desired level, slowly
turn the thermostat knob counterclockwise until the thermostat clicks.
This heater may be mounted on any wall that will support the
weight of the heater. First remove the mounting stand from the
heater, then remove four rubber grommets from stand. Secure
stand to structural members of wall with four 1/4” dia. X 1-1/2”
long lag bolts (not provided). In masonry walls use metal expansion shields or toggle bolts. Never use bolts smaller 1/4” diameter.
4. To turn the heater off, turn thermostat knob as far as it will go
in the counterclockwise direction until the indicator light is off.
5. The fan selector switch allows continuous or cycling fan operation by selecting either the “ON” or “Auto” position, respectively.
Replace the heater in the stand and tighten knobs to lock in
place. Two large rubber washers go between heater and stand,
one on either side.
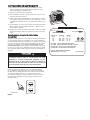
HEAT SW. 1
HI
ELEMENTS FRONT
REMEMBER: The electrical outlet must be within reach of the
six foot cord. Be sure to provide enough clearance to pivot
heater and reach adjustment knobs.
2
MIDDLE
3
LOW
REAR
KEYHOLE
SLOT
Figure 1
MOUNTING
HOLES
ARE 16” O.C.
AUTO 1
MOTOR
USE
KEYHOLES
FOR WALL
MOUNTING
6
2
FAN SW.
TERMINAL BLOCK
3
ON
4
INDICATOR LIGHT
Ceiling Mount
L1
L2
OFF
CYL
This heater may be mounted to any ceiling that will support the
weight of the heater.
THERMOSTAT
TO PREVENT HEATER FROM POSSIBLY FALLING, DO NOT
USE KEYHOLE SLOTS FOR CEILING MOUNT APPLICATION.
SEE ALSO WARNING NO. 13.
MANUAL RESET
THERMAL LIMIT
First remove the mounting stand from the heater, then remove
four rubber grommets from stand. Secure stand to structural
members of ceiling with four 1/4” diameter bolts (not provided).
In wood joist use 1-1/2” long lag bolts. In steel beams use machine bolts secured with nuts and lockwashers. Never use bolts
smaller than 1/4” diameter.
Figure 3
Note: For summer cooling, put the unit into its Operating Mode
by turning the thermostat clockwise from its OFF position to its
lowest setting. The indicator light will come ON. Turn the fan selector switch to ON position. The fan will run continuously with
not heat. If the thermosata is adjusted to demand for heat the fan
will run continuously after this demand is satisfied and the element are turned OFF. In the AUTO position of the fan selectro
switch, the fan will come ON and OFF with the heating elements.
Replace the heater in the stand and tighten knobs to lock in
place. Two large rubberwashers go between heater and stand,
one on either side.
REMEMBER: The electrical outlet must be within reach of the
six foot cord. Be sure to provide enough clearance to pivot
heater and reach adjustment knobs.
2