1
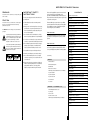
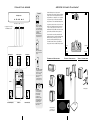
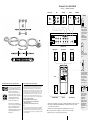
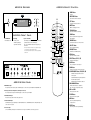
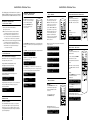
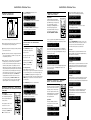
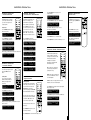
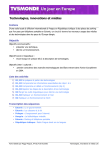
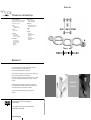
English
Technical Information
Satellite Speakers:
A patented advanced technology driver featuring a unique heat
transfer system: special high excursion suspension and a
computer-designed anti-resonant cone
Power ratings:
120V Model - 120V @ 60Hz; 80VA
240V Model - 140V @ 50Hz; 80VA
Dimensions:
Inputs:
3 x RCA Phono - Line level
1 x Stereo Mini jack - Line level
Sub Woofer - 265mm x 190mm x 350mm
Satellites - 68mm x 103mm x 90mm
Weight:
Outputs:
9 Kg
3 x Speaker terminals
Finishes:
Controls:
1 x Volume / Power pot
1 x Bass switch (3 Position)
1 x Centre input switch (2 Position)
Accessories:
2 x 5 metre Speaker cables
1 x 2 metre Signal input cable
1 x Speaker level to line level
adaptor cable
2 x Wall brackets
Black sub woofer
Textured black satellites with
silver/grey grilles
White sub woofer
Textured white satellites with
silver/grey grilles
Warranty
Your Acoustic Energy loudspeakers are guaranteed against original defects in materials,
manufacture and workmanship for 1 year from the date of purchase.
Please retain all original packaging materials for possible future use.
Under this warranty Acoustic Energy agrees to repair any defect or, at the company’s discretion,
replace the faulty component(s) without charge for parts and labour.
This warranty does not imply any acceptance by Acoustic Energy or its agents for consequential
loss damage and specifically excludes fair wear and tear, accident misuse or unauthorised
modification.
This warranty is applicable in the United Kingdom only and does not in any way limit the
customer’s legal rights. Claims and enquiries under the warranty for AE products purchased
outside the UK should be addressed to the local importers or distributors.
If you have reason to claim under the warranty please contact your dealer in the
first instance.
Designed by KOI Inc (USA) Exclusively for Acoustic Energy Limited (UK)
Manufactured in Malasyia.
Acoustic Energy Limited, 16 Bridge Road, Cirencester, Gloucestershire GL7 1NJ. UK
Tel: +44 (0)1285 654432 Fax: +44 (0)1285 654430
www.aego5.com
OWNERS
MANUAL
AEGO5/p5 Owners Manual
Important Safety
Instructions
Warning
To reduce the risk of fire or electric shock, do not expose this system
to rain or moisture.
To ensure your safety, please read these instructions before
operating this unit.
Caution
1. Follow all instructions and observe warnings marked
To reduce the risk of shock, do not remove the cover of this system.
There are no user-serviceable parts inside. Refer servicing to
qualified service personnel.
on the unit.
2. Always use the correct line voltage. Please refer to page 6,
and find out the correct power requirements in your area.
Please note that different operating voltages may require
the use of different adapters.
The CAUTION marks shown on this page are located on the back of
your system.
The lightning flash, with arrowhead symbol within an
equilateral triangle, is intended to alert the user to the
presence of uninsulated “dangerous voltage” within
the system enclosure that may be of sufficient
magnitude to constitute a risk of electric shock.
3. Do not install the unit in an unventilated rack, or directly
above heat producing equipment such as power amplifiers.
4. To avoid shock or fire hazard, do not expose the unit to rain
contents
The Acoustic Energy AEGO5 is a powered 5.1 surround sound
speaker system designed to give maximum acoustic
performance with minimal visual impact. It will enable you to
fill your room with sound rather than speakers and get the best
from your AV surround system.
This manual will help you to get the best out of your AEGO5
system and explain how to link it up with your existing digital
decoder (AEGO5) or straight to your DVD player through the
Acoustic Energy Aego decoder (AEGOP5).
Section one
- will deal with the AEGO5 speaker system, how to integrate
your existing decoder and placement of your Aego satellite
speakers.
or moisture, or operate it where it will be exposed to water.
5. Do not attempt to operate the unit if it has been dropped,
The exclamation point within an equilateral triangle as
marked on the system is intended to alert the user to
the presence of important operating and maintenance
instructions in this owner’s guide.
damaged, exposed to liquids, or if it exhibits a distinct
change in performance indicating the need for service.
6. Only qualified service personnel should open this unit.
Section two
- will provide details of the Acoustic Energy Dolby Digital/DTS
decoder that is supplied in the AEGOP5 system. Also, how to
connect your DVD player along with other ancillary equipment.
convenience receptacles, as this can result in a risk of fire
or electrical shock.
10. Route power supply cords so that they are not likely to be
walked on or pinched by items placed on or against them,
paying particular attention to cords at plugs, mains
adapters, and the point at which they exit from the unit.
2
Introduction
3
Unpacking
3
Connecting AEGO5 (with External Power Amplifier)
4
Key AEGO5 Controls
4
AEGO5 Speaker Placement
5
AEGO5 Speaker Orientation
5
Connecting AEGOP5
7
Key AEGOP5 Controls
7
AEGOP5 Front Panel
8
AEGOP5 Rear Panel
8
AEGOP5 Remote Control
9
AEGOP5 Operation
10
LCD & LEDs
10
LCD Display
10
Mode Selection
10
Input Selection
10
Test Mode
11
5 x AEGO5 Satellite Speakers
Mute Mode
11
5 x Wall Brackets
Master Volume Control
11
4 x rubber feet for subwoofer
Balance Setting
11
Delay Calibration
12
2 x Speaker leads 5.5M
Time Delay Adjustment on Centre Channel Speaker
12
2 x Speaker leads 10M
Time Delay Adjustment on Rear Surround Speakers
12
1 x Owners manual
Pro Logic Mode
13
Speaker Mode with Bass Manager
13
Saving Presets
14
Loading Presets
14
Sound Field Processing
14
Equalization
14
2 x batteries for remote control
DRC (Dynamic Range Compression)
15
1 x Multi-pin signal cable 3M (G9 multi-pin to G9 multi-pin)
Resetting
15
Technical Information
16
Warranty
16
8. Removing covers will expose you to hazardous voltages.
9. Do not overload wall outlet, extension cords or integral
Important Safety Instructions
Contents listing:
AEGO5
1 x AEGO5 subwoofer
1 x Multi-way signal cable 3M (6 x RCA Phono to 1 x Multi-pin)
1 x Speaker lead 3.5M
1 x Car Sticker
AEGOp5 - as AEGO5 plus
1 x AEGOP5 Dolby Digital / DTS decoder
1 x power supply
1 x remote control
2
3
Connecting Aego5
AEGO5 Speaker Placement
Controls
Existing Decoder
OFF
AUTO
ON
POWER
Front
Left
Front
Right
Rear
Left
Sub
Rear
Right
Centre
When set to “AUTO”
the Aego system will
go in to standby mode
if no signal is detected
for a period of time
(10 minutes).
It will automatically
switch back on when
a signal is detected.
see page 5 for connection
in to AEGOP5 decoder.
SUB
LEVEL
As with all loudspeakers, the placement in
relationship to room boundaries (walls etc.) will have
a major effect on their overall performance. As the
Aego Satellites are so small your choice of positions
is far greater and you should use this to maximize
the performance of these remarkable little speakers.
Front Left
Subwoofer
Front Right
Centre
If a speaker is positioned in free air (not close to any
walls etc.) then it will sound brighter. If mounted on
or close to a large object (such as a table or on a
wall) then the mid range will become louder and the
speaker will sound warmer and more powerful.
In most situations we would recommend that the
satellites are mounted on walls at about head height
with the brackets provided to give you a warm
powerful sound that you will find pleasing and
comfortable. However if this is not possible then
Aego Speaker Stands are available from your dealer.
(Alternative)
Right Speaker
Left Speaker
Centre Speaker
Sub Level
This can be altered to
obtain preferred level
of bass.
(Alternative)
Rear Left
Surface Mounting
Stand Mounting
Rear Right
Wall Mounting
AUX.
SUB.
Sub output
This output is available
to supply an auxiliary
subwoofer such as the
“Acoustic Energy
Aegis Compact Sub”.
This may be
recommended when
used in a large room.
SPEAKER OUTPUTS
FRONT
LEFT
SUB
LEVEL
CENTRE
POWER
OFF
AUTO
ON
FRONT
RIGHT
REAR
RIGHT
REAR
LEFT
AUX.
SUB.
MULTIPIN
INPUT
*
Power
*
Surround Right (SR)
Subwoofer
Surround Left (SL)
* Not supplied
Volume knob
This is the main volume
control for all channels.
When used with a
decoder it would
normally be set to
maximum, This enables
the Aego5 system to be
used with DVD players
that have a built in
decoder but no overall
volume control.
Detachable grille
can rotate to suit
speaker orientation.
4
5
Connecting AEGOp5
(with 5.1 Theatre System)
VCR
CD Player
Audio Out
Audio Out
L
L
Laserdisc
DVD Player
Optical
Digital Audio Out
L
L
Coaxial
R
Phono Jack
Play
Front
Left
R
R
R
Controls
POWER
OFF
AUTO
ON
Games Consul
Rec
Rear
Left
When set to “AUTO”
the Aego system will
go in to standby mode
if no signal is detected
for a period of time
(10 minutes).
It will automatically
switch back on when
a signal is detected.
Centre
ACOUSTIC ENERGY LIMITED,
16 BRIDGE ROAD, CIRENCESTER,
GLOUCESTERSHIRE GL7 1NJ
WWW.ACOUSTIC-ENERGY.CO.UK
Left
Right
MULTIPIN
Front
Right
Rear
Right
Sub
AUX 2
AUX 1
LINE IN
Developed And Manufactured By Videologic Systems.
OPTICAL
IN
DIGITAL
IN
POWER
12V DC
SUB
LEVEL
AEGOP5 Decoder
Right Speaker
Centre Speaker
Left Speaker
Sub Level
This can be altered to
obtain preferred level
of bass.
AUX.
SUB.
SPEAKER OUTPUTS
FRONT
LEFT
SUB
LEVEL
CENTRE
POWER
OFF
AUTO
ON
FRONT
RIGHT
REAR
RIGHT
REAR
LEFT
Sub output
This output is available
to supply an auxiliary
subwoofer such as the
“Acoustic Energy
Aegis Compact Sub”.
This may be
recommended when
used in a large room.
AUX.
SUB.
MULTIPIN
INPUT
Power
Acknowledgments & Trademarks
FCC Compliance Statement
The equipment has been tested and found to comply with the limits for a Class B digital
device, pursuant to Part 15 of the FCC Rules. These limits are designed to provide
reasonable protection against harmful interference in residential installation. This
equipment generates, uses, and can radiate radio frequency energy and, if not installed
and used in accordance with the instructions, may cause harmful interference to radio
communications. However, there is no guarantee that interference will not occur in a
particular installation. If this equipment does cause interference to radio or television
reception, which can be determined by turning the equipment off and on, the user is
encouraged to try to correct the interference by one or more of the following measures:
All contents are subject to change at any time without
notice. No responsibility is assumed for its use; or for
infringements of patents or other rights of third parties
and no patent or license is implied hereby.
All trademarks are the property of their respective
owners. Manufactured under license from Dolby
Laboratories. “Dolby”, “Pro Logic “ and the double-D
symbol are trademarks of Dolby Laboratories.
Confidential Unpublished Works. (c)1992 - 1997
Dolby Laboratories, Inc. All rights reserved.
■
■
■
Manufactured under license from Digital Theater
Systems, Inc. US Pat. No. 5,451,942, 5,956,674, 5,974,380,
5,978,762 and other worldwide patents issued and
pending. “DTS” and “DTS Digital Surround” are
registered trademarks of Digital Theater Systems, Inc.
Copyright 1996, 2000 Digital Theater Systems, Inc.
All Rights Reserved.
■
Reorient or relocate the receiving antenna.
Increase the separation between the equipment and receiver.
Connect the equipment into an outlet on a circuit different from that to
which the receiver is connected.
Consult the dealer or an experienced radio/TV technician for help.
Notice
This device complies with Part 15 of the FCC rules. Operation is subject to the following
two conditions: (1) this device may not cause harmful interference, and (2) this device
must accept any interference received, including interference that may cause undesired
operation. Shielded cables and I/O cords must be used for this equipment to comply with
the relevant FCC regulations.
6
Surround Right (SR)
Subwoofer
Surround Left (SL)
1. After properly connecting AEGOP5 to your audio sources and amplifier, plug in AEGOP5 ’s AC adapter to an AC outlet.
2. Turn on the power of AEGOP5 by pushing the POWER button on the front panel. Turn on the power of all audio
sources, amplifier, or powered subwoofer.
3. Installation is now complete, get ready to experience true Dolby Digital or DTS surround sound.
Note: To prevent damage to speakers, when playing music or a movie, ensure the volume is set low initially.
Gradually turn the volume up to an appropriate level after the playback has started.
7
Volume knob
This is the main volume
control for all channels.
When used with a
decoder it would
normally be set to
maximum, This enables
the Aego5 system to be
used with DVD players
that have a built in
decoder but no overall
volume control.
AEGOp5 Decoder
AEGOp5 Remote Control
1 POWER Button
On/off key
2 INPUT MODE Button
AEGOP5
Front
Left
Rear
Left
Centre
Sub
Select from the 5 different source inputs
9 6
3 TEST Button
Test signal for the 6 discrete channels
Front
Right
4 MUTE Button
Rear
Right
input
1
mute
1. The POWER Button
Turns AEGOP5 on or off.
2. LCD Display
Provides you with
information regarding the
system status and settings.
delay
6 DELAY Button
prologic
5
7
* Red means this particular channel has been set to output a wider frequency
range that contains bass signal between 20Hz to 120Hz.
* Green means this particular channel doesn’t contain the bass signal between
20Hz to 120Hz.
Select from 4 different surround settings
3
balance
3. Speaker Channel LEDs
Each LED represents the status of an individual channel. When
a particular channel is active, the LED lights up.
The colour of the LED also indicates the frequency range of
that channel:
5 PRO LOGIC Button
test
4
AEGOp5 Front Panel
Mute the sound (toggle on and off)
power
2
field
Select the desired channel to engage the time
delay adjustment
EQ on/off EQ setup
8
10
preset 1
preset 2
7 BALANCE Button
preset 3
Set the volume setting for each of the 6 channels
11
save1
preset 4
8 EQ SETUP Button
load
Select up to 5 EQ Band Settings
13
12
BassManager
Cen
15
SL/SR
9 EQ ON/OFF Button
14
Activate the selected EQ Band Setting
SW
VOL
10 FIELD Button
Select from 6 different sound fields
D Time
DRC
11 PRESET Button (P1, P2, P3, P4)
18
Recall up to 4 different presets
reset
19
Front
Left
Rear
Left
Centre
ACOUSTIC ENERGY LIMITED,
16 BRIDGE ROAD, CIRENCESTER,
GLOUCESTERSHIRE GL7 1NJ
WWW.ACOUSTIC-ENERGY.CO.UK
12 SAVE Button
17
16
Store your settings into a selected preset
13 LOAD Button
Left
Activate your saved setting stored in selected preset
14 SPEAKER ON/OFF Buttons (CEN, SL/SR, SW)
Right
MULTIPIN
Front
Right
Rear
Right
Sub
AUX 2
AUX 1
LINE IN
Developed And Manufactured By Videologic Systems.
OPTICAL
IN
DIGITAL
IN
CEN Button activates/deactivates the centre
channel speaker.
LS/RS Button simultaneously activates/deactivates
the left and right rear speakers.
SW Button activates/deactivates the subwoofer.
POWER
12V DC
AEGOp5 Rear Panel
15 BASS MANAGER Button
Switches between three bass configurations
(bass config.1, bass config.2 and bass config.3)
1. MULTIPIN Audio Output:
This output feeds 6 channels audio signals to the matching input on a control centre or power amplifier via a multipin (DIN) cable.
16 VOL + and VOL -
2. Main Outputs (Front Left, Front Right, Rear Left, Rear Right, Centre and Sub):
The Six outputs feed audio signals to the matching inputs on a control centre or power amplifier.
Increase/decrease the volume.
17 D TIME Button
3. AUX1 AUX2 and LINE Inputs:
These inputs accept signals from stereo analog signal sources.
Increase/decrease the delay time.
18 DRC Button
Select among 3 different dynamic range
compression ratios.
4. OPTICAL and DIGITAL inputs:
Your AEGOP5 has two types of digital inputs. One S/PDIF (OPTICAL) and one coaxial (DIGITAL) input. Connect the digital outputs of the
sound sources to these inputs.
19 RESET Button
Resets the system to its factory default settings.
5. 12V DC Power Input:
Connect the AEGOP5 power adapter to an AC outlet. Please refer to page 6 to determine the correct voltage in your area.
8
9
AEGOp5 Operation
AEGOp5 Operation
The following pages provide information on the operation of
AEGOP5. The AEGOP5 was purposely designed to be simple to
operate with all functions available from the remote control.
AEGOp5 Operation
- Input Selection
AEGOP5 Operation
- Test Mode
AEGOp5 Operation
- Master Volume Control
AEGOp5 Operation
- LCD and LEDs
Input Selection
The AEGOP5 can be connected to up
to 5 audio sources. Select the input
source you want by repeatedly
pressing the INPUT Button on the
remote control until the desired
source is selected.
Test Mode
After connecting up to your source
and speakers, you can press the
TEST button on the remote to test the
system. You can also use the test
mode to test the location of the
speakers. When the TEST button is
pressed, white noise is generated
through all satellite speakers in an
order of Front Left, Centre, Front
Right, Rear Left, and Rear Right
channels for 2 seconds each. When
completed, the AEGOP5 returns to
Auto Decode mode.
Volume Setting
To increase or decrease the master
volume of your AEGOP5, simply press
VOL + or VOL - on the remote control.
1. Press the power button to turn the AEGOP5 on,
press it again to turn it off.
2. When power is turned off but still connected to the mains:
a. LCD display and Speaker Configuration LEDs are off.
b. Decoder status and user configurations are stored.
c. Once the power is turned on again, AEGOP5 will resume
to its previous decoder status and user configurations.
input
power
mute
test
balance
field
delay
prologic
EQ on/off EQ setup
preset 1
preset 2
preset 3
save1
preset 4
load
BassManager
SL/SR
Cen
SW
VOL
D Time
DRC
3. When power is turned off and the unit unplugged from the mains:
a. LCD display and Speaker Configuration LEDs are off.
b. Decoder status and user configurations are not stored.
c. AEGOP5 will reset to factory defaults if the adaptor
is reconnected to the mains.
In the Digital Mode (Dolby Digital / DTS), you can manually select the
audio input source either in coaxial or optical form depending on the
input type.
If “COAXIAL” is selected, the display shows the following information:
AEGOp5 Operation
- LCD Display
DOLBY DIGITAL CO
SURROUND
Auto Decode Mode (Auto detection of input type)
When AEGOP5 is turned on, it automatically detects and identifies the
audio signal coming from source unit.
If “Optical” is selected, display of AEGOP5 shows
the following information:
DOLBY DIGITAL OP
SURROUND
Playing a DVD title with Dolby Digital (AC3) format,
the display shows the following information.
In the PCM mode, you can switch between 3 audio input sources
such as CD Player, VCR, game consoles etc. (See page 8 or page 9
for reference). The display shows the following information:
DOLBY DIGITAL CO
SURROUND
Playing a DVD title with DTS format, the display shows
the following information.
DTS COAXIAL
SURROUND
Playing DVD, CD, LD, VCR and games consoles connected to the
analog inputs (LINE, AUX1 and AUX2), the display shows
the following information.
PCM LINEIN
STEREO
PCM
STEREO
LINEIN
PCM
STEREO
AUX1
PCM
STEREO
AUX2
power
mute
balance
test
delay
preset 4
load
EQ on/off EQ setup
Cen
SW
VOL
D Time
DRC
preset 1
preset 2
preset 3
save1
preset 4
load
reset
BassManager
Example:
Volume being decreased
by 3 decibels.
Cen
SL/SR
DOLBY DIGITAL CO
VOLUME
-03DB
SW
VOL
D Time
DRC
AEGOp5 Operation
- Balance Setting
Balance Button
You can set the volume setting of each
individual channel.
DOLBY DIGITAL CO
TEST C
input
power
mute
To select a channel, press BALANCE
button on the remote control
repeatedly until the desired channel is
reached.
DOLBY DIGITAL CO
TEST R
DOLBY DIGITAL CO
TEST SL
Adjust volume on selected channel by
pressing VOL + or VOL - on the remote
control.
DOLBY DIGITAL CO
TEST SR
balance
field
Example:
Press the BALANCE button once to display
the current balance volume for
channel L (Left).
AEGOp5 Operation
- Mute Mode
mute
test
balance
field
delay
preset 3
preset 4
load
BassManager
SL/SR
reset
Press VOL + or VOL - will increase or
decrease the balance volume for selected channel.
EQ on/off EQ setup
preset 1
preset 2
preset 3
save1
preset 4
load
DOLBY DIGITAL CO
BALANCE R +0DB
Cen
SW
VOL
D Time
DRC
When MUTE Button is pressed,
the display shows the following information:
DOLBY DIGITAL CO
SURROUND
MUTE
11
Cen
SW
VOL
DOLBY DIGITAL CO
BALANCE R
0DB
prologic
EQ on/off EQ setup
preset 2
Press the BALANCE button again to select
the next channel.
power
prologic
save1
DOLBY DIGITAL CO
BALANCE L
0DB
input
test
delay
preset 1
DRC
SL/SR
10
save1
SL/SR
field
BassManager
Surround Processing Modes:
The versatile AEGOP5 surround sound processor is capable of
processing both the digital or analog audio signals from many
different types of audio source. With the equipment connected
correctly, AEGOP5 automatically detects the type of digital signal
present at the digital input.
preset 3
BassManager
DOLBY DIGITAL CO
TEST L
Mute Mode
Pressing MUTE Button on the remote
control will mute all signal outputs
(including the multipin and 6 RCA
connectors.)
preset 2
prologic
When test mode is running, the display shows information in a
sequence as below:
To disable the mute function,
press MUTE Button again.
AEGOp5 Operation - Mode
Selection
input
preset 1
D Time
AEGOp5 Operation
Press the DELAY Button will display the current
delay time for channel LS.
AEGOp5 Operation
- Delay Calibration
Subwoofer
Front
Right
Pro Logic Mode
Your AEGOP5 will automatically switch to
Pro Logic mode when it detects a Pro Logic
signal. With other types of input signal, you
can select the Dolby Pro Logic mode
manually by pressing Pro Logic button on
the remote. Repeatedly pressing the
Pro Logic Button will switch the Pro Logic
mode in between the following modes;
AUTO, ALL PCM, ENABLE and DISABLE.
Press the DELAY Button again will circle to next channel.
DOLBY DIGITAL CO
DELAY
SR 5 MS
Press the D TIME + or D TIME - button will increase or
decrease the delay time for current channel.
Rear Left
DOLBY DIGITAL CO
DELAY
SR 6 MS
Rear Right
Pressing the SL or SR button, switches the surround
channels on and off. The LCD will display the following:
AEGOp5 Operation
- Pro Logic Mode
DOLBY DIGITAL CO
DELAY
SL 5 MS
Centre
Front
Left
AEGOp5 Operation
DOLBY DIGITAL CO
SPK SUR ON
input
power
mute
test
balance
field
delay
preset 1
preset 2
preset 3
save1
preset 4
load
BassManager
■
Centre channel speaker should be placed the same distance as the
left and right speakers from your listening position.
■
Rear left and right speakers should be placed behind your listening
position and above ear level.
■
Delay Calibration
Press DELAY Button and repeat to
select the length of delay time for
SL/SR/C channels.
If speaker placement is restricted due to the physical environment
of the room, delay calibration is sometimes necessary to achieve
the ideal listening environment.
The delay range for SL/SR is 0 to 15 ms
and 0 to 5 ms for centre.
mute
test
balance
field
delay
EQ on/off EQ setup
preset 1
preset 2
preset 3
save1
preset 4
load
BassManager
■
If the centre speaker can only be placed nearer to you than the left
and right speakers, sound from the centre speaker will arrive
before the sound from the left and right speakers. The difference in
arrival time could may affect the sound quality and effect. Your
AEGOP5 allows you to adjust the speaker time delay to compensate
for this problem by increasing the delay time for the centre channel.
Thus sound from the centre, left and right speakers will reach you
at the same time. If your centre speaker is closer to your listening
position than the left and right speakers, press DELAY button
repeatedly until the centre channel is selected. To increase or
decrease the delay time, press D TIME + or D TIME - until the
desired delay is selected. The same procedure can be applied to
adjust the delay time of rear surround speakers if necessary.
Adjust the delay time on selected
channel by pressing D TIME + or
D TIME - on the remote control.
SL/SR
The delay range for SL/SR is 0 to 15
ms and 0 to 5 ms for centre.
balance
DRC
reset
DOLBY DIGITAL CO
DELAY
SL 5 MS
field
Press D TIME + or D TIME - to increase or decrease
the delay time for the selected channel.
prologic
EQ on/off EQ setup
preset 1
preset 2
preset 3
save1
preset 4
load
BassManager
SL/SR
Adjust the delay time for the selected
channel by pressing D TIME + or D
TIME - on the remote control.
DOLBY DIGITAL CO
DELAY
SR 5 MS
test
delay
DOLBY DIGITAL CO
DELAY
SR 6 MS
Cen
SW
VOL
D Time
Surround Speaker Delay
Delay calibration for the rear surround
speakers may be necessary if the surround speakers are placed quite
close to your listening position. To correct the delay this may cause,
press the DELAY button repeatedly until SL or SR appear on the
display. Increase the time delay of the surround speakers by pressing
D TIME + until you are able to hear a 3D sound effect coming from
surround speakers.
AEGOp5 Operation - Time Delay
Adjustment on Centre Channel
Speaker
mute
Cen
SW
VOL
Press DELAY Button again to move to the next channel.
Delay Calibration
Press the DELAY button and repeat to
select the length of delay time for the
Rear Left (SL), Rear Right (SR) and
Centre(C) channels.
prologic
Pressing the SW button, switches the subwoofer on and off.
The LCD will display the following:
DOLBY DIGITAL CO
SPK SW
ON
Cen
DOLBY DIGITAL CO
SPK SW OFF
SW
VOL
AEGOp5 Operation - Time Delay
Adjustment on Surround
Speakers
prologic
EQ on/off EQ setup
SL/SR
The recommended listening position is described below:
DOLBY DIGITAL CO
SPK SUR OFF
D Ti
Bass Manager
Pressing the BASS MANAGER button enables you to select from
three different settings of Bass; Bass Config.1, Bass Config.2 and
Bass Config.3. These selections will feed the bass signal
below 120Hz to different speakers as described below.
If a Pro Logic signal is detected, AEGOP5 will switch to Pro Logic
mode automatically, and the display shows the following information:
DOLBY DIGITAL CO
PROLOGIC AUTO
If a stereo signal (either analog or digital) is detected, AEGOP5 will
switch to stereo mode automatically. You can then convert the stereo
mode to Pro Logic mode by pressing the Prologic button until you see
the following on the display:
Bass Config.1
With this setting, the bass signal below 120Hz will be sent to the
subwoofer; the LEDs on the front panel indicating SW will be red,
and the LCD will show the following:
DOLBY DIGITAL CO
PROLOGIC ALL PCM
DOLBY DIGITAL CO
BASS CONFIG.1
DOLBY DIGITAL CO
PROLOGIC ENABLE
Bass Config.2
With this setting, the bass signal below 120Hz will be sent to front left
and right speakers and the subwoofer; the LEDs on the front panel
indicating L/R/SW will be red, and the LCD will show the following
information:
If you want to convert Pro Logic or 2-channel Dolby Digital signal into
Stereo mode, you can press the Prologic button until you see the
following on the display:
DOLBY DIGITAL CO
BASS CONFIG.2
DOLBY DIGITAL CO
PROLOGIC DISABLE
Bass Config.3
With this setting, the bass signal below 120Hz will be sent to all the
speakers; the LEDs on the front panel indicating L/R/SL/SR/SW
channels will be red and the LCD will show the following information:
AEGOp5 Operation - Speaker
Mode with Bass Manager
Speaker Mode with Bass Manager
The six LEDs on front panel of your AEGOP5
represent the six discrete audio channels
(Left, Right, Centre, Rear Left, Rear Right
and Sub). If a particular channel is active,
the LED will light up in green. The LED will
be red if that particular channel carries
bass signal below 120Hz.
field
DOLBY DIGITAL CO
BASS CONFIG.3
EQ on/off EQ setup
preset 1
preset 2
preset 3
save1
preset 4
load
BassManager
SL/SR
Bass Config. Off
With this setting, the bass signal below 120Hz will be sent to all
the speakers; the LEDs on front panel of AEGOP5 indicating
L/R/C/SL/SR/SW channels will be red and the LCD will show the
following information:.
Cen
SW
VOL
D Time
DOLBY DIGITAL CO
BASS CONFIG.OFF
DRC
reset
Speaker Mode
Pressing the CEN button, switches the
centre channel on and off. The LCD will
display the following:
DOLBY DIGITAL CO
SPK C
ON
D Time
DRC
reset
DOLBY DIGITAL CO
SPK C
OFF
12
13
AEGOp5 Operation
AEGOp5 Operation
AEGOp5 Operation
- Saving Presets
AEGOp5 Operation
- Sound Field Processing
Setting Presets
The AEGOP5 enables you to customise
up to 4 settings. This function enables
you to save and load your favourite
settings at any time.
DSP Sound Field
Your AEGOP5 is equipped with a sound
field processor that gives you six
different field effects; Disable, Hall,
Theater, Stadium, Club, and Church. By
pressing Field button on the remote,
you can select any of these effects. You
can also increase or decrease the
Reverb value from 0 - 9 by pressing
VOL + or VOL - on the remote control
whilst you are selecting the field effect.
Saving a Preset:
Press the PRESET 1 button, the display
will show the following:
DOLBY DIGITAL CO
PRESET 1
Press the SAVE button to save all the
current decoder settings into Preset 1.
input
power
mute
balance
field
test
delay
prologic
EQ on/off EQ setup
preset 1
preset 2
preset 3
save1
preset 4
load
BassManager
SL/SR
Cen
SW
VOL
Press the EQ SETUP button to display the current
setting of EQ Band 1.
DOLBY DIGITAL CO
EQ BAND 1
0DB
input
power
mute
balance
field
test
delay
prologic
EQ on/off EQ setup
preset 1
preset 2
preset 3
save1
preset 4
load
BassManager
SL/SR
Cen
SW
VOL
D Time
DOLBY DIGITAL CO
PRESET 1 SAVING
DOLBY DIGITAL CO
DIABLE REVERB 0
DOLBY DIGITAL CO
PRESET 1 SAVED
DOLBY DIGITAL CO
HALL
REVERB 3
When complete, your AEGOP5 will revert back to Auto Decode mode.
Loading a Preset
You can load a previously saved preset
by pressing LOAD button on the
remote.
DOLBY DIGITAL CO
PRESET 1
Press the RESET button to reset the
AEGOP5 to its factory default settings.
DOLBY DIGITAL CO
EQ BAND 2 +01DB
DOLBY DIGITAL CO
RESET TO FACTORY
Press EQ SETUP button to store the new EQ setting.
When completed, your AEGOP5 reverts
to Auto Decode mode.
input
power
mute
balance
field
test
delay
prologic
EQ on/off EQ setup
preset 1
preset 2
preset 3
save1
preset 4
load
BassManager
SL/SR
Cen
SW
VOL
D Time
DRC
mute
balance
Loading a Preset:
Press any of the 4 preset buttons,
(PRESET 1, PRESET 2, PRESET 3 or
PRESET 4), the display will show
the following:
power
field
test
delay
AEGOp5 Operation
- Equalization
EQ on/off EQ setup
preset 1
preset 2
preset 3
save1
preset 4
load
BassManager
SL/SR
5-Band Equalization
Your AEGOP5 features a 5-band equalizer
which enables you to fine tune the sound
of your favourite movie or music. Press
EQ SETUP button on the remote to
activate it. Repeatedly pressing EQ SETUP
button will switch between the 5 bands.
Cen
SW
VOL
“HALF” Partial compression is applied, this
function is useful if AEGOP5 is connected
to an external amplifier.
prologic
D Time
DRC
Press LOAD button to load the preset.
DOLBY DIGITAL CO
PRESET 1 LOADING
Each band of the equalizer enables you to
adjust your desired volume to a maximum
of ±10dB. Press VOL + or VOL - on the
remote control to adjust the volume.
DOLBY DIGITAL CO
PRESET 1 LOADED
power
mute
test
balance
field
delay
prologic
EQ on/off EQ setup
preset 1
preset 2
preset 3
save1
preset 4
load
BassManager
SL/SR
Cen
SW
VOL
When preset loading is complete, your AEGOP5 will revert back to
Auto Decode mode.
D Time
DRC
After setting the desired volume for each
EQ band, you
DOLBY DIGITAL CO
reset
“FULL” Full compression is applied, this function is useful
if AEGOP5 is connected to an external amplifier.
input
reset
Press the DRC button to display the current setting of Dynamic
Range Compression mode.
DOLBY DIGITAL CO
DYNAMIC
NO
Press the DRC button again to switch between the DRC modes.
DOLBY DIGITAL CO
DYNAMIC
FULL
DOLBY DIGITAL CO
DYNAMIC
HALF
press EQ SETUP button again to store the
new setting for that band.
Press EQ ON/OFF button to switch the new EQ settings on or off.
14
SL/SR
reset
“NO” No compression is applied to the
original audio signal, this provides the
greatest dynamic range.
preset 4
BassManager
DRC
Press the Vol+ or Vol- button to increase or decrease
the volume for current EQ Band.
DRC
Your AEGOP5 features Dynamic Range
Compression (DRC), its sophisticated
technology creates realistic sound fields
with richly detailed sound that is
remarkably free from distortion.
Repeatedly pressing DRC button will
switch between 3 modes:
DOLBY DIGITAL CO
CHURCH REVERB 3
save1
15
load
Cen
SW
VOL
AEGOp5 Operation - DRC
(Dynamic Range Compression)
DOLBY DIGITAL CO
CLUB
REVERB 3
input
DOLBY DIGITAL CO
EQ BAND 2
0DB
DOLBY DIGITAL CO
SURROUND
DOLBY DIGITAL CO
STADIUM REVERB 3
AEGOp5 Operation
- Loading Preset
Press the EQ SETUP button again to select next EQ Band.
Press EQ ON/OFF button to switch the new EQ settings on or off.
DOLBY DIGITAL CO
THEATRE REVERB 3
DOLBY DIGITAL CO
Resetting
Your AEGOP5 can be reset to its factory
default settings by pressing RESET button
on the remote.
D Time
Press the Field button and repeat to
change the current setting of Sound Field mode.
DRC
AEGOp5 Operation
- Resetting
D Time