1
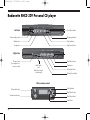
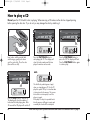
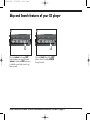
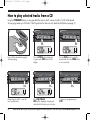
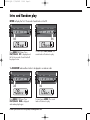
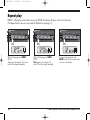
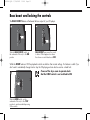
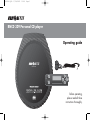
RNCD3290.QXD
17/09/2002
16:00
Page 1
RNCD 329 Personal CD player
Operating guide
RNCD 329
SKIP
PLAY/
PAUSE
VOL
STOP
SKIP
Before operating,
please read all these
instructions thoroughly.
RNCD3290.QXD
17/09/2002
16:00
Page 2
Radionette RNCD 329 Personal CD player
MODE
PROG
SKIP
CHR.
Left side
Door Open button
Power supply socket
Charging indicator
Mode button
Skip Up button
Prog button
Skip Down button
VOLUME
Right side
STOP
PLAY/PAUSE
Play/Pause button
Phones socket
(For earphones or
remote control)
Stop button
Hold Switch
and
Bass Boost switch
(on underside)
Volume Up button
Volume Down button
Wire remote control
SKIP
Volume Up button
Skip Up button
Play/Pause button
VOL
Volume Down button
PLAY/
PAUSE
STOP
SKIP
Skip Down button
Stop button
2
RNCD3290.QXD
17/09/2002
16:00
Page 3
The safe use of your personal CD player
In the interests of safety, you are advised not to listen to your unit whilst engaging in activities where the
exclusion of external sounds, (whistles, horns, sirens etc.) could be hazardous. Accordingly do not listen to
your unit while driving a car, cycling or crossing the road.
Using headphones at high volume for extended periods of time may damage your hearing.
Never use your CD player if it is damaged in any way. Do not open any fixed covers and do not repair
yourself. Repair work must be carried out by a competent engineer.
Moisture - Do not allow your CD player to be exposed to rain, moisture, dust. If any liquid is spilt into your
unit it can cause serious damage. Contact your store immediately. This appliance must not be exposed to
dripping or splashing.
Class 1 laser product - This compact disc player is classified as a class 1 laser product.
The class 1 laser product label is located on the bottom of this product.
Do not use the product differently from the procedures given in this book otherwise you may be exposed to
hazardous radiation.
Temperature - Avoid extremes of temperature, either hot or cold, place your CD player well away from
heat sources such as radiators or gas/electric fires.
Batteries are easily swallowed by young children. Do not allow young children to play with your CD player.
Never let anyone, especially children push anything into holes, slots or any other openings in the case; this
could result in a fatal shock.
3
RNCD3290.QXD
17/09/2002
16:00
Page 4
Charging the batteries
Your CD player uses 2 ‘Gum Stick’ Ni-MH rechargeable batteries (included). Average playing time with fully charged
batteries is approximately 5 hours. Changing discs or repeatedly stopping and starting will reduce playing time.
1
2
3
RNCD 329
Open the CD door by sliding the
Open button to the right.
Open the battery compartment door
by gently squeezing the two clips,
then lift the door.
4
Plug the AC adaptor into a suitable
mains outlet.
4
Insert the two batteries supplied,
making sure the polarity is correct as
shown on the diagram in the battery
compartment.
Close the battery compartment.
5
Set the Charge switch to ON.
The Charging Indicator will light to
show that the batteries are charging.
Insert the DC jack plug into the Power
Supply Socket.
NOTE:
The battery symbol will appear in the
display on the remote control when the
batteries need charging.
The batteries can be fully recharged in
15 hours.
Do not charge continuously for 24 hours
or more as this can affect the
performance of the batteries.
RNCD3290.QXD
17/09/2002
16:00
Page 5
Listening to a CD
You can can use your CD player with or without the wire remote control.
2
SKIP
RNCD 329
VOL
RNCD 329
STOP
SKIP
PLAY/
PAUSE
1
To use your CD player without the wire remote control,
plug the earphones jack plug directly into the Phones
socket.
To use your CD player with the wire remote control, plug
the remote control jack plug into the Phones socket.
Plug the earphones jack plug into the jack socket on the
remote control.
Using headphones at high volume for extended periods of time may damage your hearing.
Always make sure the volume is at a low level before putting the earphones in your ears.
5
RNCD3290.QXD
17/09/2002
16:00
Page 6
How to play a CD
Do not open the CD lid whilst a disc is playing. When removing a CD make sure the disc has stopped spinning
before opening the disc door. If you do not you may damage the disc by scratching it.
2
1
3
VOLUME
Insert a disc with the printed label
side facing up, gently push down
onto the centre hub. Close the door
(there will be a click).
PLAY/PAUSE
Press the PLAY/PAUSE button to
start playing the CD. The display will
show the track number and the time
played in minutes and seconds.
4
VOLUME
STOP
PLAY/PAUSE
Press the PLAY/PAUSE button to
pause the CD. The display will flash.
Press the PLAY/PAUSE button again
to continue play.
NOTE:
VOLUME
STOP
PLAY/PAUSE
Press the STOP button to stop the CD.
The display will show the number of
tracks and the total playing time. After
30 seconds the CD player will switch off.
6
STOP
The Anti-Shock symbol appears ‘empty’
when you start playing a CD. As the CD
plays the symbol ‘fills up’ to show that data
is being stored in the memory. This ensures
that sound is not interrupted, even if the
player is jogged.
If the player is subject to repeated knocks
then the memory will begin to empty and
eventually the sound will be interrupted.
If none of the keys seem to operate check that the HOLD control is not switched to ON. See page 11.
RNCD3290.QXD
17/09/2002
16:00
Page 7
Skip and Search features of your CD player
1
2
MODE
PROG
SKIP
MODE
PROG
SKIP
CHR.
Press and release the forward SKIP
button to advance one track. Press and
release the backward SKIP button once
to restart the current track or twice to go
back one track.
CHR.
Press and hold either of the SKIP
buttons down to audibly SEARCH
through a track.
If these features will not work, check the HOLD button on the underside is not ON. See page 11.
7
RNCD3290.QXD
17/09/2002
16:00
Page 8
How to play selected tracks from a CD
Using the PROGRAM feature you may pre-select the order in which a series of tracks of a CD will be played.
You may programme up to 20 tracks. If the Program function does not work check the hold button (see page 11).
2
1
3
MODE
PROG
SKIP
MODE
PROG
SKIP
CHR
Insert a CD as described on page 6
and start playing.
Press the PROG button during play
or pause mode PRG flashes in the
display.
4
5
MODE
PROG
Use the SKIP buttons to select the
desired track. Press the PROG button
to store your track.
6
VOLUME
SKIP
CHR
STOP
PLAY/PAUSE
VOLUME
STOP
PLAY/PAUSE
CHR
Repeat stages 2 and 3 to enter all
your required tracks.
8
Press PLAY/PAUSE.
PRG will be displayed, and play will
start with the first track in your selection.
To erase your programme press
STOP.
When the last track of your selection has been played or if STOP is pressed or if the lid is opened, all PROGRAM settings will be lost.
RNCD3290.QXD
17/09/2002
16:00
Page 9
Intro and Random play
INTRO will play the first 10 seconds of each track on the CD.
1
2
MODE
PROG
VOLUME
SKIP
STOP
PLAY/PAUSE
CHR
Press MODE THREE times. Press
PLAY/PAUSE. INT is displayed and
the first ten seconds of each track will
be played in turn.
To cancel press PLAY/PAUSE. The
current track will continue to play.
The RANDOM feature allows tracks to be played in a random order.
1
2
MODE
PROG
SKIP
MODE
PROG
SKIP
CHR
Press MODE FOUR times. Press
PLAY/PAUSE. RND is displayed
and random play begins
CHR
To cancel press MODE. The current
track will continue to play.
If STOP is pressed or if the lid is opened, all settings will be lost.
9
RNCD3290.QXD
17/09/2002
16:00
Page 10
Repeat play
REPEAT 1 will play the current track continuously. REPEAT ALL will play all tracks on the CD continuously.
If the Repeat function does not work check the Hold button (see page 11).
1
2
MODE
PROG
SKIP
CHR
With a CD playing press MODE
ONCE.
1 appears in the display. The current
track will be played repeatedly.
10
3
MODE
PROG
SKIP
MODE
CHR
With a CD playing press MODE
TWICE.
ALL appears in the display. The
whole CD will be played repeatedly.
PROG
SKIP
CHR
To cancel repeat play press the
MODE button until no repeat function
is shown in the display.
If STOP is pressed or if the lid is opened, all settings will be lost.
RNCD3290.QXD
17/09/2002
16:00
Page 11
Bass boost and locking the controls
The BASS BOOST feature will enhance the bass output of your CD player.
2
1
ON BASS BOOST OFF
ON BASS BOOST OFF
Slide the BASS BOOST switch, on
the underside of the unit, to the ON
position
BASS BOOST may cause the sound
to distort. If this happens turn down
the volume or switch bass boost OFF.
While the HOLD feature is ON the playback controls are held on their current settings - this feature is useful if you
don’t want to accidentally change track or stop the CD playing and can also be used as a travel lock.
If none of the keys seem to operate check
that the HOLD control is not switched to ON.
OFF HOLD ON
1
Slide the HOLD switch, on the
underside of the unit, to the "ON"
position to avoid accidental pressing
of the controls.
11
RNCD3290.QXD
17/09/2002
16:00
Page 12
Troubleshooting Guide
Symptom
Cause
Solution
System does
not turn on.
Batteries may
need charging.
Recharge the batteries
System is on
but no sound.
VOLUME control
is at “minimum”
position.
Adjust the VOLUME control to a higher
sound level.
A CD is in place
but will not
play.
CD is inserted
incorrectly.
Make sure the CD is inserted with the
printed side facing outwards.
CD skips.
CD is dirty.
Clean the CD as described. Do not
attempt to play a CD which is damaged.
The system is
subject to
vibration.
Place the system in a more secure place.
Vibration or jarring will cause the CD to
skip
The HOLD switch
is in the ON
position
Switch the HOLD function to OFF.
None of the
controls will
work
12
Never use a CD if it
is cracked, deformed
or has been
repaired with tape
or adhesive.
When you have finished playing a
CD, remove it from the CD player and
store it in its protective case.
Hold CD so that
you do not
touch the
playing side
(the side with
no label or
printing on
it).
To clean the
playing side of a
CD of finger
prints and other
dirty marks gently
wipe the CD with a
soft lint free cloth
from the centre of the
CD outwards.
RNCD3290.QXD
17/09/2002
16:00
Page 13
Cleaning and
maintenance
To clean the case of
your unit use a soft
damp cloth. After
cleaning wipe the case
with a dry cloth. Never use
harsh cleaners or solvents.
CLEANING THE LENS
If the lens is accidentally touched with a dirty
finger or dust settles on the lens it must be
cleaned. Blow on the lens a few times with a
blower available from photographic shops.
Brush the dust away then blow on the lens
again.
Specifications
AUDIO
Frequency response
No. of channels
Output level
Bass boost effect (100Hz)
GENERAL
Power requirements
Power consumption
Dimension
Weight
20-20,000Hz
2 Channel (stereo)
Phones : 15mW (32 ohms)
+8 dB
2 x 1.2V 1200mAh Gum Stick Ni-MH
rechargeable
battery
DC in 6V 500mA (centre positive)
0.8W (DC 2.4V) under normal condition
Approx. 128 (W) x 18.3 (H) x 143 (D) mm
Approx. 200 g not including battery
We continually strive to improve our products, specifications may change without prior notice
13