1
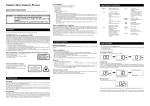
MP3 HARD DISK User Manual V1.0 MP3 HARD DISK Contents Before Using the Product 1 Introduction 1 System Requirements 1 Charging the Battery 2 Transferring Music Files 3 Music File Transferring Example 4 Basic Functions 5 Components 5 Component Description 6 Playback Screen 8 Using the Product 10 Charging the Battery with the AC Adapter 10 Charging the Battery with the USB Cable 11 Playing Music 12 Library List 13 Function List 17 Connecting to Computer 21 Software Installation 21 Cable Connection 21 MP3 Hard Disk Utility MP3 Hard Disk Utility Operation Specifications 23 23 31 MP3 HARD DISK Before Using the Product Introduction The MP3 Hard Disk has excellent sound quality, is easy to use, and is capable of storing thousands of songs. It is USB 2.0 compatible and can download MP3 files without additional software. The unit can also be used as an external hard drive. The package contains a MP3 Hard Disk Utility that allows you to convert music CDs to MP3 files and store songs onto the MP3 Hard Disk. This utility allows you to compile playlists and manage MP3 files. System Requirements Microsoft® Windows XP, Windows 2000, Windows Millennium Edition (Me) or P Windows 98 Second Edition (SE). Intel® Pentium® II 350 MHz, AMD® K6-2® 266 MHz or faster processor P P P P P P P P (Pentium III 450 MHz or faster is recommended for MP3 encoding). Optical drive (ex. CD-ROM, DVD ROM drive). USB 1.1 / USB 2.0 (USB 2.0 recommended). 64 MB RAM (128MB recommended). 10 MB of available hard disk space (A larger capacity is needed for storing music files). Internet Connection for CDDB support. SVGA Graphic Card (256 colors, resolution 800 x 600 or higher). DirectX 7.0 or higher. 1 MP3 HARD DISK Before Using the Product Charging the Battery The built-in high capacity Li-polymer battery must be fully charged before first-time use or when the battery has not been charged for over 6 months. It takes about 6 hours to fully charge the battery. (To take full advantage of the battery, charging the battery for 10 hours before initial use is recommended.) You can charge the battery with either the included AC adapter or USB cable. Charging with AC adapter Charging with USB cable 1. It is important to re-charge the battery ASAP when battery runs out. 2. Li-Ion batteries need to be used for maximum performance. If you don’t use your device often, be sure to fully charge your battery at least once a week. 2 MP3 HARD DISK Before Using the Product Transferring Music Files The MP3 Hard Disk is pre-formatted. There are two ways to transfer music files to the MP3 Hard Disk: 1. Without using any software application, connect MP3 Hard Disk directly to a computer and transfer MP3 or WMA files to the “MUSIC_ME” folder. See Figure 1. (Note: please do not transfer non-musical data to the MUSIC_ME folder.) 2. Install and use the MP3 Hard Disk Utility in the attached CD. Refer to “MP3 Hard Disk Utility” section. A USB driver is required for Windows 98 SE. Please refer to “Software Installation” section. Figure 1 3 MP3 HARD DISK Before Using the Product Music File Transferring Example You can store tracks or employ folder names by preference. The following example describes how to transfer and arrange music files in this unit: 1. Turn off the MP3 Hard Disk. 2. Use the USB cable to connect the MP3 Hard Disk with the computer. (The smaller plug of the cable connects to the USB connector of the MP3 Hard Disk; the bigger plug connects to the computer’s USB port.) 3. When the LCD lights up automatically, press button for connection. 4. The LCD will prompt a successful connection as shown on the right. 5. The MP3 Hard Disk will appear as a new drive in “My Computer” (e.g. E:). Please look up the drive in “My Computer” and click into it. 6. Open the “MUSIC_ME” folder under the new drive. 7. Create new folders under “MUSIC_ME” such as “Classic”, “Pop”, and “Rock”. 8. Open the folder and copy music albums or singles stored in your computer into these newly-created, categorized folders. 4 MP3 HARD DISK Basic Functions Components HOLD switch Earphone jack Backlight LCD Up / VOL+ button Library button Play / Pause / Power Right / Next / Enter Left / Prev / Return A-B button Menu button Down / VOL- Reset pinhole Speaker interface USB connector (with lid on top) 5 MP3 HARD DISK Basic Functions Component Description Name or Symbol Function Playback Power On/Off Right Next Enter Description Starts, pauses or resumes playback. Press once to turn the power on; Press and hold for 2 seconds to turn it off. During playback: Plays the next track or hold to fast forward. While Paused: Selects the next track. Enters into a selected function or make a selection. During playback: Replays the current track from Left Previous Return start; when at the beginning of a track, plays the previous track; hold to rewind. While Paused: Selects the previous track. Returns to upper function layer (previous screen). Volume up During playback: Raises the volume. Move upward Moves cursor upward Increase value Increases a value. Volume down During playback: Lowers the volume. Move downward Moves cursor downward Decrease value Decreases a value. Loops music; Add tracks into My Favorite; Restart a game During playback: Selects points A and B and plays from A to B repeatedly. When the cursor is on a track or folder: Adds the track or folder into My Favorite. Restarts a game when it is over. 6 MP3 HARD DISK Basic Functions Function List Library List Displays the Function List; Switches between Function List and Playback Screen. Displays the Library List; Switches among Library List, Playback Screen, and Track Location Screen Moves the Hold Switch in the arrow direction to lock Key Lock up all key operations. Moves in the opposite direction to unlock all buttons. Earphone Jack Plug in earphones. 1. Connecting with the USB cable: Use USB cable to USB Connector (with lid on top) connect to computer or charge the battery via computer (bus power). 2. Connecting with AC adapter: to charge the battery. Speaker Interface Connects to speakers. Inserting a pointy object into the Reset Pinhole will Reset Pinhole reset the MP3 Hard Disk and return it to factory (To the upper right default settings. of the USB connector) Resumed settings include: ☆ Language → ENGLISH ☆ My Favorite → Empty ☆ EQ → Normal ☆ Shuffle → Off ☆ Repeat → All ☆ Contrast → 50% ☆ BackLight Duration → 5 seconds ☆ Date&Time → Default 7 MP3 HARD DISK Basic Functions Playback Screen ① ② ③ ④ ⑤ ⑥ ⑦ ⑧ ⑨ ⑩ ⑪ ① Power Status Battery level. MP3 Hard Disk is powered by the AC adapter or by computer through USB cable; in the meantime, the battery is being recharged. MP3 Hard Disk is powered by the AC adapter and the battery is fully charged. MP3 Hard Disk is powered by computer thru USB cable and the battery is fully charged. ② Repeat Status Repeat all Repeat One No Symbol No Repeat ③ Shuffle Status Shuffle on No Symbol Shuffle off 8 MP3 HARD DISK Basic Functions ④ Playing Status Playing Paused Fast forwarding Rewinding A to B repeat, set A A to B repeat No Symbol Playback stopped ⑤ Key Lock Status Keys (buttons) locked (disabled) ⑥ System time ⑦ Title of the current track ⑧ Folder name or album name of the current track ⑨ Progress bar ⑩ Track information (displays cyclically) 1. Track length 2. Bit rate (CBR) 3. Variable bit rate (VBR) 4. Frequency 5. Track number (sequence/total) ⑪ Total played time for the current track Note: During playback, when you press any key and enter into another screen, the unit will always return to the playback screen if there is no more key (button) operation in 9 seconds. When you are not playing music (e.g. while paused), the unit will automatically shut off in 1.5 minutes after the last key operation. 9 MP3 HARD DISK Using the Product Cautions for using Li-Ion battery: 1. It is important to re-charge the battery ASAP when battery runs out. 2. Li-Ion batteries need to be used for maximum performance. If you don’t use your device often, be sure to fully charge your battery at least once a week. Charging the Battery with the AC Adapter To charge the battery via AC adapter, first pull and flip open the USB connector lid at the bottom of the MP3 Hard Disk and connect the USB-mini plug of the AC adapter to the connector slot. Then plug the other end of the AC adapter into the electrical outlet as shown in Figure 2. When the LCD panel displays the image in Figure 2-1, the battery is fully charged. Figure 2 Figure 2-1 10 MP3 HARD DISK Using the Product Charging the Battery with the USB Cable To charge the battery via USB cable, connect the MP3 Hard Disk to the computer with the USB cable as in Figure 3 illustrated. The battery is charged by power from the computer. When charging the battery via USB cable while the MP3 Hard Disk is in stand-by mode, the LCD panel will display the image in Figure 3-1. When it is in playback mode, the LCD panel will display the image in Figure 3-2. Figure 3 Stand-by Mode Playing Mode Battery Charging Battery Charging Battery Fully Charged Battery Fully Charged Figure 3-2 Figure 3-1 11 MP3 HARD DISK Using the Product Playing Music 1. Connect earphones to the MP3 Hard Disk 2. Press to turn on the MP3 Hard Disk. If the unit is unresponsive, check and make sure the Hold switch is OFF. 3. Wait a few seconds until the screen displays the image in Figure 4 or Figure 5. Figure 4 Figure 5 If this is the first time you turn on the unit after connecting it to computer or poking the reset pinhole, the Library List will appear as shown in Figure 5. Please refer to “Library List” section for instruction on playing music. 4. Press to play music. Press Press Press or or to play the previous or next track for volume control. during playback to pause playing. Not operating the MP3 Hard Disk for 1.5 minutes after pausing will turn off the MP3 Hard Disk automatically. Press Press to display Function List. once during playback to display the track’s location. Press the button one more time to display Music Library. Hold or during playback to fast forward or rewind. Hold during playback to pause and turn off the MP3 Hard Disk. 12 MP3 HARD DISK Using the Product Library List After disconnecting the unit from a computer or resetting it, the Library List (Figure 6-1) will show up automatically. Pressing (sometimes more than once) in playback mode can also bring up the Library List as illustrated in Figure 6-2. Figure 6-1 Figure 6-2 There are 3 selections in the Library List: All Music: List all tracks and folders. (Holds up to total of 5,000 songs, 1000 subfolders and maximum of 11 levels.) Playlist: List all playlists compiled by the MP3 Hard Disk Utility. (Holds up to 100 playlists and 100 tracks per playlist.) My Favorite: By selecting a track or a folder from All Music, and pressing , you can add tracks into My Favorite. (Holds up to 100 tracks in My Favorite.) After the unit is connected to a computer, tracks in My Favorite might be lost; however, they remain in All Music . Use or to move the cursor up or down. Press to enter into the selection. Press to display Function List. Press to switch among Library List, Playback Screen, and Track Location Screen Press and hold during playback to turn off the MP3 Hard Disk. 13 MP3 HARD DISK Using the Product All Music: All Music is where all music files are stored and listed. It is equivalent to the MUSIC_ME folder when the MP3 Hard Disk is connected to the computer. In Library List, use press or to move the cursor to All Music and then to enter into the selection. All folders and music files are organized and displayed in tree structure as illustrated in Figure 7. Figure 7 Following Figure 7, use or to move the cursor up or down to select a music file or folder. Press to play the selected music file or folder. (Tracks being played will depend on Play Mode setting.) Press to enter into a folder or play the track when in the bottom folder level; press to return to the previous folder level until Library List appears, or play the current track again from the start. Press Press pressing to call up Function List. to return to Library List; when in the Playback Screen, will switch among Track Location Screen, Library List, and Playback Screen. 14 MP3 HARD DISK Using the Product Playlist: Music files in Playlist are compiled by the MP3 Hard Disk Utility (refer to “MP3 Hard Disk Utility” section). You can edit up to 100 lists with up to 100 tracks in each list. Press on an edited list (e.g. the list in the figure above) to play all music files in this list, or press on a list to unfold it. Then use move cursor and select a music file and press list when or to to play the file. If there is no is pressed, “No Music” will appear shortly and Library List will be displayed on the screen. My Favorite: My Favorite holds music files selected by pressing the button. First, enter into All Music and move cursor to the desired music file or folder. Then press . The selected music file or files in the selected folder will be added into My Favorite. (After the unit is connected to a computer, tracks in My Favorite might be lost; however, they remain in All Music.) A track or folder selected for My Favorite will be marked as circled icons on the right. 15 MP3 HARD DISK Using the Product Tracks in My Favorite can be deleted by entering into My Favorite and then pressing on the track you wish to delete. (My Favorite can hold up to 100 tracks.) In My Favorite as shown in the above figure, use or to move the cursor up or down to select a track. Press to play the selected file; press to return to Library List. When a music file in My Favorite is deleted, it is only deleted from My Favorite and still exists in All Music. Press Press to display Function List. to display Library List. 16 MP3 HARD DISK Using the Product Function List The Function List is where you configure the MP3 Hard Disk. Press button to open the Function List. The Function List has five sections: EQ, Play Mode, Setup, Game, and Information. EQ: Use EQ to change to a different sound mode, such as Normal (default), Rock, Pop, Classic, Jazz, Hall, Bass and Treble. Play Mode: Play Mode has two different functions, Shuffle and Repeat. Shuffle: Changes playing order; set to Off (default) or On. Repeat: Repeats a single track, all tracks or none. Setup: Configures the MP3 Hard Disk’s LCD Contrast, Language, BackLight and Date&Time settings. Game: Snake Information: Displays the software version of the MP3 Hard Disk. EQ: Press on EQ to enter into its selection items. Use or to move the cursor to your selection. Press to set your selection. Once the selection is made, it takes effect right away. Press or to return to the previous menu layer. When the top menu layer is reached, pressing will show no response. Pressing to playback screen. 17 will return MP3 HARD DISK Using the Product Play Mode: Press in Play Mode to enter into its selection items. There are 2 selections under Play Mode: Shuffle and Repeat. You can switch between Shuffle on and Shuffle off by pressing . You can switch among Repeat all, Repeat off and Repeat one by pressing Use or Press or to move the cursor up or down. to return to the previous menu layer. When the top Menu layer is reached, pressing Pressing Press will show no response. will return to the playback screen. to display Library screen; press again to return to the playback screen. Setup: There are 4 settings under Setup: Contrast, Language, BackLight, Date&Time. . Contrast: Press to enter into Contrast screen and use or to adjust the LCD contrast. 18 MP3 HARD DISK Using the Product Language: This unit supports eight languages. Use or Press to set your selection. Press or to move the cursor up or down. to return to the previous menu layer. When the top menu layer is reached, pressing Pressing Press will show no response. will return to the playback screen. to display Library list, press again to return to playback screen. BackLight: This function allows users to set the BackLight timer among 5 (default), 10 or 15 seconds or set as BackLight Off (no backlight). Use or to move the cursor up or down. Press to set your selection. Press or to return to the previous menu layer. When the top menu layer is reached, pressing Pressing Press will return to the playback screen. to display Library List, press playback screen. 19 will show no response. again to return to MP3 HARD DISK Using the Product Date&Time: The function adjusts the system’s date and time. Use Use Press or or to adjust the value. to select the item for adjustment. or to return to the previous menu layer. When the top menu layer is reached, pressing either of these buttons again will return to the playback screen. Game: Snake Press , , , and to move the snake up, down, left and right. When a game is over, press Press to play again. to quit playing and return to the previous menu layer during game play or when a game is over. return to playback screen. 20 Press again to MP3 HARD DISK Connecting to Computer Software Installation No additional software or driver is required for Windows Me, Windows 2000, and Windows XP. Windows 98 SE, however, requires the installation of USB 2.0 driver before the unit can be used. The MP3 Hard Disk will be treated as an external hard drive. 1. Turn on the computer and make sure that the computer’s USB port is available. 2. Insert the Installation CD into the CD-ROM drive. The installation window will appear on the screen. 3. Select “Install Driver and Utility” and follow the instructions until the installation is complete. (Windows 98 SE will install the driver and utility. Windows ME, 2000, and XP will install only the utility.) 4. Click “Exit” to end installation and remove the disc from the drive. 5. Click “MP3 Hard Disk Utility” in “Start” -> “All Programs” to start up the utility. Cable Connection 1. Turn off the MP3 Hard Disk. 2. Connect the MP3 Hard Disk to the computer using the USB cable and ports as shown in the picture below. 21 MP3 HARD DISK Connecting to Computer 3. The MP3 Hard Disk’s screen will appear as shown on the right. 4. After pressing , the computer will detect the unit and recognize it as a new hard disk in My Computer. (If you press , the unit will not connect to the computer. Instead, it will be turned on for use and charging the battery at the same time.) Note: When you are ready to disconnect MP3 Hard Disk from the system, close all the programs that are accessing the unit and click the green-arrowed icon ( , or ) in the system bar. When the drive letter assigned to the unit appears, click on it to safely remove the unit from the computer. You can also click on the icon in the MP3 Hard Disk Utility window to remove from the computer. 22 MP3 HARD DISK MP3 Hard Disk Utility MP3 Hard Disk Utility Operation Main Window ① ② ③ ④ ⑤ ⑥ ⑧ ⑦ ① Menu Bar ② Tool Bar New Folder: Adds new folder. Add Music Files: Adds music files to MP3 Hard Disk folder. Add Music CD: Converts tracks from music CD to MP3 format and stores files in MP3 Hard Disk folder. Safe Removal: Safely removes MP3 Hard Disk from Windows operating system. 23 MP3 HARD DISK MP3 Hard Disk Utility ③ MUSIC_ME Folders ④ Music Files (includes file name and ID3 information) ⑤ Playlist Toolbar Add to Playlist: Adds selected music file to playlist. Remove from Playlist: Removes selected music file from playlist. Move Up: Moves selected file up playlist. Move Down: Moves selected file down playlist. ⑥ Playback Toolbar Previous: Plays previous music file. Play: Plays current music file. Next: Plays next music file. Adjusts volume ⑦ Playlist Table ⑧ Playlist Content 24 MP3 HARD DISK MP3 Hard Disk Utility Menu Bar Files New Folder: Adds new folder. Add Files: Adds music file to MP3 Hard Disk folder. Add CD: Converts tracks in music CD into MP3 format and stores files in MP3 Hard Disk folder. Refresh: Refreshes screen; re-reads MP3 Hard Disk file. Exit: Ends program. 25 MP3 HARD DISK MP3 Hard Disk Utility Edit ID3 Edit: Edits selected MP3 file’s ID3 information. ID3 Language: Selects appropriate language system to display correct ID3 information when unrecognizable symbols occur. Cut, Copy, Paste: Cuts, copies and pastes selected item. Delete: Deletes file. Select All: Selects all items. Invert Selection: Inverts selection. 26 MP3 HARD DISK MP3 Hard Disk Utility Playlist New Playlist: Creates empty playlist. New Playlist from Creates new playlist and adds selected files. Selection: Add to Playlist: Adds selected file to playlist. Remove from Playlist: Removes selected file from playlist. 27 MP3 HARD DISK MP3 Hard Disk Utility System Firmware update: Copies new firmware to the MP3 Hard Disk. (After the firmware is updated, tracks in My Favorite might be lost; however, they remain in All Music.) Follow these steps: 1. Download the new firmware file from our web site and save it on the Desktop. 2. Click this option will open the “Open File” window. Click “Browse” and move to the Desktop. Select the firmware file and click “Open”, the utility will automatically copy the firmware file to MP3 Hard Disk. 3. After the file is copied, safely remove and disconnect the MP3 Hard Disk from computer. 4. Connect the AC adaptor and turn on the unit. 5. Press and select Information. Then press to update system. 6. “Complete…” will appear on the screen when the update is complete. Press any key as instructed to reboot system. Safely Remove: Removes MP3 Hard Disk from Windows operating system. 28 MP3 HARD DISK MP3 Hard Disk Utility Add Files (Menu Bar -> File -> Add Files) Up: Returns to previous folder level. Views: Folder views (Detail, Brief, or Icon.) Play: Plays music folder. Add: Copies and adds selected file or folder to MP3 Hard Disk. Done: Returns to the main window. 29 MP3 HARD DISK MP3 Hard Disk Utility Add CD (Menu Bar -> File -> Add CD) Play Track: Plays selected track. Eject CD: Ejects CD. Track Name: Selects the rule for naming a track. Reset Name: Resets to default track name. Load CDDB: Downloads CD information from CDDB from the Internet. Select All: Selects all tracks. Quality: Selects MP3 music quality. Start: Starts converting and storing into MP3 Hard Disk. Cancel: Cancels conversion. 30 MP3 HARD DISK Specifications MP3 Hard Disk Specification Hard Disk Audio Capacity 20GB or depending on the model purchased Dimension 1.8” File System FAT32 Interface USB 2.0 Frequency Range 20Hz ~ 20KHz Maximum Output 15mW (L) + 15mW (R): 32 ohm earphone File Limitations MUSIC_ME Folder Maximum 5000 music files (for 20GB) Maximum 1000 sub-folders; folder depth up to 11 levels. Playlist Maximum 100 Playlists Maximum 100 music files per Playlist. My Favorite Maximum 100 music files for My Favorite File Type MPEG 1/2/2.5 Layer 3 Bit Rate 32Kbps ~ 320Kbps Tag ID3 V1 Tag, ID3 V2 2.0, ID3 V2 3.0 File Type Microsoft Window Media Audio V2/V7/V8/V9 Bit Rate Up to 384Kbps Display Backlit LCD Dot Matrix 128 x 64 Power Supply AC Adapter AC 100V~240V; DC 5.0V/1.2A Battery Re-chargeable Li-Polymer (1200mAh) Size Approx. 98(L)x64(W)x18(T)mm Weight Approx. 145g (including battery) MP3 WMA Dimension Playback Hours Approximately 13 hours (fully charged battery; when playing 128kbps MP3 files continuously). The following conditions may reduce the playback time: Playing MP3 files of bit rate higher than 128kbps. Playing WMA files. Frequent key operation during playback. Playing at loud volume. Backlight timer setting above 5 seconds. 31