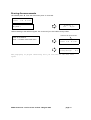
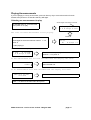
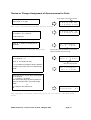
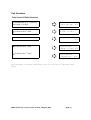
1
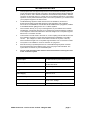
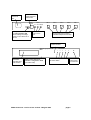
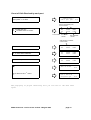
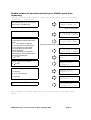
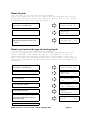
Multi-Announcer
Model 349
Version 01.02
USER GUIDE
Multimessage Systems Ltd
Units 1 & 2 Cranborne Ind. Estate, Cranbourne Road, Potters Bar Herts, EN6 3JH
Telephone: ++44 (0) 1707 644480 Fax: ++44 (0) 1707 646745
www.multimessage.co.uk
M349 Announcer version 01.02 revised 4 August 2005
page 1
CONTENTS
TECHNICAL NOTES
3
Introduction to your announcer
4
Facilities
4
Installation
5
Choosing A Suitable Site
5
Unpacking The System
5
Installation Procedure (You must follow this!)
5
Read This First (How to control it )
8
Menus
8
Function Displays
8
Getting started
8
Confirmation
9
Record- Play- Assign Announcements
10
The External Audio Input Socket
11
Remote control of the M349
11
Remotely Rerecord
12
Remote Assignment of Announcement to ports
12
Erasing Announcements
13
Playing Announcements
14
Review or Change Assignment of Announcement to Ports
15
Remote control access
16
Changing Key Code for remote control
16
Allow or bar remote control
17
Call Counters
18
Total Count Of Calls Received
18
Count of Calls Received by each port
19
Enable number of announcement plays or disable ports from answering
20
Ring delay
21
Clearing to dial-tone delay
21
Reset all ports
22
Reset a port and set its type of clearing signal
22
GUARANTEE
23
M349 Announcer version 01.02 revised 4 August 2005
page 2
TECHNICAL NOTES
1.
This equipment has been approved pursuant to Council Decision 98/482/EC [CTR 21]
for pan-European single terminal connection to the Public Switched Telephone Network
(PSTN). However, due to differences between the individual PSTN provided in different
countries, the approval does not, of itself, give an unconditional assurance of successful
operation on every PSTN termination point. In the event of problems, you should contact
your equipment supplier in the first instance.
2.
The Multimessage Systems model 349 announcer is suitable for connection to
Exchange lines which provide Multi-Frequency (MF) signalling. The model 349
announcer is not suitable for connection as an extension to a payphone, neither
to a shared-service (party) line or a 1+1 carrier system.
3.
lnterconnection directly, or by way of other apparatus, of ports marked in accordance
with BS 6301 or EN41003 with ports not so marked may produce hazardous conditions
on the telephone network and that advice should be sought from a competent engineer
before such a connection is made.
4.
Interconnection circuits made to the audio in, out and out(8Ω) ports should be such that
the equipment continues to comply with the requirements of EN60950 2.3 for SELV
circuits. (the voltages in a SELV circuit shall not exceed 42.4V peak or 60V dc).
Advice should be sought from a competent engineer before such a connection is made.
5.
The system is not suitable for use as an extension to a payphone.
6.
Refer all servicing to qualified personnel or to the Multimessage Systems Customer
Servicing Department at the address given on the front page of this handbook. The
system does not contain any user serviceable parts.
7.
The line cords and mains cable must be disconnected before removing the cover
of the announcer system.
Exchange Lines
External input
MF REN of 3 (TNV3 CIRCUIT)
-10 dBm 600 Ohms peak maximum input.
External outputs
0 dbm 8 Ohms
-10 dbm 600 Ohms
Dimensions
255mm long x 320mm wide x 40mm deep
Weight
3.2kg
Power Supply
230V AC 50 Hz
Power Consumption
65mA
Temperature
0 to 40°C working
-20 to +70°C storage
Relative Humidity
0 to 95% (non-condensing)
M349 Announcer version 01.02 revised 4 August 2005
page 3
Introduction to your announcer
Read this section to get an overview of how your Multimessage announcer works. This section also
contains some important information about conditions for installing and connecting the unit.
The Model 349 is fitted in a one-unit-high case, equipped with 5 ports (analogue telephone lines) in
addition to 1 local control telephone handset port. All ports are analogue 2-wire type.
Ports may be connected to:
♦
An analogue PSTN lines or
♦
A PBX extension lines
The announcements and settings can be modified while the system continues to function with calls
in progress and answering incoming calls on other ports.
Announcement recording and set-up selection requires one of the following:
1. An ordinary tone-dialling telephone handset connected to the local handset port on the rear
panel,
2. When remote control is enabled, a tone-dialling telephone handset calling any of the 5 ports
via the public/private telephone system.
Announcements
Each port of the M349 announcer is assigned an announcemnent.
Up to 99 different announcements are available.
Each caller hears the relevant announcement from the beginning.
Facilities
♦
♦
♦
♦
♦
♦
♦
♦
♦
♦
Solid-state (digital) storage of announcements
24 hour battery back-up for when mains power fails
Up to 99 announcements may be recorded
Announcements may be of any duration, only limited by total storage capacity
Any announcement may be assigned to any port.
Announcements can be modified while the system continues to answer calls.
Any port can have auto-answering enabled, disabled or forced to drop the call in progress
Auto-answering
Auto-clearing
Individual call counts for each port and total count for all the ports, allowing the monitoring of
the calls received
♦ Complete system set-up using MF telephone handset.
♦ Connection, both input and output via 3.5mm jack sockets for external equipment such as a
tape recorder / CD player. Outputs = 0 dbm 8 ohms and –10 dbm 600 Ohms. Input = -10 dBm
peak maximum 600 Ohm.
♦ Remote control may be obtained while the annoucement is heard, via the PSTN, for
recording, playing or assining announcements to ports. Access is guarded using a 4 MF digit
security code. Individual ports can have remote control enabled.
M349 Announcer version 01.02 revised 4 August 2005
page 4
Installation
Choosing A Suitable Site
The system should be installed on a level, solid surface, where:
♦ It is near an earthed mains socket outlet, so that the mains lead will reach. This socket shall
remain easily accessible.
♦ The telephone line cords will reach your telephone line sockets.
♦ There is a minimum of background noise, so that you can record your announcements satisfactorily.
♦
♦
♦
♦
♦
You can easily see the display (preferably at head height).
The unit is away from direct sunlight or heating appliances
Air can circulate around the unit (allow at least 10 mm clearance all round)
The temperature is maintained between -10°C and 40°C.
The unit is away from water or corrosive chemicals, particularly salt spray.
Unpacking The System
When you unpack the system from its box, you will find:
♦
♦
♦
♦
♦
The Multimessage Model 349 announcer.
A mains lead with fitted plug.
5 telephone line cords.
A telephone handset.
This User Guide.
Installation Procedure
Please make sure you follow these steps in the correct order, and that you have read the TECHNICAL NOTES.
1
2
3
4
5
6
Carefully remove the unit from its plastic bag.
Plug the local handset in to the socket marked ‘LOCAL HANDSET’.
You must plug the line cords into the M349 sockets , before connecting the other end to the
PSTN or PBX port.
Plug the mains lead into the socket at the rear of the unit.
With the switch on the mains socket set to off, plug the mains lead into the socket. Switch on
at the socket.
Switch the battery switch to the on position.
M349 Announcer version 01.02 revised 4 August 2005
page 5
Connect mains
power lead
here.
Connect the local
control telephone
handset here.
LOCAL
HANDSET
PORT 5
AUDIO
IN
OUT
PORT 4
PORT 3
PORT 2
PORT 1
OUT(8R)
BATTERY
OFF ON
Battery switch
You must switch to ON
before making recordings.
Switch to off, if taken out of
service.
Optional external
audio connections.
Connect leads from incoming
PSTN/PBX telephone lines here.
Lit when local control
handset is lifted.
Multimessage Systems Ltd.
M349
Display shows
information.
Controlled from
local handset
Safety information and
software configuration label
(on under side)
ACTIVE LINES
L
1
2
3
4
Lit when M349 port is online;
Off when offline.
M349 Announcer version 01.02 revised 4 August 2005
5
ON
Lit when
mains power
is connected.
page 6
Watch the display and check that it shows the information as follows:
When the M349 is first switched on this is the information that appears on the screen. The date is
when the software was created. Check that the
version is the same as at the foot of this page.
M394 V01.02
22 July 2005
After a few seconds you will see. This should take
approximately 30 seconds.
memory check
please wait ..
The numbers will vary, depending on the amount
of memory installed in your unit.
Memory top
8FFF
size
1000
Pick up the local telephone handset. You will hear
a tone, indicating that the announcement for this
port has not been recorded.
M349 version 01.02
0 calls
Press # # # # To check the status of the
ports. Starting with port 0 the local control hand-
0aannn..........
................
0 = Online.
. = not equipped.
a = analogue.
n = analogue with dial tone clearing.
Press ∗ and replace the handset.
M349 version 01.02
0 calls
You are now ready to set the system up to answer your callers. Go to Read This First.
M349 Announcer version 01.02 revised 4 August 2005
page 7
Read This First (How to control it )
Menus
The system works via a series of menus. The display offers you a number of options, to be selected by pressing a key on the telephone. When you press a key, you may see another menu. Inviting you to choose a further option. If you then lift the handset ( You will hear a tone or an announcement if it has been recorded and assigned to port 0 ), press the # key, a ‘pip pip’ tone is
played indicating that you are now in the initial menu.
Press 1-Record
2-Play/Assign
#→
What this means is that you can press:
1 to record or delete an announcement;
2
to play an announcement or assign an announcement;
#
to see the 2nd menu;
*
to return to play and display the current announcement for port 0;
Function Displays
When you have pressed a key to select a function from the menu, the display may prompt you to
key in some data. If you need to key in an announcement number, a port number, etc. the display
offers you a default value-usually the one assigned to that port, e.g. Announcement 1. The offered
number you can change is blinking to indicate that you can key in a new digit. Alternatively, if you
want to accept the value shown, just press the # key
The # key-where a number is offered the # key accepts the number.
The ∗ key-is used to exit from the current function without making further changes and in many
places the ∗ key allows a correction to be made by backspacing to the previous digit, number or
menu.
The 0 key-is used to step to the next available announcement number for recording or playing
announcements.
If the handset is replaced before a sequence is followed through to its usual ending then wherever
possible the M349 reverts to its condition before the sequence began.
Getting started
Using the procedure for ‘Record- Play- Assign Announcements’ record the following:
“Hello this is... (your name)” plus any other information such as “your call may be recorded” or “I
am very sorry I am unable to connect you”. Add any other information such as the times when you
will be able to take calls.
M349 Announcer version 01.02 revised 4 August 2005
page 8
Confirmation
When you have completed the recordings and assignments, replace and then pickup the local handset. The local telephone now plays the announcements, in the same way as callers would hear
them. To make changes, press # for the main menu.
When an announcement has started to play, you will need to press the # key within the first 10 seconds to gain control. If longer than this, replace the handset and start again.
M349 Announcer version 01.02 revised 4 August 2005
page 9
Record- Play- Assign Announcements
Lift handset press # . From the main menu press 1 for record.
Record ann
1
01..99
#-start
Enter announcement number
or press # to accept the one
offered.
Or if the announcement exists.
Re-record 1 ?
0-next ∗-no #-start
Enter announcement number,
press # to re-record the one offered,
0 to find first available
or
∗ to end without re-recording.
Press # to start the recording.
Recording 1
free
1634
#-stop
After the tone, speak clearly into the handset.
Shows seconds of free recording
time available to you.
Press # to stop
or
∗ to pause, resume by pressing
∗ again.
The announcement you have just recorded is played.
Press # , to accept and review or change the assignment,
or
∗ or any other key will discard your new recording.
The announcement is played repeatedly
Press # to accept
or
0..5 change the start of range,
or
∗ to exit without changing the assignment.
1 Playing Time
14
#-Accept *Do again
Shows length of recording
in seconds.
Ann 1 assigned to
ports 0.. 1 #-next
Shows range of ports to which
this ann is currently assigned and
offers start of the range.
Ann 1 assigned to
ports 0.. 1 #-next
Offers end of the range.
Press # to accept
or
0..5 change the start of range,
or
∗ to exit without changing the assignment.
Press 1-Record
2-Play/Assign
#→
The peep-peep is played indicating that you are back at the main menu
again..
M349 Announcer version 01.02 revised 4 August 2005
page 10
The External Audio Input Socket
The external input socket may be used for recording speech or music.
If speech with background music is required then follow the section
'Record Announcements' until it displays ' # to start'. Start the CD
Player (or Tape), press # key to start the recording, say your announcement, then press the # key to end the recording.
If speech from the handset is not required then follow the section
'Record Announcements' until it displays ' # to start'. Press secrecy /
Mute button (to mute the handset microphone), start the CD Player (or
Tape) when it reaches the section of music that you wish to record, press
# key to start the recording, then press # key to end the recording.
To record a mixture of speech and music e.g. "You have been placed on
hold, please wait”, follow the section 'Record Announcements' until it
displays ' # to start'. Press # key to start recording; once you have
finished recording your speech press ∗ to pause, press the secrecy button, then start the CD Player (or Tape); press ∗ to continue recording.
Once the section of music you wish to record has finished press # key to
end the recording.
The level of music should be kept low to avoid the automatic gain control
circuit from compressing the music. Replaying compressed music to the
callers may cause them to be prematurely cut off.
Remote control of the M349
Before you can use remote phone control you must enable remote access to
the ports that you are going to use for this. (see Remote control access).
Call the remote control port. Listen for the announcement then press # you
will now hear silence. Enter your 4 digit key code,(default code is 0 0 0
0 )when correct you will hear ‘pip pip’ tone played. You can now select
the functions from the main menu:
1-Record or 2-Play/Assign. The 2nd menu is not accessible.
M349 Announcer version 01.02 revised 4 August 2005
page 11
Remotely Rerecord
The following assumes that the Announcement number you wish to rerecord is
the same as currently assigned to the port you are using for remote control. If the number is different then go to Remote Assignment of Announcement to ports first.
Press # X X X X (your remote access key code)
After gaining remote access you will hear ‘pip pip’, press 1 #
to start recording, speak after the tone, press
# to stop. The recording
that you have just made is played back to you for confirmation.
Press # to accept the new recording, any other key will discard the new
recording. (Callers will continue to hear the old one.)
Press * you will hear the‘pip pip’ tone confirming that you are back at
the main menu again.
Press * again and the message that is assigned to the port you are calling
on will be played and remote control will end.
Remote Assignment of Announcement to ports
Press # X X X X (your remote access key code)
After gaining remote access you will hear ‘pip pip’
Press 2 The first announcement starts to play
Press 0 to play the next, or enter the announcement number 1..9 9 press #
to start.
When you hear the one to be assigned:
Press # then 1..5 for the first port in the range, then # to accept.
Enter 1..5 for the last port in the range, then # to accept.
You will hear the ‘pip pip’ tone confirming that you are back at the main
menu again.
Press * again and the message that is assigned to the port you are calling
on will be played and remote control will end.
M349 Announcer version 01.02 revised 4 August 2005
page 12
Erasing Announcements
Lift handset press # . From the main menu press 1 for record.
Re-record
0-next *-no
1 ?
#-start
Enter announcement number, press ∗
Erase 21 ?
∗-no
#-yes
Callers listening to this will be dropped. Use re-record if you wish callers to stay online.
Offers the next announcement.
Press # to erase or
press ∗ to return to the main menu
Re-record 22 ?
0-next ∗-no #-start
Press 1-Record
2-Play/Assign
The peep-peep is played indicating that you are back at the main menu
again.
M349 Announcer version 01.02 revised 4 August 2005
page 13
#→
Playing Announcements
If you are playing in a noisy environment, press the Secrecy key to ensure that noises from the
handset microphone do not interfere with any MF digits.
Selecting an announcement to play
Shows length of recording in seconds.
Lift handset press # . From the main
menu press 2 for play
1 Playing Time
14
1..9 #-assign 0-next
The first recorded announcement starts playing.
Press #
To select an announcement:
press digits for the announcement number 1.. 9 9 ,
press #
Ann 23
1..99
#-Accept ∗→
to start playing it.
At the end the display shows
23 end
11 seconds
1..9 #-assign 0-next
To select another press digits for the announcement
number 1.. 9 9, press #
If the announcement has not been recorded then the display will showAnn 21 not recorded
0-Next ∗
Select another announcement number, or 0 for the
next recorded one.
If no announcements have been recorded then the display will showThere are no anns.
recorded
Press ∗ to return to the main menu.
Press ∗ to return to the main menu at any time.
M349 Announcer version 01.02 revised 4 August 2005
page 14
Review or Change Assignment of Announcement to Ports
Shows length of recording in seconds.
Lift handset press # . From the main
menu press 2 for play
1 Playing Time
14
1..9 #-assign 0-next
The first recorded announcement starts playing.
1 Playing Time
14
1..9 #-assign 0-next
Select announcement. Press digits for
it’s number 1.. 9 9 , press #
to start playing it.
Press # , to review or change the assignment.
The announcement is played repeatedly.
Ann 1 assigned to
ports 0.. 1 #-next
Shows range of ports to which this act is currently
assigned and offers start of the range.
Select port for the start of range, press digits
for it’s number 1.. 5,
Ann 1 assigned to
ports 0.. 3 #-next
press # for range end offer,
Offers end range of ports.
# # to review next range of ports if present
or return to the main menu if no other range
exists.
Select port for the end of range, press digits
for it’s number
1 .. 5, press # to accept
and review next range of ports if present or
return to the main menu if no other range
exists.
or
∗ to return to the main menu.
Ann 1 assigned to
ports 4..5 #-next
Press 1-Record
2-Play/Assign
The peep-peep is played indicating that you are back at the main menu
again.
M349 Announcer version 01.02 revised 4 August 2005
page 15
#→
Remote control access
Changing Key Code for remote control
At the time of installation remote control access will be barred.
You may only change the access key code. It cannot be reviewed.
Lift handset press # # . From this 2nd
menu press 7 (hidden key)
3 for Guard.
1 for Remote control key.
Enter the your new code and make a
note of it
1-Delays 2-Enable
3-Guard 4-Reset #→
1-Key Code
- Security
*-Quit
0000 code for key
remember? *-no #-yes
1234 code for key
remember? *-no #-yes
0 0 0 0 .. 9 9 9 9.
# to accept.
∗
∗ to return to the 1st menu.
Key remembered for
remote control
#→
Press 1-Record
2-Play/Assign
The peep-peep is played indicating that you are back at the main menu
again.
M349 Announcer version 01.02 revised 4 August 2005
page 16
#→
Allow or bar remote control
Change or review the range ports allowed to control the system for making
changes such as new recordings or assign announcements to other ports.
At the time of installation remote control access will be barred.
Lift handset press # # . From this 2nd
menu press 7 (hidden key)
1-Delays 2-Enable
3-Guard 4-Reset #→
3 for Guard.
1-Key Code
2- Security
2 for Security.
*-Quit
Ports 01..5 remote=
barred 1-alter
#→
1 to allow remote access. Or
Allow remote control
via ports? 01..05
# to review next range of ports.
Shows range of ports barred/allowed remote control
and offers start of the range.
1 .. 5 to select port for start of range.
# to accept.
Allow remote control
via ports? 01..5
offers end of the range.
1 .. 5 to select port for end of range.
# to accept.
∗
Ports 01..5 remote=
allowed 0-alter #→
∗ to return to the 1st menu.
The peep-peep is played indicating that you are back at the main menu
again.
M349 Announcer version 01.02 revised 4 August 2005
page 17
Call Counters
Total Count Of Calls Received
Lift handset press # # . From the 2nd
menu press 1 for Hits.
1 for Reset Calls.
∗ to return to the 2nd menu.
0 for reset to zeros.
1-ResetCalls
2-Calls per port
#→
Total calls = 000028
0-reset to zero
Calls = 000000
#→
∗ to return to the 2nd menu.
∗ to return to the 1st menu.
1-Hits 2-Free
4-Setup 5-Clock
Press 1-Record
2-Play/Assign
The peep-peep is played indicating that you are back at the main menu
again.
M349 Announcer version 01.02 revised 4 August 2005
page 18
#→
#→
Count of Calls Received by each port
Lift handset press # # . From the 2nd
menu press 1 for Hits.
1-ResetCalls
2-Calls per port
#→
Port0 (Local handset) calls
are not counted.
2 for Calls per port.
or ∗ to return to the 2nd menu.
00
01
Port number
0000
0120
Re-settable
counter.
0000
0120
Non-resettable
counter.
Selected port re-settable
counter blinks.
8 to scroll down.
01
02
0120
0045
0120
0045
0 to zero and scroll down.
01
02
0000
0045
0120
0045
2 to scroll up.
00
01
0000
0000
0000
0120
∗ to return to the 2nd menu.
1-Hits 2-Free
#→
∗ to return to the 1st menu.
Press 1-Record
2-Play/Assign
The peep-peep is played indicating that you are back at the main menu
again.
M349 Announcer version 01.02 revised 4 August 2005
page 19
#→
Enable number of announcement plays or disable ports from
answering
Change or review the number of times the announcement will be repeated to
callers for a range ports.
Lift handset press # # . From this 2nd
menu press 7 (hidden key)
1-Delays 2-Repeats
3-Guard 4-Reset #→
Number of repeats blinks.
2 for Repeats
# to review next range of ports.
(Only if different settings have been
used)
Or 1 .. 7 for number of repeats.
Or 0 to stop ports from answering
Or 9 to answer from ‘Ring Start’
and repeat playing until a clear
signal is received.
Or 8 to answer from ‘Loop Start’
repeat playing. A clear signal will restart the announcement.
Or ∗ to quit.
00.. 05 play 1 times
0..9 to alter #-next
00.. 05 play 2 times
0..9 to alter #-next
The display will not change if all ports are the same when reviewing
after 0..9 press, # to accept
Or ∗ to quit.
0 ..5 for start of range.
# to accept
04.. 05 play 3 times
0..9 to alter #-next
00..05 not to answer
calls
#→
Enable 0 plays
to ports 0.. 5
Enable 0 plays
to ports 4.. 5
0 ..5 for start of range.
# to accept
∗ to return to the 1st menu.
Enable 0 plays
to ports 4.. 4
Press 1-Record
2-Play/Assign
The peep-peep is played indicating that you are back at the main menu
again.
M349 Announcer version 01.02 revised 4 August 2005
page 20
#→
Ring delay
Review or change the time before an incoming call is answered.
Lift handset press # # . From this 2nd
menu press 7 (hidden key)
1 for Delays.
1 for Ring
1..99 seconds.
# to accept
1-Delays 2-Enable
3-Guard 4-Reset #→
Delay?
1-Ring 2-Tone *-Quit
Ring delay = 01 sec
0..99
#-accept
or ∗ to quit.
Clearing to dial-tone delay
Review or change the time dial-tone has to be present before an incoming
call is cleared. If the time is short, noise from the caller may cause
premature clearing. If the time is long, you could experience false calls,
where callers hang up during the announcement and the disconnect clear
signal from the PSTN is not presented. Only change from the default value
of 5 seconds if you are experiencing problems.
Lift handset press # # . From this 2nd
menu press 7 (hidden key)
1-Delays 2-Enable
3-Guard 4-Reset #→
1 for Delays.
2 for Tone clear.
Delay?
1-Ring 2-Tone *-Quit
0.1..9.9 seconds.
# to accept
or ∗ to quit.
M349 Announcer version 01.02 revised 4 August 2005
Tone delay = 5.0 sec
0.1..9.9
#-accept
page 21
Reset all ports
Only use this if you are experiencing problems.
Calls in progress will be cut off. The stored announcement data will be
tested and cleared if found to be incorrect. Make a note of your current
settings before you follow this procedure.
Lift handset press # # . From this 2nd
menu press 7 (hidden key)
4 for Reset.
1 for Reset All.
After a few seconds it returns to the
1st menu.
1-Delays 2-Enable
3-Guard 4-Reset #→
1-Reset All
2-Port type
*→
Press 1-Record
2-Play/Assign
#→
Reset a port and set its type of clearing signal
Only use this if you are experiencing problems.
A call in progress will be cut off. The stored announcement data will
remain unchanged. Only change the type to ‘analogue’ if callers are
prematurely disconnected while listening to announcements with tones or
music, otherwise you could experience false calls, where callers hang up
during the greeting and the disconnect clear signal from the PSTN is not
presented.
Lift handset press # # . From this 2nd
menu press 7 (hidden key)
4 for Reset.
1-Delays 2-Enable
3-Guard 4-Reset #→
1-Reset All
2-Port type
*→
2 for Port type.
Port 0 not used
1..05
*→
1..5 enter port number
Port 1 DTone
1..05
#-Change *→
# to change port type
1-Analog
3-Analog+DTone
*→
1 to reset to analogue port type.
3 to reset to analogue + dial tone
clearing port type.
Reset completed for
port 01
#→
# for next port
M349 Announcer version 01.02 revised 4 August 2005
page 22
GUARANTEE
Multimessage Systems Ltd. guarantees this product for one year from the date of purchase provided that:
•
•
•
The product has only been used for its intended purpose, and has not been subjected to misuse, or
been wilfully or accidentally damaged.
The product has been installed according to the maker's lnstallation Instructions.
The product has not been tampered with or repaired by anyone other than Multimessage Systems Ltd.
or its approved agents.
If a fault occurs in this product within twelve months of purchase you should return it to where you bought it,
together with the sales receipt, and it will then be replaced or repaired free of charge.
This guarantee does not affect your statutory rights and is applicable to the United Kingdom only.
M349 Announcer version 01.02 revised 4 August 2005
page 23