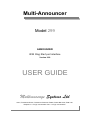
1
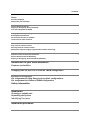
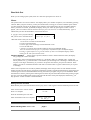
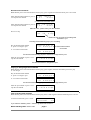
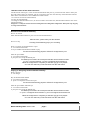
Multi-Announcer
Model 299
ANNOUNCER
With
With
Siemens
Ring Start
TMOM
portport
interface
interface
Version 9.09
( Port 1 = Ring Start, ports 2..5 = TMOM )
Version 11.03
USER GUIDE
Multimessage Systems Ltd
Unit 2, Furzewood House, Cranborne Road Ind. Estate, Potters Bar Herts, EN6 3JN
Telephone: ++44 (0) 1707 644480 Fax: ++44 (0) 1707 646745
Model 299 Ring Start version 9.09
page 1
Contents:
Read this first
Menus
3
Function displays
Setting the time and date
Record Announcements
Playing or Assigning Announcements
Free recording time available
4
Changing the Default display
Erasing Announcements
Version and revision of software
Total count of calls received
5
Enable number of announcement plays for each caller
Key code for remote control
Security level for remote control
Setting the required ringing signal duration before answering
6
Remote control of the multi-announcer
Record Announcements Remotely
Playing or Assigning Announcements Remotely
7
Introduction to your multi-announcer
8
Features and facilities
Changing links for port 1 to or from the TMOM configuration
Resetting Port Configuration
9
10
Pin assignment for Ring Start and Loop Start configurations
Pin assignment for Siemens TMOM configuration
Safety information
Installation
11
Choosing a suitable site
Unpacking the System
Identifying the parts
Installation procedure
12
Read this first
When you are setting up the system, there are a few basic principles to be aware of.
Menus
The system works via a series of menus—the display offers you a number of options, to be selected by pressing
a button. When you press a button, you may see another menu, inviting you to choose a further option. When
you first switch the system on, the display shows software version followed by the size of installed memory.
After a period of 10 seconds, by default, the display shows port status. By pressing the # button a tone is
played , (this tone indicates that the announcement for port 1 has not been recorded) followed by ‘pips’ to
indicate that you have the Initial Menu, which looks like this:
A ‘pip pip’ tone is played indicating
that you are now in the initial menu
1-Rec 2-Play
3 Assign to port
#
What this means is that you can press:
1 to record or re-record an announcement
2 to play an announcement
3 to set to play, select and assign an announcement to line.
# to see the 2nd menu
* sets port 1 to answer calls with the number of calls received default display.
Note: the announcement for port 1 is played for confirmation before the default display.
Pressing * again will force it to go to the number of calls received default display without
waiting for the end of the announcement.
Function displays
When you have pressed a button to select a function from the menu, the display
may prompt you to enter some data.
If you need to enter an announcement number, etc., the display offers you a default value—usually the
lowest possible one, e.g. Announcement 1. The number you can change now is blinking to indicate that you
can press a new digit. Alternatively, if you want to accept the value shown, just press the # button. If the
number you enter is invalid the announcer will offer a corrected value or ignore it and wait for you to press
a valid digit.
After a time out period of 30 seconds, by default, the display shows the port status or time and date with the
number of calls received, then by pressing the # button the currently assigned announcement is played. Press the
# button again to return to the Initial Menu. Pressing the # button yet again will give you the 2nd Menu. While
the 2nd menu is shown, pressing the # button again will show the port status abbreviations then pressing # again
puts port 1 into the standby mode ready to take calls with the status of all ports displayed; alternatively, you
may press the * button to return to the Initial Menu.
Setting the time and date
Hold handset press #, the announcement starts to play. Press # and # again. From the 2nd menu press 8 for time
Enter current time in 24 hour format.
Press # to complete.
Enter new time
hh mm
From the 2nd menu press 9 for date
Enter current date. Press # to complete.
Model 299 Ring Start version 9.09
Enter new date
dd mm yy
page 3
Record Announcements
Hold handset press #. the announcement starts to play, press # again From the main menu press 1 for record
Enter announcement number or press #
to accept the one offered.
Ann 1 Record
1..9-?
#-start
or if the announcement exists.
Enter announcement number or press #
to accept the one offered.
Ann 1 Re-record?
0..9-?
#-start
After the tone, speak clearly into the handset
Ann 01 Recording
free
512
#-stop
Press # to stop
Shows the free seconds of recording time
available to you
Pressing # automatically plays your recording.
Key in announcement number
or press # to assign to port
3 Playing Time 12
1..63
#-Assign tÒ
or ∗ to return to main menu
3 End
1..63
12 seconds
#-Assign tÒ
Shows the duration
in seconds
The announcement being played is offered for assignment to port.
Enter the port number or press # to accept the one offered.
Assign Ann 01
to line 01 #-accept
The announcement is assigned to port.
Playing or Assigning Announcements
Hold handset press #. the announcement starts to play, press # again, From the main menu press 2 for play
or 3 for assign.
Key in announcement number
or press # to assign to port
3 Playing Time 12
1..63
#-Assign tÒ
or ∗ to return to main menu
3 End
1..63
12 seconds
#-Assign tÒ
The announcement being played is offered for assignment to port.
Enter the port number or press # to accept the one offered.
Assign Ann 01
to line 01 #-accept
Free recording time available
Hold handset press #, the announcement starts to play, Press # and # again. From the 2nd menu press 1 for size.
To return to 2nd menu, press # twice.
Free memory size
523 seconds
#→
if you make a mistake, press∗ button to go back and correct it.
Model 299 Ring Start version 9.09
page 4
Changing the Default display
1 2 3 4 5
To change from Port status default dis- Port
play:
Status r t t t t
press #, the announcement starts to play, Press # . From the 1st menu press * and * again
To change from Number of calls received default display :
16:15 Wed 15 Mar 95
0 calls
A one second tone is played when the announcement for this port is not recorded.
You will not see this display, the 1st menu
will continue to show.
press #, the announcement starts to play, Press # and # again. From the 2nd menu press # yet again
O=Oline r=RingStart
t=TMOM s=LoopStart #Ò
press # once more
Port status default display
Port
1 2 3 4 5
Status r t t t t
Erasing Announcements
Hold handset press #, the announcement starts to play, Press # and # again. From the 2nd menu press 5 for
Delete
Enter announcement number or press #
to accept the one offered or * to quit
Ann 01 delete?
*-no
#-start
Press #, the next announcement will be
offered.
Ann 01 deleted
#→
Version and revision of software
Hold handset press #, the announcement starts to play. Press # and # again. From the 2nd menu press 1 for Size
then #
To return to 2nd menu, press # .
Ring Start V9.09
M299 1..5 Ports #→
Total count of calls received
Hold handset press #, the announcement starts to play. Press # and # again. From the 2nd menu press 2 for
Reset Calls
Press 0 to zero, then # ; or just * to
return to 2nd menu.
Total calls 000000
0-reset to zero
if you make a mistake, press∗ button to go back and correct it.
Model 299 Ring Start version 9.09
page 5
Enable number of announcement plays for each caller
Hold handset press #, the announcement starts to play. Press # and # again. From the 2nd menu press 3 for
Enable
To review: press # then repeat pressing
# until you are satisfied, then press ∗
and * to quit.
To change: press 0..9, press #; select
start of range, press #; select end of
range, press #; select plays for next
range or press ∗ to quit.
The display will not change if all ports are the same when reviewing
ports 01..5
will play 1 times
The default setting is 1.
0 stops answering
9 repeats playing forever
1..8 plays the number of times shown
Key code for remote control
This enables remote callers to dial # followed by this key code to gain control of the Multi-announcer.
Hold handset press #, the announcement starts to play. Press # and # again. From the 2nd menu press 7 (hidden
key) then 3 for Key Code
The key code can not be reviewed.
To change: press 4 digits, only press 0000 = key code
# when you have memorised it, or
remember? *-no #-yes
press ∗ to quit and continue to use the
old code.
Security level for remote control
This enables a legitimate remote caller to regain control after 3 or more illegitimate attempts have
been made to break the code.
The default setting is 3.
Hold handset press #, the announcement starts to play. Press # and # again. From the 2nd menu press 7 (hidden
key) then 4 for Security
To review: press # then press ∗ to
quit.
To change: Select level, press #
Sets the number of correct key code entries
required after 3 false entry attempts.
03 Remember this
level? *-no #-yes
Setting the required ringing signal duration before answering
The default setting is 0
Hold handset press #, the announcement starts to play. Press # and # again. From the 2nd menu press 7 (hidden
key) then 1 for RingTime
To review: press # then press ∗ to
quit.
To change: Select time, press #
RingTime = 00 secs
0..99
if you make a mistake, press∗ button to go back and correct it
Model 299 Ring Start version 9.09
page 6
Remote control of the multi-announcer
Call the remote control port . Listen for the announcement then press #, you will now hear silence. Enter your
key code, when correct you will hear ‘pip pip’ tone played. You can now select any of the functions from the
main menu. The 2nd menu is not available via remote control:
1 to record or rerecord an announcement;
2 to play an announcement;
3 to assign an announcement to line. (To avoid a remote control lock-out, announcement number 0 can not be
assigned remotely)
Only ports 1 or 2 may be used for remote recording when set to Ring Start configuration. Other ports may only play
or assign announcements.
Record Announcements Remotely
Press 1 for record
Enter announcement number or press # to rerecord announcement 1.
After the tone, speak clearly into the handset
Press # to stop
Pressing # automatically plays your recording.
Press # to assign the announcement to port
or ∗ to return to main menu
or key in another announcement number to play
The announcement being played is offered for assignment to port.
Enter the port number
or ∗ to return to main menu
or just press # to accept the default port.
The default port number will correspond with the announcement number
i.e. port 1 is announcement 1, port 5 is assigned announcement 5
When the assignment is complete you will hear ‘pip pip’ tone played.
You can now select any of the functions from the main menu.
Playing or Assigning Announcements Remotely
Press 2 for play
or 3 for assign.
Key in announcement number
or ∗ to return to main menu
or press # to assign the current one to port
The announcement being played is offered for assignment to port.
Enter the port number followed by #
or ∗ to return to main menu
or just press # to accept the default port.
The default port number will correspond with the announcement number
i.e. port 1 is assigned announcement 1, port 5 is assigned announcement 5
When the assignment is complete you will hear ‘pip pip’ tone played.
You can now select any of the functions from the main menu.
Model 299 Ring Start version 9.09
page 7
Introduction to your multi-announcer
Read this section to get an overview of how your M299 multi-announcer works.
This section also contains some important information about conditions for installing and connecting the unit
When the power is first connected to the M299 multi-announcer, the default configuration is: ports 1..5 =
Ring Start. The configuration for port 1 may be changed from Ring Start to Loop Start without changing the
hardware link positions. Changing the configuration to or from TMOM requires the hardware links for port
1 to be changed before resetting the port type to or from TMOM. Changing ports 2,3 or ports 4,5 to or from
TMOM type requires the corresponding interface card to be changed before resetting the port type, as the
hardware configuration is set during manufacture.
The Ring Start configuration may be connected to a normal analogue telephone line connected an extension
port of a PBX.
The Loop Start configuration can only be connected to analogue RAD port of a PBX for providing
announcements such as for call queuing with an automatic call distribution system.
The TMOM configuration can only be connected to a Siemens PBX fitted with a TMOM interface cards to
provide synchronised announcements such as for call queuing with an automatic call distribution system.
Features and facilities
Your M299 multi-announcer gives you the ability to play up to 63 pre-recorded announcements to your
callers. Each caller hears the relevant announcement from the beginning. These may be recorded, played or
assigned to any of the 5 ports. The remote control access is via a 4 digit key code enabling recording,
playing or assigning to port, any announcement from an extension of a PBX or over the public switched
telephone system. A handset (only earphone and microphone) is plugged in to the back of the unit. 12
buttons on the front panel provide complete control. These buttons correspond with a telephone key pad so
that the same buttons are used for both local and remote control. Features and facilities include:
•
•
•
•
•
•
•
•
•
•
•
•
•
•
•
•
•
•
Automatic answering of incoming calls
Callers hear the announcement from the beginning
Up to 63 announcements
Selectable time to answer from 0 to 99 seconds (Ring delay)
Status of all ports displayed (configuration type and off/online )
Display of announcement duration
Display of free recording time available while recording
Announcements may be repeated 1..8 times or play continuously
Remote control from any tone dialling telephone via a user selectable 4 digit PIN code.
Announcements may be recorded, played and assigned to any port remotely
Audio in/outputs for recording from cassette tape recorder or CD player ( -10 dBm peak maximum
input )
Date and time display
Call counter, allowing you to monitor the number of calls received
The ability to take ports out of service at any time
Solid-state (digital) storage of your announcements—4 or 8 minutes
Battery back-up so that the system will not lose announcements if there is a mains power failure - 20
hours memory retention
Mains powered via 240 V AC, to 9 V DC or AC, 500 ma adapter
Size; width = 273 mm, depth = 237 mm, height = 50 mm
Weight = 2.1 Kg
Model 299 Ring Start version 9.09
page 8
Changing links for port 1 to or from the TMOM configuration
This should only be done by a competent communications engineer.
The hardware configurations settings for Ports 2..5 are made during manufacture, so they may only
be changed by replacing the card for these ports.
Ring Start/Loop Start
configuration link positions
Replace the two spare links connected to only
one pin of the header, when converting from
TMOM to Ring Start/Loop Start configurations.
TMOM configuration link
positions
Model 299 Ring Start version 9.09
page 9
Resetting Port Configuration
This should only be done under the guidance of a competent communications engineer.
Press # and # again. From the 2nd menu press 7 (hidden key) then 2 for Port Type
The default port is 0 to avoid accidental change.
To review: Select port or press ∗ to
quit.
To change: Configuration press #
Port
1..5
0 = NotUsed
#-Change tÒ
Reset port to configuration type
(Any current call will be cleared )
1-RingStart 2-TMOM
3-LoopStart
tÒ
To Select next port: press #
Reset completed for
Port 01
#Ò
Only change to or from TMOM if
the hardware conforms. (Links for
port 1 or the cards for ports 2..3)
Pin assignment for Ring Start and Loop Start configurations
1
3
4
6
Not used
audio 'a'
wire
audio 'b'
wire
Not used
RJ11 Pin No.
Pin assignment for Siemens TMOM configuration
1
3
4
6
control 'c'
wire
audio 'a'
wire
audio 'b'
wire
control 'd'
wire
RJ11 Pin No.
Safety information
Please be aware of this important safety information before you install or operate your multi-announcer.
Only connect the socket marked ‘Port’ via a lead —such as the one supplied with the unit— to telephone
network voltages.
Only a handset with earphone and microphone —such as the one supplied with the unit—is to be connected
to the socket marked HANDSET.
You can connect an external audio device, such as a tape recorder, to the AUDIO IN and AUDIO OUT
sockets. Any such external equipment must not present voltages higher than 42.4 V peak ac., or 60 V dc. If
you are not sure whether your equipment is suitable, you must ask the advice of a competent engineer before
making the connection.
If you make any other type of connection you may damage the unit and make it unsafe.
Your multi-announcer is supplied with a mains power adapter suitable for connection to a 240 V AC mains
socket (standard in the UK). : however, if you need operation outside the UK. please contact your local agent
for a suitable power unit which must be approved to EN60950 European standard for safety.
Model 299 Ring Start version 9.09
page 10
Installation
Choosing a suitable site
The unit should be installed on a level, solid surface, where:
• the power supply unit lead will reach a 240 V AC switched mains socket, preferably with a guard fitted
so that it cannot be accidentally switched off
• you can easily see the display (preferably at head height)
• the unit is away from direct sunlight or heating appliances
• air can circulate around the unit (allow at least 10 mm clearance all round)
• the temperature is maintained between 0°C and 40°C
• the unit is away from water or corrosive chemicals, particularly salt spray
• there is a minimum of background noise, so that you can record your announcements satisfactorily
• the telephone line cords will reach your telephone line sockets
Unpacking the System
When you unpack the system from its box, you will find:
•
•
•
•
the M299 multi-announcer
telephone line cords
Handset
this User Guide
Identifying the parts
Multimessage
16:15 Wed 15 Mar 99
0 calls
Systems Ltd
M299
3 4 5 6 7 8 9 0 S #
1 2
POWER
This must be lit
for the unit to
function
Control buttons
Connect 9 volt
mains adapter
here.
9 Volts
Use leads with 3.5 mm mono plug
for recording/playing from/to a
tape recorder or a CD player
BATTERY
on off
AUDIO
out
Only ports 1 or 2 may be used for
remote recording when set to Ring
Start configuration. Other ports may
only play or assign announcements.
PORT
PORT
PORT
PORT
PORT
Line/RAD
Line/RAD
Line/RAD
Line/RAD
Line/RAD
2
3
4
5
HANDSET
in
ac or dc
This switch must be on to prevent loss
of recordings when the mains power
fails.
Switch off when the unit is taken out of
service.
Model 299 Ring Start version 9.09
1
Mic/Earphone
Connect RJ11 telephone line cords
with contacts for pins 1,3,4&6 for
TMOM. Ring Start/Loop Start only
use pins 3&4. Cords with all contacts
may be used for all configurations.
page 11
Connect handset for local
recording and play back
Installation procedure
Please make sure you follow these steps in the correct order, and that you have read the safety information.
1. Carefully remove the unit from its plastic bag.
2. Plug the handset in to the rear socket marked ‘HANDSET’
5. Plug the telephone line cords into the sockets marked ‘PORT’ on the rear of the unit. .
4. Plug the power unit lead into the socket marked ‘9 Volts’ at the rear of the unit.
5. With the switch on the mains socket set to OFF, plug the power unit into the socket. Switch on at the
socket.
6. Watch the display and check that it shows the correct information as follows The unit checks the size of installed memory and displays something like this:
Ring Start V9.09
M299 1..5 Ports #→
The display shows software type and version loaded on your unit and then after about 5 seconds changes to:
Free memory size
523 seconds
#→
The display shows the total recording time on your unit and then after about 10 seconds changes to:
Port status default display
Port
1 2 3 4 5
Status r t t t t
Press any button, 1 second tone followed by ‘pip pip’ tone is played. The display now shows:
The ‘pip pip’ tone indicates that you
have the initial menu
1-Rec 2-Play
3 Assign to port
The 1 second tone is played when the an-
# nouncement for this port is not recorded.
Switch the battery switch to the on position.
If the announcer is ever taken out of service for more than 24 hours this switch must remain in the off
position.
You are now ready to set the system up to answer your callers. Go to Read this First on page 3.
Model 299 Ring Start version 9.09
page 12