1
OPERATING TEMPERATURE
The Matrix operates normally between 32oF to 140oF (0oC to 60oC). You may notice the liquid crystal display (LCD)
becoming sluggish at extremely low temperatures. This is normal and will not affect the computer’s accuracy.
It is possible to damage the electronics if left exposed to direct sunlight or in a hot, confined space (like a car trunk).
After the dive, cover the computer and keep it out of the sun. If inadvertently left in direct view of the sun, the LCD may
become totally black. If this occurs, immediately immerse the Matrix in water. The display should recover its normal
appearance after a few minutes. Damage from extreme heat or cold is not covered under the two-year limited warranty.
REPLACING THE BATTERY
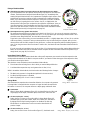
By continuously flashing, the battery icon (figure 17, a) alerts you to that the batteries are
low and must be changed as soon as possible. If there is not enough battery power to
complete a full day of diving, the Matrix immediately shuts down after activation. Since
changes in temperature can suddenly shorten battery life, U.S. Divers advises that you do
not dive when the battery icon is displayed. Furthermore, U.S. Divers recommends that
you install fresh batteries before any extended, multi-day dive trip.
CAUTION: Damage from improper battery replacement is not covered under the two-year limited warranty. It is advisable to have
your Authorized U.S. Divers Dealer perform the battery replacement.
At the same time, the dealer can perform an inspection to make
sure the computer functions properly.
Figure 17
Low Battery Display
WARNING: All memory of tissue loading is erased when the batteries are removed. If you
change batteries between dives, you must wait 24 hours before diving again. Otherwise, you
may increase the risk of decompression sickness.
If you need to change the batteries yourself, follow these simple procedures:
Removing the Matrix from the Console Boot
1. To avoid damage to the gauge, make sure to work over a soft, cushioned surface. Using two hands, push in on the
back of the console boot with your thumbs, while, at the same time, peeling the upper lip of the console boot over
the top of the Matrix module. Take special care not to let the module fall out onto the floor.
2. Beneath the Matrix module is a spacer. Remove and clean the spacer. At this time, you may want to clean the
interior of the console boot with warm fresh water to remove any salt crystals. Towel dry and insert the spacer back
into the console boot.
Battery Removal and Installation
Note: Perform battery removal and installation in a dry, clean environment,
taking extreme care to prevent the entrance of moisture or dust.
a
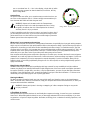
1. Using a nickel or quarter (never use a screwdriver), turn the battery hatch
(figure 18, a) counterclockwise and remove it from the case back.
2. Using your fingers, remove the O-ring from the battery hatch and discard.
Do not use tools to remove the O-ring.
b
3. Examine the threads of the battery hatch and case back for signs of
damage which may impair proper threading. If damage is found, return the
Matrix to an Authorized U.S. Divers Dealer. Do not attempt to use until the
unit has received service.
WARNING: DO NOT attempt to remove the outer case back
ring (figure 18, b). Doing so may cause the Matrix to
malfunction, resulting in injury or death; it also voids the
warranty.
Figure 18
Battery hatch