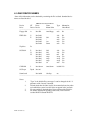
1
Copy No.________
Defence Research and
Development Canada
Recherche et développement
pour la défense Canada
Final report on the installation of Linux
and other software on a Windows NT
system
David R. Chang
Evans Computer Applications Ltd.
6424 Norwood St.
Halifax, NS, Canada B3H 2L3
Contract Number: W7707-9-7157
Contract Scientific Authority: Ian Fraser (902) 426-3100 ext 149
Defence Research Establishment Atlantic
Contractor Report
DREA CR 2001-107
August 2001
Final report on the installation of Linux
and other software on a Windows NT
system
David R. Chang
Evans Computer Applications Ltd.
6424 Norwood St.
Halifax NS B3H 2L3
Contract Number: W7707-9-7157
Contract Scientific Authority: Ian Fraser (902) 426-3100 ext 149
Defence Research Establishment Atlantic
Contractor Report
DREA CR 2001-107
August 2001
Abstract
This report describes how the Red Hat Linux 6.0 operating system was installed on a
Windows NT desktop computer. The subsequent installation of application software for NT
and Linux (including IDL for Linux) is also outlined.
Résumé
Vous trouverez dans ce rapport la description de l'installation de Red Hat Linux 6.0 sur un
poste de travail Windows NT, ainsi que les grandes lignes de l'installation de logiciels
d'application fonctionnant sous NT et Linux (y compris IDL pour Linux).
DREA CR 2001-107
i
This page intentionally left blank.
ii
DREA CR 2001-107
Executive summary
Introduction
Over the past several years, open source software architectures have come into vogue,
enabling the support base of programmers and engineers to greatly increase at little or no cost
to the end user. Among UNIX operating systems, Linux has become the de facto standard
open system, with a huge support base. Since the UNIX operating system is preferred by most
SSP Group staff for scientific work while most administrative software activities are
Windows-based, it has been decided to standardize on dual-boot PCs running both Windows
and Linux. This contractor report describes how to install Linux on one of SSP’s desktop PCs.
Results
The report documents the many decisions that must be made and software techniques that
must be mastered on the road to installing Linux on a Pentium III desktop computer that
includes a few special hardware peripherals. It also describes how to install the analysis and
display package IDL on this computer.
Significance
This document is intended to assist those who wish to increase the versatility of their
Windows-based desktop or laptop computing environment by adding an inexpensive, widely
supported UNIX-based operating system in a dual boot configuration.
Future Plans
This report deals with the installation of a specific version of Linux on a computer having a
specific hardware configuration. As experience grows with installation of later versions of
Linux on other hardware platforms, the acquired knowledge and experience should be
captured in a database that is easy to update and search, and is readily accessible to the larger
DREA community.
Chang, D. R. 2001. Final Report on the Installation of Linux and Other Software on a
Windows NT System. DREA CR 2001-107. Evans Computer Applications Ltd.
DREA CR 2001-107
iii
Sommaire
Introduction
Depuis quelques années, les architectures logicielles ouvertes ont la cote et permettent
d'élargir considérablement la base des programmeurs et des ingénieurs qui en font le soutien,
et cela sans frais ou presque pour les utilisateurs finals. Un des systèmes Unix est devenu la
norme de fait pour les systèmes ouverts et possède une base de soutien gigantesque, il s'agit
de LINUX. Comme la plupart du personnel du groupe SSP préfère le système d'exploitation
UNIX pour le travail scientifique et Windows pour le travail d'administration, il a été décidé
de normaliser sur les PC ayant Windows et Linux le démarrage double. Le présent rapport
d'entrepreneur décrit l'installation de Linux sur un poste de travail du SSP.
Résultats
Ce rapport donne les raisons de plusieurs décisions retenues et présente des techniques
informatiques à maîtriser en cours d'installation de Linux sur un poste de travail Pentium III
possédant quelques périphériques spéciaux. Il décrit aussi la façon d'installer sur un tel
ordinateur le logiciel d'analyse et d'affichage IDL.
Importance
Ce document vise à aider ceux qui souhaitent ajouter de la polyvalence à un poste de travail
ou à un portatif Windows en installant un système d'exploitation bon marché, répandu et de
type UNIX et en configurant le démarrage double.
Plans d'avenir
Dans ce rapport, on traite de l'installation d'une version spécifique de Linux sur un ordinateur
ayant une configuration matérielle particulière. À mesure que nous maîtriserons mieux les
versions à venir de Linux et d'autres plates-formes matérielles, nous devrions introduire nos
acquis et nos connaissances dans une base de données simple à mettre à jour et à rechercher,
et qui sera accessible par le maximum d'employés de la CRDA.
Chang, D. R. 2001. Rapport final sur l'installation de Linux et d'autres logiciels sur un
système Windows NT. DREA CR 2001-107. Evans Computer Applications Ltd.
iv
DREA CR 2001-107
Table of contents
Abstract .............................................................................................................................................. i
Résumé............................................................................................................................................... i
Executive summary ......................................................................................................................... iii
Sommaire ......................................................................................................................................... iv
Table of contents .............................................................................................................................. v
List of tables ................................................................................................................................... vii
I. INTRODUCTION......................................................................................................................... 1
II. INSTALLING THE SCSI CARD SOFTWARE........................................................................ 2
III. INSTALLING RED HAT LINUX 6.0...................................................................................... 3
1. Preparing for Installation ................................................................................................ 3
2. Partitioning the Disks ..................................................................................................... 4
2.1 Partitions and Sizes........................................................................ 4
2.2 Performing the Partitioning............................................................ 6
3. Installing Linux............................................................................................................... 7
3.1 Booting the Installation Program (p. 36 of the guide)..................... 7
3.2 Installation Class (p. 46 of the guide)............................................. 7
3.3 Creating Partitions for Red Hat Linux (pp. 48 – 57)....................... 7
3.4 Filesystem Configuration (p. 57 of guide)...................................... 8
3.5 Initializing swap space (p. 58 of guide).......................................... 8
3.6 Formatting Partitions (p. 60 of guide) ............................................ 8
3.7 Selecting components (p. 61 of guide) ........................................... 9
3.8 Package Installation (p. 64 of guide) .............................................. 9
3.9 Configuring the Mouse (p. 91 of guide) ......................................... 9
3.10 Configuring Networking (p. 92 of guide) ..................................... 9
3.11 Configuring the Time Zone (p. 95 of guide)................................. 9
DREA CR 2001-107
v
3.12 Selecting Services for Start on Reboot (pp. 95-96)....................... 9
3.13 Configuring a Printer (p. 96 of guide) ........................................ 10
3.14 Authentication Configuration (pp. 103-104 of guide)................. 10
3.15 Creating a Boot Diskette (pp. 104-105 of guide) ........................ 10
3.16 Installing LILO (pp. 105-106 of guide) ...................................... 10
3.17 Adding Options to LILO Boot Command Line (pp. 107-108) .... 10
3.18 Configuring the X Window System (pp. 108-109 of guide)........ 10
3.19 Preparing the Computer for Dual Booting.................................. 11
IV. SYSTEM CONFIGURATION................................................................................................ 12
1. WINDOWS NT CONFIGURATION.......................................................................... 12
1.1 Installing Service Packs ............................................................... 12
1.2 Modification of User Accounts .................................................... 12
1.3 Installing Application Software ................................................... 13
2. LINUX CONFIGURATION........................................................................................ 13
2.1 Using All Available Memory....................................................... 13
2.2 Creating the Whatis Database ...................................................... 13
2.3 Configuring the Sound Card ........................................................ 13
2.4 Allowing an Ordinary User to Mount the CD-ROM..................... 13
2.5 Allowing an Ordinary User to Mount the Floppy Disk................. 13
2.6 Installing Fortran ......................................................................... 14
2.7 Installing IDL .............................................................................. 14
V. USING LINUX.......................................................................................................................... 16
1. BOOTING LINUX....................................................................................................... 16
2. LOGGING IN AND LOGGING OUT ........................................................................ 16
3. CHANGING THE TERMINAL FONT SIZE............................................................. 16
4. LINUX DEVICE NAMES ........................................................................................... 17
5. TRANSFERRING FILES BETWEEN NT AND LINUX.......................................... 18
5.1 Standard cp Command................................................................. 18
5.2 Mtools Package ........................................................................... 18
vi
DREA CR 2001-107
VI. PROBLEMS............................................................................................................................. 20
References....................................................................................................................................... 21
List of tables
Table 1. Proposed partition table for the EIDE Drive..................................................................... 5
Table 2. Proposed partition table for the SCSI Drive. .................................................................... 5
Table 3. Actual partition table for EIDE drive. ............................................................................... 8
Table 4. Actual partition table for SCSI drive................................................................................. 8
Table 5. Linux Device Names........................................................................................................ 17
DREA CR 2001-107
vii
This page intentionally left blank.
viii
DREA CR 2001-107
I. INTRODUCTION
The object of this contract was to install Linux and some application software on a Dell
OptiPlex GX1 desktop computer with the following hardware:
1.
2.
3.
4.
5.
6.
7.
8.
9.
10.
11.
12.
13.
14.
Pentium III processor, 450 MHz.
256 MB ECC memory.
512 KB level 2 cache.
ATI 3D RAGE PRO TURBO, AGP 2X, video controller with 8 MB
SGRAM.
Sound Blaster Pro compatible card (Crystal Ware audio driver CS32BA11).
Iomega ZIP 100 MB internal drive.
3Com Fast EtherLink XL 10/100 MB TX Ethernet network interface card.
Integrated EIDE controller.
10 GB Maxtor 9 1024U4 EIDE hard disk drive.
IDE/ATAPI Samsung CD-ROM SC-1408.
1.44 MB floppy disk drive.
PS/2 compatible mouse.
104 key keyboard.
Dell UltraScan P990 color monitor.
The following hardware was added to the computer during the contract period:
1.
2.
3.
Adaptec AHA-2940UW (Ultra Wide) SCSI controller card.
9 GB Seagate ST39173N SCSI hard drive (SCSI ID 0).
ARCHIVE Python 28388-XX 4mm tape drive (SCSI ID 3).
The operating system was Microsoft Windows NT Workstation Version 4.0 (service pack 3).
DREA CR 2001-107
1
II. INSTALLING THE SCSI CARD SOFTWARE
Installing the EZ-SCSI software is straightforward. One only has to
insert the CD-ROM in the drive and follow the on-screen instructions.
Installation of the SCSI driver software takes more work:
1.
2.
3.
4.
5.
6.
7.
8.
9.
10.
Log in as administrator.
Click on "Start/Settings/Control Panel".
Double click on the "SCSI Adapters" folder.
Click on the "Drivers" tab.
Click the "Add" button. A drivers list appears.
Select "Adaptec PCI SCSI Controller: AHA-294x/AHA-394x/AHA-4944 or
AIC-78xx (NT 4.0)". Do not select "Adaptec PCI Ultra2 SCSI Controller
AHA-294xU2W/295xU2W/AIC-789x (NT 4.0)" as this does not seem to
work with the AHA-2940 UW card.
Click "OK". A message box will appear stating that the driver is already
on the system.
Click "New". Do not click "Current" as this won't cause the driver to be
installed.
A dialog box appears with "C:" as the driver location. Change this to
"C:\WINNT\System32\drivers" and then click "Continue".
A message box will appear indicating that the source and destination
files are the same. Click the "Ignore" button. The Adaptec driver will
appear in the list of installed drivers.
One also has to install the driver for the tape drive (one should be logged in as administrator):
1.
2.
3.
4.
5.
Click on "Start/Settings/Control Panel".
Double click on the "Tape Devices" folder.
Click on the "Drivers" tab.
Click the "Add" button. A drivers list appears.
Select "4mm DAT drive" and click "OK".
There is still some configuration work to do:
1.
2.
3.
4.
5.
6.
2
Reboot the system. When the message "Press <CTRL><A> for SCSISelectTM
Utility" appears, type CTRL-A (one may have to do this several times before
the utility menu appears).
Select "Configure/View Host Adapter Setting".
Select "Additional Options / SCSI Device Configuration".
The settings for SCSI ID #1 (the disk drive) do not have to be changed.
For SCSI ID #3 (the tape drive), set the "Maximum Sync Transfer Rate
(MB/Sec)" to 20.0. Set "Include in BIOS scan" to "No". The other
settings for the tape drive do not have to be changed.
Exit from the utility.
DREA CR 2001-107
III. INSTALLING RED HAT LINUX 6.0
The "Official Red Hat Linux Installation Guide" is primarily geared for simple installations on
Windows 95 machines. It is not an ideal reference for more complicated operations, such as
the dual-boot Windows NT/Linux installation that was carried out under this contract.
Additional Linux documentation should be obtained:
1.
Print a copy of the file \doc\Howto\mini\Linux_NT-Loader from the Red
Hat Linux CD-ROM #1.
2.
The Installation Guide doesn't give much information regarding the Linux
disk partitioning program fdisk. Further information can be obtained
from the "FDISK Tips" web site at http://wwwinfo.cern.ch/dis/linux/fdisk/
3.
There are numerous Linux-related web sites; here are some recent ones
containing introductory information:
a.
b.
"The Computer Paper" has articles on "Linux for Newbies" in the
"Training" department of the August, September and October 1999
issues. Their web site is at http://www.tcp.ca
"Norm Matloff's Beginner's Guide to Installing Linux" at
http://heather.cs.ucdavis.edu/~matloff/linux.html
1. Preparing for Installation
It is recommended that one read through the entire installation procedure given in the "Red
Hat Linux 6.0 Installation Guide" (hereafter referred to as the "Installation Guide" or simply
the "guide") before doing anything. The first step is to obtain information regarding the
hardware configuration (see pages 10 to 14 of the Installation Guide). This information can be
obtained from several sources:
1.
The hardware manuals that came with the computer.
2.
Various Windows NT utilities:
a.
b.
c.
d.
3.
Tools from the Windows NT Workstation Resource Kit CD-ROM.
Note that this is not part of the official Windows NT distribution.
Disk Administrator and Windows NT Diagnostics located under
"Start/Programs/Administrative Tools (Common)".
Programs in the "/Start/Settings/Control Panel" folder.
The "nslookup" program.
The network administrator.
The Dell OptiPlexGX1 is one of the few computers "certified" to work with Red Hat Linux
6.0 (see http://www.redhat.com). Our system differed somewhat from the machine Red Hat
tested (e.g., their system had a Pentium II whereas we had a Pentium III).
DREA CR 2001-107
3
As it turned out, the installation program was able to automatically identify most of the
hardware. The information that we had to provide was:
1.
The mouse's type and number of buttons (generic PS/2 with two buttons).
2.
Whether or not the disk drives were accessed in LBA (linear block
addressing) mode, sometimes referred to as "large disk" mode. We were
unable to determine if the disk drives used LBA mode. It was presumed
that they did use LBA mode since they were new, large drives.
3.
Network-related information:
IP address
netmask
gateway IP address (router)
name server IP addresses:
domain name:
hostname:
4.
drea.dnd.ca
saturn.drea.dnd.ca
Horizontal and vertical sync rates for the monitor. These were obtained
from the pages 1-14 and 1-20 of the "Dell Monitor UltraScan P990 Color
Monitor User's Guide". This is a recent monitor which was not known by
the Linux installation program.
2. Partitioning the Disks
Installing Linux requires that one partition the hard disks. There can be up to four "primary"
partitions on a disk. One of the primary partitions can be designated as an "extended" partition
which can be subdivided into one or more "logical" partitions.
Prior to the Linux installation, the disk drives were partitioned as follows. The EIDE drive
was divided into two primary partitions: a 2047 MB FAT partition (MB=1,048,576 bytes),
with the remainder of the disk occupied by an empty NTFS partition. Windows NT and any
application files were located in the FAT partition. The SCSI drive had a single, empty NTFS
primary partition which occupied the whole drive. This set-up simplified the Linux
installation somewhat, since it was not necessary to resize the Windows NT partition.
Since repartitioning the disks might accidentally result in the destruction of the Windows NT
partition, the Windows partition was backed up to tape. An NT repair floppy disk was created;
this can be done by looking up "Repair Disk" under "Help". A startup or boot floppy disk was
also created; see pages 696 to 697 of the "Microsoft Windows NT Workstation Resource Kit"
for instructions on how to do this.
2.1 Partitions and Sizes
To allow data to be transferred between the Windows NT and Linux operating systems
4
DREA CR 2001-107
(OS'es), provision was made to create some FAT partitions whose files could be read/written
by either OS. It was decided to also create an NTFS partition to take advantage of NTFS's
security features and better handling (vs. FAT) of large partitions. There is a Linux driver for
reading NTFS partitions, but it is only in alpha release.
The Installation Guide glosses over the subject of the number and size of Linux partitions that
are required (pages 29 to 30). It recommends that one create one or more swap partitions, a
boot partition for /boot, and a root partition for /. However, based on several Linux web pages
we read, it appeared that the above partitioning scheme might not be suitable for a dual-boot
Windows NT/Linux system. We therefore decided to create several swap partitions, a root
partition for /, a partition for /usr, a partition for /home, and an additional partition designated
/u1. There would be no separate partition for /boot; /boot would be in the root partition.
Following is a summary of how we proposed to partition the two hard drives:
Table 1. Proposed partition table for the EIDE Drive.
—————————————————————————————
Type:
FAT FAT Linux Linux Linux
root (/) /usr
/home
Size (MB):
2047 500
250
1000 Rest of the disk.
—————————————————————————————
The first three partitions are primary ones. The /usr and /home partitions are logical partitions
within an extended partition.
Table 2. Proposed partition table for the SCSI Drive.
—————————————————————————————
Type:
FAT FAT NTFS Linux Linux Linux Linux
swap swap swap /u1
Size (MB):
500
500
3000 125
125
125
Rest of the disk.
—————————————————————————————
The first three partitions are primary ones. The swap partitions and /u1 partition are logical
partitions within an extended partition.
The rationale behind the above partitioning scheme was as follows. The new FAT partitions
were limited to 500 MB in size, since the FAT file system does not work well for partitions
above this size. The size of the NTFS partition was chosen so that somewhat more than half of
the SCSI drive would be apportioned to Linux files. (The users planned to use Linux more
than NT.)
The size of the root (/) partition was chosen to agree with that listed at several web sites. Due
to limitations of the Linux Loader (LILO), the partition that contains the /boot directory (in
this case, the root partition) must be completely below cylinder 1023. Based on the cylinder
size for this particular EIDE drive, this meant that the root partition had to be within the first 8
GB of the disk.
DREA CR 2001-107
5
The size of the /usr partition was chosen based on the statement in the Installation Guide
(page 30) that a 1 GB partition would allow one to install every Red Hat package. The final
partition on the SCSI drive was designated /u1 in accordance with a naming scheme used by
Penguin Computing, a Linux workstation and server provider.
The Linux swap partitions were placed on a separate drive from the Linux system software
since this reportedly provides better performance. The only strict rules governing the number
and size of swap partitions are:
1.
2.
3.
If there is less than 16 MB of RAM, one must provide a swap partition.
There can be between 0 and 16 swap partitions.
The largest usable swap partition is about 127 MB in size.
The Installation Guide's rule-of-thumb (page 30) is that the minimum amount of swap space
should be equal to 16 MB or the size of RAM, whichever is larger. Some competing
recommendations for the swap space size are:
1.
2.
3.
4.
5.
Either the RAM size plus 128 MB or 256 MB, whichever is larger (Penguin
Computing).
Twice the RAM size.
No more than three times the RAM size.
No more than 127 MB total.
If you have more than 32 MB of RAM, you do not need any swap space.
The particular swap space size we chose was based on a compromise among these competing
suggestions.
2.2 Performing the Partitioning
A common recommendation is that when partitioning a drive for dual Windows/Linux use,
one should create only primary FAT/NTFS partitions using Windows. The remainder of the
drive should be left unused for subsequent partitioning by the Linux installation program. We
followed this recommendation.
The creation of the new FAT and NTFS partitions was done by using the NT Disk
Administrator program, which is available under "Start / Programs / Administrative Tools
(Common)", if one is logged in as administrator. Usage of this program is straightforward.
Some difficulties were encountered in reassigning drive letters; these were resolved by exiting
from Disk Administrator, and then restarting it.
We deleted the existing NTFS partition on the EIDE drive, and created a 500 MB FAT
partition. We deleted the NTFS partition on the SCSI drive, and created two 500 MB FAT
partitions plus a 3000 MB NTFS partition. We created a new NT rescue floppy disk for this
revised partition configuration.
For future reference during the Linux installation, we printed hard copies of the disk maps for
the EIDE and SCSI drives. These maps were created by using the DiskMap utility (see pages
6
DREA CR 2001-107
749 to 751 of the "Microsoft Windows NT Workstation Resource Kit").
3. Installing Linux
The installation process is generally straightforward, following the procedure starting on page
33 of the Installation Guide. Special steps for our particular installation are mentioned in the
following paragraphs.
3.1 Booting the Installation Program (p. 36 of the guide)
We used the floppy boot disk supplied with the Red Linux distribution, after ensuring that the
disk was write protected.
3.2 Installation Class (p. 46 of the guide)
We selected "custom" as we needed control over how the dual-boot environment would be set
up.
3.3 Creating Partitions for Red Hat Linux (pp. 48 – 57)
Based on the advice of the DREA Computer Systems Group, we chose to use fdisk rather than
Disk Druid. The "FDISK tips" and the disk maps we previously printed out were helpful when
using fdisk. Note that DiskMap's partition tables differ from fdisk's tables:
1.
2.
DiskMap gives partition sizes in terms of sectors (512 bytes), whereas
fdisk gives partition sizes in terms of blocks (1024 bytes).
DiskMap numbers cylinders starting at 0, whereas fdisk starts numbering
at 1.
The partitioning proceeded as follows. For the EIDE drive, we added a 250 MB Linux native
primary partition (for /) after the second existing FAT partition. Then we created an extended
partition which occupied the rest of the disk. The extended partition was subdivided into two
Linux native logical partitions. The first logical partition (for /usr) occupied 1000 MB,
whereas the second logical partition (for /home) took up the rest of the extended partition.
For the SCSI drive, we added an extended partition after the existing NTFS partition. This
extended partition, which occupied the rest of the disk, was subdivided into four logical
partitions: three Linux swap partitions of 125 MB each, followed by a Linux native partition
(for /u1) which occupied the rest the rest of the space.
After partitioning the disks, we copied down fdisk's partition tables for future reference. The
partition tables for the system’s two drives, plus the mount points we assigned later, are
shown in tables 3 and 4:
DREA CR 2001-107
7
Table 3. Actual partition table for EIDE drive.
Mount
Device
Boot Start End
System
Point
——————————————————————————————————
/tmp/hda1
*
1
261
DOS 16-bit >= 32M
/fat1
/tmp/hda2
262
325
DOS 16-bit >= 32M
/
/tmp/hda3
326
357
Linux native
/tmp/hda4
358
1244 Extended
/usr
/tmp/hda5
358
485
Linux native
/home
/tmp/hda6
486
1244 Linux native
——————————————————————————————————
Table 4. Actual partition table for SCSI drive.
Mount
Device
Boot Start End
System
Point
——————————————————————————————————
/fat2
/tmp/sda1
1
64
DOS 16-bit >= 32M
/fat3
/tmp/sda2
65
128
DOS 16-bit >= 32M
/ntfs1
/tmp/sda3
129
510
OS/2 HPFS
/tmp/sda4
511
1106 Extended
/tmp/sda5
511
526
Linux swap
/tmp/sda6
527
542
Linux swap
/tmp/sda7
543
558
Linux swap
/u1
/tmp/sda8
559
1106 Linux native
——————————————————————————————————
fdisk had identified the NTFS partition as being as an OS/2 HPFS one. This is typical
behavior on the part of Linux fdisk. (Note that Windows NT 4.0 does not support HPFS
partitions.)
3.4 Filesystem Configuration (p. 57 of guide)
The mount points were assigned as listed in the above table. We intentionally did not mount
the partition containing the Windows NT system files, to reduce the possibility that Linux
users might damage these files. Note that Linux swap files were not assigned mount points;
the installation program does not allow the user to do this.
3.5 Initializing swap space (p. 58 of guide)
We requested that all the swap partitions be initialized, and that they be checked for bad
blocks.
3.6 Formatting Partitions (p. 60 of guide)
We requested that all the newly-created partitions be formatted, and that they be checked for
8
DREA CR 2001-107
bad blocks. Note that the formatting process does not happen immediately.
3.7 Selecting components (p. 61 of guide)
We chose components, rather than individual packages. In addition to
the default components, we included the following:
1.
2.
3.
4.
5.
6.
7.
8.
9.
10.
DOS/Windows Connectivity
Graphics Manipulation
TeX Document Formatting
EMACS
EMACS with X Windows
C Development
Development Libraries
C++ Development
X Development
Extra Documentation
KDE was not included since GNOME was included; the "Red Hat Linux 6.0 Getting Start
Guide" described GNOME, not KDE. "GNOME Development" was not included, since it was
believed that the users would not need it.
3.8 Package Installation (p. 64 of guide)
Formatting the drives and checking for bad blocks took 39 minutes. Installing the 350
packages (478 Mbytes) took 4 minutes.
3.9 Configuring the Mouse (p. 91 of guide)
We selected "Generic Mouse (PS/2)" and "Emulate 3 Buttons".
3.10 Configuring Networking (p. 92 of guide)
We selected "Static IP Address", and input the previously mentioned network information
(see section 1. above).
3.11 Configuring the Time Zone (p. 95 of guide)
We left "Hardware clock set to GMT" unchecked and selected the "Canada/Atlantic" time
zone.
3.12 Selecting Services for Start on Reboot (pp. 95-96)
Based on the recommendation in the October 1999 issue of "The Computer Paper" (page 89),
we unchecked apmd and nfs, and left the rest as is. apmd is for automatic battery power
DREA CR 2001-107
9
management, whereas nfs is a file protocol for file sharing across TCP/IP networks.
3.13 Configuring a Printer (p. 96 of guide)
We did not ask to configure a printer.
3.14 Authentication Configuration (pp. 103-104 of guide)
We unchecked "Enable NIS". We checked "Use Shadow Passwords" and "Enable MD5
Passwords".
3.15 Creating a Boot Diskette (pp. 104-105 of guide)
We created a boot disk.
3.16 Installing LILO (pp. 105-106 of guide)
We installed LILO in the first sector of the root partition
(/dev/hda3).
3.17 Adding Options to LILO Boot Command Line (pp. 107-108)
We checked "Use linear mode", since we assumed that the hard drives were accessed in LBA
mode. In the "Bootable Partitions" menu, we blanked out the "Boot label" for the Windows
NT partition (/dev/hda1), since we did not want LILO to have the option of booting Windows
NT.
3.18 Configuring the X Window System (pp. 108-109 of guide)
Under "Monitor Setup" we selected "custom" since our specific monitor was not listed. The
Red Hat Linux installation program does not allow one to arbitrarily specify the monitor's
horizontal and vertical sync rates; instead one must select from a menu of rates. It is presumed
that this was done to reduce that possibility that the user might "overclock" the monitor,
thereby damaging or destroying it. The UltraScan P990 monitor appears to have some
protection against overclocking, since it will display an "out of scan range" message if the
input signal is not within the monitor's specifications.
For the horizontal sync rate we selected "1600 x 1200 @ 70 Hz", since the "Dell Monitor
User's Guide" (page 1-14) lists a preset timing mode of "1600 x 1200 @ 75 Hz vertical
frequency". The installation program did have an option of "1600 x 1200 @ 76 Hz", but we
decided not to select that option, out of concern that we might overclock the monitor. Note
that what the installation program refers to as "horizontal sync rate" is somewhat confusing
since it lists the screen resolution and the vertical rate, rather than the actual horizontal rate.
For the vertical sync rate we selected "50-100" as this was closest to the monitor's specified
vertical deflection frequency range of 48 to 120 Hz (page 1-20 of the "Dell Monitor User's
10
DREA CR 2001-107
Guide").
3.19 Preparing the Computer for Dual Booting
This consists of following the instructions given in the "NT OS Loader + Linux miniHOWTO" (see section III. above). In brief, the procedure is:
1.
Boot Linux using the Linux boot disk prepared during the installation
procedure.
2.
Copy the Linux boot sector (on /dev/hda3 in our case) to a DOScompatible file on a floppy disk. We used "mcopy" to do this. The HOWTO
states that one can alternatively use "copy"; this is presumably a typo
and should instead be "cp".
3.
Reboot the system to load Windows NT.
4.
Copy the Linux boot sector from the floppy disk to a file on drive C:.
Modify NT's BOOT.INI file to include a pointer to the Linux boot sector
file.
One has the option of using the NT program bootpart to perform some of the above
manipulations. We chose not to use bootpart, since previous versions of this program had
bugs.
We have seen other instructions in which it is stated that one should remove the "PROMPT"
line from the Linux /etc/lilo.conf file, as this confuses Windows NT sometimes. We did not
remove the PROMPT line, and have not encountered any problems with Windows NT.
DREA CR 2001-107
11
IV. SYSTEM CONFIGURATION
1. WINDOWS NT CONFIGURATION
1.1 Installing Service Packs
At the request of a user, we upgraded the Windows NT system with Service Pack 4 and the
associated Year 2000 Service Pack. The Service Pack files had been downloaded into the
folder c:\Service Pack4.
Instructions regarding the installation of Service Pack 4 were in the file Readme.txt in the
c:\Service Pack4\I386 directory. The installation was performed by executing the following
commands:
C:
cd \Service Pack4\I386\Update
Update
We requested the uninstall feature of the Service Pack. A message box appeared later
indicating that a manufacturer's driver AICXXX.SYS had been installed, and asking if we
wanted to overwrite it with the driver from the Service Pack. We answered "No".
The subsequent installation of the Year 2000 Service Pack was done by executing these
commands:
C:
cd \Service Pack4\I386\Update
Y2ksetup
A message box appeared indicating that a file was missing. This might have been related to
the fact that Internet Explorer had not been installed on the computer.
1.2 Modification of User Accounts
Initially, the computer had only two user accounts, "administrator" and "Collison". Collison
had administrator privileges, and had no default home directory. All files could be accessed
by anyone.
Some changes were made to improve system security. All "normal" users were assigned a
default home directory, namely H:\users\username. Since this was an NTFS partition, each
user could set file permissions for their files. Collison was removed from the administrator
group; anyone wishing to make system changes must now log in as "administrator".
12
DREA CR 2001-107
1.3 Installing Application Software
At the users' request, we installed some acoustic data manipulation software (Chang, 1999).
This simply involved copying the program executables from another Windows NT
workstation (kingfisher). To use the programs on the saturn workstation, follow the
instructions in the afore-mentioned report, replacing the kingfisher directory "D:\Chang\..."
with the corresponding saturn directory "H:\users\chang\...". (A copy of the contractor report
is available in the following PostScript file on the DREA FIRM cluster:
PS_72:[CHANG.FIR]ADMS_UPDATE.PS.)
2. LINUX CONFIGURATION
2.1 Using All Available Memory
By default, some Linux kernels do not support more than 64 MB of memory (see page 740 of
"Mastering Linux"). To use the full 256 MB of memory, the following line was added to the
"per image" section of the /etc/lilo.conf file:
append="mem=256M"
2.2 Creating the Whatis Database
In order to use the "apropos" command, the "whatis" database had to be created (see "man
whatis"). This was done by executing the following command as root:
/usr/sbin/makewhatis
2.3 Configuring the Sound Card
This was done by running sndconfig while logged as root. See pages 279 to 282 of the "Red
Hat Linux Getting Started Guide" for details. Sndconfig was able to detect the sound card
automatically. We noted that when outputting a sound file via "cat english.au > /dev/audio", a
loud crackling sound preceded the play back.
2.4 Allowing an Ordinary User to Mount the CD-ROM
This was carried out by using linuxconf as described on page 158 of the "Red Hat Linux
Getting Started Guide".
2.5 Allowing an Ordinary User to Mount the Floppy Disk
We tried to do this using a procedure similar to that for the CD-ROM, but it didn't work.
DREA CR 2001-107
13
2.6 Installing Fortran
Installation of Gnu Fortran (egcs-g77) was done by running GnoRPM. GnoRPM is described
on pages 183 to 194 of the "Red Hat Linux Installation Guide". When logged in as root, we
entered:
mount /mnt/cdrom
gnorpm &
umount /mnt/cdrom
2.7 Installing IDL
IDL 5.2 was installed from CD-ROM by following the instructions in the IDL Installation
Guide for UNIX. The command to mount the CD-ROM on the system was (see page 5 of the
guide):
mount -t iso9660 /dev/cdrom /mnt/cdrom
We used the default installation directory, and selected the "typical" installation type. We
created symbolic links for IDL in the /usr/local/bin directory. After completing the
installation, we dismounted the CD-ROM via the command:
umount /mnt/cdrom
When we attempted to run the IDL demonstration, the following error message was issued:
"... error in loading shared library; ... undefined symbol __setfpucw". After searching the
Research Systems' web site (http://www.rsinc.com), we determined that the version of IDL on
the CD-ROM (IDL 5.2.1) was for Red Hat Linux 5.1, not Red Hat Linux 6.0. To remedy this,
we had to download an update release (IDL 5.2.1 L) from the web site and install it.
Following are the installation instructions from the web site.
To install the Update distribution (requires IDL 5.2 or 5.2.1 for Linux installation):
1.
Download and save the file
ftp://ftp.rsinc.com/pub/idl_5.2.1L/unix/linux/bin.linux.tar.gz
to the directory where IDL 5.2 is installed (typically /usr/local/rsi).
2.
Change to the directory in which you saved the tar file.
3.
Move the existing bin.linux directory by typing the following
command at the Linux prompt:
mv idl_5.2/bin/bin.linux idl_5.2/bin/bin.linux.redhat5.1
4.
Unpack the tar file by typing the following command at the
Linux prompt:
gunzip -c bin.linux.tar.gz | tar xvpf -
14
DREA CR 2001-107
Once we had installed the update, the IDL demos ran successfully. We then sent an e-mail to
[email protected] to obtain an IDL license file, and eventually received an e-mail reply
which contained the license file. We extracted the license file from the e-mail, and copied it to
the file /usr/local/rsi/license/license.dat.
In order to run IDL as a licensed user, it was necessary to start the "license manager daemon".
To simplify matters, we decided to start the daemon automatically at boot time. This was done
by adding the following line to the end of the /etc/rc.d/rc.local file:
/usr/local/rsi/idl_5.2/bin/lmgrd -c /usr/local/rsi/license/license.dat
DREA CR 2001-107
15
V. USING LINUX
1. BOOTING LINUX
One selects "Linux" from the OS Loader list. The prompt "LILO boot:" will appear. One does
not have to enter anything at this point; Linux will boot by default after a few seconds. If there
is a disk present in the Zip drive, this slows down the boot process considerably.
2. LOGGING IN AND LOGGING OUT
When logging in, one should be aware that an "auto-repeat" feature for keyboard input has
been enabled. Thus if you hold a key down too long while inputting your password, your
password will be entered incorrectly.
When logging out, if you ask to "halt" or "reboot" the system, you will be prompted for your
login password if you did not log in as root.
3. CHANGING THE TERMINAL FONT SIZE
The default terminal font size is small and difficult to read. Here are two ways to get a larger
font:
1.
If using a Gnome terminal, one can click on "Settings / preferences / general /
font" and select an appropriate large courier font.
2.
One can spawn an xterm with a larger font (say 10x20) by entering the
command:
xterm -fn 10x20 &
16
DREA CR 2001-107
4. LINUX DEVICE NAMES
Some of this information can be obtained by examining the file /etc/fstab. Standard device
names are listed in table 5.
Table 5. Linux Device Names.
Device
NT
Linux
Linux
Type Mounted at
Drive
Device Device
Mount Point
Linux Boot?
——————————————————————————————————
Floppy disk
A:
/dev/fd0
/mnt/floppy
ext2
No
EIDE disk
C:
E:
/dev/hda1
/dev/hda2
/dev/hda3
/dev/hda5
/dev/hda6
/fat1
/
/usr
/home
vfat
vfat
ext2
ext2
ext2
No
Yes
Yes
Yes
Yes
Yes
Yes
No
Yes
Yes
Yes
Yes
Zip drive
D:
SCSI disk
F:
G:
H:
/dev/sda1
/dev/sda2
/dev/sda3
/dev/sda5
/dev/sda6
/dev/sda7
/dev/sda8
/fat2
/fat3
/ntfs1
swap
swap
swap
/u1
vfat
vfat
ntfs
swap
swap
swap
ext2
CD-ROM
J:
/dev/cdrom
/mnt/cdrom
iso9660 No
SCSI tape
Tape0 /dev/st0
Sound card
/dev/audio
/dev/dsp
etc.
——————————————————————————————————
Notes:
1.
2.
3.
4.
DREA CR 2001-107
"Type" is the default file system type. It can be changed via the "-t"
parameter of the "mount" command.
We had asked that /dev/hda3 (/ntfs1) be mounted at boot time when
we installed the system, but /ntfs1 does not appear in the /etc/fstab.
We were unable to determine how Linux referenced the Zip drive.
For further information regarding sound cards, refer to the file
/usr/doc/HOWTO/Sound-HOWTO.
17
5. TRANSFERRING FILES BETWEEN NT AND LINUX
Although Windows NT cannot use files in Linux ext2 disk partitions, Linux can read/write
data in Windows NT vfat partitions. Thus data files on the Windows NT drives E:, F: and G:
(/fat1, /fat2, /fat3 under Linux) can be read/written by either operating system. Data files on
the floppy disk (drive A: or /dev/fd0) can be used by both NT and Linux, provided the floppy
disk is in vfat format.
There is a difference between "native" text files under Windows NT and Linux. Under NT,
each line ends with a carriage return and a line feed. However, under Linux each line ends
with just a line feed. Some programs may not be able to handle non-native text files properly.
Windows NT programs and system commands typically do not allow one to create Linux
format text files. However under Linux, it is possible to create NT format text files.
Two ways to access vfat partitions under Linux are:
1.
2.
Use standard commands such as cp and ls.
Use the mtools package with its commands mcopy and mdir (see "man
mtools" for details).
5.1 Standard cp Command
Using the standard cp command to write to a vfat partition usually results in a "binary" copy
(i.e., the file is unchanged) by default. However, one can set the translation mode via
linuxconf. Select "File systems -> Access local drive" in linuxconf. Select the drive of
interest, and click on "Dos Options". One can then enter the desired translation mode
(binary/auto/text) in the "translation mode" box.
Although anyone can read files from a mounted vfat partition, it appears that only the "root"
can write to the partition. We attempted to change permissions for some disk devices to allow
"normal" users to write to the disk, but were unsuccessful.
5.2 Mtools Package
The mtools package allows one to easily read/write MS-DOS files. It is mainly intended for
use with removable disks. Note the following warning in the section 9.19 ("mtools says
cannot initialize drive XYZ") of the file:
/usr/doc/FAQ/html/Linux-FAQ-9.html#55.9.19
(Note - you should never use mtools to access files on an msdosfs mounted partition on
disk!")
This would appear to indicate that one should not use mtools with a device that has already
been mounted. If so, one should not use mtools with any of the hard disks.
18
DREA CR 2001-107
mtools refers to MS-DOS-like disk drive letters which are defined in the file /etc/mtools.conf.
These settings can be modified via the local file ~/.mtoolsrc. Following are the contents of a
sample.mtoolsrc file:
# Floppy disk drive
drive a: file="/dev/fd0" exclusive 1.44m
#
# EIDE disk partition(s)
drive e: file="/dev/hda2"
#
# SCSI disk partition(s)
drive f: file="/dev/sda1"
drive g: file="/dev/sda2"
N.B. - Unless one is logged in "root", it appears that the mtools package can only be used to
access the floppy disk. We attempted to change permissions for some hard disk partitions to
allow "normal" user access via mtools, but were unsuccessful.
DREA CR 2001-107
19
VI. PROBLEMS
Due to lack of time, we were unable to resolve the following issues:
20
1.
We were unable to determine how one uses the Zip drive under Linux.
During boot up, Linux does recognize the Zip drive however.
2.
When Linux is booted, the following message appears after "Enabling swap
space [OK]": "can't locate module st". We do not know what the
significance of this message is.
DREA CR 2001-107
References
1.
Chang, David, "Final Report and User's Manual for Changes and Updates to
Acoustic Data Manipulation Software", DREA Contractor Report, Draft,
September 1999.
2.
Danesh, Arman, "Mastering Linux", SYBEX Inc., Alameda, California, 1999.
3.
Dell Computer Corporation, "Dell Model UltraScan P990 Color Monitor
User's Guide", January 1999.
4.
Microsoft Corporation, "Microsoft Windows NT Workstation Resource Kit",
Microsoft Press, Redmond, Washington, 1996.
5.
Red Hat Software Inc., "The Official Red Hat Linux 6.0 Getting Started
Guide", Durham, North Carolina, 1999.
6.
Red Hat Software Inc., "The Official Red Hat Linux 6.0 Installation
Guide", Durham, North Carolina, 1999.
7.
Wilburn, Gene, "Linux for Newbies", The Computer Paper, Volume 12,
Numbers 8 - 10, August to October 1999.
DREA CR 2001-107
21
This page intentionally left blank.
22
DREA CR 2001-107
DOCUMENT CONTROL DATA
(Security classification of title, body of abstract and indexing annotation must be entered when the overall document is classified)
1.
ORIGINATOR (the name and address of the organization preparing the document.
Organizations for whom the document was prepared, e.g. Centre sponsoring a
contractor's report, or tasking agency, are entered in section 8.)
Evans Computer Applications Ltd
6424 Norwood St
Halifax NS B3H 2L3
3.
2. SECURITY CLASSIFICATION
(overall security classification of the document
including special warning terms if applicable).
UNCLASSIFIED
TITLE (the complete document title as indicated on the title page. Its classification should be indicated by the appropriate
abbreviation (S,C,R or U) in parentheses after the title).
Final report on the installation of Linux and other software on a Windows NT system
4.
AUTHORS (Last name, first name, middle initial. If military, show rank, e.g. Doe, Maj. John E.)
David R. Chang
5.
DATE OF PUBLICATION (month and year of publication of
document)
6a. NO .OF PAGES (total
6b. NO. OF REFS (total cited
containing information Include
in document)
Annexes, Appendices, etc).
August 2001
7.
21
7
DESCRIPTIVE NOTES (the category of the document, e.g. technical report, technical note or memorandum. If appropriate, enter the
type of report, e.g. interim, progress, summary, annual or final. Give the inclusive dates when a specific reporting period is covered).
CONTRACTOR REPORT
8.
SPONSORING ACTIVITY (the name of the department project office or laboratory sponsoring the research and development. Include address).
Defence R&D Canada - Atlantic
PO Box 1012
Dartmouth, NS, Canada B2Y 3Z7
9a. PROJECT OR GRANT NO. (if appropriate, the applicable research
and development project or grant number under which the document
was written. Please specify whether project or grant).
9b.
W7707-9-7157
Project 11cc
10a ORIGINATOR'S DOCUMENT NUMBER (the official document
number by which the document is identified by the originating
activity. This number must be unique to this document.)
CONTRACT NO. (if appropriate, the applicable number under
which the document was written).
10b
OTHER DOCUMENT NOs. (Any other numbers which may be
assigned this document either by the originator or by the
sponsor.)
DREA CR 2001-107
(any limitations on further dissemination of the document, other than those imposed
by security classification)
( x ) Unlimited distribution
( ) Defence departments and defence contractors; further distribution only as approved
( ) Defence departments and Canadian defence contractors; further distribution only as approved
( ) Government departments and agencies; further distribution only as approved
( ) Defence departments; further distribution only as approved
( ) Other (please specify):
11. DOCUMENT AVAILABILITY
12.
DOCUMENT ANNOUNCEMENT (any limitation to the bibliographic announcement of this document. This will normally correspond to the
Document Availability (11). However, where further distribution (beyond the audience specified in (11) is possible, a wider announcement
audience may be selected).
DRDC Atlantic mod. May 02
13. ABSTRACT
(a brief and factual summary of the document. It may also appear elsewhere in the body of the document itself. It
is highly desirable that the abstract of classified documents be unclassified. Each paragraph of the abstract shall begin with an
indication of the security classification of the information in the paragraph (unless the document itself is unclassified) represented
as (S), (C), (R), or (U). It is not necessary to include here abstracts in both official languages unless the text is bilingual).
This report describes how the Red Hat Linux 6.0 operating system was installed on a
Windows NT desktop computer. The subsequent installation of application software for
NT and Linux (including IDL for Linux) is also outlined.
14. KEYWORDS, DESCRIPTORS or IDENTIFIERS (technically meaningful terms or short phrases that characterize a
document and could be helpful in cataloguing the document. They should be selected so that no security classification is
required. Identifiers, such as equipment model designation, trade name, military project code name, geographic location may
also be included. If possible keywords should be selected from a published thesaurus. e.g. Thesaurus of Engineering and
Scientific Terms (TEST) and that thesaurus-identified. If it not possible to select indexing terms which are Unclassified, the
classification of each should be indicated as with the title).
Linux operating system
Windows NT operating system
IDL application
SCSI interface installation
DRDC Atlantic mod. May 02