1
Ascotel IntelliGate Telecommunication Systems
Ascotel Office 130 / Office 130pro
User's Guide
ascom
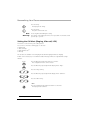
Operating and Display Elements
Operating and Display Elements
11
1
2
3
4
5
6
7
8
19
9
17
10
5
12
13
14
15
17
16
18
Some systems or system versions do not support all the features. The corresponding text sections are
identified by a letter inside square brackets. The section "System and Software Dependency" indicates
which system versions support the relevant features.
2
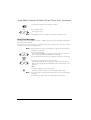
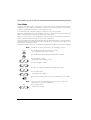
Operating and Display Elements
1
2
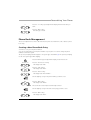
10 Headset jack 2)
11 Indicator LED
Loudspeaker
Volume key
Rocker switch:
• Short in a call: Adjusts volume
• Short in text mode (not in a call): Cursor
right/left
3
Display
• Flashing rapidly: Call
• Flashing slowly: Voice Mail, message,
or callback
• Flashing at intervals: Loudspeaker on
12 C-key
• Top: Symbols
• Middle: Information
• Bottom: Foxkey functions
4
Menu key
Menu access key
• press briefly: Scrolls through Foxkey
functions
• press and hold down: Configuration mode
5
Delete and correction key
press briefly:
• Menu / configuration: Goes back 1 step
without saving
• Input: Deletes last character
press and hold down:
• Up one menu level without saving
13 Info key
Foxkey
Multifunction key:
• press briefly: Activates
allocated function
• press and hold down: Configures Foxkey,
reverses scroll direction
6
Sound aperture
7
Call key
Calls up additional information if
displays shows i-symbol
14 #-key
press and hold down: Menu / setting
for:
• Display contrast
• Display backlighting
• Range tone
• System Busy Beep
Ringing and key confirmation tone
15 Hotkey
Corresponds to off-hook /
on-hook, switching phone on
8
Keypad1)
☛
Digit input:
• press briefly: For entering digits
Character input in text mode:
• press once briefly, twice, etc., in quick
succession: Enters letters
9
Loudspeaker key
• press briefly: Loudspeaker on / off
• press and hold down: Call alert
menu2)
16
17
18
19
Configurable key for up to 6
numbers / names or functions
• press briefly: Hotkey menu
• press and hold down: Configures hotkey
2)
Charging socket
Charging contacts
Microphone
#-key
• press and hold down: Switches DTMF
mode on / off (depends on system
software)
1) Illuminated display on the 130pro
2) 130pro
3
Operating and Display Elements
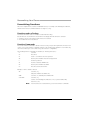
Displaysymbols
State of charge
a
b/c/d
e
Battery full
Battery 3/4, 1/2, 1/4 full
Battery almost empty
<Flashing>
e
Battery empty: Warning tone
Handset is switched off automatically.
f
State of charge undetermined
When new batteries are inserted, it takes a while
before the state of charge can be displayed.
Flashing battery symbol
Batteries charging
<Flashing>
c
Loudspeaker volume
Level 1
Level 2
Level 3
Reception range
m
Within range: Ready for use
<No display> Out of range
Reception quality
H
Very good
G
Good
F
Poor
E
Very poor
<No display> No reception
Registering on a system
A(B,C,D)
4
Phone registered on system A (B, C,
or D) and ready for use
<Flashing>
A(B,C,D)
Out of range: not ready for use
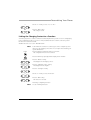
Operating and Display Elements
<Flashing>
ABCD
Phone not registered on any system
Status information
ABC
Text mode activated
j
Function activated under Foxkey or
Hotkey
i
Information available
M
Other menu items available
o/n
Microphone on / off
P
Configuration mode activated
ol
Hands-free mode activated
v
Vibra call activated
h
Connection established
j
Function activated (symbol)
S
Call to user group (subscribergroup)
<Flashing>
h
U
Call received
Forwarded call
Menu-Guided Navigation
4v
Note
Scrolling (figure indicates entry number)
Reversing direction: Press Foxkey with a long keystroke
For a detailed description of the operating and display elements, please refer
to the section "User Guidance".
5
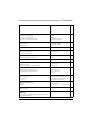
Contents
Contents
Operating and Display Elements . . . . . . . . . . . . . . . . . . . . . . . . . . . . . . . . . . . . . . . . . . . . . . . . . . . 2
Equipment Provided . . . . . . . . . . . . . . . . . . . . . . . . . . . . . . . . . . . . . . . . . . . . . . . . . . . . . . . . . . . . 7
Options . . . . . . . . . . . . . . . . . . . . . . . . . . . . . . . . . . . . . . . . . . . . . . . . . . . . . . . . . . . . . . . . . . . . . 7
Safety and Liability . . . . . . . . . . . . . . . . . . . . . . . . . . . . . . . . . . . . . . . . . . . . . . . . . . . . . . . . . . . . . 9
Dialling and Phoning . . . . . . . . . . . . . . . . . . . . . . . . . . . . . . . . . . . . . . . . . . . . . . . . . . . . . . . . . . 12
You Receive a Call. . . . . . . . . . . . . . . . . . . . . . . . . . . . . . . . . . . . . . . . . . . . . . . . . . . . . . 12
You Want to Make a Call . . . . . . . . . . . . . . . . . . . . . . . . . . . . . . . . . . . . . . . . . . . . . . . . 13
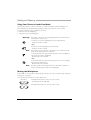
Using the Display and Operating Elements . . . . . . . . . . . . . . . . . . . . . . . . . . . . . . . . . . . . . . . . . . 16
Display . . . . . . . . . . . . . . . . . . . . . . . . . . . . . . . . . . . . . . . . . . . . . . . . . . . . . . . . . . . . . . 16
Keys . . . . . . . . . . . . . . . . . . . . . . . . . . . . . . . . . . . . . . . . . . . . . . . . . . . . . . . . . . . . . . . . 17
Input . . . . . . . . . . . . . . . . . . . . . . . . . . . . . . . . . . . . . . . . . . . . . . . . . . . . . . . . . . . . . . . . 19
Menu-Guided Navigation . . . . . . . . . . . . . . . . . . . . . . . . . . . . . . . . . . . . . . . . . . . . . . . . 20
Signals . . . . . . . . . . . . . . . . . . . . . . . . . . . . . . . . . . . . . . . . . . . . . . . . . . . . . . . . . . . . . . 21
Using Added Features to Make Efficient Phone Calls . . . . . . . . . . . . . . . . . . . . . . . . . . . . . . . . . . 22
You Want a Convenient Way of Making a Call . . . . . . . . . . . . . . . . . . . . . . . . . . . . . . . . 22
You Want to Use Functions while in a Call . . . . . . . . . . . . . . . . . . . . . . . . . . . . . . . . . . . 28
You Are Away from Your Desk . . . . . . . . . . . . . . . . . . . . . . . . . . . . . . . . . . . . . . . . . . . . 30
You Want to Use Your Phone Efficiently in Special Situations . . . . . . . . . . . . . . . . . . . . . 34
Personalizing Your Phone. . . . . . . . . . . . . . . . . . . . . . . . . . . . . . . . . . . . . . . . . . . . . . . . . . . . . . . 43
Basic Settings . . . . . . . . . . . . . . . . . . . . . . . . . . . . . . . . . . . . . . . . . . . . . . . . . . . . . . . . . 43
Setting the Ringing Properties . . . . . . . . . . . . . . . . . . . . . . . . . . . . . . . . . . . . . . . . . . . . . 47
Phone Book Management . . . . . . . . . . . . . . . . . . . . . . . . . . . . . . . . . . . . . . . . . . . . . . . . 49
Configuring Keys. . . . . . . . . . . . . . . . . . . . . . . . . . . . . . . . . . . . . . . . . . . . . . . . . . . . . . . 51
Formulating Functions . . . . . . . . . . . . . . . . . . . . . . . . . . . . . . . . . . . . . . . . . . . . . . . . . . . 54
Configuring Phone Functions . . . . . . . . . . . . . . . . . . . . . . . . . . . . . . . . . . . . . . . . . . . . . 55
Installation and First-Time Operation . . . . . . . . . . . . . . . . . . . . . . . . . . . . . . . . . . . . . . . . . . . . . . 65
Troubleshooting. . . . . . . . . . . . . . . . . . . . . . . . . . . . . . . . . . . . . . . . . . . . . . . . . . . . . . . . . . . . . . 67
Technical Data . . . . . . . . . . . . . . . . . . . . . . . . . . . . . . . . . . . . . . . . . . . . . . . . . . . . . . . . . . . . . . . 68
*/# Procedures . . . . . . . . . . . . . . . . . . . . . . . . . . . . . . . . . . . . . . . . . . . . . . . . . . . . . . . . . . . . . . . 69
System and Software-Related Functions . . . . . . . . . . . . . . . . . . . . . . . . . . . . . . . . . . . . . . . . . . . . 72
Menu Overview . . . . . . . . . . . . . . . . . . . . . . . . . . . . . . . . . . . . . . . . . . . . . . . . . . . . . . . . . . . . . . 73
Logging Your Phone on Third-Party Systems. . . . . . . . . . . . . . . . . . . . . . . . . . . . . . . . . . . . . . . . . 75
Index . . . . . . . . . . . . . . . . . . . . . . . . . . . . . . . . . . . . . . . . . . . . . . . . . . . . . . . . . . . . . . . . . . . . . . 77
6
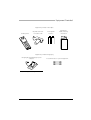
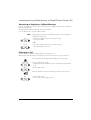
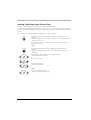
Equipment Provided
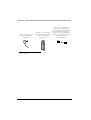
Equipment Provided
Equipment provided: 130 / 130pro
Cordless phone
Clip with strain relief
for headset cable
2 rechargeable
batteries
Quick User's
Guide and safety
information
Equipment provided: Charging bay
Charging bay including plug-in power
adapter1)
2 attachment tabs for optional equipment
1) Country-specific design.
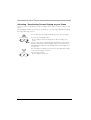
Options
7
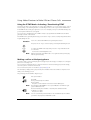
Options
Plug-in power adapter1) for
direct charging without
charging bay
Leather pouch: The headset +
plug-in power adapter can be
connected through the
leather pouch
1) For 130pro – Country-specific version.
2) For 130pro
8
Headset2) – Recommendation:
Plantronics CHS142N with ear
piece + headphone clip, DanaCom
Series 505 and 755 models Falcon,
Merlin, Robi. Ask your distribution
partner for country-specific model
designations and other
recommendations
Safety and Liability
Safety and Liability
Safety Information
Failure to observe this information can be hazardous and infringe existing laws. Please read the Operating
Instructions and keep them for future reference. When handing on your handset to others, make sure
you enclose these User Guides.
Medical equipment
The handset must not be used near medical equipment, such as pacers or hearing
aids.
Availability of telephone connections
Do not rely on your handset as your only means of communication in emergency or
critical situations. Availability cannot always be guaranteed.
Risk of explosion through sparking
Do not use the handset on premises subject to explosion hazards.
Hands-free mode and Ringing tone
Do not hold the handset up against your ear in hands-free operation and during
ringing tone, as the volume is then very high.
Maintenance
Use original accessories only. Make sure all installation and repair work is carried out
by a specially qualified technician. Do not touch the charging contacts with sharp,
metallic, and / or greasy objects.
Always use a soft, moistened, or antistatic cloth to clean your handset. Do not use
chemicals or other chemical products.
Cost control
1
5
20
You should protect your handset with a code so that no-one can make phone calls
at your expense. A code will also protect your personal settings.
When carrying the handset around, you should lock the keypad so it cannot be
accidentally activated.
Ambient conditions
Do not operate the handset outside the temperature range of +5 °C to approx.
+40 °C. Avoid direct sunlight and other sources of heat.
Protect your handset against the wet, heavy dust, corrosive liquids and steam.
Do not expose your handset to electromagnetic fields (electric motors, household
appliances). The speech quality could be affected. To prevent interference,
avoid placing your handset in the immediate vicinity of computers, radios, TV sets,
VCRs, and other telephone sets.
Disposal
Be sure to dispose of your handset and its packaging in an environmentally
compatible way; alternatively send it back to your supplier or servicingagent.
9
Safety and Liability
Intended Purpose
This telephone is designed exclusively for making and receiving phone calls on the appropriate system.
The handset can also be operated on foreign language systems in GAP mode.
Dealing with batteries
Please observe the following rules and regulations when dealing with batteries
General rules when dealing with batteries:
• Never tamper with or dismantle batteries
• Avoid touching the battery contacts.
• If necessary clean the contacts with a damp cloth.
• Protect the battery contacts from contact with metallic objects.
• Never immerse batteries in water or throw them into a fire.
• Do not expose the batteries to high temperatures.
When putting your mobile phone into operation:
• Only use the rechargeable Ni-MH batteries supplied by the manufacturer.
• Take note of the instructions in the ”Installation” chapter and follow the procedure described there.
• It takes two to three charging cycles for the batteries to reach their fully charged state.
• Only use the charging bay supplied by the manufacturer or the optional original plug-in power adapter
to recharging the batteries; otherwise the batteries may be damaged.
• For the charging bay only use the plug-in power adapter supplied by the manufacturer.
When operating your mobile phone:
• It is normal for the batteries to become warm when charging.
• Discharge the batteries from time to time to prolong their service life. To do so do not place the phone
back into the charging bay until the batteries are completely or almost completely discharged.
To replace the batteries:
• Switch off the phone before removing the batteries.
• Always replace both batteries at the same time.
• Only use batteries and charging units approved by the manufacturer. These are available from your
supplier or servicing agent.
To store the batteries:
• If you do not intend to use the phone for some time, switch off the phone and take out the batteries.
• Store the batteries at room temperature. Above-average temperatures tend to reduce the service life
of batteries.
To dispose of the batteries:
• Do not throw away the batteries with your domestic waste. Take used batteries to an appropriate
collection point for recycling or send them back to your supplier or servicing agent.
10
Safety and Liability
Exclusion of Liability
This product is manufactured in accordance with ISO 9001 quality criteria.
This product and the user information supplied with it have been produced with the utmost care.
The product's functions have been tested and approved after comprehensive conformity tests.
Nonetheless errors cannot be entirely excluded. The warranty is limited to the replacement of defective
hardware.
The manufacturers shall not be liable for any direct or indirect damage that may be caused by incorrect
handling, improper use, or any other faulty behaviour on the part of a product. Potential hazards are
mentioned in the relevant places in the User Guides. Liability for loss of profit shall be excluded in any case.
11
Dialling and Phoning
Dialling and Phoning
You Receive a Call
This section explains the procedure for answering a call.
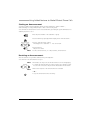
Answering a Call
Your phone is ringing and the indicator LED is flashing. To answer the call, proceed as follows:
Warning!
The volume of the ringing call can become very loud. Do not hold the sound
aperture up to your ear.
Press the Call key.
– or –
Press the Loudspeaker key.
The hands-free mode is activated.
Note
If the caller's phone number is received, it is shown on the display. If the
phone number is stored on the phone or in the system, the display also
shows the corresponding name. If there is not enough space on the display,
a "+" appears; you can then use the Info key to display additional
information.
Ending a Call
You want to end the call.
After the call, you can display the call duration or retrieve it using the Info key. Call charges are also
displayed after any external call which you initiated, provided your provider supports this function.
Press the Call key.
– or –
If no hands-free mode: Put your phone in the charging bay.
– or –
Hands-free mode and phone in the charging bay: Press the Loudspeaker key.
12
Dialling and Phoning
You Want to Make a Call
This section explains the different ways you can make a call with your phone.
Dialling with the Phone Number
You want to call someone and key in that person's phone number.
Use the digit keys to key in the phone number.
The display shows the phone number.
☛
Note
You can use the C-key to delete any incorrect digits.
Press the Call key.
The person is called.
Dialling with Redial
You want to call one of the parties who called you recently.
Your phone automatically stores in the last-number redial list the phone numbers of persons who have
called you – and their names, if available. You can call these persons back using the last-number redial list.
Press the Menu key repeatedly until "Redial" appears.
Redial
v
Press the "Redial" Foxkey.
The display shows the phone number last dialled.
To scroll through the maximum of 10 phone numbers last dialled, press the
"v" Foxkey repeatedly.
Press the Call key.
The phone number displayed is dialled.
13
Dialling and Phoning
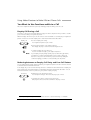
Using Your Phone in Hands-Free Mode
You want other people to join the conversation or to have your hands free while making the call.
The sound quality can be improved by keeping the volume of your phone as low as possible.
Your phone features two types of hands-free operation:
• Your phone is in the charging bay.
• Your phone is not in the charging bay.
Warning!
The volume of the phone rises sharply during hands-free operation. Do not
hold the phone up to your ear.
Your phone is not in the charging bay: Press the Loudspeaker key.
Hands-free mode is activated.
– or –
Your phone is in the charging bay: Press the Call key.
Hands-free mode is activated.
Note
The volume increases from quiet to the value last set for hands-free mode.
Make sure the microphone is not obstructed.
To deactivate hands-free operation when the phone is in the charging bay:
Take the phone from the charging bay.
Normal mode is now activated.
– or –
To deactivate hands-free operation when the phone is not in the charging
bay: Press the Loudspeaker key.
Normal mode is now activated.
Note
The Call key ends a call in hands-free mode. A call remains in hands-free
mode if you put your phone back in the charging bay.
Muting the Microphone
In the middle of a call you want to talk briefly with other persons in the room without your call partner
hearing your conversation.
You can switch the microphone on and off during a call.
14
Microphone
Switching the microphone off: Press the "Mic" Foxkey.
The display shows the symbol n.
Microphone
Switching the microphone on: Press the "Mic" Foxkey.
Dialling and Phoning
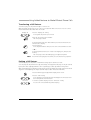
Using a Headset1)
You want to make phone calls without having to hold the phone.
The headset comprises the headphones, microphone, and a button. To answer and to end calls,
you simply press the button on the headset. Once the headset is plugged in to your handset, the phone's
microphone and loudspeaker are deactivated. In hands-free mode, only the phone's loudspeaker is
activated, not the phone's microphone.
Answering or ending a call: Press the key.
Adjusting the headphone volume: Press the Volume key on the phone.
NOTE
Headsets by other manufacturers can cause malfunctions (e.g. automatic
answering).
1) 130pro
15
Using the Display and Operating Elements
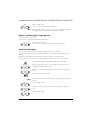
Using the Display and Operating Elements
Display
Abbreviations
Depending on the display space available, certain terms may be abbreviated, e.g. "Announ." for
"Announcement". The abbreviations though can be easily understood.
Navigating through the Foxkey menu
The Foxkey provides the functions available for the current situation.
An "M" in the display's symbol area tells you that you can use the Menu key to show further Foxkey
options.
Press the Menu key repeatedly until you come to the option you want.
Navigating through info lines
In the idle state or when you are reading display texts the display shows an "i" in the symbol line.
An "i" in the display tells you that there is a list of callers, messages, or active functions available in
various info lines. Use the Info key to scroll through info lines.
If there is not enough space on the display to show the entire text, a "+" appears. Press the Info key to
see the rest of the text.
To retrieve info lines: Press the Info key repeatedly until the information
appears.
Note
After the last info line, the display shows the idle text again.
To see the rest of the text: Press the Info key.
The display shows the rest of the text.
Note
16
Press the Info key as often as necessary to read the entire text.
Using the Display and Operating Elements
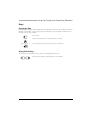
Keys
Pressing a Key
Depending on the situation and operating mode, a key may have various functions. The function activated
depends on the number of times the key is pressed or whether it is pressed quickly or held down for a
moment. Here are some examples:
Press the key.
<long>
<2x, 3x, 4x, etc.>
Keep the key held down for a moment (about 2 seconds).
In text mode, press the key twice, three times, four times, etc.
☛
Using the Foxkey
The Foxkey has variable functions. These functions are displayed above the key.
Press the Foxkey under the desired function on the display.
17
Using the Display and Operating Elements
Key Assignment
Holding a given key down for a moment (about 2 seconds) lets you jump to menu items,
display information, or activate special functions. Here are some examples:
<long>
Configures the Foxkey or reverses
the scroll direction
<long>
Information for the system
administrator
<long>
Activates the configuration mode
<long>
Locks keypad – autom. Unlocks for
incoming call
<long>
Up one menu level without saving
<long>
Locks the keypad – unlocks
manually, also necessary for
incoming calls
<long>
Switches systems
<long>
Switches DTMF mode on / off
(depending on system software)
<long>
Information for the system
administrator
<long>
Switches the phone off
<long>
Information for the system
administrator
<long>
Settings:
• Display contrast
• Display backlighting
• Range tone
• System Busy Beep
<long>
Displays the reception quality and
current radio unit
<long>
Retrieves the menu call alert1)
<long>
Displays the phone's software
version
<long>
Calls up the menu to configure
hotkeys
<long>
Displays the battery charge state
1) 130pro only
18
Using the Display and Operating Elements
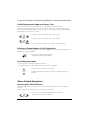
Input
Enters digits
The digit keys are used to enter the digits 0 to 9.
Entering Letters and Special Characters
You can also use the digit keys to enter letters and special characters. A number of letters and special
characters are assigned to each key.
To enter letters and special characters using the digit keys, you need to be in text mode. The display shows
"ABC" when you are in text mode. You can switch back and forth between number mode and text mode
during your input.
To switch between number mode and text mode during your input:
AB
Press the Menu key repeatedly until the display reads "ABC>123"
ABC>123
Note
Press the "ABC>123" Foxkey.
If the phone is expecting a text input, the text mode is automatically
activated.
The characters are assigned to the digit keys as follows:
-.?1!,:;’"¿¡
ABC2ÄÆÅÇ
abc2äæåàç
DEF3É
def3éèê
GHI4
ghi4ì
JKL5
jkl5
MNO6ÑÖØ
mno6ñöøò
PQRS7
pqrs7ß
TUV8Ü
tuv8üù
WXYZ9
wxyz9
+0
*/()<=>%£$€¥¤@&§
Space #
<1x, 2x, 3x, etc.>
Press the digit key repeatedly until you get the character you want.
☛
19
Using the Display and Operating Elements
Switching between Upper and Lower Case
You want to switch between upper and lower case while making an input in text mode.
Upper-case input is initially activated in text mode. After the first letter of a word has been entered,
the text mode automatically switches to lower-case input. You can use the Foxkey to switch manually
between upper-case and lower-case input.
A>a
To switch to lower-case input: Press the "A>a" Foxkey.
a>A
To switch to upper-case input: Press the "a>A" Foxkey.
Note
The switch from lower to upper case is valid for only a single letter.
Entering a Phone Number in Call Preparation
You can enter a phone number any time without the call being set up automatically. The number is not
dialled until you press the Call key.
☛
Enter a phone number in call preparation.
The display shows the phone number.
Correcting your Input
You notice you have entered a wrong digit or character.
You can delete an incorrect input either character by character or completely.
To delete the last character: Press the C-key.
<long>
To end the input without saving: Press the C-key and hold it down for a
moment.
Menu-Guided Navigation
Reversing the Scroll Direction
The Foxkey menu shows an arrow symbol for scrolling. However, you want to scroll in the opposite
direction.
Hold the key down for a moment to reverse the direction of the arrow.
v or V
20
Press the "v" or "V" Foxkey and hold it down for a moment.
The direction of the arrow is reversed.
Using the Display and Operating Elements
Switching between Editing and Scrolling
You have scrolled through a list to find a message, for instance. Now you want to edit it.
The text mode is activated as the default input mode. You can use the Menu key to switch between text
mode for entering letters and number mode for entering numbers.
Press the menu key until the Foxkey assignment "ABC" appears.
AB
You can now activate and deactivate the text mode with the "ABC" Foxkey.
To switch the Foxkey back to "v", press the Menu key again.
Undoing Actions
You can undo the last action without saving it by pressing the C-key.
<long>
Press the C-key and hold it down for a moment.
Undoes the last action.
Note
To put the phone back into standby mode, you may have to press the C-key
several times.
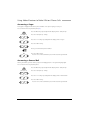
Signals
Indicator LED Signals
These are the normal LED display types. Other display types are described in the troubleshooting section.
LED is flashing rapidly
LED is flashing slowly
LED is flashing intermittently
Phone is being called
Voice Mail, message or callback
received
Warning: Loudspeaker is
switched on
21
Using Added Features to Make Efficient Phone Calls
Using Added Features to Make Efficient Phone Calls
The following sections explain the supplementary features provided by your phone for more efficient use.
You Want a Convenient Way of Making a Call
This section explains some convenient features provided by your phone for making a call.
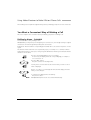
Dialling by Name – Quickdial
You want to make a call by entering a name.
With Quickdial you only need to press the digit keys for each letter once, even though each key is assigned
several letters. An efficient algorithm provides quick search results.
Requirement: The name and the corresponding phone number have to be stored on the phone or in the
system.
The surname and first name have to be separated by a space, for example "no s" (6 6 # 7) for Noble
Stephen. Use the #-key to enter spaces. Ask your system administrator whether you should start with the
surname or the first name.
Press the corresponding digit key once for each letter.
For each letter, the display shows the corresponding digit, for example a
"6" for the letter "n".
☛
ABC
Press the "ABC" Foxkey.
The phone searches for matching names.
You may have to enter another letter before the name you want or a list of
names is displayed.
☛
v
Use the "v" Foxkey to scroll through the names until the display shows the
name you are looking for.
To call the person displayed: Press the Call key.
The person is called.
Note
22
With Quickdial all phone books are searched simultaneously.
Using Added Features to Make Efficient Phone Calls
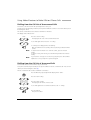
Dialling by Name
You want to make a call by entering a name.
The dialling-by-name function is provided specifically for this purpose. You can look up the name in the
phone's or the system's phone book.
The surname and first name have to be separated by a space, for example "no s" for Noble Stephen.
Use the #-key to enter spaces. Ask your system administrator whether you should start with the surname
or the first name.
Press the Menu key.
The display shows "ABC".
ABC
Press the "ABC" Foxkey.
All the available phone books would now be searched: Abbreviated
dialling, internal, and private.
Use the Foxkey to select the phone book.
The selected phone book will appear on the display after "Dialling by
name:".
Note
Enter the first letter.
The phone searches for matching names.
☛
Note
☛
v
The Menu key lets you access the private phone book.
The search function is not affected by upper / lower case and special
characters.
If the phone is unable to find a matching name, "List empty" will appear on
the display.
You may have to enter another letter before the name you want or a list of
names is displayed.
Use the "v" Foxkey to scroll through the names until the display shows the
name you are looking for.
To call the person displayed: Press the Call key.
The person is called.
23
Using Added Features to Make Efficient Phone Calls
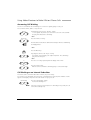
Dialling from the Call List of Unanswered Calls
You want to call someone who has previously tried to reach you.
Your phone has automatically stored the person's phone number in a call list. You can now call the person
back using this call list.
The call list of unanswered calls contains a maximum of 10 entries.
The display shows "Missed calls"
Show
Press the "Show" Foxkey.
The display shows a list of the last unanswered calls.
v
To scroll through entries: Press the "v" Foxkey.
To call the person displayed: Press the Call key.
Once the call has been successfully connected, the entry is deleted from the
call list.
Note
To obtain more information on a call in the call list, press the "Detail"
Foxkey.
To delete an entry from the list, press the Menu key and then the "Delete"
Foxkey.
Note
If you leave the coverage area or switch off your phone, the call list will be
updated as soon as your phone is operational again.
Dialling from the Call List of Answered Calls
You want to call back someone whose call you answered.
Your phone automatically stored the person's phone number on the list of answered calls. You can now
call the person back using the call list [D].
The list of answered calls contains a maximum of 10 entries.
Press the Menu key repeatedly until the display shows "Calls".
Calls
Answered calls
v
Press the "Call" Foxkey.
Press the "Calls" Foxkey.
The display shows the list of the last calls.
To scroll through the list of answered calls: Press the "v" Foxkey.
Press the Call key.
The person is called.
24
Using Added Features to Make Efficient Phone Calls
Dialling with a Configurable Hotkey
You want to call someone whose phone number is stored under a configurable hotkey.
Press the hotkey repeatedly until the display shows the person you want.
Press the Foxkey that corresponds to the person you are looking for.
The display shows the name and phone number of the person you are
looking for.
Press the Call key.
The person is called.
Requesting a Callback
You want to talk to a certain person. The person is busy or does not answer. You can make callback
requests to both internal and external subscribers. Not all providers support this function.
If the called party is busy, you can request an automatic callback. In this case, your phone will start ringing
as soon as the party you are trying to reach goes on-hook. When you pick up the handset, the called
party's phone will start ringing.
If the called party does not answer, you can also request a callback. The called party will see a continuous
visual reminder of your callback request.
Situation
Callback
Note
Reset
You called someone and hear the busy tone or dialling tone.
To activate a callback request: Press the "Callback" Foxkey.
The display shows "Call expected" and "Reset".
You can have only 1 active callback request at a time. Your callback request
will automatically be cancelled by the system after about half an hour.
You can also cancel the callback request beforehand.
Cancelling the callback request: Press the "Reset" Foxkey.
25
Using Added Features to Make Efficient Phone Calls
Answering Call Waiting
You are in a call and hear the call waiting tone. Someone is urgently trying to reach you.
You can either answer, deflect or reject the call.
Answer
Answering the call: Press the "Answer" Foxkey.
1. Your original call partner is put on hold. You are now connected with
the party who initiated the call waiting.
– or –
Deflection
Press the "Deflect" Foxkey.
Enter destination subscriber as defined in the Chapter "Deflect a Call During
the Ringing Phase".
☛
– or –
Press the Menu key.
Reject
Rejecting the call: Press the "Reject" Foxkey.
You remain connected with your original call partner. The call-waiting
party hears the busy tone.
– or –
V
Press the "/\" Foxkey repeatedly until the display shows "End".
Exit
Press the "Exit" Foxkey.
Ends the current call and the call-waiting party is connected through.
Call Waiting on an Internal Subscriber
You want to talk to an internal subscriber. However, the person is busy.
As a result of your call waiting, the person hears a call waiting tone and your phone number or name
appears on his display. The person can either answer or reject your call.
Call waiting
Note
26
Press the "Call waiting" Foxkey.
You hear the dialling tone.
If the person rejects your call request or if call waiting is not possible, the call
is disconnected (busy tone).
Using Added Features to Make Efficient Phone Calls
Starting an Announcement
You want to address internal subscribers directly via their loudspeaker – where available – ,
without waiting for a reply (similar principle to that of an intercom system).
You can initiate an announcement to the selected subscribers, provided your system administrator has
enabled your phone to do so.
Enter the phone number of the subscriber or group.
☛
Press the Menu key repeatedly until the display shows "Announcement".
Announcement
Press the "Announcement" Foxkey.
The display shows "Subscriber: ...". You can now talk.
Press the Call key.
The person is called.
Note
For direct announcements, see "*/# procedures, announcement".
Receiving an Announcement
After an attention tone you will be addressed via your loudspeaker.
You can listen to the announcement or stop it.
Note
Answer
The handset can only receive an announcement if it is in the charging bay.
To continue the announcement as a phone call: Press the "Answer" Foxkey.
You are now connected to the person who initiated the announcement.
Note
All the other recipients of the announcement are excluded.
– or –
To stop the announcement: Press the C-key.
27
Using Added Features to Make Efficient Phone Calls
You Want to Use Functions while in a Call
This section explains the different options provided by your phone while you are in a call.
Enquiry Call During a Call
You want to call someone else briefly without losing your current call partner. Then you want to resume
your conversation with your original call partner.
With the enquiry call function you can call someone else in the middle of a call and put your original call
partner on hold. You can make enquiry calls to both internal and external subscribers.
Enquiry call
Press the "Enquiry call" Foxkey.
Your original call partner is put on hold.
Enter the phone number of the enquiry call party.
The enquiry call party is called. You hear the ring back tone.
☛
To end the enquiry call: Press the C-key.
You are now back through to your original call partner.
Note
If your enquiry call party hangs up and you press the Call key by mistake,
you will hear a continuous ringing signal for 10 seconds to draw your
attention to the person still on hold. If you press the Call key during the
continuous ringing, you will be reconnected with your call partner.
Brokering between an Enquiry Call Party and Your Call Partner
You are talking with an enquiry call party and have your original call partner on hold. You want to be able
to switch back and forth between the two.
In an enquiry call you can use the brokering1) function to switch back and forth between an enquiry call
party and the party on hold. Brokering is possible with both internal and external subscribers. You can
also broker between conference parties as a group and an enquiry call party.
Brokering
Brokering: Press the "Brokering" Foxkey.
Your call partner changes. The other call party is put on hold.
To terminate the current connection: Press the C-key.
Call party disconnected. Connected with the call party on hold.
1) Depending on the system and the software version it is called "Brokering" or "2nd Call".
28
Using Added Features to Make Efficient Phone Calls
Transferring a Call Partner
You want to put your call partner through to someone else.
With the enquiry call function you can connect your call partner with someone else. You can connect
internal and external subscribers with one another.
Enquiry call
Press the "Enquiry call" Foxkey.
Your original call partner is put on hold.
Enter the other party's phone number.
The other party is called.
☛
Connecting with notification: Wait until the person has answered the call.
Announce the call party.
Press the Call key.
Your call partner and the other person are now connected with each other.
– or –
Connecting without notificaton: 1. Wait for the ringing tone, then press the
Call key.
The other party is then called directly by your original call partner.
Note
Recall: If the other party does not answer, the call comes back to your phone.
Parking a Call Partner
You want to put your call partner on hold without using a phone channel as a result.
You can park your call partner both locally and centrally. A locally parked call party can only be retrieved
by the phone that originally parked the call. Local parking is possible only with the Foxkey menu.
With central parking your call partner is parked on the system's parking position and can be retrieved from
any phone. Central parking can only be used with */# procedure *76 (retrieve with #76).
Press the Menu key repeatedly until the display shows "Park".
Park
Take back
Press the "Park" Foxkey.
Your call partner is now parked locally. The display shows "Executed" and
then "Call parked" and "Take back".
To retrieve a parked call party: Press the "Take back" Foxkey.
You are now connected with the parked call party.
29
Using Added Features to Make Efficient Phone Calls
Making a Conference Call
You are in a call and have a call party on hold at the same time. You want to include the party on hold in
the conversation and hold a conference call.
With the conference function you can include a call party on hold in the current conversation. From the
conference call you can initiate an enquiry call to someone else. You can broker between the parties as a
group and the enquiry call party.
Depending on the system, a conference call can consist of up to 6 conference participants. You can hold
a conference call with internal and external subscribers.
To connect the call party on hold: Press the Menu key repeatedly until the
display shows "Conference".
Conference
Note
Press the "Conference" Foxkey.
The call party on hold is now included in the call: Conference call.
You may hear an attention tone. This depends on the system's
configuration.
Leaving a conference call: Press the Call key.
The other conference parties remain in the call.
You Are Away from Your Desk
This section explains the different options provided by your phone when you want to leave your desk.
Forwarding a Call
You want to leave your desk. Calls for you are to be forwarded to a different destination (e.g. phone or
pager).
You can forward incoming calls to a different destination using Call Forwarding Unconditional.
Press the Menu key repeatedly until the display shows "Forwarding".
Forwarding
v
OK
Press the "Forwarding" Foxkey.
Press the "v" Foxkey repeatedly until the display shows "Forward to
subscriber".
Press the "OK" Foxkey.
Enter the person's phone number.
☛
30
Using Added Features to Make Efficient Phone Calls
OK
Press the "OK" Foxkey.
The display shows "Forwarded: ...".
Note
If a call is to be forwarded only when you are already in a call,
select "Forward: busy" instead of "Forward: subscriber".
You can deactivate call forwarding unconditional with the "Reset" Foxkey.
You can also activate a call forwarding unconditional by remote control.
Forwarding a Call on No Reply
You want calls that you receive on your phone to be forwarded to another destination.
Both your own phone and the other destination will then start ringing. The system configuration
determines whether or not there is a ringing delay at the other destination. Whoever goes off-hook first,
answers the call. Depending on the system configuration, Call Forwarding on No Reply can also be
activated when your phone is busy.
Press the Menu key repeatedly until the display shows "Forwarding".
Forwarding
v
OK
☛
OK
Press the "Forwarding" Foxkey.
Press the "v" Foxkey repeatedly until the display shows "Call Forwarding on
No Reply to subscriber".
Press the "OK" Foxkey.
Enter the phone number of the destination to which your calls are to be
forwarded.
Press the "OK" Foxkey.
Call Forwarding on No Reply is now activated. The display shows "i" or
"CFNR: ...".
To deactivate Call Forwarding on No Reply: Press the Info key repeatedly until
the display shows "Call Forwarding on No Reply..." and "Reset".
Reset
Press the "Reset" Foxkey.
Call Forwarding on No Reply is now deactivated.
31
Using Added Features to Make Efficient Phone Calls
Leaving a Message
You cannot be reached on your phone. You want any internal subscriber who calls you to get a message.
Requirement: The internal subscriber must have a phone capable of receiving messages.
Subscribers whose phone cannot receive messages are put through to your phone or rerouted to a
destination predefined within the system.
You can select the contents of your message from a list of 16 predefined texts. These texts can be edited
to suit your requirements. The predefined texts are specified in the system configuration.
Press the Menu key repeatedly until the display shows "Forward".
Forwarding
v
Press the "Forwarding" Foxkey.
Press the "v" Foxkey repeatedly until the display shows
"Forward to message".
OK
Press the "OK" Foxkey.
v
To scroll through the predefined messages: Press the "v" Foxkey.
Edit the message contents, if necessary.
☛
Note
OK
To activate a message: Press the "OK" Foxkey.
The display shows "Message activated".
Reset
To deactivate a message: Press the "Cancel" Foxkey.
Note
32
To enter letters: Press the menu key until the Foxkey assignment "ABC>123"
appears.
If you activate a call forwarding unconditional, the message you have left on
your phone will be deactivated.
Using Added Features to Make Efficient Phone Calls
Locking Your Phone
You need to leave your desk and want to ensure that no-one can alter your phone's settings, look at your
private data, or make outside calls from your phone.
You can lock your phone with a 2 to 10 digit code, see "Changing the code". The factory code setting is
0000.
Press the Menu key and hold it down for a moment.
The configuration mode is now activated.
Press the Menu key repeatedly until the display shows "Terminal".
Terminal
v
Press the "Terminal" Foxkey.
Press the "v" Foxkey repeatedly until the display shows "Lock".
OK
Press the "OK" Foxkey.
Use the digit keys to enter the code.
For each digit entered, the display shows an "*".
☛
OK
Press the "OK" Foxkey.
v
Press the "v" Foxkey repeatedly until the type of locking you want appears
on the display.
OK
Press the "OK" Foxkey.
The display shows "Executed".
Note
You can lock either the configuration only ("Cfg.locked") or the entire
phone ("Locked"). With "barred" your private data cannot be viewed and
external calls from your phone are only allowed as per system settings.
33
Using Added Features to Make Efficient Phone Calls
Unlocking Your Phone
You want to unlock your phone.
You can use the code to unlock your phone. If you have forgotten the code, consult your system
administrator.
Situation
☛
OK
v
OK
You have tried to use a locked function or pressed the "Reset" Foxkey.
The display shows "Code:"
Use the digit keys to enter the code.
For each digit entered, the display shows an "*".
Press the "OK" Foxkey.
The display shows "Locked".
Press the "v" Foxkey repeatedly until the display shows "enabled".
Press the "OK" Foxkey.
The display shows "Executed". The phone is unlocked.
You Want to Use Your Phone Efficiently in Special
Situations
This section explains the different options provided by your phone for special situations.
Deflect a Call During the Ringing Phase
You do not want to answer a call yourself but deflect it to another subscriber.
With the function "Deflect a Call During the Ringing Phase" during the ringing phase you can deflect calls
to an internal or external subscriber or to the Voice Mail Box [C].
Your phone is ringing and the indicator LED is flashing. To deflect the call, proceed as follows.
Deflection
☛
Press the "Deflect" Foxkey.
Use the digit keys to key in the phone number.
The display shows the phone number.
– or –
Dial the phone number using the Redial key function.
– or –
Dial the phone number using the dialling options described in the chapter
"You Want a Convenient Way of Making a Call".
34
Using Added Features to Make Efficient Phone Calls
OK
Press the "OK" Foxkey.
The call is deflected to the desired subscriber.
Note
If the subscriber you want to deflect to is busy, the call will not be deflected.
The display shows "Not available" and your phone still rings.
Reject a call during the ringing phase
You do not want to answer a call.
You can reject a call already during the ringing phase [C].
Reject
Press the "Reject" Foxkey.
The connection is rejected and the caller obtains the busy tone.
Send Text Messages
You are unable to reach an internal subscriber and thus want to leave a message.
You can send a text message to an internal subscriber. The text message will appear on the person's
display.
Requirement: The internal subscriber must have a phone capable of receiving messages.
You can either use the predefined message texts directly or edit them to create a new message.
Press the Menu key repeatedly until the display shows "Message".
Message
v
Press the "Message" Foxkey, to use a message text from the list of 16
standard texts available in the system.
Press the "v" Foxkey repeatedly until the display shows the message you
want.
Edit the message text, if necessary.
☛
Note
OK
v
OK
To enter letters: Press the menu key until the Foxkey assignment "ABC>123"
appears.
Press the "OK" Foxkey.
Use the "v" Foxkey to select the destination: "Subscriber", "Group", or
"All".
Press the "OK" Foxkey.
35
Using Added Features to Make Efficient Phone Calls
For subscriber and group: Enter the phone number.
☛
OK
Press the "OK" Foxkey.
The message is sent.
Note
If the display shows "Not available", the message could not be sent.
Read Text Messages
Your display shows "New message received" or "Other message received", followed by "Message list".
The Indicator LED is flashing.
The read function is used to retrieve a received message from the memory so you can read it. The first
message received is the first message shown.
Note
Read
By pressing the Info key you can identify the sender of the message before
reading the message itself.
Press the "Read" Foxkey.
The message is displayed for 8 seconds. If the message runs over several
lines, the next line will then be displayed automatically.
To show the next line before the 8 seconds have elapsed: Press the Infokey.
Delete
To delete the message: Press the "Delete" Foxkey.
The message is deleted; the next message is retrieved from the memory.
Once the last message has been deleted, the phone switches back to the
idle state.
– or –
To end the reading process: Press the C-key.
The phone reverts to the idle state. The message remains stored.
Note
The next message is only retrieved from the memory once you have deleted
a message.
The LED flashes as long as there are still messages in the memory.
36
Using Added Features to Make Efficient Phone Calls
Answering or Rejecting a Callback Message
Someone has asked you to call back. You can tell that there is a callback request because the Indicator
LED is lit in the idle state.
The display shows "Call back requiered" and a phone number.
You can either answer or reject the callback request.
Note
Call
By pressing the Info key you can identify the sender of the message before
reading the message itself.
To answer the callback request: Press the "Call" Foxkey.
The person is dialled.
– or –
Delete
To reject the callback request: Press the "Delete" Foxkey.
The callback request is rejected.
Picking Up a Call
You hear a phone ringing in your vicinity and want to pick up the call.
With the call pick-up function you can pick up the call from the other phone on your own phone.
Press the Menu key repeatedly until the display shows "Call pick-up".
Call pick-up
OK
Press the "Call pick-up" Foxkey.
The display shows the number of the phone from which you last picked up
a call.
Press the "OK" Foxkey.
Enter the number of the phone from which you want to pick up the call.
☛
OK
Press the "OK" Foxkey.
You are now connected with the caller.
37
Using Added Features to Make Efficient Phone Calls
Using the DTMF Mode. Activating / Deactivating DTMF
You want to be able to use your phone to control other equipment or to access certain services, such as
remote polling of an answering machine or telebanking. For these services you need the DTMF mode.
In the DTMF mode each key press generates a tone. If for example you key in a call number during a call,
your call partner will hear the tone signals.
You can use the configuration mode ("DTMF" menu) to specify whether the DTMF mode should be
generally activated or deactivated.
If the DTMF mode is generally deactivated, you can use the *-key to activate it temporarily (and deactivate
it again) during the call.
Situation
You're in a call and the DTMF mode is generally deactivated
First press the "C" key to clear the inputs you already made during the call.
<long>
To activate the DTMF mode temporarily: Press the *-key and hold it down
for a moment.
You hear the acknowledgement tone.
Note
When you hang up, the DTMF mode is once again deactivated, in keeping
with the general setting.
Making a call on a third-party phone
You want to make a call on a third-party phone using your personal settings, for example on a colleague’s
phone or in a meeting room.
You can activate a third-party phone to make an internal or external call using your personal settings,
even if the phone is locked for external calls.
You can activate the phone for a business [A] or private [C] call.
The called party's display shows your personal phone number and not the number of the phone from
which you are making your call.
Any call charges incurred will be charged to you.
Pick up the handset.
Enter #36.
Enter your internal phone number.
Enter your PIN.
The phone is now enabled. You hear the internal dialling tone.
☛
Note
Enter the internal phone number or external phone number with the
exchange access digit.
The person is called.
☛
Note
38
The initialization PIN "0000" is not accepted. Obtain a new PIN from your
system administrator first.
You can as alternative put the handset on-hook and dial the phone number
you want in call preparation within 60 seconds.
Using Added Features to Make Efficient Phone Calls
– or –
Pick up the handset.
Enter #46 for a private call. Enter your internal phone number.
Enter your PIN.
The phone is now enabled. You hear the external dialling tone.
☛
Note
☛
The initialization PIN "0000" is not accepted. Obtain a new PIN from your
system administrator first.
When you hang up, dialling by name and your private phone book remain
available for a whole minute so you can make another call.
Enter the external call number directly, without the exchange access digit.
The external subscriber is called.
Paging an Internal Subscriber
You are unable to reach an internal subscriber and thus want to page them.
If the system is equipped with a paging system (PS), the person can be paged. The paged person can
answer from any phone [A].
Press the Menu key repeatedly until the display shows "Page".
Page
Press the "Page" Foxkey.
Enter the phone number of the person to be paged.
☛
OK
Press the "OK" Foxkey.
The person is paged and sees your phone number on the pager.
39
Using Added Features to Make Efficient Phone Calls
Answering a Pager
Your pager is ringing and shows the phone number of the person trying to reach you.
You can answer from any internal phone [A].
Press the Menu key repeatedly until the display shows "Call pick-up".
Call pick-up
v
OK
Press the "Call pick-up" Foxkey.
Press the "v" Foxkey repeatedly until the display shows "Pager".
Press the "OK" Foxkey.
Enter your own internal phone number.
☛
OK
Press the "OK" Foxkey.
You are now connected with the person who made the general bell.
Answering a General Bell
Via the general bell, you hear either your personal ringing pattern or the general ringing signal.
You can answer from any internal phone.
Press the Menu key repeatedly until the display shows "Call pick-up".
Call pick-up
40
Press the "Call pick-up" Foxkey.
v
Press the "v" Foxkey repeatedly until the display shows "General bell".
OK
Press the "OK" Foxkey.
You are now connected with the person who made the general bell.
Using Added Features to Make Efficient Phone Calls
Suppressing your Call Number from Your Called Party's
Terminal Display
You do not want your call number to appear on the terminal display of a called party in the public
network.
You have two possibilities [B]:
• If you never want your call number to appear, you can ask your system administrator to set up the
system configuration accordingly.
• To suppress your call number display for certain calls only, select the function "CLIR per call" before
dialling your party's call number. You can store the function under a function key or activate it with a
*/# procedure.
The CLIR per call function is available on a function key.
Before the call: Press the CLIR per call function key.
Note
Suppressing your phone number from the display only works with external
calls and has to be subscribed to with your provider.
Tracing Malicious Calls
Your are being threatened or molested by a call. You want to identify the caller.
Using the MCID function (Malicious Call Identification) the provider records the following call data [D]:
• Your phone number
• The caller's phone number
• The date and time of the call
MCID has to be enabled by your provider. Your provider will inform you about accessing the recorded call
data.
Note
MCID has to be stored under a Foxkey.
During a call: Press the Foxkey for MCID.
– or –
After the call do not hang up: press the function key for MCID while you hear
the busy tone.
41
Using Added Features to Make Efficient Phone Calls
Activating / Deactivating Functions by Remote Control
You are not at your desk and want to set various functions on your phone from a different phone.
You can activate / deactivate many of your phone's functions by remote control from a different phone.
Remote control has to be enabled for your phone in the system.
Remote control is possible from within and from outside the system [D]. For external remote control,
the system administrator has to give you the dial-in number.
The remote control is initiated using a special */# procedure. You can then enter the function commands
and */# procedures in the usual way.
To remote control from a third-party phone: Pick up the handset.
☛
To initiate remote control:
Enter */# procedure *06.
Enter your phone number.
Enter the */# procedure for activating / deactivating the function you want.
☛
Put the handset on-hook.
42
Personalizing Your Phone
Personalizing Your Phone
Basic Settings
This section explains how to adapt the phone's basic settings to suit your personal requirements.
Setting the Display Contrast
You may find the display is too bright or too dark.
You can adjust the display contrast.
Press the #-key and hold it down for a moment.
v
OK
v
OK
Press the "v" Foxkey repeatedly until the display shows "Contrast".
Press the "OK" Foxkey.
Press the "v" Foxkey repeatedly until you have the right contrast level.
Press the "OK" Foxkey.
The contrast setting is stored.
43
Personalizing Your Phone
Setting the System Parameters on the Cordless Phone
You want to activate or deactivate the illumination, the range beep and / or the system busy beep.
After a key has been pressed, the display illumination persists for 15 seconds.
Repeatedly actuating the keys affects the service life.
The range beep tells you that the connection between your phone and the system is borderline.
The system busy beep tells you that the system is overloaded – you need to wait until the system is
available again.
Press the #-key and hold it down for a moment.
v
OK
v
OK
Press the "v" Foxkey repeatedly until the display shows the system
parameter you want.
Press the "OK" Foxkey.
Use the "v" Foxkey to select "On" or "Off".
Press the "OK" Foxkey.
The setting is stored.
Selecting the Language
The display text is not in the language you want.
You can select a different language in the configuration mode. The menu item under which you select
your language is marked by an "*" in front of the word for "language" in the language of your choice,
e.g. "*Language" for English.
Situation
<long>
German is set as the language on your phone.
Press the Menu key and hold it down for a moment.
The configuration mode is now activated.
Press the Menu key repeatedly until the display shows "*Language".
*Language
v
OK
44
Press the "*Language" Foxkey.
The display shows the set language.
Use the "v" Foxkey to select the language you want, e.g. "English".
Press the "OK" Foxkey.
The display text appears in your selected language.
Personalizing Your Phone
Setting the Volume during a Call
You want to adjust the volume while in a call.
The new volume will remain stored even after the call is ended.
Set the sound volume with the rocker switch.
Changing the Code
You want to change the code used for locking / unlocking your phone (see "Locking your phone" and
"Unlocking your phone").
The factory setting is digit combination "0000"; you can select any 2 to 10-digit combination for your
new code.
If you have forgotten the current code, your system administrator will be able to help.
<long>
Press the Menu key and hold it down for a moment.
The configuration mode is now activated.
Press the Menu key repeatedly until the display shows "Code".
Code
☛
OK
☛
OK
☛
OK
Press the "Code" Foxkey.
The display shows "Old code:".
Use the digit keys to enter the current code.
For each digit entered, the display shows an "*".
Press the "OK" Foxkey.
The display shows "New code:".
Use the digit keys to enter the new code.
For each digit entered, the display shows an "*".
Press the "OK" Foxkey.
The display shows "Confirmation:".
Use the digit keys to enter the new code a second time.
For each digit entered, the display shows an "*".
Press the "OK" Foxkey.
You hear the acknowledgement tone. The new code is stored.
45
Personalizing Your Phone
Entering the Display Text for the Idle State
You want to change the text displayed by your phone in the idle state.
Instead of the date and / or time you can enter a personal text for the text displayed in the idle state.
<long>
Press the Menu key and hold it down for a moment.
The configuration mode is now activated.
Press the Menu key repeatedly until the display shows "Text".
Text
Press the "Text" Foxkey.
The display shows "Idle text: ...".
Use the digit keys to enter the text.
☛
OK
Press the "OK" Foxkey.
The text is stored.
Protect against Call waiting
You want to protect against Call waiting.
You can use the configuration mode to define that call waiting is not enabled on your terminal.
<long>
Press the Menu key and hold it down for a moment.
The configuration mode is now activated.
Press the Menu key repeatedly until the display shows "Call waiting".
Press the "Call waiting" Foxkey.
v
V
OK
46
Use the Foxkey "v" and "V" to select between "Allow to own set/" and
"Protect against".
Press the "OK" Foxkey.
The setting is stored.
Personalizing Your Phone
Setting the Ringing Properties
This section explains how to set your phone's ringing tone properties.
Setting the Ringing Properties on the Handset
You want to change your cordless phone's ringing mode, ringing volume, ringing melody, or ringing
speed.
You can choose from the following ringing mode:
• Normal ringing. The phone rings continuously.
• Discreet ringing. The phone rings with a single ringing tone.
You can set the ringing volume, ringing melody, or ringing speed separately for normal ringing and
discreet ringing.
<long>
Press the Menu key and hold it down for a moment.
The configuration mode is now activated.
Press the Menu key repeatedly until the display shows "Ring".
Ring
v
OK
v
OK
v
OK
v
OK
Press the "Ring" Foxkey.
Selecting the mode of ringing (normal ringing or discreet ringing): Press the
"v" Foxkey.
Press the "OK" Foxkey.
Ringing mode selected. The display shows the setting for the ringing
volume.
Set the ringing volume with the "v" Foxkey.
The phone rings with the current ring settings.
Press the "OK" Foxkey.
Ringing volume selected. The display shows the setting for the ringing
melody.
Selecting the ringing melody with the "v" Foxkey.
Ringing tone rings with the set ringing melody.
Press the "OK" Foxkey.
Ringing melody selected. The display shows the setting for the ringing rate.
Select the ringing speed with the "v" Foxkey.
The ringing tone rings with the set ringing speed.
Press the "OK" Foxkey.
Ringing speed selected. The display shows the setting for the call alert.
47
Personalizing Your Phone
Press the C-key.
The display shows "Ring".
Press the C-key.
The phone is in the idle state.
Note
Warning!
A test ring will sound during the setting.
The volume of the ringing call can become very loud. Do not hold the sound
aperture up to your ear.
Setting the Call Alert (Ringing, Vibra call, LED)
You want to set the call alert your cordless phone's.
You can choose from the following types of call alerts:
•
•
•
•
Ringing only
Vibra call only1)
Ring and Vibra call1)
LED only
The call alerts are available for both ringing modes (Normal ringing and Discreet ringing).
If Vibra call is activated, text, Voice Mail and callback messages will also be signalled with a single
vibration.
<long>
Press the Menu key and hold it down for a moment.
The configuration mode is now activated.
Press the Menu key repeatedly until the display shows "Ring".
Ring
v
OK
Press the "Ring" Foxkey.
Press the Menu key repeatedly until the display shows "Call alert".
Press the "OK" Foxkey.
– or –
Press the Loudspeaker key and hold it down for a moment.
The display reads "Call alert".
1) 130pro
48
Personalizing Your Phone
v
Press the "v" Foxkey repeatedly until the display shows the Call alert you
want.
OK
Press the "OK" Foxkey.
Call alert type selected.
Phone Book Management
This section explains how to enter a subscriber into the phone book and how to edit or delete a phone
book entry.
Creating a New Phone Book Entry
You want to store your own phone numbers.
You can save and change your own phone numbers on your phone. You cannot change the phone
numbers stored in the system.
The operator prompting described applies to the system types listed under [A]. The operator prompting
for the other system types differs slightly).
Press the Menu key repeatedly until the display reads "Phone book".
Phone book
Press the "Phone book" Foxkey.
The display reads "Edit".
Edit
Press the "Edit" Foxkey.
The display reads "New".
New
Press the "New" Foxkey.
The display reads "Enter number".
Use the digit keys to key in the phone number you want to store.
☛
OK
Press the "OK" Foxkey.
The display reads "Name".
Note
The text mode for letter input is automatically activated.
Use the digit keys to key in the name of the party you want to store.
☛
OK
Press the "OK" Foxkey.
The display reads "New".
49
Personalizing Your Phone
Editing a Phone Book Entry
You want to edit a phone number stored on your phone.
You can only edit the entries for your own phone numbers, i.e. those stored on your phone. You cannot
edit the phone numbers stored in the system.
The operator prompting described applies to the system types listed under [A]. The operator prompting
for the other system types differs slightly.
Press the Menu key repeatedly until the display reads "Phone book".
Phone book
Edit
Press the "Phone book" Foxkey.
The display reads "Edit".
Press the "Edit" Foxkey.
The display reads "Browse".
Browse
Press the "Browse" Foxkey.
v
To scroll through entries: Press the "v" Foxkey.
Modify
To change an entry: Press the "Modify" Foxkey.
The display shows the entry's phone number.
Use the digit keys to key in the new phone number.
☛
OK
To store the phone number: Press the "OK" Foxkey.
Note
The text mode for letter input is automatically activated.
Use the digit keys to enter the new name.
☛
OK
50
To store the name: Press the "OK" Foxkey.
Personalizing Your Phone
Configuring Keys
This section explains how to assign phone numbers and functions to a configurable key.
You can store using one of the 6 hotkey memories (retrievable at any time via the hotkey) or the Foxkeys
(retrievable only in idle state).
The system administrator can disable any possibility of modifying the configuration of a key that has
already been configured.
Storing a Phone Number under a Key – Number Key
You want to retrieve a frequently used phone number with a single keystroke rather than enter it digit by
digit.
You can store a phone number including the associated name under any key that is configurable. The key
automatically becomes a number key.
There are two different keys for storing numbers:
• via hotkey on the Foxkey – accessible at all times via hotkey
• the Foxkey itself – accessible only in the idle state
<long>
To store a phone number under the Foxkey: Press the Foxkey in the idle state
and hold it down for a moment.
Display reads "Number" or "Function".
– or –
Storing a Phone Number under the Foxkey using the Hotkey: Press the
hotkey .
The display shows "Hotkey 1" and "Hotkey 2"
Press the hotkey repeatedly until the display shows the hotkey you want.
Note
<long>
Press the corresponding Foxkey and hold it down a moment.
Display reads "Number" or "Function".
Note
v
OK
You can also scroll through the hotkeys with the Menu key.
From here on, the operating sequence is the same as for: Storing under the
Foxkey and storing under the Foxkey using the hotkey.
Press the "v" Foxkey repeatedly until the display shows "Number".
Press the "OK" Foxkey.
Enter the phone number.
☛
51
Personalizing Your Phone
OK
Press the "OK" Foxkey.
The display reads "Enter name".
Enter the name.
☛
OK
Press the "OK" Foxkey.
The phone number and name are stored. Phone in idle state.
Storing a Function under a Key – Function Key
You want to retrieve a frequently used function - for example "call forwarding on no reply" - using a
single keystroke rather than having to enter it by hand.
Each function key is assigned 2 memory locations. With predefined functions, the */# procedure for
activating the function is stored in memory 1 and the */# procedure for deactivating it, in memory 2.
You can store a function under two different keys:
• via hotkey on the Foxkey – accessible at all times via hotkey
• the Foxkey itself – accessible only in the idle state
<long>
Storing a function under the Foxkey: Press the Foxkey in the idle state and
hold it down for a moment.
Display reads "Number" or "Function".
– or –
To store a function under the Foxkey using the hotkey: Press the hotkey.
The display shows "Hotkey 1" and "Hotkey 2"
Press the hotkey repeatedly until the display shows the hotkey you want.
Note
<long>
Press the corresponding Foxkey and hold it down a moment.
Display reads "Number" or "Function".
Note
v
OK
v
52
You can also scroll through the hotkeys with the Menu key.
From here on, the operating sequence is the same as for: Storing under the
Foxkey and storing under the Foxkey using the hotkey.
Press the "v" Foxkey repeatedly until the display shows "Function".
Press the "OK" Foxkey.
The display shows the first function from the list of functions.
Press the "v" Foxkey repeatedly until the display shows the function you
want.
Further prompting depends on the function
Personalizing Your Phone
Note
OK
Besides the predefined functions you can also define your own function.
For more information, please refer to the section "Formulating Functions".
Press the "OK" Foxkey.
The function is stored under the key. Phone in idle state.
Clearing a Key
You want to clear the assignment made to a configurable key.
The function "Delete key" is available for this purpose in the configuration mode.
<long>
To clear a function directly on the Foxkey: Press the Foxkey in the idle state
and hold it down for a moment.
Display reads "Number" or "Function".
– or –
To clear a function stored under the Foxkey using the hotkey: Press the
hotkey.
The display shows "Hotkey 1" and "Hotkey 2"
Press the hotkey repeatedly until the display shows the hotkey you want.
v
OK
Note
You can also scroll through the hotkeys with the Menu key.
Note
From here on, the operating sequence is the same as for: Clearing functions
stored directly under the Foxkey and clearing functions stored under the
Foxkey via a hotkey.
Press the "v" Foxkey repeatedly until the display shows "Clear".
Press the "OK" Foxkey.
The key configuration is cleared.
53
Personalizing Your Phone
Formulating Functions
This section explains how to activate an individual function, for example call forwarding unconditional,
with the aid of function commands and how to assign it to a key.
Function under a Foxkey
You want to know the status of a function stored under the Foxkey.
Certain functions are shown with a check mark on the display when the function is activated:
• T visible to the left of the function name: Function is activated.
• T not visible: Function is deactivated.
Function Commands
You can use function commands to define a function to suit your personal requirements. A function can
consist of one or more function commands, function codes, and the phone number. You can either carry
out a function directly or store it under a key (select function "configurable").
The following function commands are available (see "Entering characters"):
"I"
Seize line
"X"
Disconnect
"P"
Pause 1 second before the next operation
"N"
Use the phone number entered in call preparation
"."
Control key function
"Z"
Activate / deactivate DTMF mode
"R"
Use the phone number last dialled
"Y"
Disconnect and reseize the line.
Examples of how to define a function:
"IR"
Seize line ("I"),
dial phone number last dialled ("R")
"I201"
Seize line ("I") and dial phone number 201
"I*21201X"
Seize line ("I"),
activate call forwarding unconditional ("*21") to phone number 201,
disconnect ("X")
Note
54
Text mode has to be activated before you can enter function commands.
Personalizing Your Phone
Configuring Phone Functions
This section explains how to carry out typical phone settings.
Switching the Phone On
Your cordless phone is switched off and you want to switch it on.
You can switch on the phone when it is switched off by placing it in the charging bay or by first pressing
the Call key and then the "Yes" Foxkey.
Press the Call key.
The display shows "Switch on?".
Yes
To switch on your cordless phone: Press the "Yes" Foxkey.
The phone runs a self-test. The display goes dark and then displays
"Searching...". The phone is in standby mode and ready to receive.
Note
If your phone cannot find a system, the display will read "No system".
Use the "Configure" Foxkey in configuration mode to switch to an available
system.
Switching the Phone Off
You want to switch off your cordless phone.
Outside the coverage area the phone will keep trying to establich communication with a system. To save
your battery, you can switch off your phone whenever you leave the coverage area.
<long>
Press digit key 0 and hold it down a moment.
The display shows "Please wait"; the phone switches itself off.
☛
Note
You cannot switch the phone off in a call.
Switched off: Incoming calls are stored in the list of callers. Charging:
The phone automatically switches itself on.
55
Personalizing Your Phone
Logging Your Phone On
You want to log your cordless phone on to a system.
You can log your phone on to a maximum of 4 different systems (A, B, C, D). This means you can be
reached on the same phone even if you are at a branch office of your company.
Note
<long>
The system needs to be setup accordingly by your system administrator.
Press the Menu key and hold it down for a moment.
The configuration mode is now activated.
Press the Menu key repeatedly until the display shows "System".
System
Press the "System" Foxkey.
The display shows "System:". ..." and the active system (A, B, C, or D) or
Auto.
OK
To log your phone on to a system logged on to earlier:
Press the "OK" Foxkey.
Your phone is logged on.
– or –
Logging the phone on to a new system:
Press the Menu key.
v
Use the "v" Foxkey to scroll through the existing systems.
The display shows "Register: ..." and a system (A, B, C, or D).
New
Press the "New" Foxkey.
The display shows "Home" and "GAP".
Note
Home
If the display does not read "New" but briefly shows "><", the phone is not
fully logged off yet (see "Logging Your Phone Off").
Logging the phone on to the in-company system: Press the "Home" Foxkey.
The display shows "Searching...". The phone is logged on to the system if
it is available and logging on is authorized. The display shows "Log on OK".
– or –
GAP
Logging the phone on to a third-party system with GAP (Generic Access
Profile): Press the "GAP" Foxkey.
The display shows "AC:".
Use the digit keys to enter the authentication code.
For each digit entered, the display shows an "*".
☛
Note
56
The authentication code is issued by your system administrator.
Personalizing Your Phone
OK
Press the "OK" Foxkey.
The display shows "Searching...". The phone is logged on to the system if
it is available and logging on is authorized.
Note
If logging on to the system is not possible: The display shows "Not OK".
To be reachable, you need to be logged on to at least one system. You can
select a system manually or let the phone select one automatically.
Logging Your Phone Off
You want to log your phone out of a system area (A, B, C, D).
Even though you can log off your phone yourself, it must always be logged off from the system by the
system administrator.
To be logged off correctly, the phone must be switched on and within the system's radio range.
Your system administrator can then log off the phone in full - on the system and on the phone.
Warning:
Note
Only the system administrator can log a phone back on again.
If your system administrator logged off your phone on the system even
though it was not ready to receive, the system area will remain entered on
your phone and the system administrator will be unable to log your phone
back on to this system area.
If system areas A, B, C, D are occupied, a "><" is displayed accordingly.
You must first log your phone off the relevant system area before you can
obtain the display "New" for logging on again.
<long>
Press the Menu key and hold it down for a moment.
The configuration mode is now activated.
Press the Menu key repeatedly until the display shows "System".
System
Press the "System" Foxkey.
The display shows "System:". ..." and the active system (A, B, C, or D) or
Auto.
Press the Menu key.
The display briefly reads "> <".
><
Press the "><" Foxkey.
"ABCD" flashes on the display. The phone is logged off.
57
Personalizing Your Phone
Switching System for the Handset
You want to log your phone on to a different system.
Your phone can be logged on to a maximum of 4 different systems (A, B, C; D). Your phone has to be
logged on to one of these systems to be operational.
If you select "Auto" and there is more than one system within range of your phone, your phone will log
on to the system with the best radio reception.
<long>
Press the Menu key and hold it down for a moment.
The configuration mode is now activated.
Press the Menu key repeatedly until the display shows "System".
System
Press the "System" Foxkey.
The display shows "System:". ..." and the active system (A, B, C, or D) or
Auto.
v
Use the "v" Foxkey to select the system (A, B, C, or D) or "Auto".
OK
Press the "OK" Foxkey.
Your phone is logged on to the chosen system.
Note
To switch your phone manually to the next available system: Press digit key
1 and hold it down a moment.
Linking the Charging Contact to Direct Answering
You want to choose whether to answer a call by simply picking up the phone out of its charging bay or
by also pressing the Call key once you have picked up the phone.
With the setting "Direct: Yes" in the configuration mode, you can specify that you want your cordless
phone to act like a stationary phone when you receive a call. This means you do not have to press the Call
key when you pick up the phone from the charging bay.
<long>
Press the Menu key and hold it down for a moment.
The configuration mode is now activated.
Press the Menu key repeatedly until the display shows "Mobile".
58
Handset
Press the "Mobile" Foxkey.
The display shows "Answer".
Answer
Press the "Answer" Foxkey.
The display shows "Direct: ..." and the active setting.
Personalizing Your Phone
v
Use the "v" Foxkey to select "Yes" or "No".
OK
Press the "OK" Foxkey.
The setting is stored.
Linking the Charging Contact to a Function
You want your phone to activate a function automatically whenever you take it out of its charging bay.
In the configuration mode you can choose from predefined functions or define a function yourself.
No function is activated as default.
Available functions: See section "Menu Overview".
Note
<long>
If the Twin Comfort function is activated, you cannot configure any other
function for the charging contact. This one can only be deactivated by your
system administrator.
Press the Menu key and hold it down for a moment.
The configuration mode is now activated.
Press the Menu key repeatedly until the display shows "Mobile".
Handset
Charging contact
Configure
v
Press the "Mobile" Foxkey.
The display shows "Charging contact".
Press the "Charging contact" Foxkey.
The display shows "Configure".
Press the "Configure" Foxkey.
Use the "v" Foxkey to select the function.
OK
Press the "OK" Foxkey.
The function is activated.
Activating / configuring a function.
Note
See also "Defining functions".
59
Personalizing Your Phone
Twin Mode
You have a corded phone and a cordless phone. You want calls to be automatically rerouted from your
corded phone to your cordless phone when you're on the move. Conversely, when you're at your desk,
you want to answer all incoming calls on your corded phone only.
In the Twin Mode your corded phone and your cordless phone are coupled together:
When your cordless phone is not in the charging bay, all calls received on your corded phone when Twin
Mode is activated will automatically be rerouted to your cordless phone.
When your cordless phone is in the charging bay, all calls received on your cordless phone when Twin
Mode is activated will automatically be rerouted to your corded phone.
Your system administrator will determine whether either the Twin Mode function or the Twin Comfort
function is available on your cordless phone. Either "Twin Mode" or "Twin Comfort" will appear in your
cordless phone's configuration mode.
Twin Mode and Twin Comfort are not available if the plug-in power adapter is used for direct charging.
Note
<long>
Twin Mode can only be activated if no call forwarding is activated.
Press the Menu key and hold it down for a moment.
The configuration mode is now activated.
Press the Menu key repeatedly until the display shows "Mobile".
Handset
Charging contact
v
Press the "OK" Foxkey.
The display shows "TwinNo.:".
Enter the phone number of the person your cordless phone is to be coupled
to.
☛
Note
60
Press the "Configure" Foxkey.
Press the "v" Foxkey repeatedly until the display shows "Twin".
OK
OK
Press the "Mobile" Foxkey.
The display shows "Charging contact".
You are not tied to your desktop phone; instead, you can couple your
cordless phone to any other corded phone.
Press the "OK" Foxkey.
Twin Mode is activated.
Personalizing Your Phone
Twin Comfort
You have a corded phone and a cordless phone. You want to use your cordless phone to access not only
the functions described under Twin Mode but also the lists of your corded phone.
With the Twin Comfort function you can use your corded phone to access and edit the following lists on
your corded phone [D]:
• Phone book (private)
• Call list
• List of answered calls
• Redial list
For data protection reasons, only the system administrator is authorized to link up your cordless phone
with your corded phone or a third-party phone using the Twin Comfort function. "Twin Comfort" will
then appear in your cordless phone's configuration mode.
Twin Mode and Twin Comfort are not available if the plug-in power adapter is used for direct charging.
Note
<long>
If the Twin Comfort function is activated, you cannot configure any other
function for the charging contact. This is possible only if your system
administrator has deactivated the Twin Comfort function. See "Configuring
the charging contact".
Press the Menu key and hold it down for a moment.
The configuration mode is now activated.
Press the Menu key repeatedly until the display shows "Mobile".
Handset
Charging contact
Back
Press the "Mobile" Foxkey.
The display shows "Charging contact".
Press the "Configure" Foxkey.
The display shows "Twin Comfort" and the phone number of the phone
to which your cordless phone is connected.
Press the "Back" Foxkey.
The display once again reads "Charging contact".
61
Personalizing Your Phone
Locking / Unlocking Your Phone's Keys
You want to prevent any keys on your phone being pressed inadvertently.
You can lock the keypad against unintentional actuation. You can choose whether you want the keys to
be unlocked automatically when you receive a call or whether you prefer to unlock the keys manually in
any case.
You can unlock the locked keypad either completely or for 20 seconds only.
<long>
Locking with automatic unlocking: Press digit key 8 and hold it down a
moment.
Keys locked, display shows "Unlock". The keys are automatically unlocked
when you receive a call.
The lock is reactivated 5 seconds after the end of the call. This means you
can still make a call.
– or –
<long>
Locking with manual unlocking: Press digit key 9 and hold it down a
moment.
Keys locked, display shows "Unlock". The keys need to be unlocked
manually.
Unlock
Unlocking the keys manually: Press the "Unlock" Foxkey.
The display shows "Lock off?".
Yes
Press the "Yes" Foxkey.
OK
Press the "OK" Foxkey.
The keys are unlocked.
– or –
Temporary
62
Press the "Temporary" Foxkey.
Keys are unlocked for 20 seconds.
Personalizing Your Phone
Activating / Deactivating the Key Confirmation Tone on Your
Phone
You want your phone to confirm every keystroke with an audible tone.
For this you need to activate the key confirmation tone.
<long>
Press the Menu key and hold it down for a moment.
The configuration mode is now activated.
Press the Menu key repeatedly until the display shows "Keys".
Keys
v
OK
v
OK
Press the "Keys" Foxkey.
Press the "v" Foxkey repeatedly until the display shows "Confirmation
tone".
Press the "OK" Foxkey.
Use the "v" Foxkey to select: "Yes" or "No".
Press the "OK" Foxkey.
Press the C-key.
The setting is stored. The phone is in standby mode.
63
Personalizing Your Phone
Activating / Deactivating Discreet Ringing on your Phone
You do not want to be disturbed by your phone ringing. However, you do not want to switch off your
phone.
Discreet ringing is available on your phone as an alternative to the usual ringing. With discreet ringing,
the ringing signal rings only once.
Press the Menu key repeatedly until the display shows "Discreet ringing".
Discreet ringing
Note
Press the "Discreet ringing" Foxkey.
Discreet ringing activated: The display shows "Discreet ringing" and
"Reset".
You can activate discreet ringing during the ringing phase by pressing the
Menu key and using the "Discreet ringing" Foxkey. If you activate discreet
ringing during the ringing, the caller will still hear the normal ringing tone at
the other end.
Deactivating discreet ringing: Press the Info key repeatedly until the display
shows "Discreet ringing" and "Reset".
Reset
64
Press the "Reset" Foxkey.
Discreet ringing is deactivated.
Installation and First-Time Operation
Installation and First-Time Operation
Putting Your Phone into Operation
Logging Your Phone on
Your system administrator has to prepare the system before you can log on your phone.
Connecting1) the plug-in power adapter
1. Plug the smaller connector into the socket on the underside of the
charging bay.
2. Feed the cable through the strain relief provided.
3. Plug the plug-in power adapter into an available socket outlet.
Attaching the charging bay to other phones
You can attach your phone's charging bay to other phones, providing
they also have attachment slots on the underside. This makes sense if,
for example, you have several cordless phones on your desk or if you
are using a cordless phone in connection with a desktop set. To attach
the phones to one another, proceed as follows:
1. Push the attachment tabs into the attachment slots on the charging
bay until you feel them click into place.
2. Fit the projecting extremities of the attachment tabs into the attachment slots of the phone or of
another charging bay and carefully push both housings together until you feel them click into place.
Note
Operating several phones in interconnected charging bays can cause
malfunctions in radio operation.
Inserting the batteries
Please observe the rules and regulations when
dealing with batteries in the chapter "Safety and
liability".
1. Remove the cover from the battery compartment:
Press down gently on the cover and pull the side
ribbing downwards.
2. WARNING: Wrong polarity will irretrievably
damage your phone! Note the polarity specified
in the battery compartment. Insert the two
batteries into the battery compartment as
illustrated.
3. Slide the battery compartment cover over the batteries until the cover snaps into place.
1) Note: Plug designs vary from country to country
65
Installation and First-Time Operation
Charging the Battery
The batteries are supplied uncharged.
• To charge the batteries, place the phone in the charging bay.
• The 130pro can also be charged without the charging bay, using the optional plug-in power adapter.
To display the state of charge level, keep the 6 key pressed down. When you replace the batteries, you will
obtain a reliable indication of the battery charge level once the batteries have been fully charged.
It takes two to three charging cycles for the batteries to reach their fully charged state. To do so discharge
the phone by not placing it back into the charging bay until the batteries are completely or almost
completed discharged.
66
Troubleshooting
Troubleshooting
Display is working, but connection is not possible
Your phone may be locked. Unlock your phone (see "Locking / unlocking your phone").
The display reads: "System busy"
At the moment no connection can be set up via the current system base. The phone is trying to set up a
better radio connection with the same or a different system base. This message appears in standby mode
only.
The display reads: "No System"
You have moved out of the coverage area; the radio connection is interrupted. Move closer to a radio
station.
Insufficient display contrast
The setting for the display contrast is inadequate. Alter the setting in the configuration mode, see "Setting
the display contrast".
Impaired sound quality during hands-free operation
The sound quality can be affected if the volume is too loud – turn down the volume. If the sound quality
fluctuates, contact your system administrator.
Overload xx
You are either in a "coverage hole" or the system is overloaded. Simply alter your position slightly or the
way you are holding the phone. Or else contact your system administrator.
Leaving the coverage area
During a call: Shortly before you leave the coverage area, you will hear a warning signal. The system
constantly tries to re-establish the connection. Once the connection is restored, you will hear a continuous
ringing. Press the Call key to reconnect with your call partner.
Not during a call: If you leave the coverage area with your handset, an external caller will not obtain the
standby tone nor the busy tone if busy. Your system administrator can set up a call forwarding
unconditional or busy tone to cover such eventualities.
Note
For all other messages, faults and questions you may have, contact your system administrator.
67
Technical Data
Technical Data
Operation
Standard
DECT/GAP
Frequency range
1880 MHz – 1900 MHz
Transmitted power
10 mW, average power per channel
Batteries (rechargeable)
Battery cells
2 x 1.2 V Ni-MH rectangular (17 mm x 48 mm x 6 mm)
Capacity
880 mAh
Operating times
120 h standby / 12 h talk time
Charging time
Approx. 1 h for average daily use
Approx. 6 h for full charging
Note
Frequent actuation of the keys impairs service life (especially on the 130pro
and when the backlighting is switched on)
Note
It takes several charging cycles for new batteries to reach full capacity. Please
observe the rules and regulations when dealing with batteries in the chapter
"Safety and liability".
Ambient conditions
Operating
temperature
5 °C to 40 °C / 5 % to 85 % relative humidity
Storage temperature
-25 °C to +45 °C
Dimensions and weight
Telephone
Length: 138 mm – Width: 49/43 mm – Depth: 23/19 mm
130 g
Charging bay
without power
adapter
Length: 162 mm – Width: 81 mm – Depth: 67 mm
100 g
68
*/# Procedures
*/# Procedures
Functions that are not available via the menu can be activated using */# procedures.
You can either type in a */# procedure directly or store it under a key.
You can only activate certain */# procedures if the same function cannot be obtained via the menu.
*/# Procedure
Remote control
The availability of certain */# procedures may be restricted depending on the system and software version.
Activate / deactivate an appointment reminder call
• Activate standing order
• Clear standing order
• Activate single order
• Clear single order
*56 <hh mm>
#56
*55 <hh mm>
#55
X
X
X
X
Activate / deactivate function via third-party phone
(remote control)
(Enter number of own phone)
*06 <SC No.> <Function>
Activate exchange access with charge recall
*32 <SC No.>
Announcement
• To a subscriber
• To a group
• Answer to group
*7998 <SC No.>
*79 <GR No.>
*89
Announcement service
• Activate group 1 or 2
• Deactivate group 1 or 2
*93 1 or 2
#93 1 or 2
Answer general bell
• Coded ringing
• Ringing signal
*82
*83
Answer the pager
*82 <SC No.>
Call Forwarding on No Reply (CFNR)
• Protect against
• Allow to own set
• Activate CFNR
• Clear CFNR
• CFNR to last configured Activate SC
• CFNR to last configured Clear SC
• CFNR to preconfigured Activate SC
• CFNR to preconfigured Clear SC
• Activate CFNR to a pager
• Clear CFNR to a pager
• Activate CFNR to general bell
• Clear CFNR to a general bell
*02
#02
*61 <SC No.>
#61
*61#
#61
*62
#62
*68
#68
*68
#68
X
X
X
X
X
X
X
X
X
X
69
*/# Procedure
Remote control
*/# Procedures
Call waiting
• Activate
• Protect against
• Allow to own set
*43
*04
#04
X
X
Clear callback
#37
Controlling Relays
• Activate
• Deactivate
*75<x> (x=5,6,7)
#75<x> (x=5,6,7)
Deactivate all active functions
(except user group)
*00
X
Do not disturb (call protection)
• Activate
• Deactivate
*26
#26
X
X
Follow me
• Activate
• Clear
*23 <SC No.>
#23
Forward calls (CFU)
• Protect against
• Allow to own set
• Activate CFU
• Clear CFU
• CFU to last configured Activate SC
• CFU to last configured Clear SC
• CFU to preconfigured Activate SC
• CFU to preconfigured Clear SC
• Activate CFB
• Clear CFB
• CFB to last configured Activate SC
• CFB to last configured Clear SC
• Activate CFU to standard message
• Clear CFU to standard message
• Activate CFU to pager or general bell
• Clear CFU to pager or general bell
*02
#02
*21 <SC No.>
#21
*21#
#21
*22
#22
*67 <SC No.>
#67
*67#
#67
*24 <Text No.>
#24
*28
#28
X
X
X
X
X
X
X
X
X
X
X
X
X
X
X
X
Intrusion
• Protect against
• Allow to own set
*04
#04
X
X
Lock / unlock the phone
• Lock with new code
• Lock with code last used
• Unlock with new code
*33 <Code>
*33#
#33 <Code>
70
*/# Procedure
Remote control
*/# Procedures
Log into / out of user groupUser group (UG)
• Log into all user groups
• Log out of all user groups
• Log into a particular user group
• Log out of a particular user group
*4800
#4800
*48 <User group No.>
#48 <User group No.>
X
X
X
X
Making a call on a third-party phone
• Business Calls
• Private Calls
#36<SC No.><PIN>
#46<SC No.><PIN>
Open door
*751 / *75<x> (x=1,2)
Page subscriber over paging system
• Page in prefix dialling
• Page in suffix dialling
*81 <SC No.>
*81
Park call party
• Connect with parked call party
*76
#76
Picking Up a Call
*86 <SC No.>
Requesting a Callback
• Activate message
• Clear message from third-party phone
*38 <SC No.>
#38 <SC No.>
Route calls / functions via switch groups
• Switch group x, switch position 1
• Switch group x, switch position 2
• Switch group x, switch position 3
*851 / *85 <x> 1
*852 / *85 <x> 2
*853 / *85 <x> 3
(x=2...9)
Sending a Message
• To a subscriber
• To a group
• To all
*3598 <SC No.> <Message No.> #
*35 <GR No.> <Message No.> #
*3599 <Message No.> #
Set up a conference call
• Preset
• Variable
*70 <Conf. No.>
*71 <SC No. 1> * to <SC No. 5> #
Suppressing your call number from Display
• CLIR per call
*31
Switch the phone network manually – LCR
(Fallback)
(after fallback the external phone number last dialled is
selected automatically)
X
X
X
X
X
*90
71
System and Software-Related Functions
System and Software-Related Functions
You want to activate a feature described in these Instructions but the system will not let you.
Some systems or system versions do not support all the features. The corresponding text sections are
identified by a number inside square brackets. The list below indicates which system versions support the
relevant features. For more information contact your system administrator.
Features on the cordless system terminals
S3
S4
ISDN-4.6
[A]
ISDN-5.0
ISDN-5.5
I6
X
X
X
[B]
X
[C]
X
X
[D]
X
X
72
X
X
X
X
X
Menu Overview
Menu Overview
Note
The menu tree can vary depending on the system and the software version.
The present menu tree refers to system version I6.
Press the Menu key
ABC Name dial
All
Abbr. Dialling
Internal Dialling
Private
Redial list
Call list
Delete
Phone book
View
All
Abbr. Dialling
Internal Dialling
Private
Modify (Private)
New entry
Number
Name
Search
Call list
Modify
Number
Name
Read
Delete
Call list
Answered calls
Detail
Delete
Unanswered calls
Detail
Delete
Diversion
Divert to subscriber
Number
Divert to message
1...16
Divert on busy
Number
Forwarded to: Subscriber
Number
Discreet ring On
Pick up
Subscriber
Number
Pager
Number
Central Bell
Message
1...16
Subscriber
Number
Group
Number
All
Announcement:
Subscriber
Number
Group
Number
Configuration
see Confirm with long click on Menu key
Pager
Number
Press the Menu key and hold it down for a
moment
Phone book
New entry
Number
Name
Search
Modify
Number
Name
Read
Delete
Text
Idle text
Tasten
KeyLock
Hotkey
Hk1... Hk6
Number key
Memory1: Enter number
Memory2: Enter number
Function key
Twin/TwinComf
Number
Sammelanschluss
AllUsrGrp
UsrGrp1...UsrGrp29
configurable
73
Menu Overview
CLIR call by call
Deflect
Configurable function key
Park
Do not disturb
Discreet ring
Diversion
Routing
Gr1Pos2...Gr9Pos3
Relay
Relay1
Relay2
Relay3
Courtesy group
Courtesy gr.1
Barring
Intrus. barred
Announcement barred
Remote Maintenance
On
Only Once
MCID
ACD
Login/logout
Pause
Wrap up time
No function
Foxkey
Fox1...Fox2
Number key
Memory1: Enter number
Memory2: Enter number
Function key
see Function key Hotkey
Confirmation tone
Yes
No
Mobile
Charging contact
Programming
Twin
TwinNr
->Tasten/Hotkey/Function key
Answer
Direct
Yes
No
Terminal
Switch off
Barring
Free
Configuration barred
Barred
Contrast
74
1...5
Backlight
On
Off
Range beep
On
Off
Syst. Busy Beep
On
Off
Code
Old code
New code
Confirm
Ring:
Normal ringing
Ringing signal volume: 1...5
Melody: 1...7
Ring.signal speed: 1...7
Discreet ring
Ringing signal volume: 1...5
Melody: 1...7
Ring.signal speed: 1...7
Call alert
Vibracall only
Ring only
Ring+Vibracall
LED only
*Language
Language,Sprache,Langue,Lingua
DTMF
Call waiting
received
not received
DTMF
Call waiting
Show Handover
None
Beep
Disp
Both
System
System: A
System: B
System: C
System: D
System: Auto
Menu key
Registering
Logging Your Phone on Third-Party Systems
Logging Your Phone on Third-Party Systems
You want to operate your phone on a third-party system. You can log your phone on to a third-party
system that supports the GAP standard.
To log on your phone on a third-party system, proceed according the instructions in "Configuring Phone
Functions".
Supported Features
Even on a third-party system you do not have to do without the phone's operator convenience: This
means the basic functions and the operator prompting remain the same, and are fully supported (see
Chapter "Dialling and Making Phone Calls" and "Operator Prompting"). Most of the terminal settings
are also supported (see Chapter "Customising the Phone Settings"). Functions supported (summary):
•
•
•
•
•
•
•
•
•
•
•
•
•
•
Call lists (10 entries each in the list of answered calls and the list of unanswered calls)
Last-number redial list (last 10 calls)
Private phone book (100 entries)
Copy call number from call list to private phone book
4 configurable Hotkeys
Banner-page text, user editable
Display caller's call number and caller's name, provided they are either entered in the local phone book
or transmitted by the third-party system.
Discreet ringing
Vibra call (130pro)
Headset socket (130pro)
Socket for direct charger (130pro)
Enquiry call during a call
Hands-free operation: Switch microphone on / off during a call
Menu texts in more than 13 languages
Features that Depend on the Third-Party System
With certain telephony features, it depends on the connected third-party system whether or not those
features are supported:
•
•
•
•
•
•
•
•
Forward calls
Forwarding calls
Picking Up a Call
Set up conference from the idle state
Paging an Internal Subscriber
Answer the pager
Answering a General Bell
Protect against Call waiting
75
Logging Your Phone on Third-Party Systems
Not Supported Features
Some operating functions are not supported as they are executed in the system, not in the phone:
• Store functions on keys
• Twin Mode / Twin Comfort
• Linking the Charging Contact to a Function
Some of the telephony features are not supported as they are executed in the system, not in the phone:
• Long-click * for DTMF
• Set up call using the Loudspeaker key
• Dialling with Quickdial
• Dialling by name: Access only to names stored in the local phone book.
• To activate a callback request
• Call waiting
• Starting / Receiving an Announcement
• Park call party
• Leaving a Message
• Phone lock
• Deflect a call during the ringing phase
• Starting / Receiving Text Messages
• Suppressing your call number from your called party's terminal display
• Tracing Malicious Calls
• Voice Mail Notification
• All procedures
76
Index
Index
%, *,+...
#-key .................................................................................................................................................. 3
*/# Procedures .................................................................................................................................. 69
*-key .................................................................................................................................................. 3
A
Activate discreet ringing .................................................................................................................... 64
Activate exchange access with charge recall ...................................................................................... 69
Activate/deactivate DTMF .................................................................................................................. 38
Activate/deactivate function via third-party phone ............................................................................. 69
Activate/Deactivate Illumination ........................................................................................................ 44
Activate/Deactivate range beep ......................................................................................................... 44
Activate/deactivate the DTMF Mode .................................................................................................. 38
Activating/Deactivating Functions by Remote Control ........................................................................ 42
Announcement ................................................................................................................................. 69
Announcement service ...................................................................................................................... 69
Answer/Reject or clear a Callback Message ....................................................................................... 37
Answering a Call ............................................................................................................................... 12
Answering a General Bell .................................................................................................................. 40
Answering a pager ............................................................................................................................ 40
Answering Call Waiting .................................................................................................................... 26
Appointment reminder ..................................................................................................................... 69
Attachment tab ................................................................................................................................ 65
B
Basic Settings .................................................................................................................................... 43
Battery ................................................................................................................................................ 4
Brokering .......................................................................................................................................... 28
C
Call ..................................................................................................................................................... 5
Call duration ..................................................................................................................................... 12
Call Forwarding on No Reply .......................................................................................................31, 69
Call Forwarding Unconditional ....................................................................................................30, 70
Call key ............................................................................................................................................... 3
Call list .............................................................................................................................................. 24
Call pick-up ...................................................................................................................................... 37
Call preparation ................................................................................................................................ 20
Call transferring ................................................................................................................................ 29
Call waiting ................................................................................................................................46, 70
Call Waiting on an Internal Subscriber ............................................................................................... 26
CFNR ................................................................................................................................................ 69
CFU .................................................................................................................................................. 70
Changing the Code .......................................................................................................................... 45
Charges ............................................................................................................................................ 12
Charging .......................................................................................................................................... 66
Charging contacts ............................................................................................................................... 3
Charging socket .................................................................................................................................. 3
Charging the battery ......................................................................................................................... 66
C-key .................................................................................................................................................. 3
Clear callback ................................................................................................................................... 70
77
Index
Clearing a Key ...................................................................................................................................53
Conference call ..................................................................................................................................71
Configuration mode ............................................................................................................................5
Configuring Keys ...............................................................................................................................51
Configuring Phone Functions .............................................................................................................55
Confirmation tone .............................................................................................................................63
Connect ............................................................................................................................................29
Connection ..........................................................................................................................................5
Controlling Relays ..............................................................................................................................70
Correcting your Input ........................................................................................................................20
Creating a New Phone Book Entry .....................................................................................................49
D
Data backup ......................................................................................................................................69
Deactivate functions ..........................................................................................................................70
Deflect a call during the ringing phase ...............................................................................................34
Deflection ..........................................................................................................................................34
Dialling and Phoning ..........................................................................................................................12
Dialling by name ......................................................................................................................... 22, 23
Dialling from the Call List of Answered Calls ......................................................................................24
Dialling from the Call List of Unanswered Calls ..................................................................................24
Dialling with a Configurable Hotkey ...................................................................................................25
Dialling with Redial ............................................................................................................................13
Dialling with the Phone Number ........................................................................................................13
Discreet ringing .................................................................................................................................47
Display ............................................................................................................................................ 3, 4
Display elements ..................................................................................................................................2
Do not disturb ...................................................................................................................................70
DTMF Mode ......................................................................................................................................38
E
Edit/Scroll ..........................................................................................................................................21
Editing a Phone Book Entry ................................................................................................................50
Ending a Call .....................................................................................................................................12
Enquiry Call During a Call ..................................................................................................................28
Enter a phone number in call preparation ..........................................................................................20
Entering the Display Text for the Idle State .........................................................................................46
Enters digits .......................................................................................................................................19
Enters letters ......................................................................................................................................19
Equipment provided ............................................................................................................................7
F
Fallback .............................................................................................................................................71
Finding by paging system ............................................................................................................ 39, 71
First-Time Operation ..........................................................................................................................65
Follow me ..........................................................................................................................................70
Formulating Functions .......................................................................................................................54
Forwarded call .....................................................................................................................................5
Forwarding ........................................................................................................................................30
Forwarding a Call ..............................................................................................................................30
Forwarding a Call on No Reply ...........................................................................................................31
Foxkey ............................................................................................................................................ 3, 5
78
Index
Function ............................................................................................................................................. 5
Function Commands ......................................................................................................................... 54
Function key ..................................................................................................................................... 52
Function under a Foxkey ................................................................................................................... 54
Functions .......................................................................................................................................... 69
G
GAP .................................................................................................................................................. 56
General bell ...................................................................................................................................... 69
H
Hands-free operation ....................................................................................................................5, 14
Headset jack ....................................................................................................................................... 3
Headset mode .................................................................................................................................. 15
Hotkey ..................................................................................................................................... 3, 5, 25
I
Info key .............................................................................................................................................. 3
Information ......................................................................................................................................... 5
Input character ................................................................................................................................. 19
Inserting the batteries ....................................................................................................................... 65
Installation ........................................................................................................................................ 65
Intrusion allow to own set/Protect against ......................................................................................... 70
K
Key Assignment ................................................................................................................................ 18
Key confirmation tone ...................................................................................................................... 63
Keypad ............................................................................................................................................... 3
L
LCR ................................................................................................................................................... 71
Leaving a Message ............................................................................................................................ 32
LED ................................................................................................................................. 3, 21, 68, 73
Liability ............................................................................................................................................... 9
Linking the Charging Contact to a Function ...................................................................................... 59
Linking the Charging Contact to Direct Answering ............................................................................ 58
List of answered calls ........................................................................................................................ 24
Lock ............................................................................................................................................33, 62
Lock the phone ................................................................................................................................. 33
Lock/unlock key ................................................................................................................................ 62
Locking Your Phone .......................................................................................................................... 70
Logging your phone on ..................................................................................................................... 65
Loudspeaker ....................................................................................................................................... 3
Loudspeaker key ................................................................................................................................. 3
Loudspeaker volume ........................................................................................................................... 4
79
Index
M
Making a Call ....................................................................................................................................12
Making a call on a third-party phone .......................................................................................... 38, 71
Making a Conference Call .................................................................................................................30
MCID .................................................................................................................................................41
Menu ..................................................................................................................................................5
Menu key ............................................................................................................................................3
Menu-Guided Navigation .....................................................................................................................5
Microphone .................................................................................................................................... 3, 5
Muting the Microphone .....................................................................................................................14
N
Navigating through info lines .............................................................................................................16
Navigating through the Foxkey menu ................................................................................................16
No System .........................................................................................................................................67
Normal ringing ..................................................................................................................................47
Number key .......................................................................................................................................51
O
Open door .........................................................................................................................................71
Operating elements .............................................................................................................................2
Options ...............................................................................................................................................7
Overload xx .......................................................................................................................................67
P
Page ..................................................................................................................................................71
Pager ................................................................................................................................... 39, 40, 69
Park ............................................................................................................................................ 29, 71
Personalizing Your Phone ..................................................................................................................43
Phone Book Management .................................................................................................................49
Picking Up a Call ......................................................................................................................... 37, 71
Pressing a Key ....................................................................................................................................17
Protect against Call waiting ...............................................................................................................46
Q
Quickdial ...........................................................................................................................................22
R
Radio connection .................................................................................................................................4
Read Text Messages ...........................................................................................................................36
Receiving an Announcement .............................................................................................................27
Reception range ..................................................................................................................................4
Redial ................................................................................................................................................13
Redial list ...........................................................................................................................................13
Registering on a system .......................................................................................................................4
Reject ................................................................................................................................................35
Reject a call during the ringing phase .................................................................................................35
Remote control ........................................................................................................................... 42, 69
Requesting a Callback ................................................................................................................. 25, 71
Reversing the scroll direction ..............................................................................................................20
Ringing mode (Normal ringing, Discreet ringing) ................................................................................47
80
Index
S
Scroll ................................................................................................................................................ 20
Scroll/Edit .......................................................................................................................................... 21
Security ............................................................................................................................................... 9
Selecting the Language ..................................................................................................................... 44
Send text messages ........................................................................................................................... 35
Sending a Message ........................................................................................................................... 71
Set First-Time Operation .................................................................................................................... 65
Set the contrast ................................................................................................................................ 43
Set the ringing volume ...................................................................................................................... 45
Setting the call alert .......................................................................................................................... 48
Setting the Display Contrast .............................................................................................................. 43
Setting the Ringing Properties ........................................................................................................... 47
Setting the System Parameters .......................................................................................................... 44
Settings on the Phone ....................................................................................................................... 43
Signals .............................................................................................................................................. 21
Sound aperture ................................................................................................................................... 3
Starting an Announcement ............................................................................................................... 27
Status information .............................................................................................................................. 5
Store a function under a key ............................................................................................................. 52
Store a phone number under a key ................................................................................................... 51
Supplementary features .................................................................................................................... 22
Suppressing your call number ........................................................................................................... 41
Suppressing your call number from display ........................................................................................ 71
Switch groups ................................................................................................................................... 71
Switch the phone network manually ................................................................................................. 71
Switches systems .............................................................................................................................. 58
Switches the phone off ..................................................................................................................... 55
Switches the phone on ..................................................................................................................... 55
Switching the Phone Off .............................................................................................................55, 57
Switching the Phone On .............................................................................................................55, 56
Symbols .............................................................................................................................................. 4
System busy ...................................................................................................................................... 67
T
Text mode ....................................................................................................................................5, 19
To activate the Vibra call ................................................................................................................... 48
Tracking a Malicious Call ................................................................................................................... 41
Transferring a Call Partner ................................................................................................................. 29
Troubleshooting ..........................................................................................................................16, 67
Twin Comfort ................................................................................................................................... 61
Twin Mode ....................................................................................................................................... 60
81
Index
U
Undoing Actions ................................................................................................................................21
Unlock ........................................................................................................................................ 34, 62
Unlocking Your Phone .......................................................................................................................70
Upper and Lower Case ......................................................................................................................20
User group ................................................................................................................................... 5, 71
Using the Foxkey ...............................................................................................................................17
V
Vibra call .............................................................................................................................................5
Volume key .........................................................................................................................................3
82
Declaration of Conformity
Konformitätserklärung
We, Ascom Enterprise Communications AG, declare with full responsibility
that the product complies with the provisions of Directive 1999/5/EC of
the Council of the European Union.
You will find the complete text of the declaration of conformity and other
documents under:
http://www.ascom.com/ec/documents
Subject to delivery availability and technical modifications.
Copyright © Ascom Enterprise Communications AG
eud-0063_en/1.0
The scope of performance depends on the system and the software version.