1
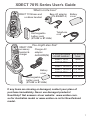
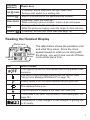
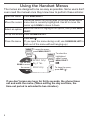
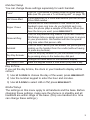
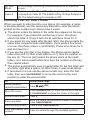
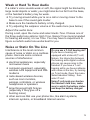
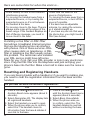
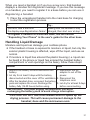
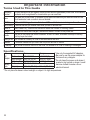
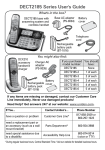
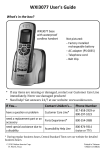
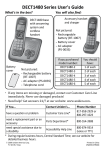
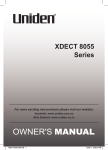
XDECT 7015 XDECT 7015 Series User's Guide What's in the box? XDECT 7015 base and cordless handset Base AC adapter (PS-S0635YL3) Rechargeable battery pack (BT-694 or BT-694s) XDECT 7005 accessory handset & charger Battery cover Telephone cord You might also find: Charger AC adapter AAD-600S(M) Battery cover Rechargeable battery pack (BT-694 or BT-694s) If you purchased You should model number: have: XDECT 7015 None XDECT 7015+1 1 of each XDECT 7015+2 2 of each XDECT 7015+3 3 of each XDECT 7015+4 4 of each XDECT 7015+5 5 of each If any items are missing or damaged, contact your place of purchase immediately. Never use damaged products! Need Help? Get answers at our website: www.uniden.com. au for Australian model or www.uniden.co.nz for New Zealand model. 1 What's in the manual? Installing Your Phone....................... 3 Charge the Battery.......................... 3 Connect the Telephone Cord......... 4 Getting to Know Your Phone.......... 5 Parts of the Base............................. 5 Parts of the Handset........................ 6 Reading the Handset Display ........ 7 Using the Handset Menus................ 8 Entering Text on Your Phone....... 10 Using Your Phone........................... 11 Changing the Volume................... 11 Using the Redial List..................... 12 Using Caller ID and Call Waiting... 12 Using the Phonebook.................... 13 Chain Dialing................................. 14 Finding a Lost Handset................. 14 Using Special Features................... 15 Using Voice Message Notification.15 Using Multi-Handset Features....... 16 Expanding Your Phone................. 16 Using Conference Calling............. 16 Using Privacy Mode...................... 16 Using Call Transfer........................ 17 Using the Intercom........................ 17 Solving Problems............................ 18 Weak or Hard To Hear Audio ...... 19 Noise or Static On The Line.......... 19 Resetting and Registering Handsets..................................... 20 Handling Liquid Damage.............. 21 Important Information.................... 22 Terms Used In This Guide............ 22 Specifications................................ 22 Battery Information....................... 23 Mount the Base Unit on a Wall..... 24 One-year Limited Warranty .......... 25 Important Safety Instructions! When using your telephone equipment, basic safety precautions should always be followed to reduce the risk of fire, electric shock and injury to persons, including the following: --This unit is NOT waterproof. DO NOT expose this unit to rain or moisture. --Do not use this product near water, for example, near a bath tub, wash bowl, kitchen sink or laundry tub, in a wet basement or near a swimming pool. --Avoid using a telephone (other than a cordless type) during an electrical storm. There may be a remote risk of electric shock from lightning. --Do not use the telephone to report a gas leak in the vicinity of the leak. --Use only the power cord and batteries indicated in this manual. Do not dispose of batteries in a fire. They may explode. Check with local codes for possible special disposal instructions. --Do not place the handset in any charging cradle without the battery installed and the battery cover securely in place. SAVE THESE INSTRUCTIONS! 2 Installing Your Phone Charge the Battery 111 Unpack all handsets, battery packs, and battery covers. If any battery cover is already on the handset, press in on the notch and slide the cover down and off. 222 Line up the red and black wires on the battery pack Black with the label inside the Red handset. 333 Push the connector in until it clicks into place; tug gently on the wires to make sure the battery pack is securely connected. 444 Place the cover over the battery compartment and slide it up into place. 555 Connect the base AC adapter to the DC IN 6V jack on the rear of the base. Route the cord through the molded wiring channel as shown. 666 If you have accessory handsets, connect a charger AC adapter to each charger's DC IN 9V jack and set the plug into the notch as shown. (These adapters might already be connected.) 777 Plug the other end of each adapter into a standard 240V AC power outlet. 3 888 Place a handset in the base and any accessory handset(s) in the charger(s) with the display(s) facing forward. The charge light on the base and each charger should all turn on. If... Try... the charge --reseating the handset. light does --checking the AC adapter connection. not turn on --seeing if the outlet is controlled by a wall switch. Charge all handsets completely (about 15 hours) before using them. Connect the Telephone Cord Use the telephone cord to connect the TEL LINE jack to a standard telephone wall jack. Test the connection 111 Pick up the handset from the cradle and press Talk ( )/flash. You should hear a dial tone, and the display should say Talk. If... Try... you don't hear a dial tone or the checking the connection between display says Check Tel Line the base and the phone jack. 222 Make a quick test call. (Press End ( ) to hang up.) If... Try... see page 19 for tips on avoiding there's a lot of noise or static interference. 333 Test any accessory handsets the same way. If you can't get a dial tone or the handset display says Unavailable, try moving the handset closer to the base or resetting it (see page 20). Charge all handsets completely (about 15 hours) before using them. To Mount the Base Unit on a Wall: please refer to page 24. 4 Getting to Know Your Phone Parts of the Base Find Handset Charge LED Charging Contacts Base keys and how they work Key name What it does Find Handset --In standby: page all handsets so you can find a lost one. Charge LED Charging Contacts --Indicates charging when handset is in the cradle. --Charge contacts with handset locator. 5 Parts of the Handset CLEAR/ INTERCOM If the key name is spelled out PHONEBOOK/ on the key itself, it's not LEFT labeled in the drawing to TALK/FLASH the right. SPEAKER UP CALLER ID/ RIGHT END DOWN Twelvekey dial pad KEYPAD LOCK MESSAGES Handset keys and how they work Key name (and icon) Charging contacts Microphone What it does --In standby: increase the ringer volume. --During a call: increase the call volume. --In the menu or any list: move the cursor up one line. Caller ID/ --In standby or during a call: open the Caller ID list. right ( ) --During text entry: move the cursor to the right. --In standby: decrease the ringer volume. Down ( ) --During a call: decrease the call volume. --In the menu or any list: move the cursor down one line. --In standby: open the menu. Menu/select --In the menu or any list: select the highlighted item. --During a call: hang up. End ( ) --In the menu or any list: exit & go to standby. --In standby: page another handset using the intercom. Clear/ --During a call: put the call on hold & start a call transfer. intercom --While entering text: delete one character, or press & hold to delete all the characters. In standby or during a call: open the phonebook. Phonebook/ In the menu: go back to the previous screen. left ( ) --During text entry: move the cursor to the left. */ lock --In standby: press and hold to lock or unlock the keypad. Up ( 6 ) Key name (and icon) What it does --In standby: start a telephone call (get a dial tone). --During a call: switch to a waiting call. Speaker ( ) --Switch a normal call to the speakerphone (& back). --In standby: open the redial list. Redial/pause --While entering a phone number: insert a 2-second pause. --During a call: mute the microphone. MUTE --While the phone is ringing: mute the ringer for this call only. message ( ) --In standby: access your voice mail (see page 15). Talk ( )/flash Reading the Handset Display Status icons Time 12:00A Handset #1 Caller ID count New CID: 5 Icon The table below shows the possible icons and what they mean. Since the icons appear based on what you're doing with Handset the phone, you won't ever see all of these banner icons at the same time. What it means The ringer is turned off: this handset will not ring when a call comes in. You have a voice message waiting (see the section titled "Using Voice Message Notification" on page 15). Privacy Mode is on: no other handset can join your call. The speakerphone is on. The microphone is muted, & the caller can't hear you. T-coil mode is on. (See "Do you use a T-coil hearing aid?" on page 19.) The battery is 1) fully charged, 2) half charged, 3) getting low, or 4) empty. 7 Using the Handset Menus The menus are designed to be as easy as possible. Some users don't even need the manual once they know how to perform these actions: Open the menu Press Menu/select. The arrow cursor on the left side of the line shows which Move the cursor menu item is currently highlighted. Use Up to move the cursor up & Down to move it down. Move the cursor to highlight the option, then press Menu/ Select an option select . Go up one screen Press Phonebook/left. Close the menu Press End ( ). (If you open the menu during a call, use Phonebook/left to back out of the menu without hanging up.) To open the menu, press MENU/SELECT. Use UP and DOWN to move the cursor. Handset Setup Day & Time Global Setup To select the highlighted option, press MENU/SELECT. OR To close the menu, press END ( ) . If you don't press any keys for thirty seconds, the phone times out and exits the menu. (When setting the day and time, the time-out period is extended to two minutes.) 8 Handset Setup You can change these settings separately for each handset. T-coil Edit Voice Mail Ringer Tones Personal Ring Autotalk Any Key Answer Banner Key Touch Tone Turn on T-coil mode to reduce noise on some hearing aids (see "Do you use a T-coil hearing aid?" on page 19). If you subscribe to a Voice Mail service you can set the Voice Mail number . Choose one of four melodies or four tones for the handset's main ring tone. As you highlight each ring tone, the phone plays a sample of the tone. When you hear the tone you want, press Menu/select. Turn on the personal ring feature. If you have Caller ID, this feature lets you assign special ring tones to anyone in your phonebook: this handset will use the special ring tone when that person calls. Turn on Auto Talk so you can answer the phone just by picking up the handset from the cradle (without having to press any buttons). Turn on Any Key Answer so you can answer the phone by pressing a key on the twelve-key dial pad. Change the name used on the handset's display. Have the keypad sound a tone when you press a key. Day & Time If you set the day & time, the clock in your handset's display will be correct. 111 Use Up & Down to choose the day of the week; press Menu/select. 222 Use the number keypad to enter the hour and minutes. 333 Use Up & Down to select AM or PM; press Menu/select. Global Setup The settings on this menu apply to all handsets and the base. Before changing these settings, make sure the phone is in standby and all handsets are within range of the base. (Only one handset at a time can change these settings.) 9 Set Line Mode Insert 0 Do not change this setting unless instructed to by customer service. This feature adds “0” or “00” at the beginning of the number received from Caller ID. The default setting for New Zealand is ON. The default setting for Australia is OFF. Entering Text on Your Phone When you want to enter text into your phone (for example, a name in the phonebook), use the twelve-key dial pad to enter the letters printed on the number keys. Here's how it works: The phone enters the letters in the order they appear on the key. For example, if you press the number key 2 once, the phone enters the letter A. Press 2 twice for B, and three times for C. If you press the key again after the last letter, the phone starts the same letter sequence with small letters. If you press 2 four times in a row, the phone enters a (small letter). Press 2 five times for b, and six times for c. If you see the icon [Aa] in the display, the phone enters capital letters first (A B C), then small letters (a b c), then the number on the key (2). The icon [aA] means the phone starts at the small letters, so it enters small letters first, then the number on the key, then capital letters. The phone automatically uses a capital letter for the first letter and any letter right after a space; all other times, it uses small letters. If two letters in a row use the same number key, enter the first letter, then use Caller ID/right to move the cursor to the next position to enter the second letter. To Switch between capital & small letters Move the cursor Leave a blank space Erase one letter Follow these steps Press / lock. Press Phonebook/left to move the cursor to the left or Caller ID/right to move the cursor to the right. Press #. Move the cursor to the letter you want to erase and press Clear/intercom. Press & hold Clear/intercom. Erase the entire entry Enter punctuation or a Press 0 to rotate through the available symbols. symbol 10 Using Your Phone To... From a handset make a call: Dial the Press Talk ( )/flash. number, then From a handset speakerphone answer a call Press Talk ( )/flash. Press Speaker. hang up Press End ( ) or put the handset in the cradle. Press Speaker. switch between the speaker & Press Speaker. Press Speaker. earpiece mute the microPress mute. phone during a call Press again to turn the microphone back on. Press Clear/intercom. put a call on hold If the call is on hold for 5 minutes, it will be disconnected. return to a call on Press Talk ( )/flash. Press Speaker. hold mute the ringer for While the phone is ringing, press mute. this call only Changing the Volume You can set the ringer, earpiece, and speaker volume separately for each handset. For each item, press Up to make it louder or Down to make it softer. The available volume levels and how change them are listed below: Change the When ringer the phone is in standby volume earpiece you are on a normal call volume speaker volume On a handset select Off, Low, Medium, or High choose one of 6 volume levels you use the speaker-phone for choose one of 6 volume levels a call. 11 Using the Redial List The phone saves the last 5 numbers you dial on each handset. To open the redial list, press Redial/pause; use Up and Down to scroll through the list. To close the list, press Phonebook/left. With the phone in standby, open the list and find the number you want. Then: to redial the selected number Press Talk ( )/flash or speaker. to delete the number Press Menu/select & select Delete Entry. to save it to the phonebook Press Menu/select & select Store Into Pb. Using Caller ID and Call Waiting You have to subscribe to Caller ID, Call Waiting, and Caller ID on Call Waiting services to use the features described in this section: contact your telephone provider for more information. When a call comes in, the phone displays the caller’s number and name (if available). The phone saves the information for the last 30 received calls to the CID list. When it's in standby, the phone displays how many calls came in since the last time you checked the CID list. Open the CID list Scroll through the CID list Close the CID list Press Caller ID/right. Press Down to scroll through the list from newest to oldest. Press Up to scroll from oldest to newest. Press Phonebook/left. Dialing from the Caller ID list 111 Find the entry you want to dial. 222 Press Talk ( )/flash or Speaker to dial the number. (You can also press Talk ( )/flash or Speaker before you open the CID list. Find the number you want to dial, then press Menu/select.) Caller ID menu options Open the CID list with the phone in standby. Find the number you want and press Menu/select. Choose one of these CID menu options: 12 Delete Entry Store Into Pb Delete All Erase this Caller ID number. Add this number to this handset's phonebook. The phone prompts you to enter the name, edit the phone number, and choose a personal ring. Erase this handset's CID list. (This does not affect the CID lists saved on any other handsets.) Using Call Waiting If you get a Call Waiting call, the phone sounds a tone and displays any CID information received for the waiting call. For Australian Model: Press Talk ( )/flash and then 2 on the handset to accept the waiting call. The first caller is put on hold, and you will hear the new caller after a short pause. To return to the original caller, press Talk ( )/flash and then 2 again. For New Zealand Model: Press Talk ( )/flash on the handset to accept the waiting call. The first caller is put on hold, and you will hear the new caller after a short pause. To return to the original caller, press Talk ( )/flash again. Note: You must subscribe to Call Waiting service for this feature to operate. Not all features are available in all areas. Using the Phonebook Each handset can store up to 70 entries in its phonebook. Open/close the phonebook Scroll through the entries Jump to entries that start with a certain letter Dial an entry Press Phonebook. Press Down to scroll through the phonebook from A to Z or Up to scroll from Z to A. Press the number key corresponding to the letter you want to jump to. 111 Find the entry you want to dial. 222 Press Talk ( )/flash or Speaker. 13 Phonebook menu options Open the phonebook with the phone in standby, then press Menu/ select to open the phonebook menu. Choose one of these options: Create New Add an entry to your phonebook. The phone prompts you to enter the name and phone number, and choose a personal ring. Copy the whole phonebook to another handset. (You must have at Copy All least two handsets to use this feature.) Delete Erase all the entries in this handset's phonebook. (This does not All affect the entries saved on any other handsets.) Phonebook entry options With the phone in standby, open the phonebook and find the entry you want. Press Menu/select to open the individual phonebook entry menu. Choose one of these options: Edit Copy Delete Edit this entry. The phone prompts you to edit the name and phone number, and choose a personal ring. Copy this entry to another handset. (You must have at least two handsets to use this feature.) Erase this entry. Chain Dialing If you often have to enter a series of digits or a code number during a call, you can save that code number to a phonebook entry and use the phonebook to send the code number. Enter the code number (up to 20 digits) into the phonebook just like a regular phonebook entry. Be sure to enter the code number into the phonebook exactly as you would enter it during a call. When you hear the prompt that tells you to enter the number, open the phonebook and find the entry that contains your code number. Press Menu/select to transmit the code. Or, if you change your mind, use Phonebook/left to close the phonebook. Finding a Lost Handset With the phone in standby, press Find handset on the base. All the handsets will beep for 1 minute, or until you press FIND HANDSET again or any key on the handset. 14 Using Special Features Using Voice Message Notification This feature supports Frequency-Shift Keying (FSK) message notification. Contact your voice mail provider for more details. If you subscribe to a voice mail service, your phone can notify you when you have a new message waiting. When you have new messages, the voice message icon ( ) appears in the display, and the new message light (at the top of the handset) blinks. Setting Up Your Voice Mail When you sign up for a voice mail service, your service provider should give you an access number. If you don't have this information, contact your provider before you start. 111 With the phone in standby, open the menu. 222 Select Handset Setup, then select Edit Voice Mail. (You have to program the voice mail access number separately for each handset.) For the New Zealand model the Telecom access number (083210) is pre-programmed. 333 Enter your access number exactly as you would dial it. You can enter a total of 20 digits. If you need the phone to wait for a few seconds between digits (to wait for the service to answer, for example), press REDIAL/PAUSE to insert a 2-second pause. If two seconds isn't long enough, you can insert as many pauses as you need, but each pause counts as one digit. Press SELECT/MENU when you're finished. Getting Your Messages Press MESSAGES to dial the access number you programmed into this handset. Resetting the voice message indicator If the voice message icon remains after you check your messages, you can reset it. Press and hold FIND until the light turns off (about five seconds). Your handsets will beep during this process: just ignore them. 15 Using Multi-Handset Features The expandable base works together with the accessory handsets to give you some useful multi-handset features. You must have at least two handsets to use the features in this section. Expanding Your Phone Your base supports a total of six cordless handsets: the one that came with the base and up to five XDECT 7005 accessory handsets. Your base might be compatible with other Uniden accessory handsets: please visit our website for a list of compatible handsets. Accessory handsets must be registered to the base before you can use them. Handsets that aren't registered display a Handset not registered message. For instructions on registering handsets to this base, see page 20 or the manual for the accessory handset. Any accessory handsets that came packaged with the base are already registered to that base for you. If a handset was previously registered to a base, you have to reset it so you can register it to a new base (see page 20 for XDECT 7005). Using Conference Calling Outside call Handset When an outside call comes in, two #2 handsets can join in a conference call with the outside caller. To join the call, Handset just press Talk ( )/flash. To leave the #1 conference call, hang up normally; the Base other handset remains connected to the call. (You can also use the handset speakerphone for a conference call, just like you can with a normal call.) Using Privacy Mode You can prevent other handsets from joining a call. Start your call as usual, then press Menu/select: the display shows Call Privacy. Press Menu/select again to turn privacy mode on (you'll see a in the display). When you hang up, privacy mode turns off automatically. 16 As long you have privacy mode on, no other handsets can interrupt your call. To allow another handset to join the call, just turn privacy mode off by repeating the process above (press Menu/select twice). Using Call Transfer To... transfer a call cancel a transfer accept a transferred call From a handset 111 Press Clear/intercom to put the call on hold. 222 Select the handset you want to transfer the call to, or select All to page all the handsets at the same time. When the other handset accepts the call, you'll be disconnected, but you can join the call again. Press Talk ( )/flash to return to the call. 1. Press CLEAR/INTERCOM to answer the page and speak to the transferring handset. 2. To accept the call, press Talk ( )/flash. Using the Intercom Here are some things you need to know about using the intercom: Whenever the phone is in standby, you can make an intercom call between handsets without using the phone line. You can make an intercom call from any handset, but only two handsets can be in an intercom call at any time. If an outside call comes in during an intercom call, the phone shows the CID information. If the other handset hasn't answered the page, the phone cancels the page so you can answer the incoming call. To... From a handset Clear/intercom. make an intercom 111 Press 222 Select the handset you want to talk with, or select All page to page all the handsets at the same time. cancel a page Press End ( ). answer an Press Clear/intercom or Talk ( )/flash. intercom page leave an intercom Press End ( ). call answer an outside call during an Press Talk ( )/flash. intercom call 17 Solving Problems If you have any trouble with your phone, try these simple steps first. If you still have a question, visit the website listed on the front cover. If… Try… --Checking the telephone cord connection. No handsets can make --Disconnecting the base AC adapter. Wait a few or receive calls. minutes, then reconnect it. --Moving the handset closer to the base. One handset can’t make or receive calls. --Resetting the handset. A handset can make --Making sure the ringer is turned on. calls, but it won’t ring. --Charging the battery for 15-20 hours. A handset's display won't turn on. --Checking the battery pack connection. --Charging the battery for 15-20 hours. A handset is not --Checking the battery pack connection. working. --Resetting the handset. --Moving the handset closer to the base. A handset says --Seeing if another handset has Privacy Mode on. Unavailable. --Making sure the base is plugged in. --Letting calls ring at least twice before answering. No handsets will --Seeing if the call was placed through a switchboard. display any Caller ID --Checking with your telephone service provider to information. make sure your Caller ID service is active. --You may have to change the line mode. Contact Caller ID displays briefly & then clears. customer service for more information. I can’t transfer calls. --Resetting all the handsets. --Making sure both handsets are registered to this I can’t get two handsets to talk to the base. caller. --Making sure no handset is in Privacy Mode. The phone keeps --You may have to change the line mode. Visit the ringing if I answer on website for more information. an extension. --Seeing if you already have 6 handsets registered to I can't register a this base. handset. --Resetting the handset. 18 Weak or Hard To Hear Audio If a caller’s voice sounds weak or soft, the signal might be blocked by large metal objects or walls; you might also be too far from the base, or the handset’s battery may be weak. Try moving around while you’re on a call or moving closer to the base to see if the sound gets louder. Make sure the handset’s battery is fully charged. Try adjusting the earpiece volume or the audio tone (see below). Adjust the audio tone During a call, open the menu and select Audio Tone. Choose one of the three audio tone options: High Tone, Natural Tone (recommended for hearing aid users), or Low Tone. You may have to experiment to figure out which audio tone works best for you. Noise or Static On The Line Do you use a T-Coil hearing aid? Interference is the most common If you have a hearing aid cause of noise or static on a cordless equipped with a telecoil (T-coil) phone. Here are some common feature, the interaction between sources of interference: the hearing aid & digital cordless electrical appliances, especially phones can cause noise in the microwave ovens handset. If you have a T-coil computer equipment, especially hearing aid & you have problems wireless LAN equipment and DSL with noise on the line, try turning on T-coil mode. Open the menu. modems Select Handset Setup, then radio-based wireless devices, select T-coil. such as room monitors, Using T-coil mode can shorten wireless controllers, or wireless the handset’s talk time; make headphones or speakers sure to watch the battery status large florescent light fixtures and keep the battery charged. (especially if they give off a buzzing noise) other services that use your phone line, like alarm systems, intercom systems, or broadband Internet service 19 Here are some hints for when the static is... on 1 handset or in 1 location: --Check nearby for one of the common interference sources. --Try moving the handset away from a suspected source, or try moving the suspected source so it’s not between the handset & the base. --Try moving closer to the base. There is always more noise at the edges of the base's range. If the handset displays an Out of Range message, you need to move closer to the base. on all handsets or in all locations: --Check near the base for the source of interference. --Try moving the base away from a suspected source, or turn off the source if possible. --If the base has an adjustable antenna, try raising the antenna so it stands straight up. --If you have any service that uses the phone line, you might need a filter (see below). Installing a line filter or DSL filter Sometimes, broadband Internet services Telephone wall jack that use the telephone line can interfere with phones. One of these services -DSLoften causes static on telephones. A DSL Telephone cord filter or telephone line filter usually solves this problem. The technician who installed DSL filter your DSL service might have left some filters for you; if not, call your DSL provider or look in any electronics store. Plug the DSL filter into the telephone wall jack and plug your phone’s base into the filter. Make a test call to make sure the noise is gone. Resetting and Registering Handsets If you are having trouble with a handset or if you want to replace one, you need to clear the registration information from the base and the handset: Do you have the base the handset is registered to? Yes No End ( ) # 111 Press & hold and until the 111 Press & hold End ( ) and # System Reset menu appears (about 5 until the System Reset menu seconds). appears (about 5 seconds). 222 Select Deregister HS. The display lists 222 Select Base Unavailable. all registered handsets. 333 When the phone asks you 333 Select the handset you want to reset. to confirm, select Yes. The handset deletes its own link 444 When the phone asks you to confirm, without contacting the base. select Yes. The handset clears its information from the base & deletes it own link to the base. 20 When you reset a handset (or if you buy a new one), that handset displays a Handset Not Registered message. If you see this message on a handset, you need to register it to a base before you can use it. Registering a handset 111 Place the unregistered handset into the main base for charging to start the registration process. If... Try... --you don't hear a dial tone Making sure the handset is fully --the display says Registration Failed charged, then start over at step 1. To register a handset to a different base, see the section "Expanding Your Phone" in the user's guide for the other base. Handling Liquid Damage Moisture and liquid can damage your cordless phone. If the handset or base is exposed to moisture or liquid, but only the exterior plastic housing is affected, wipe off the liquid, and use as normal. If moisture or liquid has entered the plastic housing (i.e. liquid can be heard in the phone or liquid has entered the handset battery compartment or vent openings on the base), follow these steps: Handset Base 111 Remove the battery cover & disconnect the 111 Disconnect the AC battery. adapter to cut off the power. 222 Let dry for at least 3 days with the battery disconnected and the cover off for ventilation. 222 Disconnect the telephone cord. 333 After the handset dries, reconnect the battery pack and replace the cover. Recharge the 333 Let dry for at least 3 days battery fully (15-20 hours) before using. before reconnecting. IMPORTANT: You must unplug the telephone line while recharging the battery pack to avoid charge interruption. CAUTION! DO NOT use a microwave oven to speed up the drying process. This will cause permanent damage to the handset, base and the microwave oven. 21 Important Information Terms Used In This Guide Accessory handset An extra handset that can register to and be used with an expandable phone base. All accessory handsets must be registered to a base before you can use them. The main part of the phone. It connects to your phone line and lets you make and receive calls. Base Most bases also have a cradle to store a handset. CIDCW (CID on Call Waiting.) A service that shows CID for calls that come in during another call. Call Waiting A service that lets you receive calls while you are on another call. Caller ID (Also called CID.) A service that shows the name and number of incoming callers. Charger A cradle that stores and charges a handset but doesn’t connect to the phone line. The part of the phone that stores a handset. While in a cradle, a handset is always in standby, Cradle and any keys are locked. During a call The handset is currently on a call or has activated a dial tone. Handset A cordless handset that you use to dial the phone and talk to callers. In standby The phone is inactive: there is no dial tone, no handset is on a call or listening to messages. Specifications only the supplied AC adapters. sure to use the proper adapter for the base & any chargers. Do not place the power cord where it creates a trip hazard or where it could become chafed & create a fire or electrical hazard. Do not place the base in direct sunlight or subject it to high temperatures. AC Part number adapter Input voltage Output voltage Battery Part number pack Capacity 22 Base Charger PS-S0635YL3 AAD-600S(M) 240V AC, 50 Hz 240V AC, 50Hz 6V DC @ 350mA 9V DC@ 210mA BT-694 or BT-694s 650mAh (BT-694) or 500mAh(BT-694s) Use Be Battery Information Fully charged, the battery should provide about 10 hours of talk time and about 7 days of standby time. For best results, return the handset to the cradle after each call to keep it fully charged. Keep an eye on the battery status icon. When the battery gets too low, the handset shows a low battery alert. If you hear a strange beep during a call, check the display: if you see the low battery alert, finish your conversation as quickly as possible and return the handset to the cradle. If the handset is in standby, none of the keys will operate. With normal use, the battery should last about one year. Replace the battery when the talk time becomes short even when the battery is charged. To buy a replacement battery, visit the website listed on the front cover. Rechargeable Nickel-Metal-Hydride Battery Warning CAUTION! Risk of explosion if battery is replaced by an incorrect type! Dispose of used batteries according to the instructions. Do not open or mutilate the battery. Disconnect the battery before shipping this product. This equipment contains a rechargeable Nickel-Metal-Hydride battery. rechargeable batteries contained in this equipment may explode if disposed of in a fire. Do not short-circuit the battery. Do not charge the rechargeable battery pack used in this equipment with in any charger other than the one designed to charge this battery pack as specified in the owner's manual. Using another charger may damage the battery pack or cause the battery pack to explode. The Uniden works to reduce lead content in PVC coated cords in our products & accessories. 23 Mounting the base unit on a wall You can mount your base directly to the wall. Before doing this, consider the following: • • • • Avoid electrical cables, pipes, or other items behind the mounting location that could cause a hazard when inserting screws into the wall. Mount your phone within distance of a working phone jack. Make sure the wall material is capable of supporting the weight of the base and handset. Use screws with anchoring devices suitable for the wall material where the base unit will be placed. 111 Insert two mounting screws into the wall (with their appropriate anchoring device), 85mm apart. Allow about 3mm between the wall and screwheads for mounting the phone. 222 Plug the AC adapter into the DC IN 6V jack on the telephone and then into a Standard AC wall outlet. 333 Plug the telephone cord into the TEL LINE jack on the telephone and then into the telephone socket on the wall. 444 Align the mounting slots on the base with the mounting posts on the wall. 555 Then push in and down until the phone is firmly seated. This phone also can be mounted on any standard telephone wall plate (for Australia). mm 3mm 5mm 85mm 35mm 24 One Year Limited Warranty UNIDEN XDECT 7015 IMPORTANT Evidence of the original purchase is required for warranty service. Warrantor: Uniden Australia Pty Limited ABN 58 001 865 498 Uniden New Zealand Limited Elements of Warranty: Uniden warrants to the original retail owner for the duration of this warranty its XDECT 7015 (hereinafter referred to as the Product), to be free from defects in materials and craftsmanship with only the limitations or exclusions set out below. Warranty Duration: This warranty to the original retail owner only is only valid in the original country of purchase and shall be of no further effect 1 year after the date of original retail sale. This warranty will be deemed invalid if the Product is: (A) Damaged or not maintained as reasonable and necessary, (B) Modified, altered or used as part of any conversion kits, subassemblies, or any configurations not sold by Uniden, (C) Improperly installed, (D) Repaired by someone other than an authorized Uniden Repair Agent for a defect or malfunction covered by this warranty, (E) Used in conjunction with any equipment or parts or as a part of a system not manufactured by Uniden. (F) Only available in the original country of sale. Parts Covered: This warranty covers for one (1) year, the Product and included accessories. Statement of Remedy: In the event that the Product does not conform to this warranty at any time while this warranty is in effect, the warrantor, at its discretion, will repair the defect or replace the Product and return it to you without charge for parts and service. This warranty does not provide for reimbursement or payment of incidental or consequential damages. This EXPRESS WARRANTY is in addition to and does not in any way affect your rights under the TRADE PRACTICES ACT 1974 (Cth) (Australia) or the CONSUMER GUARANTEES ACT (New Zealand). Procedure for obtaining performance or warranty: in the event that the Product does not conform to this warranty, the Product should be shipped or delivered, freight prepaid, with evidence of original purchase (e.g. a copy of the sales docket) to the warrantor at: UNIDEN AUSTRALIA PTY LTD Service Division 345 Princes Highway, Rockdale, NSW 2216 Fax (02) 9599 3278 www.uniden.com.au UNIDEN NEW ZEALAND LTD Service Division 150 Harris Road, East Tamaki, Manukau 2013 Fax (09) 274 4253 www.uniden.co.nz © 2009 Uniden Australia Pty/Uniden New Zealand Limited Printed in Vietnam UNZZ01072BZ(0)