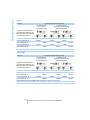
1
Supplementary
Owner's Manual
The Ultimate
Driving Machine
Contents
A-Z
Online Edition for Part no. 01 41 2 604 369 - © 03/10 BMW AG
Online Edition for Part no. 01 41 2 604 369 - © 03/10 BMW AG
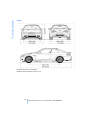
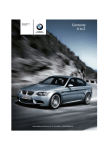
M3
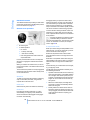
Supplementary Owner's Manual for Vehicle
Thank you for choosing a BMW M3.
The more familiar you are with your vehicle, the better control
you will have over it on the road.
We therefore strongly suggest:
Read the information provided in this Supplementary Owner's
Manual before starting out in your new BMW. It contains important information on vehicle operation that will help you make full
use of the technical features available in your BMW.
We wish you a safe and enjoyable drive.
BMW AG
Online Edition for Part no. 01 41 2 604 369 - © 03/10 BMW AG
© 2010 Bayerische Motoren Werke
Aktiengesellschaft
Munich, Germany
Reprinting, including excerpts, only with the
written consent of BMW AG, Munich
US English II/10, 03 10 500
Printed on environmentally friendly paper,
bleached without chlorine, suitable for recycling.
Online Edition for Part no. 01 41 2 604 369 - © 03/10 BMW AG
For the quickest access to special topics, consult the index, refer to page 80.
Using this Owner's Manual
4
Notes
At a glance
Contents
At a glance
8
Cockpit
20
21
24
34
38
46
47
Opening and closing
Adjustments
Driving
Controls overview
Technology for driving comfort and
safety
Lamps
Practical interior accessories
Controls
Controls
50
52
Things to remember when driving
BMW M3 engineering
Mobility
56
57
59
63
64
68
69
Refueling
Wheels and tires
Under the hood
Care
Replacing components
Giving and receiving assistance
Indicator and warning lamps
Driving tips
Driving tips
Technical data
Everything from A to Z
Online Edition for Part no. 01 41 2 604 369 - © 03/10 BMW AG
Reference
74
80
Mobility
Reference
Notes
Notes
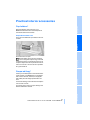
Using this Owner's Manual
Symbols used
This Supplementary Owner's Manual contains
all important equipment information, operating
instructions and technical data of the BMW M3
that differ from the BMW 3 Series. Descriptions
that are not contained in this Supplementary
Owner's Manual can be found in the Owner's
Manual for Vehicle or in the additional brochures that may be included in the onboard literature.
Indicates precautions that must be followed precisely in order to avoid the possibility of personal injury and serious damage to
the vehicle.<
We have tried to make the information in this
Supplementary Owner's Manual easy to locate.
The fastest way to find specific topics is to refer
to the detailed index at the back of the manual. If
you wish to gain an initial overview of your vehicle, you will find this in the first chapter.
Should you sell your BMW one day, please
remember to hand over the Supplementary
Owner's Manual as well; it is an important component of your vehicle.
Indicates information that will assist you
in gaining the optimum benefit from your
vehicle and enable you to care more effectively
for your vehicle.<
Refers to measures that can be taken to
help protect the environment.<
< Marks the end of a specific item of information.
* Indicates special equipment, country-specific equipment and optional accessories, as
well as equipment and functions not yet available at the time of printing.
With iDrive*:
"..." Identifies Control Display texts used to
select individual functions.
{...} Verbal instructions to use with the voice
activation system.
{{...}} Identifies the answers generated by the
voice activation system.
Symbols on vehicle components
Indicates that you should consult the relevant section of this Owner's Manual for
information on a particular part or assembly.
4
Online Edition for Part no. 01 41 2 604 369 - © 03/10 BMW AG
The individual vehicle
At a glance
When you ordered your BMW, you chose various items of equipment. This Supplementary
Owner's Manual describes the entire array of
options and equipment available with a specific
BMW model range.
Please bear in mind that the manual may contain information on accessories and equipment
that you have not specified for your own vehicle.
Sections describing options and special equipment are marked by asterisks * to assist you in
identifying possible differences between the
descriptions in this manual and your own vehicle's equipment.
Controls
If equipment in your BMW M3 is not described
in this Supplementary Owner's Manual, please
refer to the Owner's Manual for the vehicle.
Editorial notice
5
Online Edition for Part no. 01 41 2 604 369 - © 03/10 BMW AG
Reference
Mobility
Driving tips
BMW pursues a policy of continuous, ongoing
development that is conceived to ensure that
our vehicles continue to embody the highest
quality and safety standards combined with
advanced, state-of-the-art technology. In rare
cases, therefore, the features described in this
Supplementary Owner's Manual may differ
from those in your vehicle.
Online Edition for Part no. 01 41 2 604 369 - © 03/10 BMW AG
At a glance
This overview of buttons, switches and displays
is intended to familiarize you with your vehicle's
operating environment. The section will also
assist you in becoming acquainted with the
control concepts and options available for
operating the various systems.
Online Edition for Part no. 01 41 2 604 369 - © 03/10 BMW AG
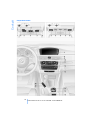
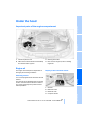
Cockpit
Cockpit
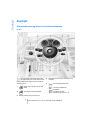
Around the steering wheel: controls and displays
Sedan
The description of features without specific page references can be found in the
Owner's Manual for Vehicle under the respective keyword.<
1
2
3
Safety switch for electric rear windows
Opening and closing windows
4
5
Adjusting exterior mirrors, automatic curb
monitor*
Parking lamps/low beams
Low-beam headlamps
Automatic
headlamp control*
Adaptive light control* 46
Folding exterior mirrors in and out*
8
Online Edition for Part no. 01 41 2 604 369 - © 03/10 BMW AG
12 Horn: the entire surface
Turn signal indicators
High beams, headlamp flasher
Roadside parking lamps*
13 Adjusting the steering wheel
14
Cruise control 32
At a glance
6
15 Releasing the hood
16 Opening the trunk lid
Computer 35
Settings and information about the
vehicle 36
8
Instrument cluster 12
Windshield wipers
Controls
7
Rain sensor*
9
Switching the ignition on/off and
starting/stopping the engine 24
10 Ignition lock
11 Buttons on the steering wheel
Driving tips
Telephone*:
Accepting and ending a call; dialing* selected phone numbers.
Redialing if no phone number is
selected
Volume
Activating/deactivating the voice
activation system*
Mobility
Changing the radio station
Interrupting a traffic bulletin
Selecting a music track
Scrolling through the redial list
M Drive*, calling up individual
settings 21
Recirculated-air mode
9
Online Edition for Part no. 01 41 2 604 369 - © 03/10 BMW AG
Reference
Next entertainment source*
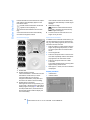
Cockpit
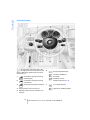
Coupe/Convertible
The description of features without specific page references can be found in the
Owner's Manual for Vehicle under the respective keyword.<
1
Convertible: opening and closing
windows jointly
2
Convertible: opening and closing
rear windows
3
Opening and closing front windows
4
Folding exterior mirrors in and out*
5
Adjusting exterior mirrors, automatic curb
monitor*
6
Parking lamps/low beams
Low-beam headlamps
Automatic
headlamp control*
Adaptive light control* 46
7
Turn signal indicators
High beams, headlamp flasher
10
Online Edition for Part no. 01 41 2 604 369 - © 03/10 BMW AG
Roadside parking lamps*
14 Adjusting the steering wheel
15
Cruise control 32
Settings and information about the
vehicle 36
8
9
At a glance
Computer 35
16 Releasing the hood
17 Opening the trunk lid
Instrument cluster 12
Windshield wipers
Rain sensor*
Switching the ignition on/off and
starting/stopping the engine 24
Controls
10
11 Ignition lock
12 Buttons on the steering wheel
Telephone*:
Driving tips
Accepting and ending a call; dialing* selected phone numbers.
Redialing if no phone number is
selected
Volume
Activating/deactivating the voice
activation system*
Changing the radio station
Interrupting a traffic bulletin
Selecting a music track
Scrolling through the redial list
Mobility
M Drive*, calling up individual
settings 21
Next entertainment source*
Recirculated-air mode
11
Online Edition for Part no. 01 41 2 604 369 - © 03/10 BMW AG
Reference
13 Horn: the entire surface
Cockpit
Instrument cluster
The description of features without specific page references can be found in the
Owner's Manual for Vehicle under the respective keyword.<
8
Display for
> Gear display M dual clutch transmission
with Drivelogic* 25
> With manual transmission:
Computer 35
1
Speedometer
2
Indicator lamps for turn signals
3
Indicator and warning lamps 13
> Date of next scheduled service, and
remaining distance to be driven
4
Tachometer 34
> Odometer and trip odometer
5
Shift Lights* 29
> Checking oil level 59
6
Engine oil temperature 34
> Settings and information 36
7
Display for
>
There is a Check Control message
> Clock
9
> Outside temperature
10 Resetting the trip odometer
Fuel gauge 34
> Indicator and warning lamps
> With dual clutch transmission:
Computer 35
12
Online Edition for Part no. 01 41 2 604 369 - © 03/10 BMW AG
Indicator and warning lamps
Indicator lamps without text messages
At a glance
The following indicator lamps notify you that
certain functions are active:
M Drive* 21
13
Online Edition for Part no. 01 41 2 604 369 - © 03/10 BMW AG
Reference
Mobility
Driving tips
Controls
M Dynamic Mode* 38
Cockpit
Around the center console: controls and displays
Sedan
14
Online Edition for Part no. 01 41 2 604 369 - © 03/10 BMW AG
Microphone for voice activation system*
and for telephone* in hands-free mode
2
SOS: initiating an Emergency Request call*
3
Reading lamps
4
Glass roof, electric*
5
Interior lamps
6
Passenger airbag status lamp*
7
Control Display*
8
Hazard warning flashers
9
Flat Tire Monitor FTM* 40
Tire Pressure Monitor TPM* 42
13
Roller sun blind*
14 Controller*
Can be turned, pressed or moved in four
directions
15 Opening start menu on Control Display*
At a glance
1
12 Radio
16 Dynamic Stability Control DSC 38
17 Electronic Damper Control EDC* 39
18 M Engine Dynamics Control POWER 31
Controls
The description of features without specific page references can be found in the
Owner's Manual for Vehicle under the respective keyword.<
10 Central locking system
11 Automatic climate control
Air distribution to the windshield
Driving tips
Air distribution to the upper body
area
Air distribution to the footwell
Automatic air distribution and flow
rate
Cooling function
Automatic recirculated-air control
AUC and recirculated-air mode
Maximum cooling
Mobility
ALL program
Air flow rate
Defrosting windows
Rear window defroster
15
Online Edition for Part no. 01 41 2 604 369 - © 03/10 BMW AG
Reference
Heated seats*
Cockpit
Coupe/Convertible
16
Online Edition for Part no. 01 41 2 604 369 - © 03/10 BMW AG
Microphone for voice activation system*
and for telephone* in hands-free mode
2
SOS: initiating an Emergency Request call*
3
Reading lamps
4
Coupe: glass roof, electric*
5
Interior lamps
6
Passenger airbag status lamp*
7
Control Display*
8
Hazard warning flashers
9
Flat Tire Monitor FTM* 40
Tire Pressure Monitor TPM* 42
13
Coupe:
Roller sun blind*
14 Controller*
Can be turned, pressed or moved in four
directions
15 Opening start menu on Control Display*
16
At a glance
1
12 Radio
Convertible:
Opening and closing retractable
hardtop
17 Dynamic Stability Control DSC 38
18 Electronic Damper Control EDC* 39
19 M Engine Dynamics Control POWER 31
10 Central locking system
11 Automatic climate control
Controls
The description of features without specific page references can be found in the
Owner's Manual for Vehicle under the respective keyword.<
Air distribution to the windshield
Driving tips
Air distribution to the upper body
area
Air distribution to the footwell
Automatic air distribution and flow
rate
Cooling function
Automatic recirculated-air control
AUC and recirculated-air mode
Maximum cooling
Mobility
ALL program
Air flow rate
Defrosting windows
Rear window defroster
17
Online Edition for Part no. 01 41 2 604 369 - © 03/10 BMW AG
Reference
Heated seats*
Online Edition for Part no. 01 41 2 604 369 - © 03/10 BMW AG
Controls
This chapter is intended to provide you with
information for complete control of your vehicle.
All features and accessories that are useful for
driving and your safety, comfort and
convenience, are described here.
Online Edition for Part no. 01 41 2 604 369 - © 03/10 BMW AG
Opening and closing
Opening and closing
Personal Profile
Note the following instructions for your
BMW M3 that deviate from the description in
the Owner's Manual for Vehicle.
Personal Profile settings
For more information on specific settings, refer
to the specified pages.
> M Drive, refer to page 21
> Calling up the preferred program of the
M Engine Dynamics Control POWER and
Electronic Damper Control EDC when starting the vehicle, refer to Configuring settings
on page 21
> Shift Lights*, refer to page 29
20
Online Edition for Part no. 01 41 2 604 369 - © 03/10 BMW AG
With M Drive you can configure several individual settings for your vehicle on the Control Display. The settings influence the engine characteristics, dynamic driving control, damper
tuning and steering tuning.
> M Engine Dynamics Control 31
> Dynamic Stability Control DSC 38
> Electronic Damper Control EDC 39
> "EDC:"
Electronic Damper Control EDC programs, refer to page 39
> "DSC:"
Dynamic Stability Control and
M Dynamic Mode*, refer to page 38
> "POWER:"
M Engine Dynamics Control programs,
refer to page 31
> Servotronic 44
> "Servotronic:"
Servotronic programs, refer to page 44
Configuring settings
> "Shift lights:"
Shift Lights, refer to page 29
You can set M Drive on the Control Display
when the ignition is switched on.
3. Select the desired function, e.g. "DSC:".
Controls
M Drive*
At a glance
Adjustments
4. Select the desired setting.
Driving tips
1. "Settings"
> "Drivelogic:"
M dual clutch transmission with Drivelogic: shift modes and Drivelogic drive
programs, refer to page 28
The setting is stored for the remote control currently in use.
21
Online Edition for Part no. 01 41 2 604 369 - © 03/10 BMW AG
Reference
The functions contained in M Drive are displayed:
"Unchanged" retains the current setting
created outside of M Drive, e.g. via the buttons in the center console.
Mobility
2. "M Drive"
Adjustments
Activating the settings
Operation using voice commands*
Press the
You can also select the "M Drive" menu using
voice commands.
button on the steering wheel.
The indicator lamp in the instrument
cluster comes on. The M Drive settings
made on the Control Display are active.
If the indicator lamp flashes after the button was pressed, M Drive could not be
activated because the Antilock Brake System
ABS or Dynamic Stability Control DSC is currently regulating driving stability. Press the
button again when the indicator lamp is no
longer flashing.<
You can change individual settings outside of
M Drive even when M Drive is activated, e.g.
using the buttons on the center console. To
reactivate all settings made on the Control Display for M Drive: press the
button twice.
{M Drive}.
The menu is selected.
M key settings*
For the remote control currently in use, you can
set your preferred program for the M Engine
Dynamics Control, the Electronic Damper Control EDC and the Shift Lights. These presets are
called up when the engine is started.
1. "Settings"
2. "M Drive"
When the M Drive is activated, changes on the
Control Display are accepted immediately.
Deactivating the settings
Press the
button on the steering wheel
again. M Drive is deactivated. The indicator
lamp in the instrument cluster goes out.
Resetting the settings
You can reset all M Drive settings to their
default values:
1. "Settings"
2. "M Drive"
3. Move the controller to the right repeatedly
until the "Options" menu is selected.
4. "Reset"
3. Move the controller to the right repeatedly
until the "Options" menu is selected.
The available functions are displayed:
> "POWER:"
M Engine Dynamics Control programs,
refer to page 31
> "EDC:"
Electronic Damper Control* programs,
refer to page 39
> "Shift lights:"
Shift Lights, refer to page 29
5. Confirm with "Yes".
22
Online Edition for Part no. 01 41 2 604 369 - © 03/10 BMW AG
At a glance
4. Select the desired function.
5. Select the desired setting.
23
Online Edition for Part no. 01 41 2 604 369 - © 03/10 BMW AG
Reference
Mobility
Driving tips
Controls
The setting is stored for the remote control currently in use.
Driving
Driving
Start/stop button
Note the following instructions for your
BMW M3 that deviate from the description in
the Owner's Manual for Vehicle.
Do not wait for the engine to warm up while the
vehicle remains stationary. Start driving right
away, but at moderate engine speeds.
Note the following instructions for your
BMW M3 that deviate from the description in
the Owner's Manual for Vehicle.
M dual clutch transmission with
Drivelogic
Remote control in the ignition lock or, with
Comfort Access, inside the vehicle.
1. Depress the brake.
2. Press the start/stop button.
Pressing the start/stop button switches radio
readiness or the ignition on or off.
M dual clutch transmission: when you
press the start/stop button while the
brake is depressed, the engine starts.<
Starting the engine
Do not run the engine in enclosed areas;
otherwise, the inhalation of toxic exhaust
gases can cause loss of consciousness and
death. The exhaust gases contain carbon monoxide, an odorless and colorless, but highly
toxic gas. Never leave an unattended vehicle
with the engine running, otherwise such a vehicle represents a potential safety hazard.
Before leaving the car with the engine running,
place the transmission in neutral and forcefully
apply the parking brake to prevent the car from
moving.<
The engine starts with the selector level in any
position. Driving off: with the engine running,
move the selector level from the middle position
Β in the desired direction.
Avoid frequent starting in quick succession as well as repeated start attempts in
which the engine does not start. Otherwise, the
fuel is not burned or incompletely burned and
there is a danger of overheating and damaging
the catalytic converter.<
Always take the remote control with you
when you leave the vehicle.
When parking, forcefully apply the parking
brake to prevent the vehicle from moving.<
Every time you start the engine, sequential
mode is activated in program S3 if you lightly
press the selector lever to the right to position
D/S with the brake pedal depressed.
Switching off the engine
Note the following instructions for your
BMW M3 that deviate from the description in
the Owner's Manual for Vehicle.
24
Online Edition for Part no. 01 41 2 604 369 - © 03/10 BMW AG
M dual clutch transmission
with Drivelogic*
The concept
The M dual clutch transmission with Drivelogic
is an automated manual transmission with two
clutches and a partial transmission in which an
electro-hydraulic system takes over clutch
action and shifting.
With the M dual clutch transmission, gears are
changed without interruption of the traction
force.
The M dual clutch transmission is operated
using the selector lever or two shift paddles on
the steering wheel.
The transmission offers you the following functions:
> Choice between sequential mode and drive
mode
Avoid driving off frequently with high acceleration and do not hold the vehicle on inclines by
pressing lightly on the accelerator while letting
the clutch slip, as this may cause the transmission to overheat.
Low Speed Assistant
The Low Speed Assistant supports you when
driving at very low speeds: the vehicle moves at
walking speed and automatically controls the
engine speed. You can also use the Low Speed
Assistant when rocking the vehicle out of deep
snow. To do so, shift between reverse gear and
the forward position without pressing the brake.
Activating
> Shift Lights, refer to page 29
2. Briefly tap the accelerator.
> Automatic downshifting and protection
against selecting the wrong gear even in
sequential mode
The vehicle rolls at the minimum speed.
> Automatic throttle blip
> Low Speed Assistant
> Hill Start Assistant
At a glance
In traffic congestion or at very low speeds, use
the Low Speed Assistant, refer to the information below.
> Selection between different drive programs, Drivelogic, refer to page 28
> Launch Control, refer to page 30
Controls
3. Remove the remote control from the ignition lock The transmission position P is
engaged automatically.
The indicator lamp lights up yellow
when the transmission becomes too
warm. Avoid high engine loads and
driving off frequently. If the transmission is
overheated, the indicator lamp lights up red.
You can continue your journey, but moderate
your speed and exercise due caution. Bring the
vehicle to a stop at your soonest opportunity,
switch off the engine, and allow the transmission to cool down.
Driving tips
2. Forcefully apply the parking brake.
The M dual clutch transmission is equipped
with an overheating protection system that protects the clutch against extreme loads.
1. Engage a drive position.
Do not press the brake continuously as
this may cause the transmission to overheat.<
Mobility
1. Press the start/stop button.
If N is engaged when you switch off the
engine, you are notified visually and acoustically.
System limitations
Deactivating
Brake the vehicle to a stop to deactivate the
Low Speed Assistant.
25
Online Edition for Part no. 01 41 2 604 369 - © 03/10 BMW AG
Reference
M dual clutch transmission with
Drivelogic
Driving
Hill Start Assistant
The Hill Start Assistant provides you with assistance when starting off on uphill grades, refer to
Drive-off assistant on page 40.
Selector lever positions
N engages when you open the driver's door
while the engine is running, your safety belt is
not fastened and you press neither the brake
pedal nor the accelerator. If you immediately
step on the brake or accelerator pedal, the vehicle can be moved for maneuvering purposes.
To drive off after closing the driver's door and
fastening your safety belt, move the selector
lever to position N first and then to the desired
drive position.
N remains engaged even after the engine
is switched off if you leave the remote
control in the ignition lock. This function can be
used in an automatic car wash, for example,
refer to page 63.<
> R: reverse gear
> Β: middle position
> N: neutral
> +: shift up manually
> –: shift down manually
> D/S: change between drive mode and
sequential mode
Push or pull the selector lever in the required
direction to engage the desired transmission
position.
When you release the selector lever, it returns
to its center position. The selector lever locks in
position R.
The transmission position currently engaged is
indicated in the instrument cluster and by LEDs
on the selector lever.
Shiftlock
To shift out of N when the vehicle is stationary,
step on the brake; otherwise, the gearshift
request will not be executed.
R Reverse
Select this only when the vehicle is stationary.
N Neutral
If the driving situation demands, e.g. when
downshifting on a slippery road, the M dual
clutch transmission disengages and engages
the clutch automatically.
S sequential mode
Shift up or down using the shift paddles or the
selector lever. You do not need to lift your foot
off the accelerator when doing so.
Shift from sequential mode to drive mode:
press the selector lever to the right in the D/S
direction.
Shift back to sequential mode: shift using the
shift paddles or the selector lever, or press the
selector level to the right in the D/S direction
again.
On a level road, you can drive off in second gear,
e.g. on slippery roads.
The M dual clutch transmission assists you in
the following situations:
> Upshifts and downshifts are executed only
when they will result in a plausible combination of engine and vehicle speed; thus, for
example, a downshift that would cause the
engine to overrev will not be executed by
the system.
> When the vehicle stops, Drivelogic drive
programs 2 to 6 are automatically shifted
down into first gear.
> Shortly before the vehicle slows down to
below the minimum speed of the gear currently engaged, the transmission automatically shifts down without requiring your
intervention.
26
Online Edition for Part no. 01 41 2 604 369 - © 03/10 BMW AG
Changing gears
Via the selector lever
> To shift up, pull back the selector lever.
> To shift down, push it forward.
Shift from drive mode to sequential mode: shift
using the shift paddles or the selector lever, or
press the selector level to the right in the D/S
direction.
Via the shift paddles on the steering
wheel
Controls
In drive mode, all forward gears are shifted automatically.
Shift back to drive mode: press the selector
lever to the right in the D/S direction again.
Kickdown: to accelerate rapidly, e.g. when
passing, you can skip several gears. Do so by
pressing the accelerator past the resistance
point. This provides maximum acceleration.
P Park
P is engaged automatically when the
engine is switched off unless N is
engaged and the remote control is in the ignition lock. When you remove the remote control
from the ignition lock, P is engaged regardless
of the selector lever position.<
Displays in the instrument cluster
> To shift up, pull the right-hand shift paddle
+ briefly.
> To shift down, pull the left-hand shift paddle
– briefly.
Unlocking the parking lock manually
If a power failure occurs, e.g. if the battery
is discharged or disconnected, the parking lock must be released manually, otherwise
the rear wheels are blocked and the vehicle
cannot be towed.<
Release the parking lock manually for towing
only and forcefully apply the parking brake
beforehand to prevent the vehicle from rolling.
After parking the vehicle, lock the parking lock
again.
Driving tips
D drive mode
At a glance
At very low outside temperatures, this display
may not be functional. The engaged driving
direction is indicated by the LEDs on the selector lever.
Mobility
Rapid downshifting: to accelerate rapidly, e.g.
when passing, you can skip several gears in
sequential mode. To do so, press the accelerator past the resistance point and pull the left
shift paddle once or press the selector lever forward once. This provides maximum acceleration.
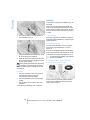
Engaged gear 1 to 7, R, N, P
1. Unclip the sleeve of the selector lever.
2
Selected drive program,
corresponds to the number of illuminated
fields, refer to Drivelogic, page 28
2. Pull the sleeve up over the selector lever
until the sleeve is inside out.
3
The gear currently engaged is displayed
together with a D in drive mode
3. Push the black cover forward using the
screwdriver from the onboard vehicle tool
kit.
27
Online Edition for Part no. 01 41 2 604 369 - © 03/10 BMW AG
Reference
Releasing
1
Driving
Drivelogic
Various drive programs are available to you via
Drivelogic.
After every change between sequential and
drive mode, the program selected last in each
case is active. Exception: after the first change
from sequential to drive mode, drive program 3
is active.
4. Insert the screwdriver into the opening of
the white lever, arrow 1.
In drive mode
Five drive programs are available for selection,
from winter program/balanced 1 to sporting and
highly dynamic 5.
In sequential mode
You can choose between six drive programs,
from winter program/balanced 1 to sporty
puristic 6.
5. Pull the screwdriver back all the way, arrow
2. The parking lock is released.
6. Carefully remove the screwdriver, for example to avoid accidentally engaging the parking lock during towing.
After parking the vehicle, lock the parking
lock again or forcefully apply the handbrake. Otherwise there is a danger of the vehicle rolling.<
Program 6 is available when Dynamic Stability
Control is deactivated, refer to page 38. If DSC
is activated, the program changes from 6 to 5.
To maintain driving stability, activate DSC
whenever possible.<
Selecting the drive program via the
button in the center console
Locking
1. Insert the screwdriver into the opening of
the white lever and press forward.
The parking lock is locked again.
2. Fold back the black cover until it engages
audibly.
3. Clip the sleeve of the selector lever back
into place.
Press the button repeatedly until the desired
drive program is displayed in the instrument
cluster, refer to page 27.
Jump-starting and towing, refer to page 68.
28
Online Edition for Part no. 01 41 2 604 369 - © 03/10 BMW AG
Selecting the drive program via M Drive
You can set M Drive on the Control Display
when the ignition is switched on.
At a glance
1. "Settings"
2. "M Drive"
Controls
3. Select "Drivelogic:".
4. Turn the controller to set drive mode or
sequential mode.
7. Press the controller.
You can also activate the selected drive program using the button on the steering wheel;
refer to M Drive on page 21. M Drive is opened
with the settings you selected.
2. At the latest, shift when the red LEDs 2 light
up.
The LEDs flash when the maximum allowable
engine speed is reached. When the maximum
engine speed is exceeded, the fuel supply is cut
off to protect the engine. Avoid engine speeds
in this range at all costs.
Observe the DSC settings in M Drive;
otherwise, driving stability may be
impaired and there is the risk of an accident.<
Switching the Shift Lights on/off
Shift Lights
1. Switch on the ignition, refer to page 24.
To achieve the best possible acceleration in
sequential mode when using a sporty driving
style, the Shift Lights in the instrument cluster
indicate the best shift point just before the maximum engine speed is reached.
2. Lightly push button 1 in the turn indicator
lever up or down repeatedly until the symbol appears in the display accompanied by
the word "SET".
Driving tips
6. Turn the controller to set the drive program.
For operating principle, refer to page 36.
29
Online Edition for Part no. 01 41 2 604 369 - © 03/10 BMW AG
Mobility
5. Press the controller to select the drive programs.
1. As the vehicle approaches its maximum
engine speed, the yellow LEDs 1 light up
consecutively to indicate the impending
shift point.
Reference
"Unchanged" retains the current settings
made outside of M Drive.
Driving
Brightness of Shift Lights
The brightness of the Shift Lights can be set
using the brightness control in the instrument
cluster.
Launch Control
Launch Control enables you to drive off with an
optimal vehicle acceleration on a high grip road
surface.
3. Press button 2.
Do not use Launch Control too often, as
the higher loads on the vehicle lead to
premature component wear.<
Launch Control is available when the engine is
at operating temperature, i.e. after driving continuously for approx. 6 miles/10 km.
1. Press the brake while the engine is running.
2. Deactivate Dynamic Stability Control DSC,
refer to page 39.
4. Use button 1 to select:
>
Shift Lights activated.
>
Shift Lights deactivated.
3. Select sequential mode with Drivelogic
drive program 6.
4. With the vehicle stationary, press the selector lever forward and hold. A flag symbol
appears in the instrument cluster.
5. Press button 2.
5. Press the accelerator down all the way. The
engine speed when driving off is controlled.
The setting is stored for the remote control currently in use.
6. If you wish, you can adjust the drive-off
engine speed by up to approx. 500 rpm:
Switching the Shift Lights on/off via
M Drive
You can also set and call up the preferred status
of the Shift Lights via M Drive on the Control
Display; refer to page 21.
Press the
button on the steering wheel, refer
to M Drive on page 21. M Drive is opened with
the settings you selected.
Observe the DSC settings in M Drive;
otherwise, driving stability may be
impaired and there is the risk of an accident.<
> Increase the drive-off engine speed by
approx. 100 rpm: press the lever beyond
the resistance point, arrow 1.
After the ignition is switched off and the engine
is restarted, the status saved for the remote
control in use is active, refer to M key settings
on page 22.
> Decrease the drive-off engine speed by
approx. 100 rpm: pull the lever beyond
the resistance point, arrow 2.
> Reset the drive-off engine speed: press
the lever upward or downward, arrows 3.
30
Online Edition for Part no. 01 41 2 604 369 - © 03/10 BMW AG
7. The vehicle accelerates when you release
the selector lever. Keep the accelerator
pressed all the way down.
Selecting a program
Using the button in the center console
At a glance
8. The transmission shifts up automatically as
long as the accelerator is pressed all the
way down.
Launch Control only becomes available again
after a certain distance has been driven.
Do not use Launch Control during the vehicle
break-in period, refer to page 50.
M Engine Dynamics Control
When the "Sport" program is in use, the LED in
the POWER button lights up.
The concept
The selected program is stored for the remote
control currently in use and is reactivated the
next time the engine is started.
"Normal" program
In the "Normal" program, the engine responds
gently to accelerator movements, which is ideal
for city traffic or on snow, for example.
Via M Drive
You can also set and call up your preferred program via M Drive on the Control Display, refer to
page 21.
When the "Sport" or "Sport Plus" program is in
use, the LED in the POWER button lights up.
"Sport" program
Press the button on the steering wheel, refer
to M Drive on page 21. M Drive is opened with
the settings you selected.
The "Sport" program provides for a more spontaneous response of the engine to accelerator
movements.
Observe the DSC settings in M Drive;
otherwise, driving stability may be
impaired and there is the risk of an accident.<
"Sport Plus"* program
In the "Sport Plus" program, the engine
responds to accelerator movements with high
spontaneity and uncompromising sportiness.
The "Sport Plus" program can only be activated
via M Drive, refer to M Drive on page 21.
After the ignition is switched off and the engine
is restarted, the status saved for the remote
control in use is active, refer to M key settings
on page 22.
31
Online Edition for Part no. 01 41 2 604 369 - © 03/10 BMW AG
Driving tips
You can select between two programs, or three
programs with M Drive.
Mobility
With M Engine Dynamics Control you can influence how sportily your vehicle should respond
to movements of the accelerator.
Controls
Press the POWER button to switch between
the "Normal" and "Sport" programs.
Reference
To maintain driving stability, activate DSC
whenever possible.<
Driving
Cruise control
Increasing desired speed
The concept
Repeatedly press the lever to the resistance
point or beyond, arrow 1, until the desired
speed is reached.
Cruise control is available for use at speeds of
approx. 20 mph or 30 km/h. The car then stores
and maintains the speed that you specify using
the lever on the steering column. This function
is not available when DSC is switched off.
Do not use cruise control when driving at
constant speed is prevented by adverse
conditions, e.g. winding roads, dense traffic or
poor road conditions due to, e.g. snow, rain, ice
or loose surfaces. Otherwise you could lose
control of the vehicle and cause an accident as a
result.<
One lever for all functions
> Each time the lever is pressed lightly to the
resistance point, the desired speed is
increased by approx. 1 mph or 1 km/h.
> Each time the lever is pressed beyond the
resistance point, the desired speed is
increased by up to 5 mph or 10 km/h.
The system stores and maintains the speed.
Accelerating using the lever
Accelerate slightly, increase speed steadily:
Press the lever to the resistance point, arrow 1,
until the desired speed is reached.
Accelerate strongly, increase speed in intervals
of 10:
Press the lever beyond the resistance point,
arrow 1, until the desired speed is reached.
The vehicle accelerates without pressure on
the accelerator pedal. The system stores and
maintains the speed.
Decreasing desired speed
1
Storing and maintaining speed or accelerating
2
Storing and maintaining speed or decelerating
3
Deactivating cruise control
4
Resuming a speed stored beforehand
Maintaining current speed
Tap the lever, arrow 1, or pull it briefly, arrow 2.
The car's current speed is stored and maintained. It is displayed on the speedometer and
briefly in the instrument cluster.
On uphill gradients, it may prove impossible to
maintain the set speed if current engine power
output is insufficient. If the engine braking
effect is insufficient on steep downhill grades, it
may not be possible to reach the stored speed
or the stored speed may be exceeded.
Repeatedly pull the lever to the resistance point
or beyond, arrow 2, until the desired speed is
displayed.
> Each time the lever is pulled to the resistance point, the desired speed is decreased
by approx. 1 mph or 1 km/h.
> Each time the lever is pulled beyond the
resistance point, the desired speed is
decreased by up to 5 mph or 10 km/h, down
to a minimum speed of 20 mph or 30 km/h.
The engine braking power slows the vehicle to
the desired speed. The system stores and
maintains the speed.
32
Online Edition for Part no. 01 41 2 604 369 - © 03/10 BMW AG
Deactivating cruise control
Tap the lever upwards or downwards, arrow 3.
The displays on the speedometer disappear.
At a glance
In addition, the system is automatically deactivated:
> When you brake the vehicle
> When you shift or depress the clutch
> When you deactivate DSC
> When DSC or ABS is intervening
Controls
Cruise control is not deactivated by depressing
the accelerator pedal. Once the accelerator
pedal is released, the stored speed is achieved
again and maintained.
Resuming a speed stored beforehand
Press the button, arrow 4.
The stored speed is resumed and maintained.
When the ignition is switched off, the stored
speed value is cleared and can no longer be
called up.
Driving tips
Displays in the instrument cluster
Stored speed
2
Selected speed is displayed briefly
33
Online Edition for Part no. 01 41 2 604 369 - © 03/10 BMW AG
Reference
Mobility
1
Controls overview
Controls overview
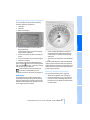
Tachometer
Engine oil temperature
When the engine is at normal operating temperature, the engine oil temperature is between
approx. 1757/806 and approx. 2507/
1206.
If the engine oil temperature is too high, a warning lamp lights up in the instrument cluster or a
message appears on the Control Display.
The variable advance warning zone, arrow 1
and arrow 2, limits the currently permissible
engine speed range depending on the engine
oil temperature. The permissible engine speed
increases as the engine oil temperature rises. If
at all possible, avoid engine speeds in the yellow advance warning zone, arrow 1.
Fuel gauge
Absolutely avoid engine speeds in the red
warning field, arrow 2. In this range, the engine
speed is limited to protect the engine.
Fuel tank capacity: approx. 16.6 US gal/
63 liters.
You can find information on refueling on
page 56.
If the tilt of the vehicle varies for a longer period,
when you are driving in mountainous areas, for
example, the indicator may fluctuate slightly.
34
Online Edition for Part no. 01 41 2 604 369 - © 03/10 BMW AG
Computer
At a glance
Displays in the instrument cluster
Without iDrive*
Once the fuel level has fallen to the reserve
zone of approx. 3.3 US gal/12.5 liters, the indicator lamp and cruising range for the remaining
amount of fuel are displayed briefly. The indicator lamp remains permanently on when the
remaining range is less than approx. 30 miles/
50 km.
With iDrive*
Once the fuel level has fallen to the reserve
zone, a message briefly appears on the Control
Display and the cruising range for the remaining
amount of fuel is displayed on the computer.
Under a cruising range of approx. 30 miles/
50 km, the message remains in the Control Display.
Press the button in the turn indicator lever.
The following items of information are displayed in the order listed:
> Cruising range
> Oil level, refer to Checking oil level on
page 59
Controls
Refuel as soon as possible once your
cruising range falls below 30 miles/
50 km, otherwise engine functions are not
ensured and damage can occur.<
> Average fuel consumption
> Speed
> No information
35
Online Edition for Part no. 01 41 2 604 369 - © 03/10 BMW AG
Reference
Mobility
M dual clutch transmission:
Outside temperature, time, cruising
range, oil level, average fuel consumption and
speed appear in the top display.<
Driving tips
Reserve
Controls overview
Settings and information
Operating principle without iDrive
Certain settings and information can only be
made or called up when the ignition is switched
on. A number of settings cannot be made while
driving.
1
Button for:
> Selecting display
> Setting values
2
Button for:
> Confirming selected display or set values
> Calling up computer information 35
3
When the lights are on: instrument lighting
brightness
4
Calling up Check Control
5
Setting the time
6
Setting the date
7
Viewing service requirement display
8
Setting formats and units of measure,
resetting to factory settings
9
Adjusting settings
> Confirmation signals when locking and
unlocking the vehicle
> Response during unlocking procedure
> Automatic locking
> Pathway lighting
> Daytime running lights
> Triple turn signal activation
> Seat memory
10 Switching the Shift Lights on/off 29
Exiting displays
After end of the current adjustment procedure
is terminated by pressing the button 2 or if no
entry is made within approx. 15 seconds, the
outside temperature and the time are displayed.
36
Online Edition for Part no. 01 41 2 604 369 - © 03/10 BMW AG
1
3
When the lights are on: instrument lighting
brightness
4
Calling up Check Control
Button for:
5
Setting the time
> Confirming selected display or set values
6
Setting the date
7
Viewing service requirement display
> Calling up computer information 35
8
Switching the Shift Lights on/off 29
Button for:
> Selecting display
> Setting values
2
Driving tips
Controls
At a glance
Operating principle with iDrive
Exiting displays
37
Online Edition for Part no. 01 41 2 604 369 - © 03/10 BMW AG
Reference
Mobility
After end of the current adjustment procedure
is terminated by pressing the button 2 or if no
entry is made within approx. 15 seconds, the
outside temperature and time are displayed.
Technology for driving comfort and safety
Technology for driving comfort and safety
Driving stability control
systems
Contrary to the description in the Owner's Manual for Vehicle, your BMW M 3 is not equipped
with Dynamic Traction Control DTC.
Activating MDM
When the ignition is on, you can set the
M Dynamic Mode via M Drive on the Control
Display.
1. "Settings"
2. "M Drive"
Dynamic Stability Control DSC
3. "DSC:"
DSC optimizes driving stability and traction. In
addition, the system recognizes unstable driving situations such as understeering and oversteering, and helps keep the vehicle on a safe
course within physical limits by reducing engine
power and applying the brakes on individual
wheels.
4. Select "M Dynamic Mode".
The laws of physics cannot be repealed,
even with DSC. An appropriate driving
style always remains the responsibility of the
driver. Therefore, do not reduce the additional
safety margin again by taking risks, as this could
result in an accident.<
M Dynamic Mode MDM*
M Dynamic Mode is a mode of the Dynamic
Stability Control DSC that permits greater longitudinal and lateral acceleration when driving
on dry surfaces, yet with reduced driving stability. Only at the absolute limit of stability does
the system intervene to stabilize the vehicle by
reducing engine power and applying the brakes
on the wheels. In such situations, additional
corrective steering maneuvers may be necessary.
M Dynamic Mode is switched off every time the
engine is started.
Press the
button on the steering wheel, refer
to M Drive on page 21. M Drive is opened with
the settings you selected.
The MDM indicator lamp in the instrument cluster lights up.
Observe the DSC settings in M Drive;
otherwise, driving stability may be
impaired and there is the risk of an accident.<
Deactivating MDM
Press the
button on the steering wheel
again; MDM and the settings selected under
M Drive are deactivated. The MDM indicator
lamp in the instrument cluster goes out.
For better control
When the M Dynamic Mode is on, stabilizing measures are performed to a limited
degree only. Take action yourself, otherwise
there is a risk of an accident.<
The indicator lamp goes out briefly after
the engine is started.
If the indicator lamp lights up:
M Dynamic Mode is activated.
To maintain vehicle stability, drive with
the DSC activated and the
M Dynamic Mode deactivated whenever possible.<
The indicator lamp lights up permanently and the DSC indicator lamp
flashes: M Dynamic Mode is controlling the drive and braking forces.
38
Online Edition for Part no. 01 41 2 604 369 - © 03/10 BMW AG
If the indicator lamp flashes:
DSC is regulating the drive and braking forces.
If the indicator lamps are on:
DSC is deactivated.
You may find it useful to briefly deactivate DSC
under the following exceptional circumstances:
Electronic Damper Control
EDC*
The concept
Whenever there is a change in any significant
parameter such as road surface quality or in an
operating condition such as steering, braking,
etc., the damping automatically adjusts to the
new conditions in fractions of a second.
> When driving uphill on snow-covered roads,
in slush or on unplowed, snow-covered
roads
You can select between three programs.
> When rocking a stuck vehicle free or starting off in deep snow or on loose ground
Select the "Comfort" program if you want comfort-oriented control of the shock absorbers.
> When driving with snow chains
To increase vehicle stability, activate DSC again
as soon as possible.
"Comfort" program
"Normal" program
The "Normal" program offers control that is balanced between comfort and sportiness.
Activating DSC
Press the DSC OFF button again; the indicator
lamps in the instrument cluster go out.
Controls
Press the DSC OFF button for longer than
approx. 1 second until the DSC indicator lamps
in the instrument cluster light up. DSC and
M Dynamic Mode are both deactivated. Stabilizing and drive-output promoting actions are
no longer executed.
At a glance
For better control
Driving tips
Deactivating DSC
"Sport" program
Select the "Sport" program if you want consistently sporty control of the shock absorbers.
Via M Drive
Mobility
With the ignition switched on, you can also set
DSC via M Drive on the Control Display, refer
also to page 21.
Press the button on the steering wheel, refer
to M Drive on page 21. M Drive is opened with
the settings you selected.
39
Online Edition for Part no. 01 41 2 604 369 - © 03/10 BMW AG
Reference
To maintain driving stability, activate DSC
whenever possible.<
Technology for driving comfort and safety
Selecting a program
Using the button in the center console
The drive-off assistant holds the car in
place for approx. 2 seconds after the
brake is released. Drive off without delay after
releasing the brake. Otherwise, the drive-off
assistant will no longer hold the car in place
after approx. 2 seconds and the car will start to
roll backwards.<
Flat Tire Monitor FTM*
The concept
Press the EDC button repeatedly:
> "Comfort": LED off
> "Normal": one LED lights up.
> "Sport": both LEDs light up.
The selected program is stored for the remote
control currently in use and is reactivated the
next time the engine is started.
Via M Drive
You can also set and call up your preferred program via M Drive on the Control Display, refer to
page 21.
Press the
button on the steering wheel, refer
to M Drive on page 21. M Drive is opened with
the settings you selected.
Observe the DSC settings in M Drive;
otherwise, driving stability may be
impaired and there is the risk of an accident.<
After the ignition is switched off and the engine
is restarted, the status saved for the remote
control in use is active, refer to M key settings
on page 22.
Drive-off assistant
The drive-off assistant enables you to drive off
smoothly on uphill gradients. It is not necessary
to use the parking brake for this.
1. Hold the car in place by depressing the
brake.
The Flat Tire Monitor detects pressure loss in a
tire by comparing the rotating speeds of the
individual tires while moving.
In the event of pressure loss, the rolling circumference changes and, thus, the rotating speed
of the affected wheel. This change is detected
and is reported as a flat tire.
Functional requirement
In order to assure the reliable reporting of a flat
tire, the system must be initialized for the correct tire inflation pressure.
The system must be reinitialized each
time a tire inflation pressure has been corrected or a wheel or tire has been changed.<
System limitations
The Flat Tire Monitor is unable to warn
the driver of sudden, severe tire damage
caused by external factors, nor can it identify
the gradual loss of pressure that will inevitably
occur in all four tires over a lengthy period of
time.<
In the following situations, the system could be
delayed or malfunction:
> System has not been initialized
> Driving on snowy or slippery road surface
> Performance-oriented style of driving: slip
in the drive wheels, high lateral acceleration
> Snow chains are attached
2. Release the brake and drive off without
delay.
40
Online Edition for Part no. 01 41 2 604 369 - © 03/10 BMW AG
Using the button in the center console
1. Start the engine, but do not start driving.
2. Press the button for approx. 4 seconds until
the warning lamp in the instrument cluster
lights up yellow. Warning lamp, refer to Indication of a flat tire on page 41.
Indication of a flat tire
The warning lamps come on in yellow
and red. A message appears on the
Control Display. In addition, an
acoustic signal sounds. There is a flat
tire or substantial loss of tire pressure.
At a glance
The initialization is completed during driving, which can be interrupted at any time.
When driving resumes, the initialization is continued automatically.
Do not initialize the system while snow chains
are attached.<
The initialization is completed during the trip.
"Status: Flat Tire Monitor active" is displayed
again on the Control Display.
1. Reduce your speed and carefully stop the
car. Avoid sudden braking and steering
maneuvers.
2. Identify the damaged tire. To do so, check
the tire pressure using the M Mobility System, refer to Correcting the tire inflation
pressure on page 67.
3. Repair the flat tire with the M Mobility System, refer to page 66.
Controls
Initializing the system
Status display*
Driving tips
3. Start driving.
Initialization is completed while the car is
moving, without any feedback.
The current status of the Flat Tire Monitor can
be displayed on the Control Display, e.g.
whether or not the FTM is active.
1. "Vehicle Info"
2. "Vehicle status"
3. "Flat Tire Monitor"
Via iDrive
1. "Vehicle Info"
2. "Vehicle status"
Mobility
3. "Reset"
The status is displayed.
4. Start the engine – do not drive away.
6. Start driving.
41
Online Edition for Part no. 01 41 2 604 369 - © 03/10 BMW AG
Reference
5. Start the initialization using "Reset".
Technology for driving comfort and safety
Tire Pressure Monitor TPM*
One wheel yellow
The concept
There is a flat tire or substantial loss of tire pressure in the indicated tire. A message appears on
the Control Display.
TPM checks the inflation pressures of the four
mounted tires. The system notifies you if there
is a significant loss of pressure in one or more
tires.
Functional requirement
In order to assure the reliable reporting of a flat
tire, the system must be reset while all tire inflation pressures are correct.
All wheels yellow
There is a flat tire or substantial loss of tire pressure in several tires. A message appears on the
Control Display.
Gray
The system cannot detect a puncture.
Always use wheels with TPM electronics. Otherwise, the system may malfunction.
Possible reasons for this:
Each time a tire inflation pressure has
been corrected or a wheel or tire has been
changed, reset the system.<
> Temporary malfunction caused by systems
or devices using the same radio frequency
System limitations
TPM cannot warn you in advance of sudden severe tire damage caused by outside influences.<
The system does not work correctly if it has not
been reset; for example, a flat tire may be indicated even though the tire inflation pressures
are correct.
The system is inactive and cannot indicate a flat
tire if a wheel without TPM electronics has been
mounted, or if TPM is temporarily malfunctioning due to other systems or devices using the
same radio frequency.
Status indicator on the Control Display
> TPM is being reset
> Malfunction
Resetting the system
Each time a tire inflation pressure has
been corrected or a wheel or tire has been
changed, reset the system.<
Using the button in the center console
1. Start the engine, but do not start driving.
2. Press the button for approx. 4 seconds until
the warning lamp in the instrument cluster
lights up yellow. Warning lamp, refer to
Message for low tire inflation pressure on
page 43.
The "Resetting TPM..." message appears
on the Control Display for several seconds.
The color of the wheels represents the status of
the tires and the system.
TPM takes into account that tire pressures
change while the vehicle is being driven. The
tire pressures do not need to be corrected
unless the TPM instructs you to do so by means
of color indicators.
Green
The tire inflation pressure corresponds to the
established target value.
"TPM active" appears on the Control Display.
3. Start driving.
After driving a few minutes, the set inflation
pressures in the tires are accepted as the
target values to be monitored. The system
42
Online Edition for Part no. 01 41 2 604 369 - © 03/10 BMW AG
Via iDrive
1. "Vehicle Info"
2. "Vehicle status"
1. Reduce your speed and carefully stop the
car. Avoid sudden braking and steering
maneuvers.
2. Identify the damaged tire or tires on the
vehicle. To do so, check the status display
on the Control Display, refer to page 42, or
check the tire inflation pressure using the
M Mobility System, refer to Correcting the
tire inflation pressure on page 67.
At a glance
reset is completed during your drive, and
can be interrupted at any time. When driving
resumes, the reset is continued automatically. The indicator lamp goes out after the
system reset is completed.
If it is not possible to make an identification, contact your BMW center.<
3. "Reset TPM"
Have the tire replaced by a BMW center or a
workshop that is informed in the handling of
TPM and that works according to BMW repair
procedures with correspondingly trained personnel.
After driving a few minutes, the set inflation
pressures in the tires are accepted as the target
values to be monitored. The system reset is
completed during your drive, and can be interrupted at any time. When driving resumes, the
reset is continued automatically. On the Control
Display, the tires are shown in green and "Status: TPM active" is displayed again.
If a flat tire is detected while the system is
resetting and determining the inflation
pressures, all wheels on the Control Display are
displayed in yellow. The "Low tire!" message is
displayed.<
Message for low tire inflation pressure
The warning lamps come on in yellow
and red. A message appears on the
Control Display. In addition, a signal
sounds. There is a flat tire or substantial loss of tire pressure.
1. "Vehicle Info"
2. "Vehicle status"
3. "Tire Pressure Monitor - TPM"
Driving tips
6. Start driving.
The tires are shown in gray and "Resetting
TPM..." is displayed.
The current status of the Tire Pressure Monitor
can be displayed on the Control Display, e.g.
whether or not the TPM is active.
Mobility
5. Start the initialization using "Reset TPM".
Status display*
The status is displayed.
Malfunction
The small warning lamp flashes in
yellow and then lights up continuously; the large warning lamp comes
on in yellow. On the Control Display,
the wheels are shown in gray and a message
appears. No punctures can be detected.
43
Online Edition for Part no. 01 41 2 604 369 - © 03/10 BMW AG
Reference
4. Start the engine – do not drive away.
Controls
3. Repair the flat tire with the M Mobility System, refer to page 65.
Technology for driving comfort and safety
This type of message is shown in the following
situations:
flation has not reached the level at which the
TPMS low tire pressure telltale illuminates.
> If there is a malfunction
Have the system checked.
The TPMS malfunction indicator is combined
with the low tire pressure telltale. When the system detects a malfunction, the telltale will flash
for approximately one minute and then remain
continuously lit. This sequence will continue
upon subsequent vehicle startups as long as
the malfunction exists. When the malfunction
indicator is illuminated, the system may not be
able to detect or signal low tire pressure as
intended. TPMS malfunctions may occur for a
variety of reasons, including the installation of
replacement or alternate tires or wheels on the
vehicle that prevent the TPMS from functioning
properly. Always check the TPMS malfunction
telltale after replacing one or more tires or
wheels on your vehicle to ensure that the
replacement or alternate tires and wheels allow
the TPMS to continue to function properly.
> If a wheel without TPM electronics has
been mounted
> If TPM is temporarily malfunctioning due to
other systems or devices using the same
radio frequency.
Message for unsuccessful system
reset
The warning lamp lights up yellow. A
message appears on the Control Display. The system has not been reset
after a tire has been changed, for example.
Check the tire inflation pressure and reset the
system, refer to page 42.
Declaration according to NHTSA/
FMVSS 138
Tire Pressure Monitoring Systems
Each tire should be checked monthly when cold
and inflated to the inflation pressure recommended by the vehicle manufacturer on the
vehicle placard or tire inflation pressure label. If
your vehicle has tires of a different size than the
size indicated on the vehicle placard or tire inflation pressure label, you should determine the
proper tire inflation pressure for those tires. As
an added safety feature, your vehicle has been
equipped with a tire pressure monitoring system, TPMS, that illuminates a low tire pressure
telltale when one or more of your tires are significantly under-inflated. Accordingly, when the
low tire pressure telltale illuminates, you should
stop and check your tires as soon as possible,
and inflate them to the proper pressure. Driving
on a significantly underinflated tire causes the
tire to overheat and can lead to tire failure.
Underinflation also reduces fuel efficiency and
tire tread life, and may affect the vehicle’s handling and stopping ability. Please note that the
TPMS is not a substitute for proper tire maintenance, and it is the driver’s responsibility to
maintain correct tire pressure, even if underin-
Servotronic
The concept
"Servotronic" varies the steering force required
to turn the wheels as a function of the speed at
which you are driving.
At low speeds, steering is assisted strongly, i.e.
less effort is required to turn the vehicle. Steering assistance lessens with increasing speed.
With M Drive you can select between two programs.
"Normal" program
Select the "Normal" program if you want comfort-oriented steering, e.g. in city traffic or when
parking.
"Sport" program
Select the "Sport" program if you want consistently sporty steering.
44
Online Edition for Part no. 01 41 2 604 369 - © 03/10 BMW AG
Selecting a program
At a glance
You can set and call up your preferred program
via M Drive on the Control Display, refer to
page 21.
Press the button on the steering wheel, refer
to M Drive on page 21. M Drive is opened with
the settings you selected.
Observe the DSC settings in M Drive;
otherwise, driving stability may be
impaired and there is the risk of an accident.<
45
Online Edition for Part no. 01 41 2 604 369 - © 03/10 BMW AG
Reference
Mobility
Driving tips
Controls
After the ignition is switched off and the engine
is restarted, the status saved for the remote
control in use is active, refer to M key settings
on page 22.
Lamps
Lamps
Adaptive light control*
Note the following instructions for your
BMW M3 that deviate from the description in
the Owner's Manual for Vehicle.
The concept
Adaptive light control is a variable headlamp
control system that enables better illumination
of the road surface. Depending on the steering
angle and other parameters, the light from the
headlamp follows the course of the road.
In tight curves at speeds up to 40 mph/70 km/h,
e.g. on mountainous roads or when turning, an
additional, corner-illuminating lamp is switched
on that lights up the inside area of the curve.
Activating adaptive light control
With the ignition switched on, turn the light
switch to position 3.
The corner-illuminating lamp is switched on
automatically, depending on the steering wheel
angle or turn signal indicator.
To avoid blinding oncoming traffic, the adaptive
light control directs light towards the front passenger side when the vehicle is at a standstill.
When you are reversing, only the corner-illuminating lamps are switched on and active on
both sides.
Malfunction
The LED next to the symbol for automatic headlamp control flashes. Adaptive light control is
malfunctioning or has failed. Have the system
checked as soon as possible.
46
Online Edition for Part no. 01 41 2 604 369 - © 03/10 BMW AG
Practical interior accessories
At a glance
Cup holders*
Note the following instructions for your
BMW M3 that deviate from the description in
the Owner's Manual for Vehicle.
Coupe/Convertible: rear
Controls
There are two additional cup holders in the rear
console.
Press the button to open.
Driving tips
Before folding down the rear seat backrest or using the transport bag, remove all
containers from the cup holder and close it. Do
not place objects into the cup holder and do not
use force to close it. Do not use the cup holder
as a grab handle.<
Coupe: ski bag*
Mobility
Contrary to the description in the Owner's Manual for Vehicle, your BMW M3 is not equipped
with a center armrest; instead, it is equipped
with a filler piece for weight optimization reasons.
To load the ski bag, remove the insert and place
it on the rear console.
47
Online Edition for Part no. 01 41 2 604 369 - © 03/10 BMW AG
Reference
For further steps, refer to Coupe: ski bag in the
Owner's Manual for Vehicle.
Online Edition for Part no. 01 41 2 604 369 - © 03/10 BMW AG
Driving tips
This section provides you with information
useful in dealing with specific driving and
operating conditions.
Online Edition for Part no. 01 41 2 604 369 - © 03/10 BMW AG
Things to remember when driving
Things to remember when driving
Break-in period
Braking safely
Note the following instructions for your
BMW M3 that deviate from the description in
the Owner's Manual for Vehicle.
Hills
During the vehicle break-in period, do not use
Launch Control, refer to page 30.
Engine and differential
Always obey all official speed limits.
Up to 1,200 miles/2,000 km
Drive at varying engine and road speeds, but do
not exceed an engine speed of 5,500 rpm and a
road speed of 105 mph/170 km/h.
Do not depress the accelerator all the way.
From 1,200 miles/2,000 km to
3,000 miles/5,000 km
Engine and road speeds can be increased gradually up to a traveling speed of 135 mph/
220 km/h. Use the maximum speed only for
brief intervals, e.g. when passing.
Transmission
The transmission begins functioning at an optimal level only after a distance of approx.
300 miles/500 km. Do not exceed engine
speeds of 5,500 rpm during this period.
To prevent overheating and the resulting
reduced efficiency of the brake system,
drive long or steep downhill gradients in the
gear in which the least braking is required. Even
light but consistent brake pressure can lead to
high temperatures, brake wear and possibly
even brake failure.<
You can increase the engine's braking effect by
shifting down, all the way to first gear if necessary. This strategy helps you avoid placing
excessive loads on the brake system.
M dual clutch transmission: never drive
with the transmission in neutral or with
the engine switched off; otherwise, engine
braking action will not be present or there will be
no power assistance to the brakes or steering.
Manual transmission: never drive with the
clutch held down, with the transmission in neutral or with the engine switched off; otherwise,
engine braking action will not be present or
there will be no power assistance to the brakes
or steering.
Never allow floor mats, carpets or any other
objects to protrude into the area around the
pedals, otherwise pedal function could be
impaired.<
Corrosion on brake rotors
General driving notes
Clearance
Mind the limited clearance of the BMW
M3, e.g. when driving into underground
parking garages or over obstacles. If equipped
with EDC, select the "Sport" program, refer to
page 39, when driving off curbs to keep clearance as even as possible. Otherwise, the vehicle may be damaged.<
When the vehicle is driven only occasionally,
during extended periods when the vehicle is not
used at all, and in operating conditions where
brake applications are less frequent, there is an
increased tendency for corrosion to form on
rotors, while contaminants accumulate on the
brake pads. This occurs because the minimum
pressure which must be exerted by the pads
during brake applications to clean the rotors is
not reached.
50
Online Edition for Part no. 01 41 2 604 369 - © 03/10 BMW AG
At a glance
This can also lead to a permanent loss in ride
comfort and to squealing noises during braking.
A loss in comfort can also be caused by
extended braking with little pressure on the
pedal.
Should corrosion form on the brake rotors, the
brakes will tend to respond with a pulsating
effect that even extended application will fail to
cure.
51
Online Edition for Part no. 01 41 2 604 369 - © 03/10 BMW AG
Reference
Mobility
Driving tips
Controls
For information on brake system technology,
refer to Compound brake on page 52.
BMW M3 engineering
BMW M3 engineering
High performance V8 engine
Compound brake
The high-speed V8 engine uses its 244 cu in/
4 liters of displacement to produce a maximum
output of 414 hp and a maximum torque of
295 lb ft/400 Nm. Its spontaneous response
results in a very wide effective rpm range. The
maximum engine speed is 8,400 rpm and is
electronically regulated. Because of the powerful engine dynamics, the maximum engine
speed is limited to 7,000 rpm when the vehicle
is stationary.
Your BMW M3 is equipped with a high-performance brake system with perforated compound brake discs.
Warming up the engine
During the warm-up phase, the high-performance V8 engine runs a little more roughly due
to its emissions control system.
For technical reasons, the exhaust system
sounds slightly metallic when the engine is
cold.
For further information on warming up the
engine, refer to Tachometer on page 34 and
Engine oil temperature on page 34.
Due to special design features of the perforated
compound brake discs, operating noise is audible during braking. However, this does not
affect the brake's performance, safe operation
or stability under load.
Braking correctly
To keep the brake system in optimal condition,
it is advisable to apply the brakes at regular
intervals as appropriate for the character of the
vehicle.
Refer also to Corrosion on brake rotors on
page 50.
Drive train
In your BMW M3, special emphasis was placed
on the direct connection between the engine
and drive. The torsionally rigid execution of the
drive train results in acoustic feedback of the
torque, as is typical in sports cars. Clacking
sounds can arise during load changes. They do
not impair functionality or shorten the lifespan
of any component.
52
Online Edition for Part no. 01 41 2 604 369 - © 03/10 BMW AG
Driving on a race track
At a glance
BMW recommends the following measures
before driving on a race track:
> Participate in a BMW driver training course
> Have the vehicle checked by your BMW
center
Operation on race tracks results in a
higher rate of wear. The BMW M3 is not
designed for use in competitive motorsports.
This wear is not covered by the vehicle warranty.<
53
Online Edition for Part no. 01 41 2 604 369 - © 03/10 BMW AG
Reference
Mobility
Driving tips
Controls
The series brake pads and wear indicator are
not designed for operation on a race track. Your
BMW center will be glad to advise you.
Online Edition for Part no. 01 41 2 604 369 - © 03/10 BMW AG
Mobility
This section helps you maintain your car's
mobility by supplying important information
on vital topics including fuels and lubricants,
wheels and tires, service, maintenance and
roadside assistance.
Online Edition for Part no. 01 41 2 604 369 - © 03/10 BMW AG
Refueling
Refueling
Observe the following when
refueling
equivalent amount of cosolvent, will not void the
applicable warranties with respect to defects in
materials or workmanship.
Note the following instructions for your
BMW M3 that deviate from the description in
the Owner's Manual for Vehicle.
The use of poor-quality fuels may result in
drivability, starting and stalling problems
especially under certain environmental conditions such as high ambient temperature and
high altitude.
Should you encounter drivability problems
which you suspect could be related to the fuel
you are using, we recommend that you respond
by switching to a recognized high-quality brand
such as gasoline that is advertised as Top Tier
Detergent Gasoline.
Failure to comply with these recommendations
may also result in unscheduled maintenance.<
Fuel tank capacity
Approx. 16.6 US gal/63 liters, including the
reserve capacity of 3.3 US gal/12.5 liters.
Refuel as soon as possible once your
cruising range falls below 30 miles/
50 km; otherwise, engine functions are not
ensured and damage can occur.<
Fuel specifications
Do not fill the tank with leaded fuel, as this
would cause permanent damage to the
catalytic converter.
Do not fill the tank with E85, i.e. fuel containing
85Ξ ethanol, nor with FlexFuel. Otherwise the
engine and fuel supply system will be damaged.<
Required fuel
Super Premium Gasoline/AKI 93
Always use this premium grade fuel to obtain
maximum fuel economy and performance.
The minimum approved fuel grade is AKI 91.
Do not use any gasoline below the specified minimum fuel grade. Otherwise the
engine could be damaged.<
Use high-quality brands
Field experience has indicated significant differences in fuel quality: volatility, composition,
additives, etc., among gasolines offered for sale
in the United States and Canada. Fuels containing up to and including 10Ξ ethanol or other
oxygenates with up to 2.8Ξ oxygen by weight,
that is, 15Ξ MTBE or 3Ξ methanol plus an
56
Online Edition for Part no. 01 41 2 604 369 - © 03/10 BMW AG
Correct wheels and tires
Information for your safety
The tires approved for your vehicle by the manufacturer were chosen specifically to meet the
requirements of your vehicle and offer optimum
driving safety and the desired driving comfort
when used properly.
Contrary to the description in the Owner's Manual for Vehicle, your BMW M3 is not equipped
with run-flat tires.
At a glance
Wheels and tires
Tire inflation pressures
Sedan
Pressure specifications in psi/kPa
Traveling speeds
up to a max. of
100 mph/160 km/h
Controls
Tire size
Traveling speeds
including those exceeding
100 mph/160 km/h
235/40 R 18 M+S
33/230
39/270
33/230
Front: 245/40 ZR 18
Rear: 265/40 ZR 18
Front: 245/35 ZR 19
Rear: 265/35 ZR 19
36/250
38/260
33/230
-
-
35/240
35/240
-
-
36/250
46/320
35/240
-
38/260
-
-
35/240
-
41/280
35/240
-
41/280
-
-
35/240
-
44/300
Driving tips
All pressure specifications in
the table are indicated in psi/
kilopascal with cold tires. Cold
= ambient temperature
57
Online Edition for Part no. 01 41 2 604 369 - © 03/10 BMW AG
Reference
Mobility
More details on the permissible load and weights can be found on page 78.
Wheels and tires
Coupe
Tire size
Pressure specifications in psi/kPa
Traveling speeds
up to a max. of
100 mph/160 km/h
Traveling speeds
including those exceeding
100 mph/160 km/h
All pressure specifications in
the table are indicated in psi/
kilopascal with cold tires. Cold
= ambient temperature
235/40 R 18 M+S
33/230
36/250
33/230
Front: 245/40 ZR 18
Rear: 265/40 ZR 18
36/250
38/260
33/230
-
-
35/240
Front: 245/35 ZR 19
33/230
Rear: 265/35 ZR 19
-
44/300
33/230
-
39/270
-
-
35/240
-
44/300
-
33/230
-
41/280
-
35/240
-
35/240
-
44/300
More details on the permissible load and weights can be found on page 78.
Convertible
Tire size
Pressure specifications in psi/kPa
Traveling speeds
up to a max. of
100 mph/160 km/h
Traveling speeds
including those exceeding
100 mph/160 km/h
All pressure specifications in
the table are indicated in psi/
kilopascal with cold tires. Cold
= ambient temperature
235/40 R 18 M+S
36/250
42/290
36/250
Front: 245/40 ZR 18
Rear: 265/40 ZR 18
42/290
41/280
33/230
-
-
35/240
Front: 245/35 ZR 19
36/250
Rear: 265/35 ZR 19
35/240
-
41/280
-
-
35/240
-
46/320
-
35/240
-
42/290
-
-
38/260
-
35/240
-
46/320
More details on the permissible load and weights can be found on page 78.
58
Online Edition for Part no. 01 41 2 604 369 - © 03/10 BMW AG
51/350
Under the hood
1
Coolant expansion tank
3
Starting aid terminal
2
Filler neck for washer fluid for the headlamp
and window washer system
4
Filler neck for engine oil, refer to Adding
engine oil
Engine oil
The engine oil consumption is dependent on
driving style and driving conditions.
Driving tips
Controls
At a glance
Important parts of the engine compartment
Display in the instrument cluster
Checking oil level
The oil level can be displayed when the engine
is warm. Continuous short distance travel or a
very sporty driving style may make measurement impossible.
1
Oil level
2
Maximum mark
3
Minimum mark
4
Computer button
59
Online Edition for Part no. 01 41 2 604 369 - © 03/10 BMW AG
Reference
Mobility
Your car is equipped with an electronic oil level
monitor.
Under the hood
Press button 4 in the turn indicator lever repeatedly until the oil level display appears in the
instrument cluster.
M dual clutch transmission: the oil level
appears in the top display.<
If the oil level is below the minimum value,
add engine oil immediately to avoid engine
damage.
4
Oil level is too high.
Have the vehicle checked immediately, otherwise the excess oil may
lead to engine damage.<
The oil level must be between the two markings.
A new measurement is taken automatically
each time the engine is started.
5
Possible displays
Quick measurement
A value cannot be read at this time. The
engine is not yet warm.
In addition to the automatic measurement, you
can also determine the current oil level manually, e.g. after adding engine oil, but such measurements are less accurate.
1. Park the vehicle on a level surface with the
engine at operating temperature, i.e. after
an uninterrupted drive of at least 6 miles/
10 km.
2. Let the engine idle.
3. Press the computer button in the turn indicator lever repeatedly until the oil level display appears in the instrument cluster.
4. Press the computer button for at least
2 seconds.
The oil level is determined. A clock symbol
appears during measurement.
5. After approx. 1 minute, the current oil level
is displayed.
1
Oil level OK.
2
Oil level is being checked.
This can take about 1 minute if the car is at a
standstill on a level surface, or about
5 minutes while the car is moving.
If engine oil was added, it may take up to
30 minutes to obtain an oil level reading.
3
Display via iDrive
1. "Vehicle Info"
2. "Vehicle status"
Oil level down to minimum:
Add engine oil at the next opportunity, but
no more than 1 US quart/1 liter, refer also to
Adding engine oil on page 61. Add at least
0.5 US quarts/0.5 liters, otherwise the oil
level monitor will be unable to display the
new value reliably.
60
Online Edition for Part no. 01 41 2 604 369 - © 03/10 BMW AG
Adding engine oil
At a glance
3. "Engine oil level"
Add oil within the next 125 miles/200 km,
otherwise the engine could be damaged.
Add no more than 1 US quart/1 liter of oil, otherwise too much engine oil can lead to engine
damage. Add at least 0.5 US quarts/0.5 liters,
otherwise the oil level monitor will be unable to
display the new value reliably.<
> "Engine oil level below minimum. Add 1
quart!"
Add engine oil at the next opportunity, but
no more than 1 US quart/1 liter, refer also to
Adding engine oil on page 61. Add at least
0.5 US quarts/0.5 liters; otherwise, the oil
level monitor will be unable to display the
new value reliably.
If the oil level is below the minimum value,
add engine oil immediately to avoid engine
damage.
Keep oils, greases, etc. out of the reach of
children and comply with the relevant
warnings on the containers. Otherwise, health
hazards may result.<
> "Engine oil level too high! Have this
checked."
Specified engine oils
Have the vehicle checked immediately, otherwise the excess oil may
lead to engine damage.<
> "Measurement inactive. Have this
checked."
Do not add engine oil. Before continuing to
drive, note the recalculated remaining distance before the next oil service, refer to
Service requirements in the Owner's Manual for Vehicle. Have the system checked as
soon as possible.
Oil change
Have oil changed only at your BMW center or at
a workshop that works according to BMW
repair procedures with correspondingly trained
personnel.
The quality of the engine oil selected has critical
significance for the operation and service life of
an engine. BMW continuously approves specific oils after testing them extensively.
Do not use oil additives as these may
cause engine damage.<
Your BMW center will be glad to answer
any questions regarding BMW High Performance Synthetic Oil or approved synthetic
oils.<
61
Online Edition for Part no. 01 41 2 604 369 - © 03/10 BMW AG
Controls
> "Measuring engine oil level...":
This can take about 1 minute if the car is at a
standstill on a level surface, or about
5 minutes while the car is moving.
If engine oil was added, it may take up to
30 minutes to obtain an oil level reading.
Driving tips
> "Measurement not possible at this time."
Mobility
> "Engine oil level OK"
Do not add 1 US quart/1 liter of engine oil until
the display shows an oil level measurement of
"+1qt" or "+1l".
Reference
Possible messages
Under the hood
You can also call BMW of North America at
1-800-831-1117 or visit the website
www.bmwusa.com to obtain this information.
Viscosity ratings
Viscosity is a measure of an oil's flow rating and
is categorized in SAE classes.
Approved oils belong to the 10W-60 SAE
class.<
Alternative oil types
If BMW High Performance Synthetic Oil is not
available, you can add small quantities of other
synthetic oils in between oil changes. Only use
oils with the following specifications:
> Viscosity:
Preferred: SAE 10W-60;
alternative: SAE 10W-40, SAE 5W-50 or
SAE 10W-50
> Specification:
API SJ/CF, API SK/CF or higher
Low ambient temperatures
The oils used at BMW factories for your vehicle
type are suitable for virtually any ambient temperature. However, if the vehicle is operated at
temperatures below –47/–206 for extended
periods, your BMW center will be glad to recommend an optimal oil.
62
Online Edition for Part no. 01 41 2 604 369 - © 03/10 BMW AG
Care
At a glance
Exterior care
Automatic car washes
Note the following instructions for your
BMW M3 that deviate from the description in
the Owner's Manual for Vehicle.
M dual clutch transmission
Before driving into an automatic car wash, perform the following steps to ensure that the vehicle can roll:
Controls
1. Insert the remote control into the ignition
lock, even with Comfort Access*.
2. Engage transmission position N.
3. Release the parking brake.
4. Switch off the engine.
5. Leave the remote control in the ignition lock
so that the vehicle can roll.
Transmission position P is engaged:
Driving tips
> Automatically after approx. 30 minutes
63
Online Edition for Part no. 01 41 2 604 369 - © 03/10 BMW AG
Reference
Mobility
> When you remove the remote control from
the ignition lock
Replacing components
Replacing components
Front bulb replacement
3. Disconnect the plug, change the bulb and
reconnect the plug.
Accessing the bulbs
4. Insert the bulb and turn it until it stops.
1. Switch off the lamps and take the remote
control out of the ignition lock.
5. Reattach the cover.
2. Remove the upper cover from the headlamp. To do so, use a screwdriver to press
the catches towards the rear, see arrows,
and pull the cover forward and out.
Corner-illuminating lamp*
H3 bulb, 55 watts
1. Switch off the lamps and take the remote
control out of the ignition lock.
2. Remove the cover, refer to Accessing the
bulbs.
3. Push the wire bracket out of the anchor
towards the right and fold it up.
Follow the same steps in reverse order to reattach the cover.
Be careful when installing the cover, otherwise leaks could occur and cause damage to the headlamp system.<
Parking lamps and roadside parking
lamps, daytime running lights
4. Disconnect the plug, change the bulb and
reconnect the plug.
5. Insert the bulb.
H8 bulb, 35 watts
6. Fold the wire bracket down and engage it.
1. Remove the cover, refer to Accessing the
bulbs.
7. Reattach the cover.
2. Turn the bulb approx. 90°, see arrow, and
take it out.
Turn signals, front
PY24W bulb, 24 watts
The turn signal bulb can be changed via a cover
in the wheel arch.
64
Online Edition for Part no. 01 41 2 604 369 - © 03/10 BMW AG
At a glance
Preparations
1. Turn the respective wheel inwards.
6. Attach the cover by positioning the bottom
edge first and then turning both locks all the
way to the right using a coin.
Repairing a flat tire with the
M Mobility System
If possible, leave any foreign bodies that have
penetrated the tire in place.
Follow the instructions on using the
M Mobility System found on the compressor and the sealant bottle.<
Remove the label with the speed restriction
from the sealant bottle and apply it to the steering wheel.
Sealant and compressor
To repair a flat tire, your BMW M3 includes an
M Mobility System. With this system you can
apply a sealant to the inside of the tire to seal
the damaged section, restore the tire inflation
pressure and continue on your trip.
Safety measures in the event of a flat tire:
Park the vehicle as far away from moving
traffic as possible and on a firm surface. Switch
on the hazard warning flashers.
Apply the parking brake and engage first gear,
reverse gear or transmission position P. Have all
occupants leave the vehicle and move beyond
the danger zone, e.g. behind the guard rails.
If necessary, erect a warning triangle* or warning flasher* at a suitable distance. Adhere to
country-specific regulations.<
Controls
5. Insert the bulb holder and lock it by turning
it to the right.
1
Sealant bottle and label with speed restriction
2
Filling hose
Driving tips
4. Turn the bulb socket in the bulb holder to
the right for removal and replacement.
Use of the M Mobility System may be ineffective against tire damage larger than
approx. 0.16 in/4 mm. Please contact the nearest BMW center if the tire cannot be made drivable with the M Mobility System.
Mobility
3. Turn the bulb holder to the left, arrow 2, and
take it out.
The M Mobility System is located in the cargo
area under the floor board.
Please note the expiry date on the sealant
bottle.<
65
Online Edition for Part no. 01 41 2 604 369 - © 03/10 BMW AG
Reference
2. Using a coin, turn both locks of the cover all
the way to the left, arrows 1, and remove the
cover.
Replacing components
4. Insert the sealant bottle into the housing of
the compressor so that the bottle is upright.
3
Plug and cable for the socket in the vehicle
interior
4
Holder for the sealant bottle
5
Compressor
6
On/off switch
7
Pressure gauge for displaying the tire inflation pressure
8
Screw on pressure gauge to reduce tire
inflation pressure
9
Hose to connect compressor and sealant
bottle or compressor and wheel
The connector, cable and connection hose are
stored in the compressor housing.
Using the M Mobility System
To repair a flat tire with the M Mobility System,
proceed as follows:
> Fill with sealant.
> Distribute the sealant.
> Correct the tire inflation pressure.
Filling with sealant
Follow the specified sequence, otherwise
the sealant may escape under high pressure.<
1. Shake the sealant bottle.
2. Pull the connection hose 9 fully out of the
compressor housing and screw it onto the
connector of the sealant bottle. Make sure
that the hose is not kinked.
3. Ensure that the screw 8 on the pressure
gauge is closed.
5. Unscrew the dust cap from the valve of the
defective wheel and screw the filling hose 2
of the sealant bottle onto the valve.
6. Ensure that the compressor is switched off.
7. Insert the plug 3 into the power socket in
the vehicle interior.
8. Start the engine and let it run.
9. Switch on the compressor and let it run for
approx. 3 to 8 minutes to fill the tire with
sealant and achieve a tire inflation pressure
of approx. 36 psi/250 kPa.
While the tire is being filled with sealant, the inflation pressure may briefly
reach approx. 73 psi/500 kPa. Do not
switch off the compressor in this phase.<
Do not let the compressor run for
more than 10 minutes, otherwise the
device will overheat and may be damaged.<
10. Switch off the compressor.
11. Switch off the engine.
If an inflation pressure of 29 psi/200 kPa cannot
be reached:
1. Unscrew the filling hose 2 from the wheel
and drive the vehicle forward and backward
approx. 33 ft/10 m each to evenly distribute
the liquid sealant in the tire.
2. Inflate the tire again with the compressor.
If an inflation pressure of 29 psi/200 kPa
still cannot be reached, the tire is too
heavily damaged. Contact the nearest BMW
center.<
66
Online Edition for Part no. 01 41 2 604 369 - © 03/10 BMW AG
Distributing the sealant
Immediately drive approx. 3 miles/5 km to
evenly distribute the sealant in the tire.
Continuing your trip
Do not exceed the maximum allowable
speed of 50 mph/80 km/h to avoid the risk
of an accident.<
Reinitialize the Flat Tire Monitor, refer to
page 41 for more information.
Have the faulty tire and the sealant bottle of the
M Mobility System replaced as soon as possible.<
At a glance
Remove the connection hose 9 and the filling
hose 2 from the sealant bottle connection and
from the tire valve.
Wrap the empty sealant bottle in suitable material to avoid dirtying the cargo area. Return the
M Mobility System to its storage location in the
vehicle.
Do not exceed a speed of 35 mph/
60 km/h. If possible, do not fall below a
speed of 12 mph/20 km/h.<
Controls
Correcting the tire inflation pressure
1. After driving approx. 3 miles/5 km, stop at a
suitable location.
2. Connect connection hose 9 of the compressor directly to the tire valve.
3. Insert the plug 3 into the power socket in
the vehicle interior.
Driving tips
4. Adjust the tire inflation pressure to 29 psi/
200 kPa. With the engine running:
> To increase the inflation pressure:
switch on the compressor. To check the
inflation pressure, switch off the compressor.
Do not let the compressor run for
more than 10 minutes, otherwise the
device will overheat and may be damaged.<
> To reduce the inflation pressure: turn
screw 8 on the pressure gauge.
67
Online Edition for Part no. 01 41 2 604 369 - © 03/10 BMW AG
Reference
Mobility
If the inflation pressure is not maintained,
drive the vehicle a second time, refer to
Distributing the sealant. Then repeat steps
1 to 4.
If an inflation pressure of 29 psi/200 kPa cannot
be reached, the tire is too heavily damaged.
Contact the nearest BMW center.<
Giving and receiving assistance
Giving and receiving assistance
Tow-starting, towing away
Note the following instructions for your
BMW M3 that deviate from the description in
the Owner's Manual for Vehicle.
With a tow truck
M dual clutch transmission:
Being towed
Make sure that the ignition is switched on,
refer to page 24, otherwise the low-beam
headlamps, tail lamps, turn signal indicators and
windshield wipers may be unavailable.
Power steering assistance is not available when
the engine is not running. Thus, braking and
steering will require increased effort.<
Have the BMW transported with a tow truck
with a so-called lift bar, or on a flatbed.
M dual clutch transmission with
Drivelogic
Tow-starting
Ensure that the parking lock P is not
engaged as the rear wheels will otherwise
be blocked.
When using the car wash function, refer to
page 63, note that the parking lock P is
engaged automatically after approx.
30 minutes, blocking the rear wheels.
If an electrical malfunction occurs or if towing
takes longer than approx. 20 minutes, manually
release the parking lock, refer to page 27.<
M dual clutch transmission with
Drivelogic
Vehicles with an M dual clutch transmission
cannot be tow-started.
When towing, do not exceed a maximum
speed of 30 mph/50 km/h and a maximum travel distance of 30 mph/50 km; otherwise, the transmission can be damaged.<
BMW recommends transporting the vehicle on
a tow truck with a flat bed.
Towing methods
Do not lift the vehicle by a tow fitting or
body and chassis parts, otherwise damage may result.<
68
Online Edition for Part no. 01 41 2 604 369 - © 03/10 BMW AG
Indicator and warning lamps appear in the display area. See the table for information on
causes and how to react. Note whether a lamp
comes on alone or in combination with another.
Some lamps can light up in different colors.
Corresponding distinctions are made in the
text.
At a glance
Indicator and warning lamps
In addition to the indicator lamps described in
the Owner's Manual for Vehicle, note the following lamps in your BMW M3:
2
Cause
What to do
Controls
Lights up briefly:
Approx. 3.3 US gal/12.5 liters of fuel
remain in the tank
Lights up in red:
Have the system in question checked
without delay.
> Starter failed or
The engine cannot be restarted.
> Ignition malfunctioning. Engine
restart only possible when brake is
depressed or
Depress the brake to restart the engine.
Driving tips
Remains on:
Remaining operating range is no more
than 30 miles/50 km, refer to page 35
> Lighting system failed. Low beams/
tail lamps and brake lamps still
operational. All other lamps failed
> Control of the brake lamps failed or
> Fuel supply malfunctioning
> Drive malfunctioning
You can continue your journey, but
moderate your speed and exercise due
caution. Have the system in question
checked without delay.
Transmission limp-home program
active with reduced acceleration. You
can continue your journey, but moderate your speed and exercise due caution. Have the system checked immediately.
69
Online Edition for Part no. 01 41 2 604 369 - © 03/10 BMW AG
Mobility
Lights up in yellow:
Reference
1
Indicator and warning lamps
1
2
Cause
What to do
Lights up in red*:
> Transmission limp-home program
active with restricted range of
gears, possibly with reduced acceleration.
You can continue your journey, but
moderate your speed and exercise due
caution. It may not be possible to continue the trip after stopping. Have the
system checked without delay.
Gears can be engaged without
depressing the brake
Always depress the brake to engage a
gear. Have the system checked without
delay.
Lights up in yellow*:
> Transmission limp-home program
active with restricted range of gears
You can continue your journey, but
moderate your speed and exercise due
caution. Have the system checked
without delay.
> Transmission position P malfunctioning:
Selector lever locked in position P
with engine running or ignition
switched on and brake depressed
Release parking lock, refer to page 27.
Have the system checked as soon as
possible.
> Brake signal malfunctioning: gear
can be engaged without depressing the brake
To engage a gear while the vehicle is at
a standstill, always step on the brake.
Switch off the engine before leaving the
vehicle. Have the system checked as
soon as possible.
Lights up in red*:
Transmission overheating
Stop the car and switch off the engine.
Allow the transmission to cool down.
You can continue your journey, but
moderate your speed and exercise due
caution. Have the system checked if the
situation reoccurs.
Lights up in yellow*:
Transmission too hot
Avoid high engine loads. You can continue your journey, but moderate your
speed and exercise due caution.
Selector lever malfunctioning
You can continue your journey. Shift
again if necessary. Have the system
checked if the situation reoccurs.
Brake signal malfunctioning: gear can
be engaged without depressing the
brake
To engage a gear while the vehicle is at
a standstill, always step on the brake.
Switch off the engine before leaving the
vehicle. Have the system checked as
soon as possible.
70
Online Edition for Part no. 01 41 2 604 369 - © 03/10 BMW AG
At a glance
Controls
Driving tips
Mobility
Reference
71
Online Edition for Part no. 01 41 2 604 369 - © 03/10 BMW AG
Online Edition for Part no. 01 41 2 604 369 - © 03/10 BMW AG
Reference
This chapter contains technical data and an
index that will help you find information most
quickly.
Online Edition for Part no. 01 41 2 604 369 - © 03/10 BMW AG
Technical data
Technical data
Engine data
M3
Displacement
cu in/cmμ
244/3,999
hp
414
Number of cylinders
Maximum power output
at engine speed
Maximum torque
at engine speed
8
rpm
8,300
lb ft/Nm
295/400
rpm
3,900
74
Online Edition for Part no. 01 41 2 604 369 - © 03/10 BMW AG
Dimensions
Driving tips
Controls
At a glance
Sedan
75
Online Edition for Part no. 01 41 2 604 369 - © 03/10 BMW AG
Reference
Mobility
All dimensions given in inches/mm.
Smallest turning circle dia.: 38.4 ft/11.7 m.
Technical data
Coupe
All dimensions given in inches/mm.
Smallest turning circle dia.: 38.4 ft/11.7 m.
76
Online Edition for Part no. 01 41 2 604 369 - © 03/10 BMW AG
Driving tips
Controls
At a glance
Convertible
77
Online Edition for Part no. 01 41 2 604 369 - © 03/10 BMW AG
Reference
Mobility
All dimensions given in inches/mm.
Smallest turning circle dia.: 38.4 ft/11.7 m.
Technical data
Weights
Sedan
M3
Approved gross weight
lbs/kg
Load
lbs/kg
1,014/460
Approved front axle load
lbs/kg
2,249/1,020
Approved rear axle load
lbs/kg
2,624/1,190
Approved roof load capacity
lbs/kg
165/75
cu ft/liters
15.9/450
Approved gross weight
lbs/kg
4,586/2,080
Load
lbs/kg
882/400
Approved front axle load
lbs/kg
2,249/1,020
Approved rear axle load
lbs/kg
2,469/1,120
Cargo area capacity
4,740/2,150
Never exceed either the approved axle loads or
the gross vehicle weight.
Coupe
M3
Approved roof load capacity
Cargo area capacity
lbs/kg
165/75
cu ft/liters
15.2/430
Convertible
M3
Approved gross weight
lbs/kg
5,027/2,280
Load
lbs/kg
882/400
Approved front axle load
lbs/kg
2,337/1,060
Approved rear axle load
Cargo area capacity
lbs/kg
2,800/1,270
cu ft/liters
7.4-12.4/210-350
78
Online Edition for Part no. 01 41 2 604 369 - © 03/10 BMW AG
Capacities
Fuel tank
US gal/liters
approx. 16.6/63
including reserve of
US gal/liters
approx. 3.3/12.5
US qt/liters
approx. 4.8/4.5
Fuel grade: page 56
Window washer system
79
Online Edition for Part no. 01 41 2 604 369 - © 03/10 BMW AG
Reference
Mobility
Driving tips
Controls
including headlamp washers
At a glance
Notes
Everything from A to Z
Everything from A to Z
Index
A
ABS Antilock Brake
System 38
Acceleration assistant, refer to
Launch Control 30
Adaptive light control 46
Air pressure, refer to Tire
inflation pressure 57
AKI, refer to Fuel
specifications 56
Antilock Brake System
ABS 38
Approved axle loads, refer to
Weights 78
Approved gross vehicle
weight, refer to Weights 78
Assist systems, refer to
Driving stability control 38
Automatic
– cruise control 32
Automatic car washes 63
Axle loads, refer to Weights 78
B
Being towed 68
Beverage holders, refer to
Cup holders 47
Bluetooth, refer to separate
Owner's Manual
Bottle holders, refer to Cup
holders 47
Brake rotors 50
Brakes, refer to Braking
safely 50
Brake system
– disc brakes 50
Breaking in the differential,
refer to Engine and
differential 50
Break-in period 50
Button for starting the engine,
refer to Start/stop button 24
Buttons on the steering
wheel 9, 11
C
Can holders, refer to Cup
holders 47
Capacities 79
Car care, refer to Care 63
Care 63
– automatic car washes 63
– exterior 63
Cargo area
– capacity 78
Center console, refer to
Around the center
console 14
Changing gears 27
Chassis number, refer to
Engine compartment 59
Cleaning your BMW, refer to
Care 63
Cockpit 8
Cold start, refer to Starting the
engine 24
Combined instrument, refer to
Instrument cluster 12
Comfort area, refer to Around
the center console 14
Computer 35
Controls and displays 8
Copyright 2
Corner-illuminating lamps,
refer to Adaptive light
control 46
Cornering lamps, refer to
Adaptive light control 46
Cruise control 32
Cup holders 47
Curb weight, refer to
Weights 78
D
Dashboard, refer to Cockpit 8
Dashboard, refer to
Instrument cluster 12
Data, technical 74
– dimensions 75
– engine 74
– weights 78
Dimensions 75
Displacement, refer to Engine
data 74
Displays, refer to Instrument
cluster 12
Displays and controls 8
Drinks holders, refer to Cup
holders 47
Drivelogic 28
Drive mode 27
Drive-off assistance, refer to
Dynamic Stability Control
DSC 38
Drive-off assistant 40
Drive position, engaging, refer
to Selector lever
positions 26
Drive programs, refer to
Drivelogic 28
Driving notes 50
Driving off on hills, refer to
Drive-off assistant 40
Driving stability control
systems 38
Driving tips, refer to Driving
notes 50
DSC Dynamic Stability
Control 38
Dynamic Stability Control
DSC
– indicator/warning lamp 39
– M Dynamic Mode MDM 38
80
Online Edition for Part no. 01 41 2 604 369 - © 03/10 BMW AG
F
Flat tire
– tire Pressure Monitor
TPM 42
Flat tire, repairing 65
Flat Tire Monitor FTM 40
– indicating a flat tire 41
– indicator/warning lamp 41
– initializing the system 41
– snow chains 40
– system limits 40
Footbrake, refer to Braking
safely 50
H
Hands-free system 14
Hazard warning flashers 14
Headlamp flasher
– indicator lamp 9, 11
Height, refer to
Dimensions 75
Hills 50
Holders for cups 47
Horn 8, 9, 11
K
Key Memory, refer to Personal
Profile 20
Kickdown, refer to Drive
mode 27
Knock control 56
L
Launch Control 30
Length, refer to
Dimensions 75
Lighting
– vehicle, refer to Lamps 46
At a glance
Controls
Gasoline, refer to Required
fuel 56
Gasoline display, refer to Fuel
gauge 34
Gasoline engine, checking
engine oil level 59
Gear
– neutral 26
Gear indicator, refer to
Displays in the instrument
cluster 27
General driving notes 50
Gross vehicle weight, refer to
Weights 78
Driving tips
G
Indicator and warning
lamps 13
– M Drive 22
– M Dynamic Mode 38
– tire Pressure Monitor
TPM 43
Indicator and warning lamps,
overview 69
Inflation pressure, refer to Tire
inflation pressure 57
Inflation pressure monitoring,
refer to Tire Pressure
Monitor TPM 42
Initializing
– flat Tire Monitor FTM 41
Instrument cluster 12
Instrument panel, refer to
Cockpit 8
M
Malfunction
– tires 41
Manual operation
– parking lock 27
MDM, refer to M Dynamic
Mode 38
M Drive 21
Mobility
EDC, refer to Electronic
Damper Control 39
Electrical malfunction
– M dual clutch transmission
with Drivelogic 27
Electronic Damper Control
EDC 39
Electronic oil level check 59
Electronic Stability Program
ESP, refer to Dynamic
Stability Control DSC 38
Engaging drive position, refer
to Selector lever
positions 26
Engine
– breaking in 50
– data 74
– speed 74
– starting 24
– switching off 24
Engine compartment 59
Engine oil
– adding 61
– checking level 59
– possible displays 60
Engine output, refer to Engine
data 74
Engine speed, refer to Engine
data 74
Engine starting, refer to
Starting the engine 24
FTM, refer to Flat Tire
Monitor 40
Fuel 56
– gauge 34
– high-quality brands 56
– quality 56
– specifications 56
– tank contents, refer to
Capacities 79
Fuel clock, refer to Fuel
gauge 34
Fuel display, refer to Fuel
gauge 34
Fuel filler flap 56
I
Imprint 2
81
Online Edition for Part no. 01 41 2 604 369 - © 03/10 BMW AG
Reference
E
Everything from A to Z
M dual clutch transmission
with Drivelogic 25
– drive mode 27
– kickdown 27
– Launch Control 30
– neutral 26
– reverse gear 26
– sequential mode 26
– Shift Lights 29
– shiftlock 26
– tow-starting 68
– unlocking parking lock
manually 27
M Dynamic Mode MDM 38
– indicator lamp 38
Measurements, refer to
Dimensions 75
M Engine Dynamics
Control 31
Microphone
– telephone 14
– voice commands 14
M Mobility System 65
– compressor 65
– continuing the trip 67
– distributing sealant 67
– filling sealant 66
– inflating the tire 67
– sealant 65
Monitoring system for tire
pressures, refer to Flat Tire
Monitor 40
Multifunctional steering
wheel, refer to Buttons on
the steering wheel 9, 11
N
Neutral 26
Number of cylinders, refer to
Engine data 74
O
Octane ratings, refer to Fuel
specifications 56
Oil, refer to Engine oil 59
Oil consumption 59
Oil level 59
Output, refer to Engine
data 74
P
Parking
– vehicle 24
Parking lock, unlocking
manually 27
Personal Profile 20
Pressure, tires 57
Pressure monitoring, tires 40
– flat Tire Monitor 40
Pressure monitoring of tires,
refer to Tire Pressure
Monitor TPM 42
Programmable buttons on the
steering wheel 9, 11
Puncture
– flat Tire Monitor 40
R
Refueling 56
Reserve warning, refer to Fuel
gauge 34
Reverse gear 26
Roof load capacity 78
S
Safety systems
– Antilock Brake System
ABS 38
– driving stability control 38
– Dynamic Stability Control
DSC 38
Selector lever positions 26
Sequential M gearbox with
Drivelogic
– Drivelogic driving
program 28
Sequential mode 26
Settings
– configuring, refer to M
Drive 21
– configuring, refer to
Personal Profile 20
Settings and information 36
Shifting 27
Shift lever 26
Shift Lights 29
Shiftlock 26
Shift paddles on steering
wheel 27
Shift-up display, refer to Shift
Lights 29
Shock absorber control, refer
to Electronic Damper
Control EDC 39
Signal horn, refer to
Horn 8, 9, 11
Ski bag 47
SOS, refer to Sending an
Emergency Request 68
Speedometer 12
Stability control, refer to
Driving stability control 38
Start/stop button 24
– starting the engine 24
– switching off the engine 24
Starting, refer to Starting the
engine 24
Starting the engine
– start/stop button 24
Status of this Owner's Manual
at time of printing 5
Steering wheel
– buttons on steering
wheel 9, 11
– M Drive button 21
– shift paddles 27
Steering wheel buttons, refer
to Shift paddles 27
Summer tires, refer to Wheels
and tires 57
Switches, refer to Cockpit 8
Switching off
– engine 24
Symbols 4
T
Tachometer 34
Tank contents, refer to
Capacities 79
82
Online Edition for Part no. 01 41 2 604 369 - © 03/10 BMW AG
At a glance
Turning circle, refer to
Dimensions 75
Turn signal indicators
– indicator/warning lamp 12
U
Universal mobile phone
preparation package, refer
to separate Owner's Manual
V
Driving tips
Controls
Vehicle
– breaking in 50
– identification Number, refer
to Engine compartment 59
– measurements, refer to
Dimensions 75
– parking 24
– weight 78
Volume
– cargo area, refer to
Weights 78
– fuel tank, refer to
Capacities 79
W
Mobility
Warning and indicator
lamps 13
Warning and indicator lamps,
overview 69
Weights 78
Wheelbase, refer to
Dimensions 75
Wheels and tires 57
Width, refer to Dimensions 75
Windshield wash
– filling capacity, reservoir 79
Y
Your individual vehicle
– settings, refer to M Drive 21
– settings, refer to Personal
Profile 20
83
Online Edition for Part no. 01 41 2 604 369 - © 03/10 BMW AG
Reference
Technical data 74
– capacities 79
– dimensions 75
Tempomat, refer to Cruise
control 32
The individual vehicle 5
Tire inflation pressure 57
– loss 41, 42
Tire pressure monitoring,
refer to Flat Tire Monitor 40
Tire Pressure Monitor
TPM 42
– resetting the system 42
– system limitations 42
– warning lamp 43
Tire puncture, refer to Flat Tire
Monitor 41
Tires
– air loss 43
– inflation pressure 57
– pressure monitoring, refer to
Flat Tire Monitor 40
– pressure monitoring, refer to
Tire Pressure Monitor
TPM 42
– puncture 41
Torque, refer to Engine
data 74
Towing 68
– with the M Double-clutch
Transmission 68
Tow-starting 68
TPM, refer to Tire Pressure
Monitor 42
Traction control, refer to
Dynamic Stability Control
DSC 38
Transmission
– Drivelogic 28
– drive mode 27
– kickdown, refer to Drive
mode 27
– Launch Control 30
– reverse gear 26
– sequential mode 26
– Shift Lights 29
– unlocking parking lock
manually 27
Online Edition for Part no. 01 41 2 604 369 - © 03/10 BMW AG
Online Edition for Part no. 01 41 2 604 369 - © 03/10 BMW AG
More about BMW
The Ultimate
Driving Machine
01 41 2 604 369 Ue
bmwusa.com
*BL2604369004*
Online Edition for Part no. 01 41 2 604 369 - © 03/10 BMW AG